Prima Games eGuides
primagames.com Browse Redeem a code Help
Hyrule Warriors Legends eGuide
Sign in My Guides

Sign in or create an account

We'll email you a link. No password needed, and if you don't have an account yet, the link makes one.

By creating an account or signing in, you agree to our Terms of Service and Privacy Policy.

Have a password?

Had an account on the old eGuides site, or a code from a printed guide? Help and troubleshooting

Sign in with a password

By signing in, you agree to our Terms of Service and Privacy Policy.

Check your email

A sign-in link is on its way. It works once and expires in 15 minutes. Open it and you're in, with an account if you didn't already have one.

Contents

  • Legend Mode
    • Overview
    • The Armies of Ruin: Hyrule Field
    • Boss Fight: King Dodongo First Fight
    • The Sheikah Tribesman: Eldin Caves
    • The Sorceress of the Woods: Faron Woods
    • Boss Fight: Gohma
    • Linkle's Tale: The Girl in the Green Tunic
    • The Sorceress of the Valley: Valley of Seers
    • Boss Fight: Manhandla
    • Land of Twilight: Twilight Field
    • The Shadow King: Palace of Twilight
    • Boss Fight: Argorok
    • Land of Myth: Death Mountain
    • The Water Temple: Lake Hylia
    • Boss Fight: King Dodongo Second Fight
    • Linkle's Tale: Powers Collide
    • Land in the Sky: Skyloft
    • Sealed Ambition: Sealed Grounds
    • Boss Fight: The Imprisoned
    • Linkle's Tale: The Demon Lord's Plan
    • The Sacred Sword: Temple of the Sacred Sword
    • A War of Spirit: Temple of Souls
    • Linkle's Tale: Her True Self
    • Shining Beacon: Valley of Seers
    • Ganondorf's Return: Gerudo Desert
    • March of the Demon King: Valley of Seers
    • Battle of the Triforce: Hyrule Field
    • Enduring Resolve: Gerudo Desert
    • Liberation of the Triforce: Ganon's Tower
    • Boss Fight: Ganon
    • Linkle's Tale: The Other Hero
    • Boss Fight: Dark King Dodongo
    • Cia's Tale: The Dragon of the Caves
    • Cia's Tale: The Invasion Begins
    • Cia's Tale: The Usurper King
    • Cia's Tale: The Demon Lord
    • Cia's Tale: Darkness Falls
    • Wind Waker: A New Disturbance
    • Wind Waker: The Search for Cia
    • Boss Fight: The Great Bird
    • Wind Waker: Reclaiming the Darkness
    • Wind Waker: Watchers of the Triforce
    • Boss Fight: Phantom Ganon
  • The Goddesss Descent: The World of Hyrule Warriors
    • Prologue
    • Link The Hero Appears
    • Invasion of the Black Witch
    • On to Adventure
    • A New Phenomenon
  • Master Quest Map
    • Overview
    • A-1
    • A-2
    • A-3
    • A-4
    • A-5
    • A-6
    • A-7
    • A-8
    • A-9
    • A-10
    • A-11
    • A-12
    • A-13
    • A-14
    • A-15
    • A-16
    • B-1
    • B-2
    • B-3
    • B-4
    • B-5
    • B-6
    • B-7
    • B-8
    • B-9
    • B-10
    • B-11
    • B-12
    • B-13
    • B-14
    • B-15
    • B-16
    • C-1
    • C-2
    • C-3
    • C-4
    • C-5
    • C-6
    • C-7
    • C-8
    • C-9
    • C-10
    • C-11
    • C-12
    • C-13
    • C-14
    • C-15
    • C-16
    • D-1
    • D-2
    • D-3
    • D-4
    • D-5
    • D-6
    • D-7
    • D-8
    • D-9
    • D-10
    • D-11
    • D-12
    • D-13
    • D-14
    • D-15
    • D-16
    • E-1
    • E-2
    • E-3
    • E-4
    • E-5
    • E-6
    • E-7
    • E-8
    • E-9
    • E-10
    • E-11
    • E-12
    • E-13
    • E-14
    • E-15
    • E-16
    • F-1
    • F-2
    • F-3
    • F-4
    • F-5
    • F-6
    • F-7
    • F-8
    • F-9
    • F-10
    • F-11
    • F-12
    • F-13
    • F-14
    • F-15
    • F-16
    • G-1
    • G-2
    • G-3
    • G-4
    • G-5
    • G-6
    • G-7
    • G-8
    • G-9
    • G-10
    • G-11
    • G-12
    • G-13
    • G-14
    • G-15
    • G-16
    • H-1
    • H-2
    • H-3
    • H-4
    • H-5
    • H-6
    • H-7
    • H-8
    • H-9
    • H-10
    • H-11
    • H-12
    • H-13
    • H-14
    • H-15
    • H-16
  • Extras
    • Overview
    • Potions
    • Materials
    • Nintendo amiibo
    • Medals
  • Adventure Mode
    • How It Works
    • A-1
    • A-2
    • A-3
    • A-4
    • A-5
    • A-6
    • A-7
    • A-8
    • A-9
    • A-10
    • A-11
    • A-12
    • A-13
    • A-14
    • A-15
    • A-16
    • B-1
    • B-2
    • B-3
    • B-4
    • B-5
    • B-6
    • B-7
    • B-8
    • B-9
    • B-10
    • B-11
    • B-12
    • B-13
    • B-14
    • B-15
    • B-16
    • C-1
    • C-2
    • C-3
    • C-4
    • C-5
    • C-6
    • C-7
    • C-8
    • C-9
    • C-10
    • C-11
    • C-12
    • C-13
    • C-14
    • C-15
    • C-16
    • D-1
    • D-2
    • D-3
    • D-4
    • D-5
    • D-6
    • D-7
    • D-8
    • D-9
    • D-10
    • D-11
    • D-12
    • D-13
    • D-14
    • D-15
    • D-16
    • E-1
    • E-2
    • E-3
    • E-4
    • E-5
    • E-6
    • E-7
    • E-8
    • E-9
    • E-10
    • E-11
    • E-12
    • E-13
    • E-14
    • E-15
    • E-16
    • F-1
    • F-2
    • F-3
    • F-4
    • F-5
    • F-6
    • F-7
    • F-8
    • F-9
    • F-10
    • F-11
    • F-12
    • F-13
    • F-14
    • F-15
    • F-16
    • G-1
    • G-2
    • G-3
    • G-4
    • G-5
    • G-6
    • G-7
    • G-8
    • G-9
    • G-10
    • G-11
    • G-12
    • G-13
    • G-14
    • G-15
    • G-16
    • H-1
    • H-2
    • H-3
    • H-4
    • H-5
    • H-6
    • H-7
    • H-8
    • H-9
    • H-10
    • H-11
    • H-12
    • H-13
    • H-14
    • H-15
    • H-16
  • Warriors & Weapons
    • Overview
    • Link
    • Impa
    • Sheik
    • Lana
    • Zelda
    • Ganondorf
    • Darunia
    • Ruto
    • Agitha
    • Midna
    • Zant
    • Fi
    • Ghirahim
    • Cia
    • Volga
    • Wizzro
    • Twili Midna
    • Young Link
    • Tingle
    • Linkle
    • Skull Kid
    • Toon Link
    • Tetra
    • King Daphnes
    • Weapon Skills
    • Items
  • Great Sea Map
    • Overview
    • A-1
    • A-2
    • A-3
    • A-4
    • A-5
    • A-6
    • A-7
    • A-8
    • A-9
    • A-10
    • A-11
    • A-12
    • A-13
    • A-14
    • B-1
    • B-2
    • B-3
    • B-4
    • B-5
    • B-6
    • B-7
    • B-8
    • B-9
    • B-10
    • B-11
    • B-12
    • B-13
    • B-14
    • C-1
    • C-2
    • C-3
    • C-4
    • C-5
    • C-6
    • C-7
    • C-8
    • C-9
    • C-10
    • C-11
    • C-12
    • C-13
    • C-14
    • D-1
    • D-2
    • D-3
    • D-4
    • D-5
    • D-6
    • D-7
    • D-8
    • D-9
    • D-10
    • D-11
    • D-12
    • D-13
    • D-14
    • E-1
    • E-2
    • E-3
    • E-4
    • E-5
    • E-6
    • E-7
    • E-8
    • E-9
    • E-10
    • E-11
    • E-12
    • E-13
    • E-14
    • F-1
    • F-2
    • F-3
    • F-4
    • F-5
    • F-6
    • F-7
    • F-8
    • F-9
    • F-10
    • F-11
    • F-12
    • F-13
    • F-14
    • G-1
    • G-2
    • G-3
    • G-4
    • G-5
    • G-6
    • G-7
    • G-8
    • G-9
    • G-10
    • G-11
    • G-12
    • G-13
    • G-14
  • The Land of Hyrule: Stage Art
    • Hyrule Field
    • Ganon's Tower
    • Eldin Caves
    • Faron Woods
    • Valley of Seers
    • Death Mountain
    • Water Temple
    • Twilight Field
    • Palace of Twilight
    • Skyloft
    • Sealed Grounds
    • Temple of the Sacred Sword
    • Temple of Souls
    • Gerudo Desert
    • Forsaken Fortress
    • Wind and Earth Temples
    • From the Designers
  • Makers of History: Creating Characters
    • Link
    • Zelda
    • Lana
    • Cia
    • Ganondorf
    • Impa
    • Sheik
    • Darunia
    • Ruto
    • Agitha
    • Fi
    • Midna
    • Twili Midna
    • Young Link
    • Tingle
    • Zant
    • Ghirahim
    • Volga
    • Wizzro
    • Linkle
    • Skull Kid
    • Toon Link
    • Tetra
    • King Daphnes
    • Hylian Soldier
    • Goron Soldier
  • Creatures of Darkness: Creating Monsters
    • Ground Cover Evil Troops
    • Blood of the Dragon
    • Commanders of the Dead
    • Immovable
    • Giant Beasts
    • Companion Fairies
  • Twilight Map
    • Twilight Map
    • Item Cards
    • A-3
    • A-4
    • A-5
    • A-6
    • A-7
    • A-8
    • A-9
    • A-10
    • A-11
    • B-1
    • B-2
    • B-3
    • B-4
    • B-5
    • B-6
    • B-7
    • B-8
    • B-9
    • B-10
    • B-11
    • C-1
    • C-2
    • C-3
    • C-4
    • C-5
    • C-6
    • C-7
    • C-8
    • C-9
    • C-10
    • C-11
    • C-12
    • D-1
    • D-2
    • D-3
    • D-4
    • D-5
    • D-6
    • D-7
    • D-8
    • D-9
    • D-10
    • D-11
    • D-12
    • D-13
    • D-14
    • E-1
    • E-2
    • E-3
    • E-4
    • E-5
    • E-6
    • E-7
    • E-8
    • E-9
    • E-10
    • E-11
    • E-12
    • E-13
    • E-14
    • F-1
    • F-2
    • F-3
    • F-4
    • F-5
    • F-6
    • F-7
    • F-8
    • F-9
    • F-10
    • F-11
    • F-12
    • F-13
    • F-14
    • F-15
    • G-2
    • G-3
    • G-4
    • G-5
    • G-6
    • G-7
    • G-8
    • G-9
    • G-10
    • G-11
    • H-3
    • H-4
    • H-5
    • H-6
    • H-7
    • H-8
    • H-9
    • H-10
  • Rewards Map
    • True Partners
    • Chosen by Fate
    • Boss Rush
    • Running to the Rescue
    • Scattered Seeds
    • Unity
    • Evil Power
    • Rulers of Twilight
    • The Giants Gather
  • Termina Map
    • Termina Map
    • Item Cards
    • A-1
    • A-2
    • A-3
    • A-7
    • A-8
    • A-9
    • A-10
    • A-11
    • A-12
    • A-13
    • A-14
    • B-1
    • B-2
    • B-3
    • B-6
    • B-7
    • B-8
    • B-9
    • B-10
    • B-11
    • B-12
    • B-13
    • C-1
    • C-2
    • C-3
    • C-6
    • C-7
    • C-8
    • C-9
    • C-10
    • C-11
    • C-12
    • C-13
    • C-14
    • C-15
    • D-5
    • D-6
    • D-7
    • D-8
    • D-9
    • D-10
    • D-11
    • D-12
    • D-13
    • D-14
    • D-15
    • D-16
    • E-5
    • E-6
    • E-7
    • E-8
    • E-9
    • E-10
    • E-11
    • E-12
    • E-13
    • E-14
    • E-15
    • F-5
    • F-6
    • F-7
    • F-8
    • F-9
    • F-10
    • F-11
    • F-12
    • F-13
    • F-14
    • F-15
    • G-4
    • G-5
    • G-6
    • G-9
    • G-10
    • G-11
    • G-12
    • G-13
    • G-14
    • H-7
    • H-8
    • H-9
    • H-10
    • H-11
    • H-12
    • H-13
  • Hero Training
    • Overview
    • Legend Mode
    • Free Mode
  • Companion Fairies
    • Companion Fairies
  • Credits

Hyrule Warriors Legends Guide › Master Quest Map

C-12

Missing Enemies

You must use a Recorder in the Search Screen to make the enemies appear in this Scenario.

Guard the Allied Keeps with your life!

Unlockables

Bombs

Wizzro – Heart Container (A-Rank)

Search Item

None

A-Rank

TIME – 7 minutes or less

Master Quest Rule:

No Guarding

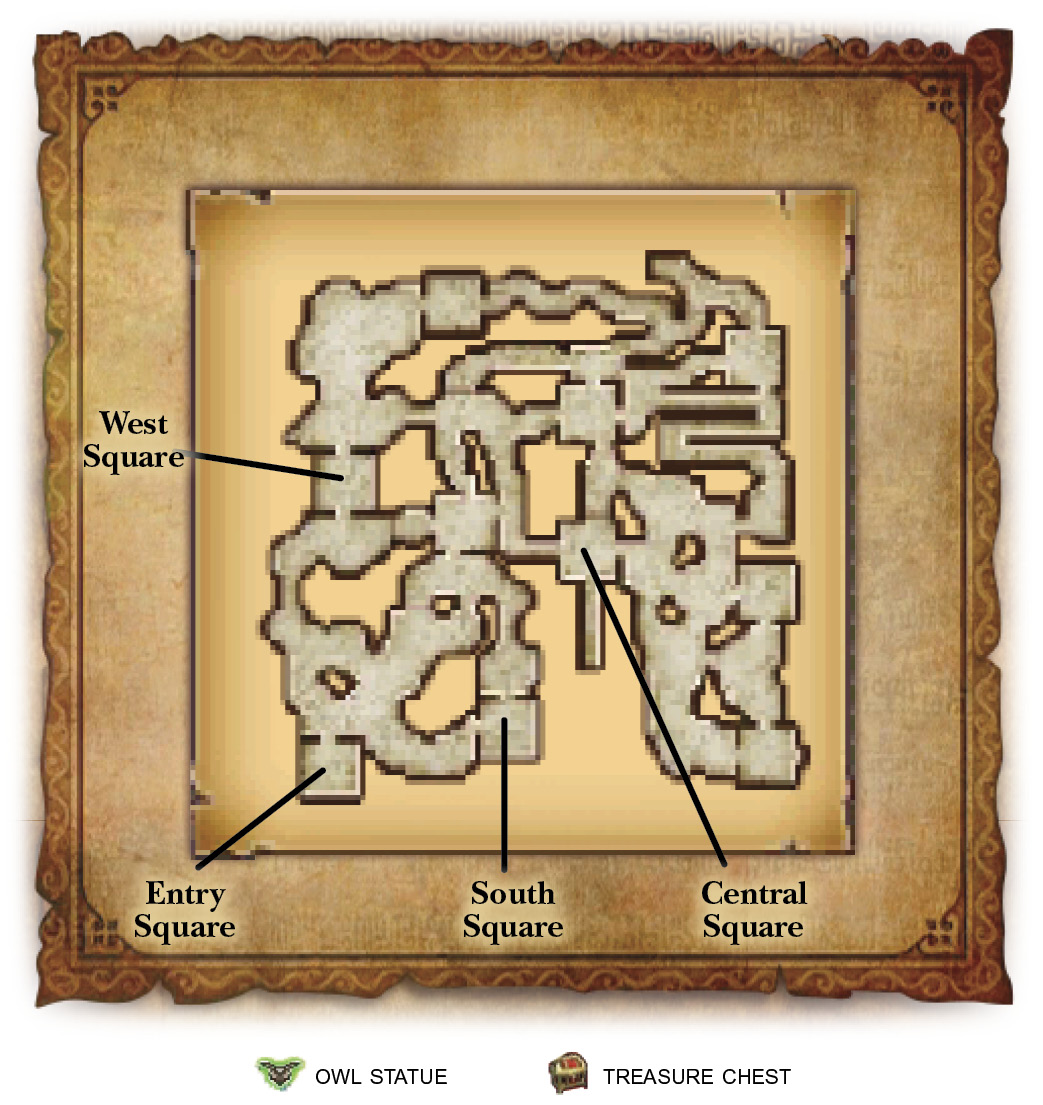
Start by defeating the Aeralfos directly east of you. Do it quickly, then head south directly to the South Square Keep. Defeat the Bokoblins with health bars down there and immediately race to the Entry Square Keep. Defeat the Aeralfos and head directly to the center of the map.

Two Messengers appear in the center of the map. Defeat the west one first, then chase down the east one. Now race to the West Square Keep, defeat the Bokoblins with health bars and run to the South Square Keep to do the same there.

After defeating the Bokoblins, race to the Central Square Keep and intercept the two Aerolfos that are moving from the southeast corner to that Keep. Defeat them as quickly as possible, then head directly to the West Square Keep. The remaining two Aeralfos head toward that Keep while you’re still fighting with the ones in the Central Square Keep, so time is extremely tight.

Once you’ve defeated the Aeralfos in the West Square Keep, the mission is over.

Keep reading with a free account

The first 3 sections of Hyrule Warriors Legends are open to everyone. An account opens the rest of it, and every other guide in the archive. It's free, and there's nothing to buy.

Bought guides on the old Prima Games site? Your account and every guide you own moved here, so there's nothing to buy again. Sign in.

Create a free account Or browse our free guides

PreviousC-11 NextC-13