
Hyrule Warriors Legends Guide Warriors & Weapons
Ganondorf
The Source of all Monsters himself, Ganondorf is the perfect antithesis of Link. Instead of being fast and acrobatic, Ganondorf is slow and cumbersome, but not because he’s incapable of a speedy assault—he just prefers a less hurried approach to combat. After all, why rush when you can spend time really enjoying the agony of your foes? Though, we say all that, but if you put his Trident in his hands, he’ll tear across the battlefield like red and purple blur. He is one of the most powerful Warriors in the game, without a doubt. Ganondorf is perfect for those of you who have a bit of an evil side.
How to unlock
Ganondorf becomes playable after completing “Shining Beacon” in Legend Mode.
Ganondorf’s Weapons
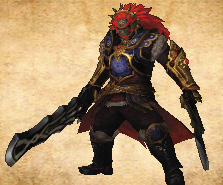
Great Swords
Ganondorf’s Great Swords build up dark power as you use Combo Attacks, which can then be unleashed with a single press of Combo to make a large, crater-producing blast that causes any enemies not caught in the blast to regret ever taking up arms in the first place. The Great Swords’ Combo Attacks are pretty lacking, all told. They have limited range and a really slow startup, meaning if you get hit while your Combo Attack is heating up, it is cancelled and you must try again. Truly, this weapon’s greatest assets are the reach and power of its Regular Attacks. Ganondorf can chop through enemies like a demonic lawn mower possessed by history’s angriest gardener with his Regular Attacks. Although, we don’t want to write off Combo Attacks entirely, because a couple of them are worth having around for some quick crowd control: Regular-Regular-Combo and Regular-Regular-Regular-Regular-Combo are both fast and have pretty a decent range of attack, making them excellent for when there are too many enemies and not enough time to crush them all individually. Being the King of Evil can be so trying sometimes.
 Swords of Despair
This is Ganondorf’s starting weapon.
 Swords of Darkness
You can find this weapon in Scenario F-2 of the Great Sea Map. You must first use an Item Card in the Search Screen to locate it, and then get an A-Rank to unlock the weapon.
 Swords of Demise
You can find this weapon in Scenario B-4 of the Master Quest Map. You must first use an Item Card in the Search Screen to locate it, and then get an A-Rank to unlock the weapon.
Swords of Demise +
You can find this weapon in Scenario H-2 of the Twilight Map. You must first use an Item Card in the Search Screen to locate it, and then get an A-Rank to unlock the weapon.
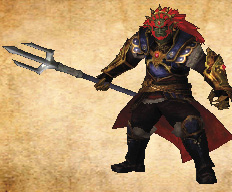
Trident
As an answer to the slow nature of Ganondorf’s Great Swords, the Trident makes everyone’s favorite Demon King zip, zig, and zag across the battlefield like a green and red blur of absolute destruction. Mashing Combo at the end of Combo Attacks can create all sorts of fun additional attacks that will make your foes weep and your friends weep even harder. The Trident is just as deadly as the Great Swords, if not more so.
 Thief’s Trident
You can find this weapon in Scenario B-8 of the Adventure Map. You must first use an Item Card in the Search Screen to locate it, and then get an A-Rank to unlock the weapon.
 King of Evil Trident
You can find this weapon in Scenario A-1 of the Great Sea Map. You must first use an Item Card in the Search Screen to locate it, and then get an A-Rank to unlock the weapon.
 Trident of Demise
You can find this weapon in Scenario C-15 of the Master Quest Map. You must first use an Item Card in the Search Screen to locate it, and then get an A-Rank to unlock the weapon.
Trident of Demise +
You can find this weapon in Scenario B-1 of the Termina Map. You must first use an Item Card in the Search Screen to locate it, and then get an A-Rank to unlock the weapon.
Ganondorf’s Badges
Attack Badges
| Name | Description | Materials Required | Cost | |
|---|---|---|---|---|

|
Kokiri Sword I (Unlocks Din’s Fire I) | New Combo Attack for the Hylian Sword: Regular Attack ×6 | Metal Plate ×1 | 100 |

|
Kokiri Sword II (Unlocks Stamina Fruit I) | New Combo Attack for Great Swords: Regular Attack ×4, then press Combo Attack | Essence of Icy Big Poe ×1, Metal Plate ×1 | 500 |

|
Kokiri Sword III (Unlocks Digging Mitts I) | New Combo Attack for Great Swords: Regular Attack ×7 | Dinolfos Fang ×1, Metal Plate ×1 | 1,000 |

|
Kokiri Sword IV | New Combo Attack for Great Swords: Regular Attack ×5, then press Combo Attack | Goron Armor Breastplate ×1, Metal Plate ×1 | 3,000 |

|
Din’s Fire I (Unlocks Hover Boots I) | Makes the Special Attack gauge fill slightly faster. | Dinolfos Fang ×1, Metal Plate ×1 | 500 |

|
Din’s Fire II (Unlocks Fierce Deity’s Mask I) | Makes Special Attack gauge fill moderately faster. | Goron Armor Breastplate ×1, Metal Plate ×1 | 1,000 |

|
Din’s Fire III | Makes the Special Attack gauge fill a lot faster. | Cia’s Staff ×1, Cia’s Bracelet ×2, Stalmaster’s Skull ×2 | 3,000 |

|
Stamina Fruit I | Makes the Weak Point gauge diminish slightly quicker. | Stalmaster Wrist Bone ×1 | 500 |

|
Stamina Fruit II | Makes the Weak Point gauge diminish moderately quicker. | Zelda’s Brooch ×1, Gohma’s Acid ×1, Stalmaster Wrist Bone ×3 | 1,000 |

|
Stamina Fruit III | Makes the Weak Point gauge diminish a lot quicker. | Zelda’s Tiara ×1, Gohma’s Acid ×2, Stalmaster’s Skull ×2 | 3,000 |

|
Hover Boots I | Slightly lengthens the duration of Focus Spirit. | Stalmaster Wrist Bone ×2 | 500 |

|
Hover Boots II | Moderately lengthens the duration of Focus Spirit. | Zelda’s Brooch ×1, Gohma’s Acid ×1, Stalmaster’s Wrist Bone ×3 | 1,000 |

|
Hover Boots III | Greatly lengthens the duration of Focus Spirit. | Zelda’s Tiara ×1, Gohma’s Acid ×2, Stalmaster’s Skull ×2 | 3,000 |

|
Digging Mitts I | Allows the warrior to inflict minor damage to enemies with their guard up. | Stalmaster Wrist Bone ×3 | 2,000 |
|
|
Digging Mitts II | Allows the warrior to inflict moderate damage to enemies with their guard up. | Zelda’s Brooch ×1, Gohma’s Acid ×1, Stalmaster’s Wrist Bone ×2 | 3,000 |

|
Digging Mitts III | Allows the warrior to inflict heavy damage to enemies with their guard up. | Zelda’s Tiara ×1, Gohma’s Acid ×2, Stalmaster’s Skull ×2 | 5,000 |

|
Fierce Deity’s Mask I | Gives the warrior a second Special Attack gauge. | Hylian Captain Gauntlet ×1, Metal Plate ×1 | 2,000 |

|
Fierce Deity’s Mask II | Gives the warrior a third Special Attack gauge. | Zelda’s Tiara ×1, Gohma’s Acid ×2, Stalmaster’s Skull ×2 | 3,000 |

|
Wooden Sword I | New Combo Attack for the Trident: Regular Attack ×6 | Metal Plate ×1 | 100 |

|
Wooden Sword II | New Combo Attack for the Trident: Regular Attack ×4, then press Combo Attack | Hylian Captain Gauntlet ×1, Metal Plate ×1 | 500 |

|
Wooden Sword III | New Combo Attack for the Trident: Regular Attack ×7 | Big Blin Hide ×1, Metal Plate ×1 | 1,000 |

|
Wooden Sword IV | New Combo Attack for the Magic Rod: Regular Attack ×5, then press Combo Attack | Stone Blin Buckler ×1, Metal Plate ×1 | 3,000 |
Defense Badges
| Name | Description | Materials Required | Cost | |
|---|---|---|---|---|

|
Empty Bottle I (Unlocks all other tier I badges in Ganondorf’s Defense Badge tree) | Allows a warrior to use a potion once per battle. | Monster Tooth ×1 | 100 |

|
Empty Bottle II (Unlocks Nayru’s Love I) | Allows a warrior to use a potion twice per battle. | Goron Armor Breastplate ×1, Monster Tooth ×1 | 1,000 |

|
Empty Bottle III | Allows a warrior to use a potion three times per battle. | Gohma’s Lens ×1, Zelda’s Brooch ×2, Stalmaster’s Skull ×2 | 3,000 |

|
Hornet Larvae I | Slightly increases the healing effect from hearts picked up in battle. | Stalmaster’s Wrist Bone ×1 | 500 |

|
Hornet Larvae II | Moderately increases the healing effect from hearts picked up in battle. | Zelda’s Brooch ×1, Gohma’s Acid ×1, Stalmaster Wrist Bone ×3 | 1,000 |

|
Hornet Larvae III | Greatly increases the healing effect from hearts picked up in battle. | Gohma’s Lens ×1, Zelda’s Brooch ×2, Stalmaster’s Skull ×2 | 3,000 |

|
Goron Tunic I | Slightly reduces damage taken on fire-element-recommended stages. | Stalmaster Wrist Bone ×2 | 1,000 |

|
Goron Tunic II | Moderately reduces damage taken on fire-element-recommended stages. | Zelda’s Brooch ×1, Gohma’s Acid ×1, Stalmaster Wrist Bone ×3 | 3,000 |

|
Goron Tunic III | Greatly reduces damage taken on fire-element-recommended stages. | Gohma’s Lens ×1, Zelda’s Brooch ×2, Stalmaster’s Skull ×2 | 5,000 |

|
Zora Tunic I | Slightly reduces damage taken on water-element-recommended stages. | Stalmaster Wrist Bone ×2 | 1,000 |

|
Zora Tunic II | Moderately reduces damage taken on water-element-recommended stages. | Zelda’s Brooch ×1, Gohma’s Acid ×1, Stalmaster Wrist Bone ×3 | 3,000 |

|
Zora Tunic III | Greatly reduces damage taken on water-element-recommended stages. | Gohma’s Lens ×1, Zelda’s Brooch ×2, Stalmaster’s Skull ×2 | 5,000 |

|
Magic Armor I | Slightly reduces damage taken on lightning-element-recommended stages. | Stalmaster Wrist Bone ×2 | 1,000 |

|
Magic Armor II | Moderately reduces damage taken on lightning-element-recommended stages. | Zelda’s Brooch ×1, Gohma’s Acid ×1, Stalmaster Wrist Bone ×3 | 3,000 |

|
Magic Armor III | Greatly reduces damage taken on lightning-element-recommended stages. | Gohma’s Lens ×1, Zelda’s Brooch ×2, Stalmaster’s Skull ×2 | 5,000 |

|
Sacred Shield I | Slightly reduces damages taken on light-element-recommended stages. | Stalmaster Wrist Bone ×2 | 1,000 |

|
Sacred Shield II | Moderately reduces damage taken on light-element-recommended stages. | Zelda’s Brooch ×1, Gohma’s Acid ×1, Stalmaster Wrist Bone ×3 | 3,000 |

|
Sacred Shield III | Greatly reduces damage taken on light-element-recommended stages. | Gohma’s Lens ×1, Zelda’s Brooch ×2, Stalmaster’s Skull ×2 | 5,000 |

|
Mirror Shield I | Slightly reduces damage taken on darkness-element-recommended stages. | Stalmaster Wrist Bone ×2 | 1,000 |

|
Mirror Shield II | Moderately reduces damage taken on darkness-element-recommended stages. | Zelda’s Brooch ×1, Gohma’s Acid ×1, Stalmaster Wrist Bone ×3 | 3,000 |

|
Mirror Shield III | Greatly reduces damage taken on darkness-element-recommended stages. | Gohma’s Lens ×1, Zelda’s Brooch ×2, Stalmaster’s Skull ×2 | 5,000 |

|
Naryu’s Love I | Nullifies knock-back on the first hit taken from enemies. | Stalmaster Wrist Bone ×3 | 1,000 |

|
Nayru’s Love II | Nullifies knock-back on the first two hits taken from enemies. | Zelda’s Brooch ×1, Gohma’s Acid ×1, Stalmaster Wrist Bone ×3 | 3,000 |
|
|
Nayru’s Love III | Nullifies knock-back on the first three hits taken from enemies. | Cia’s Staff ×1, Cia’s Bracelet ×2, Stalmaster’s Skull ×2 | 5,000 |
Assist Badges
| Name | Description | Materials Required | Cost | |
|---|---|---|---|---|

|
Farore’s Wind I (Unlocks Goron’s Bracelet I) | Slightly speeds up the process of taking keeps. | Old Rag ×1 | 500 |

|
Farore’s Wind II | Moderately speeds up the process of taking keeps. | Zelda’s Brooch ×1, Gohma’s Acid ×1, Stalmaster Wrist Bone ×3 | 1,000 |

|
Farore’s Wind III | Greatly speeds up the process of taking keeps. | Cia’s Staff ×1, Cia’s Bracelet ×2, Stalmaster Wrist Bone ×2 | 3,000 |

|
Goron’s Bracelet I (Unlocks Hawkeye I) | Slightly increases the duration of bomb power-ups. | Stalmaster Wrist Bone ×2 | 1,000 |

|
Goron’s Bracelet II | Greatly increases the duration of bomb power-ups. | Zelda’s Tiara ×1, Zelda’s Brooch ×2, Stalmaster’s Skull ×2 | 2,000 |

|
Hawkeye I (Unlocks Beetle I) | Slightly increases the duration of bow and arrows power-ups. | Stalmaster Wrist Bone ×2 | 1,000 |

|
Hawkeye II | Greatly increases the duration of bow and arrows power-ups. | Zelda’s Tiara ×1, Zelda’s Brooch ×2, Stalmaster’s Skull ×2 | 2,000 |

|
Beetle I (Unlocks Whip I) | Slightly increases the duration of boomerang power-ups. | Stalmaster Wrist Bone ×2 | 1,000 |

|
Beetle II | Greatly increases the duration of boomerang power-ups. | Zelda’s Tiara ×1, Zelda’s Brooch ×2, Stalmaster’s Skull ×2 | 2,000 |

|
Whip I (Unlocks Bug Net I) | Slightly increases the duration of Hookshot power-ups. | Stalmaster Wrist Bone ×2 | 1,000 |

|
Whip II | Greatly increases the duration of Hookshot power-ups. | Zelda’s Tiara ×1, Zelda’s Brooch ×2, Stalmaster’s Skull ×2 | 2,000 |

|
Bug Net I | Slightly increases the duration of hammer power-ups. | Stalmaster Wrist Bone ×2 | 1,000 |

|
Bug Net II | Greatly increases the duration of hammer power-ups. | Zelda’s Tiara ×1, Zelda’s Brooch ×2, Stalmaster’s Skull ×2 | 2,000 |
Ganondorf’s Costumes
| Name | Location |
|---|---|
| Standard Armor | This is Ganondorf’s starting outfit. |
| Standard Armor (Boss) | Complete “Rulers of Twilight” in the Rewards Map with an A-Rank. |
| Standard Armor (Great Sea) | E-9 in the Great Sea Map; need to use Item Card. |
| Standard Armor (Master Quest) | H-1 in the Master Quest Map; need to use Item Card. |
| Era of Twilight Armor | D-9 in the Twilight Map; need to use Item Card. |
| Standard Armor (Twilight) | G-4 in the Twilight Map; need to use Item Card. |
| Era of the Hero of Time Armor | D-6 in the Termina Map; need to use Item Card. |
| Odolwa’s Remains | C-3 in the Termina Map; need to use Item Card. |