Final Fantasy XII: The Zodiac Age Guide Zodiac Job System
Machinist
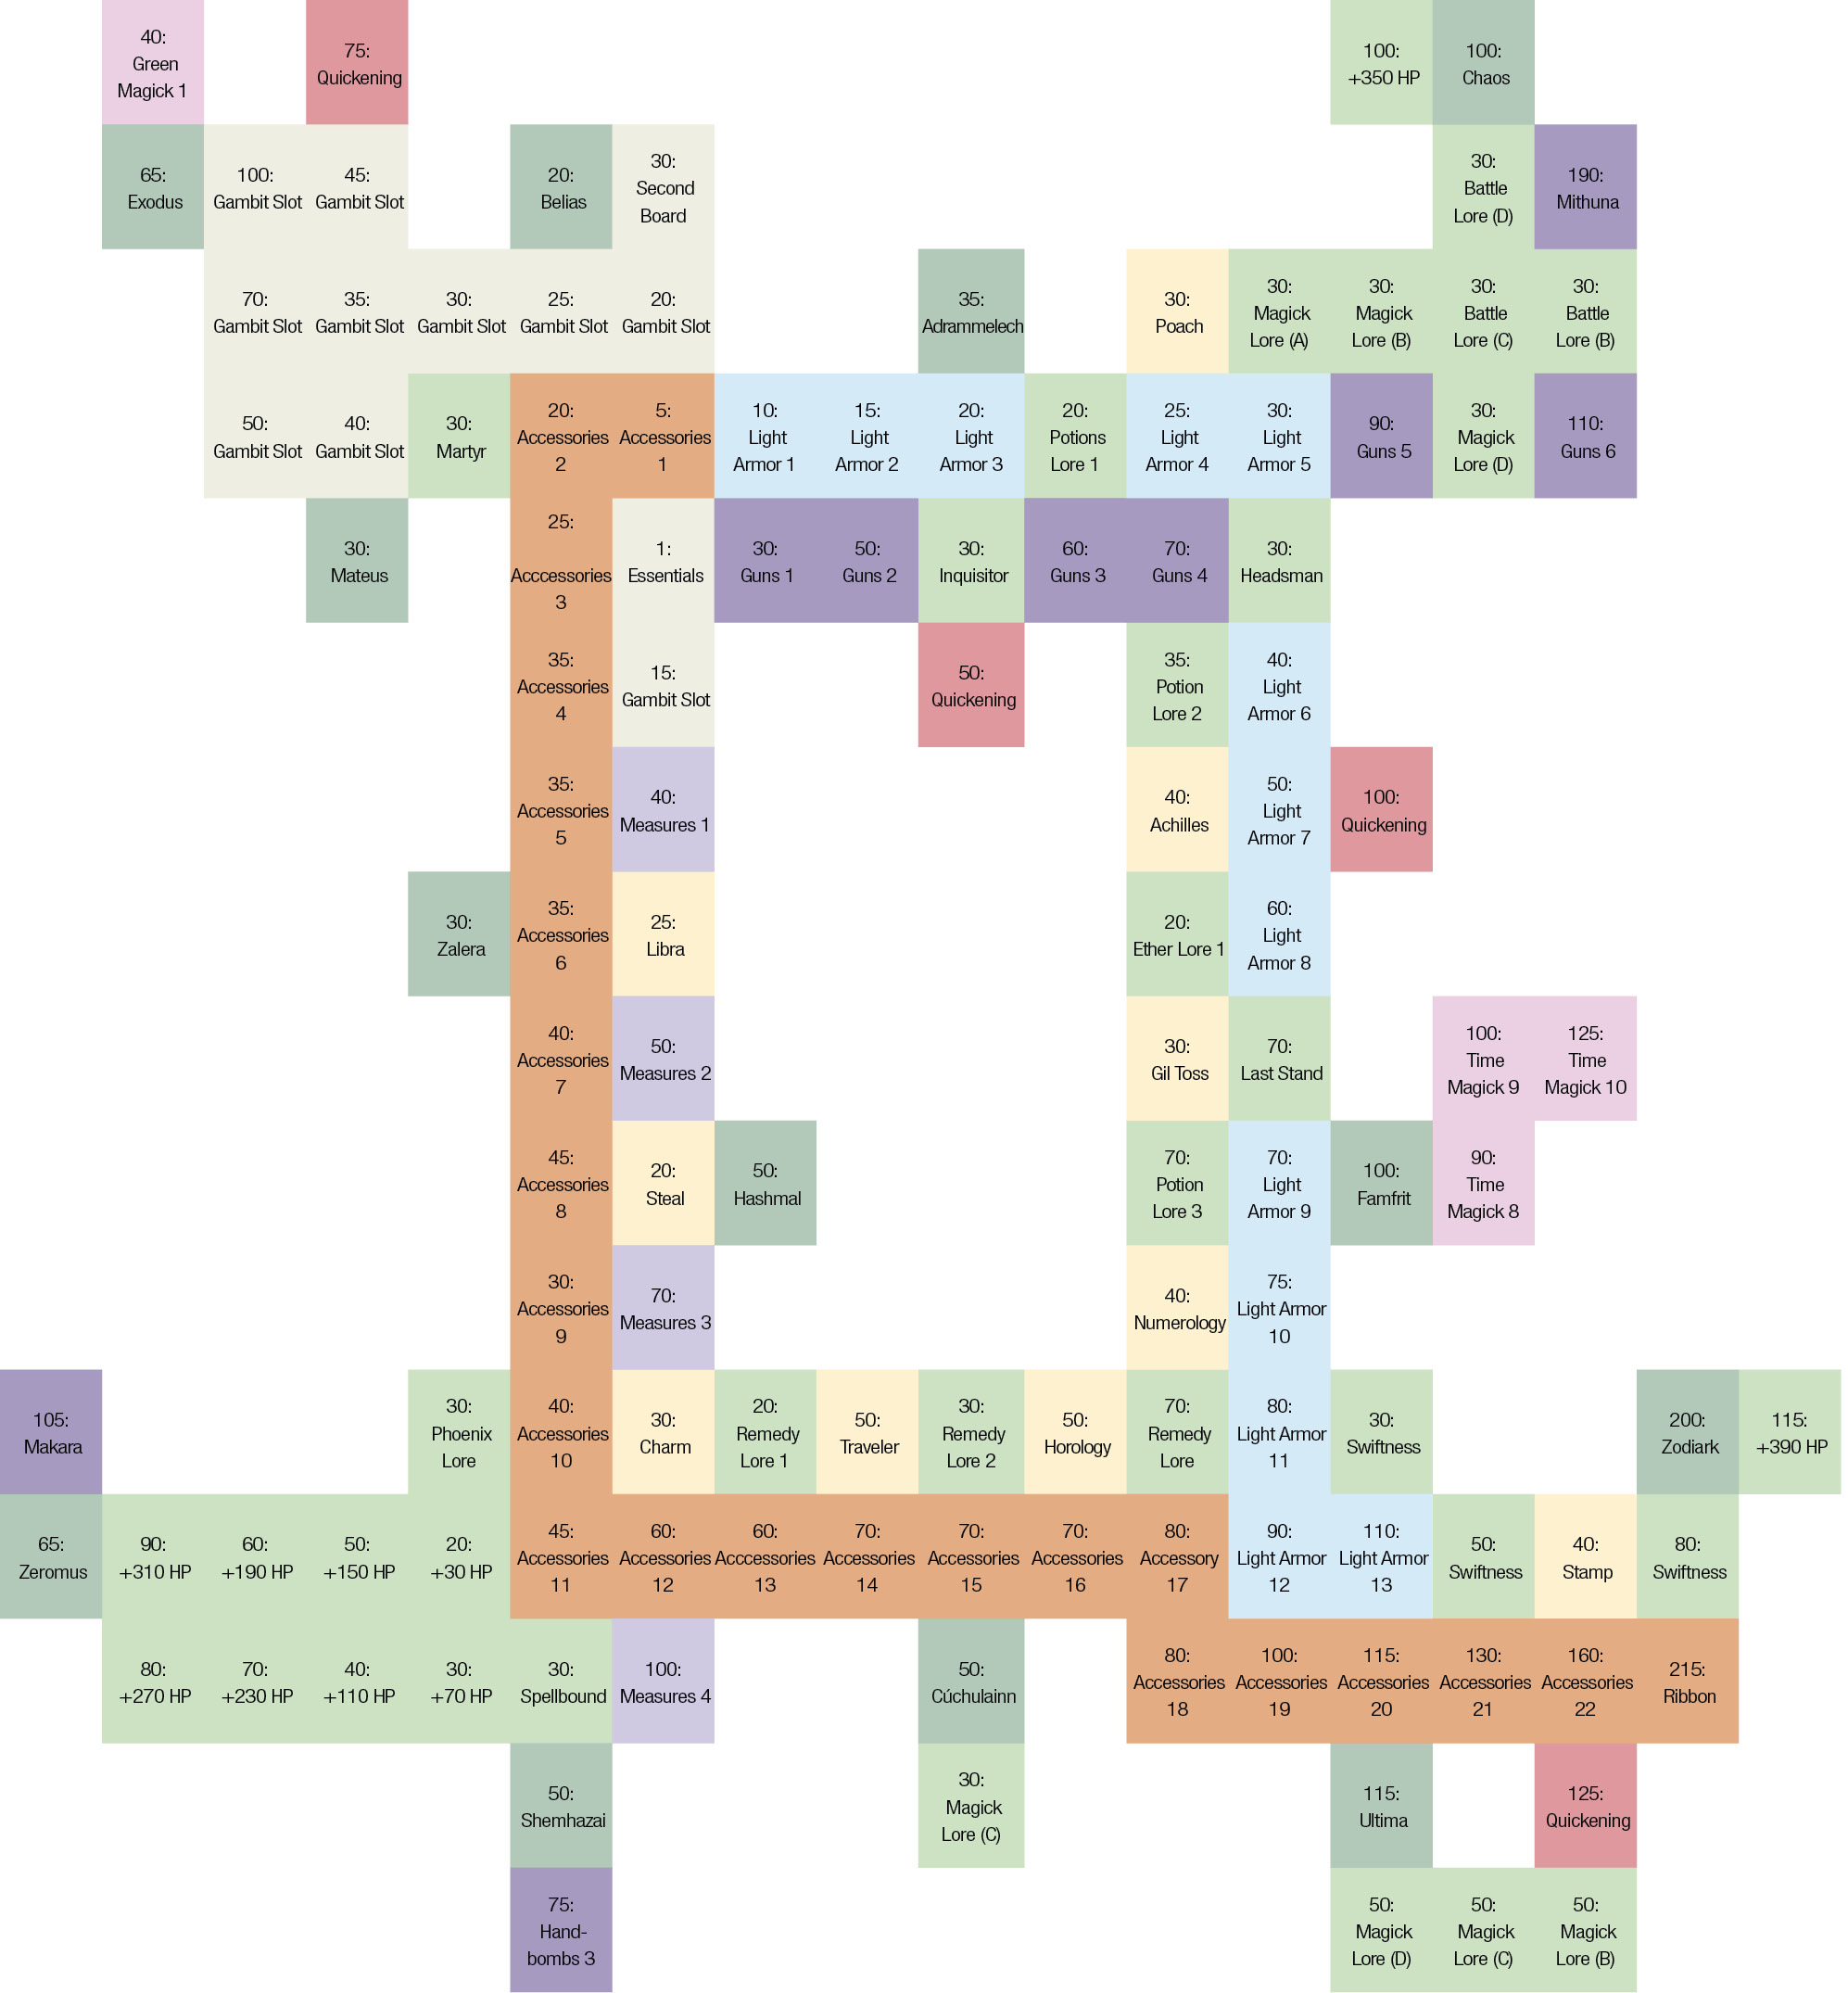
Potential Core Nodes
|
1360 HP |
— |
|
Swiftness x3 |
— |
|
Battle Lore x2 |
— |
|
Magick Lore x3 |
— |
|
Potion Lore 1 |
— |
|
Potion Lore 2 |
— |
|
Potion Lore 3 |
— |
|
Ether Lore 1 |
— |
|
Phoenix Lore |
— |
|
Remedy Lore 1 |
Remedies remove Sleep, Sap, Immobilize, and Disable. |
|
Remedy Lore 2 |
Remedies remove Petrify, Confuse, and Oil. |
|
Remedy Lore 3 |
Remedies remove Stop, Doom, and Disease. |
|
Headsman |
Recover MP when dealing fatal damage to a Foe in the amount of Foe level divided by 4. |
|
Inquisitor |
Restores MP when dealing Physical damage. (See Damage to MP chart) |
|
Last Stand |
Halves Physical damage recieved when in Critical status |
|
Martyr |
Restores MP upon being damaged. (See Damage to MP chart) |
|
Spellbound |
Beneficial statuses last 50% longer |
|
Guns 1 |
Altair |
|
Guns 2 |
Capella, Vega |
|
Guns 3 |
Sirius, Betelgeuse |
|
Guns 4 |
Ras Algethi, Aldebaran |
|
Guns 5 |
Spica, Antares |
|
Guns 6 |
Arcturus, Fomalhaut |
|
Mithuna |
Mithuna |
|
Measures 1 |
Gilt Measure |
|
Measures 2 |
Arc Scale, Mulltiscale |
|
Measures 3 |
Cross Scale, Caliper |
|
Measures 4 |
Euclid’s Sextant |
|
Light Armor 1 |
Leather Cap, Leather Clothing |
|
Light Armor 2 |
Headgear, Chromed Leathers, Headguard, Leather Breastplate |
|
Light Armor 3 |
Leather Headgear, Bronze Chestplate, Horned Hat, Ringmail |
|
Light Armor 4 |
Balaclava, Windbreaker, Soldier’s Cap, Heavy Coat |
|
Light Armor 5 |
Green Beret, Survival Vest, Red Cap, Brigandine |
|
Light Armor 6 |
Headband, Jujitsu Gi, Pirate Hat, Viking Coat |
|
Light Armor 7 |
Goggle Mask, Metal Jerkin, Adamant Hat, Adamant Vest |
|
Light Armor 8 |
Officer’s Hat, Barrel Coat, Chakra Band, Power Vest |
|
Light Armor 9 |
Thief’s Cap, Ninja Gear, Gigas Hat, Gigas Chestplate |
|
Light Armor 10 |
Chaperon, Minerva Bustier |
|
Light Armor 11 |
Crown of Laurels, Rubber Suit |
|
Light Armor 12 |
Renewing Morion, Mirage Vest |
|
Light Armor 13 |
Dueling Mask, Brave Suit |
|
Achilles |
Causes a foe to gain vulnerability to a random status. Most enemies are immune. |
|
Charm |
Inflicts Confuse on one Foe. Immunity to Confuse applies. |
|
Gil Toss |
Expends gil to do damage at a 1 to 1 ratio. This can be very strong and very expensive. |
|
Horology |
Deals damage based on Level and the ones digit of the game clock, 9 being the strongest and 0 the weakest. |
|
Libra |
Puts Libra status on the user. Shows Foe's HP, statuses, and level as well as reveals traps. Generally very useful. |
|
Numerology |
Deals damage to enemies, doubles with each successive hit when used repeatedly. Deals area damage as well. |
|
Poach |
KO’s a Foe to gain loot. Only works on enemies in Critical Status. Foe does not drop gil, Experience, or items. |
|
Stamp |
Copies all of the user’s status ailments onto one Foe. |
|
Steal |
Steal an item from a Foe that has an item. Cannot steal after a successful steal. See also: Thief’s Cuffs. |
|
Traveler |
Does area damage based on how many steps taken since the last use of Traveler (if any). Rolls over at 1000 steps. Not recommended. |
missable Nodes
|
Magick Lore (50B) |
Locked |
Quickening OR Esper |
— |
|
Magick Lore (50C) |
Locked |
Quickening OR Esper |
— |
|
Magick Lore (50D) |
Locked |
Quickening OR Esper |
— |
|
350 HP |
Locked |
Esper |
— |
|
390 HP |
Locked |
Esper |
— |
|
Magick Lore (30C) |
Locked |
Esper |
— |
|
Hand-bombs 3 |
Locked |
Esper |
Caldera, Volcano |
|
Makara |
Locked |
Esper |
Makara |
|
Green Magick 1 |
Locked |
Esper |
Vanishga, Warp |
|
Time Magick 8 |
Locked |
Esper |
Reflectga, Slowga |
|
Time Magick 9 |
Locked |
Esper |
Graviga, Hastega |
|
Time Magick 10 |
Locked |
Esper |
Decoy, Oil |
| Sign | Role | Weapon | Armor |
|---|---|---|---|
|
Gemini |
Ranged Damage |
Guns, Measures |
Light |
Machinists are swift-moving, Light Armored, Gun users who can swap to Measures in order to utilize their unique buffing properties. Machinists are masters of Potion and Remedy Lores, which can help your team recover at a moment’s notice. They have access to a number of technicks, most notably Numerology and Gil Toss. This Job benefits greatly from a well-placed Esper or two, gaining access to Green and Time Magicks such as Decoy and Hastega, in particular. Machinists can also use some Hand-bombs with some judicious Esper usage, if needed.
The Machinist Job by itself offers little in either flash or substance. Guns are very good weapons if you happen to be playing on “New Game -” (the extra-hard mode unlocked by beating Trial Mode) because they are totally unaffected by a character’s stats. This makes Guns terrible otherwise, since your hard-earned stats are going to waste. The technicks that the Machinist learns are mostly hard to use or underpowered, making their access to some support magick their most alluring feature. The good news is that this Job pairs well with another busy Job, or a character who is already likely to have the Espers they need to unlock their magicks. Monk is a good fit from that perspective. Machinist and Monk Espers align well, giving the Monk Job a full complement of Swiftness and filling that time with a buff or two.
Since they don’t have weapons that use any stats apart from the Hand-bombs that you probably won’t unlock, there’s not a particularly good reason to worry about stats here. Fran has the worst stats in the game overall, so she could fit this role the best. However, spending a great deal of time on this may not be worth the effort.