
Final Fantasy XII: The Zodiac Age Guide Weapons, Armor, and Accessories
Shields & Armor
Shields
Characters equipped with one-handed weapons can and should equip a shield. Shields greatly increase survivability in battle by allowing your characters to block incoming attacks, completely negating the damage they would otherwise sustain. They occasionally provide extra benefits as well; for example, immunity to certain elements or automatic status effects. One shield toward the end of the game even comes equipped with a variety of negative status ailments to compensate for its extremely high evasion rating!
Shields become especially potent when coupled with the Gauntlets accessory. However, one downside to using shields is you lose the option to use two-handed and ranged weapons, which tend to cause more damage than one-handed weapons. This really isn’t a huge obstacle when you consider that you could equip one character with a shield and keep the Decoy magick active on that character. This approach forces the character into a “tanking” role and frees up your remaining characters to focus on dealing damage.

LEather Shield
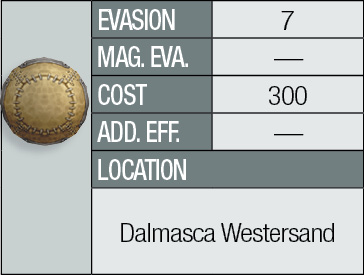
Buckler
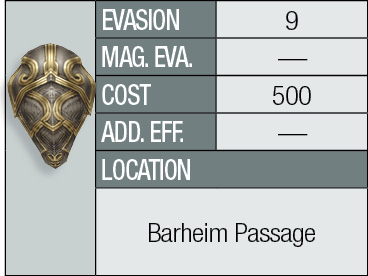
Bronze shield
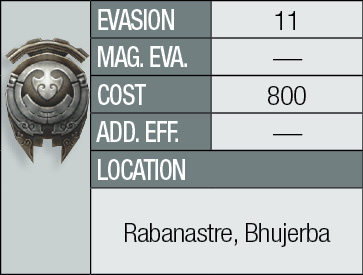
Round Shield
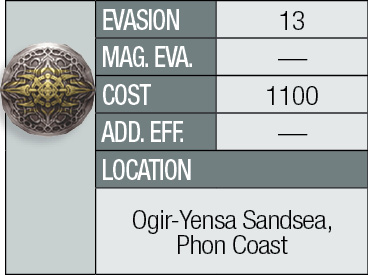
Golden Shield
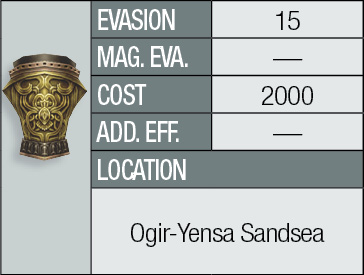
Ice Shield
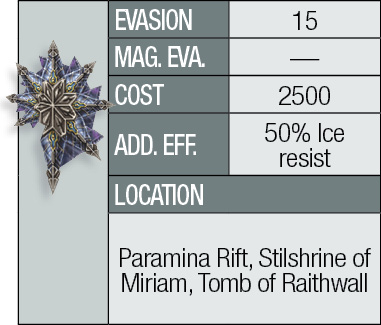
Flame Shield
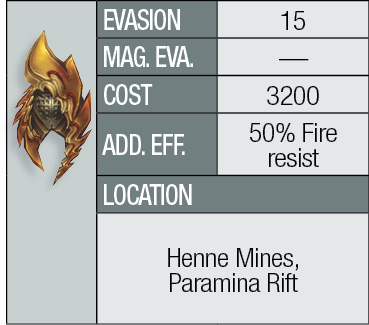
Diamond Shield
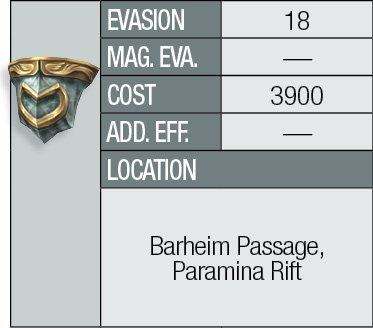
Platinum Shield
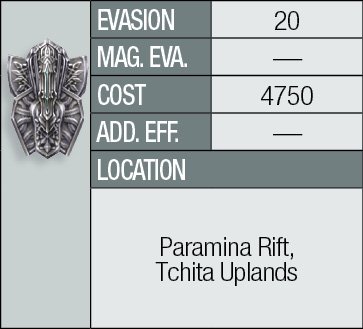
Dragon Shield
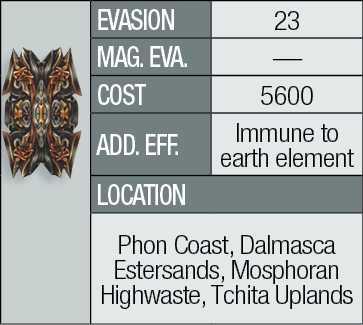
Crystal Shield
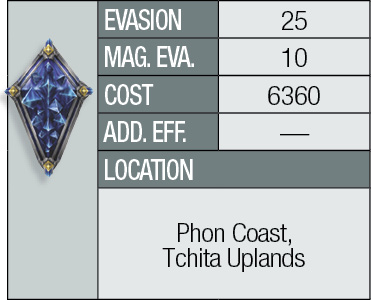
Kaiser Shield
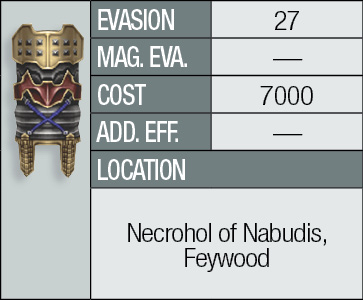
Aegis Shield
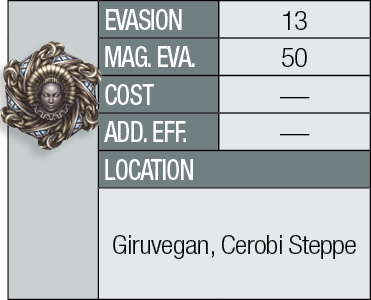
Demon Shield
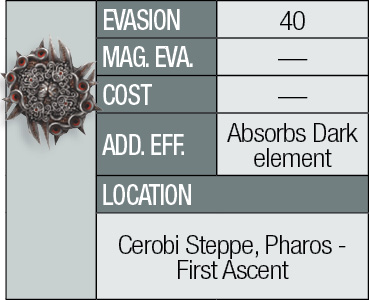
Venetian Shield
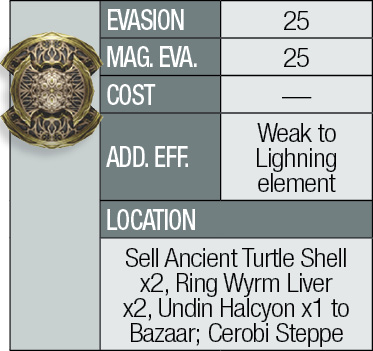
Shell Shield
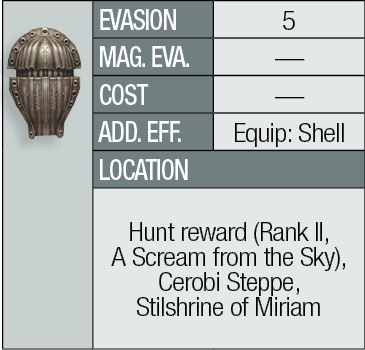
Ensanguined Shield
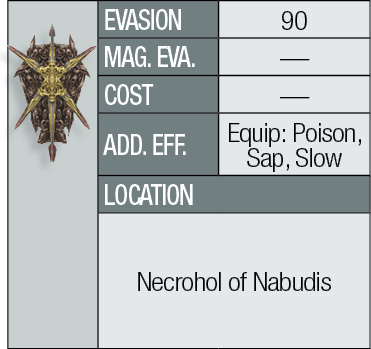
Zodiac Escutcheon
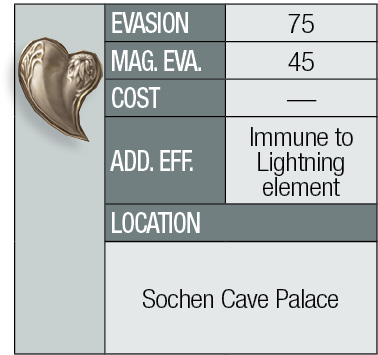
Gendarme
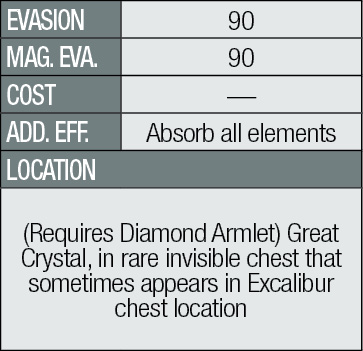
Light Armor
Light armor is the most basic armor type and it can be the most useful armor for a large part of the first half of the game. Light armor generally adds a very sizeable bonus to HP as well as moderate defense. When in doubt, light armor is usually a safe bet. Even near the end of the game, when heavy armor and mystic armor provide bonuses that can far outweigh that which light armor offers, the HP bonus can still prove useful when used with the Bubble spell or Bubble Belt accessory.
| Item | name | Piece | HP | MP | Def. | Mag. Res. | Str. | Mag. Pwr. | Vit. | Spd. | Add. Eff. | Location | Cost |
|---|---|---|---|---|---|---|---|---|---|---|---|---|---|
|
|
Leather Cap |
Head |
10 |
— |
— |
4 |
— |
— |
— |
— |
— |
Rabanastre |
100 |
|
|
Leather Clothing |
Body |
10 |
— |
4 |
— |
— |
— |
— |
— |
— |
Rabanastre |
100 |
|
|
Headgear |
Head |
20 |
— |
— |
5 |
— |
— |
— |
— |
— |
300 |
|
|
|
Chromed Leathers |
Body |
20 |
— |
5 |
— |
— |
— |
— |
— |
— |
Garamscythe Waterway |
200 |
|
|
Headguard |
Head |
30 |
— |
— |
6 |
— |
— |
— |
— |
— |
Barheim Passage |
300 |
|
|
Leather Breastplate |
Body |
30 |
— |
6 |
— |
— |
— |
— |
— |
— |
Garamscythe Waterway |
300 |
|
|
Leather Headgear |
Head |
40 |
— |
— |
8 |
— |
— |
— |
— |
— |
500 |
|
|
|
Bronze Chestplate |
Body |
40 |
— |
8 |
— |
— |
— |
— |
— |
— |
Rabanastre, Nalbina, Bhujerba |
500 |
|
|
Horned Hat |
Head |
50 |
— |
— |
10 |
— |
— |
— |
— |
— |
Rabanastre, Bhujerba |
700 |
|
|
Ringmail |
Body |
50 |
— |
10 |
— |
1 |
— |
— |
— |
— |
Rabanastre, Bhujerba |
700 |
|
|
Balaclava |
Head |
90 |
— |
— |
12 |
1 |
— |
— |
— |
— |
1000 |
|
|
|
Windbreaker |
Body |
100 |
— |
12 |
— |
— |
— |
— |
— |
50% Wind resist |
1000 |
|
|
|
Soldier’s Cap |
Head |
110 |
— |
— |
14 |
— |
— |
— |
— |
— |
Nam-Yensa Sandsea, Ogir-Yensa Sandsea, Phon Coast, Tomb of Raithwall |
1400 |
|
|
Heavy Coat |
Body |
120 |
— |
14 |
— |
— |
— |
— |
— |
— |
1400 |
|
|
|
Green Beret |
Head |
130 |
— |
— |
16 |
— |
— |
— |
3 |
— |
Giza Plains (Rains), Ozmone Plain |
1900 |
|
|
Survival Vest |
Body |
140 |
— |
17 |
— |
— |
— |
5 |
— |
— |
Giza Plains (Rains) |
1900 |
|
|
Red Cap |
Head |
150 |
— |
— |
19 |
— |
— |
3 |
— |
— |
Golmore Jungle, Paramina Rift |
2500 |
|
|
Brigandine |
Body |
160 |
— |
20 |
— |
— |
— |
— |
— |
— |
Henne Mines, Paramina Rift, Tchita Uplands |
2500 |
|
|
Headband |
Head |
170 |
— |
— |
22 |
2 |
— |
— |
— |
— |
Barheim Passage, Paramina Rift |
3200 |
|
|
Jujitsu Gi |
Body |
180 |
— |
23 |
— |
2 |
— |
— |
— |
— |
Barheim Passage, Paramina Rift |
3200 |
|
|
Pirate Hat |
Head |
230 |
— |
— |
25 |
— |
— |
— |
— |
— |
4000 |
|
|
|
Viking Coat |
Body |
240 |
— |
27 |
— |
— |
— |
— |
— |
Immune to Water |
Dalmasca Estersands, Phon Coast |
4000 |
|
|
Goggle Mask |
Head |
270 |
— |
— |
28 |
— |
— |
— |
— |
Immune to Blind |
4900 |
|
|
|
Metal Jerkin |
Body |
280 |
— |
31 |
— |
— |
— |
— |
— |
— |
4000 |
|
|
|
Adamant Hat |
Head |
310 |
— |
— |
31 |
— |
— |
— |
— |
Weak to Ice, 50% Fire resist |
Salikawood, Tchita Uplands, Phon Coast |
5900 |
|
|
Adamant Vest |
Body |
320 |
— |
35 |
— |
— |
— |
— |
— |
Weak to Ice, 50% Fire resist |
Phon Coast, Tchita Uplands |
5900 |
|
|
Officer’s Hat |
Head |
350 |
— |
— |
34 |
— |
— |
— |
3 |
— |
7000 |
|
|
|
Barrel Coat |
Body |
360 |
— |
38 |
— |
— |
— |
— |
— |
— |
7000 |
|
|
|
Chakra Band |
Head |
390 |
— |
— |
37 |
2 |
— |
— |
— |
— |
Necrohol of Nabudis, Feywood |
8100 |
|
|
Power Vest |
Body |
400 |
— |
41 |
— |
2 |
— |
— |
— |
— |
Necrohol of Nabudis, Feywood |
8100 |
|
|
Thief’s Cap |
Head |
460 |
— |
— |
40 |
— |
— |
— |
4 |
— |
— |
|
|
|
Ninja Gear |
Body |
470 |
— |
44 |
— |
— |
— |
— |
4 |
— |
— |
|
|
|
Gigas Hat |
Head |
530 |
— |
— |
43 |
— |
2 |
— |
— |
— |
10700 |
|
|
|
Gigas Chestplate |
Body |
540 |
— |
47 |
— |
— |
2 |
— |
— |
— |
10700 |
|
|
|
Chaperon |
Head |
600 |
— |
— |
46 |
— |
— |
— |
— |
— |
Cerobi Steppe, Pharos - First Ascent |
— |
|
|
Minerva Bustier |
Body |
610 |
— |
50 |
— |
— |
— |
— |
— |
— |
Cerobi Steppe, Pharos - Second Ascent, steal from monster Foobar |
— |
|
|
Crown of Laurels |
Head |
680 |
— |
— |
49 |
— |
— |
— |
— |
— |
— |
|
|
|
Rubber Suit |
Body |
700 |
— |
53 |
— |
— |
— |
— |
— |
Immune to Lightning |
— |
|
|
|
Renewing Morion |
Head |
370 |
— |
— |
52 |
— |
— |
4 |
— |
Equip: Regen |
Cerobi Steppe, Lhusu Mines, drop from Nightwalker in the Stilshrine of Miriam |
— |
|
|
Mirage Vest |
Body |
800 |
— |
55 |
— |
— |
— |
10 |
10 |
— |
Cerobi Steppe, steal from rare monster 73, Disma |
— |
|
|
Dueling Mask |
Head |
800 |
— |
— |
55 |
2 |
— |
— |
— |
— |
Cerobi Steppe, Henne Mines |
— |
|
|
Brave Suit |
Body |
500 |
— |
57 |
— |
— |
— |
— |
— |
Equip: Bravery |
Cerobi Steppe, Henne Mines |
— |


Heavy Armor
Heavy armor is commonly used by frontline fighters. Although it doesn’t usually offer the HP bonuses of light armor or the magick power benefits of mystic armor, it does offer plenty of strength and defense. As most weapons primarily factor in strength when determining damage, selecting the right armor class for damage dealers is often a no-brainer. For much of the game, heavy armor doesn’t really provide much benefit over light armor. However, toward the end of the game when enemies start striking much harder and offering up increasingly stalwart defense, heavy armor becomes a great option.
Early on in the game, HP is extremely important, so it makes sense to use light armor. However, as your characters level up and gain access to the Bubble spell, raw HP becomes less of a concern and reducing the damage your characters take per hit becomes more important. This is especially true when facing many of the game’s strongest adversaries. You should be aware that one specific encounter in the game penalizes the use of heavy armor through greatly increased charge time on actions.
| Item | Name | Piece | HP | MP | Def. | Mag. Res. | Str. | Mag. Pwr. | Vit. | Spd. | Add. Eff. | Location | Cost |
|---|---|---|---|---|---|---|---|---|---|---|---|---|---|
|
|
Leather Helm |
Head |
— |
— |
— |
5 |
2 |
— |
— |
— |
— |
Rabanastre |
250 |
|
|
Leather Armor |
Body |
— |
— |
6 |
— |
2 |
— |
— |
— |
— |
Rabanastre |
300 |
|
|
Bronze Helm |
Head |
— |
— |
— |
6 |
2 |
— |
— |
— |
— |
450 |
|
|
|
Bronze Armor |
Body |
— |
— |
7 |
— |
2 |
— |
— |
— |
— |
Barheim Passage |
500 |
|
|
Sallet |
Head |
— |
— |
— |
7 |
3 |
— |
— |
— |
— |
Rabanastre, Bhujerba |
750 |
|
|
Scale Armor |
Body |
— |
— |
9 |
— |
3 |
— |
— |
3 |
— |
Rabanastre, Bhujerba |
800 |
|
|
Iron Helm |
Head |
— |
— |
— |
9 |
3 |
— |
— |
— |
— |
Dreadnought Leviathan |
1250 |
|
|
Iron Armor |
Body |
— |
— |
11 |
— |
3 |
— |
— |
— |
— |
Rabanastre, Bhujerba |
1300 |
|
|
Barbut |
Head |
— |
— |
— |
11 |
4 |
— |
— |
— |
— |
1800 |
|
|
|
Linen Cuirass |
Body |
— |
— |
14 |
— |
4 |
— |
— |
— |
— |
1800 |
|
|
|
Winged Helm |
Head |
— |
— |
— |
14 |
5 |
— |
— |
3 |
— |
2400 |
|
|
|
Chainmail |
Body |
— |
— |
17 |
— |
3 |
— |
— |
— |
— |
Ogir-Yensa Sandsea, Nam-Yensa Sandsea, Zertinan Caverns, Ozmone Plain |
2300 |
|
|
Golden Helm |
Head |
— |
— |
— |
17 |
5 |
— |
— |
— |
— |
Giza Plains (Rains) |
3100 |
|
|
Golden Armor |
Body |
— |
— |
21 |
— |
4 |
— |
— |
— |
— |
Giza Plains (Rains) |
2900 |
|
|
Burgonet |
Head |
— |
— |
— |
20 |
4 |
— |
— |
— |
— |
Golmore Jungle, Paramina Rift |
3800 |
|
|
Shielded Armor |
Body |
— |
— |
25 |
— |
5 |
— |
— |
— |
Equip: Protect |
Henne Mines, Paramina Rift |
3800 |
|
|
Close Helmet |
Head |
— |
— |
— |
23 |
5 |
— |
— |
— |
— |
Barheim Passage, Paramina Rift |
4900 |
|
|
Demon Mail |
Body |
— |
— |
30 |
— |
5 |
— |
3 |
— |
— |
Barheim Passage, Phon Coast |
4700 |
|
|
Bone Helm |
Head |
— |
— |
— |
26 |
6 |
— |
— |
— |
Weak to Holy, 50% Dark resist |
Dalmasca Estersands |
5900 |
|
|
Bone Mail |
Body |
— |
— |
35 |
— |
6 |
— |
— |
— |
Weak to Holy, 50% Dark resist |
5700 |
|
|
|
Diamond Helm |
Head |
— |
— |
— |
29 |
7 |
— |
3 |
— |
— |
Dalmasca Estersands, Tchita Uplands |
7000 |
|
|
Diamond Armor |
Body |
— |
— |
40 |
— |
7 |
— |
5 |
— |
— |
6600 |
|
|
|
Steel Mask |
Head |
— |
— |
— |
32 |
7 |
— |
— |
4 |
— |
Phon Coast, Tchita Uplands |
8100 |
|
|
Mirror Mail |
Body |
— |
— |
44 |
— |
6 |
— |
— |
— |
Equip: Reflect |
Tchita Uplands, Phon Coast |
7500 |
|
|
Platinum Helm |
Head |
— |
— |
— |
35 |
8 |
— |
— |
— |
— |
9300 |
|
|
|
Platinum Armor |
Body |
— |
— |
49 |
— |
7 |
— |
— |
— |
— |
8500 |
|
|
|
Giant’s Helmet |
Head |
150 |
— |
— |
38 |
8 |
— |
— |
— |
— |
Necrohol of Nabudis, Feywood |
11000 |
|
|
Carabineer Mail |
Body |
— |
— |
53 |
— |
8 |
2 |
— |
— |
— |
Feywood, Necrohol of Nabudis |
9600 |
|
|
Dragon Helm |
Head |
70 |
— |
— |
41 |
9 |
— |
— |
— |
— |
Cerobi Steppe, Pharos - First Ascent |
— |
|
|
Dragon Mail |
Body |
100 |
— |
57 |
— |
8 |
— |
— |
— |
— |
Cerobi Steppe, Pharos - Second Ascent |
— |
|
|
Magepower Shishak |
Head |
— |
— |
— |
47 |
11 |
5 |
— |
— |
— |
— |
|
|
|
Maximillian |
Body |
— |
— |
64 |
1 |
9 |
— |
— |
6 |
— |
Cerobi Steppe, Lhusu Mines, drop from Elvoret in the Necrohol of Nabudis |
— |
|
|
Grand Helm |
Head |
— |
— |
— |
50 |
12 |
— |
10 |
— |
— |
Drop from rare monster 26, Tower; Cerobi Steppe, Henne Mines |
— |
|
|
Grand Armor |
Body |
— |
— |
67 |
— |
12 |
— |
— |
— |
— |
Drop from rare monster 38, Helvinek; Henne Mines, Cerobi Steppe |
— |


Mystic Armor
While mystic armor lacks the versatility and HP bonuses of light armor and the defense and strength of heavy armor, it compensates for these deficiencies by offering large bonuses to magick power. This has a marked effect on all magick actions, whether it’s using magicks like Firaga to damage the enemy, magicks like Curaja to heal your party, or magicks like Slowga to enfeeble your opponents.
The magick power statistic also comes into play with certain specialized weapon types (staves, katana, and maces) when determining melee damage, so mystic armors can be indirectly useful in this area as well. Several of them also offer terrific bonuses, like the complete absorption of harmful elements. For example, getting hit with Holy while wearing a White Mask will heal instead of harm. This diversity in mystic gear makes different pieces worth carrying around to give you options in counteracting harmful magicks, should the need arise.
The main drawback to mystic armor is its lack of physical defense when compared to heavy or even light armor. To counter this, consider setting one character up specifically as a “tank,” using the “Decoy” spell to keep the enemy’s attention off the character sporting the mystic armor.
| Item | Name | Piece | HP | MP | Def. | Mag. Res. | Str. | Mag. Pwr. | Vit. | Spd. | Add. Eff. | Location | Cost |
|---|---|---|---|---|---|---|---|---|---|---|---|---|---|
|
|
Cotton Cap |
Head |
— |
5 |
— |
4 |
— |
2 |
— |
— |
— |
100 |
|
|
|
Cotton Shirt |
Body |
— |
3 |
4 |
— |
— |
1 |
— |
— |
— |
100 |
|
|
|
Magick Curch |
Head |
— |
11 |
— |
5 |
— |
2 |
— |
— |
— |
Rabanastre |
200 |
|
|
Light Woven Shirt |
Body |
— |
7 |
5 |
— |
— |
2 |
— |
— |
— |
Garamscythe Waterway |
200 |
|
|
Pointy Hat |
Head |
— |
16 |
— |
6 |
— |
2 |
— |
— |
— |
Barheim Passage, Phon Coast |
300 |
|
|
Silken Shirt |
Body |
— |
8 |
6 |
— |
— |
2 |
— |
— |
— |
Garamscythe Waterway, Nalbina Dungeons |
300 |
|
|
Topkapi Hat |
Head |
— |
20 |
— |
8 |
— |
3 |
— |
— |
— |
500 |
|
|
|
Kilimweave Shirt |
Body |
— |
16 |
8 |
— |
— |
3 |
— |
— |
— |
Rabanastre, Bhujerba |
500 |
|
|
Calot Hat |
Head |
— |
25 |
— |
10 |
— |
3 |
— |
— |
— |
Phon Coast |
700 |
|
|
Shepherd’s Bolero |
Body |
— |
20 |
10 |
— |
— |
3 |
— |
— |
— |
Dreadnought Leviathan |
700 |
|
|
Wizard’s Hat |
Head |
— |
47 |
— |
12 |
— |
4 |
— |
— |
— |
1000 |
|
|
|
Wizard’s Robes |
Body |
— |
32 |
12 |
— |
— |
4 |
— |
— |
— |
1000 |
|
|
|
Lambent Hat |
Head |
— |
36 |
— |
15 |
— |
4 |
— |
3 |
— |
Nam-Yensa Sandsea, Ogir-Yensa Sandsea, The Tomb of Raithwall |
1400 |
|
|
Chanter’s Djellaba |
Body |
— |
35 |
15 |
— |
— |
4 |
5 |
— |
— |
1400 |
|
|
|
Feathered Cap |
Head |
— |
40 |
— |
18 |
— |
5 |
— |
— |
— |
Giza Plains (Rains) |
1900 |
|
|
Traveler’s Vestment |
Body |
50 |
30 |
18 |
— |
— |
5 |
— |
— |
— |
Giza Plains (Rains) |
1900 |
|
|
Mage’s Hat |
Head |
— |
50 |
— |
21 |
— |
5 |
— |
— |
— |
Golmore Jungle, Paramina Rift |
2500 |
|
|
Mage’s Habit |
Body |
— |
50 |
21 |
— |
— |
6 |
— |
— |
— |
Henne Mines, Paramina Rift |
2500 |
|
|
Lamia’s Tiara |
Head |
— |
48 |
— |
25 |
— |
4 |
7 |
— |
— |
Barheim Passage, Paramina Rift, Phon Coast |
3200 |
|
|
Enchanter’s Habit |
Body |
— |
45 |
25 |
— |
— |
7 |
10 |
— |
— |
Barheim Passage, Tchita Uplands |
3200 |
|
|
Sorcerer’s Hat |
Head |
— |
70 |
— |
29 |
— |
6 |
— |
— |
— |
4000 |
|
|
|
Sorcerer’s Habit |
Body |
— |
63 |
29 |
— |
— |
8 |
— |
— |
— |
Phon Coast |
4000 |
|
|
Black Cowl |
Head |
— |
60 |
— |
33 |
— |
5 |
— |
4 |
— |
Dalmasca Estersands |
4900 |
|
|
Black Garb |
Body |
— |
38 |
33 |
— |
— |
6 |
— |
3 |
— |
4900 |
|
|
|
Astrakhan Hat |
Head |
— |
65 |
— |
37 |
— |
6 |
— |
— |
— |
Tchita Uplands, Phon Coast |
5900 |
|
|
Carmagnole |
Body |
— |
40 |
37 |
— |
— |
7 |
— |
— |
— |
Tchita Uplands, Phon Coast |
5900 |
|
|
Gaia Hat |
Head |
90 |
70 |
— |
41 |
— |
7 |
— |
— |
— |
7000 |
|
|
|
Maduin Gear |
Body |
— |
46 |
41 |
— |
1 |
8 |
— |
— |
— |
7000 |
|
|
|
Hypnocrown |
Head |
— |
75 |
— |
44 |
2 |
7 |
— |
— |
— |
Necrohol of Nabudis, Feywood |
8100 |
|
|
Jade Gown |
Body |
— |
53 |
44 |
— |
— |
8 |
— |
— |
— |
Feywood, Necrohol of Nabudis |
8100 |
|
|
Gold Hairpin |
Head |
— |
80 |
— |
47 |
— |
7 |
8 |
— |
— |
— |
|
|
|
Gaia Gear |
Body |
150 |
10 |
47 |
— |
— |
8 |
— |
— |
— |
— |
|
|
|
Celebrant’s Miter |
Head |
— |
90 |
— |
50 |
— |
6 |
— |
5 |
— |
10700 |
|
|
|
Cleric’s Robes |
Body |
— |
70 |
50 |
— |
— |
9 |
— |
— |
— |
10700 |
|
|
|
Black Mask |
Head |
— |
81 |
— |
53 |
— |
8 |
— |
— |
Absorbs Dark element |
Cerobi Steppe, Pharos - First Ascent |
— |
|
|
Black Robes |
Body |
— |
66 |
56 |
5 |
— |
10 |
— |
— |
— |
13500 |
|
|
|
White Mask |
Head |
— |
81 |
— |
56 |
— |
8 |
— |
— |
Absorbs Holy element |
— |
|
|
|
White Robes |
Body |
100 |
66 |
53 |
— |
— |
10 |
— |
4 |
— |
Cerobi Steppe, Pharos - Third Ascent |
— |
|
|
Golden Skullcap |
Head |
— |
107 |
— |
58 |
— |
10 |
— |
3 |
— |
Lhusu Mines, drop from Dead Bones in the Pharos |
— |
|
|
Glimmering Robes |
Body |
— |
120 |
59 |
— |
— |
12 |
10 |
— |
— |
— |
|
|
|
Circlet |
Head |
— |
151 |
— |
60 |
2 |
10 |
— |
— |
— |
Cerobi Steppe, Henne Mines |
— |
|
|
Lordly Robes |
Body |
— |
100 |
61 |
— |
5 |
15 |
— |
— |
— |
Cerobi Steppe, Henne Mines |
— |


Genji Armor
A set assembled from legend and belonging to an ancient man of mystery, Genji armor offers many of the benefits of advanced heavy armor sets with a few twists thrown in. The entire set requires only one license and only one set of this armor exists in the game! During your time in Clan Centurio, you may well come across an opportunity to claim this unique set—don’t let it slip away!
| Item | Name | Piece | def. | Mag. Res. | eva. | mag. eva. | Str. | Mag. Pwr. | Add. Eff. | location |
|---|---|---|---|---|---|---|---|---|---|---|
|
|
Genji Shield |
Shield |
— |
— |
30 |
5 |
— |
— |
— |
Steal during “Battle on the Big Bridge” clan hunt |
|
|
Genji Helm |
Head |
— |
46 |
— |
— |
9 |
4 |
When attacked, automatically counter with weapon in hand. |
Steal during “Battle on the Big Bridge” clan hunt |
|
|
Genji Armor |
Body |
63 |
— |
— |
— |
9 |
3 |
Improves chance to counter. |
Steal during “Battle on the Big Bridge” clan hunt |
|
|
Genji Gloves |
Accessory |
— |
— |
— |
— |
— |
3 |
Improves chance of scoring multiple hits. |
Steal during “Battle on the Big Bridge” clan hunt |


