
Final Fantasy XII: The Zodiac Age Guide Side Events
Other Stuff
Archades Information Exchange
There are residents in the Molberry, Trant, Rienna, and Nilbasse sections of Archades with valuable information. The party can earn Pine Chops by matching two people’s stories. The stories are always contained within one of the four areas. (For example, you won’t find one person in Molberry and the other one in Trant.) Match up everyone within the four areas to earn enough Pine Chops to trade them in for a Sandalwood Chop. With this item, the party can access the Grand Arcade and Highgarden Terrace sections of Archades.
Molberry
| Person #1 | Person #2 | |
|---|---|---|
|
Reminiscing Lady |
|
Family-minded Girl |
|
Avid Traveler |
|
Traveling Gentleman |
|
Daughter-in-Law |
|
Man from Giza |
|
Look-Alike |
|
Look-Alike |
|
Talented Woman |
|
Akademician |
|
Ardent Woman |
|
Ardent Man |
|
Proud Mother |
|
Tutor |
|
Poor Husband |
|
Poor Wife |
|
Would-be Judge |
|
Judge’s Wife |


Rienna
| Person #1 | Person #2 | |
|---|---|---|
|
Philosopher of Cuisine |
|
Dangerous Chef |
|
Lazy Profiteer |
|
Researcher’s Wife |
|
Greenseller |
|
Vegetable Seller |
|
Good Brother |
|
Waiting Woman |
|
Tarot Reader |
|
Happy Novelist |
|
Lucky Man |
|
Romantic Lady |
|
Tour Reader |
|
Bhujerban Lady |


Trant
| Person #1 | Person #2 | |
|---|---|---|
|
Boutiquere |
|
Moneyed Gentleman |
|
Farce-Goer |
|
Girl on an Errand |
|
Music Appreciator |
|
Lutenist |
|
Historian |
|
Perceptive Man |
|
Smitten Woman |
|
Smitten Man |
|
Builder |
|
Artistan Architect |


Nilbasse
| Person #1 | Person #2 | |
|---|---|---|
|
Determined Researcher |
|
Ex-Researcher |
|
Aspiring Starlet |
|
Faded Star |
|
Worried Husband |
|
Materialistic Woman |
|
Senior Researcher |
|
Failed Researcher |
|
Athletic Woman |
|
Avid Reader |
|
Gentleman Onlooker |
|
Eager Crier |


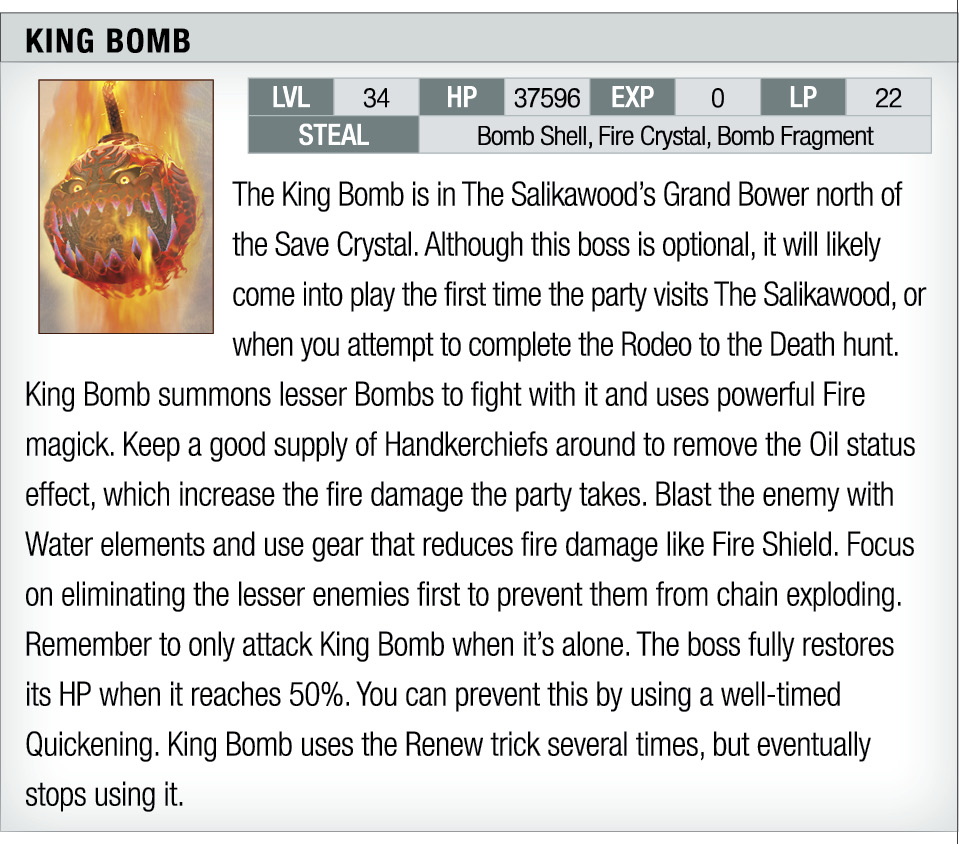
King Bomb –Optional Boss
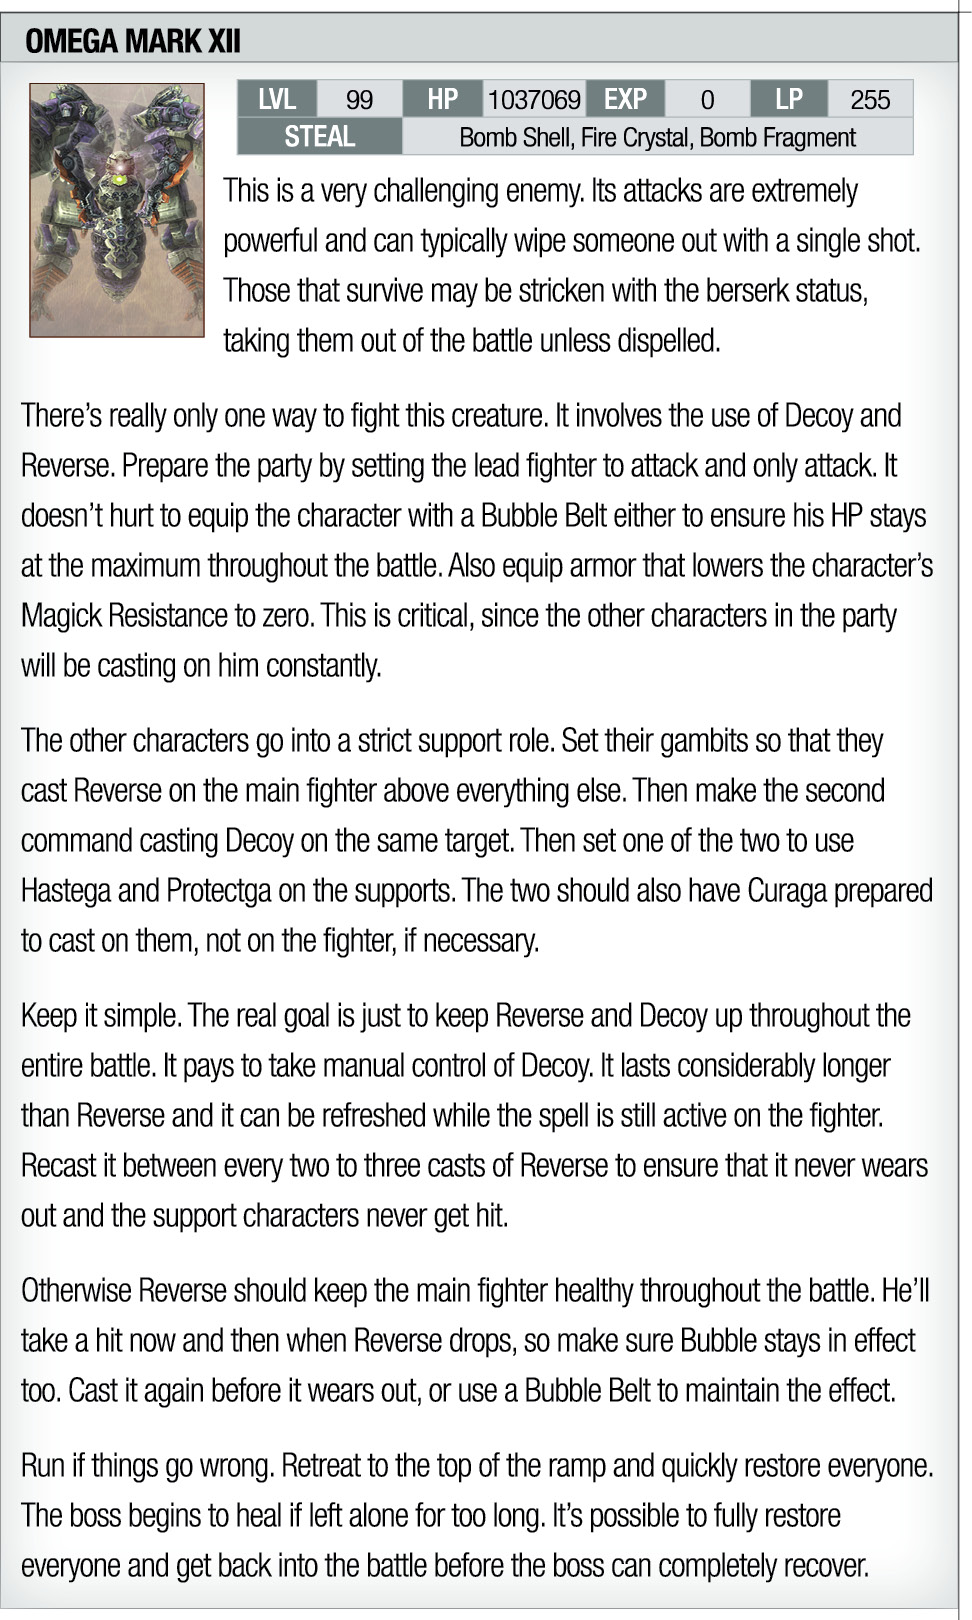
Omega Mark XII Extermination
Reaching Omega Mark XII is almost as difficult as fighting the hidden boss. Begin by diving deep into the dungeon following the same route used to reach Ultima. Take a left turn at the Save Crystal to find the Aquarius Gate Stone (1). Backtrack to the previous section and open Gate Aquarius 1 (2), so the path to the Taurus Gate Stone (5) is open. Forget the Taurus Gate Stone for now and go to the nearby Capricorn Gate Stone (3). Flip the switch and run across the area to Gate Capricorn 2 (4). Backtrack to the Taurus Gate Stone (5) and use the switch. Cross the area again passing through Gate Capricorn 2 to reach Gate Taurus 1 (6). The road beyond Gate Taurus 1 leads to Omega Mark XII.
100 Secrets of FFXII
The following section takes a look at 100 oddities within FINAL FANTASY XII. These are subtle things you may not notice while playing through the game, but they’re worth mentioning. Have a little fun and check them out for yourself.
Event Related
No.01: Thoughts on Nabreus Deadlands
The first time you enter Nabreus (by either approaching the stone gate or by entering the Hall of Effulgent Light), Basch tells your party about the city. Normally he will simply finish with “We should turn back,” but if you visit either places after defeating Judge Bergan but before reaching Archades, a scene in which Ashe talks with Fran about the lost city of Nabreus is added. Furthermore, if you watch Basch’s explanation and then visit one of these locations between defeating Judge Bergan and reaching the Imperial City, Fran will be the one who suggests turning back.
No.02: Getting Through the East Gate
After setting out to defeat the Rogue Tomato, you will be unable to get back inside Rabanastre. When this occurs, hop into the line of people standing in front of the Dalmascan Soldier guarding the door on the left-hand side. Wait in line. When everyone is gone, speak to the Dalmascan Soldier in front of the gate to get back inside. After sitting through the line once, you can get back in again by simply speaking to the Dalmascan Soldier.
No.03: The Rabanastre Palace Map in Old Archades
You’re only allowed into the Rabanastre Palace when the story sends you there near the beginning of the game. If you miss the map on this trip, you can still pick it up later from the Cartographers’ Guild moogle in the Alley of Low Whispers within Old Archades.
No.04: Ktjn’s Welcome to the Clan Hall
If you influence Ktjn to become a guard for Clan Centurio, you can talk to her outside of the Clan HQ. Avoid visiting the Clan Hall until after defeating Judge Bergan and finishing Ktjn’s event and all of the lines that normally belong to the bangaa guard can be heard from Ktjn instead.
No.05: Visitors to the Dalmasca Estersand Outpost
The Outpost in Dalmasca Estersandis visited by different travelers as the story progresses, each taking a rest before continuing theirjourney. Stop by and see who is visiting every once in a while
| Timing | Visitors |
|---|---|
|
After the RogueTomato hunt |
family traveling by chocobo |
|
After escaping Marquis Ondore’s Manor |
bangaa and seeq merchants |
|
After obtaining the Dawn Shard |
family from the empire |
|
After defeating Judge Bergan |
three moogles |
|
After obtaining free flight in the Strahl |
a pair of viera |
No.06: The Buccaneer’s Battalion
After completing the Wraith Hunt, you gain access to a house in the Rabanastre Lowtown area that is used by Deeg, the son of the Jovial Seeq. If you can’t fulfill certain conditions, Kytes, Filo, and other children will gather in this house and form the Buccaneer’s Battalion. You must meet the following conditions for the children to gather:
• Visit the Draklor Laboratory.
• Return the three medallion pieces to Roh’kenmou in Old Dalan’s Place (part of the “Medal of Nabreus” event).
• Return to Charlotte’s Magickery and hand the Moonsilver Medallion to Roh’kenmu (part of the “Medal of Nabreus” event).
No.07: Free Maps
Generally, if you do not own the map of an area, you will need to fill the map in manually by walking to every area displayed. However, if your next goal happens to be displayed during the progress of the story or you can check a petitioner’s location in the Hunts menu, you can view the entire map, including areas you have never visited.
No.08: The Rest of the Story…
A few of the side events end with plot points that keep you wondering what happened, but you can fill in some of these loose ends by doing a little research. After finishing the Pilika’s Errand side event, read Pilika’s diary to find out that her other pet, “Bianca,” is hiding above the shelves in the technick shop. You can uncover another storyline after completing the Earth Tyrant Extermination side event. You can meet up again with Rimzat, the investigator, if you travel to the Hunters’ Camp on the Phon Coast. He will then return home to his empire hoping for a bonus.
Message Related
No.09: Dalan’s Adventure Tips
Dalan provides different bits of advice depending on the progress of the story. If you’re ever unsure about where you should go next, seek him out! The following is a list of the type of advice he gives and when you’re likely to receive it.
| Story Point | Advice |
|---|---|
|
After the new Consul Inauguration Ceremony |
Directions to the Nomad’s Camp |
|
After obtaining the Sunstone |
How to infiltrate the Rabanastre Royal Palace |
|
After escaping the Barheim Passage |
How to deliver the Sword of the Order |
|
After delivering the Sword of Dalmasca |
Balthier’s location |
|
After talking to Balthier in the Sandsea |
Directions to the Lhusu Mines |
|
After escaping the Battleship Leviathan. |
How to rescue Penelo |
|
After obtaining the Dawn Shard |
Directions to Jahara |
|
After Larsa joinsthe party |
About Mt Bur-Omisace |
|
After visiting Mt Bur-Omisace |
Advice onVaan’s worries |
|
After defeating Judge Bergan |
Directions to Archades |
|
After visiting the Draklor Laboratory |
Directions to Giruvegan |
|
After obtaining the Treaty-Blade |
Nothing to say |
|
After the Sky Fortress Bahamut is activated |
Offers to provide advice |
No.10: Legends of Old
Paying 1 gil to the Rabanastran boy in the middle of East End across from the stairs to Lowtown allows you to hear stories about Rabanastre’s history and several other things. The stories change as the game’s story progresses.
| Story Point | Contents | Leaving Line |
|---|---|---|
|
After Reks's arc ends |
The state of Rabanastre after losing the war |
“You’re not worth his time.” |
|
After the close of the new Consul Inauguration Ceremony |
How to get to Downtown Rabanastre |
“He just wanted to talk.” |
|
After Escaping the Barheim Passage |
A summary of the Rabanastre Palace attack |
“He heard this straight from a fake jailer.” |
|
After receiving the Dawn Shard |
The connection between King Raithwall and the demon |
“He guesses it can’t be helped.” |
|
After visiting Draklor Laboratory |
The connection between a mysterious place and a great power |
“To be honest, he’s completely out of stories.” |
No.11: Migelo’s Changing Reaction
After meeting up with Penelo aboard the Leviathan, talk to Migelo in the item shop in Rabanastre to hear how happy he is that she is safe. This conversation can go one of two ways, depending on whether or not you have obtained the Dawn Shard.
Before obtaining the Dawn ShardMigelo is happy that Penelo is safe, but angry at Balthier and the others for dragging her into everything.
After obtaining the Dawn Shard
Migelo scolds you for not coming back sooner to tell him that Penelo is safe.
No.12: War-chief Supinelu’s Health
You can find the Garif warrior, War-chief Supinelu, as an ally in the Haulo Green area of the Ozmone Plains before the party visits Jahara for the first time. Even if he gets knocked out on the plains, he will show up to help your party when they first visit Jahara. If he does happen to perish, you’ll notice that the text changes slightly to match his experiences.
When he is in good shape, he will explain to the Garif clan at the entrance that Vaan and his party have come across the Ozmone Plains. If he is in bad shape after his fight with the monsters, he will be unable to finish explaining his story to the Garif clan.
No.13: The Warrior Chief’s Goodwill
When leaving Jahara and heading for Mt Bur-Omisace for the first time, the Garif war-chief Supinelu allows you to use their chocobo rental once, free of charge. If you do not use the rental and visit the Temple Grounds area of Mt Bur-Omisacefirst, Gurdy will quiz you as to why you haven’t taken a chocobo yet.
No.14: Arrogant Vaan
After getting three Pinewood Chops in Archades, you can ride a taxi in the Nilbasse district. For those who don’t ride the taxi and continue collecting chops until getting the Sandalwood Chop before talking to the Cab Guide, you can hear a special line and view some very arrogant choices.
No.15: Mocked for Teleporting
Use a teleport stone to visit the Tsenoble area of Archades. Talk to the Prideful Boy nearby to be mocked for using a teleport stone.
No.16: Interesting Airship Passengers
Choose the “By leisure craft” option when flying from one of the airship terminals in each region to explore the airship while in flight. There are some nice shops and a variety of other passengers. The passengers depend on the destination.
No.17: The Travel Loving Family
The conversations with the family who loves to travel change along with your progress through the story. In essence, it doesn’t matter which terminal you talk to them in, but there are some differences between the time when you obtain the Dawn Shard and the moment you defeat Judge Bergan. If the family doesn’t appear, try leaving and coming back into the terminal a few times.
| Story Point | Terminal | Conversation |
|---|---|---|
|
After escaping Barheim Passage and returning to Rabanastre |
Everywhere |
Reason mother loves to travel by air |
|
After obtaining Dawn Shard |
Rabanastre |
Chocobo failure |
|
— |
Mother’s makeup failure |
|
|
— |
Bhujerba |
Rivalry with the neighbors |
|
After defeating Judge Bergan |
Everywhere |
Dragon attacking public airways |
No.18: Conversation During Deathgaze’s Attack
You can witness different conversations than usual from the passengers on the regular service airship when Deathgaze appears. Once it shows up, don’t defeat it right away; instead, keep talking to the passengers and escaping to the Private Cabin.
No.19: Changing Merchant Responses
When speaking to the traveling merchant Dyce in Balfonheim Port or to Tetran and Lulucce when first arriving at the Eruyt Village, there are two different sets of lines depending on whether or not you have talked to them before. If you didn’t talk to Tetran on the Leviathan, your conversation starts with a self introduction when meeting him in the Eruyt Village. Conversely, if you didn’t speak with Dyce in the Ogir-Yensa Sandsea or any of his other potential meeting locations, he won’t have much to say when you run into him in Balfonheim Port.
No.20: Changing Conversations
The conversations with the people listed in the following table change a great deal depending on who leads the party. Try making each character the party leader, thentalk to each person.
Characters whose conversations change depending on who is leader
| Location | Person |
|---|---|
|
East Spur Stairs (Garamsythe Waterway) |
Defeated Soldier (vanishes after escaping from the Nalbina Dungeons) |
Characters whose conversations change drastically when Fran is leader
| Location | Person |
|---|---|
|
Crystal Glade (Giza Plains) |
Viera Wayfarer (vanishes after the Gil Snapper hunt) |
|
Pithead Junction A (Henne Mines) |
Wounded Imperial (vanishes after obtaining the Lente’s Tear key item) |
|
Rava’s Pass (Phon Coast) |
Viera Wayfarer |
No.21: Cutting Remarks
Attempting to run away from certain bosses or heading in a different direction from where you should be going can lead to unexpected remarks. At the points shown here, head toward the location specified to enjoy a few acidic remarks at your expense.
| Location | Place to Go |
|---|---|
|
During the Air Cutter Remora fight in Nalbina Fortress |
Aerial Gardens area of Nalbina Fortress |
|
Heading for the Rabanastre Sandsea after hearing Migelo’s request |
Southern Plaza area of Rabanastre |
|
Heading toward the Crystal Glade (The Dry) area of Giza Plains after hearing Masyua’s story |
Throne Road area of Giza Plains |
|
Split off from Balthier and in need of a cab in the Imperial City of Archades |
Alley of Muted Sighs area of Old Archades |
No.22: Chocobo Only Messages
Attempting to enter towns or dungeons while riding a chocobo causes a special message to appear saying that you must dismount or turn back. This message changes depending on the location, as shown here.
Messages displayed when a chocobo won’t enter an area
| Place | Message |
|---|---|
|
Any town or village |
“You must dismount to proceed.” |
|
Dungeon |
“The chocobo refuses to go any further.” |
|
Esper Zone |
“The chocobo is too scared to proceed any further. Something terrifying lies ahead.” |
No.23: No Espers, Please
When one of your party members is accompanied by an Esper, you cannot use airships or chocobos. If you are aware of this and attempt to use them while having an Esper, you can hear different lines. Most of these situations require summoning the Esper outside of the city.
Where to go:
• Try to use a regular service airship.
• Try to ride the Strahl from the airship terminal.
• Try to rent a chocobo from Gurdy (the lines differ depending on whether you are in Nalbina Fortress or another place).
• Try to ride a stray chocobo (the lines differ depending on whether you are trying to ride the chocobo in the Henne Mines or another place).
• Try to borrow the chocobo from the Imperial Soldier in the Ozmone Plains.
System Related
No.24: Distance Walked
A tally of the number of steps taken is kept during the game. The total walked distance can sometimes increase even if you’re not actually using the left stick to move your character. Certain things such as being knocked back when attacked or being pushed around by other characters in towns will increase this number. The distance walked is based on the movements of the party leader.
No.25: Weakened Basch!?
When first entering the North-SouthJunctionduring the escape from the Barheim Passage, Basch obtains a weapon and armor and his appearance changes. At this point, Basch’s parameters are actually recalculated as though he had just gained a level. Oddly enough, his MAX HP and MP could actually decrease due to the slightly random nature of these values.This happens most often if your party members have not leveled up during the Barheim Passage section.
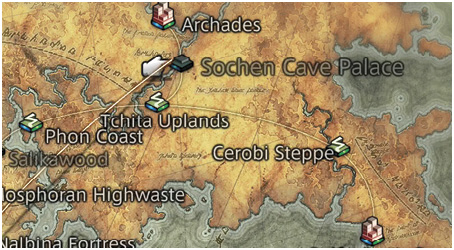
No.26: Hidden Meaning on the World Map
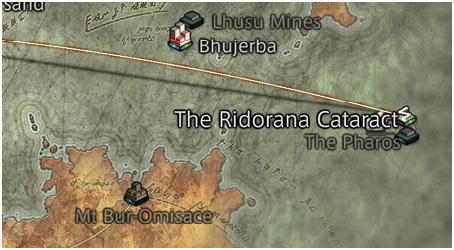
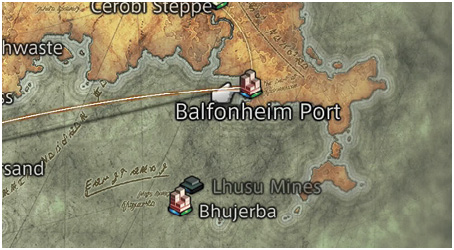
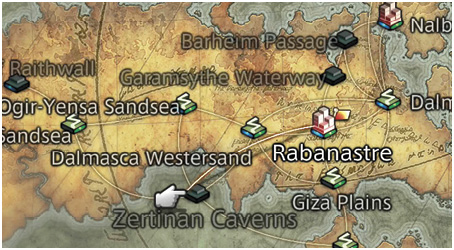
Look closely at the isometric location icons displayed on the world map and you’ll notice that beneath some of them, there are small colored strips. These strips indicate the different possible ways to warp to those locations.
No.27: Status Effects Maximum
Up to 27 different status effects can be applied to a single party member at one time. To do this, you must use items, accessories, spells and even traps.Every status effect aside from X-Zone, KO, Stone, Lure (or Stop) and HP critical (or Disease) can be applied at once!
No.28: Limiting an Area Effect Spell
If after a character has started to perform an action, his target moves into another zone or the equipment of the character performing the action is changed, the action is interrupted and immediately comes to an end. Making use of this allows you to manipulate area effect actions so that they only hit selected targets. For example, say you are facing a Skeleton and a Steeling in battle. Normally in this situation, casting Curaja would damage the Skeleton but heal the Steeling. However, if you make the Skeleton the target of the Curaja and quickly change equipment immediately after the Skeleton has been damaged, the spell is cut short and doesn’t heal the Steeling.
No.29: Altered View
After completing a hunt or immediately after using a Gate Crystal to move to another zone, you cannot move or input commands for a short period of time. However, you can still move around your viewpoint.
No.30: Merits of a Lone Warrior
After more than three characters have joined your party, it’s likely that you always use the maximum of three, right? Well, there are a few merits to only using one character!
When using an area effect action on allies
Area effect actions can target all reserve characters. Therefore, if you have only one battle member, you can heal the remaining five reserve characters with a single Curaja spell.
Avoiding traps
When walking down a narrow passage, other battle members often run into traps. You can avoid this by reducing the number of battle members to one at these points.
Surviving enemy area effect attacks
Some enemies have area effect attacks, such as Zodiark’s Darkja, which they use in a regular pattern or fixed time. Reducing your battle members to one prior to this attack can minimize its effect.
No.31: Maximum Item Drops
The icons for the items dropped by monsters generally disappear after a set amount of time. If there are already 10 icons in the area before that time runs out, when the 11th icon appears, the oldest symbol will disappear instantly.
No.32: Obtaining Trapped Treasure
When a treasure chest appears with a trap underneath it, there is no obvious way to grab the goodies without taking a hit. You could equip the Winged Boots accessory, which provides a constant Float effect, but there is actually an even easier way to get the item. Press lightly on the left stick to walk very slowly toward the chest, then as soon as the field sign “!” appears, press the  button. If there are enemies nearby, make sure the leader’s Gambit is in the OFF position.
No.33: Switching a Targeted Character
When a battle member becomes the target of any kind of action,his name changes to red and he cannot be transferred to the reserve. However, if you use Cure or a potion on a reserve member and then make him a battle member before the action is performed, the character’s name remains white, regardless of the fact that he’s being targeted. You can also return this character to reserves.
No. 4: Name Colors
When Libra is not in effect on anyone in the battle party, the enemy name displayed in the Target Info box appears asblue, yellow, or red depending on the strength of the targeted enemy compared to the current leader. Unfortunately, boss names are always displayed in white, indicating that the gap between their level and the leader is unknown.
No.35: Status Without Libra
Somealliesmake it possible to see more than just a target’s name and current status effects even if no members of the battle party are using Libra. There are certainally characters, such as Bansat and Krjn, who only join the party for specific battles. They will make the enemy’s Level, HP, and Elemental weakness or just Elemental weakness appear without the use of Libra.
Battle Related
NO.36: Guns and Measures
Of all the weapons in the game, only Guns and Measures don't take character stats into account whatsoever. Measures are meant for attacking allies to give them status effects, while Guns are full-on offensive weapons. They get badly outclassed by everything else by the end of the game—unless you're playing on New Game- (See the Trial Mode chapter for more.)
If you've given yourself the challenge of a New Game- playthrough, meaning your characters never level up and gain stats, you will find that Guns are the best options to get through this ordeal.
No.37: Reverse Battle Chain
A battle chain ends when you defeat a different type of enemy from that defeated previously, but at that instant another chain actually begins! A hidden, “Reverse Battle Chain” exists, linked by continually defeating different types of monsters. A high Reverse Battle Chain slightly increases the chances of items being dropped, but has few real advantages compared to a regular battle chain.
No.38: Move When IMMOBILIZED
A character affected by the Immobilize status may not be able to move by himself, but he can still be moved. If the affected character is pushed by another character or knocked back by enemy attacks, he can end up outside of the center of action. Use an attack with a lunging motion to get back into the action.
No.39: Wait for Us!
The only player you can move directly is the leader, while the other battle members follow. So what happens in situations where the leader runs far away while the other members are busy fighting or can’t move for some reason? When the party leader is far away, the other battle members’ running speed increases by 1.25 times, so they will eventually catch up.
No.40: Better Loot with Omega Mark XII
After defeating Omega Mark XII, there is a very small chance that it will drop a Mythril Sword. However, you can improve this chance by simply raising your Chain Level prior to the fight. By doing so, the item drop rates improve even thoughsingle-mark Omega Mark XII should be unaffected by Chain Level.
No.41: Battle Chaining Allies
A battle chain occurs not only when you defeat monsters, but also when you defeat allies! In some ways, this chain is even easier than a monster chain because you only need to go to one otherzone for an ally to reappear in the same spot. Thus, you candefeat the ally, go to another zone, come back,defeat the ally, and repeat the process over again.You can even attack different allies to build up a chain as long as they’re of the same race!
No.42: Magick and Action Timing Effects
The amount of damage or healing caused by an action along with whether or not status effectstake hold are determined the instant the action reaches the target. Knowing this, you can do a couple of things to maximize your defensive prowess. First, if a character with theSerenity license grid unlocked (Serenity increases Magick Power when HP are full) uses Curaja to heal all three battle characters,your partybenefits the most by selecting the casteras the target of the spell. In this case, Curaja first heals the HP of the target character, bringinghis HP back to full and increasing the amount of HP restored on subsequently cured characters.
You can also use attack timingknowledge to protect all of your characters from an enemy area effect status with a singlenullification accessory. For example, if the enemy uses an ability such as Disable, select the targeted character first and equip the Black Belt. As soon as “IMMUNE”appears, remove the Black Belt from the targeted character and equip it on the next closest character. Finally, equip the Black Belt onto the final party member to complete your defense.
No.43: Zero Damage Indicators
If your target is in a counter-attack position, or possesses an attribute that absorbs the attack, their HP will recover by the amount of damage they would normally have received and the attack value will be displayed in green numbers. If absolutely no damage is received or recovered, the number “0” is displayed in red. If an opponent is using “Magic Barrier” or some other neutralization effect, attacks will result in an “IMMUNE” message. If the enemy neutralizes an Esper or Quickening attack, it will also result in a red colored “0”.
No.44: Elemental Damage and Status Effects
Attacking a monster with an elemental weapon when the foe can nullify or absorb that element will not cause any damage. However, if the weapon has an additional effect, it may still occur at the fixed rate, regardless of the damage being absorbed or healed.
No.45: Countering Distant Enemies
A counter enables a character to strike back against an attacking enemy. You may think that you can only counter a ranged attack if the attacking enemy is nearby, but it’s actually possible to counter even the most distant enemy. For example, equip a Hand-bomb to an ally and attack another ally with a Sword at long range. If a counter occurs, you will be treated to an awesome display of martial arts.
No.46: Continuous “Numerology”
The area effect technick Numerology is a special attack that doubles in strength each time it is used, so long as it does not miss. Even though there is an initial damage of 1 (2 to surrounding enemies), after 17 consecutive hits the damage will reach 65,536 (131,072 to surrounding enemies). The 18th attack always misses and returns the damage to 1.After 17 successful hits, if you then use Numerology on an enemy with the "Safety" Augment, they will nullifythe damage, but you still have a 13% chance of causing 131072 damage to surrounding enemies.
No.47: Magick Without MP or a License
Normally, you need to purchase a magick spell and learn the appropriate license before you can use it. However, there is a way to use Black Magick without fulfilling either of these conditions. The method is simple: use the technick Shades of Black. This technick allows magic to be used regardless of whether you have the license or own the spell.
No.48: Confusion + Invisibility = Total Chaos
Confused characters will attempt to “fight” an allied character (including themselves). But what happens if all battle members just happen to be Invisible? Unable to find anything to turn their confusion against, the poor character runs off randomly.
No.49: Faulty Concurrence?
A Concurrence attack performed after a Quickening will damage all of the enemies around the initially targeted enemy. However,this isn’t the case when fighting a boss with minions. If theQuickening damage kills the boss, the battle will end before the surrounding minions are defeated and you won’t receive the LP for them.
No.50: Keeping InactiveCreatures Inactive
You can damage inactive enemies by the surroundingConcurrence damage from a Quickening aimed at a different monster without becoming active. You can use this strategy to defeat powerful inactive monsters, such as the Wild Saurian, even when your party is still quite weak.
No.51: Repeatedly Steal from an Enemy
Since you can only steal once from each enemy, after Steal is successful you normally need to go at least two zones away and cause the enemy to respawn before you can steal again. Bosses and marks are an exception to this rule, though.Simply go into a neighboring area to steal from them again. Near the start of the game you can use this technique to repeatedly steal the Glass Jewel (which can be sold for 115 gil) during the Wraith hunt.
In addition, there are some bosses and marks that you can steal from multiple times without having to go to another Zone.
| Enemy | Conditions |
|---|---|
|
Rook x4 |
Defeat a Rook (only after defeating first Rook) |
|
Dr. Cid (2nd fight) |
Reduce HP to less then 50% |
|
Gabranth (1st fight, 2nd fight) |
Reduce HP to less then 50% |
|
Gilgamesh (1st time) |
Each time HP reduced by 20% of MAX (can steal once at 80%, 60%, 40% and 20%) |
|
Gilgamesh (2nd time) |
Each time HP reduced by 20% of MAX (can steal once at 80%, 60%, 40% and 20%) |
|
Shadowseer |
When enemy calls Pandemonium |
Monsters
No.56: Lv. 99 Red Chocobo
Red and Black Chocobos normally roam the Haulo Green area of the Ozmone Plains. However, if you meet a specific set of requirements, a chocobo called Lv. 99 Red Chocobo may appear. When defeated, this titan can drop valuable items such as a Ribbon or Gemsteel.
After gaining free use of the Strahl,travel to the Ozmone Plains area and defeat six or more Red and Black Chocobos,thenenter or reenter the Haulo Green area. Upon arrival there is a 1 in 256 chance for the Lv.99 Red Chocoboto appear. If the enemy does not show up, simply go two zones away (Dagan Flats) and return. Keep in mind this can take a very long time.
No.57: One-Time Attacks Repeated
The Flowering Cactoid’s Thousand Needles or Feral Retriever’s Balance are attacks that these monsters should only be able to use once per battle. However, if you move far away from that enemy, or if all current battle members are knocked out after these attacks have been used,the enemycan use the attack again.
No.58: Exp from Allies
Fundamentally, there are no merits for defeating the allies who fight with you on the field, such as the Dalmascan soldiers. However, it is possible to garner a few experience points and gil if you defeat certain allies at the following levels.
| Ally | Location | Party Lv | EXP |
|---|---|---|---|
|
Rabanastre Watch |
4 |
20 |
|
|
5 |
— |
||
|
Bangaa Hunter |
Giza Plains (The Dry) |
4 |
— |
|
Garif Hunter |
22 |
— |
|
|
Seeq Fisher |
Phon Coast |
37-38 |
145-290 |
No.59: Level 99 Monsters
Some monster actions, such as Cannibalize or Mystery Waltz, raise the monster’s level. Furthermore, it is possible for monsters with these actions to use them enough times to reach level 99. Note that the Wild Saurian only consumes nearby wolves while in its inactive “friendly” state.
No.60: Pushy Chocobos
Vaan and the others can push monsters around by walking into them, but some heavier monsters (such as the Clay Golems or Slaven Wilders) only move a small bit. To move them further, simply hop onto a chocobo. When riding a chocobo,it’s possible to push around all enemies—no matter how heavy they are.
No.61: Overcome Orthros’s Dislike of Men
Elite Mark Orthros has an affinity for women. Normally, he won’t appear unless you have a party consisting of nothing but women. As long as Fran, Penelo, and Ashe are your main party members, bringing either Larsa or Reddas along as a guest member won’t cause Orthros to hide.
No.62: Monsters’ Natural Healing
Monsters that have lost sight of your party gradually recover HP over time. Even monsters such as Hell Wyrm and Yiazmat, which won’t regain HP when the party exits the zone,aren’t exceptions to this rule.
No.63: Decoy and the Ba’Gamnan Clan
Of all the monsters in the game, the only ones incapable of nullifying Decoy status are the Ba’Gamnan Clan (Ba’Gamnan, Bwagi, Gijuk, and Rinok). Cast Decoy on an ally in Reflect status and bounce the spell onto one of them to get things started. In theory, they should now begin to tear each other apart, right? Wrong. They will continue their attack as though nothing has changed. On top of this, your own battle members ignore their Gambits and attack the Decoy enemy.
No.64: Unique Mandragora Endings
You will fight five monsters called the Mandragoras in the Hall of Lambent Darkness area of the Sochen Cave Palace. You can defeat them in any order, but depending on the one you defeat last, the beginning of the event scene that plays immediately after the battle changes slightly. You can see each of the different Mandragoras’ unique personalities depending on which of them goes down last.
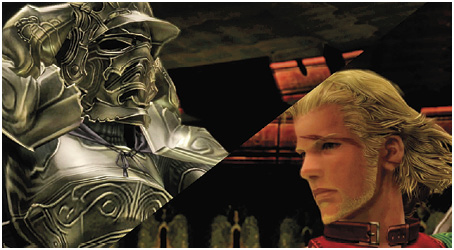
No.65: Basch and Gabranth
The second battle with Judge Gabranth takes place in the Central Lift area of Sky Fortress Bahamut. When his remaining HP falls below 50%, he responds by speaking a few lines.The content can change depending on whether or not Basch is in your party.
No.66:Gilgamesh and Enkidu’s Bond
The Elite Mark Gilgamesh spouts some bold lines when his HP fallsbelow 80%,each time you fight him. If you haven’t defeated Enkidu at this point, then an additional line is added.
No.67: Gilgamesh’s Weapon Collection
Many of the weapons used by Gilgamesh are replicas of those from previous FINAL FANTASY games.
Orichalcum Replica
A replica of the Orichalcum, this is a short sword that has been a regular in the FINAL FANTASY series.
Excalipur
A replica of the Excalibur, the moon crest on the hilt is based upon the design from FINAL FANTASY V.
Excalibur XII
This is a replica of the Holy Sword Excalibur. This one is also based on the FINAL FANTASY V model, but this one has a sun emblem on the hilt.
Steel Cutter Replica
A replica of the Steel Cutter blade used by the summon monster Odin. It has a blue-black blade with an unnerving face set into it.
Buster Sword Replica
A replica of the Buster Sword, this mighty blade was used by Cloud, the main character from FINAL FANTASY VII.
Gunblade Replica
This is a replica of the Gunblade used by Squall in FINAL FANTASY VIII. There is a small chocobo printed on the blade.
Brotherhood Replica
This is a replica of the Brotherhood sword used by Tidus in FINAL FANTASY X.
Legendary Sword
A replica of the Legendary Sword found in Dragon Warrior I – III.
No.68: Knock Back
When using the Attack command,“knock back” can sometimes occur.This means that the enemy is pushed back a little after being hit. If the knock back occurs on the blow that kills an enemy, you will seea special animation of the enemy being sent flying. This does not work on monsters larger than a human,though.
No.69: Panicky Malboro Minions
When fighting the Wild Malboro mark, ignore its smaller minions and insteaddefeat the Wild Malboro first. With their leader history, the other Malboros fall into a panic and simply stop attacking.
No.70: Bestiary
You can view all monsters you have previously defeated in the Clan Primer Bestiary. There is background and trivia about the monster, as well as Ivalice at large. You can unlock extra info by defeating more of that type of monster.
Items
No.71: Victory Celebrations
After defeating a tricky boss or mark, you will hear the traditional FINAL FANTASY battle victory music. When you hear this sound, watch what your character’s reactions very closely. They will celebrate with their favorite weapons.
No.72: Lost Note and Secret Stash
In the Phase 2 Digpoint area of Henne Mines, you can find aDiscarded piece of paper. This is actually a fragment from the diary of one of the workers in the mine.Read it to learn that a worker’s secret stash is hidden in the mine. The hint states to go“around 4.” In other words, go somewhere near the Special Charter Shaft area, which looks like a “4” on the map. Search around hereto find thetreasure ofBacchus’s Wine x3 and Megalixir x2.
No.73: Mega Fang Damage
The Rime Fang, Soleil Fang, and Lightning Fang items normally deal damage equivalent to 25% of the target’s Max HP. Depending on how it is used, though, it is possible to deal damage that is greater than 100% of the target’s HP. To do so, equip a Pheasant Netsuke and a weapon that strengthens the attribute of the Fang you’re using, then attack the target’s weak point. Doing so deals more damage than 100% of the target’s HP and allows you to defeat it in a single attack.
No.74: No Mist Charge Recovery
If one of your characters has the Goddess Tear or Dawn Shard equipped and a different character triggers a Quickening, the character with the MP 0 item equipped cannot participate in the Quickening combo. During the Quickening combo attack, these items deny those characters the ability to select the Mist Charge command to prepare their Mist Charges for attack.
No.75:The Unlucky Merchant
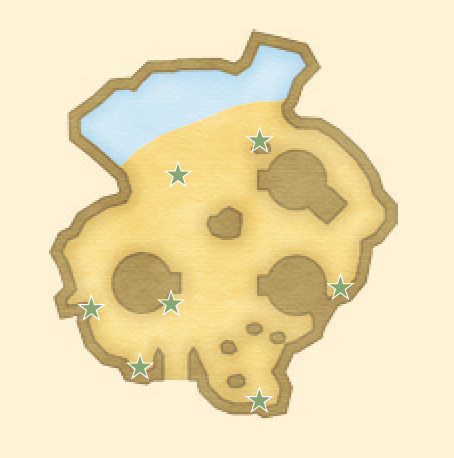
You can find an Unlucky Merchant in the Outpost near Dalmasca Estersand. This merchant’s chocobo loves to scatter gil around, and has buried all of his profits around the camp. The “glittering things” scattered around the outpost are actually his profits. Follow the map here to obtain all 17 gil.
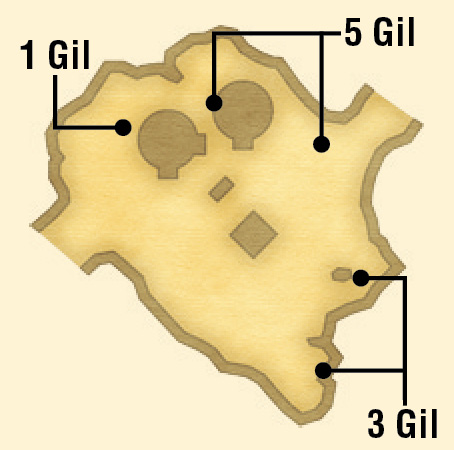
After the Inauguration Ceremony, this merchant will move to the South Bank Village part of the Dalmasca Estersand. Even at this new location, his chocobo will bury his profits in the ground. After speaking to the merchant, a “mysterious glint” will randomly appear in one of the locations marked on the map shown here. Each time you leave the zone and return, the random item will reappear.
No.76: Overpriced Bazaar Goods?
Among the items you can obtain through the Bazaar are several items that you can find in the shop. In most cases, it is cheaper to obtain these through trading. These include the "Soul of the Fire Bird" which costs 980 gil more than just buying the 25 Phoenix Downs included in the package, as well as the "Flask of Viscous Liquid," which is a Hi-Ether overpriced by an alarming 10,890 gil!
No.77: Attack Motion and Stance Variety
While each character is locked into two Jobs per game, everyone is capable of using any weapon. If you make a second run through, or simply save before assigning jobs, pay attention to how each character holds their weapons. Everyone has their own different stance and style!
Variety
No.78: A Very Familiar Face
Montblanc, the head of Clan Centurio, is actually a well-known denizen of the world of Ivalice! He first appeared before FFXII in Final Fantasy Tactics Advance, which may not explicitly be an official part of the tales of Ivalice. After Final Fantasy XII, he returns and then continues to run Clan Centurio in Final Fantasy Tactics A2: Grimoire of the Rift, and these further adventures are definitely official. Vaan and Penelo can even join Clan Centurio and Montblanc once again in that game!
No.79: A.K.A (Changing Names)
When you approach characters with whom you can converse, their names appear above their head. For some characters, however, this name will change. In the Highgarden Terrace area of Archades, for example, one of the characters named Archadian Gentry turns out to be the owner of the Hunt Club after you talk to him, and his name switches to Hunt Club Owner.
No.80: The Jovial Seeq’s Lost Laugh
There is a store near the other side of the civilian house in the North Sprawl of Rabanastre Lowtown that resembles a weapons shop. Inside you will find a seeq with the name Jovial Seeq. As his name implies, he is almost always laughing loudly. However, if you visit him at a certain time, he won’t be laughing. This occurs after you have escaped from the Barheim Passage, but before you have completed the Waterway Haunting hunt. The hiding child mentioned by Milha, the mission’s client, is actually Deeg, this seeq’s son. After you complete the Wraith hunt, his spirits pick up once again.
No.81: Reunite with Jinn in Rabanastre
During the story, the rainy season first comes to Giza after you obtain the Dawn Shard. If you go to theSouthern Plaza section of Rabanastre at this point, you can meet Jinn. Talk to him and he explains that the rainy season has come, and that there is no one in the nomad settlement.
No.82: Gurdy Takes to the Sky
After obtaining the Sword of Kings but prior to defeating Judge Bergan, the chocobo rental owner Gurdy disappears from theSand-strewn Pass in the Mt Bur-Omisace. Rotate the camera down and look up into the sky to find out where she is!
No.83: The Moogles Eight
The Moogles Eight are doing their dance near the bridge at Old Archades. What you may not notice, though, is that as you examine the dancing moogles, the camera cycles between three different viewpoints beginning with the view from above and in front, switching the view from above and behind, and finally getting down at their level for a close-up view.
No.84: The Face of Imperials
Find the Imperial Soldier picking over the wares in front of the weapon shop in the West Ward area of the Nalbina Fortress. Although Archadian Soldier’snormally have their visors down, this one’s visor is wide open. Rotate the right stick to see his face.
No.85: The Chocobo Who Loves People
Chocobos in rental pens normally ignore Vaan and his friends. However, the friendly chocobos found inthe West Barbican area of the Nalbina Fortress are an exception to this rule. If they notice Vaan and his friends, they will move over to them.
No.86: Psychedelic Cúchulainn
Cúchulainn has a crazy special effect that gives him his unique look. Summon him and cast Vanish on him to make him look even crazier!
No.87: Pedestrians and Espers
If you are in Summon Beast mode in the West Barbican area of the Nalbina Fortress, pedestrians may bump into the Summon Beast. You would expect them to go flying away, but they actually just continue on their way.
No.88: Viewing the Zone Beyond
Approach almost any zone break line (the dotted line that separates two zones) and you’ll notice that the area on the other side is nearly as detailed as it looks after passing over the zone line. Also, pay attention to the zone line in areas where townspeople are traveling in between zones. You can watch them travel to the other side and actually catch up with them if you follow them through the zone!
No.89: Dangling Moogles
Moogles across the land have a variety of cute poses. Of special note are the moogles hanging from the sides of shop counters and banisters. These little guys are sometimes hanging just a few feet from the ground, but they’re kicking their legs as if their life depends on it.
No.90: Save 1100 Gil!
After escaping Rabanastre and entering the Garamsythe Waterway, Balthier and Fran join the party, bringing with them Cure, Fire and First Aid. As such, you can obtain these for free at this point in the story without purchasing them from a shop.
No.91: The Ultimate Combo!
If you select Attack with certain weapons, a combo may occur where multiple attacks are performed one after another. The maximum number of combo attacks is 12, and if all of themconnect, the final attack count number will be displayed larger than usual.
No.92: Changing Stopping Animation
Press the left stick for less than three seconds, then release it. You’ll notice that your party leader stops suddenly in his tracks. Now try pressing on the left stick for longer than three seconds and releasing it. This causes your lead character to bend a bit at the knees upon stopping.
No.93: Airship Crew
If you select "By Leisure Craft" when flying, the names of the crew are announced upon take off. The crew’s names are fixed for each possible route. The names of the Captain and Chief Steward are often taken from the names of the cities between which the routes fly. Also note that the coloring of the female crews’ uniforms are also different, depending on the route.
No.94: SECRETS OF THE GREAT CRYSTAL
Each zone in the Great Crystalhas a peculiar name. Although they may appear meaningless, each name has a meaning that helps to identify where in the Great Crystal that zone is located.
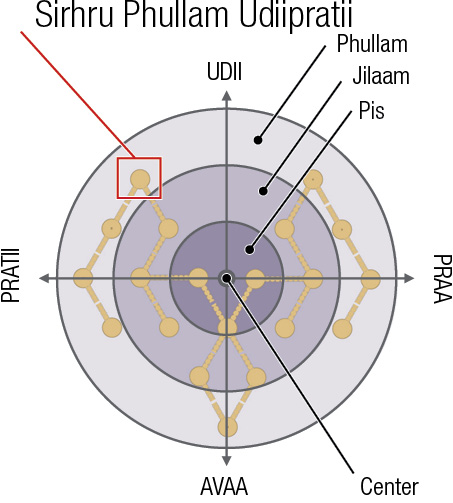
Let’s take the Sirhru Phullam Udiipratii, as an example. “Sirhru” indicates the layer. Use the following chart to determine that Sirhru means Silurian, which indicates that this area is on one of the higher layers away from the core. The “Phullam”section of the name corresponds to Phloem, which indicates the distance from the core (Phloem is the furthestpossible distance away). Lastly, “Udiipratii” indicates North (Udii)and West (Pratii), showing that this area is Northwest from the centre.
| Name | Meaning | Great crystals defined |
|---|---|---|
|
Peak |
Peak |
Crystal Peak is obviously the top. Kanbhru, Vikaari, Sirhru, Dhebon, Kabonii, Bhrum, Trahk and Jula are all named after prehistoric periods, with the oldest period coming highest inside Great Crystal. Crystal Core is obviously the central core. |
|
Kanbhru |
Cambrian |
|
|
Vikaari |
Ordovician |
|
|
Sirhru |
Silurian |
|
|
Dhebon |
Devonian |
|
|
Kabonii |
Carboniferous |
|
|
Bhrum |
Permian |
|
|
Trahk |
Triassic |
|
|
Jula |
Jurassic |
|
|
Core |
Core |
|
|
Prama |
Ground |
Crystal Ground is where the teleporter links you with Giruvegan. |
|
Pis |
Pith |
Pis, Jilaam and Phullam indicate the interior, central part, and exterior part of a plant, and are used to show distance from the core inside Great Crystal as indicated on the nearby diagram of the Sirhru region |
|
Jilaam |
Xylem |
|
|
Phullam |
Phloem |
|
|
Udii |
North |
Udii, Avaa, Praa and Pratii indicate North, South, East and West direction in relation to the core. |
|
Avaa |
South |
|
|
Praa |
East |
|
|
Pratii |
West |
|
|
A |
Up |
A, Dha and Vikaari are used to indicate where a teleporter will take you. “A Vikaari” means move up a layer and Dha Vikaari means to move down a layer. |
|
Dha |
Down |
|
|
Vikaari |
Shift |
|
|
Sthaana |
Set |
Sthaana indicates a location with a wall control switch. |
No.95: A Unique Scene for Ashe
After defeating Gilgamesh, he sneaks up and tries and take the legendary sword that is stuck in the ground. When this occurs, the current party leader senses Gilgamesh’s presence and turns around, then gets a puzzled look on his face after turning back. If Ashe is your party leader, she acts differently than the others. Ashe places her left hand on her chin, then tilts her head as if thinking.
No.96: Special Boss Rewards
After defeating certain monsters (mainly bosses), Montblanc passesalonggil and thanks from across the world that have been entrusted to him by individuals or organizations to hand out as a reward for a job well done.
| Monster | Thanks Received From… |
|---|---|
|
Flan x4 |
Rabanastre Rulers |
|
Firemane |
Rabanastre Healers |
|
Mimic Queen |
Rabanastre Girl |
|
Demon Wall (Front) |
Ancient Ruins Study Group |
|
Demon Wall (Interior) |
Ancient Ruins Study Group |
|
Earth Tyrant |
Merchant Caravan |
|
Tiamat |
Henne Miners |
|
Elder Wyrm |
Viera Guard |
|
Vinuskar |
The Platinum Guild |
|
King Bomb |
Salikawoods’ Patrol |
|
Ahriman |
Barkeep |
|
Mandragora |
Mandragora Friends Association |
|
Hell Wyrm |
Montblanc |
|
Rafflesia |
Garif Warrior |
|
Daedalus |
Montblanc |
|
Tyrant |
Montblanc |
|
Hydro |
Clan Buckaboo |
|
Humbaba Mistant |
Nabreus People |
|
Fury |
Nabreus People |
|
Belias |
Minstrel |
|
4 Espers |
Minstrel |
|
8 Espers |
Minstrel |
|
All 13 Espers |
Minstrel |
No.97: Different Airship Scenes
Both the Strahl and airship terminal methods of transportation include a special takeoff event that lasts just a few moments. Depending on certain factors, these events will vary.
Strahl
Takeoff is shown from three random camera angles. Also, weather affects the takeoff view. If it’s raining, the sky will seem cloudy and you can watch the rain bounce off the Strahl as it takes to the skies.
Airship Terminal
When flying out of an airship terminal, you may notice that different people on the ground see you off depending on which terminal you’re leaving from.
| Departure | Departure friends |
|---|---|
|
Rabanastre |
Bangaa, hume male, hume female |
|
Bangaa with a box on his shoulder, Imperial |
|
|
Bhujerba |
Hume male, 1 or 2 moogles, Bhujerba guide |
|
Archades |
A hume family (father, mother, and son) |
|
Balfonheim Port |
2 pirates, hume male waiting for luggage |
No.98: Moogling Attendants’ Special Actions
In Rabanastre, there is a useful teleport service run by a Moogling Attendant. When you first speak to them, they look up in excitement as you make your selection. Upon choosing a location, the Moogling Attendant bows down, then quickly jumps up, and waves goodbye. When you finally arrive at your destination, the Moogling Attendant there gives you another wave of introduction.
No.99: Chocobo Riders
Vaan stands in for your entire party when in a town or city, regardless of who your party leader is. However, this isn’t the case when your party is riding chocobos. Select any party member as your leader and hop onto a chocobo. You’ll notice that the lead party member you chose is riding the Chocobo instead of Vaan. Once you’re on a chocobo, you can’t change your lead party member until you hop off the chocobo.
No.100: Fiery-eyed Chocobos
Hop on a chocobo and press the button to sprint. Swing the camera around to the front and stare into the giant bird’s eyes. They’re a glowing red color!
BONUS:
Certain zones that had scrambled or hidden minimaps may now be revealed with the map overlay (L3). This is extremely useful in the Pharos challenge where the player must choose between losing Attacks, Magicks, Items, or Minimap.