
Final Fantasy XII: The Zodiac Age Guide Gambits
Gambits
Gambits are unique to Final Fantasy XII. They introduce a simple way to guide your party in combat without having to micromanage every encounter. A gambit is a programmed command that instructs a character to react automatically in a predetermined manner when faced with a specific situation. Think of it as a user-determined AI (Artificial Intelligence). Gambits allow you to take as much or as little control in each battle as desired. A carefully crafted set of gambits can handle most battles against common enemies. Bosses and rare monsters often require a more hands-on approach.
Gambit Building 101
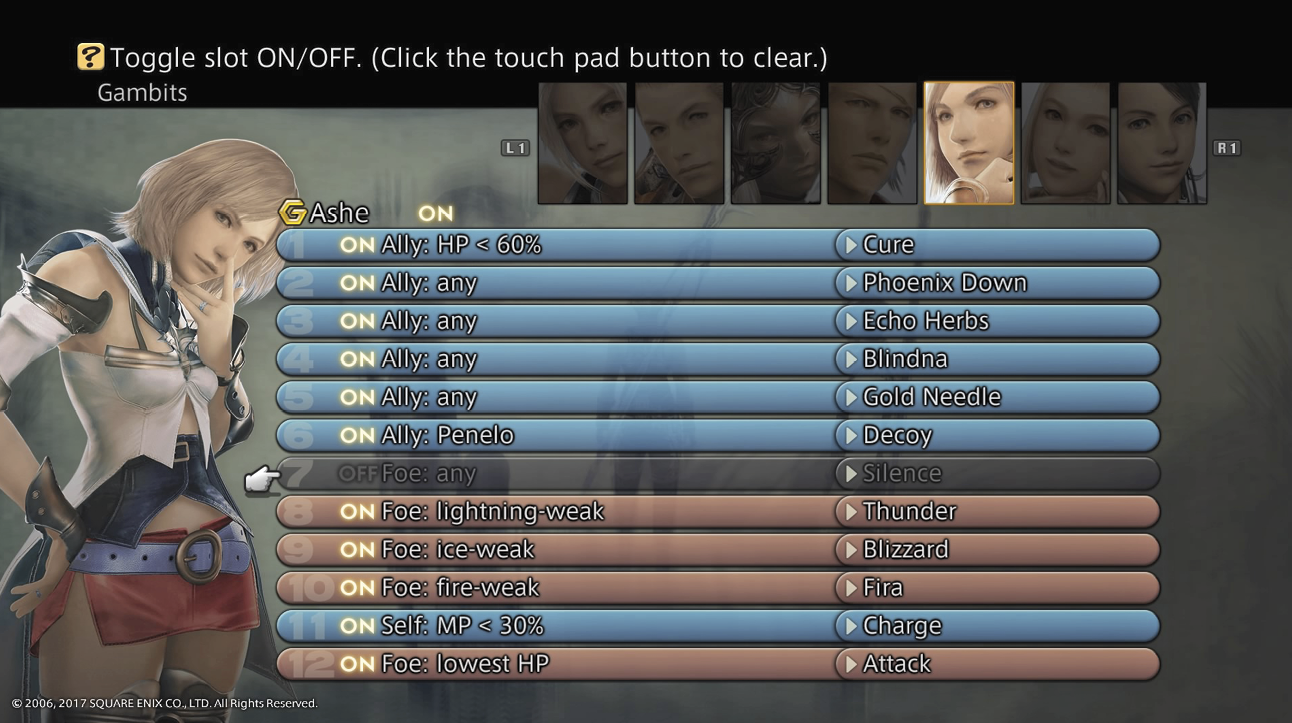
Each gambit consists of two separate parts: a condition and a reaction. Thus, the character assesses the situation and reacts in the programmed manner. Condition gambits focus characters on either foes, allies, or themselves. You can use them with nearly any learned command from magicks, technicks, and items. The adventure begins without gambits being front and center, but shortly after events involving Vaan, Fran, and Balthier, a gambit tutorial will occur and then gambits will be available for editing from the menu. A basic set of gambit conditions and actions are included for free, indicated in the following tables by the lack of shop prices. After this, gambit shops throughout the land will have other gambits for sale.
For example, you can attach simple commands like “Attack” to gambits such as “Foe: nearest visible” to automatically initiate combat whenever a hostile creature wanders within range. Later on, the commands become more complex and specific as magicks like Dispel or technicks like Souleater are added to the equation. For example, a player can dictate that a character always casts Dispel whenever the “Foe: status = Protect,” or use Souleater whenever “Foe: character HP > 90%.”
Gambit Palette Examples
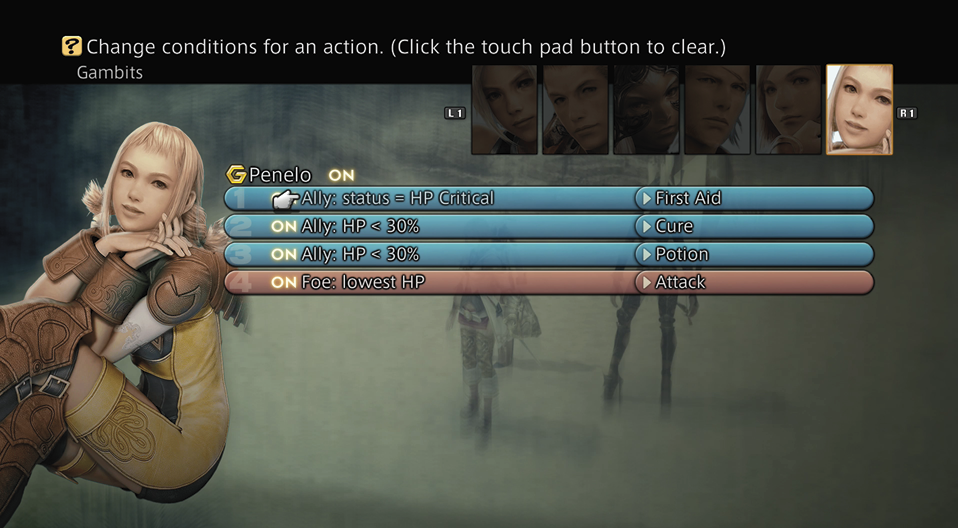
This is a basic example of an early-game gambit palette. Even with characters assigned jobs focused on damage dealing, like Foebreaker or Black Mage, you’ll want some sort of focus on stability prioritized over attacks. Characters can’t dish out pain when they’re KO’d, after all. Here, if an ally is suddenly reduced to less than 20% of max HP, Penelo will react with First Aid. If an ally is reduced to between 20-30% HP, Penelo will first react with the Cure spell; if Penelo lacks enough MP for Cure, she’ll instead go down the list to using a Potion. If no allies require healing attention, she’ll proceed to her attack gambit.
When choosing between magick-curing or item-curing gambits, and deciding which to put at a higher priority, note that potions are faster. So, if you flip the order of Cure and Potion here, Penelo may be able to quickly restore a desperate ally’s HP before the enemy lands a final blow.
First Aid is also faster than Cure spells, but the amount of HP restored may not be enough to get the victim entirely out of immediate trouble. But either way, First Aid and Potion gambits overcome lengthy spell-casting times in desperate situations.
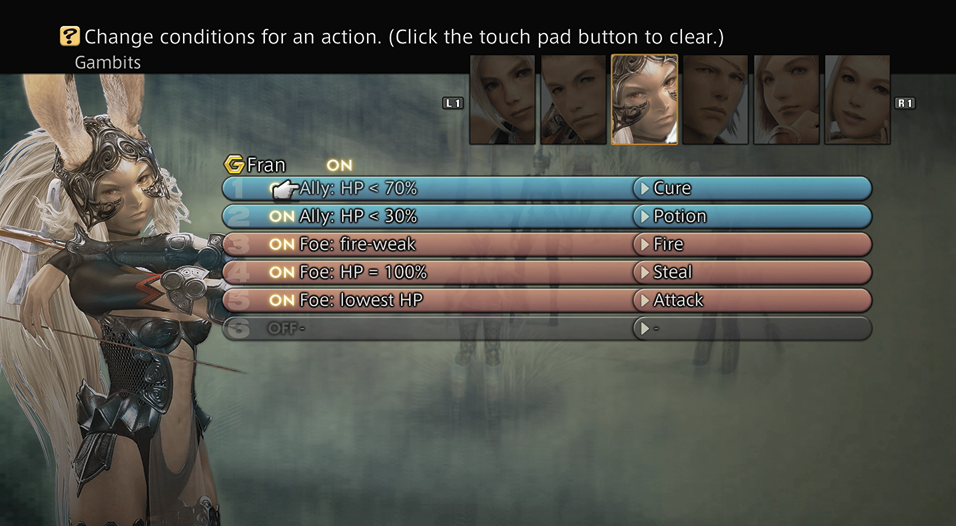
This is also an early- to midgame palette that does some interesting things. Here, Fran has a varied approach to both healing and damage dealing. Her first priority is to use Cure to restore any allies who are hurt just a bit. Topping off characters who lose some, but not most, of their Health Points keeps the party more stable, and helps keep licenses activated that confer some bonus at full HP. If a friend is badly damaged, Fran will use a Potion instead, which is faster. Often, this approach will lead to Fran using a Potion to temporarily relieve an ally near death; she’ll then follow up with a Cure spell to get them into a comfort zone.
If allies are stable, Fran checks for any fire-weak foes, then nukes them. The element-weak gambit conditions are terrific for Black Mages and Red Battlemages, who can precisely sling their MP around to inflict maximum damage on susceptible foes. (“Element-vulnerable” gambits just mean “the enemy won’t resist the spell,” but you won’t get any bonus damage as you will with “element-weak” gambits.)
"Foe: HP = 100%—Steal" is an interesting gambit that requires some discretion and babysitting, but is well worth it to always assign to one (and only one) member of the current battle party. Put this just above their attack gambits, but behind all gambits concerned with party survival. When it’s time to attack, this character will first look to steal from any full-health enemies nearby. When only one enemy is incoming, this takes care of itself: the stealing ally will get in one theft attempt, by then the other party members will begin their attacks, and the thieving ally will then move on to attack gambits since the foe is damaged.
When several foes are incoming, this can get complicated. On weak or middling enemies, your party will probably still be fine as one member runs around using Steal on all the monsters; if you realize they’ve stolen from everyone and they start getting messages that “there was nothing to be stolen,” then manually issue attack commands to that character for the rest of the encounter.
When there are several tough enemies incoming, or it’s a boss encounter with a hefty enemy surrounded by helpers, one ally running around trying to Steal over and over can start a downward spiral of instability for the party. In these cases, quickly open up the Party Menu and disable that character’s Steal gambit. Make sure the encounter is under control before deciding if you should manually attempt to Steal. When tough encounters are out of the way, enable the Steal gambit again.
Loot obtained from defeating enemies constitutes most of your gil income; this can basically be doubled if you make sure to also Steal as often as possible. This is also on-theme in an adventure where half of your allies are thieves!
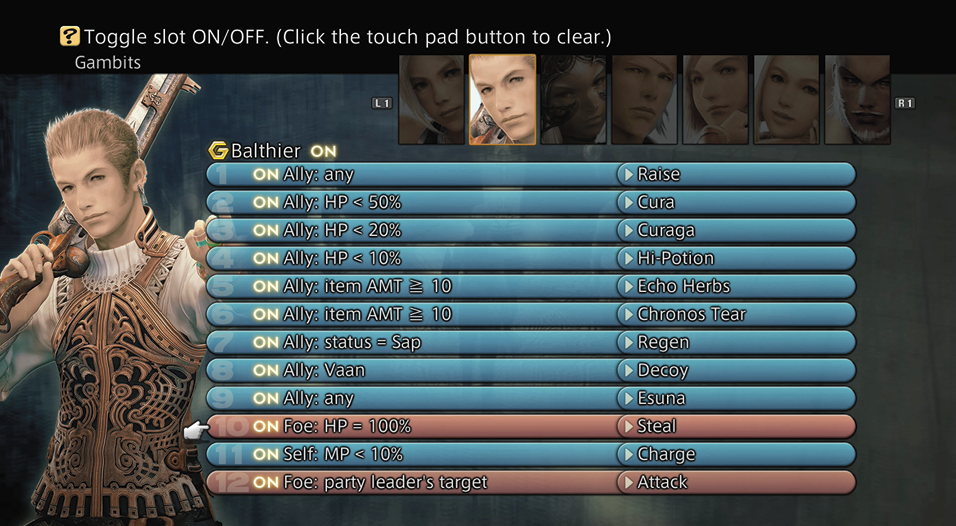
Here, Balthier is a White Mage later in the game. Raise in the first slot (or Phoenix Down, or Arise) ensures that KO’d friends won’t be down for long. Immediately following that are the primary healing gambits, Cura to restore all allies in range at once, and Curaga to greatly restore an ally who’s near defeat. Immediately following the Curaga gambit is a Hi-Potion gambit for extremely low HP; in this case, Potions are faster, so the lower an ally is, the more worthwhile it is to consider Potions over spells. After that, an array of status-curing gambits help keep the party in top fighting shape. It’s impossible to account for EVERY status ailment in one gambit palette. Generally speaking, it’s best to start by placing crucial gambits for Cure and attacks on the gambit palettes, then fill out remaining slots with status buffs and enfeeble erasers. You’ll probably tinker with these often, as enemies in one area may use Sleep often, while in another region the main danger is Petrification, and so on.
Note that Balthier as a White Mage with a Steal gambit on his palette makes a good bit of sense. If you choose to make someone a White Mage, then they’re mostly concerned with party maintenance anyway, and their contribution as a damage source is incidental, so the loss to party output is not party-breaking if Balthier gets caught in a fruitless Steal loop.
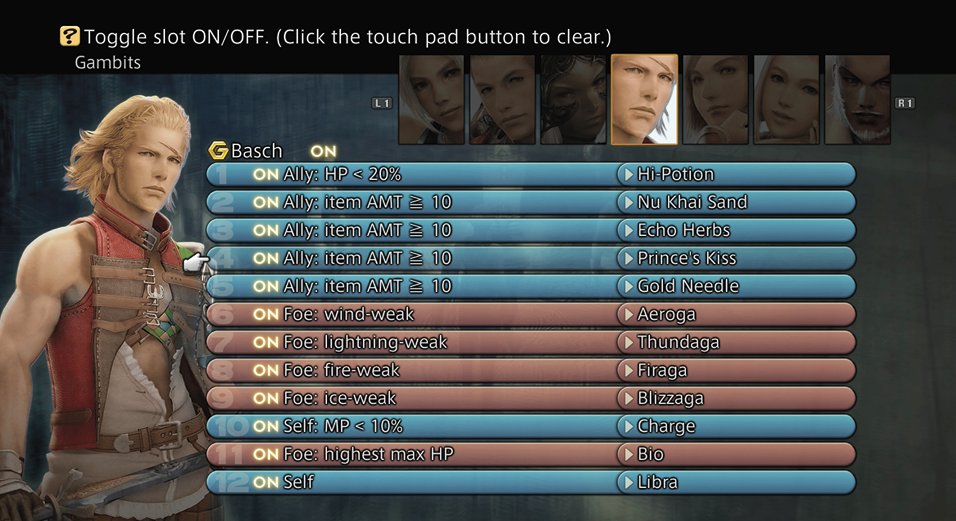
This palette is for a Black Mage focusing on outputting high-efficiency pain. There’s a nod to party stability in the form of the Hi-Potion gambit first, but without any innate healing abilities, that’s as much as the Black Mage will do (unless assigned a second job with healing abilities, of course). A few status-curing gambits follow, just in case. Then, the primary nukes, tailored to trigger against foes who will take extra damage. Here, all the nukes assigned strike an area-of-effect, meaning this character will be EXTREMELY strong in any area where groups of enemies attack who are all weak to one element.
Finally, toward the end, a Charge gambit is there to help in low-MP situations, a Bio gambit serves as the primary attack (and will only come up if no enemies are present who don’t have a weakness listed earlier in the gambits), and Libra brings up the rear, so, when the coast is clear, Basch will enabled detailed enemy data and trap locations.
Disabling Gambits
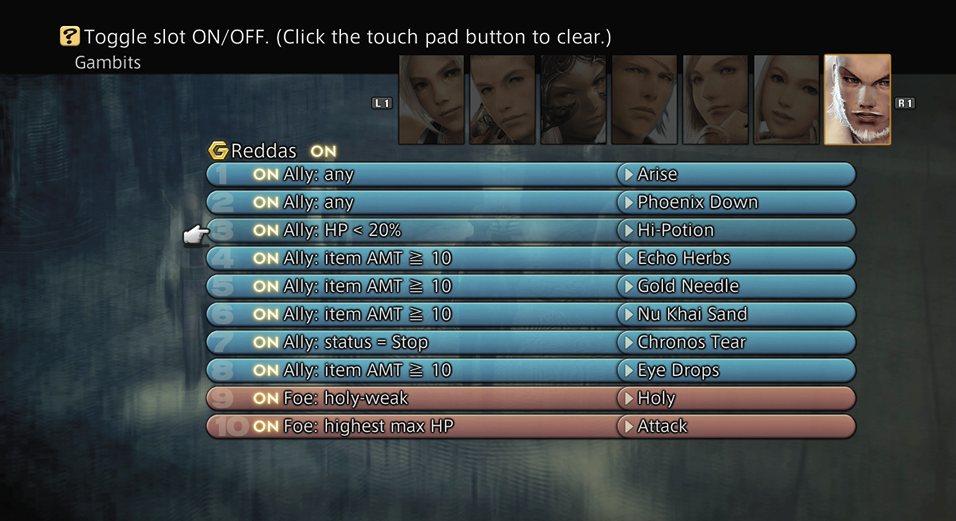
Gambits aren’t always a good thing. In major battles against extremely tough enemies, it’s sometimes best to use only a few simple healing and attack gambits and leave the rest up to manual input. This keeps the party from wasting valuable MP, or accidentally using a technick that has no effect on the enemy. Status attacks are a common issue, as most bosses are immune to several status effects. Unless such Status gambits are disabled for that battle, the caster will stand back and cast an endless stream of worthless magicks while expending lots of MP.
Foe Gambit Preamble and Tables
These determine the condition under which a character will target an enemy. Typically, enemy-targeted gambits should be prioritized toward the bottom of a set of gambits. Curative actions that stabilize and buff the party are more important; when characters are healthy and prepared, then it’s time to attack.
Generally speaking, the most universally useful targeting gambit is “Foe: lowest HP.” In most general combat situations, the best broad plan of attack is to thin the enemy’s numbers as quickly as possible, lowering the number of threats active against the party.
In certain battles against a powerful boss-type enemy backed up by a continual stream of lesser foes who act as nuisances, you may need to temporarily change “Foe: lowest HP” gambits to “Foe: highest HP” (or whichever “highest” stat assures the most dangerous enemy is prioritized, such as “Foe: highest max HP”).
If you’d like the same general approach (focusing fire to thin enemy ranks fast) but a little more control over whom allies target, you can use “Foe: party leader’s target” as your primary general-purpose targeting gambit. Then just make sure you’re keeping the current party leader occupied (and alive), and allies will follow suit.
“Foe: character HP/MP” gambits can be useful to direct characters to use Drain or Syphon when their Health Points or Mist Points are low enough.
“Foe: #+ foes present” are great conditionals for crowd control like Sleepga, mass enfeebling like Blindga or Immobilize, and area-of-effect black or arcane magick nukes.
| Gambit | Cost |
|---|---|
|
Foe: party leader’s target |
— |
|
Foe: nearest visible |
50 |
|
Foe: any |
50 |
|
Foe: targeted by ally |
100 |
|
Foe: not targeted by ally |
100 |
|
Foe: targeting leader |
50 |
|
Foe: targeting self |
50 |
|
Foe: targeting ally |
50 |
|
Foe: targeting Vaan |
— |
|
Foe: targeting Ashe |
— |
|
Foe: targeting Fran |
— |
|
Foe: targeting Balthier |
— |
|
Foe: targeting Basch |
— |
|
Foe: targeting Penelo |
— |
|
Foe: furthest |
70 |
|
Foe: nearest |
70 |
|
Foe: highest HP |
50 |
|
Foe: lowest HP |
50 |
|
Foe: highest max HP |
50 |
|
Foe: lowest max HP |
50 |
|
Foe: highest MP |
70 |
|
Foe: lowest MP |
70 |
|
Foe: highest max MP |
70 |
|
Foe: lowest max MP |
70 |
|
Foe: highest level |
50 |
|
Foe: lowest level |
50 |
|
Foe: highest strength |
70 |
|
Foe: lowest strength |
70 |
|
Foe: highest magick power |
70 |
|
Foe: lowest magick power |
70 |
|
Foe: highest speed |
70 |
|
Foe: lowest speed |
70 |
|
Foe: highest defense |
70 |
|
Foe: highest magick resist |
70 |
|
Foe: HP ≥ 100,000 |
300 |
|
Foe: HP ≥ 50,000 |
300 |
|
Foe: HP ≥ 10,000 |
300 |
|
Foe: HP ≥ 5,000 |
70 |
|
Foe: HP ≥ 3,000 |
70 |
|
Foe: HP ≥ 2,000 |
70 |
|
Foe: HP ≥ 1,000 |
70 |
|
Foe: HP ≥ 500 |
70 |
|
Foe: HP < 100,000 |
300 |
|
Foe: HP < 50,000 |
300 |
|
Foe: HP < 10,000 |
300 |
|
Foe: HP < 5,000 |
70 |
|
Foe: HP < 3,000 |
70 |
|
Foe: HP < 2,000 |
70 |
|
Foe: HP < 1,000 |
70 |
|
Foe: HP < 500 |
70 |
|
Foe: HP = 100% |
50 |
|
Foe: HP ≥ 90% |
70 |
|
Foe: HP ≥ 70% |
50 |
|
Foe: HP ≥ 50% |
50 |
|
Foe: HP ≥ 30% |
50 |
|
Foe: HP ≥ 10% |
70 |
|
Foe: status = Petrify |
70 |
|
Foe: status = Stop |
70 |
|
Foe: status = Sleep |
70 |
|
Foe: status = Confuse |
70 |
|
Foe: status = Doom |
70 |
|
Foe: status = Blind |
70 |
|
Foe: status = Poison |
70 |
|
Foe: status = Silence |
70 |
|
Foe: status = Sap |
70 |
|
Foe: status = Oil |
70 |
|
Foe: status = Reverse |
70 |
|
Foe: status = Disable |
70 |
|
Foe: status = Immobilize |
70 |
|
Foe: status = Slow |
70 |
|
Foe: status = Disease |
70 |
|
Foe: status = Protect |
70 |
|
Foe: status = Shell |
70 |
|
Foe: status = Haste |
70 |
|
Foe: status = Bravery |
70 |
|
Foe: status = Faith |
70 |
|
Foe: status = Reflect |
70 |
|
Foe: status = Regen |
70 |
|
Foe: status = Berserk |
70 |
|
Foe: status = HP Critical |
70 |
|
Foe: fire-weak |
70 |
|
Foe: lightning-weak |
70 |
|
Foe: ice-weak |
70 |
|
Foe: earth-weak |
70 |
|
Foe: water-weak |
70 |
|
Foe: wind-weak |
70 |
|
Foe: holy-weak |
70 |
|
Foe: dark-weak |
70 |
|
Foe: fire-vulnerable |
70 |
|
Foe: lightning-vulnerable |
70 |
|
Foe: ice-vulnerable |
70 |
|
Foe: earth-vulnerable |
70 |
|
Foe: water-vulnerable |
70 |
|
Foe: wind-vulnerable |
70 |
|
Foe: holy-vulnerable |
70 |
|
Foe: dark-vulnerable |
70 |
|
Foe: undead |
70 |
|
Foe: flying |
70 |
|
Foe: character status = Blind |
300 |
|
Foe: character status = Silence |
300 |
|
Foe: character status = Bravery |
300 |
|
Foe: character status = Faith |
300 |
|
Foe: character status = HP Critical |
300 |
|
Foe: character HP = 100% |
300 |
|
Foe: character MP ≥ 90% |
300 |
|
Foe: character MP ≥ 70% |
300 |
|
Foe: character MP ≥ 50% |
300 |
|
Foe: character MP ≥ 30% |
300 |
|
Foe: character MP ≥ 10% |
300 |
|
Foe: character MP < 90% |
300 |
|
Foe: character MP < 70% |
300 |
|
Foe: character MP < 50% |
300 |
|
Foe: character MP < 30% |
300 |
|
Foe: character MP < 10% |
300 |
|
Foe: character HP ≥ 90% |
300 |
|
Foe: character HP ≥ 70% |
300 |
|
Foe: character HP ≥ 50% |
300 |
|
Foe: character HP ≥ 30% |
300 |
|
Foe: character HP ≥ 10% |
300 |
|
Foe: character HP < 90% |
300 |
|
Foe: character HP < 70% |
300 |
|
Foe: character HP < 50% |
300 |
|
Foe: character HP < 30% |
300 |
|
Foe: character HP < 10% |
300 |
|
Foe: 2+ foes present |
300 |
|
Foe: 3+ foes present |
300 |
|
Foe: 4+ foes present |
300 |
|
Foe: 5+ foes present |
300 |
|
Foe: 2+ allies present |
300 |
|
Foe: 3+ allies present |
300 |
|
Foe: item AMT ≥ 10 |
300 |
Ally Gambits Preamble and Tables
Ally-targeted gambits direct characters to assist the party.
The most basic ally-targeting conditions will involve restoring HP.
When dealing with defeated allies and negative status effects, characters are pretty smart about correctly observing the “Ally: any” gambit. If you build a gambit of “Ally: any—Phoenix Down,” that character will only use a Phoenix Down if an ally gets KO’d. The character won’t just uselessly use Phoenix Downs on upright fighters. The same is true for status-curing actions like Antidotes, Golden Needles, Vox and Esuna magick, and so on. Pair “Ally: any” with various status-curing magicks and items as medium-priority actions (under HP-restoring actions, but over attacks) to automate party upkeep to your liking.
“Ally: item AMT ≥ 10” works the same as “Ally,” but will refrain from expending more items when you’re running out.
The more specific ally-status gambits can be used if you want more specific and situational status-curing solutions. For example, a gambit of “Ally: any—Remedy/Esuna” will be triggered by many debuffs. But if you build a gambit of “Ally: status = Stop—Dispel,” then Dispel will only be cast upon that ally if they’re afflicted with Stop. Other examples include “Ally status = Sap—Regen” and “Ally status = Slow—Haste.”
| Gambit | Cost |
|---|---|
|
Ally: any |
50 |
|
Ally: party leader |
50 |
|
Ally: Vaan |
— |
|
Ally: Ashe |
— |
|
Ally: Fran |
— |
|
Ally: Balthier |
— |
|
Ally: Basch |
— |
|
Ally: Penelo |
— |
|
Ally: guest |
— |
|
Ally: lowest HP |
70 |
|
Ally: strongest weapon |
70 |
|
Ally: lowest defense |
70 |
|
Ally: lowest magick resist |
70 |
|
Ally: HP < 100% |
50 |
|
Ally: HP < 90% |
70 |
|
Ally: HP < 80% |
70 |
|
Ally: HP < 70% |
50 |
|
Ally: HP < 60% |
50 |
|
Ally: HP < 50% |
50 |
|
Ally: HP < 40% |
50 |
|
Ally: HP < 30% |
50 |
|
Ally: HP < 20% |
70 |
|
Ally: HP < 10% |
70 |
|
Ally: MP < 100% |
50 |
|
Ally: MP < 90% |
70 |
|
Ally: MP < 80% |
70 |
|
Ally: MP < 70% |
50 |
|
Ally: MP < 60% |
50 |
|
Ally: MP < 50% |
50 |
|
Ally: MP < 40% |
50 |
|
Ally: MP < 30% |
50 |
|
Ally: MP < 20% |
70 |
|
Ally: MP < 10% |
70 |
|
Ally: status = KO |
70 |
|
Ally: status = Stone |
70 |
|
Ally: status = Petrify |
70 |
|
Ally: status = Stop |
70 |
|
Ally: status = Sleep |
70 |
|
Ally: status = Confuse |
70 |
|
Ally: status = Doom |
70 |
|
Ally: status = Blind |
70 |
|
Ally: status = Poison |
70 |
|
Ally: status = Silence |
70 |
|
Ally: status = Sap |
70 |
|
Ally: status = Oil |
70 |
|
Ally: status = Reverse |
70 |
|
Ally: status = Disable |
70 |
|
Ally: status = Immobilize |
70 |
|
Ally: status = Slow |
70 |
|
Ally: status = Disease |
70 |
|
Ally: status = Lure |
70 |
|
Ally: status = Protect |
70 |
|
Ally: status = Shell |
70 |
|
Ally: status = Haste |
70 |
|
Ally: status = Bravery |
70 |
|
Ally: status = Faith |
70 |
|
Ally: status = Reflect |
70 |
|
Ally: status = Invisible |
70 |
|
Ally: status = Regen |
70 |
|
Ally: status = Float |
70 |
|
Ally: status = Berserk |
70 |
|
Ally: status = Bubble |
70 |
|
Ally: status = HP Critical |
50 |
|
Ally: 2+ foes present |
300 |
|
Ally: 3+ foes present |
300 |
|
Ally: 4+ foes present |
300 |
|
Ally: 5+ foes present |
300 |
|
Ally: item AMT ≥ 10 |
300 |
Self Gambits Preamble and Tables
These function like ally gambit conditions, but targeted only at the character performing the action.
These can be useful for “tank” characters who are taking most of the party’s hits, and focusing on dishing out melee damage to enemies; you won’t want these characters to get too bogged down with assisting the entire party, but it’s quite useful for them to keep an eye out for themselves, especially at critical HP. Something like a “Self: HP < 20%—Hi-Potion/X-Potion” gambit won’t occupy a tank character for very long, and will ease the curing burden of their supporting allies.
For supporting characters who are focusing on magely duties, Silence can be devastating. For casters, a gambit of “Self—Echo Herbs” can restore the mage’s abilities without occupying another party member’s time (it also works if you use gambits of “Self: status = Silence—Echo Herbs,” or even “Self: item AMT ≥ 10—Echo Herbs”). Depending on a character’s function in your party, this may be something else equally important, like having melee fighters watch themselves for Blind status, ready to clean it up with Eye Drops.
As with other categories, “Self: item AMT ≥ 10” works the same as the “Self” condition, but with an item restriction. You’ll basically realize an item restriction gambit is kicking in if your characters stop restoring their status with items. At least when you realize this is happening, you’ll have a few items left in reserve, to hopefully tide you over till you can reach a teleport crystal or the Strahl, so you can get back to an item shop somewhere and replenish your disposable item stock.
“Self: MP < #%” gambits are crucial to help characters maintain their Mist Points. “Self: MP < 10%—Charge” is the tried-and-true method for rolling the dice on recouping MP when you’re almost out. The Syphon magick is even better for stealing MP from foes to restore your own, as long as the enemy isn’t immune, and has MP in reserve to steal. Set the Syphon gambit to drain power from foes when MP is at a mid-to-low level, and for Charge to occur as a lower-priority action, when MP is basically depleted.
| Gambit | Cost |
|---|---|
|
Self |
50 |
|
Self: HP < 100% |
50 |
|
Self: HP < 90% |
70 |
|
Self: HP < 80% |
70 |
|
Self: HP < 70% |
50 |
|
Self: HP < 60% |
50 |
|
Self: HP < 50% |
50 |
|
Self: HP < 40% |
50 |
|
Self: HP < 30% |
50 |
|
Self: HP < 20% |
70 |
|
Self: HP < 10% |
70 |
|
Self: MP < 100% |
50 |
|
Self: MP < 90% |
70 |
|
Self: MP < 80% |
70 |
|
Self: MP < 70% |
50 |
|
Self: MP < 60% |
50 |
|
Self: MP < 50% |
50 |
|
Self: MP < 40% |
50 |
|
Self: MP < 30% |
50 |
|
Self: MP < 20% |
70 |
|
Self: MP < 10% |
70 |
|
Self: status = Petrify |
70 |
|
Self: status = Doom |
70 |
|
Self: status = Blind |
70 |
|
Self: status = Poison |
70 |
|
Self: status = Silence |
70 |
|
Self: status = Sap |
70 |
|
Self: status = Oil |
70 |
|
Self: status = Reverse |
70 |
|
Self: status = Immobilize |
70 |
|
Self: status = Slow |
70 |
|
Self: status = Disease |
70 |
|
Self: status = Lure |
70 |
|
Self: status = Protect |
70 |
|
Self: status = Shell |
70 |
|
Self: status = Haste |
70 |
|
Self: status = Bravery |
70 |
|
Self: status = Faith |
70 |
|
Self: status = Reflect |
70 |
|
Self: status = Invisible |
70 |
|
Self: status = Regen |
70 |
|
Self: status = Float |
70 |
|
Self: status = Bubble |
70 |
|
Self: status = HP Critical |
50 |
|
Self: 2+ foes present |
300 |
|
Self: 3+ foes present |
300 |
|
Self: 4+ foes present |
300 |
|
Self: 5+ foes present |
300 |
|
Self: targeted by foe |
300 |
|
Self: targeted by ally |
300 |
|
Self: item AMT ≥ 10 |
300 |
Helpful Gambits
The possibilities seem endless, but here are a few useful gambits to get things going in the right direction. Use these as building blocks for more complicated gambits later on in the game. Remember to always check your gambits before entering a major battle. One simple mistake can ruin an encounter!
REVIVE Gambits
| Ally: |
Any—(Raise, Arise or Phoenix Down) |
|---|
In most battles, it's a good idea to assign very high or top priority to some variation of a revival gambit. Reviving downed allies is crucial in battle. The gambit triggers an immediate response and oftentimes revives the fallen ally before he or she can hit the ground. It's a riskier approach, but a KO'd ally can also be cured by sacrificing another character with a Revive gambit.
Healing Gambit
| Ally: |
HP < #%—(Cure, Cura, Curaga, or Curaja) |
|---|
This is perhaps the second most important gambit. Make sure it always follows the revival gambit (if you have one assigned). Healing is extremely important in every battle, regardless of what the party is fighting. Unless, of course, you’re just fighting weaker creatures for sport or loot! Close to 50% is a good trigger during a fight. Try staggering the percentage between three characters to ensure there’s a primary, secondary, and emergency healer. (For instance, use 60%, 50%, and 40%.) Doing so keeps the damage dealers focused on fighting instead of stopping to heal all of the time.
Status Effect Removal Gambits
| Ally: |
Status = (any status)—(any status remover) |
|---|
Automating status removal can be a big help. Find the proper gambit for the status in question and match it up with the cure. Esuna and Esunaga can eliminate most common status effects like Blind and Silence, while others require a specific cure or item. See below for a complete breakdown:
| Berserk |
|---|
|
Dispel |
| Blind |
|---|
|
Eye Drops—Blindna—Remedy |
| Confuse |
|---|
|
Nu Khai Sand—Remedy (requires Remedy Lore 2 license) |
| Disable |
|---|
|
Remedy (requires Remedy Lore 1 license) |
| Disease |
|---|
|
Cleanse—Serum—Remedy (requires Remedy Lore 3 license) |
| Doom |
|---|
|
Remedy (requires Remedy Lore 3 license) |
| Immobilize |
|---|
|
Remedy (requires Remedy Lore 1 license) |
| KO |
|---|
|
Raise—Arise—Phoenix Down—Revive technick |
| Oil |
|---|
|
Handkerchief—Remedy (requires Remedy Lore 2 license) |
| Petrify |
|---|
|
Gold Needle—Stona—Remedy (requires Remedy Lore 3 license) |
| Poison |
|---|
|
Antidote—Poisona—Remedy |
| Sap |
|---|
|
Regen—Remedy (requires Remedy Lore 1 license) |
| Silence |
|---|
|
Echo Herbs—Vox—Remedy |
| Sleep |
|---|
|
Prince's Kiss—getting hit—Remedy (requires Remedy Lore 1 license) |
| Slow |
|---|
|
Dispel—Haste—Remedy —Chronos Tear |
| Stop |
|---|
|
Dispel—Chronos Tear—Remedy (requires Remedy Lore 3 license) |
Dispel Gambits
| Foe: |
Status = (most statuses)—(Dispel or Dispelga) |
|---|
Some enemies make use of positive status effects like Protect, Shell, Haste, Bravery, Faith, and others. Such effects may make battles a bit more challenging, especially when the creature is a boss. Dispel and Dispelga can quickly eliminate such status effects and even wipe out Reflect. The only drawback is that they may also eliminate negative statuses cast by the party such as Slow. The “Foe: any” gambit also works with Dispel, but keep in mind that you will also dispel Slow or Stop. Surprisingly, Dispel can also be used to remove Stop status from allies, as long as an "Ally" condition is used instead.
MP Restoration Gambits
| Self: |
MP < 10%—Charge |
|---|
| Self: |
MP < 50%—Syphon |
|---|
There are two very effective ways to restore MP without using a Save Crystal or Ether. The first is the Charge technick. A player can take a chance to regain a small amount of MP. The risk is that if the technick fails, the character’s MP drops to zero. This is really only effective when the character is extremely low on MP. The risk of failing increases as the character’s MP increases, so one to two attempts is usually all that is advisable.
The second gambit involves the use of Syphon magick. With Syphon, a caster can steal a large chunk of MP from most enemies and transfer it to him or her. Most characters can easily restore a third of their MP this way with a single cast of Syphon. Unfortunately, many creatures, especially the undead, are immune to it. Turn off this gambit during such situations to ensure that the character doesn’t pointlessly cast Syphon over and over again.
Attack Gambits
| Foe: |
(Any or nearest)—(Attack, magick, or technick) |
|---|
| Foe: |
Party leader’s target—(Attack, magick, or technick) |
|---|
| Foe: |
Lowest HP—(Attack, technick) |
|---|
The best attack condition gambit to use depends on your preference, party makeup, and the situation.
Foundationally, it's almost always best to make all of the characters in the party focus on the same target. If there are lots of pesky foes on the field, this will thin their ranks quicker than spreading fire between several targets.
When there's only one boss-grade enemy, gambit conflict is no issue; the party will focus on the only enemy on the field as long as the attack gambit makes sense. (In other words you can still mess up if, for example, the only attack condition on a character is "Foe: HP < 10%" and the lone enemy has plenty of HP left.)
When a boss-type foe stands among many lesser enemies, you might want to ignore the nuisances in favor of taking out the boss faster. In this kind of case, you'd want to change all primary attack gambits to "Foe: highest max HP."
Rare exceptions might occur when, for example, a magick-casting enemy stands behind lots of melee-oriented foes; a "Foe: lowest HP" gambit on everyone in that scenario might prove problematic, as everyone runs past a bunch of threats to attack one in the back, training the whole mess along. Areas with a varied mix of physical and magick-based foes might warrant a primary attack gambit of "Foe: nearest visible" in these cases.
Another way to assure focus fire is to give most characters the attack condition "Foe: party leader's target." To whomever you like to use as party leader, assign a more conventional attack gambit, like "Foe: lowest HP" or "Foe: highest max HP" or "Foe: nearest visible." You can also take a more hands-on control of the party leader and manually select their attacks and actions.
The party-leader-focused gambits are great, with the only issues arising when party leaders are KO'd. A dead party leader can't target anything, of course, and you'll have to select a new party leader before reviving the old one, and the party's attack gambits will break down until you either manually revive the old leader and switch back to them, or enter the Party Menu and alter gambits to reflect the new party leader (or to reflect a more universal condition, as described above).
Post-Battle/Beneficial Status Gambits
| Ally: |
Any—(positive status) |
|---|
| Ally: |
HP < 80%—Cura |
|---|
Any gambit placed after the attack gambit is initiated once all nearby enemies are defeated. This is useful for positive status effects such as Haste, Bubble, Faith, Bravery and even Decoy and Berserk. By placing these gambits at the end, it ensures the characters focus on attacking during combat and spend less time protecting. This also means the player must take over during longer battles to ensure that necessary positive status effects remain intact throughout the entire fight.
Weakness Gambits
| Foe: |
(Any element)-weak—(matching element) |
|---|
| Foe: |
(Any element)-vulnerable—(matching element) |
|---|
Most enemies have a weakness to at least one element. Casters can take advantage of these weaknesses by using the correct type of magick. For instance, cause extra damage by casting Fire magick on an enemy with a low fire resistance, or Aero on a creature with low wind resistance. Gambits will enable you to automatically take advantage of such weaknesses. Make sure the caster has an MP restoration gambit or two to go with the weakness gambits so he or she never runs out of Mist Points.
Gambit Oddities
The following aren’t the most practical gambits, but they are fun to use. Give them a shot and have some fun. They may even spark a few original ideas.
| Ally: |
(Melee specialist’s name)—Berserk |
|---|
This tricky gambit sacrifices control of one character in favor of drastically increasing his/her attack power, speed, and combos. The character won’t consider gambits when acting and may also run from target to target rather than focusing on one. It isn’t perfect, but it can be extremely effective. When using Berserk, always pair it with Haste for maximum speed.
| FOE: |
Character status = Blind—Sight Unseeing |
|---|
Sight Unseeing is an amusing technick that only works when the character suffers from the Blind status. You can put this to work by intentionally blinding the character and giving him or her a gambit such as this one. Keep in mind that many enemies are immune to Sight Unseeing (in particular, the undead), so be ready to turn off the gambit when necessary.
| Foe: |
HP = 100%—Charm |
|---|
This is another technick that can be useful, but more often than not, an enemy will resist it. Placing Charm with the “Foe: HP = 100%” gambit ensures that the caster will try to influence someone other than the leader’s target. It can be useful when fighting large groups. Like with a gambit of "Foe: HP = 100%—Steal," this can get one character caught in an ineffective loop sometimes, so be ready to manually give them useful commands if needed.
| Foe: |
Character HP > 90%—Souleater |
|---|
Souleater is a powerful technick that consumes the user’s HP to damage the enemy. Although it doesn’t work well against the undead, it is effective against other enemies. It’s especially effective against enemies with a high defense.
| Foe: |
Character MP < 10%—Shades of Black |
|---|
Low on MP? No worries. Shades of Black enables a caster to fire a random Black magick without consuming any MP. The only drawback is that you never know what will happen! The spell may be extremely powerful, ineffective, or even absorbed by the monster. This is mainly effective against lesser enemies so, unless you feel like taking a risk, don’t use it against bosses.
For a slightly different purpose, try out a gambit of "Foe: flying—Shades of Black." This is a passable, if not ideal, option for melee-centered fighters to use against flying enemies, in the absence of access to spears, hand bombs, ranged weapons, or Telekinesis.
| Foe: |
Undead—(Cure, Cura, Curaga, Curaja, Raise, or Arise) |
|---|
The undead may have a bunch of resistances, but they can’t stand up against Holy magicks. This includes most restoration spells. Try bombarding a group of undead with Curaja and watch them melt away.
| Ally: |
Party leader—Reverse |
|---|
Reverse magick is unpredictable at best. It often misses and doesn’t last long, but it can be beneficial when facing a particularly difficult enemy. Try casting Reverse on the party leader and watch as the enemy’s attacks actually heal that person. This is best used in combination with Decoy. Also, make sure all Healing gambits are turned off while this gambit is active, or someone may actually end up killing the party leader while trying to heal him/her. Alternatively, change the restorative gambits of your non-Reversed party members to “Self: HP < 50%—Curaga” so that they don’t undermine your efforts.
| Foe: |
Flying—Telekinesis |
|---|
This technick is incredibly useful. With this gambit, a character equipped with a melee weapon can strike a flying foe for random damage based off the equipped weapon. This is a huge advantage, since melee weapons usually cause more damage than ranged weapons.