
Final Fantasy XII: The Zodiac Age Guide Battle System
Battle System
At the time of its original release, the battle system in FINAL FANTASY XII represented a huge departure from the series' original tradition of menu-driven, turn-based combat. FFXII contains combat heavily influenced by the MMORPGs that reshaped online gaming at the time, including Square-Enix's own sprawling FINAL FANTASY XI. And on top of the blurred line between exploration and combat, along with real-time movement during battles and a furious pace, FFXII allows you to set basic A.I. for your party's characters, in the form of the gambit system. Combat can be automated to some degree, allowing you to set up basic plans of attack that you monitor, stepping in where needed to issue commands beyond the scope of gambit potential. Or contingency plans could be arranged, so your heroes automatically take care of tedium like status effect removal and fallen comrade revival, while you continue to handle the moment-to-moment battle decisions.
This chapter covers the intricacies of the battle system. For details on jobs and license boards, which determine what abilities will be available to you during combat, check out the Zodiac Job System chapter. For a list of gambits and an in-depth explanation of their function, check out the Gambits supplement at the end of this chapter.
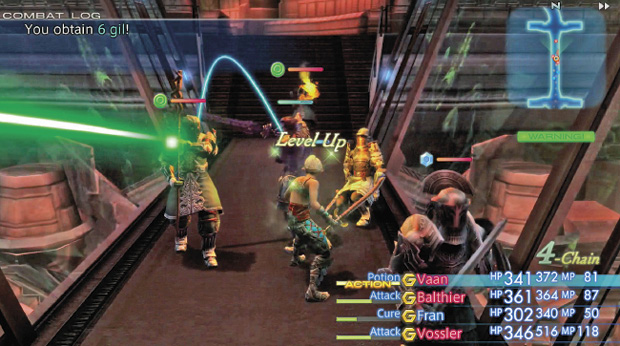
ADB: Active Dimension Battle
The most immediately noticeable difference between combat here and in most games in the series is that there aren't breaks between battle and exploration. Enemies are visible from a distance, so you choose to avoid or attack them. The party doesn’t enter a battle screen that contains and limits the action. This also means that additional enemies may join the battle as it progresses and the party can sometimes use the landscape to its advantage.
Battles take place in real time, with friends and foes attacking and repositioning constantly. For a temporary pause when selecting battle commands on the Battle Menu, select the "Wait" option from the Config menu.
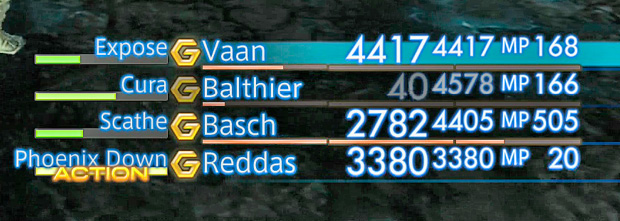
Pressing the  button brings up the Battle Menu. You can then choose actions by pressing up and down on the D-pad and pressing the button again to confirm. A small timed meter appears next to the character’s name in the lower-left corner of the screen (see screenshot). The rate at which the meter rises is based upon the character’s speed. When the timed meter fills completely, the character performs the action. You can choose actions individually for each character by bringing up the menu screen and pressing right or left on the D-pad to cycle between the characters.
While the new battle system might seem like a radical departure, it really isn’t. With Wait mode on, the game’s battle system is virtually identical to that of older titles, just thrown onto a 3-D plane. The main distinction here, then, is the Gambit system. Gambits enable you to automate many actions you would normally have to perform manually.
So Why Fight at All?
Unlike other FINAL FANTASY games, the battles aren’t random and you can choose to fight or avoid most enemies. Continuously avoiding enemies has its drawback, though, because battles provide EXP (Experience), LP (License Points), clan points, item drops, gil drops, and additions to the Bestiary for defeating the game’s foes. Note, however, that some of the larger enemies—such as bosses, mini-bosses, and certain hunts—will not reward EXP or item drops, but they do offer large amounts of LP.
What’s This About Aggro?
It’s possible to avoid most enemies while exploring, but as soon as the characters and enemies spot each other, the party enters a battle stance. The battle is then initiated unless you or the enemy decides to flee. Vaan and the rest of the party usually walk around with their swords sheathed. They’re in battle stance if their weapons are drawn. Once a battle stance has been initiated, it’s usually a good idea to stay in one place and finish the battle, lest you draw more enemies into the fray and be forced to take on several at once.
Creatures with a green life bar are non-aggressive and will not attack unless provoked. It can be a good idea to fight these creatures to add them to your Bestiary or collect their dropped items. In some cases, like facing elementals, it’s a good idea to just walk past them. If you accidentally target one, it will stay non-aggressive until a hit lands, so there’s time to cancel your attack if you accidentally target a creature. There are a few exceptions to this rule regarding foes with green life bars. Elementals, a powerful and unpredictable enemy with a green bar, often appear to be non-aggressive at first, but they will attack if the party casts magic. The other time non-aggressive enemies will attack is if they see your party attacking another one of their kind.
Oh No! What If I’m Seen?
If you initiate a battle that you would rather not fight, hold down the R2 button to trigger a retreat. Holding this button causes your characters to sheathe their weapons, in effect cancelling all actions and disabling all gambits. On occasion, an enemy will continue to chase after the party when they attempt to flee. If other enemies spot the party running away, they may join in the attack. Eventually, some of the foes may give up on the chase, but it’s best to find an exit from your current area. Another way out is to run toward a set of creatures that are natural enemies of the party's pursuers. This sometimes causes the enemies chasing after the party to flee, but may instigate a fight with the new enemies.
The plus side to running away is that the party slowly gains MP (Mist Points). It can sometimes be a good idea to temporarily run away from a winnable battle if the party needs a few more MP.
Restoring HP and MP?
Here are a few ways to solve the problem of restoring HP and MP:
- Touch a Save Crystal to fully restore all lost HP and MP.
- Run around to restore MP.
- Trigger a lucky Rejuvenation trap to gain HP.
- Hit a lucky Manafont trap to gain MP.
- Use an item from the Potion family to restore HP.
- Use an item from the Ether family to restore MP.
- Use an item from the Elixir family to restore HP and MP.
- Cast a spell from the Cure family or use the Infuse technick to gain HP.
- Use the Charge technick to restore MP.
- Use Drain magick on an enemy to steal their HP.
- Use Syphon magick on an enemy to pilfer their MP, or use it on a berserked character since they restore their MP fast and won’t need it while in this state.
- Let your character get hit by a Magick type that his or her equipment absorbs to restore HP.
- Cast Regen on a character to slowly restore their HP.
- Although this rarely occurs, a character may pick up a dropped item that may restore HP, MP, or both. (This happens randomly as a chain combo increases in level.)
- Unlock certain spots on the license board to reveal other ways to restore MP.
- Take damage when a character has the Reverse magick cast on them to restore HP equal to the attack’s damage.
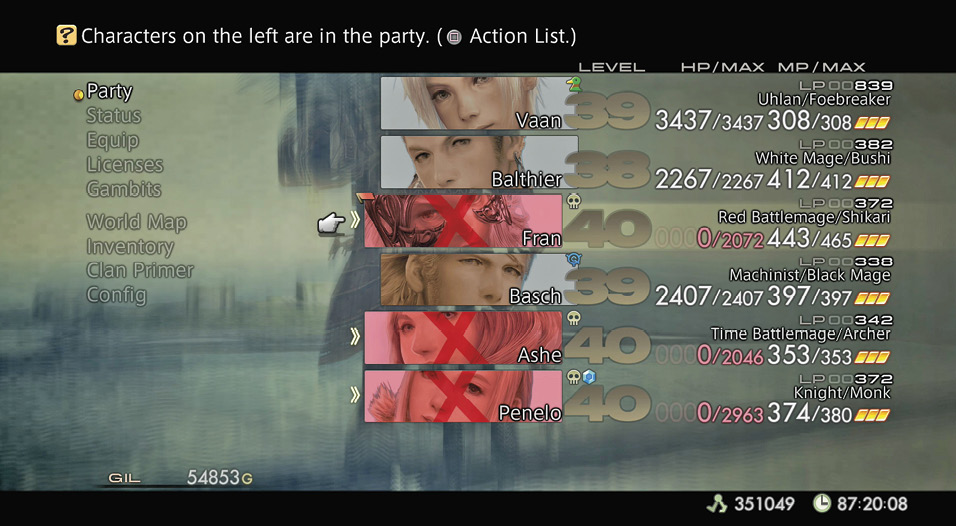
When a character loses all of his HP, it’s not the end of the game. Get the character back in action by casting Raise magick or using a Phoenix Down, or swap them out for reserve characters. The game doesn’t even end if all three active party members lose their HP. When this occurs, you can swap in any reserve party members to continue the battle. The game only ends when all of your active and reserve party members have no more HP (Health Points).
What Else Is There?
In certain parts of the game, the general rules will be slightly modified to create a more challenging experience. Occasionally, you’ll have to fight a battle as your HP or MP slowly seep away, or you may be forced to fight without using items. This is a very rare occurrence, but it’s a good idea to know what the icons mean when this does occur.
 |
HP Sap: The active party’s HP decreases as the fight goes on. The effect isn’t lethal, though; a character with 1 HP won’t die until he gets hit. |
 |
MP Sap: The active party’s MP decreases as the fight continues. |
 |
No Attack: This effect disables the Attack command and any gambits that use the Attack command. When this occurs, you must rely on magick and technicks to fight enemies. |
 |
No Magick: Magick abilities are disabled. You'll need to rely on physical attacks and technicks for damage, and items for healing and status restoration. |
 |
No Technicks: This means that all technicks are locked. With Charge stricken from your arsenal, it becomes necessary to rely on other methods of MP restoration. |
 |
No Items: This effect prevents the use of items or gambits that use items. Healing and recovery must be accomplished through magick. |
 |
Magnet Icon: Any characters equipped with metal armor or accessories will have their ADB slowed down significantly. Remove any equipped metal or replace it with cloth or leather equivalents to speed up a character’s actions. |
- Certain areas have no exits: During most boss battles, there is no chance to exit the zone.
- Instant game over: There’s just one of these in the game and it occurs when you are fighting the Demon Walls in the Tomb of Raithwall.
- Battle timer: A certain battle has a timer that limits the length of the fight. The enemy will have its HP instantly reset when the timer hits zero.
Charge Time
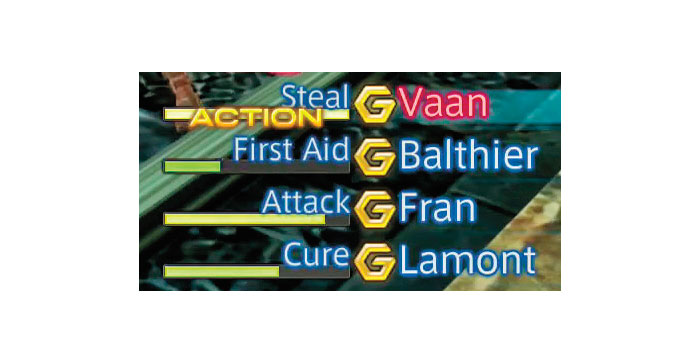
Every action has a certain time cost associated with it. The charge meter, which measures time for actions, is located in the right-hand corner of the screen next to each character’s name. After selecting an action or having a gambit automatically select one for you, the action is displayed above the meter and the meter begins to fill. When the meter is full, the word “action” will appear as soon as you’re within range of the target character or enemy. After an action has begun to charge, you can stop it by doing the following:
- Selecting another command
- Entering escape mode
- Changing equipment
- Switching maps (zones)
- Examining a treasure box or speaking to someone
- Having higher priority gambits fulfilling their conditions, which restarts the charge bar in favor of the highest priority action
Charge Time Speed
| Status Effects | Speed |
|---|---|
|
Haste + Berserk |
3x speed |
|
[Berserk] or [Slow + Haste + Berserk*] = 2x Speed* |
2x speed |
|
Haste |
1.5x speed |
|
[Slow + Haste*] or [Slow + Berserk] = 1x Speed |
1x speed |
|
Slow |
0.5x speed |
|
Stop or Stone |
0x speed |
Party
Your party consists of several different types of characters who each play a different sort of role.
- Battle Member: A party member who is currently on the battlefield. You are limited to three battle members at a time and any extra party members are forced to sit on the bench as reserve members.
- Reserve Member: Reserve members are party members who are not actively fighting, but are members of your party.
- Guest Member: A story-related character who joins your party temporarily. Guest members can be controlled as party leaders, and can be issued commands. Their gambits can also be altered, but their equipment and licenses cannot.
- Other Member: A non-story character who joins the party temporarily and does not appear in your party list. This person is also not considered a Party Member.
Watch the information section in the right-hand corner of the screen to notice that the character names change from red to blue depending on what actions are being performed and what actions are being performed against them. If a battle member’s name appears in red, this means that you cannot swap out the character for a reserve character. Instead, you must wait until the action is finished to perform the swap.
The Party Leader
One battle member is always designated as the leader. The lead character can be identified by either having their name highlighted or having a red flag attached to their portrait. This is the character you move around the field. To change the lead character, go to the Party menu, change the current battle members, and watch the leader flag jump around between leaders, or simply press the D-pad up or down while exploring. If the lead character runs out of HP, you will be forced to designate a different battle member as the leader before continuing.
Striking a Balance
Reserve party members do not receive EXP when enemies are defeated, but they do receive LP. Depending on your preference, you can choose to focus on a single set of three characters as battle members for most of the game, or continuously swap out battle members and reserve members to keep their levels somewhat even. WARNING! If you focus on a smaller number of characters, you will be more susceptible to defeat when your main group of battle members is defeated.
Attributes
.png)
Character effectiveness is comprised of several statistics that are altered by things like a character’s level and equipment, or negative and positive status effects. Leveling up increases a character’s base statistics, but you can also affect these values by equipping certain equipment. The following is a list of things that drastically increase certain attributes:
- Increase HP: Equip Light Armor or unlock +HP slots on the license board.
- Increase MP: Equip a Rod or Mystic Armor.
- Increase Attack Power: Equip weapons and ammunition.
- Increase Defense: Equip armor.
- Increase Magick Resist: Equip hats and helms.
- Increase Evade: Equip a shield.
- Increase Magick Evade: Equip certain shields.
- Strength: Equip Heavy Armor or unlock Battle Lore on the license board.
- Magick Power: Equip Mystic Armor or unlock Magick Lore on the license board.
- Vitality: Equip certain accessories.
- Speed: Equip certain accessories or unlock Swiftness panels on the license board.
EXP Level Requirements
| Lvl | Total EXP | Lvl | Total EXP | Lvl | Total EXP | Lvl | Total EXP |
|---|---|---|---|---|---|---|---|
|
1 |
0 |
26 |
123665 |
51 |
1249580 |
76 |
5215245 |
|
2 |
51 |
27 |
140286 |
52 |
1338271 |
77 |
5469006 |
|
3 |
169 |
28 |
158474 |
53 |
1431529 |
78 |
5731834 |
|
4 |
386 |
29 |
178321 |
54 |
1529506 |
79 |
6003941 |
|
5 |
735 |
30 |
199920 |
55 |
1632355 |
80 |
6285540 |
|
6 |
1253 |
31 |
223368 |
56 |
1740233 |
81 |
6576848 |
|
7 |
1978 |
32 |
248763 |
57 |
1853298 |
82 |
6878083 |
|
8 |
2950 |
33 |
276205 |
58 |
1971710 |
83 |
7189465 |
|
9 |
4213 |
34 |
305798 |
59 |
2095633 |
84 |
7511218 |
|
10 |
5812 |
35 |
337647 |
60 |
2225232 |
85 |
7843567 |
|
11 |
7796 |
36 |
371861 |
61 |
2360676 |
86 |
8186741 |
|
12 |
10215 |
37 |
408550 |
62 |
2502135 |
87 |
8540970 |
|
13 |
13121 |
38 |
447826 |
63 |
2649781 |
88 |
8906486 |
|
14 |
16570 |
39 |
489805 |
64 |
2803790 |
89 |
9283525 |
|
15 |
20619 |
40 |
534604 |
65 |
2964339 |
90 |
9672324 |
|
16 |
25329 |
41 |
582344 |
66 |
3131609 |
91 |
10073124 |
|
17 |
30762 |
42 |
633147 |
67 |
3305782 |
92 |
10486167 |
|
18 |
36982 |
43 |
687137 |
68 |
3487042 |
93 |
10911697 |
|
19 |
44057 |
44 |
744442 |
69 |
3675577 |
94 |
11349962 |
|
20 |
52056 |
45 |
805191 |
70 |
3871576 |
95 |
11801211 |
|
21 |
61052 |
46 |
869517 |
71 |
4075232 |
96 |
12265697 |
|
22 |
71119 |
47 |
937554 |
72 |
4286739 |
97 |
12743674 |
|
23 |
82333 |
48 |
1009438 |
73 |
4506293 |
98 |
13235398 |
|
24 |
94774 |
49 |
1085309 |
74 |
4734094 |
99 |
13741129 |
|
25 |
108523 |
50 |
1165308 |
75 |
4970343 |
Targeting
When you select an action for a battle member to perform, a target line appears (unless the option is turned off) that shows who the character is targeting. Depending on whether the action is an attack, a curing magick or a status-enhancing magick, the line will appear in a different color.
Target Info
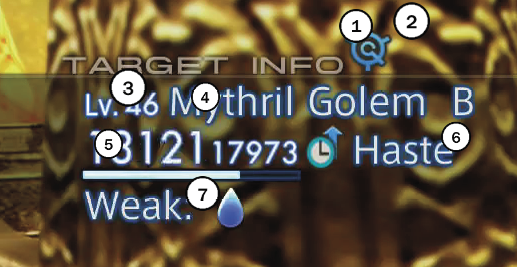
The technick Libra enables you to see a lot of useful information about enemies. (The Bangle accessory provides the same effect.)
1. Libra: If Libra is cast on your party, the Libra icon will appear here to show whether the enemy is affected by it or not. If the enemy is not affected by Libra, an “X” will appear over the Libra mark.
2. Flying: If the enemy is a flying type, a feather and the words flying type will appear here.
3. Enemy Level: If none of your battle members have Libra active, you will see question marks in place of the enemy’s level.
4. Name: If an enemy’s name appears in red, that is an indication that the enemy is three or more levels higher than your character. If the name appears in yellow, the foe is one or two levels higher than your characters. And if the name appears in blue, the enemy is either the same level as yours or lower. This information appears even when Libra is inactive.
5. Current HP and HP Max: If none of your battle members have Libra active, you will see question marks in this spot.
6. Status Effects: This section indicates any status effects currently in effect. This information appears even when Libra is inactive.
7. Weakness: The enemy’s weak point. If none of your battle members have Libra active, you will see nothing in its place.
Target Line
The target line helps to designate whether a character is targeting a friend or foe and with what type of action. Here’s a breakdown of the colors and what they mean:
Purple: Monster action (healing)
Blue: Character action (anything aside from healing)
Green: Character action (healing)
Red: Monster action (anything aside from healing)
Target Signal
The target line indicates where your lead character’s target is, but there is another arrow next to that character that signifies whether they are actually close enough to the target. This arrow changes color depending on whether or not you are within range.
Red Arrow: Your character is outside of range to attack the monsterYellow Arrow: Your character is within range to attack the monster.
Switching Targets
Pressing the R1 or L1 button enables you to select a different group of targets. The cursor cycles through target groups in a specific order before coming back around to the original target. If your cursor targets the battle members by default, pressing the R1 button switches to your reserve members, other members, and then enemies. Pressing the L1 button does this in reverse. If no other members are present or performing the action on reserve members is not allowed, these categories will be skipped. Again, that order is as follows:
Foes > Party > Reserve > Allies > back to the enemy
Attacks
Attacks are divided into two categories: regular attacks and magick attacks. The following table breaks down the basic things that affect various aspects of every attack.
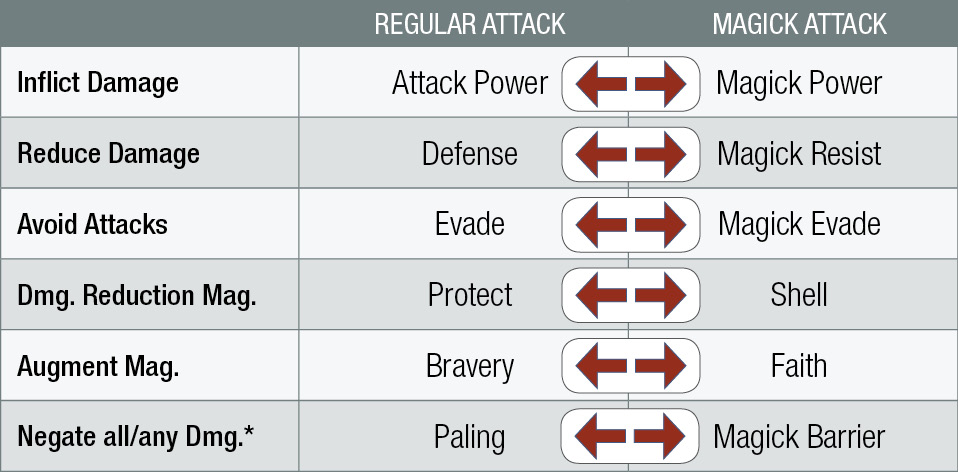
Critical Attacks and Combos
Weapons don’t always hit for the same amount of damage. There are minor fluctuations with most weapons between each hit based on the success of the attack and the enemy’s defense. Weapons sometimes make a critical hit, which drastically increases the damage caused. This usually increases the attack power, but it is also affected by elemental weaknesses and strengths that come into play.
Combo attacks are random, but certain weapons are more likely to combo than others. Katanas, ninja swords, and daggers combo very often and can create a chain of up to 10 hits at a time. Ranged weapons like bows and guns never combo. Weapons that combo often typically cause less damage per hit, but can bypass the damage of stronger weapons by hitting multiple times.
2H Sword: 9999 damage x 1 hit = 9999 damage
2H Katana: 4999 damage x 10 hits = 49990 damage
Keep in mind that combos don’t occur with every swing and a 10-hit combo is a very rare occurrence. The damage difference tends to even out over time, so the ability to combo frequently doesn’t necessarily make one weapon better than another. However, the Genji Glove accessory will facilitate combo hits, especially with a Katana.
Counters
The Battle Harness accessory enables a character to automatically counterattack upon being attacked. This is a fantastic option early in the game, since it makes it much easier to deal with multiple opponents.
Enemies sometimes counterattack, so beware. The word “Counter” always appears on-screen when a counterattack occurs. You can thwart enemies that counterattack frequently by using Immobilize or Sleep because magicks can’t be countered.
Elements
Battle members and enemies can use weapons and magicks that are enhanced with the power of the elements. Knowing this and using it to your advantage can give you the upper hand in many battles. Conversely, not paying attention to how these elements can work against you may mean your characters will meet a quick end.
Elemental Armor, Shields, Weapons, & Accessories
 |  |  |  |  |  |  |  | |
|---|---|---|---|---|---|---|---|---|
|
Weak Point |
— |
Diamond Armlet, Venetian Shield |
Adamant Hat, Adamant Vest |
— |
— |
— |
Bone Helm, Bone Mail |
— |
|
Half Damage |
Flame Shield, Adamant Hat, Adamant Vest, Manufacted Nethicite |
Manufacted Nethicite |
Cat-ear Hood, Ice Shield, Lamia's Tiara, Manufacted Nethicite, Tourmaline Ring |
Manufacted Nethicite |
Manufacted Nethicite |
Agate Ring, Cat-ear Hood, Manufacted Nethicite, Windbreaker |
Manufacted Nethicite |
Argyle Armlet, Bone Helm, Bone Mail, Manufacted Nethicite |
|
Immune |
— |
Zodiac Escutcheon, Rubber Suit |
— |
Dragon Shield |
Viking Coat |
— |
— |
— |
|
Absorb |
Gendarme |
Gendarme |
Gendarme |
Gendarme |
Gendarme |
Gendarme |
Gendarme, Sage's Ring, White Mask |
Black Mask, Demon Shield, Gendarme |
|
Magick Up / Elemental Strike |
Flame Staff / Burning Bow, Flametongue, Gungnir, Multiscale |
Cloud Staff, Storm Staff / Cross Scale, Storm Spear |
Glacial Staff, Staff of the Magi / Icebrand, Gilt Measure, Serpent Rod, Trident |
— / Cypress Pole, Gaia Rod, Koga Blade |
Cloud Staff, Fumarole, Six-fluted Pole / Arc Scale, Iga Blade, Mitre, Murasame |
Cherry Staff, Cloud Staff, Staff of the Magi / Ame-no-Murakumo, Caliper, Gladius, Zephyr Pole, Zwill Crossblade |
Holy Rod, Staff of the Magi, White Robes / Euclid's Sextant, Excalibur, Holy Lance, Holy Rod, Wyrmhero Blade |
Black Robes, Zeus Mace / Yagyu Darkblade |
- Weak point = 2x damage
- No element changes = 1x damage (normal damage)
- Half damage = 0.5x damage
- Immune = 0x damage (no damage)
- Absorb = -1x damage (healing)
Status Effects
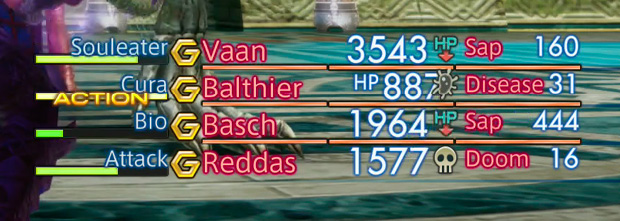
There are two types of status effects: positive and negative. Like their names imply, positive status effects are beneficial to your party. If you have them, good; if not, you may want to think about it. By contrast, negative status effects can change the tide of battle against your party, making things a bit more difficult. You can remove status effects in several different ways. You can use items, magick, or simply wait until the spell wears off (though waiting out a debilitating debuff can be an excruciating experience, or downright foolish in the cases of enfeebles like Oil and Silence).
- Vitality increases the length of time that positive status effects stay active, while reducing the time that negative status effects are in effect.
- Save Crystals remove negative status effects, but positive status effects stay active.
- Unlocking Spellbound on the license board increases the amount of time that positive status effects last, but it has no effect on negative status effects.
- When Stop is cast on your characters, their other status effect timers will not decrease until the Stop wears off or is taken away.
- The status effect time is not affected by modifying the battle speed, or having Slow or Haste inflicted.
Length of Status Effects
The amount of time that status effects stay active on your characters depends upon the effect itself. Some effects do not go away naturally with time, but most of them do.
Conflicting Status Effects
You can remove several status effects by casting an equal but opposite spell on a character. Unfortunately, this doesn’t work for everything. See the list below for all the details. This list shows pairs of status effects that will not be effective when one has already been cast on the character.
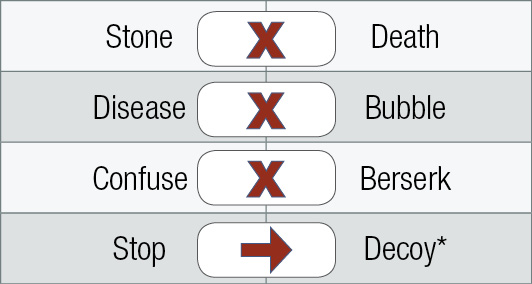
The following status effect pairs will overwrite their counterpart when inflicted on an ally or enemy.
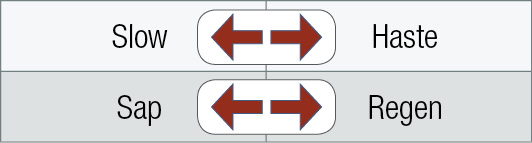
Preventing Status Effects with Equipment
Certain equipment can prevent your characters from succumbing to negative status effects, and some will cause your characters to always be inflicted with positive status effects. Examine the equipment section to see the special statuses that equipment and accessories can carry.
Mist Charges
Mist Charges are divisions of Mist Points that you can spend to summon an Esper or use a Quickening. Each character can obtain up to three Mist Charges. The first charge is obtained when the character unlocks his or her first Quickening or Summoning spot on the license board. Each additional Quickening or Esper panel unlocked will add another Mist Charge.
In the original release of FINAL FANTASY XII, Mist Charges were tied to MP totals, but no longer. In The Zodiac Age, Mist Charges are now kept as a separate meter underneath each character's HP and MP totals. With Mist Charges to spare, Quickenings and Espers are available for use. When Mist Charges are depleted, a character will rebuild this gauge by dishing out and receiving damage. Actions that replenish MP, like using Charge, Syphon, or Ethers, will also restore Mist Charges. An Elixir will totally refill one character's Charges; a Megalixir will refill the entire battle party's Charges.
Battle Chain
The basic gist of battle chains is that each time you defeat an enemy that is the same type (classification) as the previously defeated enemy, your battle chain number will increase by one. As you continue to defeat the same type of enemy, the chain continues to grow until eventually the chain level increases. This raises the chance that the fallen enemy will drop valuable items in greater numbers. As the Chain Level increases through each of the four ranks, so too do the rewards.
Easy Money? Sign Me Up!
Unfortunately, fighting the same enemy over and over again can be problematic. There are lots of different enemies in Ivalice, and the variety of enemies in each area tends to be pretty high. There are three ways to break a Battle Chain:
1.Defeat a monster of a different type.
2.Enter a town.
3.Touch a Save Crystal.
An enemy that has a different name doesn’t necessarily mean that it is a different type (classification). If you fight several Wolves and then a few Hyenas, your chain won’t break because both are classified as Wolves. If, however, you defeat a Cactuar, the chain will return to zero.
An exception exists if you use the damage-over-time effect of Poison or the petrifying effects of Stone to kill enemies that you don't want breaking the chain. This is useful when going on hunts for rare drops or marks, where you want to ensure a continuous chain but may still be forced to deal with enemies from different monster families.
Interestingly, a mild battle chain effect occurs if you continuously defeat foes of different types. In other words, there's a hidden chain effect for never starting a chain. The only visual indication you'll get for this is just that a real chain counter never starts up. However, this effect is still not as beneficial to drop rates as a "real" battle chain, and doesn't confer the same occasional boosts to HP and MP.
Item Drop Rarity List
| Chain Level | Common Drops | Semi-Rare Drops | Rare Drops | Super Rare Drops |
|---|---|---|---|---|
|
0 |
40% |
25% |
3% |
1% |
|
1 |
45% |
30% |
6% |
2% |
|
2 |
50% |
35% |
8% |
3% |
|
3 |
55% |
40% |
12% |
5% |
Intangible Rewards for Chaining
Item rewards are great, but they’re not the only rewards for making chains. The items gathered may also restore HP or MP or even cast magick on your characters. Refer to the following chart for all the details:
| Chain Level | Bonus | 10% HP Restore | 10% MP Restore | Protect | Shell |
|---|---|---|---|---|---|
|
0 |
0% |
0% |
0% |
0% |
0% |
|
1 |
20% |
10% |
10% |
0% |
0% |
|
2 |
50% |
20% |
20% |
5% (Leader) |
5% (Leader) |
|
3 |
60% |
25% |
25% |
5% (All) |
5% (All) |
Traps
Sprinkled across the landscape of Ivalice, traps rigged by fiends are usually tailored towards malicious purpose. Whether by accident or unexpectedly benevolent design, a few can actually benefit your party! Either way, keep an eye out for traps with Libra and the Bangle accessory, and avoid them via the time magick Float or the Steel Poleyns accessory. If you’re feeling lucky or adventurous you can also just trigger them, but beware of potentially disastrous traps like Fusillade, Befuddling Gas, and Stasis, especially during combat. Finally, be aware that while you can easily maneuver the party leader around traps, your CPU-controlled members will not be as careful. Keep this in mind while plotting your course around trap-laden areas.
| Type of trap | Effect |
|---|---|
|
Explosion |
Deals damage to all allies in range |
|
Sten Needle |
Deals heavy damage to all allies in range |
|
Fusillade |
Deals massive damage to all allies in range |
|
Wizardsbane |
Strips MP from all allies in range |
|
Leech |
Strips heavy MP from all allies in range |
|
Stone Gas |
Petrify status to all allies in range |
|
Befuddling Gas |
Confuse status to all allies in range |
|
Silence Gas |
Silence status to all allies in range |
|
Choking Gas |
Sap status to all allies in range |
|
Blinding Smoke |
Blind status to all allies in range |
|
Stasis |
Reverse and Disable status to all allies in range |
|
Swarm |
Disease status to all allies in range |
|
Oil Bug |
Oil status to all allies in range |
|
Gil Bug |
Some gil disappears! |
|
Rejuvenation |
HP is restored for all allies in range |
|
Manafont |
MP is restored for all allies in range |
Weather Effects
Beyond existing solely for aesthetic value, weather in FFXII can actually affect combat. Schools of elemental magick can be positively or adversely affected depending on the weather. The weather also occasionally dictates the appearance of rare or extremely difficult monsters. If you’d like to negate weather’s effect upon elemental magick for a caster, equip them with an Agate Ring.
Weather sometimes changes if you completely leave a region and then return (use the map screen for reference; you must go to a completely different set of maps, rather than just a zone adjacent to your current location, but within the same region). Certain ranged weapons are also affected by the weather and the wind. Below you will find the effect each type of weather has on weapon accuracy and elemental damage, as well as any special monsters that appear.
Earth elemental effects are listed here, though there is no explicit earthen school of magick for mages. There are enemy-exclusive earth technicks like Quakega, and the Esper Hashmal also unleashes earth-element abilities.
Clear Skies
| Weapon effects | Special monster appearances | Elemental Effects |
|---|---|---|
|
During windy clear weather: bow and crossbow accuracy decreased |
Salamand Entite (Ogir-Yensa Sandsea), Fire Elemental (Mosphoran Highwaste) |
During windy clear weather: fire and wind slightly boosted, water greatly weakened |
Cloudy Weather
| Weapon effects | Special monster appearances | Elemental Effects |
|---|---|---|
|
During windy cloudy weather: bow and crossbow accuracy decreased |
Sylphi Entite (Ozmone Plain), Earth Elemental (Tchita Uplands), Lindwyrm (Tchita Uplands) |
During windy cloudy weather: fire and wind slightly boosted, water greatly weakened |
Rain
| Weapon effects | Special monster appearances | Elemental Effects |
|---|---|---|
|
During windy rainy weather: bow and crossbow accuracy decreased |
Storm Elemental (Giza Plains, Rainy Season), Air Elemental (Phon Coast), Undin Entite (Cerobi Steppe) |
Fire greatly decreased, thunder and wind boosted |
Heavy Rain
| Weapon effects | Special monster appearances | Elemental Effects |
|---|---|---|
|
Bow and crossbow accuracy decreased |
Storm Elemental (Giza Plains, Rainy Season), Mardu Entite (Giza Plains, Rainy Season), Gil Snapper (Giza Plains, Rainy Season) |
Fire and water greatly decreased, thunder and wind boosted |
Snow
| Weapon effects | Special monster appearances | Elemental Effects |
|---|---|---|
|
Bow and crossbow accuracy decreased |
Ice Elemental (Paramina Rift) |
Fire, ice, and wind boosted, water greatly decreased |
Blizzard
| Weapon effects | Special monster appearances | Elemental Effects |
|---|---|---|
|
Bow and crossbow accuracy decreased |
Leshach Entite (Paramina Rift), Fafnir (Paramina Rift) |
Fire, ice, and wind boosted, water greatly decreased |
Fog
| Weapon effects | Special monster appearances | Elemental Effects |
|---|---|---|
|
None |
None |
Water boosted |
Heavy Fog
| Weapon effects | Special monster appearances | Elemental Effects |
|---|---|---|
|
None |
Daikon Entite (Giruvegan), Leamonde Entite (Nabreus Deadlands) |
Water boosted |
Sandstorm
| Weapon effects | Special monster appearances | Elemental Effects |
|---|---|---|
|
Bow and crossbow accuracy decreased |
Gnoma Entite (Dalmasca Westersand), Earth Tyrant (Dalmasca Westersand), Ring Wyrm (Dalmasca Westersand) |
Fire, earth, and wind boosted, water greatly decreased |
Geomancy
In addition to the modifiers listed under Weather Effects, elemental magick is further modified slightly by the type of ground the caster stands upon. Use the tables here showing the bonuses during certain types of weather and standing on certain surfaces to give yourself huge bonuses when the circumstances line up correctly. Playing with electricity while standing in water during a rainstorm might sound like an awful idea for us here on Earth, but for the residents of Ivalice in FFXII it’s terrific!
| Surface | Elemental Effects |
|---|---|
|
Standing in water |
Thunder and water boosted, earth greatly decreased |
|
Standing on ice/snow |
Ice boosted |
|
Standing on earth |
Earth slightly boosted |
Battle Advice:Mix Up Your Weapon Types
Allowing the game to automatically select your weapons based on attack power isn’t always the best idea. It’s often a better idea to mix up your weapon use a bit. Some of the weaker weapons carry specific abilities that can make a character more useful in certain situations. Here are some of the “weaker” weapon groups and their advantages:
- Bow & Crossbow: These weapons are primarily for use against flying creatures, but also allow the wielder to keep their distance from ground enemies. The ammunition used also allows for a variety of elemental or status attacks.
- Gun & Measure: Guns and Measures completely ignore an enemy’s defense, making them a great choice against heavily armored enemies.
- Axe, Hammer & Hand-Bomb: These weapons are very strong but subject to lots of variance—they can hit harder than other weapon types of comparable attack rating, but may also churn out weaker hits.
- Rod & Staff: These magick-user weapons add magick power and MP to their wielders.
Focus on Useful Accessories
Some accessories offer less useful enhancements. The following accessories are the real deal and offer your characters attractive bonuses that are well worth the cost and effort it takes to acquire them.
| Accessory | Effect |
|---|---|
|
Sage’s Ring |
Reduces MP cost by half |
|
Diamond Armlet |
Better treasure |
|
Thief’s Cuffs |
Doubles Steal success rate and allows stealing from different rarity tiers at once |
|
Genji Gloves |
Improves chance of scoring multiple hits |
|
Nihopalaoa |
Reverses effect of potions and status curing items, such that Potions cause damage and Antidotes cause Poison, etc. |
|
Embroidered Tippet |
Double wearer’s received EXP |
|
Jade Collar |
Improves chance of avoiding attacks |
|
Indigo Pendant |
Improves chance for magick to hit |
|
Golden Amulet |
Doubles wearer’s received LP (excellent for reserve party members) |
|
Bubble Belt |
Endows the wearer with the "Bubble" status effect (doubles HP) |
|
Hermes Sandals |
Endows the wearer with the “Haste” status effect |
|
Cat-Ear Hood |
+3 boost to Speed, halves ice and wind damage, and converts all license points earned to gil. |
Focus on Useful Magick
There are a few spells that are a lot more useful than you may initially think. One of these spell combinations involves casting Reflectga on all of your characters, then attacking them with attack magick.
Another very useful spell is Reverse. When it is cast on your own characters, it converts any damage that the player receives into HP.
- White Magick: White Magick can heal your characters and remove nearly any status ailments. Make this a top priority for any capable character.
- Various Attack Magick: Attack Magick enables you to target a monster’s specific weakness. Pure melee characters can ignore these, unless they add a second Job with Black Magick access.
- Haste & Hastega: The Haste spells put the status effect Haste on your characters.
- Reflect & Reflectga: The Reflect spells put the status effect Reflect on your characters.
- Protect & Protectga: The Protect spells put the status effect Protect on your characters. Make sure at least one party member has access to these spells once they become available.
- Shell & Shellga: The Shell spells put the status effect Shell on your characters. These aren’t as critical as Protect, but come in very handy when facing bosses that use powerful magick.
- Reverse: Any damage received is turned into HP, while any cure spells turn into attack damage. This is essential when facing some of the toughest bosses in the game.
- Decoy: Decoy draws the attention of the enemy to a specific character. Put this on the primary fighter in the party to keep the support characters safe.
- Bubble: Bubble doubles your maximum HP for its duration. Use it from the moment it becomes available.
- Syphon: This lets you absorb MP from the target. Some enemies are immune to the effect, especially bosses, but it’s far more effective than the Charge technick.
Focus on Useful Technicks
Technicks are nice because they don’t require MP to cast. Some are far more useful than others, though. The following technicks are very useful and many become life-saving tools during the course of the game.
- Steal: Steal enables you to take items from enemies. This is a great way to increase cash flow and it is essential to obtaining rare loot that unlocks some of the game’s best weapons and armor.
- Libra: Libra enables you to spot traps and view an enemy’s stats. Keep it on a gambit or keep someone equipped with a Bangle accessory at all times.
- Charge: Charge enables you to instantly regain MP. If you miss an attempted charge, your MP will reduce to 0, so be careful!
- 1,000 Needles: Deals 1,000 damage to one foe. This can be useful if physical damage is needed from magick users equipped with low-power weapons intended to boost magick damage, like staves and rods, when an enemy makes itself immune to magick damage.
- Expose: Lowers an enemy’s defense. You can use this over and over again during a battle to deplete the enemy’s defense.
- Wither: Lowers an enemy's attack. Like Expose, can be used repeatedly, and extremely useful. Crucial for helping "tank" characters survive against powerful monsters, along with a shield, the Decoy and Bubble spells, and equipment that boosts evasion, among other things.
- Addle and Shear: The magick equivalents of Wither and Expose, used for decreasing enemy magick power and magick resistance. Like Expose and Wither, these technicks can be used more than once to keep reducing the enemy's stats. Addle reduces magick power, while Shear reduces magick resist.
Steal from the King Bomb
King Bomb’s Stolen Loot
| Steal Rate | Item | Sell |
|---|---|---|
|
Common |
Bomb Shell |
896 gil |
|
Average |
Fire Crystal |
160 gil |
|
Rare |
Bomb Fragment |
1911 gil |
The King Bomb battle is one of the rare boss battles during which you can enter and leave as many times as you like. You can then save your game at the Save Crystal just outside of the boss room. You can use this to your advantage in several different ways. First, without touching the Save Crystal between each trip into the room, it’s possible to build up a mean battle chain from the endless supply of bombs that King Bomb drops. Second, and perhaps more importantly, you can steal from the King Bomb each time you face him. You can quickly collect up to 99 items that can be sold for a reasonably large chunk of cash.
Reflecting Attacks to Increase Damage
With the right setup, it’s possible to hit an enemy multiple times with a single spell. To do this, create a situation where all of your battle members have the status enhancement Reflect cast on them. After doing so, access the magic menu, target each member of your own party, and unleash the elemental attack. The spell will bounce off your party and every individual hit will reflect onto the single opponent, thus magnifying the strength of the attack by three. If you have a guest member and another member in your party, it’s possible to increase the number of hits to 5!
Since magic can only be reflected once, it’s possible to hit enemies that currently have Reflect cast on them with this as well. Several spells work well with this technique, including Firaga, Blizzaga, Thundaga, and Scathe, which has the power to inflict nearly as much damage as your strongest Quickening combo.
“Last Selection” Cursor Position
In the options screen, there’s an option to remember the last-selected action and automatically return your cursor to it when you access the action menu. This option is crucial if you’re going to play in Active mode and can be very useful in Wait mode. Regardless of your selected mode, you’ll often find yourself needing to perform the same battle action multiple times. “Last Selection” removes the tedium of having to wander through the menu over and over again.
“Fishing” for Enemies
When you find a group of difficult enemies that are grouped together and you don’t want to fight them all at once, it’s possible to lure enemies out one at a time and take them on individually. To do this, make sure your party leader is a ranged character. Approach the enemy from far away and manually select “Attack,” targeting the nearest opponent. You’ll be too far away to hit the enemy, so slowly creep up to the group until you’re within distance to attack and your character will automatically use their attack, drawing its attention to your party. Now that the opponent is aware, hold down the R2 button to run away. The enemy will follow, leaving the rest of his cronies behind to pace back and forth.