Final Fantasy XII: The Zodiac Age Guide Side Events
Side Events Part 5
Hunt Club
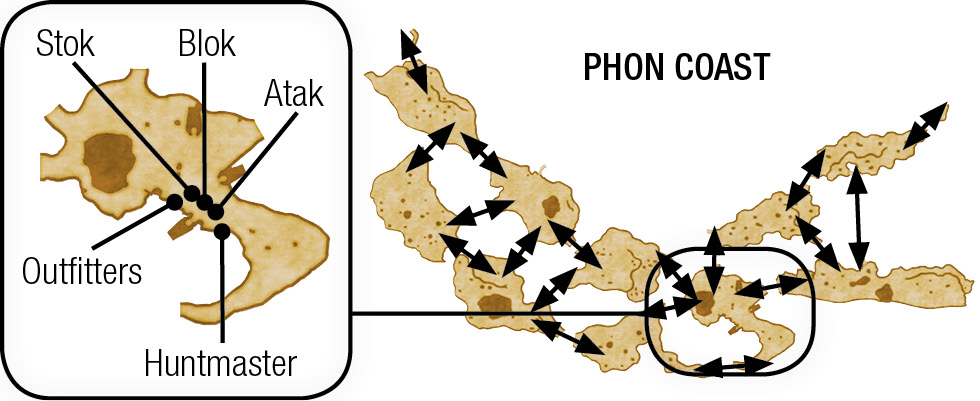
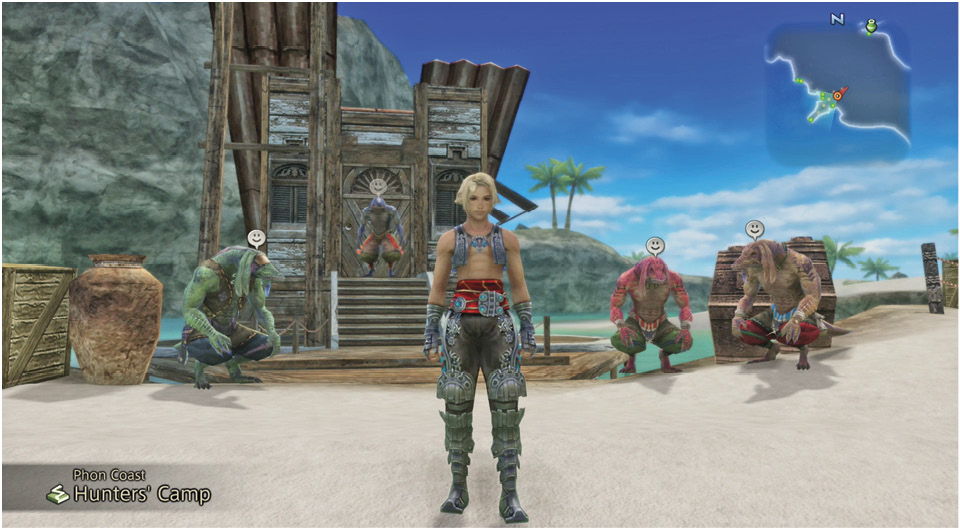
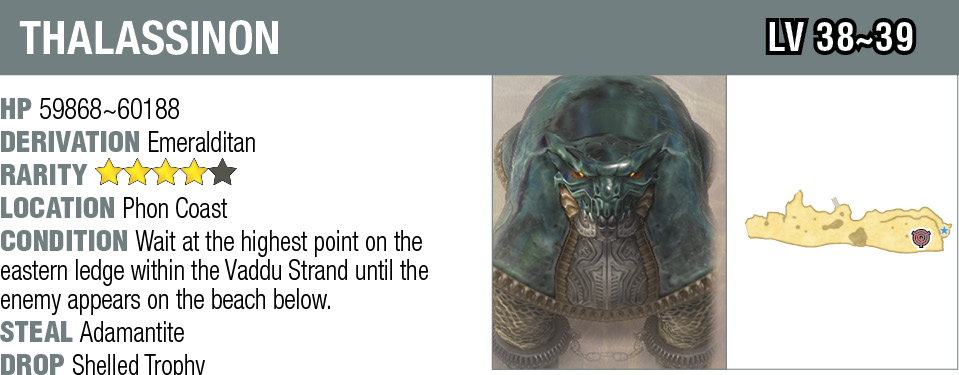
Talk to the Huntmaster at the Phon Coast Hunters’ Camp after finishing up Archades. He offers to let Vaan join the Hunt Club if he can prove himself with one small task. The party must track down a Thalassinon on the Vaddu Strand.
The Vaddu Strand is east of the Hunters’ Camp. The only way to spot the prey is to look for it from a high elevation. Go to the east end of the Vaddu Strand and climb the small ledge that overlooks the beach. Remain at the peak until the Thalassinon appears. Defeat it and return the Shelled Trophy to the Huntmaster.
The Huntmaster orders Vaan to speak to one of the three brothers (formerly Shady Bangaas). Agree to hunt before speaking to the Huntmaster again.
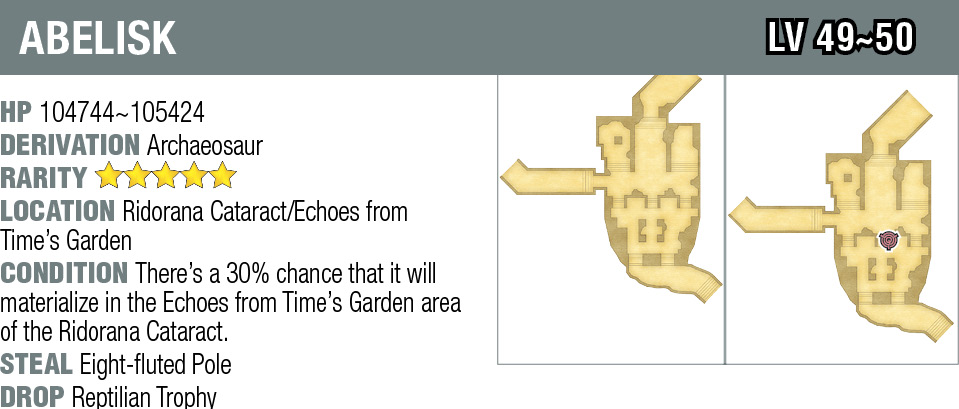
The objective of this event is to find 30 rare monsters located around the world and defeat them. Vaan can then trade their trophies to Atak, Stok, and Blok to unlock items in the Shifty-Eyed Merchant’s store. The following section lists the monsters and their locations.
Abelisk
Alteci
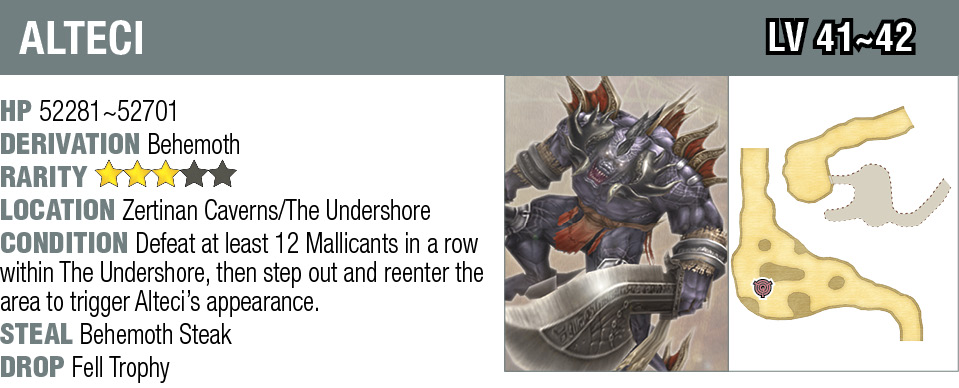
Ancbolder
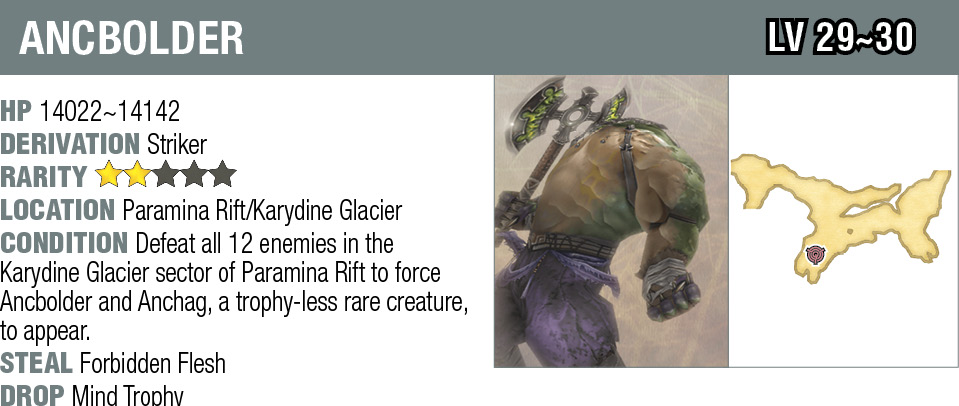
Anubys
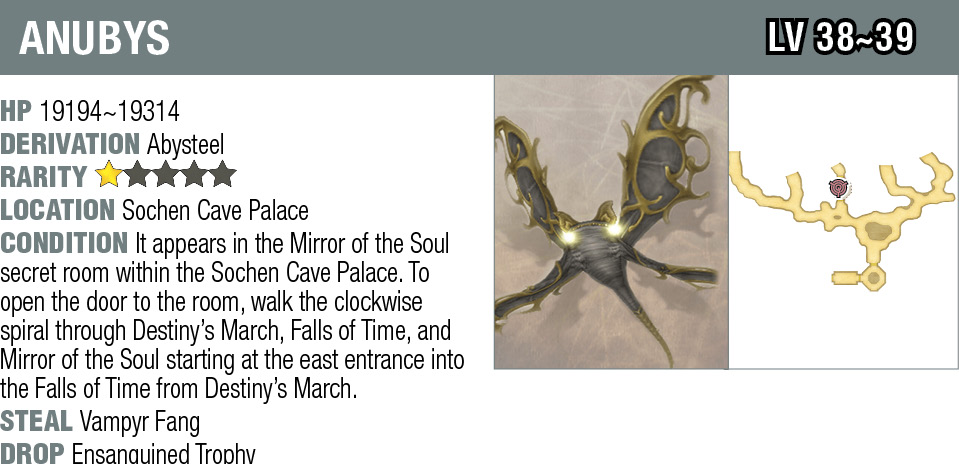
Arioch
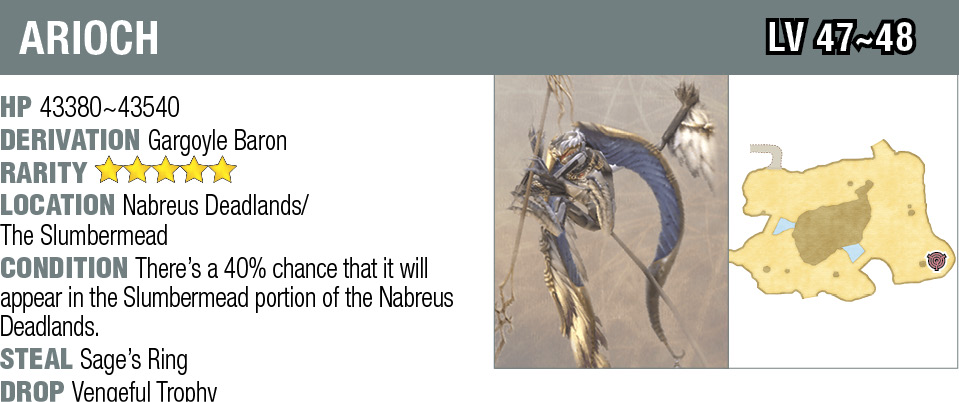
Aspidochelon
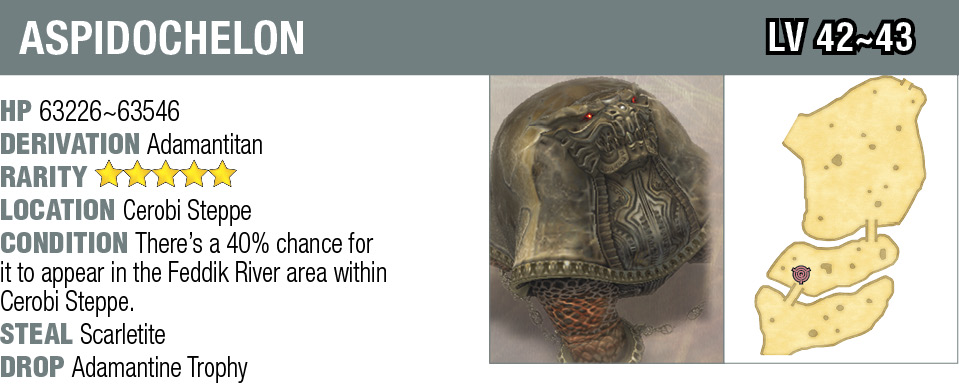
Avenger
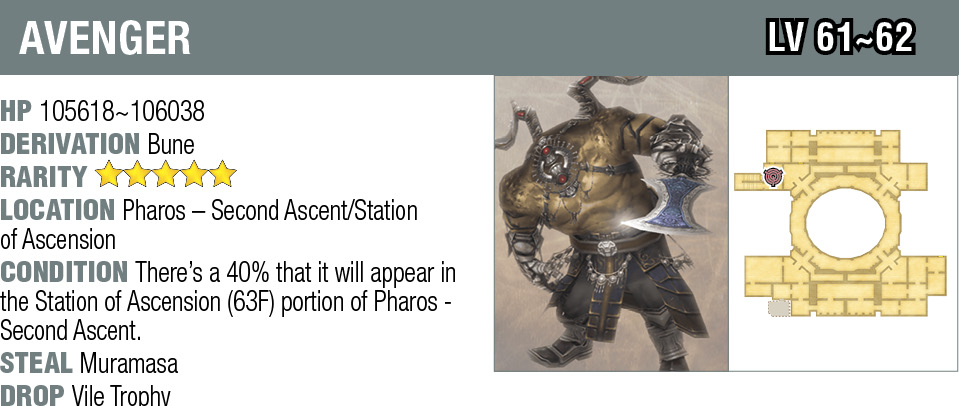
Biding Mantis
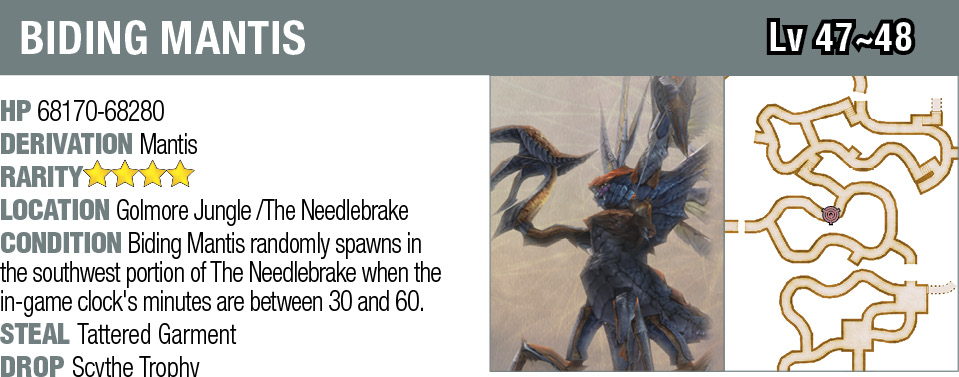
BLUESANG
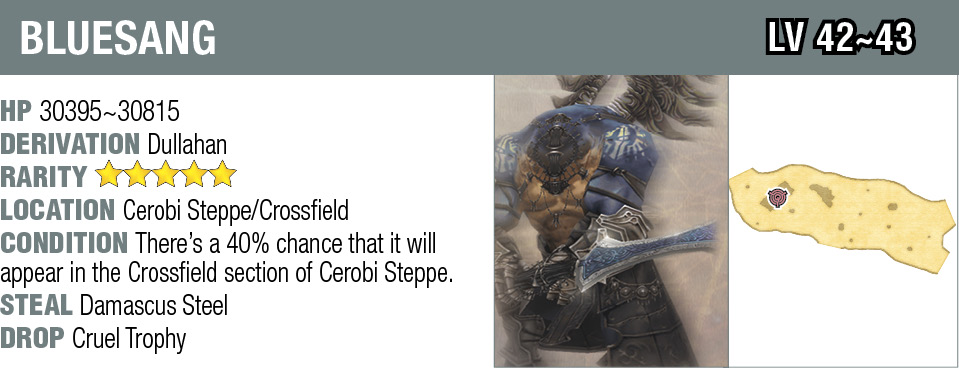
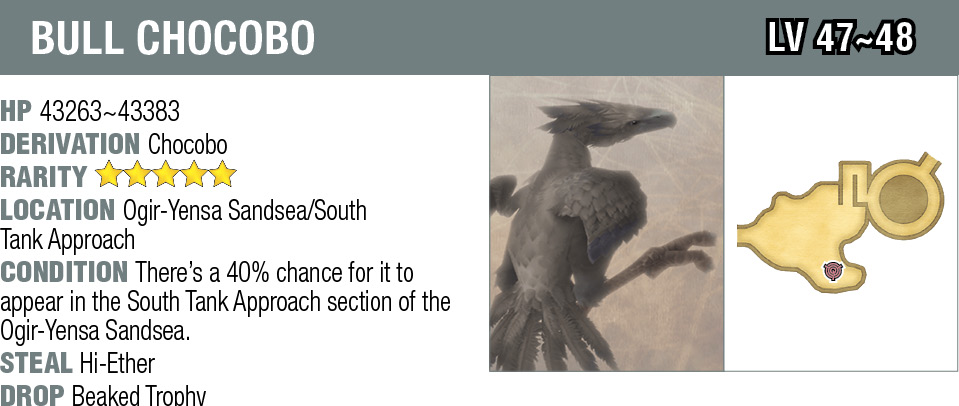
Bull Chocobo
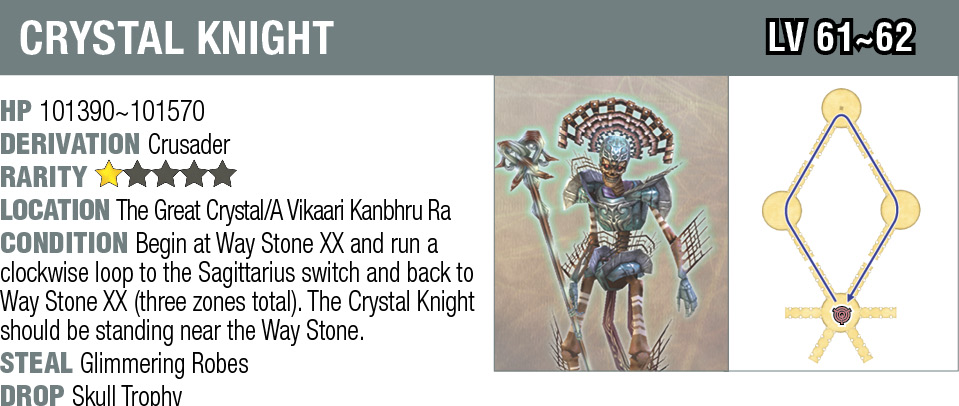
Crystal Knight
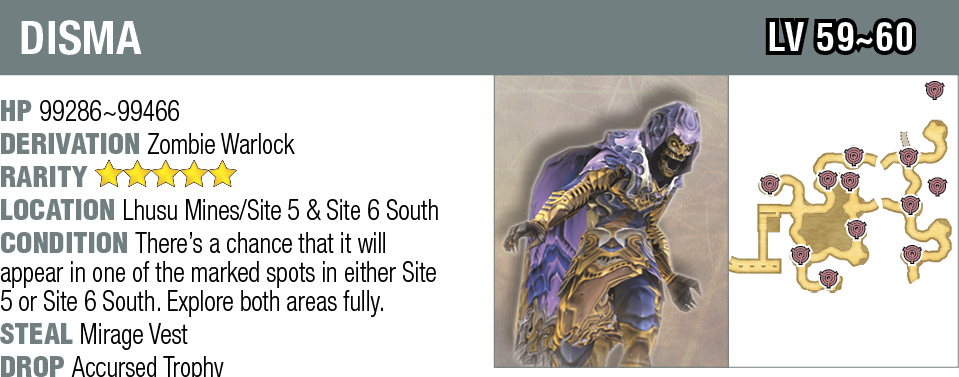
Disma
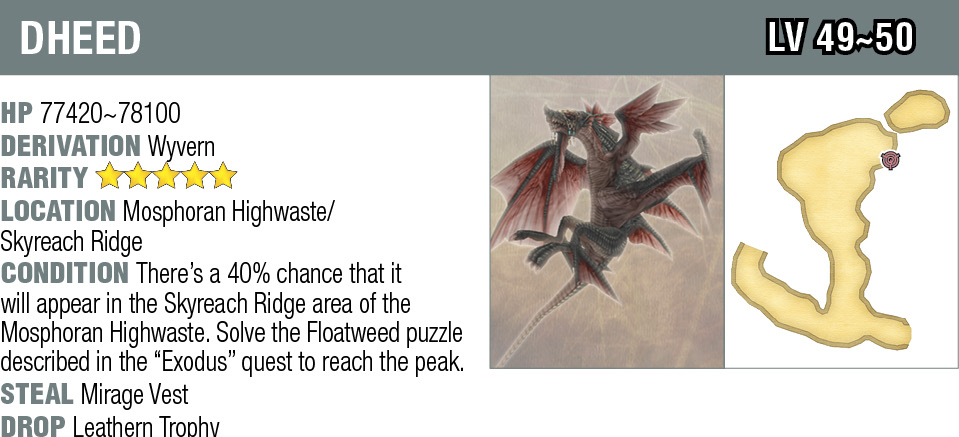
Dheed
Dreadguard
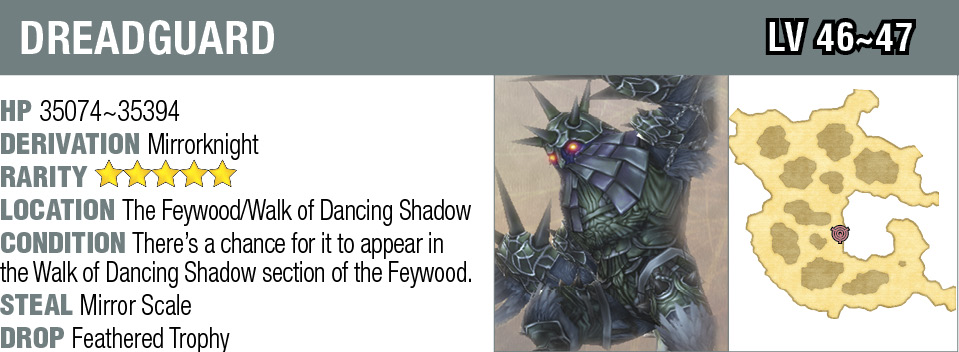
Gavial
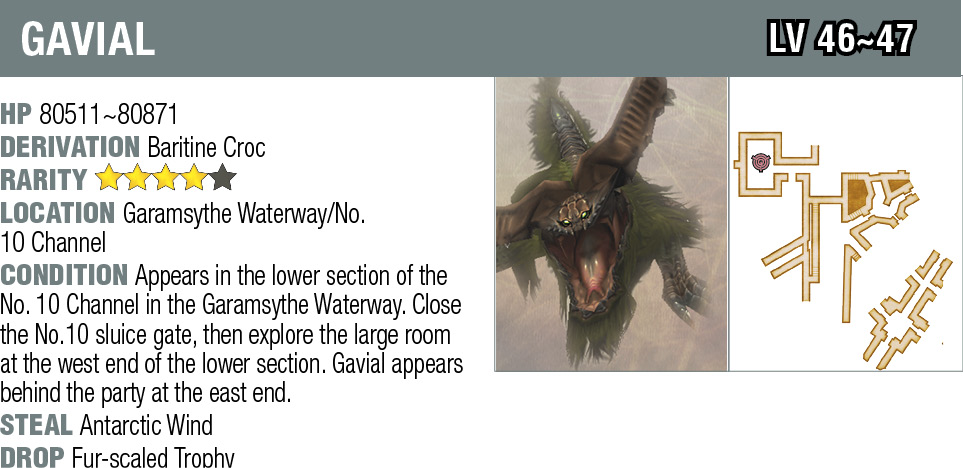
GRIMALKIN
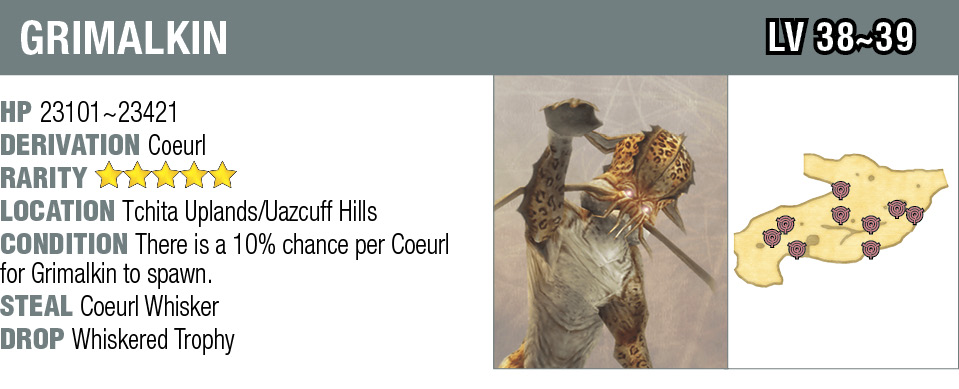
Ishteen
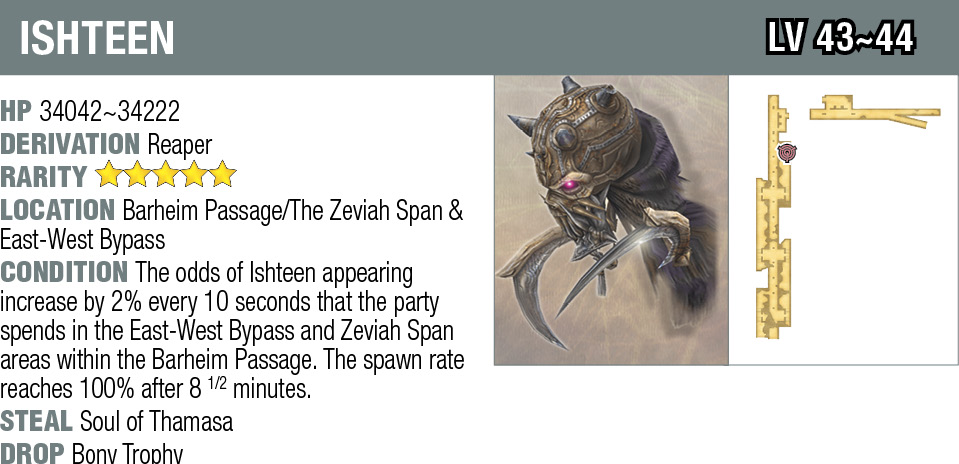
Kaiser Wolf
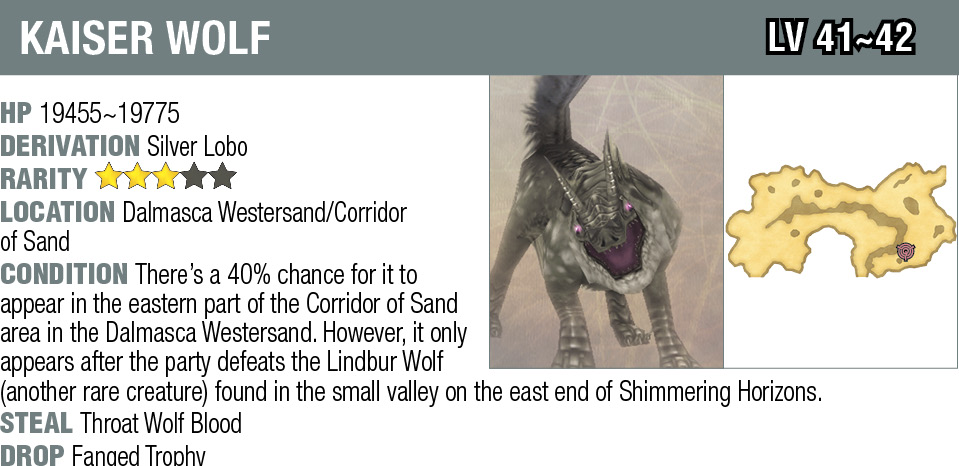
Killbug
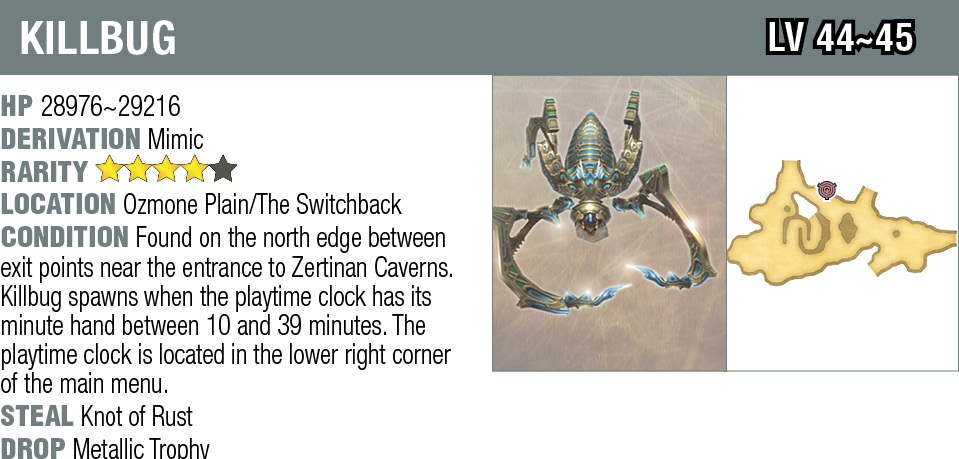
Kris
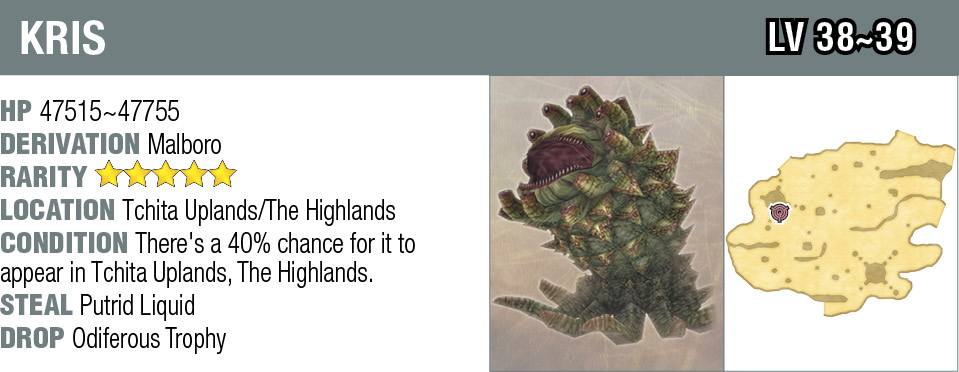
Melt
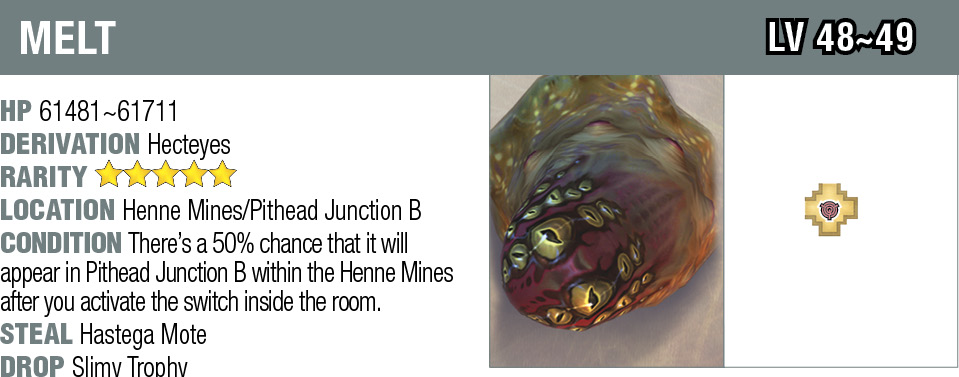
Myath
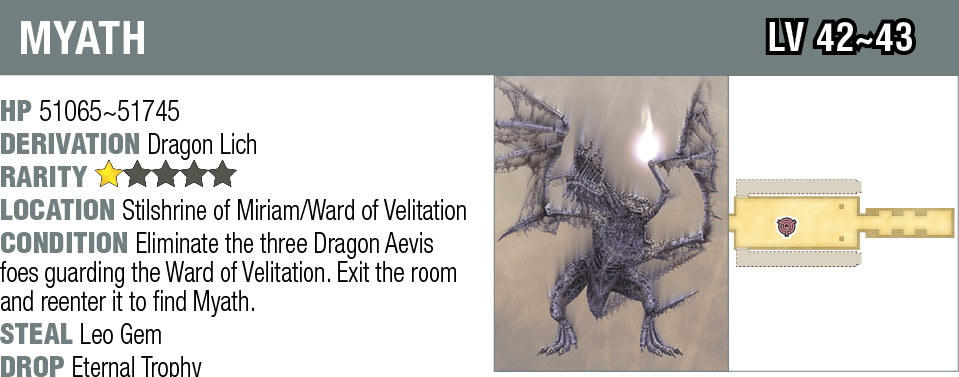
Nazarnir
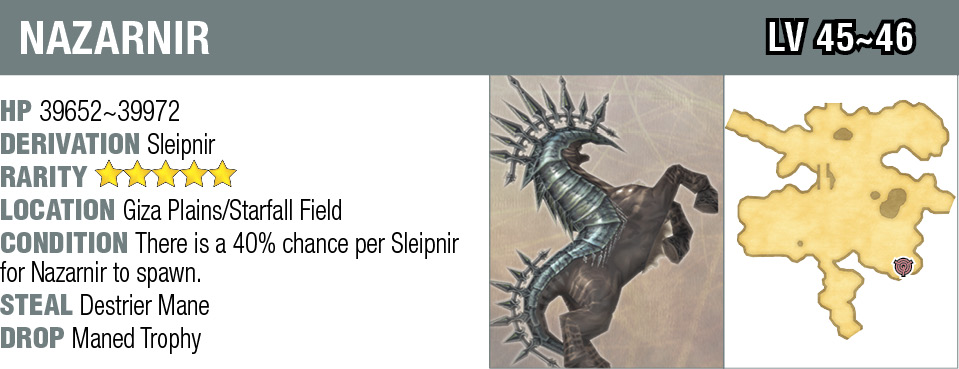
Rageclaw
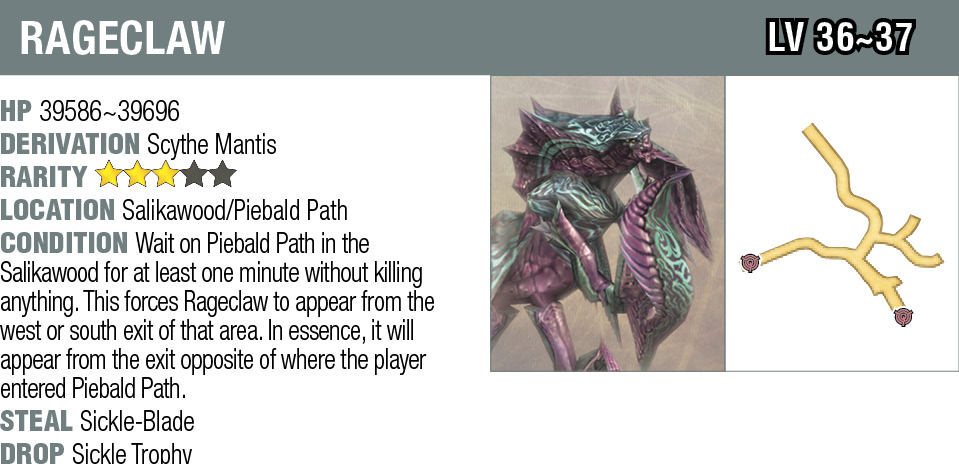
Skullash
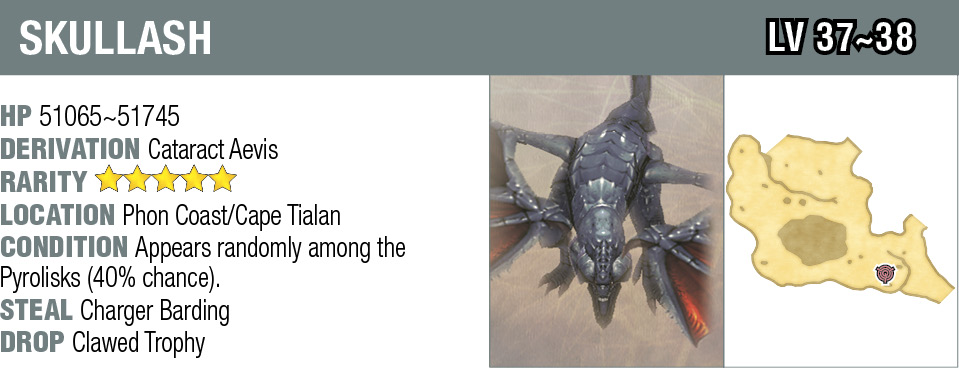
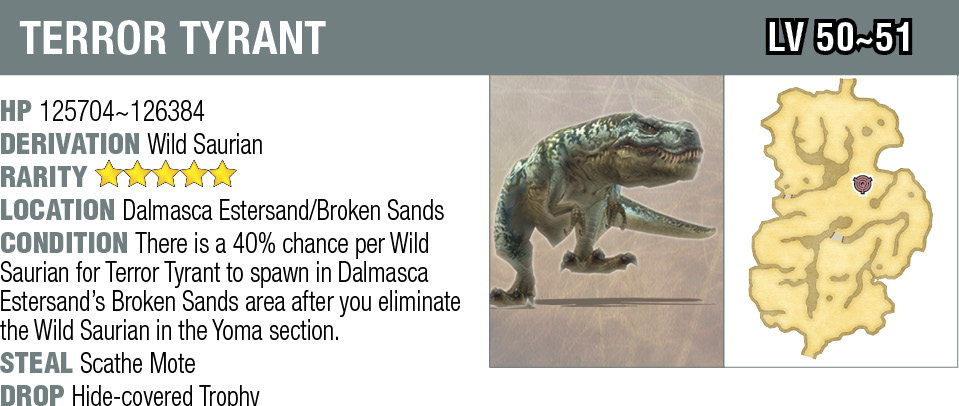
Terror Tyrant
Thalassinon
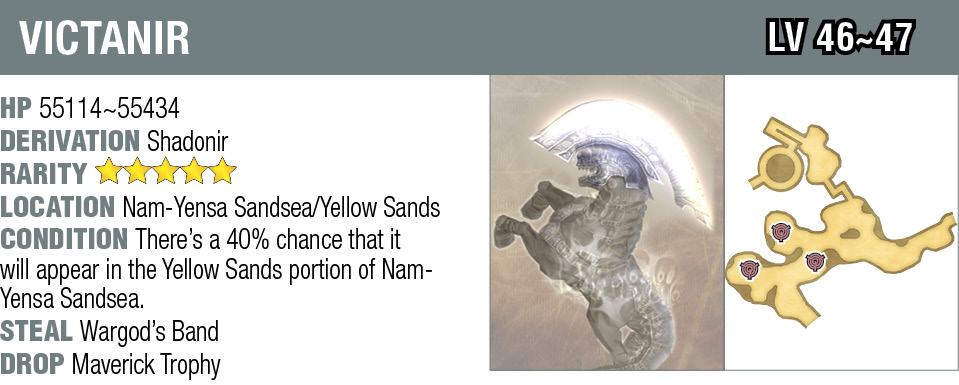
Victanir
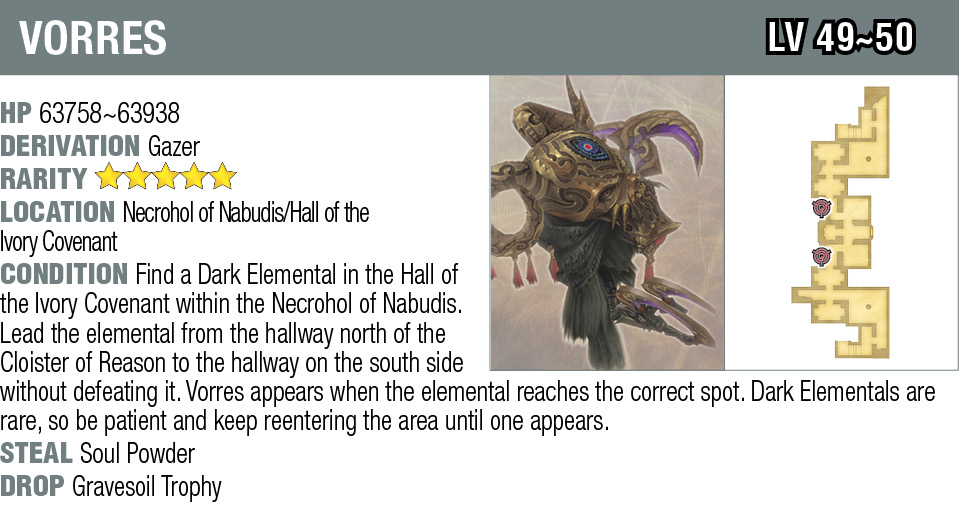
Vorres
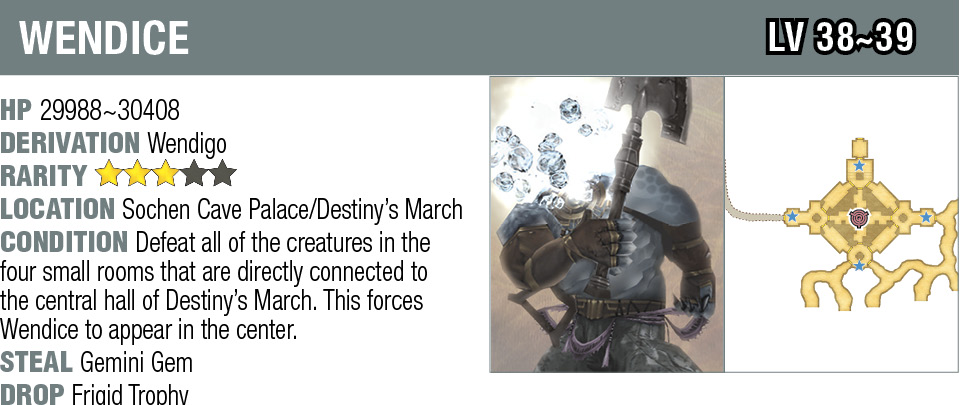
WENDICE
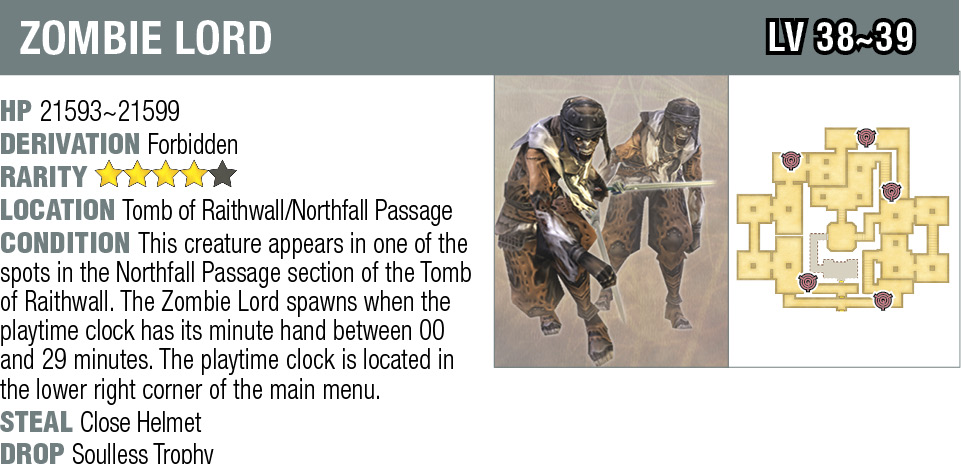
Zombie Lord
Atak, Blok, & Stok
When you collect trophies, take them back to the Phon Coast and turn them over to Atak, Blok, or Stok. Upon doing so, the bangaas add items to the Shifty-Eyed Man’s store. There are only 30 trophies in the game, so it will be very difficult to claim all of the potential rewards from this event. Refer to the lists below to determine which bangaa you should surrender the trophies to ahead of time.
| Atak, Weapon Procurer | ||
|---|---|---|
|
Trophies Given |
Weapon |
Cost |
|
1 |
Kiku-ichimonji |
9450 |
|
5 |
Holy Lance |
13050 |
|
10 |
Ame-no-Murakumo |
13500 |
|
15 |
Stoneblade |
29250 |
|
20 |
Orochi |
49500 |
|
25 |
Ultima Blade |
75000 |
|
30 |
Masamune |
700000 |
| Blok, Protectives Procurer | ||
|---|---|---|
|
Trophies Given |
Armor |
Cost |
|
1 |
Platinum Armor |
8370 |
|
5 |
Minerva Bustier |
11160 |
|
10 |
White Mask |
21750 |
|
15 |
Aegis Shield |
57600 |
|
20 |
Dueling Mask |
117000 |
|
25 |
Grand Helm |
123750 |
|
30 |
Grand Armor |
162000 |
| Stok, Sundries Procurer | ||
|---|---|---|
|
Trophies Given |
Armor |
Cost |
|
1 |
Thief’s Cuffs |
3600 |
|
5 |
Ruby Ring |
10200 |
|
10 |
Opal Ring |
19200 |
|
15 |
Golden Amulet |
5400 |
|
20 |
Cat-ear Hood |
36000 |
|
25 |
Bubble Belt |
47520 |
|
30 |
Nihopalaoa |
360000 |
| Possible Rewards | ||||
|---|---|---|---|---|
|
Trophies to Atok |
To Blok |
To Stok |
Item |
Cost |
|
12 |
5 |
5 |
Artemis Bow & Artemis Arrows |
61600 |
|
5 |
12 |
5 |
Black Mask |
18600 |
|
10 |
5 |
0 |
Eight-fluted Pole |
70200 |
|
5 |
5 |
15 |
Genji Gloves |
447000 |
|
1 |
1 |
25 |
Indigo Pendant |
60000 |
|
1 |
25 |
1 |
Lordly Robes |
132000 |
|
5 |
10 |
5 |
Maximillian |
20400 |
|
25 |
1 |
1 |
Tula & Grand Bolts |
104000 |
|
5 |
5 |
12 |
Turtleshell Choker |
11160 |
|
10 |
10 |
10 |
Zodiac Spear & Zodiac Escutcheon |
999999 |
You’ll have to make some tough choices, despite the great spoils available here. If you go for a three-way tie, you won’t open access to any items that require procurers to get more than 10 trophies. And if you go for a single procurer winning with 16+ trophies, you’ll have to find some other place to get items from the Staff of the Magi, Ensanguined Shield, and Sage’s Ring group. What’s best here depends entirely on how you’ve constructed your battle party. You’ve got a chance to get Tula, the best crossbow, for a Time Battlemage, or the Zodiac Spear for an Uhlan. Meanwhile, Staff of the Magi and Sage’s Ring make Black Mages salivate, and Ribbon is, as ever in Final Fantasy canon, fantastic for anyone.
| 30 Trophy Ceremony Perks | ||
|---|---|---|
|
Winning Procurer |
Trophy Split |
Reward |
|
3-Way Tie |
10/10/10 |
Staff of the Magi, Ensanguined Shield, Sage's Ring |
|
Atak-Blok Tie |
15/15 |
Staff of the Magi, Ensanguined Shield |
|
Atak-Stok Tie |
15/15 |
Staff of the Magi, Sage's Ring |
|
Blok-Stok Tie |
15/15 |
Ensanguined Shield, Sage's Ring |
|
Atak |
16+ |
Zodiac Spear |
|
Blok |
16+ |
Zodiac Escutcheon |
|
Stok |
16+ |
Ribbon |
Hunt Club Owner
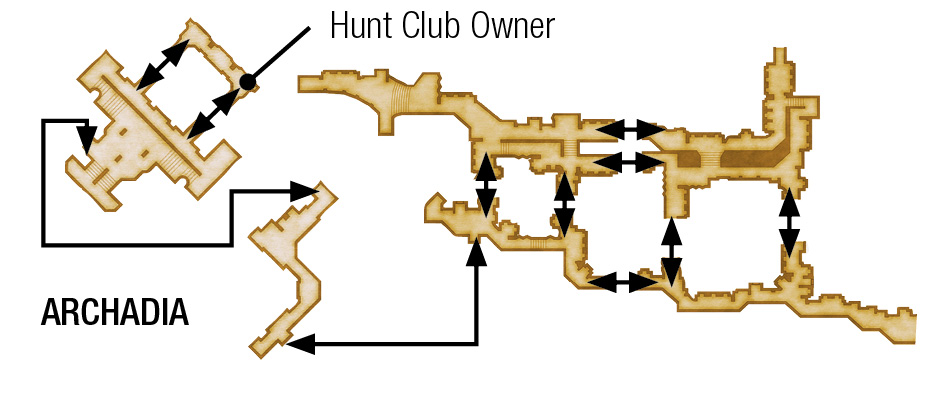
Only the most elite Archadians ever see the Highgarden Terrace. One of those citizens is the Hunt Club Owner, who takes a special interest in the party’s exploits. Visit him from time to time to collect additional rewards for finding the 30 rare monsters.
| Trophies | Reward |
|---|---|
|
5 |
Aries Gem & Libra Gem |
|
10 |
Taurus Gem & Scorpio Gem |
|
15 |
Gemini Gem & Sagittarius Gem |
|
20 |
Cancer Gem & Capricorn Gem |
|
25 |
Leo Gem & Aquarius Gem |
|
30 |
Virgo Gem & Pisces Gem |
The Great Cockatrice Escape
Visit the Nomad Village in Giza Plains during The Dry to learn that the cockatrices have all disappeared. Speak to the boy Terra within the pen to learn about a special feather that allows one to communicate with the mystic birds.
The Feather of the Flock is inside an urn within the Tracks of the Beast area, which is only accessible during The Rains. Check out the Paradise Risen hunt to learn more about accessing this area. You can’t track down the cockatrices until you acquire the feather.
Chit (Eruyt Village/Fane of the Path)
Speak to Chit and then Mjrn, who is standing next to her. Check the ground next to them to find a Sparkling Light, then examine it to find a Dewdrop Pebble. Offer the Dewdrop Pebble to Mjrn, who asks the party to return more of the pebbles. There are eight more to find:
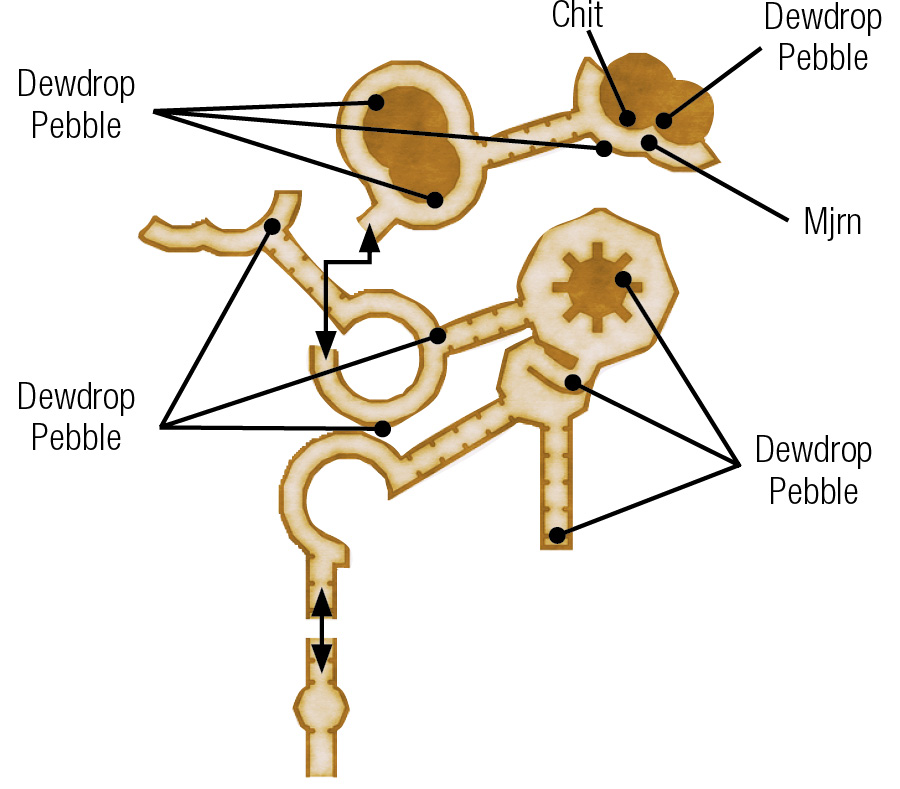
Return the pebbles to Mjrn and speak to Chit again. Pick up the object that falls out of Chit’s wing and lands on the ledge. Present the new pebble to Mjrn. Chit leaves for Giza and presents the party with a Yoichi Bow.
Renn (Rabanastre/North End)
Look for this cockatrice in an alcove at the top of North End. After speaking to the cockatrice, it flees the alcove and begins walking a long loop around North End. It runs away any time you attempt to run toward it and just plain walking is too slow. Staying in one spot doesn’t work either, since the bird runs away if it spots anyone.
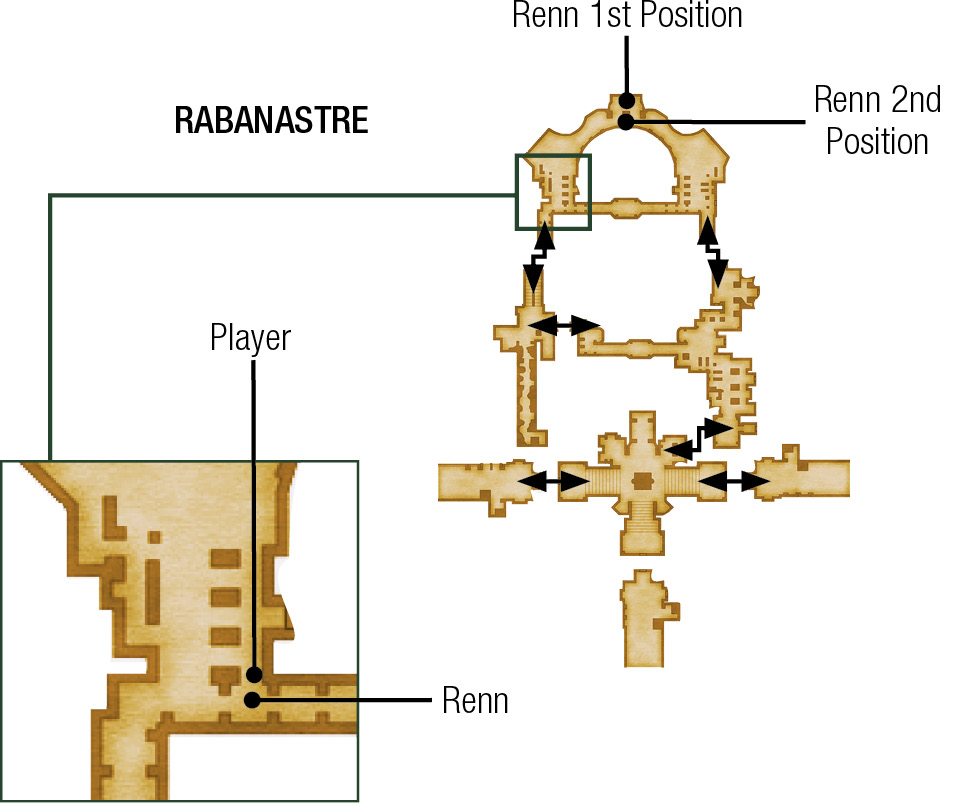
Use the entrances around the shops to sneak up on the cockatrice. Get ahead of it and stand behind the pillars by a shop’s door, then slowly walk out to the cockatrice’s side as it passes and engage it in conversation. Select “Erm… no?” Renn is willing to go home if Chit is already there and presents the party with a Deathbringer. If not, he returns to the top of North End to await word of Chit’s arrival in Giza Plains.
Shurry (Jahara/Lull of the Land)
Shurry is found on the west side of Lull of the Land. Speak to the Garif Herder next to her and then to Shurry. Speak to the Garif Herder again and tell him that the cockatrice comes from Giza Plains. The Garif Herder then instructs the party to speak to the Great-chief.
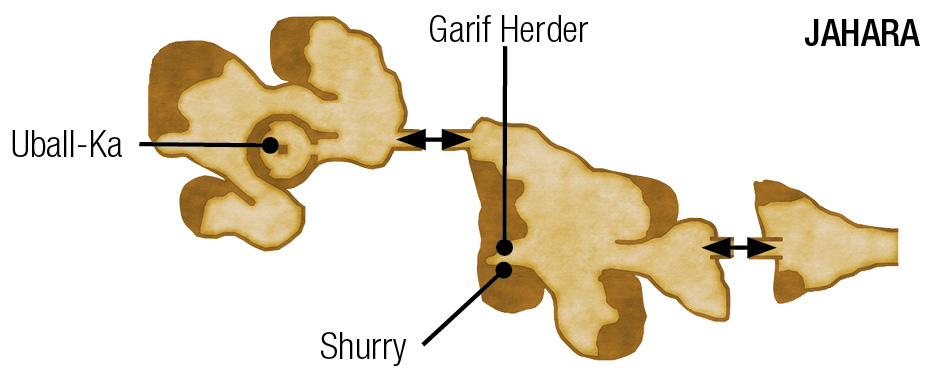
Enter The Elderknoll and tell Great-chief Uball-Ka about the visitor. He presents the party with the Gift of the Great-chief. Return the gift to Shurry and speak to the Garif Herder once more. The Garif Herder then presents the party with a Platinum Dagger.
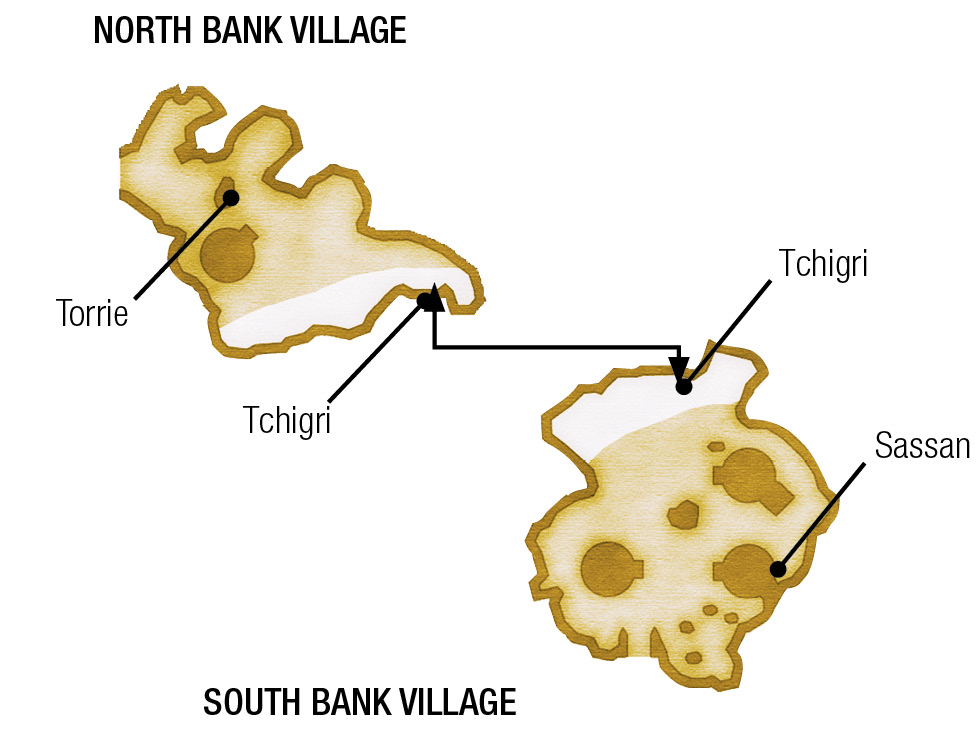
Sassan (Dalmasca Estersand/South Bank Village)
Sassan wants to see Torrie in North Bank Village, but won’t go near Nathyl, the wolf. Speak to Tchigri about crossing the river to learn more. Select Nathyl when Tchigri asks about taking someone along. Return to South Bank Village and select “no one” when asked. Speak to Tchigri again and choose to cross the river with Arryl. Return to South Bank Village once more while taking “no one” back. Talk to Tchigri one last time and select “Sassan” when crossing the river. Follow Sassan into North Bank Village and speak to him again. He returns to Giza and the party earns a Koga Blade.
Agytha (Archades/Grand Arcade)
First, the party must gain access to the Grand Arcade, which requires a Sandalwood Chop. To obtain this item, the party must match stories in Archades, then trade Pine Chops for a Sandalwood Chop (see the “Archades Information Exchange”).
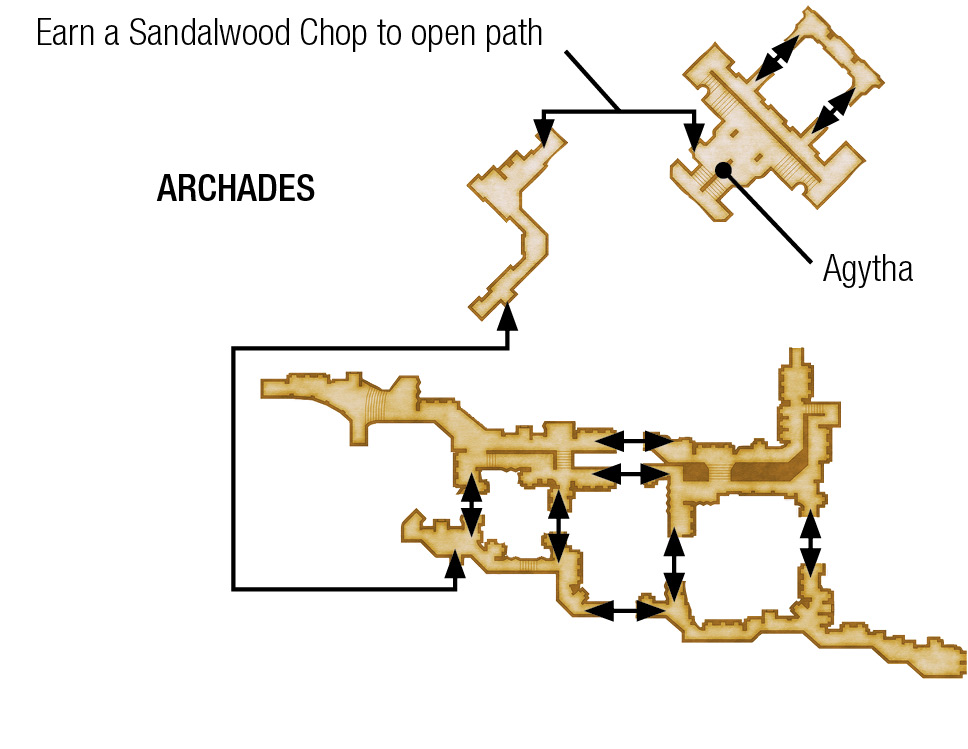
Upon entering the Grand Arcade, the party finds the cockatrice Agytha who is looking for a mate. The mate is in the northeast corner of the Alley of Low Whispers in Old Archades. Tell Agytha about the cockatrice and she leaves immediately, giving the party a Tumulus and eventually returning to Giza.
Moomer (Balfonheim Port/Sea Breeze Lane)
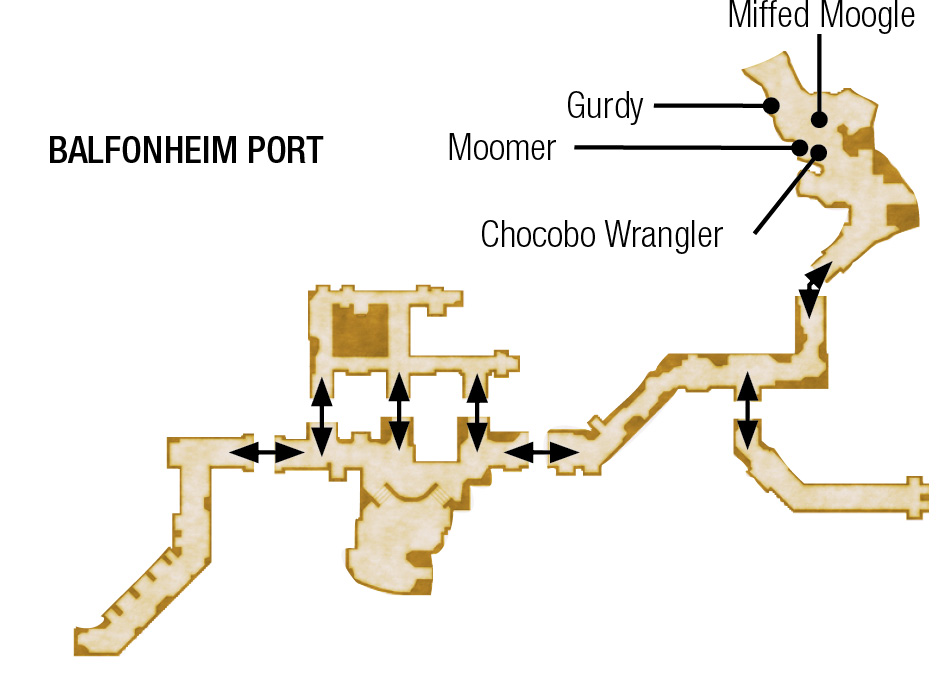
Speak to the Chocobo Wrangler sitting by the pen and show her the Feather of the Flock. Talk to the Miffed Moogle when it approaches the fence, then go to Gurdy after speaking to the Miffed Moogle. The party receives a Defender and Moomer returns to Giza.
Terra’s Reward
Return to the Nomad Village in Giza Plains during The Dry and talk to Terra to obtain a final reward of two Hi-Ethers. You can also speak to the cockatrices once more to hear how their adventures turned out.
Fishing Nebra River
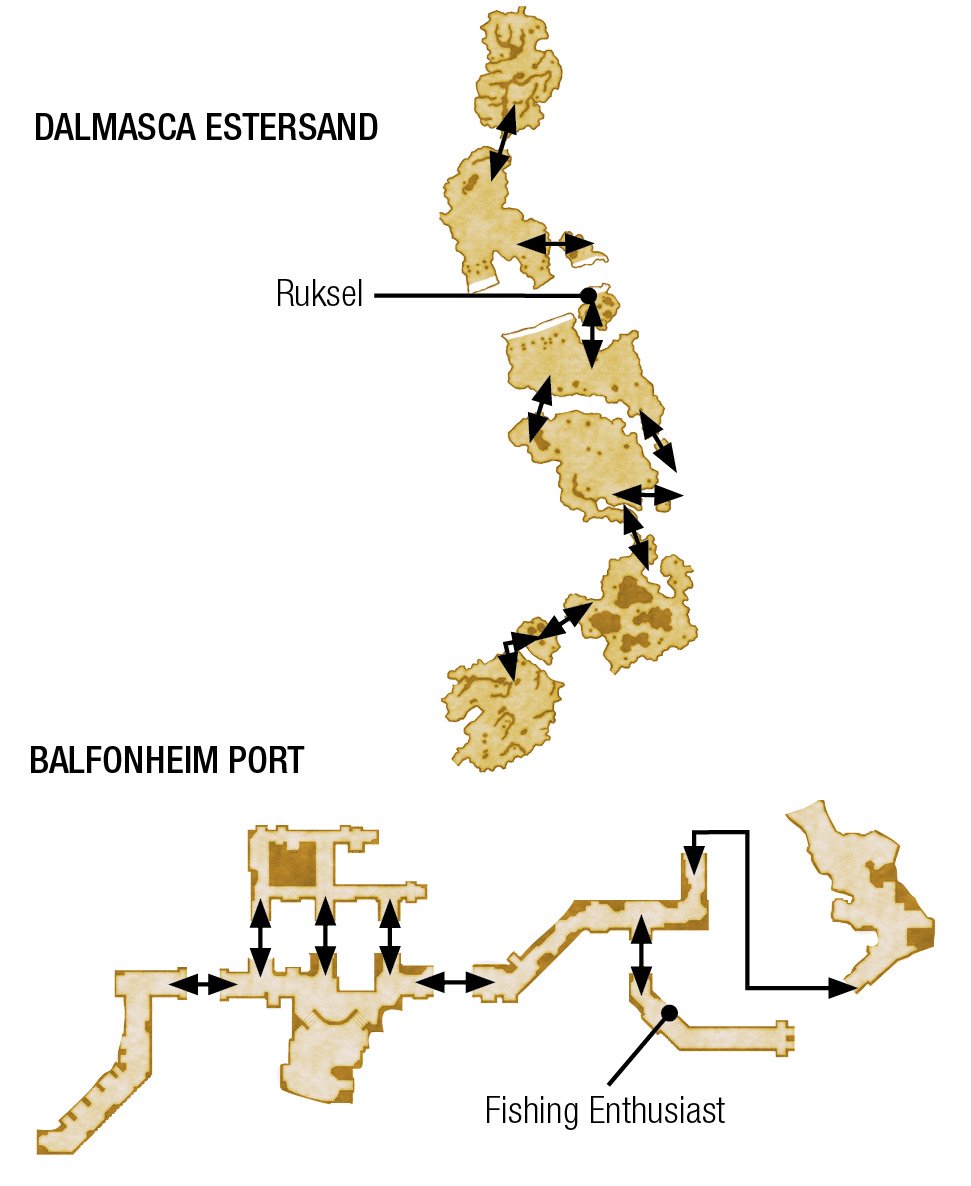
Talk to Ruksel on the west dock in South Bank Village in Dalmasca Estersand. He mentions that he wants to fish, but he doesn’t have a rod. Travel to Balfonheim Port and seek out the Fishing Enthusiast in the Chivany Breakwater section. Speak to her twice and ask about her fishing rod. Run to the aerodrome’s entrance and then back to where the Fishing Enthusiast was sitting without leaving the area. Check the wall to find the Muramata fishing rod, then return to Ruksel and present the rod to him.
Ruksel is all set to go fishing, but he needs Vaan’s help. Vaan must quietly signal to Ruksel the kind of fish that has been hooked so it can be reeled in. A line of four to eight buttons appears on-screen moving from left to right, right to left, top to bottom, or bottom to top. Quickly enter the commands before they reach the opposite side of the screen. Press the buttons in order to capture a fish. Miss a button, or take too long entering the commands, and the fish escapes.
The goal is to catch all six fish in one outing to collect a bonus prize. Downstream is the only fishing spot available at the start, but there are actually five fishing spots in all. Unlock the second location, Midstream, by getting five perfects at Downstream. Unlock the third location, Upstream, by scoring five more perfects at Midstream. The other two locations require some detective work.
Downstream
|
GOAL: |
Clear section five times in a row to unlock Midstream. |
|---|
Downstream is a nice starting area. The commands always appear on the left or right side, so there’s plenty of time to enter them as they skip across the screen. Catch all six fish in one outing to earn one of the prizes. Do it five times in a row to unlock Midstream.
| Potential Commands | |
|---|---|
|
Command |
Fish |
|
|
Common Fish |
|
|
Common Fish |
|
|
Common Fish |
|
|
Common Fish |
|
|
Common Fish |
|
|
Common Fish |
|
|
Common Fish |







| Command Movement | |
|---|---|
|
Direction |
Probability |
|
|
100% |
|
|
0% |


| Perfect Fishing Rewards | |
|---|---|
|
Reward |
Probability |
|
100 gil |
34% |
|
Hi-Potion |
33% |
|
Water Stone |
33% |
Midstream
|
GOAL: |
Clear section five times in a row with a perfect score to unlock Upstream. |
|---|
The fishing gets a little tougher here, as commands begin to appear at the top or bottom of the screen, moving up or down. The commands also get a little longer, plus the shoulder buttons are added into the mix. Clear this section five times with a perfect score to open Upstream.
| Potential Commands | |
|---|---|
|
Command |
Fish |
|
|
Common Fish |
|
|
Common Fish |
|
|
Common Fish |
|
|
Common Fish |
|
|
Common Fish |
|
|
Delicious Fish |
|
|
Delicious Fish |







| Command Movement | |
|---|---|
|
Direction |
Probability |
|
C/D |
40% |
|
A/B |
60% |
| Perfect Fishing Rewards | |
|---|---|
|
Reward |
Probability |
|
Fish Scale |
34% |
|
100 gil |
33% |
|
Water Stone |
33% |
Upstream
Upstream tests your reflexes and controller knowledge. The commands are all at least four buttons long and a bit trickier. You can’t unlock the next area until the party hunts down the Matamune rod and catches the Cactoid Compact. You can only catch the Cactoid Compact once. The reward table changes slightly at that point, adding the Cactoid Compact’s extra 10% to the Turtle Shell’s drop rate.
| Potential Commands | |
|---|---|
|
Command |
Fish |
|
|
Common Fish |
|
|
Common Fish |
|
|
Delicious Fish |
|
|
Delicious Fish |
|
|
Delicious Fish |
|
|
Delicious Fish |
|
|
Delicious Fish |
|
|
Delicious Fish |
|
|
Delicious Fish |









| Command Movement | |
|---|---|
|
Direction |
Probability |
|
C/D |
40% |
|
A/B |
60% |
| Perfect Fishing Rewards | |
|---|---|
|
Reward |
Probability |
|
Fish Scale |
30% |
|
Turtle Shell |
30% |
|
Frogspawn |
30% |
|
Cactoid Compact |
10%* |
*Requires Matamune; can only be caught once; 10% is added to Turtle Shell once Cactoid Compact is caught.
Matamune Hunt
The Matamune is a legendary cursed fishing rod and finding it isn’t easy. To do so, you must first defeat Gilgamesh in the Battle on the Big Bridge clan hunt, then solve several puzzles and track down clues all over the world. While fishing in the first three areas, the party will occasionally catch an Empty Bottle instead of a fish. When Ruksel hands the bottle over, it may turn out to be one of five special colored bottles. Each of the colored bottles has a note inside that you can view in the Key Items menu. The notes are actually cryptic clues that lead to rewards and additional clues.
1. Blue Bottle
|
CLUE: |
Truth lies just beyond falsehood. CDZCKZMCRANZS |
|---|
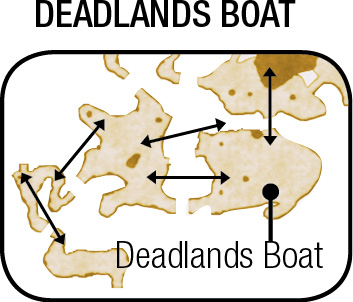
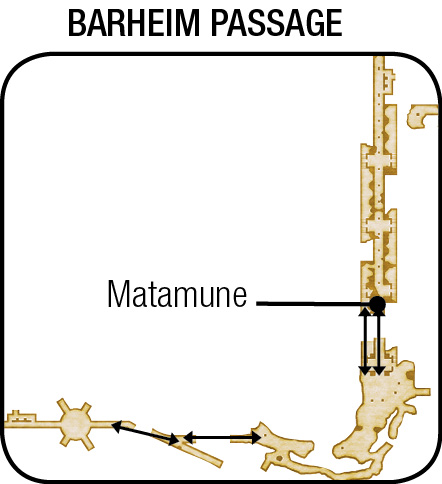
The clue suggests that the real answer is one step beyond the fake. Replace each letter with the following letter in the alphabet (A>B, B>C, etc). The answer is: DEADLANDS BOAT. The boat is located in the southeast corner of the Echoes of the Past section of Nabreus Deadlands. Look for a faint glow in the water. Hold the Blue Bottle near the glow to obtain an X-Potion and a Wanly Limned Message with “River…unde…o” written on it.
2. Green Bottle
|
CLUE: |
Skip on stones to far bank’s shore, by skipping stones return once more. SSADLNIAKLADHAUETDNREA |
|---|
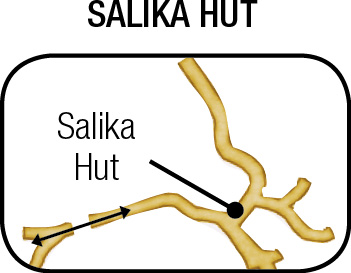
This puzzle suggests skipping across the clue and then coming back. Start at the left end and read every other letter, then start at the right and read the remaining letters. The answer is: SALIKA HUT NEAR DEADLANDS. The hut is in the center of the Piebald Path in The Salikawood. Check the entrance to locate a faint glow. Hold the Green Bottle near the glow to find a Hastega Mote and a Green-hued Message with “Forest…rgro…w” written on it.
3. Red Bottle
|
CLUE: |
Foothills rise in mountains’ shadow. nhIiQsTUrEe |
|---|
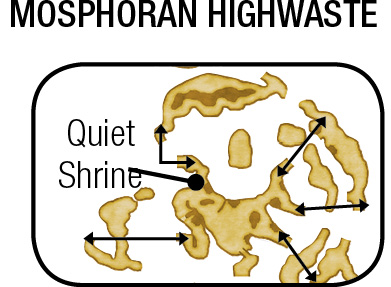
Go to Mosphoran Highwaste’s Babbling Vale and search the northwest corner for a Quiet Shrine. Hold the Red Bottle to the Quiet Shrine to receive a Holy Mote and a Vermillion Message. The message reads, “Fire…undb…h.”
4. Yellow Bottle
|
CLUE: |
Dragons stir among the eaters of the wind. 1 2 – – 5 – 7 – 9 – |
|---|
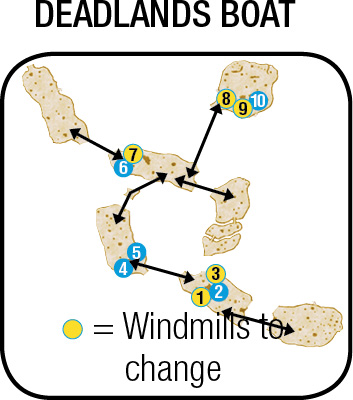
This is one of the tougher puzzles, since it doesn’t provide any info about the location. Note there are 10 numbers, though, which matches the 10 windmills in Cerobi Steppe that are numbered one through ten. 1, 2, and 3 are at North Liavell Hills. 4 and 5 are at The Terraced Bank, while 6 and 7 are in Crossfield. Finally, 8, 9, and 10 are lined up in The Northsward. Turn on (or leave on) windmills 1, 2, 5, 7, and 9 and turn off (or leave off) windmills 3, 4, 6, 8, and 10. The party receives an Auric Message when all of the windmills are adjusted properly. The message reads, “Ash…ridge…e.”
5. Black Bottle
|
CLUE: |
Easy as a, b, c, so count yourself lucky. 19-12-21-9-3-5-7-1-20-5-18-1-20-19 |
|---|
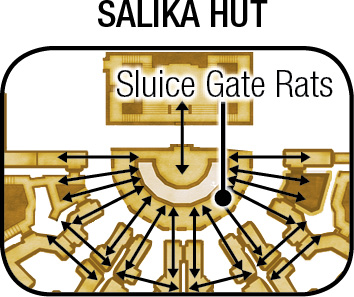
This clue suggests counting letters to solve the puzzle. Write down 1 to 26 on a piece of paper, then place every letter of the alphabet under the numbers starting with 1:A to 26:Z. Next, replace the numbers in the puzzle with the matching letter. The answer is: SLUICE GATE RATS. Enter the Central Waterway Control in the Garamsythe Waterway and look for some rats running around the south side of the room. Follow them to the point where they all congregate to find a faint glow. Hold the Black Bottle up to the faint glow to obtain an Elixir and an Onyx Message. This message says, “Darkness…eton…e.”
Putting the Pieces Together
After completing all of these tasks, you have collected five more messages with the following clues:
- River…unde…o
- Forest…rgro…w
- Fire…undb…h
- Ash…ridg…e
- Darkness…eton…e
Use the five words at the beginning of the messages to determine the logical order: River, Forest, Fire, Ash, Darkness. Next, put the words in the middle together in the same order: unde/rgro/undb/ridg/eton (underground bridge ton). Line up the final five letters in the same order: owhee. The last part is a little cryptic, since it’s missing a letter, but the full answer seems to be: underground bridge to nowhere. There’s only one place that matches that description.
Hidden Shoals
Hidden Shoals is a little tougher than Upstream. Some of the commands are repeats and there’s a new six-button command that’s a little tricky. The goal here is to keep fishing and getting perfect scores and rewards until you receive the Cactoid Commendation. This can take a long time, so be patient and keep practicing. Vaan can fish at the Den of the River Lord after obtaining the Cactoid Commendation.
| Potential Commands | |
|---|---|
|
Command |
Fish |
|
|
Delicious Fish |
|
|
Delicious Fish |
|
|
Delicious Fish |
|
|
Delicious Fish |
|
|
Nebra Succulent |





| Command Movement | |
|---|---|
|
Direction |
Probability |
|
|
40% |
|
|
60% |


| Perfect Fishing Rewards | |
|---|---|
|
Reward |
Probability |
|
Hi-Potion |
45% |
|
Adamantite |
45% |
|
Cactoid Commendation |
10% |
Den of the River Lord
The Den of the River Lord is extremely challenging. The commands get very long, so it pays to learn them all. The most important command is the eight-button command for the King of Nebra. This command appears repeatedly when the player first fishes here. The King of Nebra has nine lives. Catch it 10 times, but note that you don’t have to catch them all in a row or even on the same trip to capture the King of Nebra and earn Lu Shang’s Badge, the ultimate reward for this side quest!
| Potential Commands | |
|---|---|
|
Command |
Fish |
|
|
Nebra Succulent |
|
|
Nebra Succulent |
|
|
Nebra Succulent |
|
|
Nebra Succulent |
|
|
Nebra Succulent |
|
|
King of Nebra |







| Command Movement | |
|---|---|
|
Direction |
Probability |
|
|
40% |
|
|
60% |


| Perfect Fishing Rewards | |
|---|---|
|
Reward |
Probability |
|
Adamantite |
50% |
|
Scarletite |
50% |
Balfonheim Port Footrace
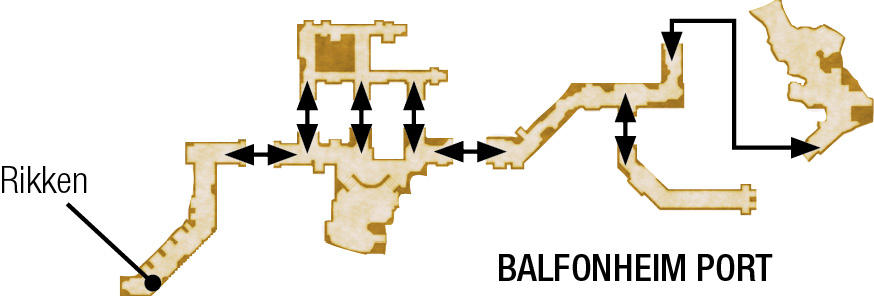
Rikken posts a bill for the Who’s the Strongest!? hunt, which leads Vaan to the Saccio Lane section of Balfonheim Port. Before he tells Vaan about the hunt, he challenges him to a footrace through the streets. From this point forward, Vaan can race Rikken and his companions endlessly by talking to him again.
The footrace is a simple concept: rhythmically press the  button and the
  button to run. Keeping an even and steady pace is far more important than quickly mashing the buttons, as Vaan runs the same speed no matter how quickly you press the buttons. Go straight ahead by alternating between the and buttons. Tap the button repeatedly to turn left and the button to turn right. If you have trouble keeping a rhythm, you can also tap each button two or three times and still maintain a fairly straight line.
The real trick is in the strategy. There are three opponents: Rikken, the man, Elza, the woman, and Raz, the bangaa. Rikken is steady, but sticks to the left side of the track. He’s rarely a threat. Elza cuts across the track from left to right. She’s tough to beat if she gets all the way to the right. Raz is extremely fast, but clumsy. Vaan can knock him down to keep him from passing.
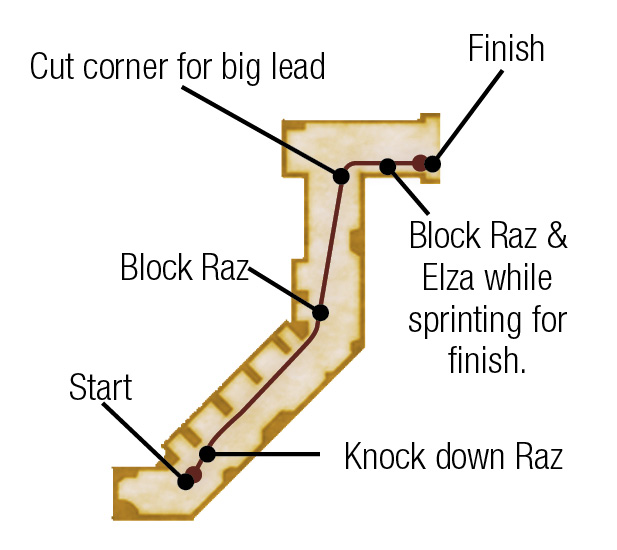
Keep an even pace at the start until Raz falls, then remain in the middle or slightly to the left to keep Elza to the left side of the track. Raz should make a move and try to come up the middle (preferable) or along the right side. Get in his way immediately if he comes up the middle. Otherwise, wait until after the
first turn to cut him off and knock him down by zipping over to the right.
Drift over to the right side of the track after the first turn and stay there until the second turn. With some luck, Elza will get hung up on Rikken and will be unable to cross to the right. Vaan is in trouble if she gets in front of him and to the right side. He can still make up ground at the turn and win, but it isn’t easy. The trick to beating Elza is keeping her on the left through the first turn so that Rikken blocks her from moving to the right in the second half of the course.
Cut the second corner as closely as possible, so Vaan just barely scrapes through without getting stuck. You can make up a ton of time with this move and can easily take the lead if Elza and Rikken remain outside and Raz has been held back. Go all out in the final stretch. Get in front of Elza if she’s neck-and-neck with Vaan and beware of Raz making a late charge for the lead.
There are 100 tiers to the footrace event. You receive a prize and move up a tier each time you win until you get the ultimate prize at tier 100. There’s no penalty for losing and it isn’t necessary to clear all the tiers in one sitting, so race with confidence and rest your fingers now and then.
Footrace Rewards
| Tier | Reward |
|---|---|
|
1 |
Potion |
|
2 |
Phoenix Down |
|
3 |
Eye Drops |
|
4 |
Antidote |
|
5 |
10 gil, Echo Herbs |
|
6 |
Gold Needle |
|
7 |
Alarm Clock |
|
8 |
Handkerchief |
|
9 |
Bacchus’s Wine |
|
10 |
100 gil & Balance Motes x2 |
|
11 |
Potion x2 |
|
12 |
Phoenix Down x2 |
|
13 |
Eye Drops x2 |
|
14 |
Antidote x2 |
|
15 |
20 gil & Echo Herbs x2 |
|
16 |
Gold Needle x2 |
|
17 |
Alarm Clock x2 |
|
18 |
Handkerchief x2 |
|
19 |
Bacchus’s Wine x2 |
|
20 |
300 gil & Float Motes x2 |
|
21 |
Potion x3 |
|
22 |
Phoenix Down x3 |
|
23 |
Eye Drops x3 |
|
24 |
Antidote x3 |
|
25 |
30 gil & Echo Herbs x3 |
|
26 |
Gold Needle x3 |
|
27 |
Alarm Clock x3 |
|
28 |
Handkerchief x3 |
|
29 |
Bacchus’s Wine x3 |
|
30 |
800 gil & Teleport Stones x3 |
|
31 |
Potion x4 |
|
32 |
Phoenix Down x4 |
|
33 |
Eye Drops x4 |
|
34 |
Antidote x4 |
|
35 |
40 gil & Echo Herbs x4 |
|
36 |
Gold Needle x4 |
|
37 |
Alarm Clock x4 |
|
38 |
Handkerchief x4 |
|
39 |
Bacchus’s Wine x4 |
|
40 |
1500 gil & Vanishga Motes x2 |
|
41 |
Potion x5 |
|
42 |
Phoenix Down x5 |
|
43 |
Eye Drops x5 |
|
44 |
Antidote x5 |
|
45 |
50 gil & Echo Herbs x5 |
|
46 |
Gold Needle x5 |
|
47 |
Alarm Clock x5 |
|
48 |
Handkerchief x5 |
|
49 |
Bacchus’s Wine x5 |
|
50 |
2500 gil & Reflectga Motes x2 |
|
51 |
Potion x6 |
|
52 |
Phoenix Down x6 |
|
53 |
Eye Drops x6 |
|
54 |
Antidote x6 |
|
55 |
60 gil & Echo Herbs x6 |
|
56 |
Gold Needle x6 |
|
57 |
Alarm Clock x6 |
|
58 |
Handkerchief x6 |
|
59 |
Bacchus’s Wine x6 |
|
60 |
3500 gil & Hi-Ethers x2 |
|
61 |
Potion x7 |
|
62 |
Phoenix Down x7 |
|
63 |
Eye Drops x7 |
|
64 |
Antidote x7 |
|
65 |
70 gil & Echo Herbs x7 |
|
66 |
Gold Needle x7 |
|
67 |
Alarm Clock x7 |
|
68 |
Handkerchief x7 |
|
69 |
Bacchus’s Wine x7 |
|
70 |
4500 gil & Holy Motes x2 |
|
71 |
Potion x8 |
|
72 |
Phoenix Down x8 |
|
73 |
Eye Drops x8 |
|
74 |
Antidote x8 |
|
75 |
80 gil & Echo Herbs x8 |
|
76 |
Gold Needle x8 |
|
77 |
Alarm Clock x8 |
|
78 |
Handkerchief x8 |
|
79 |
Bacchus’s Wine x8 |
|
80 |
6000 gil, Hastega Motes x2, & Caramel |
|
81 |
Potion x9 |
|
82 |
Phoenix Down x9 |
|
83 |
Eye Drops x9 |
|
84 |
Antidote x9 |
|
85 |
90 gil & Echo Herbs x9 |
|
86 |
Gold Needle x9 |
|
87 |
Alarm Clock x9 |
|
88 |
Handkerchief x9 |
|
89 |
Bacchus’s Wine x9 |
|
90 |
8000 gil, Scathe Motes x2, & Slime Oil |
|
91 |
Potion x10 |
|
92 |
Phoenix Down x10 |
|
93 |
Eye Drops x10 |
|
94 |
Antidote x10 |
|
95 |
100 gil & Echo Herbs x10 |
|
96 |
Gold Needle x10 |
|
97 |
Alarm Clock x10 |
|
98 |
Handkerchief x10 |
|
99 |
Bacchus’s Wine x10 |
|
100 |
10000 gil, Elixirs x2, & Unpurified Ether |
Wyrm Philosopher
| Pop odds | If pop, Gil odds & Amt | Normal Loot | w/Diamond Armlet | ||||
|---|---|---|---|---|---|---|---|
|
OG # |
App. % |
Gil % |
Amt. if Gil |
50% |
50% |
95% |
5% |
|
1 |
100% |
0% |
— |
Claymore |
Claymore |
Claymore |
Claymore |
|
2 |
20% |
20% |
~1000 |
Knot of Rust |
Knot of Rust |
Knot of Rust |
Arc Scale |
|
3 |
20% |
20% |
~1000 |
Knot of Rust |
Knot of Rust |
Knot of Rust |
Cross Scale |
|
4 |
20% |
20% |
~1000 |
Knot of Rust |
Knot of Rust |
Knot of Rust |
Ninja Gear |
|
5 |
20% |
20% |
~1000 |
Knot of Rust |
Knot of Rust |
Knot of Rust |
Perseus Bow |
|
6 |
20% |
20% |
~1000 |
Knot of Rust |
Knot of Rust |
Knot of Rust |
Ashura |
|
7 |
20% |
20% |
~1000 |
Knot of Rust |
Knot of Rust |
Knot of Rust |
Sweep |
|
8 |
20% |
20% |
~1000 |
Knot of Rust |
Knot of Rust |
Knot of Rust |
Gaia Gear |
|
9 |
20% |
20% |
~1000 |
Knot of Rust |
Knot of Rust |
Knot of Rust |
Multiscale |
|
10 |
20% |
20% |
~1000 |
Knot of Rust |
Knot of Rust |
Knot of Rust |
Hornito |
|
11 |
20% |
20% |
~1000 |
Knot of Rust |
Knot of Rust |
Knot of Rust |
Fumarole |
|
12 |
20% |
20% |
~1000 |
Knot of Rust |
Knot of Rust |
Knot of Rust |
Gold Hairpin |
|
13 |
20% |
20% |
~1000 |
Knot of Rust |
Knot of Rust |
Knot of Rust |
Sakura-saezuri |
|
14 |
20% |
50% |
~1000 |
Knot of Rust |
Knot of Rust |
Knot of Rust |
Dark Shot |
|
15 |
20% |
50% |
~1000 |
Knot of Rust |
Knot of Rust |
Knot of Rust |
Snapping Bolts |
|
16 |
20% |
50% |
~1000 |
Knot of Rust |
Knot of Rust |
Knot of Rust |
Dragon Helm |
|
17 |
10% |
80% |
~1000 |
Knot of Rust |
Knot of Rust |
Knot of Rust |
Dark Energy |
|
18 |
20% |
50% |
~1000 |
Knot of Rust |
Knot of Rust |
Knot of Rust |
White Mask |
|
19 |
20% |
50% |
~1000 |
Knot of Rust |
Knot of Rust |
Knot of Rust |
Rubber Suit |
|
20 |
20% |
20% |
~1000 |
Knot of Rust |
Knot of Rust |
Knot of Rust |
Cloud Staff |
|
21 |
20% |
50% |
~1000 |
Knot of Rust |
Knot of Rust |
Knot of Rust |
Minerva Bustier |
|
22 |
20% |
50% |
~1000 |
Knot of Rust |
Knot of Rust |
Knot of Rust |
Caldera |
|
23 |
20% |
50% |
~1000 |
Knot of Rust |
Knot of Rust |
Knot of Rust |
Caliper |
|
24 |
10% |
80% |
~1000 |
Knot of Rust |
Knot of Rust |
Knot of Rust |
Arcturus |
|
25 |
10% |
80% |
~1000 |
Knot of Rust |
Knot of Rust |
Knot of Rust |
Eight-fluted Pole |
|
26 |
20% |
50% |
~1000 |
Knot of Rust |
Knot of Rust |
Knot of Rust |
Zwill Crossblade |
|
27 |
20% |
50% |
~1000 |
Knot of Rust |
Knot of Rust |
Knot of Rust |
Water Bombs |
|
28 |
20% |
20% |
~1000 |
Knot of Rust |
Knot of Rust |
Knot of Rust |
Kagenui |
|
29 |
20% |
80% |
~1000 |
Knot of Rust |
Knot of Rust |
Knot of Rust |
Dark Matter |
|
30 |
20% |
80% |
~1000 |
Knot of Rust |
Knot of Rust |
Knot of Rust |
Dark Matter |
|
31 |
20% |
50% |
~1000 |
Knot of Rust |
Knot of Rust |
Knot of Rust |
Zeus Mace |
|
32 |
10% |
80% |
~1000 |
Knot of Rust |
Knot of Rust |
Knot of Rust |
Rod of Faith |
|
33 |
10% |
80% |
~1000 |
Knot of Rust |
Knot of Rust |
Knot of Rust |
Durandal |
|
34 |
20% |
50% |
~1000 |
Knot of Rust |
Knot of Rust |
Knot of Rust |
Black Robes |
|
35 |
20% |
50% |
~1000 |
Knot of Rust |
Knot of Rust |
Knot of Rust |
Golden Axe |
|
36 |
20% |
0% |
— |
Cleanse |
Cleanse |
Cleanse |
Cleanse |
|
37 |
20% |
50% |
~1000 |
Knot of Rust |
Knot of Rust |
Knot of Rust |
Black Mask |
|
38 |
20% |
80% |
~1000 |
Knot of Rust |
Knot of Rust |
Knot of Rust |
Megalixir |
|
39 |
20% |
50% |
~1000 |
Knot of Rust |
Knot of Rust |
Knot of Rust |
Muramasa |
|
40 |
10% |
80% |
~1000 |
Knot of Rust |
Knot of Rust |
Knot of Rust |
Stoneblade |
|
41 |
20% |
50% |
~1000 |
Knot of Rust |
Knot of Rust |
Knot of Rust |
Stone Shot |
|
42 |
20% |
50% |
~1000 |
Knot of Rust |
Knot of Rust |
Knot of Rust |
Iga Blade |
|
43 |
20% |
50% |
~1000 |
Knot of Rust |
Knot of Rust |
Knot of Rust |
Claymore |
|
44 |
20% |
80% |
~1000 |
Knot of Rust |
Knot of Rust |
Knot of Rust |
Mythril Blade |
|
45 |
10% |
80% |
~1000 |
Knot of Rust |
Knot of Rust |
Knot of Rust |
Grand Mace |
|
46 |
10% |
80% |
~1000 |
Knot of Rust |
Knot of Rust |
Knot of Rust |
Bonebreaker |
|
47 |
20% |
50% |
~1000 |
Knot of Rust |
Knot of Rust |
Knot of Rust |
Koga Blade |
|
48 |
20% |
80% |
~1000 |
Knot of Rust |
Knot of Rust |
Knot of Rust |
Whale Whisker |
|
49 |
20% |
80% |
~1000 |
Knot of Rust |
Knot of Rust |
Knot of Rust |
Maximillian |
|
50 |
20% |
80% |
~1000 |
Knot of Rust |
Knot of Rust |
Knot of Rust |
Dragon Whisker |
|
51 |
10% |
80% |
~1000 |
Knot of Rust |
Knot of Rust |
Knot of Rust |
Dark Energy |
|
52 |
10% |
80% |
~1000 |
Knot of Rust |
Knot of Rust |
Knot of Rust |
Grand Helm |
|
53 |
20% |
80% |
~1000 |
Knot of Rust |
Knot of Rust |
Knot of Rust |
Brave Suit |
|
54 |
20% |
80% |
~1000 |
Knot of Rust |
Knot of Rust |
Knot of Rust |
Fomalhaut |
|
55 |
20% |
80% |
~1000 |
Knot of Rust |
Knot of Rust |
Knot of Rust |
Megalixir |
|
56 |
20% |
80% |
~1000 |
Knot of Rust |
Knot of Rust |
Knot of Rust |
Mirage Vest |
|
57 |
10% |
80% |
~1000 |
Knot of Rust |
Knot of Rust |
Knot of Rust |
Meteorite (D) |
|
58 |
20% |
80% |
~1000 |
Knot of Rust |
Knot of Rust |
Knot of Rust |
Golden Scullcap |
|
59 |
20% |
80% |
~1000 |
Knot of Rust |
Knot of Rust |
Knot of Rust |
Glimmering Robes |
|
60 |
20% |
80% |
~1000 |
Knot of Rust |
Knot of Rust |
Knot of Rust |
Magepower Shishak |
|
61 |
20% |
80% |
~1000 |
Knot of Rust |
Knot of Rust |
Knot of Rust |
Orochi |
|
62 |
20% |
80% |
~1000 |
Knot of Rust |
Knot of Rust |
Knot of Rust |
Shell Shield |
|
63 |
20% |
80% |
~1000 |
Knot of Rust |
Knot of Rust |
Knot of Rust |
Bone of Byblos |
|
64 |
10% |
80% |
~1000 |
Knot of Rust |
Knot of Rust |
Knot of Rust |
Venetian Shield |
|
65 |
10% |
80% |
~1000 |
Knot of Rust |
Knot of Rust |
Knot of Rust |
Baltoro Seed |
|
66 |
10% |
80% |
~1000 |
Knot of Rust |
Knot of Rust |
Knot of Rust |
Grand Armor |
|
67 |
10% |
80% |
~1000 |
Knot of Rust |
Knot of Rust |
Knot of Rust |
Hunter's Blade |
|
68 |
20% |
80% |
~1000 |
Knot of Rust |
Knot of Rust |
Knot of Rust |
Lordly Robes |
|
69 |
20% |
80% |
~1000 |
Knot of Rust |
Knot of Rust |
Knot of Rust |
Megalixir |
|
70 |
10% |
80% |
~1000 |
Knot of Rust |
Knot of Rust |
Knot of Rust |
Volcano |
|
71 |
20% |
50% |
~1000 |
Knot of Rust |
Knot of Rust |
Knot of Rust |
Artemis Arrows |
|
72 |
20% |
80% |
~1000 |
Knot of Rust |
Knot of Rust |
Knot of Rust |
Circlet |
|
73 |
10% |
80% |
~1000 |
Knot of Rust |
Knot of Rust |
Knot of Rust |
Ultima Blade |
|
74 |
10% |
80% |
~1000 |
Knot of Rust |
Knot of Rust |
Knot of Rust |
Yagyu Darkblade |
|
75 |
20% |
80% |
~1000 |
Knot of Rust |
Knot of Rust |
Knot of Rust |
Renewing Morion |
|
76 |
20% |
80% |
~1000 |
Knot of Rust |
Knot of Rust |
Knot of Rust |
Dueling Mask |
|
77 |
10% |
80% |
~1000 |
Knot of Rust |
Knot of Rust |
Knot of Rust |
Euclid's Sextant |
|
78 |
10% |
80% |
~1000 |
Knot of Rust |
Knot of Rust |
Knot of Rust |
Sagittarius |
|
79 |
20% |
80% |
~1000 |
Knot of Rust |
Knot of Rust |
Knot of Rust |
Mythril Sword |
|
80 |
10% |
80% |
~1000 |
Knot of Rust |
Knot of Rust |
Knot of Rust |
Scorpion Tail |
|
81 |
20% |
50% |
~1000 |
Knot of Rust |
Knot of Rust |
Knot of Rust |
Chaperon |
|
82 |
20% |
50% |
~1000 |
Knot of Rust |
Knot of Rust |
Knot of Rust |
Aegis Shield |
|
83 |
20% |
50% |
~1000 |
Knot of Rust |
Knot of Rust |
Knot of Rust |
Demon Shield |
|
84 |
10% |
80% |
~1000 |
Knot of Rust |
Knot of Rust |
Knot of Rust |
Dark Energy |
|
85 |
20% |
50% |
~1000 |
Knot of Rust |
Knot of Rust |
Knot of Rust |
Grand Bolts |
|
86 |
20% |
50% |
~1000 |
Knot of Rust |
Knot of Rust |
Knot of Rust |
White Robes |
|
87 |
20% |
50% |
~1000 |
Knot of Rust |
Knot of Rust |
Knot of Rust |
Crown of Laurels |
|
88 |
10% |
80% |
~1000 |
Knot of Rust |
Knot of Rust |
Knot of Rust |
Staff of the Magi |
|
89 |
20% |
50% |
~1000 |
Knot of Rust |
Knot of Rust |
Knot of Rust |
Defender |
|
90 |
20% |
50% |
~1000 |
Knot of Rust |
Knot of Rust |
Knot of Rust |
Dragon Mail |
|
91 |
20% |
50% |
~1000 |
Knot of Rust |
Knot of Rust |
Knot of Rust |
Stink Bombs |
|
92 |
10% |
8% |
~1000 |
Knot of Rust |
Knot of Rust |
Knot of Rust |
Artemis Bow |
|
93 |
20% |
20% |
~1000 |
Knot of Rust |
Knot of Rust |
Knot of Rust |
Antares |
|
94 |
20% |
50% |
~1000 |
Knot of Rust |
Knot of Rust |
Knot of Rust |
Icecloud Arrows |
|
95 |
10% |
80% |
~1000 |
Knot of Rust |
Knot of Rust |
Knot of Rust |
Gastrophetes |
|
96 |
20% |
20% |
~1000 |
Knot of Rust |
Knot of Rust |
Knot of Rust |
Thief's Cap |
|
97 |
20% |
20% |
~1000 |
Knot of Rust |
Knot of Rust |
Knot of Rust |
Tumulus |
|
98 |
20% |
20% |
~1000 |
Knot of Rust |
Knot of Rust |
Knot of Rust |
Gilt Measure |
|
99 |
20% |
20% |
~1000 |
Knot of Rust |
Knot of Rust |
Knot of Rust |
Holy Rod |
|
100 |
20% |
20% |
~1000 |
Knot of Rust |
Knot of Rust |
Knot of Rust |
Blood Sword |
|
101 |
100% |
0% |
— |
Telekinesis |
Telekinesis |
Telekinesis |
Telekinesis |
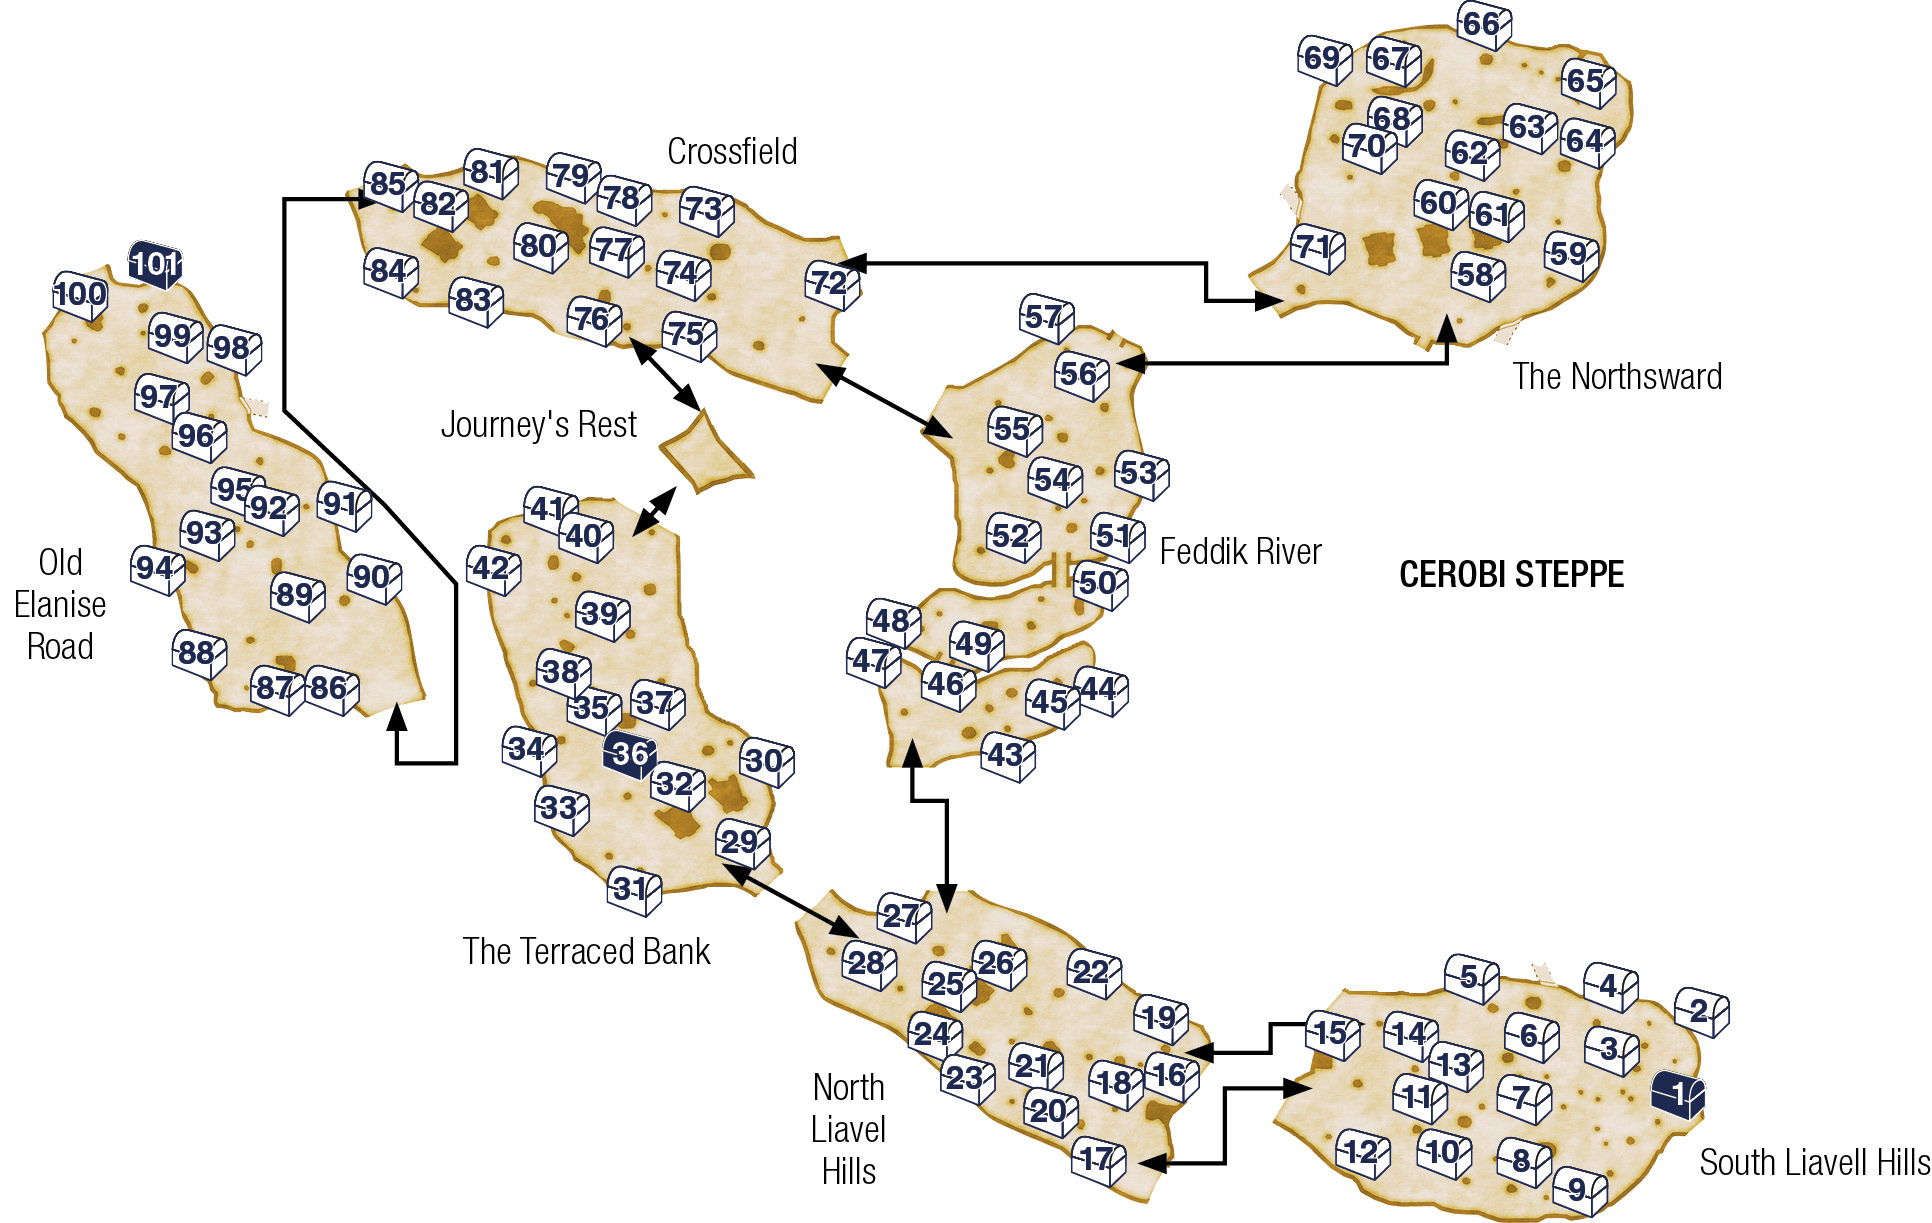
The Wyrm Philospher is found on a windmill in Cerobi Steppe. Check out windmill #10 in The Northsward to make him appear. He’s seeking the Vyraal Wyrm, which the party should have already defeated. Give him the Dragon Scale from the Vyraal Wyrm and he provides the party with an Ageworn Key.
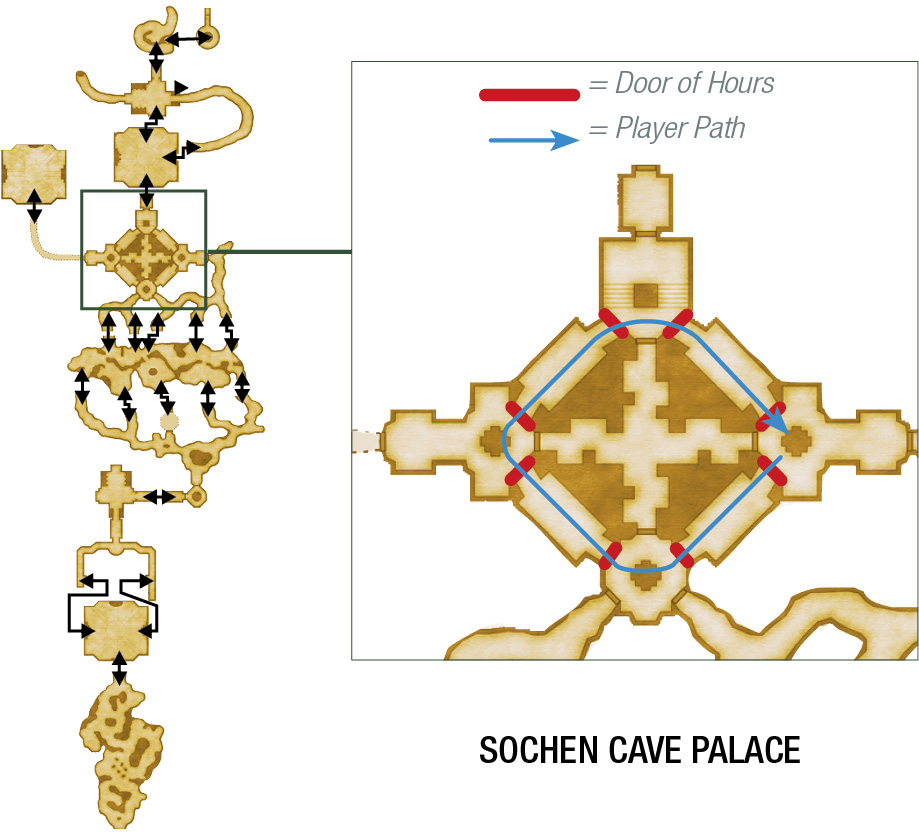
The Ageworn Key unlocks a secret chamber within the Sochen Cave Palace. The secret chamber is guarded by an ancient puzzle, which mentioned in certain clues scattered around the dungeon. To open the Hall of the Ascetic to the Hall of the Wroth God, you must walk a certain path through Destiny’s March.
Enter the Sochen Cave Palace from the south (Tchita Uplands). Proceed up the east side of the dungeon to the far east door into Destiny’s March. You must walk a circle around Destiny’s March, only opening the doors marked as a ‘Door of Hours’. Go clockwise starting on the east side and heading southwest, then follow the hall all the way around to the starting point. This triggers the Ascetic’s Door if done properly.
Go to the west side of Destiny’s March and check the Ascetic’s Door. Follow the Hall of the Ascetic down to the Hall of the Wroth God and use the Ageworn Key to enter the secret chamber.