
Assault Rifles
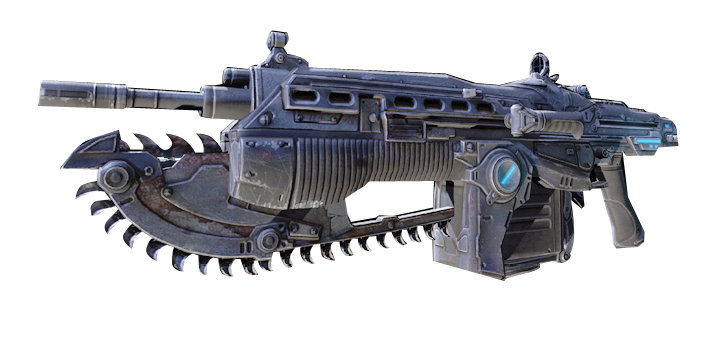
Lancer
Weapon Stats
| Magazine Size | Max Ammo | Rate of Fire | Reload Speed |
|---|---|---|---|
| 60 | 420 | 550/M | Fast |
In many ways, the Lancer has been every bit the face of the Gears of War franchise as Marcus Fenix and the Locust. This chainsaw-equipped assault rifle has long been the workhorse in the war against the Locust. Now, thanks to an expanded magazine that holds 20% more ammo, the Lancer is deadlier than ever. Furthermore, the Lancer gains the largest damage boost from a perfectly-executed Active Reload of any weapon.
The Lancer offers a near-perfect blend of power, accuracy, and range that makes it a solid choice in many situations. The Lancer can provide suppression fire at range, but it really comes into its own at medium-to-close range. Its stopping power is where it really excels against other weapons in its class. The Lancer can down an exposed enemy quickly, and its under-barrel chainsaw attachment provides instant lethality at close range.
Damage Statistics
| Difficulty | Standard Reload | Active Reload |
|---|---|---|
| Casual | 102 | 133 |
| Normal | 82 | 106 |
| Hardcore | 66 | 86 |
| Insane | 51 | 66 |
Active Reload increases the damage dealt by 30%.
Field Notes
Long Range: The Lancer can certainly hit its mark at long range, but damage and accuracy trail off the further the bullet travels. This results in a large expenditure of ammunition. Use the Lancer to suppress long-range targets, while you and your squad move into a more lethal range. Or pair the Lancer with a Longshot or Torque Bow for maximum effectiveness across all distances.
Medium Range: This is where the Lancer truly shines. Its high rate of fire, massive magazine clip, and above-average accuracy make it an excellent choice against exposed enemies. It can be blind fired with moderate accuracy from cover. It’s relatively stable on the move, though it’s better to employ hit-and-run tactics as you move from cover to cover to close the distance. The Lancer can down all but the toughest foes fairly quickly, and can often hit a small, exposed piece of an enemy behind cover.
Close Range: The Lancer has plenty of stopping power at close range—and a chainsaw melee attack for extreme close range—but players must be cautious when running headlong into a close-quarters encounter. Though the Lancer can win many point-blank duels, it will lose out consistently to an enemy armed with a Gnasher or Sawed-Off Shotgun. Check to see what enemy your target is wielding before closing on him. Backing away a few steps and hip-firing with the Lancer is the perfect counter to a shotgun.
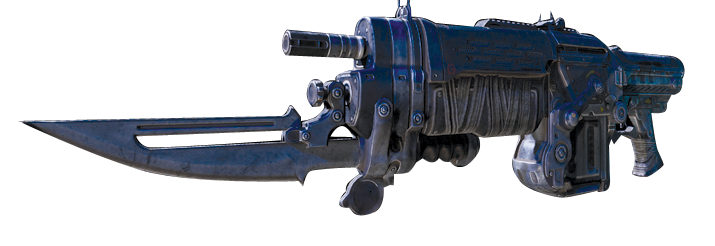
Retro Lancer
Weapon Stats
| Magazine Size | Max Ammo | Rate of Fire | Reload Speed |
|---|---|---|---|
| 30 | 210 | 500/M | Fast |
Leave it to the Locust to show up on the surface and immediately repurpose old COG equipment. The Retro Lancer makes its debut in Gears of War 3, despite predating E-Day. It exists throughout the campaign, both as a lone weapon pick-up and mounted alongside three others just like it on a Multi-Turret. You can thank the Savage Locust for that…
The Retro Lancer has just half the standard Lancer’s ammo capacity and a slightly slower firing rate. It’s also wildly inaccurate compared to the other assault rifles and must be fired in short bursts except at very close range. So why would anyone use it? Because it’s extremely powerful, that’s why. Its baseline damage rating is more than twice that of the Lancer! The Retro Lancer also features a lethal under-barrel bayonet attachment that allows players to make a long-distance, high-speed charge to impale an enemy—though this is arguably a more useful tactic in multiplayer.
Damage Statistics
| Difficulty | Standard Reload | Active Reload |
|---|---|---|
| Casual | 240 | 288 |
| Normal | 192 | 230 |
| Hardcore | 156 | 187 |
| Insane | 120 | 144 |
Active Reload increases the damage dealt by 20%.
Field Notes
Long Range: The Retro Lancer is not suited for long-range targets, except perhaps as a noise-maker. Though a stray bullet may hit its mark, the weapon’s low accuracy and smallish magazine make it a poor choice for long-range combat. Its ammo is too valuable at shorter distances to be used for suppression. Move in closer or switch weapons.
Medium Range: The Retro Lancer’s lethal stopping power begins to reveal itself at medium distance, though only if the target is outside cover. Aim for the enemy’s torso for the best odds, and continue to close the distance until you’re within 15 to 20 yards. This is also the maximum distance from which you should attempt a bayonet charge. Even then, try this only against enemies that are unaware of your intentions.
Close Range: The Retro Lancer can drop an enemy at close range in moments. Its power and fire rate are too much for all but the toughest foes to overcome. Even the Retro Lancer’s notorious inaccuracy is no concern inside 10 yards. The Retro Lancer is the only weapon with which you might want to take on a shotgun-wielding foe with at close range—it’s one of the rifle’s main strengths. Note that the bayonet charge requires roughly five yards to perform—don’t try it standing adjacent to your target.
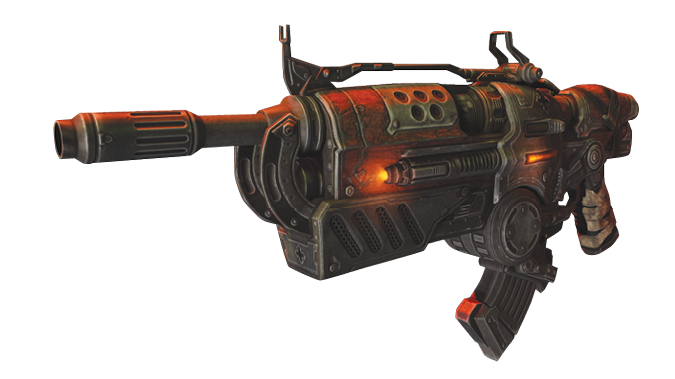
Hammerburst
Weapon Stats
| Magazine Size | Max Ammo | Rate of Fire | Reload Speed |
|---|---|---|---|
| 20 | 140 | 250/M | fast |
The Hammerburst is the Locust’s answer to the Lancer, a standard-issue assault rifle that its Drones can rely on in a variety of combat situations. Though its name hasn’t changed, the burst has been stripped away—the Hammerburst now fires in fully-automatic mode, though at a rate less than half that of the Lancer and Retro Lancer. Skilled players will find they can achieve a faster firing rate semi-automatically by rapidly squeezing the trigger.
Though the weapon’s six-round burst is gone, it’s every bit as powerful and accurate as it ever was. The Hammerburst has a higher baseline damage than the Lancer, though it’s lower than the Retro Lancer. The Hammerburst also now includes iron sights that assist in lining up a potential headshot when you zoom in on an enemy. The Hammerburst doesn’t have the Longshot’s range or power, but you can achieve headshot kills with it. The Hammerburst’s modifications, not to mention the prevalence of its ammo, make it a fine weapon to carry throughout much of the campaign.
Damage Statistics
| Difficulty | Standard Reload | Active Reload |
|---|---|---|
| Casual | 172 | 206 |
| Normal | 138 | 165 |
| Hardcore | 112 | 134 |
| Insane | 86 | 103 |
Active Reload increases the damage dealt by 20%.
Field Notes
Long Range: Of the three assault rifles, the Hammerburst is best suited to long-range combat, but only marginally. The inclusion of iron sights and the ability to fire individual rounds allow you to conserve ammo while you pressure a distant foe. Nevertheless, damage decreases at range, and lethal strikes are unlikely.
Medium Range: The Hammerburst is deadly at medium range. Its accuracy, power, and precision make it well suited to enemies in and out of cover, as well as those on the move. This is the ideal distance from which to aim for headshot kills.
Close Range: The Hammerburst can inflict heavy damage on an enemy at close range, but its slower firing rate may bring about your downfall if you go against an enemy with a shotgun or Retro Lancer. Either switch weapons, fall back into cover, or aim for the head—and cross your fingers.
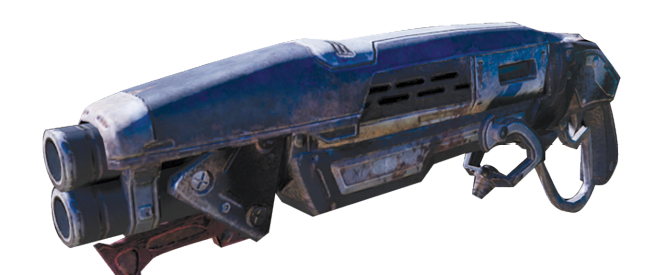
Gnasher
Weapon Stats
| Magazine Size | Max Ammo | Rate of Fire | Reload Speed |
|---|---|---|---|
| 8 | 39 | 60/M | Moderate |
The Lancer may be one of the most identifiable weapons in gaming, but the Gnasher has long been a workhorse for Gears of War players, particularly those battling in the game’s multiplayer arena. Though you’re unlikely to use the Gnasher as much in the campaign as in multiplayer, it’s a near-perfect close-range weapon. It’s an excellent complement to any rifle or power weapon.
The Gnasher is standard issue for many Locust Grenadiers, which means ammo is rarely in short supply. The Gnasher is the preferred weapon for dealing with smaller, nimbler enemies, like Wretches, Polyps, and Tickers. The Gnasher is most effective outside of cover, against enemies in open terrain or on the move. It’s also great against enemies that are in cover; switch to the Gnasher and mantle-kick an enemy, then immediately open fire with the Gnasher for this newfangled, two-part kill!
Damage Statistics
| Difficulty | Standard Reload | Active Reload |
|---|---|---|
| Casual | 1000 | 1200 |
| Normal | 800 | 960 |
| Hardcore | 650 | 780 |
| Insane | 500 | 600 |
Active Reload increases the damage dealt by 20%.
Field Notes
Long Range: The Gnasher does very little damage, if any, at long range. Save your ammo and either close toward the enemy or switch weapons.
Medium Range: The Gnasher is surprisingly effective at medium range, particularly against exposed enemies closing in on you with an assault rifle or pistol. You can blind fire the Gnasher from behind cover, but we don’t recommend it. If you lack a suitable weapon to switch to, take the risk and aim manually from behind cover.
Close Range: Few weapons are more at home at a particular range than the Gnasher is at close range. The Gnasher’s wide pellet spread makes it unnecessary to aim manually. Instead, fire the Gnasher from the hip and keep moving.
Sawed-Off Shotgun
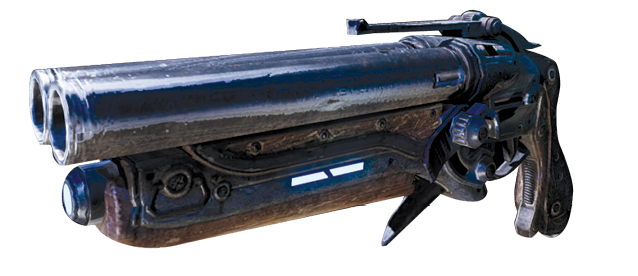
Weapon Stats
| Magazine Size | Max Ammo | Rate of Fire | Reload Speed |
|---|---|---|---|
| 1 | 12 | 20/M | Slow |
If you thought the Gnasher made a mess of the Locust, wait until you see this newest addition to the COG arsenal in action! The Sawed-Off Shotgun has but a single-shot capacity and a very long reload process. However, it packs enough power to obliterate two Locust with a single blast.
The Sawed-Off Shotgun has five times the Gnasher’s baseline damage, but it has just a fraction of a standard shotgun’s range. The Sawed-Off Shotgun is the ultimate risk-reward weapon, in that you must get very close to your target for it to be effective, and that is always a risk. It’s best to switch to the Sawed-Off Shotgun when you move in on enemies armed with long-range power weapons, or against enemies unaware of your approach. Never approach a Gnasher-wielding Locust with the Sawed-Off Shotgun; it’s too easy for the enemy to deliver lethal damage from outside your range.
Damage Statistics
| Difficulty | Standard Reload | Active Reload |
|---|---|---|
| Casual | 5000 | 5000 |
| Normal | 4000 | 4000 |
| Hardcore | 3250 | 3250 |
| Insane | 2500 | 2500 |
Active Reload increases reload speed only.
Field Notes
Long Range: You’d be better off hurling insults than firing the Sawed-Off Shotgun at a long-range opponent. Switch weapons immediately or find another enemy to target.
Medium Range: Don’t be lulled into thinking the Sawed-Off Shotgun has the same range as the Gnasher—it doesn’t. It’s not even close. Even enemies at medium range are still too far away to use the Sawed-Off Shotgun.
Close Range: No weapon is better at close range than the Sawed-Off Shotgun, with the emphasis on close! The Sawed-Off Shotgun’s double-barrel blast fires a spread wide enough to eviscerate two enemies with a single shot. But you must be within two to three steps of your targets, as the damage drops off precipitously beyond five yards. Even at this range, we still don’t recommend using this cannon of a boomstick against enemies in cover.