
Elder Scrolls V: Skyrim Guide The Atlas Hold 5: The Reach
Hold Capital: Markarth
Related Quests
- Civil War Quest: Liberation of Skyrim
- Civil War Quest: Compelling Tribute
- Daedric Quest: The House of Horrors
- Daedric Quest: Prelude: Hunger in the Hall*
- Daedric Quest: The Taste of Death
- Daedric Quest: A Night to Remember
- Side Quest: The Forsworn Conspiracy
- Side Quest: No One Escapes Cidhna Mine
- Temple Quest: The Heart of Dibella
- Temple Quest: The Book of Love
- Dark Brotherhood Quest: Mourning Never Comes
- Dark Brotherhood Quest: Breaching Security
- Dark Brotherhood Quest: Recipe for Disaster
- Thieves Guild Quest: Hard Answers
- Thieves Guild Radiant Quest: No Stone Unturned (x2)
- Thieves Guild Radiant Quest: Larceny Targets*
- Thieves Guild City Influence Quest: Silver Lining
- Dungeon Quest: The Lost Expedition
- Dungeon Activity (Understone Keep)
- Dungeon Activity (Abandoned House)
- Miscellaneous Objective: Innkeeper Rumors (Silver-Blood Inn)
- Miscellaneous Objective: Calcelmo’s Ring* (Kerah)
- Miscellaneous Objective: Dibella’s Shrine* (Lisbet)
- Miscellaneous Objective: The Steward’s Potion* (Bothela)
- Miscellaneous Objective: The Last Scabbard* (Ghorza gra-Bagol)
- Miscellaneous Objective: Triumph Over Talos* (Ondolemar)
- Miscellaneous Objective: The Heart of the Matter* (Moth gro-Bagol)
- Miscellaneous Objective: Neutralizing Nimhe* (Calcelmo)
- Favor (Activity): A Drunk’s Drink* (Cosnach)
- Favor (Activity): A Drunk’s Drink* (Degaine)
- Favor (Activity): The Gift of Charity* (Degaine)
- Favor: A Good Talking To* (Omluag)
- Favor: Sparring Partners* (Cosnach)
- Favor: Jobs for the Jarls* (Jarl Igmund: 1)
- Favor: Jobs for the Jarls* (Jarl Igmund: 2)
- Thane Quest: Thane of The Reach*
Habitation: Hold Capital (Major)
Crafting
- Alchemy Labs (3)
- Anvils (2)
- Arcane Enchanters (3)
- Blacksmith Forges (2)
- Grindstones (2)
- Smelter
- Tanning Racks (2)
- Workbenches (4)
Services
- Follower: Cosnach [13/47]
- Follower: Vorstag [14/47]
- Follower: Argis the Bulwark [15/47]
- House for Sale: Vlindrel Hall [2/5]
- Marriage Prospect: Cosnach [10/62]
- Marriage Prospect: Vorstag [11/62]
- Marriage Prospect: Argis the Bulwark [12/62]
- Marriage Prospect: Anwen [13/62]
- Marriage Prospect: Orla [14/62]
- Marriage Prospect: Senna [15/62]
- Marriage Prospect: Omluag [16/62]
- Marriage Prospect: Muiri [17/62]
- Marriage Prospect: Ghorza gra-Bagol [18/62]
- Marriage Prospect: Moth gro-Bagol [19/62]
- Trader (Apothecary): Bothela [4/12]
- Trader (Blacksmith): Ghorza [11/33]
- Trader (Blacksmith): Mot gro-Bagol [12/33]
- Trader (Fence): Endon [3/10]
- Trader (Food Vendor): Hogni Red-Arm [4/9]
- Trader (General Store Vendor): Lisbet [5/19]
- Trader (Innkeeper): Kleppr [6/15]
- Trader (Jeweler): Kerah [1/2]
- Trader (Spell Vendor): Calcelmo [9/12]
- Trainer (Enchanting: Master): Hamal [2/2]
- Trainer (Smithing: Journeyman): Ghorza [1/3]
- Trainer (Sneak: Expert): Garvey [1/3]
- Trainer (Speech: Expert): Ogmund the Skald [2/4]
- Trader (Alchemy Vendor): Bothela [5/14]
- Trader (Alchemy Vendor): Muiri [6/14]
- Trader (Fence): Endon [3/4]
- Trader (General Store Vendor): Kerah [5/25]
- Trader (General Store Vendor): Hogni Red-Arm [6/25]
- Trader (General Store Vendor): Lisbet [7/25]
- Trader (Innkeeper): Kleppr [6/18]
- Trader (Innkeeper): Keerava [7/18]
- Trader (Weapons/Armor Vendor): Moth gro-Bagol [13/35]
- Trainer (Enchanting: Master): Hamal [2/2]
- Trainer (Smithing: Journeyman): Ghorza [1/3]
- Trainer (Sneak: Expert): Garvey [1/3]
- Trainer (Speech: Expert): Ogmund the Skald [2/4]
Special Objects
- Business Ledgers
- Civil War: Map of Skyrim
- Shrine of Arkay [5/12]
- Shrine of Dibella [3/8]
- Shrine of Talos [6/17]
Collectibles
- Larceny Target: Dwemer Puzzle Cube [4/7]
- Skill Book [Alchemy]: Herbalist’s Guide to Skyrim [C1/10]
- Skill Book [Alteration]: Daughter of the Niben [B1/10]
- Skill Book [Alteration]: Sithis [D1/10]
- Skill Book [Conjuration]: The Warrior’s Charge [E1/10]
- Skill Book [Heavy Armor]: Chimarvamidium [B1/10]
- Skill Book [Illusion]: 2920, Sun’s Dawn, v2 [A1/10]
- Skill Book [Illusion]: Mystery of Talara, Part 4 [D1/10]
- Skill Book [Light Armor]: Ice and Chitin [A1/10]
- Skill Book [Lockpicking]: Proper Lock Design [B1/10]
- Skill Book [One-Handed]: The Importance of Where [E1/10]
- Skill Book [Restoration]: 2920, Rain’s Hand, v4 [A2/10]
- Skill Book [Speech]: A Dance in Fire, v7 [C1/10]
- Unique Item: Calcelmo’s Ring [41/112]
- Unique Item: Armor of the Old Gods [42/112]
- Unique Item: Boots of the Old Gods [43/112]
- Unique Item: Gauntlets of the Old Gods[44/112]
- Unique Item: Helmet of the Old Gods [45/112]
- Unique Item: Silver-Blood Family Ring [46/112]
- Unique Item: Muiri’s Ring [47/112]
- Unique Item: Ogmund’s Amulet of Talos [48/112]
- Unique Item: Raerek’s Inscribed Amulet of Talos [49/112]
- Unique Weapon: Rusty Mace [50/80]
- Unique Weapon: Mace of Molag Bal [28/80]
- Unique Weapon: Shiv [29/80]
- Unique Weapon: Spider Control Rod [30/80]
- Unusual Gem: [8/24]
- Unusual Gem: [9/24]
- Chest(s)
- Potions aplenty
- Loose gear

 Lore: City Overview
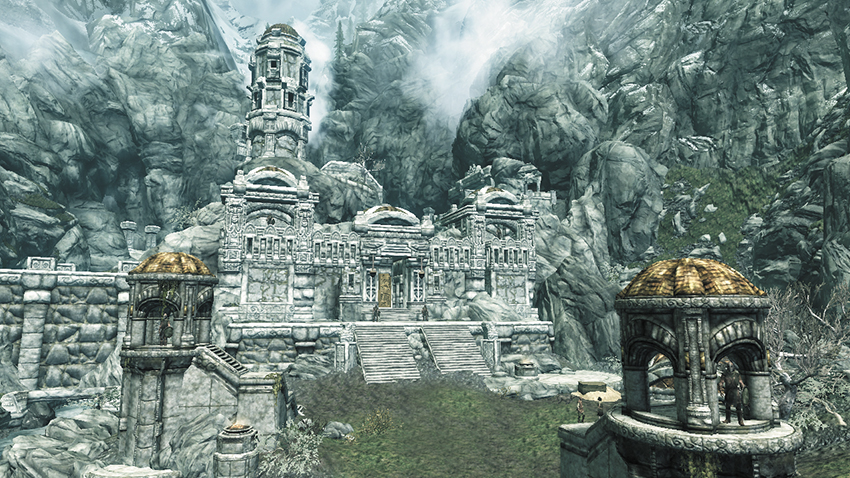
Markarth is an epic canyon city built eons ago by dwarven stonewrights in the Druadach Mountains. It is a defensive fortification constructed around the underground city of Nchuand-Zel. Primitive Reachmen were the first to repopulate the sprawling city after the dwarves’ disappearance. Hundreds of years later, Markarth is in a state of turmoil stemming from what some historians (and Nord nationalists) call “the Markarth Incident.”
In 4E 174, at the height of the Great War, a tribe of native Reachmen called the Forsworn took advantage of the Empire’s desperate straits by launching an open rebellion, wresting control of Markarth and declaring their independence from Skyrim. This was seen as a stab in the back by both the Empire and more radical Nord elements, but the Forsworn were left unchallenged for a time.
Two years later, in a short but very bloody war, Nord irregulars invaded the Reach and drove the Forsworn from Markarth. The Nords were led by the most vociferous adherents to Talos (whose worship had been outlawed by the terms of the White-Gold Concordat that ended the Great War), who claimed that they had been promised freedom of worship within the Reach in return for their help in retaking the Hold. While true, this secret agreement violated the terms of the treaty. Shortly thereafter, the Thalmor ambassador arrived in the Imperial City to confront the Emperor. Faced with the threat of a second war, the Emperor was forced to send the Imperial Legion to back the Thalmor Justiciars. The Nords refused to back down, and many were arrested or imprisoned. The Markarth Incident was a large step toward the eventual Civil War.
Aside from conflict and power struggles, Markarth is the center of silver mining in Skyrim. The city is a contrast between the beauty of its architecture, based on its dwarven heritage and the wealth of its silver mines, and the squalor and grime of the mining operation. Markarth simmers with tension between the ruling Nords and the native Reachmen who work the mines. Meanwhile, the surviving Forsworn hide in the hills, terrorizing the Reach and waiting for an opportunity to strike.
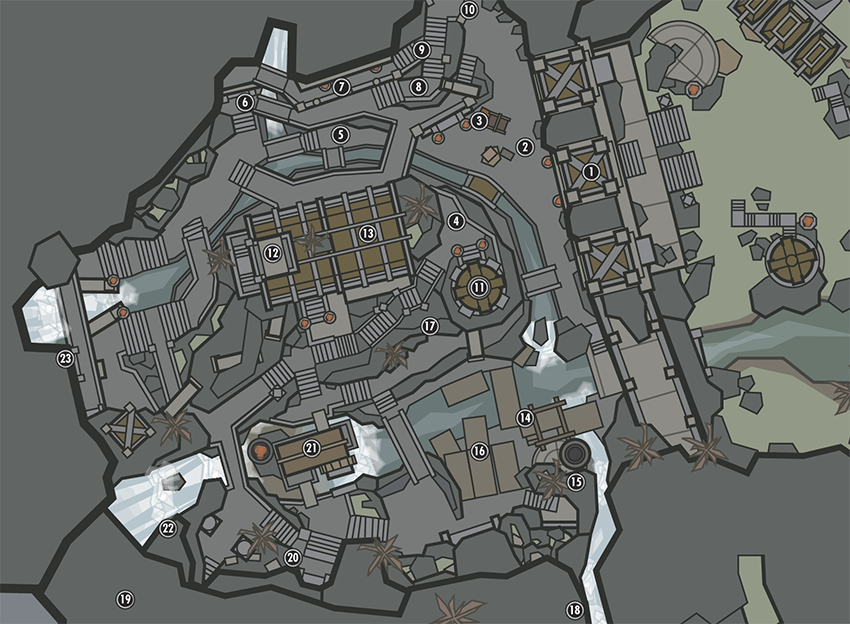
Important Areas of Interest
 City Gates
The only way to enter Markarth (until you’ve visited Understone Keep and can Fast-Travel there) is to step through the giant dwarven doors. However, you can use the rocks to the north or the river to the south, and sneak into the guardhouse from either of these side entrances. There are some covered battlements from which the guards look out across the Reach and two watchtowers, one of which forms the side of the stables.
- Crafting: Workbench
- Loose gear
Highside
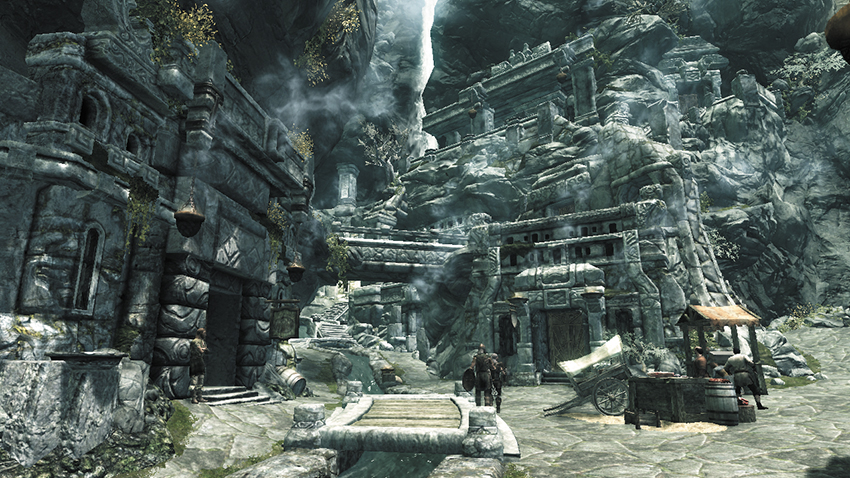
Located on the spur’s north side, behind and above the market, Highside is where the most prominent members of the city (besides the Jarl and his advisors) live and work, mingling with the lower classes who stagger around the canal streets during let-out time at the Silver-Blood Inn.
 Marketplace
Endon
Kerah
Adara
Hogni Red-Arm
An open-air market near the city gate, the Marketplace is where you’ll watch a brazen Forsworn named Weylin attack one of the street traders (Margaret), meet Eltrys, and begin Side Quest: The Forsworn Conspiracy. One of the stalls has several necklaces to steal. Search Margaret’s corpse for the key to her room inside the Silver-Blood Inn.
- Trader (Jeweler): Kerah [1/2]
- Trader (Food Vendor): Hogni Red-Arm [4/9]
- Unique Item: Calcelmo’s Ring [41/112]
- Key to Margaret’s Room
- Loose gear
 Arnleif and Sons Trading Company
Lisbet
Imedhnain
Cosnach
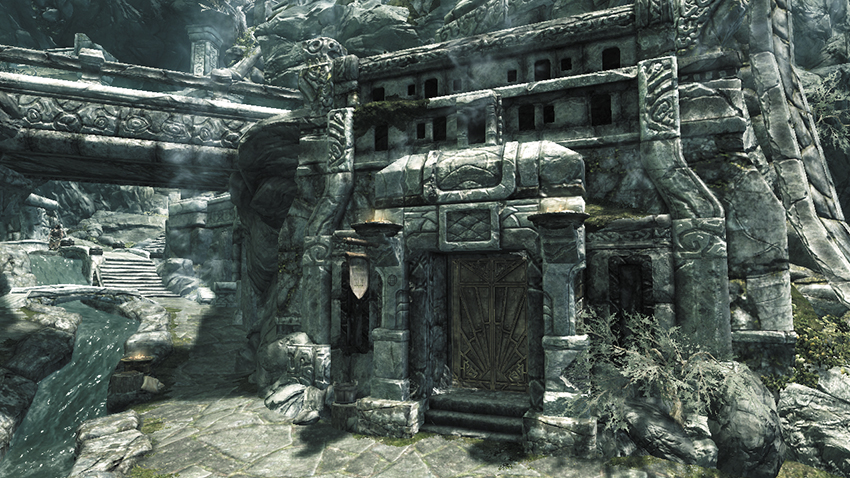
Another of the ancient Markarth trading houses, this dwelling adjacent to the market functions as the general store for Markarth. Currently run by the widow Lisbet, the trading company has fallen on hard times due to the Forsworn situation.
- Follower: Cosnach [13/47]
- Marriage Prospect: Cosnach [10/62]
- Trader (General Store Vendor): Lisbet [5/19]
- Skill Book [Speech]: A Dance in Fire, v7 [C1/10]
- Business Ledger
- Strongbox [Adept]
- Chest
 Silver-Blood Inn
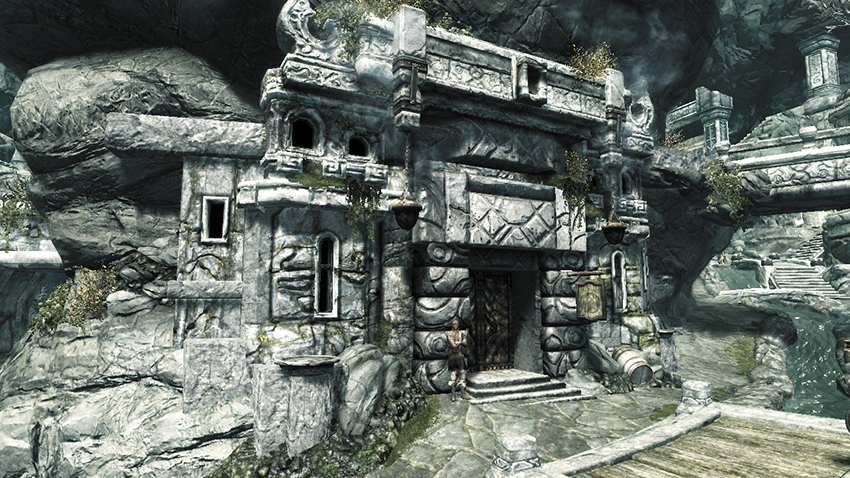
Kleppr
Frabbi
Hroki and Hreinn
Ogmund
The Silver-Blood Inn is a relatively successful establishment considering the problems Markarth is facing and is perhaps the most welcoming of Markarth’s social dwellings. It is comprised of a central bar and roaring fire, with rentable rooms on either side. Hire Vorstag to aid you in your adventures here, learn eloquence from Ogmund, and beckon Kleppr to ask him for the latest rumor around town and beyond. His wife, Frabbi, is a little more crabby. Search the rooms for loose gear, a few coins, and books. Continue Side Quest: The Forsworn Conspiracy by searching the only rented room that is locked (Adept), which belonged to the deceased Margaret. There’s a journal in the end table that helps your progress.
- Follower: Vorstag [14/47]
- Marriage Prospect: Vorstag [11/62]
- Trader (Innkeeper): Kleppr [5/15]
- Room for the night, food
- Trainer (Speech: Expert): Ogmund the Skald [2/4]
- Margaret’s Journal
- Business Ledger
- Strongbox (Apprentice)
- Loose gear
 Abandoned House (Locked: Requires Key)
Vigilant Tyranus
This dwelling is currently empty. It was the scene of a gruesome murder, and there’s rumors of it being haunted. In order to explore this location and the passageways that run deep into the long-forgotten and unspeakable chambers, Daedric Quest: House of Horrors must be active.
- Unique Weapon: Rusty Mace [27/80]
- Unique Weapon: Mace of Molag Bal [28/80]
- Chest (2)
- Potions
- Loose gear
 The Treasury House
Thonar Silver-Blood
Betrid
Rhiada
Ildene and Donnel
This is an impressive building befitting one of Markarth’s most important families, who take charge of the Reach should it fall into Stormcloaks hands (Thongvor will move to Understone Keep with Reburrus and Yngvar, while Thonar, Betrid, Kolgrim, and the servants will remain in Treasury House). This family mansion of the Silver-Blood clan is the most elaborate dwelling in Markarth and also functions as a bank. It is where a frightening Forsworn insurrection is mounted during Side Quest: The Forsworn Conspiracy. Inside, a Skill Book rests on a stone shelf at the foot of the stairs. Behind the counter is a locked gate (Expert), behind which are some ingots and a safe. The rooms to the southeast are where the servants sleep. The locked door (Apprentice) to the northwest leads to Thonar’s private chambers.
- Shadowmark: “Loot”
- Skill Book [Archery]: Vernaccus and Bourlor
- Unusual Gem: [8/24]
- Safe (Expert)
- Loose gear
 Endon’s House
This is a small but well-appointed house where Endon and Kerah work as silversmiths, along with their daughter Adara. One of them sells their wares in the market during the day. The shop contains a number of fine necklaces to steal.
- Crafting: Anvil, Workbench, Cooking Pot
- Display Cases (Adept) (2)
- Chest
 Ogmund’s House
A smaller but comfortable house where Ogmund lives. He follows the ancient teachings of a Nord skald; he plays in the Silver-Blood Inn and announces the news of the day in the market.
- Chest
- Loose gear
 Nepos’s House
Nepos the Nose
Uaile and Morven
Tynan
Nepos administers Cidhna Mine and the smelter. He’s rather wealthy, for a native, and is collaborating with both the Silver-Bloods and Madanach in Side Quest: The Forsworn Conspiracy. His home consists of a large fireplace and a large feasting room with two tables. To the rear of the property are the bedrooms.
- Skill Book [Illusion]: Mystery of Talara, Part 4 [D1/10]
- Display Case (Apprentice)
- Chest
- Potions
- Loose gear

 [HF.04] Vlindrel Hall (Markarth)
Related Quests
- Hearthfire Task: Adoption
- Thane Task: Thane of The Reach
Crafting
- Alchemy Lab
- Arcane Enchanter
- Cooking Pot
Miscellaneous
- Area is locked
- Chest
- Loose gear
- Potions aplenty
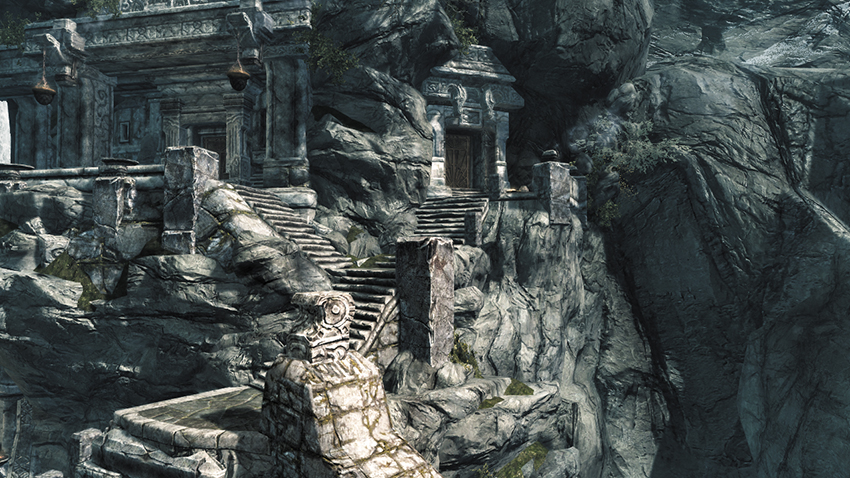
Should you become the Thane of the Reach (by completing Favors for the citizens and Jarl), you can purchase this abode from Jarl Thongvor’s Steward, Reburrus Quintilius. Consult the Thane Quests for more information. This is a cliff house in the upper part of the city. The Vlindrels were a Colovian merchant family. During the Reachmen Rebellion, the Markarth Vlindrels were driven out, and their former mansion has stood empty ever since. Should you wish to purchase the children’s bedroom, it replaces the Alchemy Laboratory.
- Follower: Argis the Bulwark (Housecarl) [15/47]
- House for Sale [2/5]
- Markarth Thief Caches [1/3]
- Marriage Prospect: Argis the Bulwark [12/62]
- Marriage Prospect: Argis the Bulwark [12/62]
- Follower: Lydia (Housecarl) [22/47]
- Marriage Prospect: Lydia [29/62]
Purchase Price: 8,000 gold
Jarl: Jarl Igmund or Jarl Thongvar Silverfish
Steward: Raerek or Reburrus Quintillius
Available Decorations
- Alchemy Laboratory (1,000 gold)
- Bedroom (800 gold)
- Children’s Bedroom (700 gold)
- Enchanting Laboratory (1,000 gold)
- Entrance Hall (500 gold)
- Living room (900 gold)
Total cost: 12,900 gold
The Crag
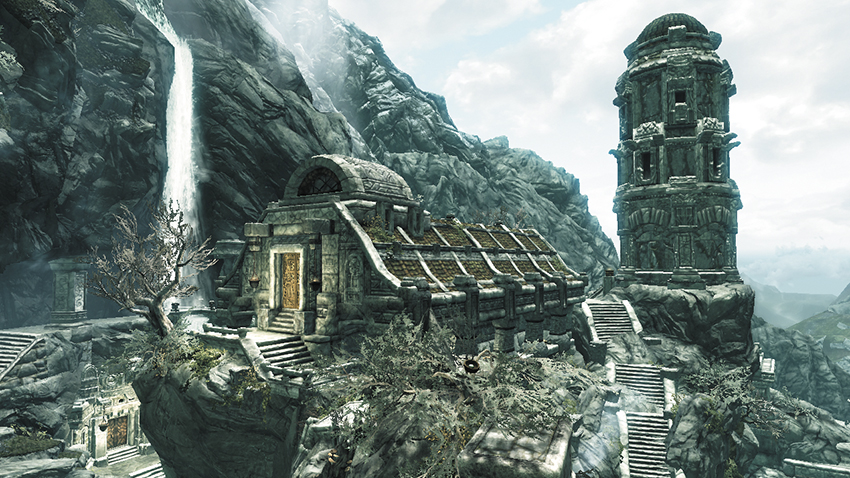
This is the central spur of rock that splits the city into north (Highside) and south (Riverside) sections.
 Guard Tower
This dwarven tower atop the central rock spur is now used as a barracks and lookout tower for the soldiers who patrol the city. Head down the spiral steps to the training room and sleeping quarters.
- Skill Book [Light Armor]: Ice and Chitin [A1/10]
- Skill Book [One-Handed]: The Importance of Where [E1/10]
- Loose gear
 Temple of Dibella
Hamal
Orla and Anwen
Senna
The other main structure atop the Crag is the ancient Temple of Dibella. There is a Shrine of Dibella where you can get a Blessing Sybil’s Antechamber: where the High Priestess sleeps. An Inner Sanctum (Locked: Expert) is where only women are allowed to go. A small number of priestesses wander the temple grounds. Inside the Sanctum, more priestesses pray and seek sensual contemplation, including Hamal, who is an exceptional enchantress. Aside from books (including a Skill Book on a shelf), ingredients, and a variety of trinkets, the following offerings are to be found. The door at the far end of the Inner Sanctum leads to an altar, where Dibella’s fetish is prayed to and offerings are made.
- Marriage Prospect: Anwen [13/62]
- Marriage Prospect: Orla [14/62]
- Marriage Prospect: Senna [15/62]
- Trainer (Enchanting: Master): Hamal [2/2]
- Skill Book [Illusion]: 2920, Sun’s Dawn, v2 [A1/10]
- Shrine of Dibella [3/8]
- Chest
- Potions
- Loose gear
 Shrine of Talos
This is a relatively grand chapel. During Imperial control, it will be deserted and “closed,” but even the Thalmor know not to desecrate this place for fear of fueling the rebellion. The shrine functions again if the Stormcloaks seize control. Eltrys usually hides out here.
- Shrine of Talos [6/17]
Riverside
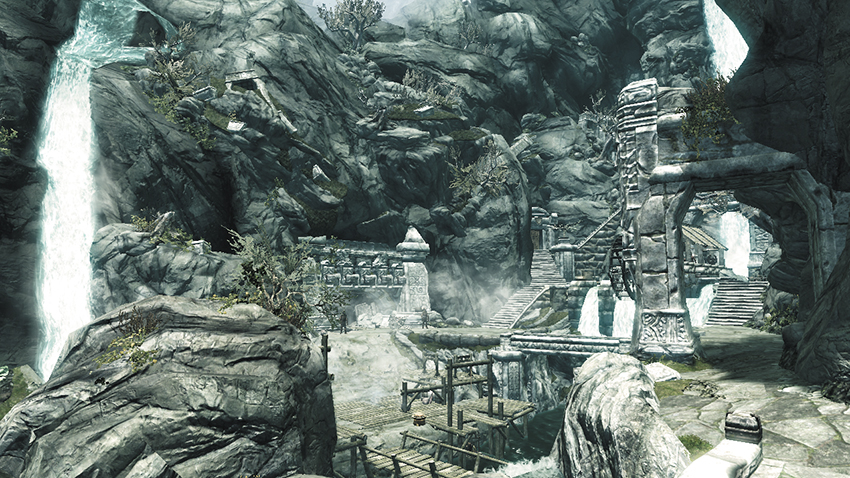
This section of Markarth encompasses the area along the river, near the smelter, on the south side of the central spur. Reachmen laborers of Markarth live here; mainly they work in the smelter but are also maids and servants in other parts of the city. There’s a slight feeling of despair cloaking the already-dirty air.

 Smelter and Smelter Overseer’s House
Mulush gro-Shugurz
The smelter is by the river, for all your ingot-creation needs. Above the smelter, by some half-hidden steps at the waterfall, is the locked entrance to Mulush’s dwelling.
- Crafting: Anvil, Smelter
- Chest
- Knapsack
- Loose gear
 The Stocks and Ducking Cage
For those who are unwilling or unable to work in Cidhna Mine to pay for their crimes, Markarth has another solution. The Stocks and Ducking Cage stands right outside the entrance to the mine, a reminder of the fate of any criminals who don’t work or who talk back to their overseers. This can result in humiliation or death. Fortunately, you don’t suffer either; you’re put to work in the mines if you commit a crime in the Reach!
 The Warrens
Degaine
Hathrasil
Omluag
Eltrys
Garvey
Cairine
Weylin
Dryston
Most of the poor in Markarth live in the Warrens, an old crypt with run-down chambers for the poorest of the city’s residents. Aside from the chambers that have suffered a cave-in, all six rooms are locked (Novice), and good practice for your Lockpicking skill. Only Weylin’s room has anything more than a few pieces of food in it; there is a chest inside with a Note important for Side Quest: The Forsworn Conspiracy.
- Marriage Prospect: Omluag [16/62]
- Trainer (Sneak: Expert): Garvey [1/3]
- Weylin’s Note
- Chest
 Cidhna Mine
Urzoga gra-Shugurz
Madanach
Braig
Duach
Odvan
Uraccen
Borkul
Grisvar the Unlucky
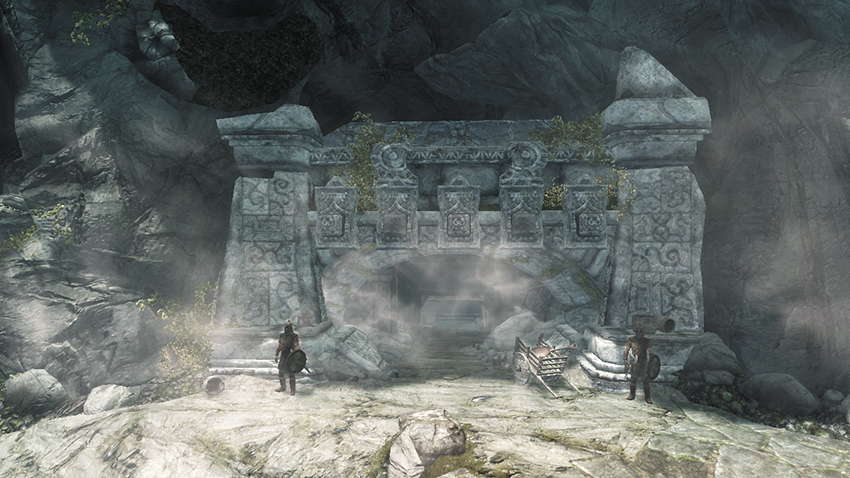
This silver mine (Cidhna means “silver” in the Reach dialect) is the primary source of Markarth’s wealth. It is also a prison where criminals work off their sentences. Many of the prisoners here are Forsworn, imprisoned for life after the Nords recaptured the city. The mine is owned and operated by the powerful Silver-Blood clan.
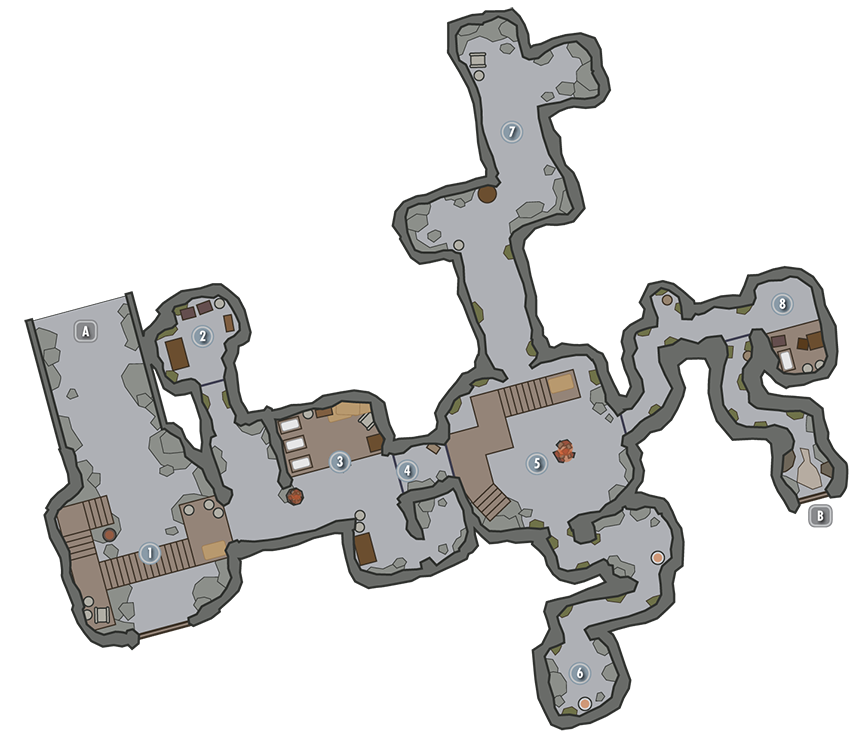
 Door to Markarth
Entrance Shaft
Urzoga gra-Shugurz and her Silver-Blood Guards patrol this area, which is usually off-limits to visitors. The main mine to the south has already been excavated and is sealed off.
Holding Cell (Locked: Adept)
This is where you collect your belongings and evidence should you try to escape.
- Skill Book [Lockpick]: Proper Lock Design [B1/10]
- Evidence Chest
- Unique Weapon: Shiv [29/80]
- Prisoner Belongings Chest
- Apothecary’s Satchel
- Potions aplenty
- Loose gear
Early Excavations and Barracks
Urzoga’s guards sleep here and use a couple of pull chains to open and close the mine entrance.
Mine Entrance (Locked: Requires Key)
Two connecting gates are opened by Urzoga when she ferries prisoners to and fro. You normally appear inside the prison only after committing crime or concluding Side Quest: The Forsworn Conspiracy.
Campfire
The large hub room has exits out of the mine, to the two tunnel areas. The entrance to Madanach’s Quarters are guarded by Borkul the Beast and a moping man named Uraccen who usually sits by the fire.
South Tunnel
Mining occurs in these parts.
- Silver Ore Vein (2)
North Tunnel
Mining is coming to an end, and this area is home to more addicts than miners.
Madanach’s Quarters (Locked: Requires Key)
The leader of the Forsworn Resistance is holed up in impressive surroundings given his imprisonment. He is the key to the Forsworn cause, during Side Quest: No One Escapes Cidhna Mine.
 Door to Markarth Ruins
This is only accessible during Side Quest: No One Escapes Cidhna Mine.
 Markarth Ruins (Locked: Requires Key)
Part of an ancient dwarven city, these ruins have been slowly collapsing during earthquakes. No one ventures into these parts, due to the instability of the area and reports of mechanical monstrosities guarding the place. The only place with any items of worth is a ruined two-floor chamber with pipes and a dwaven automaton or two guarding. This area is used during Side Quest: No One Escapes Cidhna Mine. It connects Cidhna Mine to Markarth (Riverside).
- Unique Item: Armor of the Old Gods [42/112]
- Unique Item: Boots of the Old Gods [43/112]
- Unique Item: Gauntlets of the Old Gods[44/112]
- Unique Item: Helmet of the Old Gods [45/112]
- Unique Item: Silver-Blood Family Ring [46/112]
- Potions
 The Hag’s Cure
Bothela
Muiri
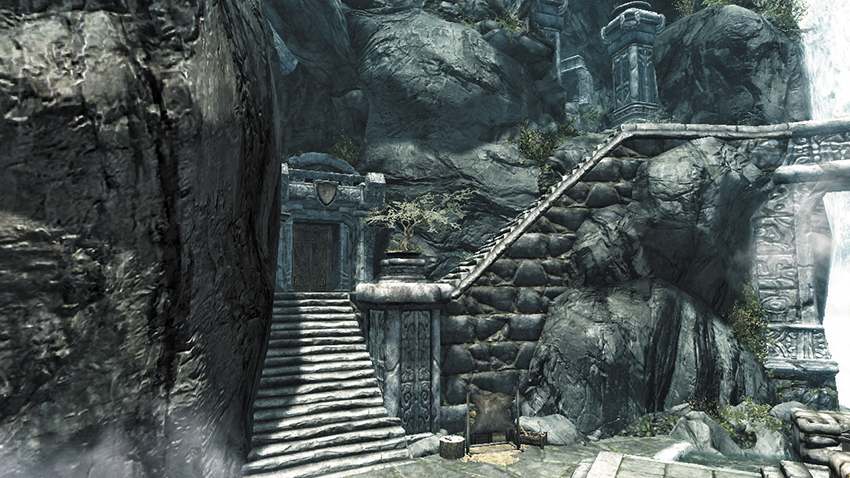
Bothela is an old Reach woman who dispenses potions, poisons, and ingredients; tells your fortune; and runs the creepiest shop in Riverside. Aside from the ingredients to steal, you can always purchase a good amount of items. A Skill Book is kept behind the counter.
- Crafting: Alchemy Lab
- Marriage Prospect: Muiri [17/62]
- Trader (Apothecary): Bothela [5/14]
- Potions, Food, Ingredients
- Skill Book [Alchemy]: Herbalist’s Guide to Skyrim [C1/10]
- Unique Item: Muiri’s Ring [47/112]
- Business Ledger
- Strongbox (Apprentice)
- Chest
- Potions aplenty
 Lumber Mill and Forge
Ghorza gra-Bagol
Tacitus Sallustius
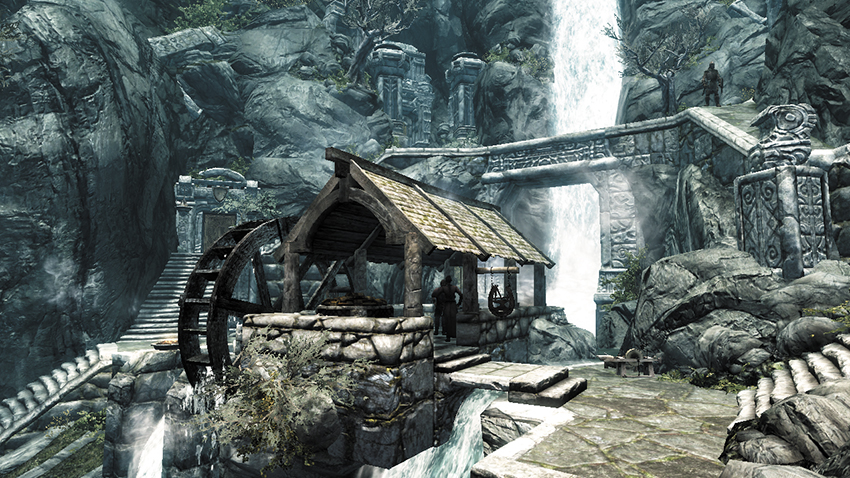
This overlooks Riverside, but the Blacksmith and her apprentice are well-respected members of the Understone Keep’s staff and provide the Jarl with the best steel in the Reach.
- Crafting: Blacksmith Forge, Grindstone, Tanning Rack, Workbench
- Trader (Blacksmith): Ghorza [11/33]
 Hall of the Dead [Locked: Adept]
Brother Verulus
The Hall of the Dead is in a side cavern accessed via Darkside or Understone Keep (both doors are locked), where the dead are buried in crypts and mausoleums are carved into the cave walls. Brother Verulus is the priest of Arkay who oversees the Hall of the Dead.
- Skill Book [Restoration]: 2920, Rain’s Hand, v4 [A2/10]
- Shrine of Arkay [5/12]
 Understone Keep
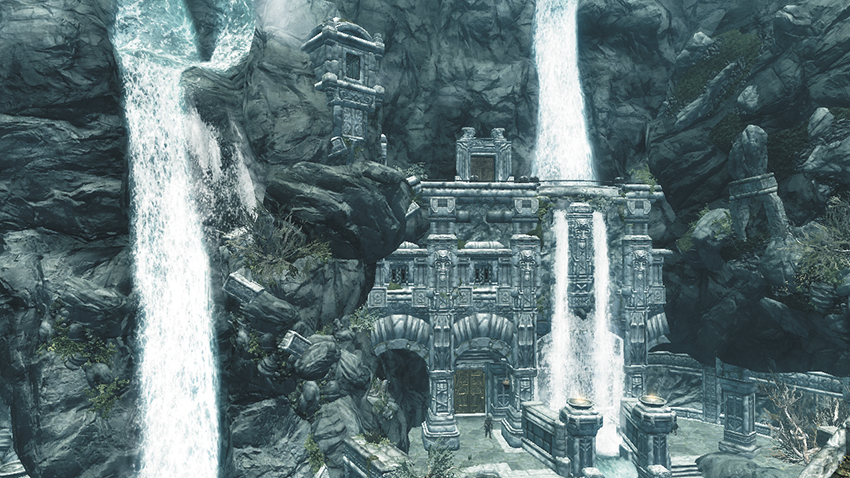
Jarl Igmund
Raerek (Steward)
Faleen (Housecarl)
Legate Emmanuel Admand
Thongvor Silver-Blood
Reburrus Quintilius (Steward)
Yngvar (Housecarl)
Calcelmo (Court wizard)
Aicantar
Anton Virane
Rondach and Voada
Blacksmith: Moth gro-Bagol
Ondolemar
 The following leaders of Markarth are loyal to the Imperials at the start of the Civil War.
Jarl Igmund
Jarl Igmund, son of Hrolfdir and nephew of Raerek, recently took the throne when Hrolfdir was killed in battle with the Forsworn. Igmund is an Imperial supporter (some might say a puppet) and holds court all day and eats and sleeps in the Keep. He sits upon the Mournful Throne, a relic and seat of power famous for centuries across the Reach.
Raerek (Steward)
Igmund’s Steward and successor manages the household, serves as the treasurer, and commands the palace guard.
- Unique Item: Raerek’s Inscribed Amulet of Talos [48/112]
Faleen (Housecarl)
She is completely loyal and very competent. She was Igmund’s father’s Housecarl and managed to escape from the ambush with the gravely wounded Igmund, although she blames herself for not being able to do more. As a result, she is almost paranoid about Igmund’s security and will rarely allow him out of her sight.
Legate Emmanuel Admand
 The following residents of Markarth arrive to take control once this Hold has fallen during the Civil War.
Thongvor Silver-Blood
Thongvor is the head of the Silver-Blood family, who controls the majority of Markarth’s wealth. More involved in politics and Ulfric’s rebellion, Thongvor leaves the business operations of the family to his brother Thonar.
Reburrus Quintilius (Steward)
Reburrus Quintilius is the steward to Thongvor. His family has served as the chief financial and political advisors to the Silver-Blood family for generations, and Reburrus has distilled the wisdom of the generations to a fine art.
Yngvar (Housecarl)
The huge housecarl to the Silver-Blood family, Yngvar has a reputation for cheerful brutality. He is completely loyal to the Silver-Blood clan and loves his job. He particularly loves it when he can beat someone to a pulp. But he is also surprisingly cultured; he attended the Bard’s College as a youth, until he found better employment using his other talents.
The following citizens are staff of Understone Keep:
Calcelmo (Court wizard)
Calcelmo is here in order to study the Dwemer ruins in and around the city. He views his duties as the castle mage as a distraction from his main scholarly interest. He is completely uninterested (and mainly unaware) of politics. He has been quite put out by the Forsworn situation, which has prevented him from doing his usual wide-ranging travels. He is secretly in love with Faleen, although he has never told anyone else or done anything about it.
- Trader (Spell Vendor): Calcelmo [9/12]
Aicantar
Aicantar is Calcelmo’s assistant and nephew. He is less than enthused by his uncle’s plans to study more dangerous Dwemer Ruins and prefers they spend time studying spells and enchanting. Aicantar is aware of Calcelmo’s secret love for Faleen but is unlikely to do anything about it directly. Faleen scares Aicantar, and the thought of her being around the laboratory more makes him nervous.
Anton Virane
Anton is a genuine Breton from High Rock in a city of Reachmen, a fact that constantly annoys him (because everyone assumes he’s a Reachman). He is particularly bigoted toward Reachmen. He is an excellent cook, though, which is why the Jarl continues to tolerate him.
Rondach and Voada
Moth gro-Bagol
- Trader (Blacksmith): Moth gro-Bagol [12/33]
Ondolemar
Ondolemar is the head of the Thalmor Justiciars in Markarth, and a prime example of why most folk hate the Thalmor. Ondolemar is completely confident in the Dominion’s ultimate victory over the Empire. He’s a Thalmor true believer, and is not here if the Stormcloaks take this city during the Civil War.
Understone Keep (Interior)
Understone Keep is a gigantic dwarven structure, now used as the city’s castle. Built by the Dwemer into the western wall of the canyon, the Castle Wizard, Calcelmo, has recently uncovered additional chambers (and worrying underground monstrosities) and a wealth of artifacts that he keeps in his museum. The sheer size of this place and ability to be well guarded negates some of the instability the location has recently suffered from.
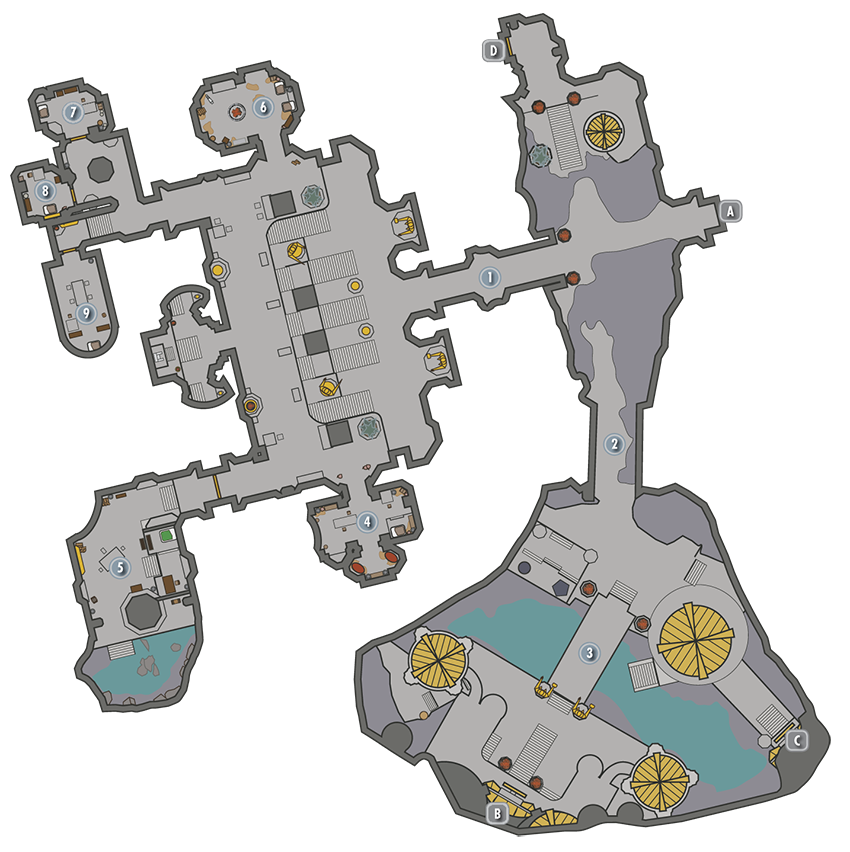
Door to Markarth
Entrance to the Mournful Throne
The first time you enter via the main doors, Thongvor Silver-Blood is having a heated discussion with Brother Verulus about the worship of the outlawed deity, Talos. At this huge intersection of stone and fire, head right to the Dwemer Museum, or move up to meet the Jarl, who is guarded by both Markarth Guards and Thalmor Soldiers. Jarl Igmund sits on the Mournful Throne, usually with his Steward and Housecarl by him. Outside, on the upper top of the stairs where Ondolemar and his guards like to stride about, are two stone tables. The one to the right (northwest) houses a Skill Book.
- Skill Book [Alteration]: Daughter of the Niben [B1/10]
Corridor to Nchuand-Zel
Head left to Nchuand-Zel’s entrance.
Nchuand-Zel Entrance
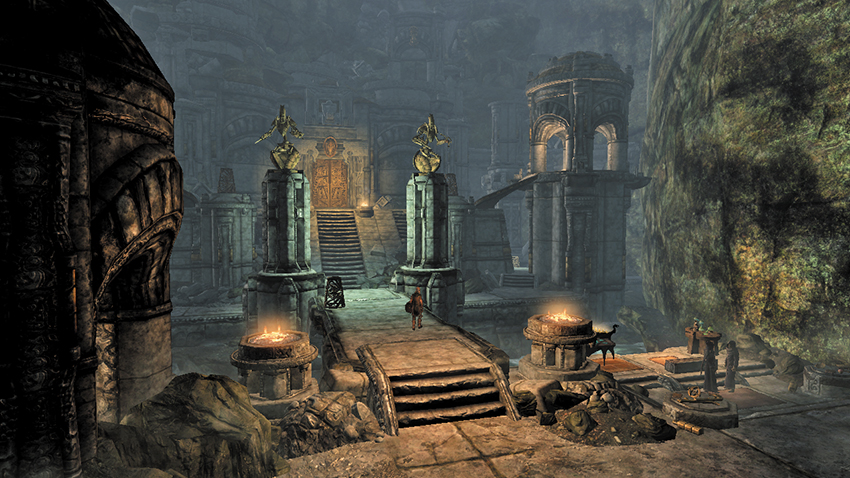
The epic cavern is usually where Calcelmo and Aicantar can be found, dedicating their lives to researching this mighty dwarven stronghold of historic significance. When you emerge from the entrance cavern close to the throne room, you are greeted by a rushing river, various curved passageways, and circular towers (one with seats to sit on and gaze down at the rushing water), as well as an entrance to the Hall of the Dead. Of more significance is the entrance to Nchuand-Zel itself. Enter here, either before speaking to Calcelmo (Locked: Adept) or after acquiring the key and agreeing to slay a large spider for him (Miscellaneous Objective: Neutralizing Nimhe*).
- Crafting: Alchemy Lab, Arcane Enchanter
Door to Nchuand-Zel Excavation Site
 Door to Hall of the Dead
 Door to Dwemer Museum [Adept]
Kitchens
To the left (south) of the throne room are the kitchens. The two hounds around here are large but friendly. Inside, you usually find Voada and Rondach and the short-tempered Anton Virane. As expected, there’s a massive amount of food in here.
Jarl’s Chamber (Locked: Adept)
Igmund rests here, behind the large golden door to the left (southeast) of the throne room. If you’re going to sift through his personal belongings, remember to try the ones on the stone shelf facing the subterranean river that dominates the rear of the chamber.
- Skill Book [Conjuration]: The Warrior’s Charge [E1/10]
- Loose gear
Understone Forge
This is located to the right (north) of the throne room. Moth gro-Bagol works here, while his sister Ghorza tends to the Blacksmith Forge outside.
- Crafting: Blacksmith Forge, Grindstone, Tanning Rack, Workbench
- Marriage Prospect: Ghorza gra-Bagol [18/62]
- Marriage Prospect: Moth gro-Bagol [19/62]
- Trader (Blacksmith): Moth gro-Bagol [12/34]
- Weapons, Apparel, Misc.
- Trainer (Smithing: Journeyman): Ghorza [1/3]
- Loose gear
Faleen’s Room
To the right (northwest) are bedrooms for the more important members of the Jarl’s council. Faleen’s room (sometimes locked: Adept) is to the right, with the large dinner table, a Key to Markarth Keep that opens the two other nearby doors, and the Jarl’s Quarters.
Raerek’s Room
This room (sometimes locked: Adept) houses the steward, a Key, and his secret Talos-loving reading materials.
Imperial War Room
Up the stairs is a third room (sometimes locked: Apprentice) leading to the Imperial War Room, where Legate Emmanuel Admand is overseeing the Civil War in this territory.
- Civil War: Map of Skyrim
- Key to Markarth Keep (3)
- Display case (Novice)
- Loose gear
Understone Keep: Dwemer Museum
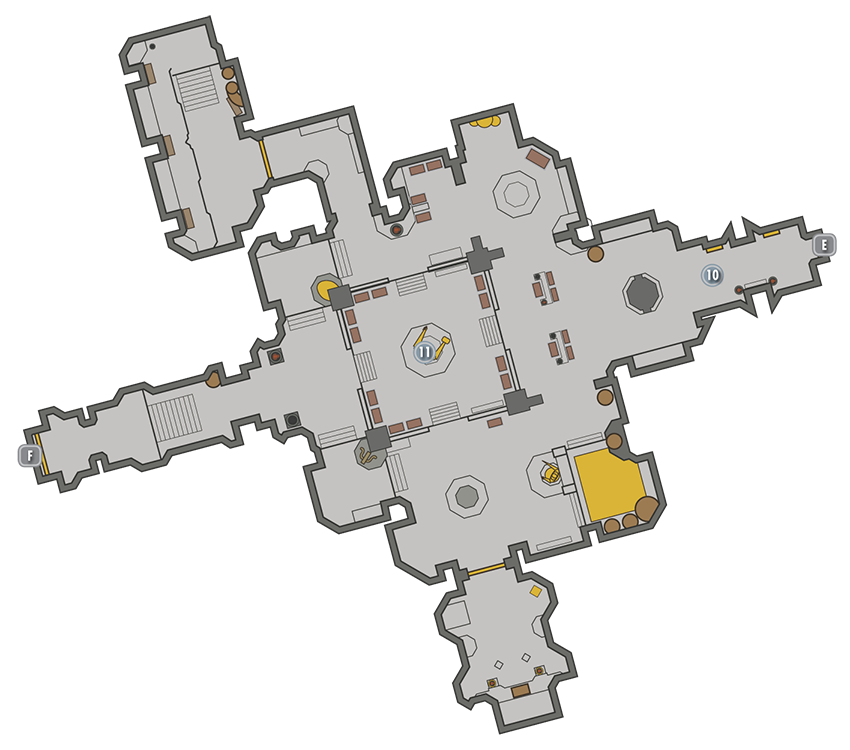
Restricted Area
The Museum, Laboratory, and Tower levels of Understone Keep are normally forbidden to visitors. Calcelmo may give you permission to visit the Museum, but you can only explore the Laboratory and Tower during Thieves Guild Quest: Hard Answers.
Dwemer Museum (Locked: Adept)
The Dwemer Museum showcases Calcelmo’s collection of artifacts recovered from ruins across Skyrim. Only three guards patrol this area, keeping watch for intruders. This space is normally off-limits—the guards will aggressively arrest you if you trespass here—but you can get Calcelmo’s permission to visit the museum in any number of ways; see Thieves Guild Quest: Hard Answers for details.
The Museum has the finest collection of Dwarven artifacts (weapons, armor, items, and books) in the entirety of Skyrim and the highest concentration of locked containers in any area of the game. There’s even a small selection of Falmer items. To the south is a gate (Apprentice) leading to a small workshop with an Unusual Gem and locked chest (Expert). To the northwest is a locked gate (Adept) to a two-level storage room. Up the steps to the west is the laboratory door.
- Unusual Gem: [9/24]
- Display Case (3)
- Display Case (Novice) (5)
- Display Case (Apprentice) (2)
- Display Case (Adept) (7)
- Display Case (Expert) (14)
- Chest (Adept)
- Chest (Expert)
- Loose gear
 Door to Understone Keep
 Door to Calcelmo’s Laboratory
Understone Keep: Calcelmo’s Laboratory
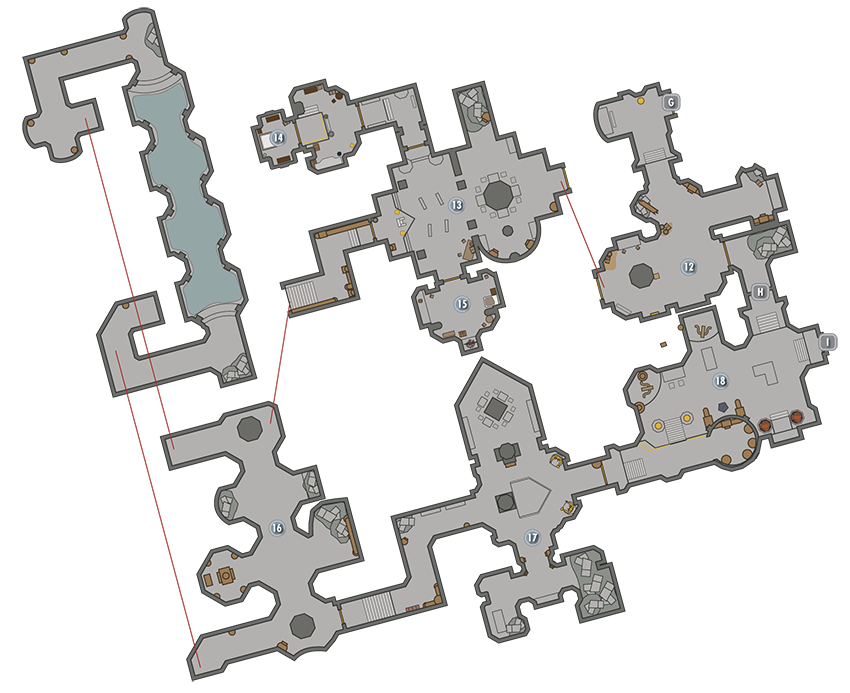
This area is the main living and research quarters for Calcelmo and Aicantar, although they typically spend most of their time in the Keep, closer to the Nchuand-Zel Entrance. Most of this area is locked unless you’re on Thieves Guild Quest: Hard Answers; see that quest for an exhaustive walkthrough of quest events in this space. The laboratory is divided into a number of chambers.
 Door to Dwemer Museum
Entry Room
The Entry Room has oil on the floor, a dart trap, and a gate you can’t normally open to the southeast.
- Danger! Dart Trap, Oil Pool Trap
- Unique Weapon: Spider Control Rod [30/80] (quest only)
Throne Chamber
The Throne Chamber consists of a main room with a raised throne and guard. Dwarven junk (or is it research?) is scattered around, along with several traps you can activate. You cannot progress beyond the Throne door without a key, which you can only find during Thieves Guild Quest: Hard Answers.
Calcemo’s Bedroom
To the northwest is Calcelmo’s bedroom, which has some display cases (Apprentice) and scrolls to steal.
Aicantar’s Bedroom
To the south is Aicantar’s bedroom and food preparation area.
- Danger! Dwarven Ballista Trap, Dwarven Thresher Trap, Swinging Wall Trap
- Display Case (Apprentice)
- Loose gear
Steam Hall
Beyond the Throne Room is the Steam Hall. There’s little to search for, except a few corpses of fallen foes. The valve at the far end activates the thresher traps in the floor, ideally against enemies following you.
- Danger! Dwarven Thresher Trap, Poison Gas Trap
Statue Room
Next is the Statue Room, whose exit is flanked by two Dwarven Spheres. There are two side chambers here; take advantage of the guard’s patrol to slip through the door when he steps away from it.
Work Room
And finally, you emerge into a large work room. The valve in the control booth sets off a frightening number of traps in the room that will send even the most stout-hearted guard running for cover. This area has the following items and two exits.
- Danger! Dwarven Ballista Trap, Dwarven Thresher Trap, Flamethrower Trap
- Crafting: Arcane Enchanter
- Larceny Target: Dwemer Puzzle Cube [4/7]
- Skill Book [Enchanting]: Twin Secrets
- Chest
- Loose gear
 Barred Door
 Door to Markarth Wizards’ Balcony
Markarth Wizards’ Balcony (Exterior)
The great balcony atop the keep connects Calcelmo’s laboratory to his tower, a separate structure off the main body of the Keep. There’s a great view of the city from here. One section of the balcony wall has broken away, exposing a path around the cliffside that ends in a waterfall. If you were in a hurry, you might just be able to jump from here.
Understone Keep: Calcelmo’s Tower
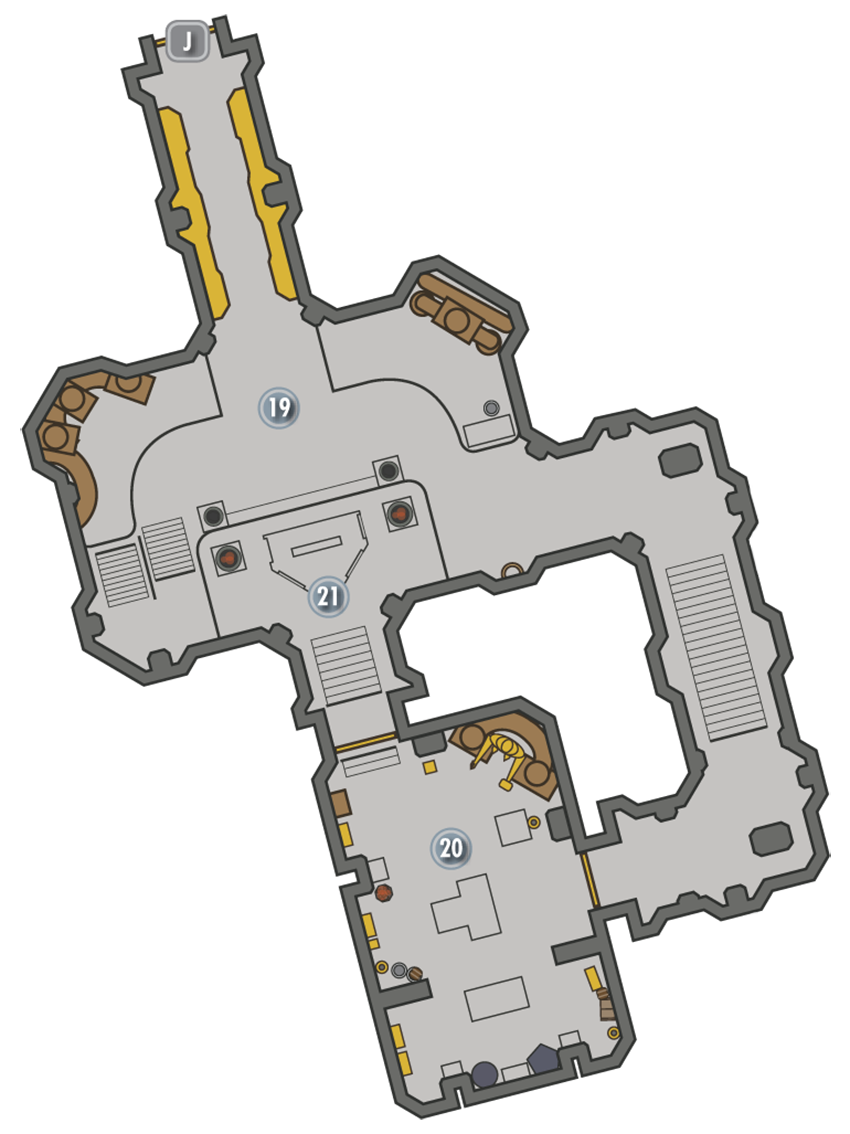
The tower (accessible only during Thieves Guild Quest: Hard Answers) has a lower-level entry hall, an upper-level office, and a massive stone relic containing a text in Dwemer and Falmer on the same granite slab!
 Door to Markarth Wizards’ Balcony (Locked: Requires Key)
Entry Hall
Office
- Crafting: Alchemy Lab, Arcane Enchanter
- Skill Book [Heavy Armor]: Chimarvamidium [B1/10]
- Potions
Stone Relic
This stone is the key to Calcelmo’s current research, a secret he jealously protects.
<
- Calcelmo’s Stone
Nchuand-Zel Excavation Site
Dungeon: Dwarven City
- Animal
- Dwarven Centurion
- Dwarven Sphere
- Dwarven Spider
- Falmer
- Nimhe
Dangers
- Flamethrower Traps
- Rune Traps
- Spear Trap
Quest Items
- Alethius’s Notes
- Krag’s Journal
- Stromm’s Diary
- Erj’s Notes
- Staubin’s Diary
Collectibles
- Skill Book [Alteration]: Sithis [D1/10]
- Area Is Locked (Adept)
- Chest(s)
- Potions
- Loose gear
- Mineable ore (Corundum, Iron, Moonstone)
Door to Understone Keep
Entrance Corridor
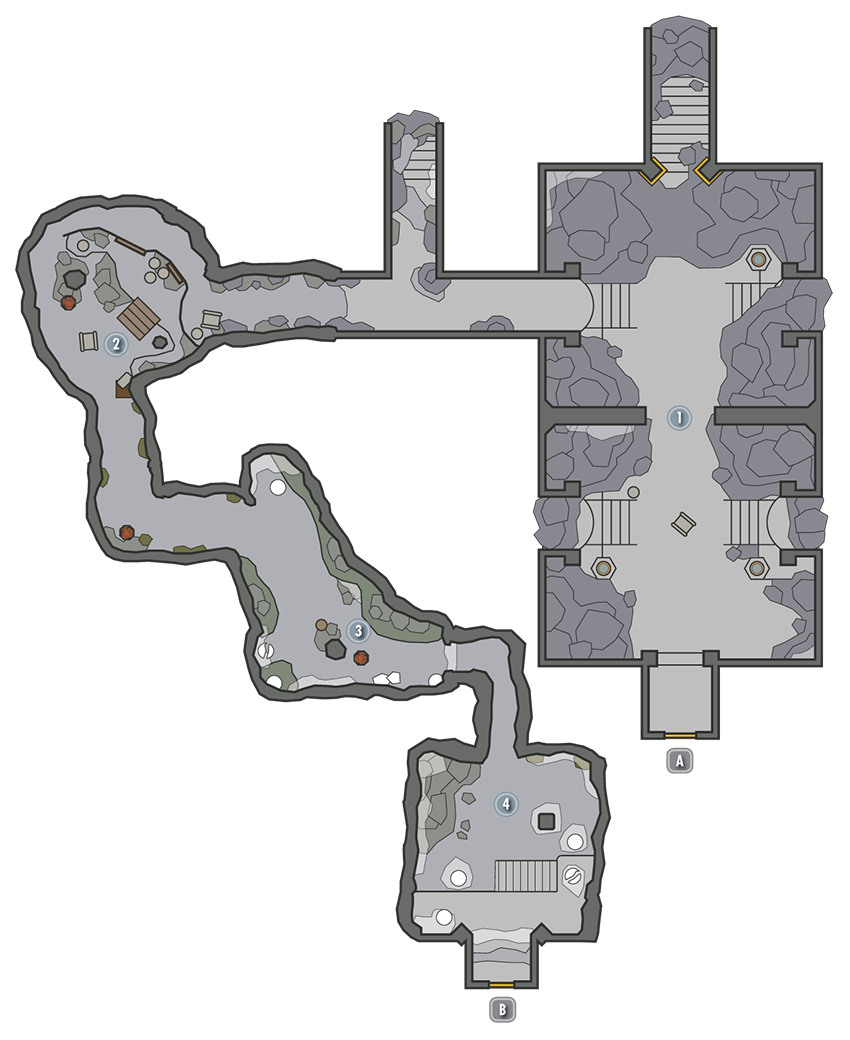
Throughout this entire area, there’s Dwemer artifacts to gather and sell later. Turn left (west) to break through the already-collapsed wall to where the excavation site was first discovered.
Excavation Drop
In this steam-filled drop, follow the mine working’s ledges. Take that Potion of Plentiful Healing by the wagon before you descend. You’ll need it! Try dropping onto the nearer stalagmite for a quicker drop down.
- Potion
- Loose gear
Mine Workings
These have been completely taken over by Frostbite Spiders. Slay them all here before continuing past the skeletons of the long-dead miners and cut through the webs.
- Mineable ore (Corundum, Iron)
Nimhe’s Lair
A gigantic Frostbite Spider drops in to slay you as you reach the edge of the mining area. Face her or flee! Then inspect the dead Imperial named Alethius and read his Note. This begins Dungeon Quest: The Lost Expedition. Consult that quest for precise knowledge on completing this exploration.
- Alethius’s Notes
Door to Nchuand-Zel
Nchuand-Zel
Door to Nchuand-Zel Excavation Site
Upper Walkway (Upper Level)
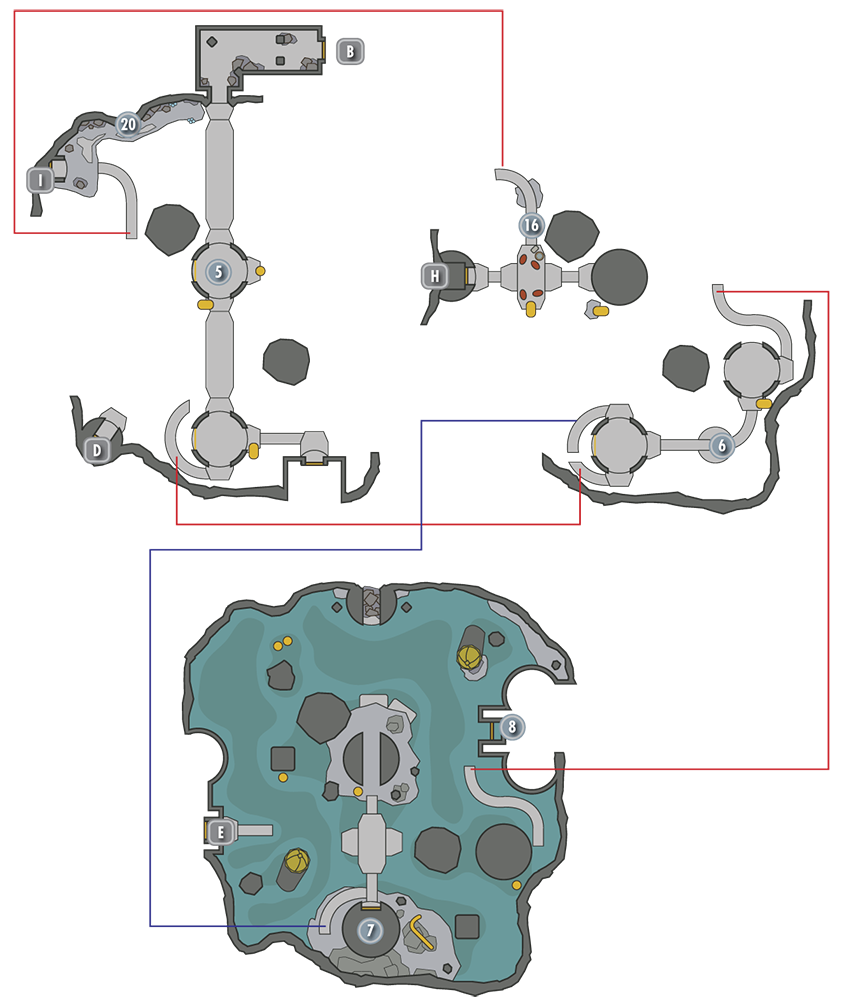
After a short corridor ramp down, this opens up into a single, dramatic and gigantic chamber. This Upper Walkway has a couple of Falmer to face, and the southern tower has ramps down and a walkway across to the Nchuand-Zel Quarters. Find a Skill Book resting on an ornate bench as you go.
- Skill Book [Alteration]: Sithis [D1/10]
Door to Nchuand-Zel Quarters (Upper Level)
Lower Walkways (Lower Level)
Below the upper walkway are stone ramps down to a middle section, and down again to the base of the structure, which is waterlogged.
South Gate (Waterlogged Ground Area; Locked: Adept)
- Chest
Piston Building Door (Waterlogged Ground Area)
- Potions (underwater)
Door from Nchuand-Zel Quarters (Lower Level)
This leads from the Quarters to an otherwise-inaccessible ledge.
- Chest
Door to Nchuand-Zel Armory (Waterlogged Ground Area)
Door from Nchaund-Zel Armory (Lower Level)
Krag’s Walkway
The researcher Krag lies near blood splatters along this walkway and camping spot. The Dwarven Centurion roars into life only after you pull the switch inside the Control.
- Krag’s Journal
Door to Nchuand-Zel Control (Upper Level)
This is only accessed from this location, but only after you emerge from the Armory.
Escape Ledge (Upper Level)
The Dwarven mechanical entities may be moving (and attacking any Falmer you’ve left alive) if you fiddled with the Control. Use this ledge running around the northwest corner of this gigantic chamber to reach the exit and escape to the Excavation Site.
- Mineable ore (Moonstone)
Nchuand-Zel Quarters
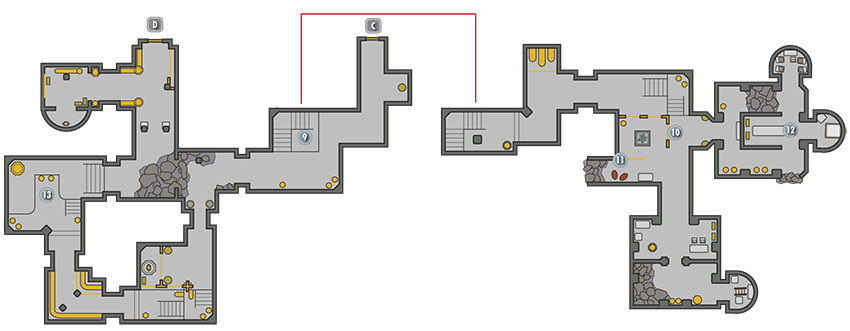
Door to Nchuand-Zel (Upper Level)
Return here after you’ve fully explored the Quarters, as there are no other exits from the Quarters (aside from the one leading to a high platform with no way onwards).
Central Quarters Stairwell
This descends to corridors that run under the upper corridors above and the exit door [C], to another set of steps.
Eastern Quarters
Access this series of upper chambers from the Central Quarters Stairwell. When you reach the second ascending set of steps, watch for Fire Rune Traps at the top. Continue south down the corridor, passing Stromm’s corpse, and check the dead bodies of the expedition’s Imperial Guards and a torture chamber at the far end.
- Danger! Rune Traps
- Loose gear
Stromm
Search the corpse, and check the nearby stone table for his diary.
- Stromm’s Diary
Far Eastern Living Areas
This collection of small rooms and a corridor are accessed after turning east at the steps with the Fire Rune Traps. Pass the pistons to reach a variety of dining, sleeping, and storage rooms.
- Loose gear
Western Chambers
These lower chambers are filled with Falmer foes. They lead you to the Door to Nchuand-Zel and a dead-end area with dwarven barrels and a chest.
- Chest
Door to Nchuand-Zel (Upper Level)
Nchuand-Zel Armory
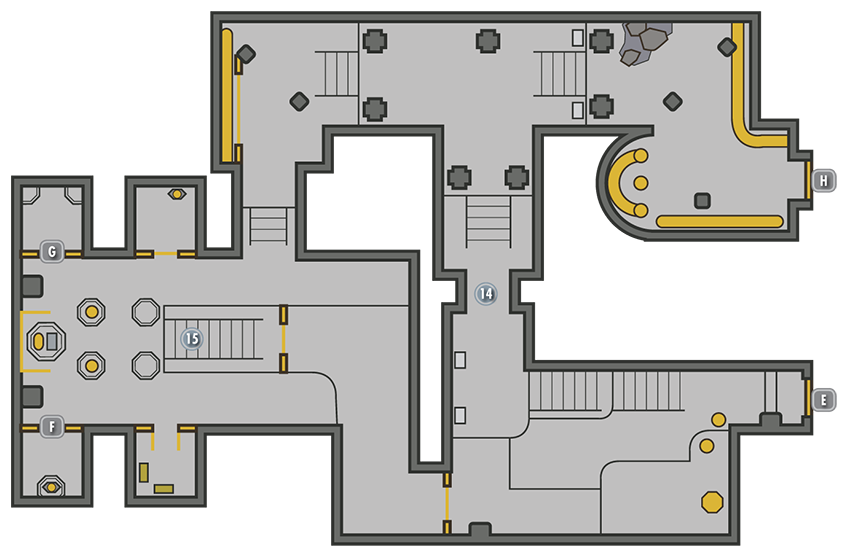
Door to Nchuand-Zel (Waterlogged Ground Level)
Stone Corridors (Upper and Lower)
These wind through to the center of the Armory. Take the upper ramped corridors to the right turn (east) and to an exit door leading back into Nchuand-Zel [H]. Take the upper path and turn right (west), heading down past a Wall Fire and Wall Spear Trap (check the floor for a trigger and don’t step on them!) to the Armory Hall. Take the lower path directly to the Armory Hall. There’s a gate at the base of the steps to unlock (Adept).
- Danger! Flamethrower Trap, Spear Trap
Armory Hall and Erj
Statues of dwarven mechanical monsters stand frozen in time at the top of these steps. A dead Falmer and the remains of Erj the adventurer are also here. Close by are three gates, one of which is unlocked; behind it is a chest surrounded by Dwemer pots.
- Erj’s Notes
- Chest
Gate (Locked: Expert)
Gate (Locked: Expert)
- Chest
Door to Nchuand-Zel (Lower Level)
Nchuand-Zel Control
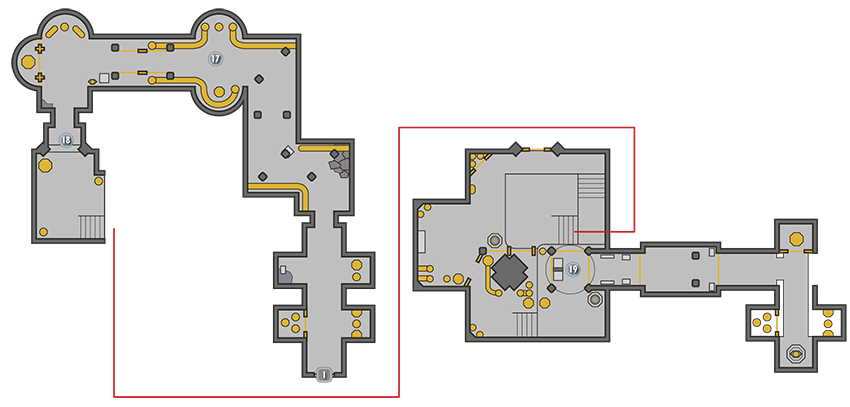
Door to Nchuand-Zel (Lower Level)
Control Corridor (Upper and Lower)
You begin on the lower part of this north-south corridor. You drop down from above to exit this area; the way in is the only way out!
Falmer Pipeway and Staubin
A group of these creatures are guarding the golden pipes and barred sections of this corridor. Close by are the remains of Staubin.
- Staubin’s Diary
- Loose gear
Control Room
This is guarded by a Falmer. Tug on the lever next to the potion, and all the previously dormant Dwemer statuary clanks into life and battles any Falmer you haven’t killed yourself. Return from whence you came.
- Chest
- Loose gear