
Elder Scrolls V: Skyrim Guide The Atlas Hold 5: The Reach
Additional Locations
[DG.11] Darkfall Cave and Darkfall Passage
Related Quests
Dawnguard Main Quest: Touching the Sky
Recommended Level: 18
Faction: Falmer Lair
Frostbite Spider
Giant Frostbite Spider
Troll
Chaurus
Chaurus Hunter
Falmer
Falmer Shaman
Vale Deer
Vale Sabre Cat
Notable Inhabitants
Knight-Paladin Gelebor
Prelate Sidanyis
Special Area
Shrine of Auriel [1/ 2]
Crafting
Alchemy Lab
Dangers
Bone Trap
Boulder Trap
Claw Trap
Dart Trap
Spear Trap
Underground Connection
Miscellaneous
Area is locked
Chest
Loose gear
Potions
Exterior
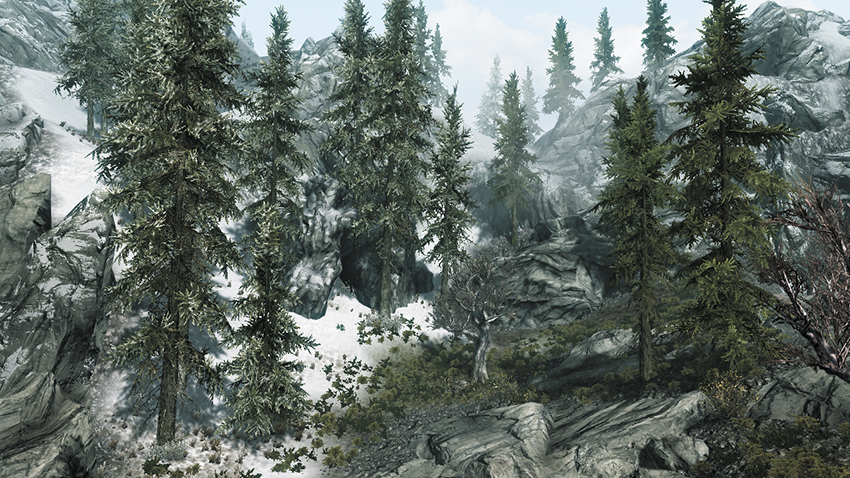
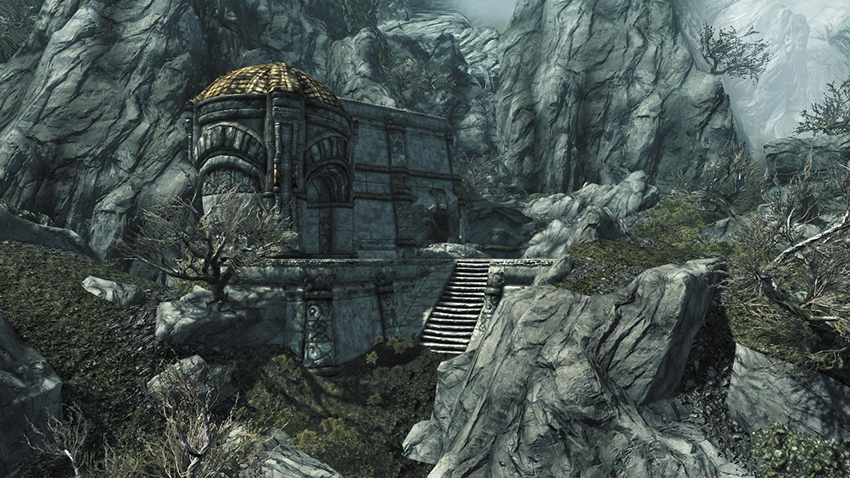
An unassuming crag in the Reach is actually the gateway to a vast network of uncharted caverns and mountain land in the northern climbs of the Reach and Haafingar Hold. The cave is south of Mor Khazgur and north of Druadach Redoubt.
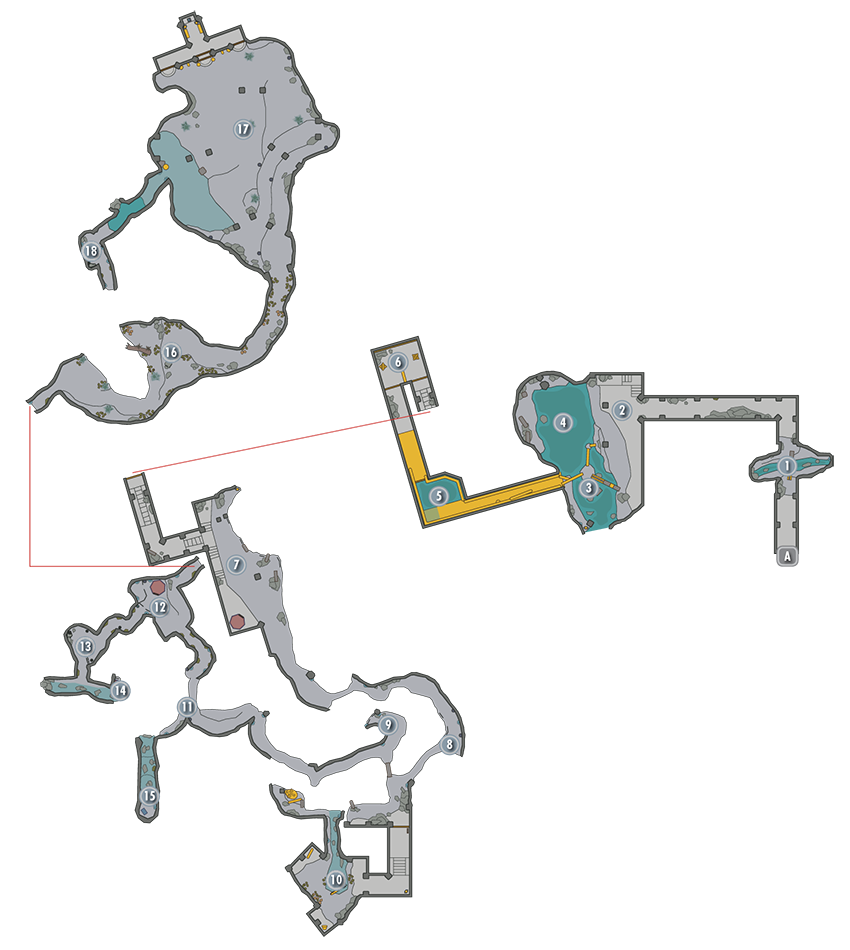
Interior: Darkfall Cave
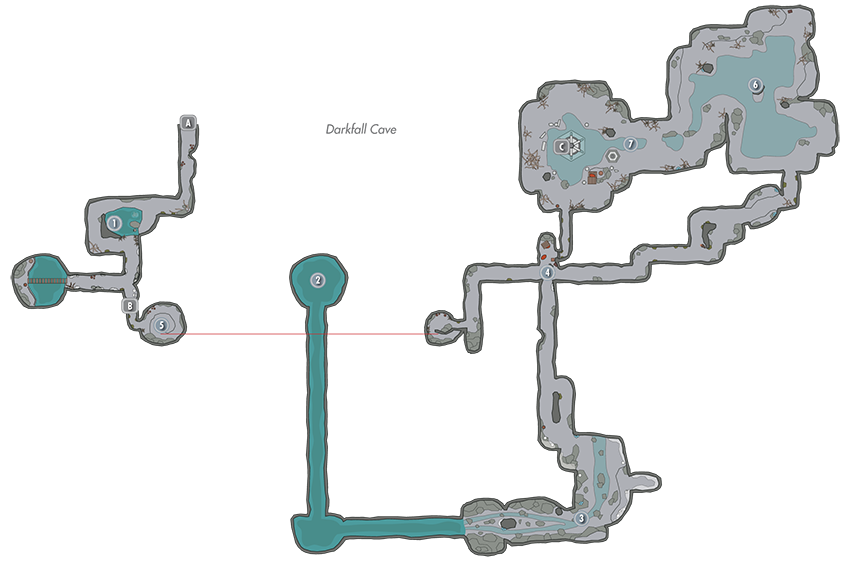
 Exit to Skyrim
 Waterfall Pool
Aside from the rushing water, this place is quiet. Continue to navigate the curving tunnels past this water feature.
 Hidden Exit
This small alcove has a Frostbite Spider. Approach from the south (as you exit this cave system once the quest is over, although it can be opened prior to the quest), and you can remove a hidden stone wall, allowing quick access back out to Skyrim.
 River Ride
Cross the rickety bridge, optionally mining the Moonstone if you wish. There aren’t any more tunnels here, except the one the river is racing through. Take a deep breath (although you can surface easily) and ride the two tunnels into the lower depths of the cave.
 Subterranean Spider Lair
You land on some rocks with a couple of Frostbite Spiders following you downstream. Tackle all the spiders as you work your way down this cavern. Engage the Giant Frostbite Spider in its eastern alcove (watch for the gap in the natural bridge!) before ransacking its lair.
- Chest
 Crossroads Camp
A dead Breton lies here (along with a note on her inability to deal peaceably with trolls) near a small makeshift camp. Scour it for items, then assess your situation. If you’re running low on supplies, you can take the ascending path that leads to the Upper Ledge Cave and eventually back to the Hidden Exit (Location B). Or you can press on and take the descending tunnel deeper into the caves. There’s also a secret cave door here, just behind the wooden planks leaning up against the wall. Use Clairvoyance to reveal it; it leads down to the Great Chantry of Auri-El.
- Chest
- Darkfall Cave Note
- Loose gear
- Potions
 Upper Ledge Cave
If you take the tunnel that ascends to the west from Location 4 (step over the trip wire or face boulders in your back), you end up in a circular cave with ledges that lead back up to the Hidden Exit (Location B). This is used to exit the cave (as you can’t swim back).
- Danger! Boulder Trap
 Troll Cavern
Two trolls are lolloping around this large cavern with shallow water pools, near a male corpse. Stay in the eastern section and deal with them. They are guarding a rather bloody chest.
- Chest
 Great Chantry of Auri-El
If Dawnguard Main Quest: Touching the Sky is not active, this area is empty, and you have no choice but to exit via the narrow tunnel here, which leads back to the Crossroads Camp (Location 4), after dispatching some additional trolls roaming this area. If you are on the quest, you meet Knight-Paladin Gelebor here. Gelebor prepares you for the Pilgrim’s Path to five Wayshrines and raises the Portal to Darkfall Passage. Dip the ewer into the water before proceeding, and take advantage of the blessing before you leave.
- Quest Item: Initiate’s Ewer
- Shrine of Auriel [1/ 2]
 Portal to Darkfall Passage
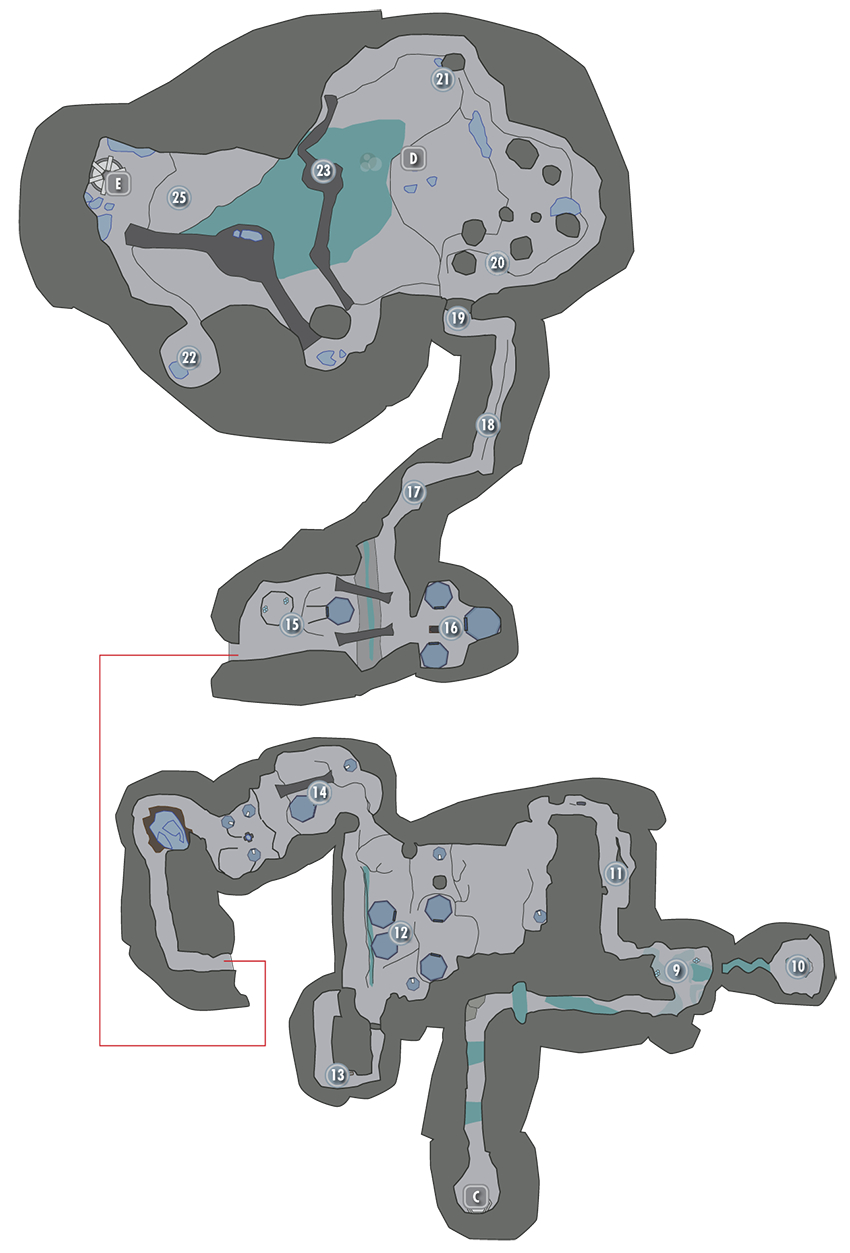
Interior: Darkfall Passage
Portal to Darkfall Cave
 Falmer Passage
Odd, luminous fungus plants recede as you head down this tunnel. Watch for Falmer and Chaurus Hunter attacks as you go.
 Skeleton’s Grotto
This is a small grotto with a low ceiling. Inspect the skeleton here, but the real prize awaits those with fine swimming abilities. One of the pools of water isn’t that shallow; dive into it and swim east to a hidden cave (Location 10)!
 Hidden Cave
Swim east and up from Location 9, into a small dead-end cave where a long-dead Snow Elf lies. Inspect the note on this corpse if you wish.
- Loose gear
- Potions
 Trap Tunnel
This winding tunnel has a trip wire to avoid.
- Chest
- Danger! Claw Trap
 Falmer Camp (Lower)
You are now in the central part of this cave system, where the Falmer have built two makeshift camps (the other is directly above this one). Use the waterfall to judge your position. This large, low-ceilinged cave has a few huts to check for items and more Falmer (along with their disgusting pets) to deal with. Exit the camp by heading around the waterfall and moving north through a connecting cave to a second Falmer Camp (Location 14).
- Chest
- Potions
 Fallen Falls Passage
If you fall down the waterfall, you’ll have to use this passage to return to the first Falmer Camp. You can’t access it from the first Falmer Camp, as there’s a hidden stone wall to lift with a rope lever. Head up the narrow tunnel, pausing to inspect a skeleton draped over a chest.
- Chest
 Falmer Village (Lower)
Around the corner to the west of the Falmer Camp is a larger village with more huts to search and Falmer to fight. Beware of the chest illuminated by Gleamblossom; deactivate the trap trigger or brace yourself for two claws. Pass a strange skeletal totem as you leave. Step over the bone trap as you navigate around the large blue crystal deposits.
- Chest (2)
- Danger! Bone Trap
- Danger! Claw Trap (2)
- Loose gear
- Potions
 Falmer Camp (Upper)
The passage wraps around to a second camp directly above the first. This area is dominated by a large Chaurus pen and an impressive hut. Attack the Falmer and Chaurus that stand in your way, then pass through the waterfalls using either bridge.
- Chest
 Dead-End Chamber
Watch for the trip wire and Claw Trap. Enter this small cave to face a Chaurus Hunter. Also watch for spear traps when you try to open the chest; remove the trip wire beforehand.
- Alchemy Lab
- Danger! Claw Trap
- Danger! Spear Trap (4)
- Potions


 Tunnel to Darkfall Grotto
Beware the first skeleton you see lying on the tunnel floor; there’s a trip wire near it (releasing rocks from above), as well as rattling bone traps. It’s easy to overlook the skeletal remains near a satchel at Location 18. The end of the tunnel has another dead Snow Elf (with a note to read, and loose gear) and two rope levers. The left one releases a rock wall to the right (north). The other releases a multitude of traps that can kill the Vale Sabre Cat on the other side of the rock wall.
- Chest
- Danger! Bone Trap (4)
- Danger! Claw Trap
- Danger! Dart Trap
- Danger! Spear Trap
- Loose gear
 Darkfall Grotto: Vista
The impressive view over this expansive cavern also reveals the location of the first Wayshrine, to the west.
 Darkfall Grotto: Long Sloping Path
Among the Vale Deer are Poison Blooms to avoid, or harvest if you’re quick and grab them before they activate. Continue down to the water’s edge.
- Danger! Poison Bloom
 Darkfall Grotto: Vale Sabre Cat Cave
Among the rocks is a small cave with a predator to slay. A pile of bones in one corner has a Soul Gem to gather.
- Soul Gem

 Darkfall Grotto: Narrow Path
Take the narrow raised path of natural bridges up from the water, around past a Vale Sabre Cat shallow cave, and finally to the Wayshrine.
 Waterfall from Darkfall Grotto (Upper)
The cascading waterfall from the roof of this cavern is actually an exit from Forgotten Vale Location [FV2.D], Waterfall to Darkfall Grotto. You can’t access it from here.
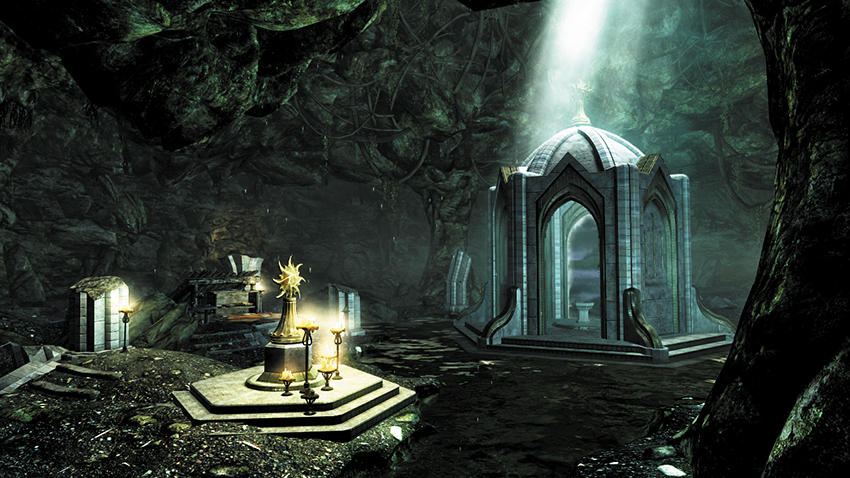
 Darkfall Grotto: Wayshrine of Illumination
Related Dawnguard Main Quest: Touching the Sky
Prelate Sidanyis
Prelate Sidanyis welcomes you to your first Wayshrine (of the five to find), where you first scoop water into your ewer and begin your pilgrimage. Eventually, you can teleport to five locations from here, depending on the other Wayshrines you have opened. Here’s where you can warp to:
Shrine of Learning
Shrine of Resolution
Shrine of Radiance
Shrine of Sight
Wayshrine [1/5]
 Portal to Forgotten Vale
 [DG.13] Arkngthamz
Related Quests
Side Quest: Lost to the Ages
Recommended Level: 16
Faction: Dwarven City/Falmer Hive
Chaurus
Chaurus Hunter
Dwarven Centurion
Dwarven Sphere
Dwarven Spider
Falmer
Katria
Puzzle
Tonal Lock
Collectibles
Unique Weapon: Zephyr [DG6/7]
Miscellaneous
Chest
Loose gear
Exterior
Arkngthamz is a hidden Dwarven ruin located in the Reach, just south of the Orc Stronghold Dushnikh Yal and a short romp south of Reachwind Eyrie. As you approach its ancient Exterior steps, you feel a slight vibration, an earthquake from down below. Push open the imposing Dwarven doors and enter this ancient city.
Exit to Skyrim
Fallen Pillar and Stream
Cross a fast-flowing stream via a fallen pillar here. The remains of a Dwarven Spider are at one end of the stream.
Grand Cavern (East)
A massive earthquake sundered this room recently, caused by Katria’s failure to solve a Tonal Lock, creating a huge chasm down the center. This side of the cavern is now home to a ghost named Katria, who approaches you shortly after you enter.
Katria’s Remains
Katria’s ill-fated fall ended here. Inspect her twisted remains for her journal and a few small valuables.
- Katria’s Journal
Grand Caven (River)
The river at the bottom of the cavern is fast-flowing (and can be dropped into once your adventuring here is over) and has several corpses scattered around its banks (two automaton, two Falmer). Check the ledge to the right of the waterfall for a chest.
- Chest
Pipe Vent Tunnel and Waterlogged Chamber
Inspect the Falmer corpses and check under the walkway for a rare Dynamo Core. Watch for Dwarven Spiders as you progress into the waterlogged room. Climb the pipe to continue on, or stay and check underwater for a chest.
- Chest
Kinetic Resonators: Machine Room
The first gate opens as the Kinetic Resonator on the other side is struck by blasts of steam from a broken pipe. Step into the machine room. Strike the second resonator (with any weapon) to open the second gate. Then ready yourself for Falmer in the next corridor.
Grand Cavern (West)
A small Falmer camp has been constructed on this side of the cavern. Remember to check the hut and the ledge to the north for a chest.
- Chest (2)
Chasm Ledge and Falmer Nest
Take care as you progress up the chasm, as the rumbling continues. Before you cross the first bridge, edge to a small ledge and chest. Then cross the bridge. Expect three Falmer in this area. Remember to double back across the fallen pillar bridge to a ledge on the opposite side of the chasm with some Falmer fencing.
- Chest
Barred Chamber and Inlet Stream Tunnel
Inspect the sealed door to your left (south) and observe that there is a chest behind it. To reach it, head west to the cliff edge and drop down to the riverbank; then turn south and trek up an inlet stream tunnel. This leads to the half-fallen rear of the chamber behind the door and a fallen Dwarven Centurion at the foot of the waterfall. Expect Dwarven Sphere combat before the chest. Use the ground lever to open the door from the chamber.
- Chest
Waterfall Grotto
Pockmarked with Falmer nest holes, attack the foes (Falmer and a Chaurus) here. There are two secret areas (Locations 14 and 15) on the opposite side of the waterfall.
Falmer Camp
Slay the Falmer in this small camp, and journey southwest to reach the next location, or head north to continue toward your goal.
- Chest
Chaurus Tunnel
In this tight tunnel, expect Chaurus attacks as you ascend.
Waterfall Grotto (High Ledge and Secret Tunnel)
At the top of the Chaurus Tunnel is a stream leading to the top of the Waterfall Grotto. Watch for a Falmer dropping onto this precarious perch. Check the tiny ledge to the left (north) for a chest. Then (carefully) turn right (south), drop down the grotto wall to a lower ledge and to a second, lower stream. Inspect this secret tunnel for a chest. Then drop into the grotto water in search of one more secret, an underwater passage to the west. Dive into the pool at the base of the falls and search for this tunnel leading into a thin, secret cavern with another chest, close to the skeletal remains of a warrior.
- Chest (3)
- Loose gear
- Lots o’ Gold
Zephyr’s Glade
Sitting on the edge of a log over a nasty drop (where Katria fell from) is the ghost’s trusty bow. Carefully reach for it before making your way up the cliffs here.
- Unique Weapon: Zephyr [DG6/7]
Tonal Lock Chamber
A spectacular summit with dwarven arches to descend through, and a flat lower area littered with dwarven arrows and skeletal remains (at least eight corpses are here, some of whom have gear to grab).
Puzzle Solution: There are five resonators that make up the Tonal Lock. Bring out your favored bow (or Zephyr), and utilize the scattered arrows on the ground if you run out of ammunition. Figure out the correct order to hit each resonator. There are two clues to help you:
The first clue provides the correct listing of the first two resonators to hit. This is the sketch on the last page of Katria’s Journal.
The second clue is on the corpse of the only non-skeletal adventurer lying on the ground near your feet. Search him for a scrap of paper, which correctly lists the second and the third resonator. Now take careful aim...
The correct order to strike the resonators is as follows: lower row, left (directly above the left door). Then lower row, right (directly above the right door). Then upper row, left (of the dwarven head). Then upper row, right (of the dwarven head). Then, finally, lower row, middle (below the dwarven head).
Beyond the puzzle is the treasure room with an Aetherium Shard (called Glowing Crystal Shard if you haven’t received this quest yet) and a chest and other items. Don’t forget to find the chest on the ledge above the exit tunnel to Location 19 too!
- Aetherium Shard [1/4]
- Chest (2)
- Loose Gear
- Scrap of Paper
Waterlogged Tunnel
This is the preferred (and rather terrifying) exit back to the Grand Cavern. The long drop into the water is safe. Well, so long as you hit the water...