
Far Cry 5 Guide Jacob’s Region: Whitetail Mountains
Story Mission: Missing In Action
- Prerequisites: Complete Story Mission: The World Is Weak, access Wolf’s Den
- Rewards: 600 Resistance Points (Whitetail Mountains)
- Details: Rescue the Whitetail Militia being held hostage at the Visitor’s Center.
MISSION Commencement

Once you’re dragged back to the land of the living from Jacob’s hallucinations during The World Is Weak, you gain access to Wolf’s Den. Speak with the militia leader Eli Palmer and agree to help him.

REACH the Visitor’s Center
You need to free four hostages held at the Whitetail Park Visitor Center. Head there by ground vehicle, as a stealthy course of action is required.
SECURE the Visitor’s Center Militia Hostages Rescued (4)
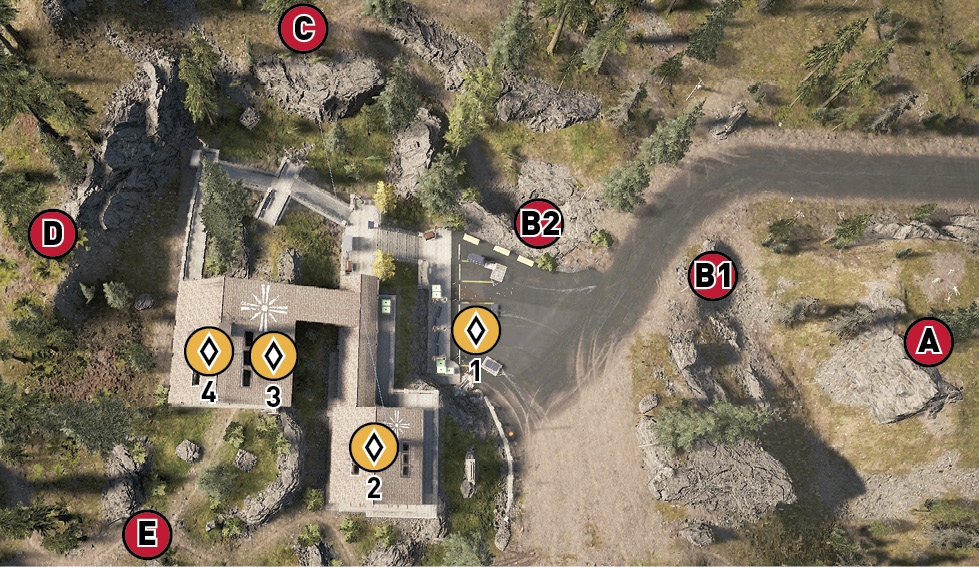
The visitor’s center is nestled on a slope. You’re here to remove the eight cult members, securing the place. Then free the four hostages indicated on the map ( 1-4).
1-4).
Be sure to use silenced weaponry, a bow, or melee strangulation, as the enemies start executing prisoners around ten seconds after hearing your first shot. They also obviously react if they see a fellow cult member fall, so time your takedowns wisely.
OPTIMAL Path

Approach from the rock outcrop to the east  . This way, when Eli radios in, you can follow his recommendation and scoot under the road via a drainage pipe (
 to
to  ), but tag all foes with your binoculars first. Then head up the rocky gully to the tree platform
  and across the top of the rock outcrop along the western side of the search zone
  . This allows you to study patrol routes and hostage locations.
Begin methodically and quietly removing the enemies, one at a time. It’s easier to creep down from the west side, using the building as cover, rather than working from the parking lot uphill, as foes have less chance seeing you. You can also use the two buildings and low connecting walls as cover, and you have better line-of-sight opportunities.

Drop down and start removing foes around the souvenir shop where hostages (3) and (4) are being held. The order is dependent on the foes’ patrol paths, but expect to remove around four of the eight foes here. Use windows to fire through and corners to hide behind. Constantly crouch as you whittle down the enemy presence without the others knowing. Then work your way to the Information Center, to hostage (2). Tackle two to three foes here, before finally aiming down at the remaining enemies on the parking lot, by (1).
Free the hostages after securing the center, or you risk them running into a foe.
OTHER Paths

An excellent alternative to sneaking around at ground level is to move to the west rock outcrop  , then head to the west wall of the souvenir center. Climb onto the roof above hostage (4). You can shoot foes through the skylights, use the roof apex as cover, and bound to the lower roof. Expect foes to eventually spot you, but you can clear the area without hostage casualties.
After creeping up the north gully to the tree platform  , use it to tag all the enemies with your binoculars, then fire from here. If you need to quickly reach the hostages, use the zip line.
Creep in from the southwest trail  . You have the height and good views of foes through the glass windows. Work from high ground to low.
Distractions are an option, in a pinch—lobbing a stone to attract a foe so you can execute them or take down an adjacent enemy while the distracted enemy looks the other way.
Are the enemies executing the hostages due to your poor noise or takedown management? Then slay the cultists so at least one hostage survives. Eli isn’t happy, but the mission continues.
REACH the Hawkeye Tunnel
There are two more hostages to rescue. Don’t delay, as they’re about to be thrown off “Devil’s Drop,” a cliff at Hawkeye Tunnel. Drive there immediately.
SECURE Hawkeye Tunnel
RESCUE the Whitetails (2)
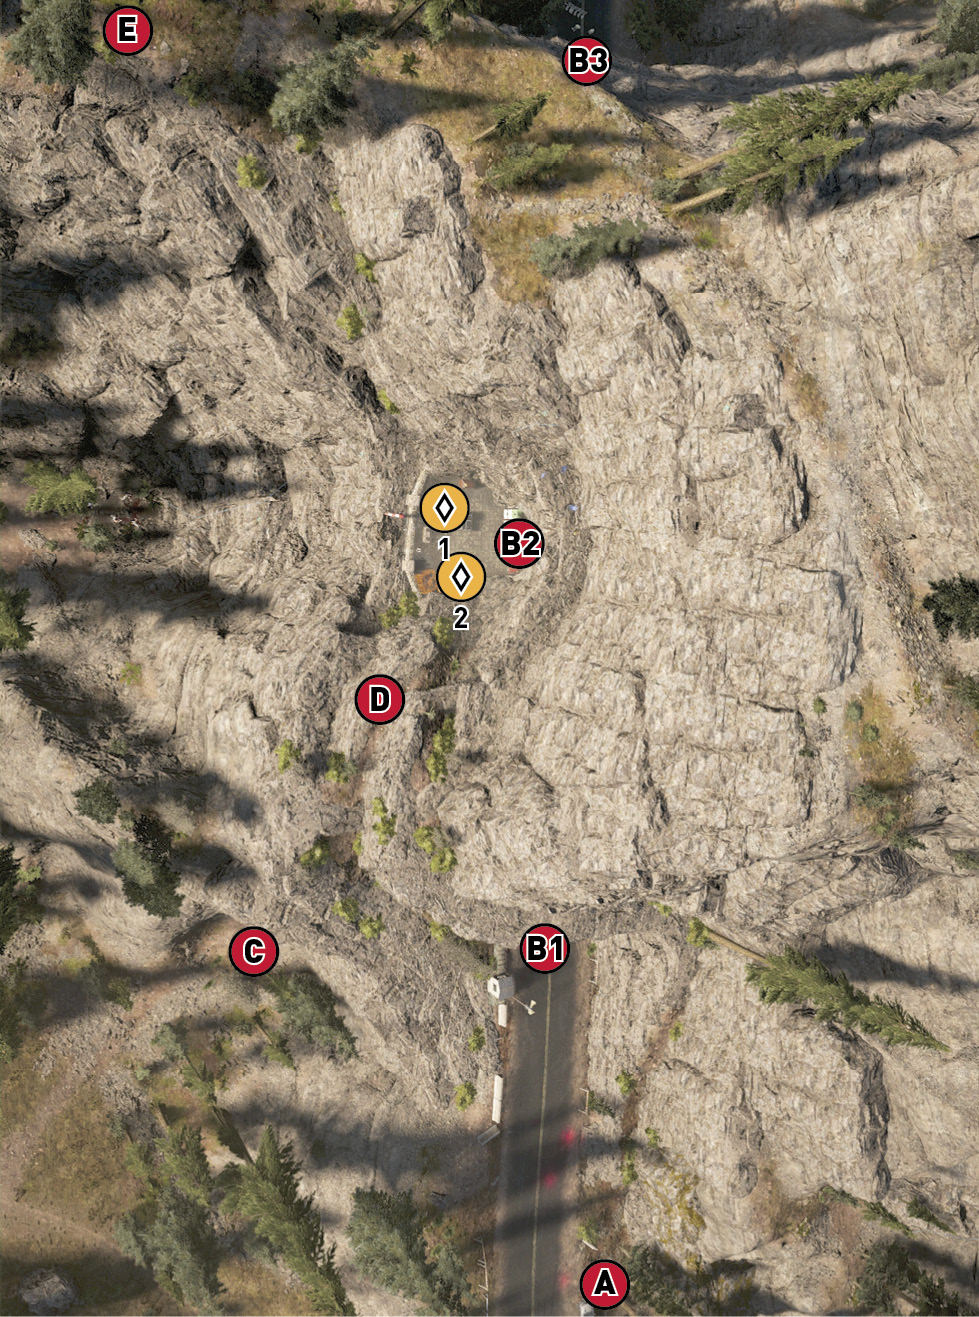
You haven’t the time to ponder which route to take; the first execution comes pretty swiftly (around a minute in, or quicker if you’re spotted). This means immediately getting a visual on Devil’s Drop  . You’re usually approaching from
  , and the tunnel has three exits (
 ,
,  ,
,  ). If you took the long route and are approaching from the north, toward
  or from
  , the same optimal strategy applies.
Expect two enemies at each tunnel entrance ( ,
,  ) and four foes near Devil’s Drop
  by the hostages, including a sniper. Expect possible reinforcements from the road and a helicopter hovering to the west, during the securing of the area.
OPTIMAL Path

Stop before you’re spotted at the tunnel entrance  , and head up the cliff path to the east
  that winds to the left, over the tunnel entrance, and around to the cliffs just south of Devil’s Drop
  . Crouch down so you aren’t spotted, ensuring the enemies don’t start executing the two hostages. There’s a third hostage that is tossed off the cliff; you can’t save them.
Line up a shot, and tag the foes by the hostages in the overlook. Make rapid, accurate headshots, beginning with the sniper. Then anyone venturing close to the hostage. Descend to the overlook at  , and start securing the tunnel now, clearing foes incoming from both directions. Feel free to use projectiles. If you hear the chopper, shoot the pilot quickly. Then free both hostages.
OTHER Paths

The “crazy” plan involves using similar stealth techniques to your earlier rescue and tagging all foes from the road near  . Remain on the tarmac, watching for the two enemies at the tunnel entrance
  , and remove one with melee strangulation or silenced weaponry. Assuming no shouting occurs, venture into the tunnel, tackling foes as you see them. Turn left to
  and slay the guards holding the hostages.
You could drive your quad down the trail to the west of the road. Grapple up the cliff from  , clamber to
  , and then follow the rest of the Optimal Path strategy.
If you took the route from  to the ledge above
  , you can vary your route by grappling up, then moving to a ledge path above the overlook directly above the hostages. Creep along the lip to the ledge above the tunnel before attacking.
With an ally, you can send one into the tunnel while the other sneaks around the cliff edge to  ; time your attack so you’re both properly positioned before the strike.
If you can’t trust your sniping prowess when aiming at the pilot, bring an RPG with you (or grab one from the sniper corpse) to quickly remove the helicopter threat.
With at least one hostage freed and the tunnel area secured, the mission can be considered a success.