
Prima Games eGuides
primagames.com Browse Redeem a code Help
The Elder Scrolls Online: Summerset eGuide
Sign in My Guides

Sign in or create an account

We'll email you a link. No password needed, and if you don't have an account yet, the link makes one.

By creating an account or signing in, you agree to our Terms of Service and Privacy Policy.

Have a password?

Had an account on the old eGuides site, or a code from a printed guide? Help and troubleshooting

Sign in with a password

By signing in, you agree to our Terms of Service and Privacy Policy.

Check your email

A sign-in link is on its way. It works once and expires in 15 minutes. Open it and you're in, with an account if you didn't already have one.

Contents

  • Crafting and Armor
    • Introduction
    • Jewelry Crafting
    • Armor Sets
    • Craft Works Locations
    • Crafting Quests
  • The Psijic Order
    • Introduction
    • Unlocking the Psijic Order Skill Line
    • Rank 1
    • Rank 2
    • Rank 3
    • Rank 4
    • Rank 5
    • Rank 6
    • Rank 8
    • Rank 9
    • Rank 10
    • The Psijic Order Quest Line
  • Abyssal Geysers
    • Introduction
    • Minor Geysers
    • Geyser Locations
    • Geyser Bosses
  • Quests
    • Quest Index
    • Story Quests
      • Introduction
      • The Mind Trap
      • The Queen’s Decree
      • A Pearl of Great Price
      • Buried Memories
      • The Tower Sentinels
      • The Dreaming Cave
      • Lost in Translation
      • A Necessary Alliance
      • The Crystal Tower
      • A New Alliance
    • Side Quests
      • Introduction
      • A Duelist’s Dilemma
      • A Tale of Two Mothers
      • Aicessar’s Invitation
      • Bantering with Bandits
      • King’s Haven Pass
      • Culture Clash
      • Curinure’s Invitation
      • The Ebon Sanctum
      • The Forest Vandal
      • Gjadil’s Legacy
      • Gryphon Grievance
      • His Final Gift
      • The Hulkynd’s Heart
      • Illusions of Grandeur
      • Lauriel’s Lament
      • Lost Libations
      • Manor of Masques
      • Murder in Lillandril
      • Obedience Issues
      • Old Wounds
      • The Perils of Art
      • Room to Spare
      • The Taste of Fear
      • Untamed and Unleashed
      • Wasting Away
      • Storming the Walls
      • The Vaults of Moawita
      • Whispers from the Deep
    • Daily Solo Quest
      • Introduction
      • The Divine Deputation
    • Daily Group Quests
      • Introduction
      • The Sickening Sea
      • Taming the Wild
      • The Abyssal Alchemist
      • Never Forgotten
      • Run Aground
      • Birds of a Feather
      • Sinking Summerset (Daily)
  • Delves
    • Introduction
    • Completing a Delve
    • Archon’s Grove
    • Tor-Hame-Khard
    • Traitor’s Vault
    • Wasten Coraldale
    • King’s Haven Pass
    • Eton Nir Grotto
  • Dungeons and Trials
    • Introduction
    • Sunhold
    • Karnwasten
    • Cloudrest (Trial)
  • The Atlas of Summerset Isle
    • An Overview of the Lands of the High Elves
    • Summerset Isle: Region 1 (Northwest)
    • Summerset Isle: Region 2 (Southwest)
    • Summerset Isle: Region 3 (Northeast)
    • Summerset Isle: Region 4 (Southeast)
    • Summerset Isle: Region 5
  • Interactive World Maps
    • Summerset
    • Artaeum
  • Summerset Bestiary
    • Overview
    • Coral Crab
    • Giant Salamander
    • Gryphon
    • Indrik
    • Reef Viper
    • Sea Sload
    • Yaghra (Varieties)
    • Gloam Knight (Shadow of Nocturnal)
  • Appendices
    • Overview
    • Collections: Preorder
    • Collections: Collector’s Edition
    • Crafting Motifs
    • Crafting Sets
    • Equipment Sets
    • Jewelry Sketches
    • Furnishings
    • Quest Rewards
    • Rare Fish
    • Treasure Maps
    • Housing
    • Merchants
    • Crafting Stations
    • Skyshards
    • Thieves Guild Dead Drop Chests
  • Summerset Achievements
    • Overview
    • General Achievements
    • Exploration Achievements
    • Quest Achievements
    • Abyssal Geyser Achievements
    • Cloudrest Achievements
    • New Crafting Achievements
    • Achievement Rewards List
    • Achievement Furnishings
    • New Dragon Bones Achievements
    • New Midyear Mayhem Achievements

The Elder Scrolls Online: Summerset Guide › Quests › Side Quests

Untamed and Unleashed

  • Location: In front of each of the major entrances to Sil-Var-Woad
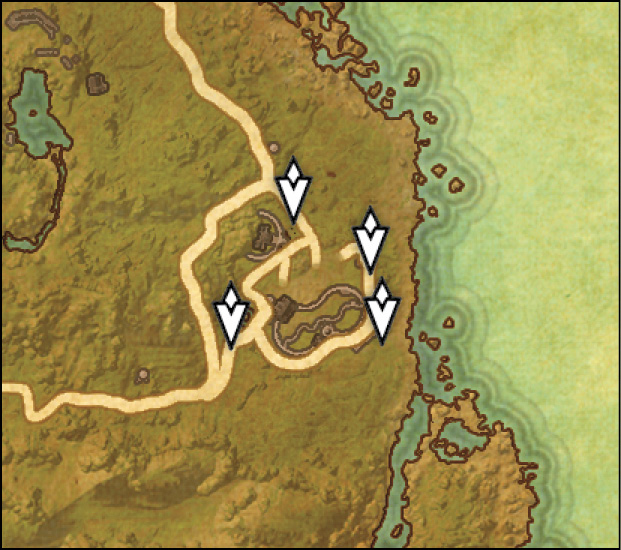
  • Quest-giver: Talomar

Description: Something’s frenzied the animals in the Royal Menagerie of Sil-Var-Woad, which is only the beginning of Talomar’s problems. The Queen’s beloved Indrik, Lotus, has escaped Sil-Var-Woad in the ensuing chaos and Talomar is keen on getting her back. Help Talomar track down Lotus and bring her home safely before she learns the harshness of nature outside of a pen.

Search for Lotus

Sil-Var-Woad is completely overrun with wild animals, so making progress can be slow and dangerous, especially if you encounter a Mammoth. Luckily you can avoid Mammoths entirely during this quest, which is what we wholeheartedly suggest you do unless you’re really itching for a fight.

You’ll need to investigate two spots in the Royal Menagerie; we’ll start by looking at the southernmost of the two. Investigate some tainted feed in the corner of one of the Echatere pens, then speak with Talomar about your discovery.

The northern location has a suspicious sight: a Mammoth that died breaking through a menagerie wall. Investigate the dead Mammoth and speak with Talomer once again.

Speak with Elise Mallon

Once you’ve searched both locations, head to the west side of the menagerie to speak with Elise Mallon. She suggests you head to the reflecting pool to look for Lotus. You can optionally speak with Talomar to get more insight on Elise.

As soon as you arrive at the reflecting pool, Lotus will bolt off to the east side of the menagerie. Give chase and try to catch up. You’ll bump into Conservator Vinelore upon arriving at the objective marker. Speak with her, then follow Talomar out. Speak with him as soon as he stops. Elise Mallon will show up again after speaking with Talomar. Talk with her once again, then with Talomar.

Mammoth

You must find a way into the conservatory, which unfortunately means you need to fight a Mammoth standing in the way of your objective. Mammoths don’t have a lot going for them in terms of attack diversity, but they hit like trucks and can take a beating before finally giving up the ghost. For the most part, they’ll just approach you and do a basic melee attack, but on occasion they’ll continually swing their tusks in a wide area to gore you. This can be really sudden, so if you see a second tusk attack follow a first, put distance between you and the Mammoth immediately. They can also charge at you or stomp down to deal hefty damage, but both of these moves are rare and incredibly slow. You’ll see them telegraphed well before you’re ever in danger.

Once you defeat the Mammoth, inspect the dead ranger lying on the ground behind where the Mammoth was standing. The ranger has a key on him that you can use to access the conservatory. With the key in hand, head south to reach the conservatory entrance.

Search the Conservatory

Speak with Elise to get more info about the conservatory; then head to the third floor and inspect each of the marked items in the room. Talk to Elise, then head back downstairs and into the Sil-Var-Woad paddocks. Speak with Conservator Vinelore before talking to Elise again.

Defeat Conservator Vinelore

Exit the paddock gate and head east until you reach a set of stairs. Go upstairs to find Vinelore. You’ll need to defeat her and Specimen II to complete the quest.

Vinelore is more of a nuisance than a real threat, which is why you should take her out first. Most of her attacks are ranged, allowing her to chip your health down while you punch it out with Specimen II. Her attack patterns are the basic attacks you encounter when fighting most bow-wielding enemies, so nothing you likely haven’t seen a dozen times already. Just watch out for her multi-arrow shot, which hits everything in a cone in front of her. You’ll also want to take care not to step on the traps she throws on the ground. They have a nice, bright light beacon jetting out of them, so they’re hard to miss, but if you step in one you’ll be rooted temporarily.

Specimen II

Specimen II fights like other Indriks. It can teleport, charge while creating a trail of flame behind it, create a lightning storm while it bucks wildly, and shoot energy beams out of its head. You’ll also have to watch out for its spectral Indrik charge attack, which has it creating a clone of itself that will charge at you and knock you over if it lands a hit.

Free Lotus

Once you defeat the pair, open the gate on the right side of the pen behind Vinelore. Use the portal Lotus opens to get back to Talomar and Elise. Talomer will ask for your opinion on how to proceed with the Royal Menagerie. Neither answer will affect the outcome of the quest, so choose whichever one you agree with most.

You’ll receive a Ritemaster’s Gifted Axe as a reward for completing the quest.

Keep reading with a free account

The first 3 sections of The Elder Scrolls Online: Summerset are open to everyone. An account opens the rest of it, and every other guide in the archive. It's free, and there's nothing to buy.

Bought guides on the old Prima Games site? Your account and every guide you own moved here, so there's nothing to buy again. Sign in.

Create a free account Or browse our free guides

PreviousThe Taste of Fear NextWasting Away