
Prima Games eGuides
primagames.com Browse Redeem a code Help
The Elder Scrolls Online: Summerset eGuide
Sign in My Guides

Sign in or create an account

We'll email you a link. No password needed, and if you don't have an account yet, the link makes one.

By creating an account or signing in, you agree to our Terms of Service and Privacy Policy.

Have a password?

Had an account on the old eGuides site, or a code from a printed guide? Help and troubleshooting

Sign in with a password

By signing in, you agree to our Terms of Service and Privacy Policy.

Check your email

A sign-in link is on its way. It works once and expires in 15 minutes. Open it and you're in, with an account if you didn't already have one.

Contents

  • Crafting and Armor
    • Introduction
    • Jewelry Crafting
    • Armor Sets
    • Craft Works Locations
    • Crafting Quests
  • The Psijic Order
    • Introduction
    • Unlocking the Psijic Order Skill Line
    • Rank 1
    • Rank 2
    • Rank 3
    • Rank 4
    • Rank 5
    • Rank 6
    • Rank 8
    • Rank 9
    • Rank 10
    • The Psijic Order Quest Line
  • Abyssal Geysers
    • Introduction
    • Minor Geysers
    • Geyser Locations
    • Geyser Bosses
  • Quests
    • Quest Index
    • Story Quests
      • Introduction
      • The Mind Trap
      • The Queen’s Decree
      • A Pearl of Great Price
      • Buried Memories
      • The Tower Sentinels
      • The Dreaming Cave
      • Lost in Translation
      • A Necessary Alliance
      • The Crystal Tower
      • A New Alliance
    • Side Quests
      • Introduction
      • A Duelist’s Dilemma
      • A Tale of Two Mothers
      • Aicessar’s Invitation
      • Bantering with Bandits
      • King’s Haven Pass
      • Culture Clash
      • Curinure’s Invitation
      • The Ebon Sanctum
      • The Forest Vandal
      • Gjadil’s Legacy
      • Gryphon Grievance
      • His Final Gift
      • The Hulkynd’s Heart
      • Illusions of Grandeur
      • Lauriel’s Lament
      • Lost Libations
      • Manor of Masques
      • Murder in Lillandril
      • Obedience Issues
      • Old Wounds
      • The Perils of Art
      • Room to Spare
      • The Taste of Fear
      • Untamed and Unleashed
      • Wasting Away
      • Storming the Walls
      • The Vaults of Moawita
      • Whispers from the Deep
    • Daily Solo Quest
      • Introduction
      • The Divine Deputation
    • Daily Group Quests
      • Introduction
      • The Sickening Sea
      • Taming the Wild
      • The Abyssal Alchemist
      • Never Forgotten
      • Run Aground
      • Birds of a Feather
      • Sinking Summerset (Daily)
  • Delves
    • Introduction
    • Completing a Delve
    • Archon’s Grove
    • Tor-Hame-Khard
    • Traitor’s Vault
    • Wasten Coraldale
    • King’s Haven Pass
    • Eton Nir Grotto
  • Dungeons and Trials
    • Introduction
    • Sunhold
    • Karnwasten
    • Cloudrest (Trial)
  • The Atlas of Summerset Isle
    • An Overview of the Lands of the High Elves
    • Summerset Isle: Region 1 (Northwest)
    • Summerset Isle: Region 2 (Southwest)
    • Summerset Isle: Region 3 (Northeast)
    • Summerset Isle: Region 4 (Southeast)
    • Summerset Isle: Region 5
  • Interactive World Maps
    • Summerset
    • Artaeum
  • Summerset Bestiary
    • Overview
    • Coral Crab
    • Giant Salamander
    • Gryphon
    • Indrik
    • Reef Viper
    • Sea Sload
    • Yaghra (Varieties)
    • Gloam Knight (Shadow of Nocturnal)
  • Appendices
    • Overview
    • Collections: Preorder
    • Collections: Collector’s Edition
    • Crafting Motifs
    • Crafting Sets
    • Equipment Sets
    • Jewelry Sketches
    • Furnishings
    • Quest Rewards
    • Rare Fish
    • Treasure Maps
    • Housing
    • Merchants
    • Crafting Stations
    • Skyshards
    • Thieves Guild Dead Drop Chests
  • Summerset Achievements
    • Overview
    • General Achievements
    • Exploration Achievements
    • Quest Achievements
    • Abyssal Geyser Achievements
    • Cloudrest Achievements
    • New Crafting Achievements
    • Achievement Rewards List
    • Achievement Furnishings
    • New Dragon Bones Achievements
    • New Midyear Mayhem Achievements

The Elder Scrolls Online: Summerset Guide › Quests › Side Quests

Illusions of Grandeur

  • Location: On the southeast end of the Illumination Academy, or in the Illumination Academy courtyard
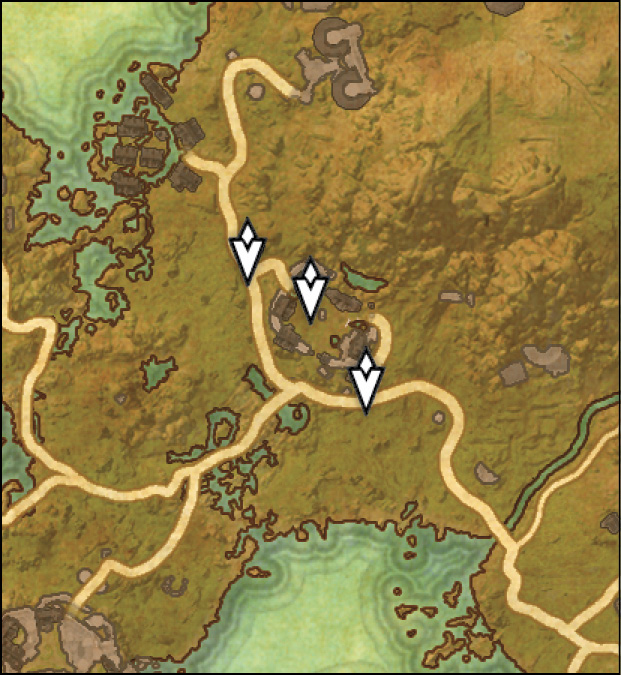
  • Quest-giver: Merenfire or Erudil

Description: Merenfire seems a bit . . . off. She’s speaking like a Nord, mocking thin-legged High Elves despite clearly being one. Find Erudil to see if he can give you a clue as to Merenfire’s condition.

Talk to Erudil

Head into the Illumination Academy and look for Erudil near the center of the courtyard. After speaking with him, look at the Illuminus next to him, then speak with him once again. Follow Erudil, then talk with him again when he stops.

Locate Erudil’s Friends

You’ll need to find three of Erudil’s friends around the academy, the first of whom is Pavo Maria, located just east of Erudil himself. Pavo will ask you to choose the book about his life from a selection of three books surrounding the tree in front of him. If you’ve been paying attention to Pavo, the choice will be clear.

After inspecting the book, speak with Pavo once more. He will ask you to spare some coin. You can save your money if you’d like; this won’t affect your result. After “curing” Pavo, head back to speak with Erudil. Next, read the Illuminus again, and discuss your findings with Erudil.

Tanelwen

Erudil’s second friend, Tanelwen, is on the academy’s north side. Tanelwen will ask you to read the story of her life, which has been mixed in with two other books on the benches behind you. Like Pavo, if you were listening to what Tanelwen had to say, you’ll know which book to inspect first.

After reading the book, speak with Tanelwen again. She’ll ask you to help put one of the two Illumination Academy students behind her behind bars. Speak with both of them to root out the criminal amongst them. After speaking with both of the suspects, a delicious bit of evidence pops up in the form of fruit smears on the ground. Follow this tasty trail and see if it can help unmask this pesky pie thief.

After following the trail to its conclusion, head back to Tanelwen and help her finally bring the thief to justice! Once the case has been closed, follow Tanelwen back to Erudil, speak with him, then read the Illuminus again. Speak with Erudil about the Illuminus’s contents.

Selynia

Head up the stairs on the academy’s east side and enter the Faculty Hall. Go to the second floor, then take the first left to reach the door leading to the academy’s walls. You’ll find Selynia getting into trouble there. Like the others, she will ask you to identify her by examining one of three books nearby. The book in the center of the three will give you the answers you’re looking for.

After examining the book, speak with Selynia again. Head back down to the courtyard and collect one of the giant, awful spiders roaming around. Take it back up to the wall and place it behind Selynia. Follow her into the Faculty Hall and speak with her, then head back to Erudil. Read the Illuminus once again, then speak with Glardir and Erudil, respectively.

Head back to where you originally found Tanelwen and enter the door to the Hall of Illumination. Head into the hall and take a left to reach the Academy Stacks.

Academy Stacks

The Forest Dark

Once inside the Academy Stacks, speak with Meredil the Archivist. He will ask you to dispel the illusions created by the books. Head through the door on the left and go down to the second level of the stacks. Continue to the main half of the third level to find the book The Forest Dark. You must place the book back in its proper place. Look at each of the marked bookshelves to understand how the books are sorted in this room. Reading the book in your Quest Items tab will give you a hint on this book’s home. If you get stuck on this or any other book, you can read the “A Place for Everything” note here for the answers.

A Place for Everything

The Forest Dark: Reading The Forest Dark will show that it is no doubt a work of poetry. In addition, it’s about nature and you’ll know that its proper place is on the Nature Poetry shelf on the room’s south wall.

The Siege of Ald Marak:The Siege of Ald Marak clearly refers to Imperial history and thus belongs on the Imperial History bookshelf.

The Truth of Minotaurs: The Truth of Minotaurs undoubtedly belongs on the Beasts and Horrors bookshelf.

After placing the book in its proper spot, head through the library door on the room’s north side.

The Siege of Ald Marak

Head up the stairs, and go to the room’s east side to find your next book, The Siege of Ald Marak. Grab it, then enter the door south of you and go upstairs. Again, look at the bookshelves to learn which category your book belongs in, then read the book again to see if it matches any of these.

After placing the book, head east and enter the door on your left. Head up the stairs to find your next book.

The Truth of Minotaurs

The title of the book says it all. Look through this new set of bookshelves and find the one that most relates to the title and content of this book.

Minotaur and Minotaur Shaman

After you enter the marked door, a Minotaur immediately attacks you. Try to fight the Minotaur as close to the door as possible. There’s a Minotaur Shaman on the room’s other side, but it won’t engage unless you get really close to it.

The Minotaur focuses almost exclusively on melee attacks, and it is fast and very aggressive. Its reach is huge for how little space you have in the room, so you’ll need to rely on careful dodging and blocking to avoid taking huge damage.

Its charge attack is particularly devastating, as it creates a shock wave that far extends its weapon’s reach. Blocking this attack will save you from being split down the middle. Aside from basic melee swings, the only other attack the Minotaur will perform is a fire-based AoE attack. It will get into a charging position and begin shooting fire out of its nose. If it manages to hit you with the subsequent lunge attack, it will create a fire AoE on the ground surrounding it for a few seconds. If you roll away from it, the attack will whiff and no fire will be created.

As soon as you defeat the Minotaur, the Minotaur Shaman begins attacking you. If you thought the Minotaur’s range was rough, you’re going to hate this guy. For the most part, the Shaman will shoot single, blockable fireballs at you. These aren’t a big deal if you’ve got stamina. Its other moves are definitely more trouble, though.

If you stay too far away from it, the Minotaur Shaman’s hands will become engulfed in flames and it will create a massive AoE attack right under where you’re standing. This move slows and burns, so if you see that AoE ring, roll toward the Shaman immediately.

When you’re within about ten feet of the Shaman, it will rely exclusively on fireball attacks and a second AoE attack that revolves around it creating blood-red crystals in a random pattern under your feet. If you see it begin punching the ground, move away from the Shaman. Its crystals start near it and work their way toward you. They’re not hard to avoid if you’re paying attention to the Shaman’s behaviors.

After defeating the Minotaur duo, enter the room they were guarding and speak with Glardir. Then take the passage behind her and go down the stairs into the room below. You’ll find the Illuminated one there.

The Illuminated One

The Illuminated One isn’t a particularly complicated fight, but it does come with a few surprises. It will mostly rely on blockable basic and charged melee attacks, but where it can really dish out punishment is when it performs its spinning blade attack. If you see it begin to absorb energy into its core, run and run fast. The Illuminated One will begin spinning its blades like a tornado while it pursues you. You can avoid it by sprinting, but you’ll have to watch out for its second major attack: the chain pull. If you’re too far away, it will shoot out spectral chains and pull you toward it, immediately following up with the spinning blade attack.

Once you defeat the Illuminated One, grab the book behind it and put it on its proper shelf. Now head back to Erudil and speak with him to wrap up this quest up. He’ll give you a shield, the Targe of Foul Story, for your help.

Keep reading with a free account

The first 3 sections of The Elder Scrolls Online: Summerset are open to everyone. An account opens the rest of it, and every other guide in the archive. It's free, and there's nothing to buy.

Bought guides on the old Prima Games site? Your account and every guide you own moved here, so there's nothing to buy again. Sign in.

Create a free account Or browse our free guides

PreviousThe Hulkynd’s Heart NextLauriel’s Lament