Prima Games eGuides
primagames.com Browse Redeem a code Help
The Elder Scrolls Online: Summerset eGuide
Sign in My Guides

Sign in or create an account

We'll email you a link. No password needed, and if you don't have an account yet, the link makes one.

By creating an account or signing in, you agree to our Terms of Service and Privacy Policy.

Have a password?

Had an account on the old eGuides site, or a code from a printed guide? Help and troubleshooting

Sign in with a password

By signing in, you agree to our Terms of Service and Privacy Policy.

Check your email

A sign-in link is on its way. It works once and expires in 15 minutes. Open it and you're in, with an account if you didn't already have one.

Contents

  • Crafting and Armor
    • Introduction
    • Jewelry Crafting
    • Armor Sets
    • Craft Works Locations
    • Crafting Quests
  • The Psijic Order
    • Introduction
    • Unlocking the Psijic Order Skill Line
    • Rank 1
    • Rank 2
    • Rank 3
    • Rank 4
    • Rank 5
    • Rank 6
    • Rank 8
    • Rank 9
    • Rank 10
    • The Psijic Order Quest Line
  • Abyssal Geysers
    • Introduction
    • Minor Geysers
    • Geyser Locations
    • Geyser Bosses
  • Quests
    • Quest Index
    • Story Quests
      • Introduction
      • The Mind Trap
      • The Queen’s Decree
      • A Pearl of Great Price
      • Buried Memories
      • The Tower Sentinels
      • The Dreaming Cave
      • Lost in Translation
      • A Necessary Alliance
      • The Crystal Tower
      • A New Alliance
    • Side Quests
      • Introduction
      • A Duelist’s Dilemma
      • A Tale of Two Mothers
      • Aicessar’s Invitation
      • Bantering with Bandits
      • King’s Haven Pass
      • Culture Clash
      • Curinure’s Invitation
      • The Ebon Sanctum
      • The Forest Vandal
      • Gjadil’s Legacy
      • Gryphon Grievance
      • His Final Gift
      • The Hulkynd’s Heart
      • Illusions of Grandeur
      • Lauriel’s Lament
      • Lost Libations
      • Manor of Masques
      • Murder in Lillandril
      • Obedience Issues
      • Old Wounds
      • The Perils of Art
      • Room to Spare
      • The Taste of Fear
      • Untamed and Unleashed
      • Wasting Away
      • Storming the Walls
      • The Vaults of Moawita
      • Whispers from the Deep
    • Daily Solo Quest
      • Introduction
      • The Divine Deputation
    • Daily Group Quests
      • Introduction
      • The Sickening Sea
      • Taming the Wild
      • The Abyssal Alchemist
      • Never Forgotten
      • Run Aground
      • Birds of a Feather
      • Sinking Summerset (Daily)
  • Delves
    • Introduction
    • Completing a Delve
    • Archon’s Grove
    • Tor-Hame-Khard
    • Traitor’s Vault
    • Wasten Coraldale
    • King’s Haven Pass
    • Eton Nir Grotto
  • Dungeons and Trials
    • Introduction
    • Sunhold
    • Karnwasten
    • Cloudrest (Trial)
  • The Atlas of Summerset Isle
    • An Overview of the Lands of the High Elves
    • Summerset Isle: Region 1 (Northwest)
    • Summerset Isle: Region 2 (Southwest)
    • Summerset Isle: Region 3 (Northeast)
    • Summerset Isle: Region 4 (Southeast)
    • Summerset Isle: Region 5
  • Interactive World Maps
    • Summerset
    • Artaeum
  • Summerset Bestiary
    • Overview
    • Coral Crab
    • Giant Salamander
    • Gryphon
    • Indrik
    • Reef Viper
    • Sea Sload
    • Yaghra (Varieties)
    • Gloam Knight (Shadow of Nocturnal)
  • Appendices
    • Overview
    • Collections: Preorder
    • Collections: Collector’s Edition
    • Crafting Motifs
    • Crafting Sets
    • Equipment Sets
    • Jewelry Sketches
    • Furnishings
    • Quest Rewards
    • Rare Fish
    • Treasure Maps
    • Housing
    • Merchants
    • Crafting Stations
    • Skyshards
    • Thieves Guild Dead Drop Chests
  • Summerset Achievements
    • Overview
    • General Achievements
    • Exploration Achievements
    • Quest Achievements
    • Abyssal Geyser Achievements
    • Cloudrest Achievements
    • New Crafting Achievements
    • Achievement Rewards List
    • Achievement Furnishings
    • New Dragon Bones Achievements
    • New Midyear Mayhem Achievements

The Elder Scrolls Online: Summerset Guide › Quests › Side Quests

The Ebon Sanctum

  • Location: West or southeast of Ebon Stadmont
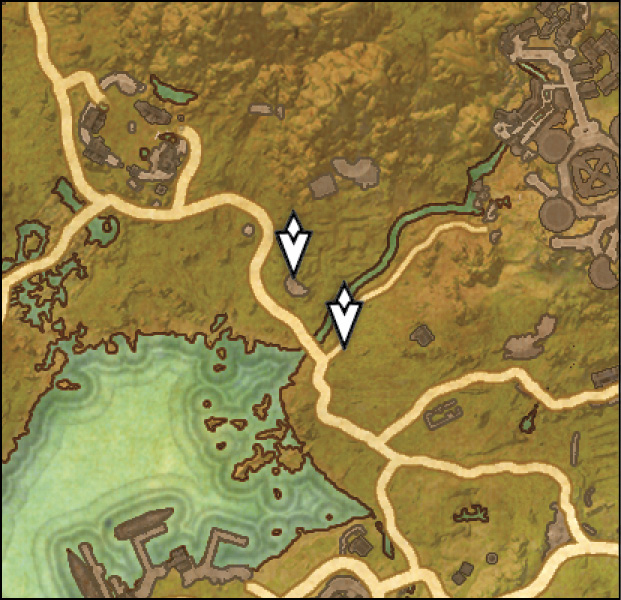
  • Quest-giver: Andewen or Telarniel

Description: Andewen needs an escort through the labyrinthine forests of Ebon Stadmont and you’re the best option she’s got. Help her locate an ancient temple and you may walk out with some extra coin in your pocket. Or perhaps you’ll end up hopelessly lost in the twists and turns of the forest. Only one way to find out.

Assist Andewen

Enter Ebon Stadmont and go to the Inscribed Stonework. After you examine the stonework, Andewen will do an inspection of her own. While she looks over the writing on the ancient stones, waves of daedra will attack you both. Fight the daedra so Andewen has the time necessary to read the writing.

Nogril

The attack will climax with the appearance of an Ogrim named Nogril. While they aren’t the fastest enemy you’ll face, Ogrim are notoriously aggressive and have plenty of options for attacking you no matter where you are. To make matters worse, just about every attack Ogrim do has some sort of negative status effect. They’ll often throw rocks or charge directly at you, both of which will knock you to the ground. Then they’ll perform a stomp attack that has a massive AoE that will put a moving speed debuff on you.

The best way to fight an Ogrim is to block most of its heavier attacks, or avoid it outright if you’re certain you can get away. We know, that’s basic information for any fight, but in the case of the Ogrim, if you can get your guard up for any of its attacks, you’ll negate the negative effects of it hitting you. Play defensively instead of taking risks to knock the Ogrim’s health down faster. All it takes is one good hit and all of your efforts will come undone.

Find the Path to the Ruin

After defeating Nogril, go northeast to the portal down the path. Pass through the portal, and you and Andewen become separated. You must choose between one of two portals; one will take you to Andewen and the other will boot you out of the forest altogether.

The portal you want is the northwesternmost of the two. You’ll know you’ve picked the correct portal when you hear Andewen call out, “I’m over here!” and you see a blue torch to the right of the portal’s archway.

The Next Inscription

Head down the path a little ways and examine the stone tablet to your right. More daedra will appear while Andewen reads the inscription. The attacks will conclude with the appearance of Nikalia the Beguiling.

Nikalia the Beguiling

Nikalia doesn’t have the most complicated attack patterns, focusing mostly on chasing after you and doing basic melee attacks. She does have a slew of debuffs on you like Agony, Blood Craze, and Minor Maim. For the most part, you can use basic attack strategies and manage your health to finish off Nikalia without too much fuss.

Once you defeat Nikalia, Andewen will bolt for the portal in the area’s southwest side. Follow her through the portal, then head to the north end of the following area to find Andewen’s much-coveted ruins.

Ebon Sanctum

After entering the ruins, head north and read the note in the center of the room ahead. Inspect the Enchanted Stone, then enter the door on the room’s north side. Head up the stairs in the next room and you’ll find Nightstealer Sorina.

Nightstealer Sorina

Sorina, like the other elite enemies you’ve faced in Ebon Stadmont, doesn’t have much in the way of complex attacks and abilities, but she does have a flexible range of attack. If she’s close, she’ll attack with her sword, but if she’s far, she can lob dark energy balls your way.

Still, using basic attack strategies is more than enough to get through this fight relatively unscathed.

Help Andewen Heal Fletch

Once you defeat Sorina, head back downstairs and assist Andewen by bandaging Fletch, who is lying on the ground in front of her. Speak with Fletch once he’s conscious, then go through the door on the room’s east side.

Ebon Sanctum Garden

Once inside the Ebon Sanctum Garden, speak with Maestro Forte. He’ll task you with inspecting another Enchanted Stone. To reach it, first head east along the path and go through the door to the Northern Path.

Continue following the path around the bend and eventually come to the next Enchanted Stone. Inspect the stone, then speak with Andewen. Once finished, head through the door to the west of the Enchanted Stone. Speak with Andewen again, and go through the southern door.

Follow Fletch

This next room features two Hungers waiting to attack. Thankfully you can completely avoid them if you sneak and move along the room’s left side. If you do get spotted, don’t panic! Draw the Hunger away from its cohort and battle with it alone. If you draw the attention of both Hungers, you’ll be in a lot of trouble.

Fletch

Fletch is almost entirely a range-based fighter. He’ll fire arrows into the air, which will rain down and start small fires wherever they land. So long as you’re watching the ground, you shouldn’t have a difficult time avoiding this attack.

Fletch can also perform two different attacks with conal AoEs. The first one appears to be short-ranged, but as soon as he fires, the AoE circles will split and race across the ground. The circles are rather large, so unless you can get behind or to the side of Fletch immediately, back up as far as you can and move between the AoEs.

The second conal attack has an impressively long range but is easily avoided if you’re not standing in the AoE. Fletch will draw his bowstring and let loose a flurry of arrows that strictly stay within the boundaries of the AoE.

Generally speaking, staying near Fletch is a good strategy. The only time you really need to back away from him is if he fires arrows into the air. His other attacks are easily avoided if you’re near him and he doesn’t have any melee attacks to answer with.

Activate the Southern Stone

After you lay Fletch low, go through the eastern door once more, then head through the south door to the southern path. You’ll find the southern Enchanted Stone on the west side of this area.

Head through the nearby door to reenter the temple. You’ll find Fletch ahead. Speak with him, then exit the temple and talk to a certain someone to conclude the quest. You’ll earn Reverie’s Trick Bow as a reward for your help.

Keep reading with a free account

The first 3 sections of The Elder Scrolls Online: Summerset are open to everyone. An account opens the rest of it, and every other guide in the archive. It's free, and there's nothing to buy.

Bought guides on the old Prima Games site? Your account and every guide you own moved here, so there's nothing to buy again. Sign in.

Create a free account Or browse our free guides

PreviousCurinure’s Invitation NextThe Forest Vandal