Prima Games eGuides
primagames.com Browse Redeem a code Help
The Elder Scrolls Online: Summerset eGuide
Sign in My Guides

Sign in or create an account

We'll email you a link. No password needed, and if you don't have an account yet, the link makes one.

By creating an account or signing in, you agree to our Terms of Service and Privacy Policy.

Have a password?

Had an account on the old eGuides site, or a code from a printed guide? Help and troubleshooting

Sign in with a password

By signing in, you agree to our Terms of Service and Privacy Policy.

Check your email

A sign-in link is on its way. It works once and expires in 15 minutes. Open it and you're in, with an account if you didn't already have one.

Contents

  • Crafting and Armor
    • Introduction
    • Jewelry Crafting
    • Armor Sets
    • Craft Works Locations
    • Crafting Quests
  • The Psijic Order
    • Introduction
    • Unlocking the Psijic Order Skill Line
    • Rank 1
    • Rank 2
    • Rank 3
    • Rank 4
    • Rank 5
    • Rank 6
    • Rank 8
    • Rank 9
    • Rank 10
    • The Psijic Order Quest Line
  • Abyssal Geysers
    • Introduction
    • Minor Geysers
    • Geyser Locations
    • Geyser Bosses
  • Quests
    • Quest Index
    • Story Quests
      • Introduction
      • The Mind Trap
      • The Queen’s Decree
      • A Pearl of Great Price
      • Buried Memories
      • The Tower Sentinels
      • The Dreaming Cave
      • Lost in Translation
      • A Necessary Alliance
      • The Crystal Tower
      • A New Alliance
    • Side Quests
      • Introduction
      • A Duelist’s Dilemma
      • A Tale of Two Mothers
      • Aicessar’s Invitation
      • Bantering with Bandits
      • King’s Haven Pass
      • Culture Clash
      • Curinure’s Invitation
      • The Ebon Sanctum
      • The Forest Vandal
      • Gjadil’s Legacy
      • Gryphon Grievance
      • His Final Gift
      • The Hulkynd’s Heart
      • Illusions of Grandeur
      • Lauriel’s Lament
      • Lost Libations
      • Manor of Masques
      • Murder in Lillandril
      • Obedience Issues
      • Old Wounds
      • The Perils of Art
      • Room to Spare
      • The Taste of Fear
      • Untamed and Unleashed
      • Wasting Away
      • Storming the Walls
      • The Vaults of Moawita
      • Whispers from the Deep
    • Daily Solo Quest
      • Introduction
      • The Divine Deputation
    • Daily Group Quests
      • Introduction
      • The Sickening Sea
      • Taming the Wild
      • The Abyssal Alchemist
      • Never Forgotten
      • Run Aground
      • Birds of a Feather
      • Sinking Summerset (Daily)
  • Delves
    • Introduction
    • Completing a Delve
    • Archon’s Grove
    • Tor-Hame-Khard
    • Traitor’s Vault
    • Wasten Coraldale
    • King’s Haven Pass
    • Eton Nir Grotto
  • Dungeons and Trials
    • Introduction
    • Sunhold
    • Karnwasten
    • Cloudrest (Trial)
  • The Atlas of Summerset Isle
    • An Overview of the Lands of the High Elves
    • Summerset Isle: Region 1 (Northwest)
    • Summerset Isle: Region 2 (Southwest)
    • Summerset Isle: Region 3 (Northeast)
    • Summerset Isle: Region 4 (Southeast)
    • Summerset Isle: Region 5
  • Interactive World Maps
    • Summerset
    • Artaeum
  • Summerset Bestiary
    • Overview
    • Coral Crab
    • Giant Salamander
    • Gryphon
    • Indrik
    • Reef Viper
    • Sea Sload
    • Yaghra (Varieties)
    • Gloam Knight (Shadow of Nocturnal)
  • Appendices
    • Overview
    • Collections: Preorder
    • Collections: Collector’s Edition
    • Crafting Motifs
    • Crafting Sets
    • Equipment Sets
    • Jewelry Sketches
    • Furnishings
    • Quest Rewards
    • Rare Fish
    • Treasure Maps
    • Housing
    • Merchants
    • Crafting Stations
    • Skyshards
    • Thieves Guild Dead Drop Chests
  • Summerset Achievements
    • Overview
    • General Achievements
    • Exploration Achievements
    • Quest Achievements
    • Abyssal Geyser Achievements
    • Cloudrest Achievements
    • New Crafting Achievements
    • Achievement Rewards List
    • Achievement Furnishings
    • New Dragon Bones Achievements
    • New Midyear Mayhem Achievements

The Elder Scrolls Online: Summerset Guide › Quests › Side Quests

A Tale of Two Mothers

  • Location: On the east side of Shimmerene
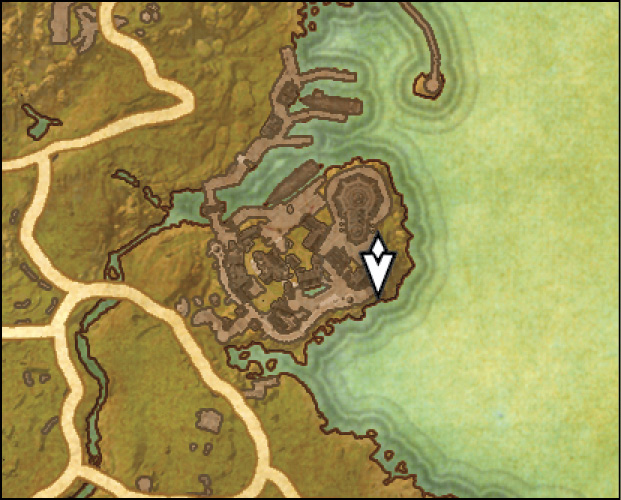
  • Quest-giver: Lanarie

Description: Lanarie’s son has gone missing. He turned himself into the authorities, claiming that he was involved in a plot to kill Sapiarch Aicantar. He should be in his prison cell, but he’s seemingly vanished. Investigate beneath the Kinlady’s manor and see if you can get to the bottom of this mystery.

Talk to Talerion

After speaking with Lanarie, turn around and enter Kinlady Avinisse’s mansion. Head downstairs to find Talerion. After speaking with him, head upstairs and take Arathel’s Map off the nightstand in the left room at the top of the stairs.

Exit the Kinlady’s manor and go to the city’s north side. At the hedge maze there, you’ll find information about where to go next. Once you enter the maze, stick to the outside wall on the right and follow it along the interior of the maze. You’ll come to a small shrine with a note in front of it. Read the note, then exit the maze.

Talk to Talerion or Go to the Anchor’s Aweigh Inn

At this point, you can either head into the nearby Anchor’s Aweigh Inn or head back to Talerion and tell him what you’ve found.

The Anchor’s Aweigh Path

If you entered the Anchor’s Aweigh Inn instead of speaking with Talerion, speak with Riharai the barkeep. Tell her you want Deathlands Ale, then head up to the second floor and speak with Edgar Jend in the room’s back corner.

After you speak with Edgar, exit the inn and head to the docks to find the entrance to the Shimmerene Underground.

The Talerion Path

If you spoke with Talerion instead of going to the Anchor’s Aweigh Inn, your first stop will be Kinlady Avinisse’s Mansion. You’ll find Talerion in the basement where you left him. Speak with him, then enter the Broken Passage in the corner of the cell.

Shimmerene Waterworks

Once inside the waterworks, you must follow a rat to a hidden room. The rat heads to the waterworks’ south side and stops at the secret passage.

Go through the passage to reach the Mother’s Den, where the Mother of Rats resides.

Find Zan’hi

Leave the Mother’s Den the way you came in and head west. When you hit a dead end, go through the passage on the room’s south side.

Continue south and head up the ramp on the left. Cross the bridge, then follow the path until you reach Mirulon’s Chamber.

Mirulon

Mirulon uses a lot of tricky dark magic attacks to defeat his foes. He will typically shoot balls of dark energy at you as his basic attack, but that’s about as easy as it gets. He’ll spin his staff in the air while an AoE surrounds him. When he brings his staff to the ground, it will damage the area around him, then create an additional AoE or two underneath your feet. Keep moving during this attack until he completely finishes it.

He will occasionally lift both hands in the air, then teleport nearby, leaving a shadow version of himself behind. Both he and the clone will shoot basic projectiles at you, which you can block. You can kill the clone with only a handful of hits, but it will surround itself with an AoE, which will damage you if you stand in it. Attack the clone with ranged attacks if possible. If not, gauge your health, then melee-attack it if you’re feeling confident. Even if you choose to ignore it, the clone will eventually fade away on its own.

Mirulon will spin his wand in front him and shoot out a singular dark energy ball, which will continuously spit out an additional energy ball on either side of it. You can interrupt this attack before Mirulon casts it, but if you miss the window to do so, immediately run to the left or right of the ball. If you try and run backward away from it, it will likely corner you. It has an incredibly long range, and the additional energy balls it creates make it very difficult to maneuver around it the closer it is to you.

Retrieve the Evidence from Upstairs

After defeating Mirulon, head up the northern set of stairs and collect the note lying on the ground. Head through the door to the Shimmerene Aqueducts and follow the path, dropping down into the water-filled room below.

Talk to Arathel

Speak with Arathel in the water-filled room, then escort him back to the Mother of Rats. Once inside the Mother’s Den, hand the evidence you discovered to Talerion.

Speak with the Mother of Rats to complete the quest. You’ll earn a Rat-Fang Dagger for completing this quest.

Keep reading with a free account

The first 3 sections of The Elder Scrolls Online: Summerset are open to everyone. An account opens the rest of it, and every other guide in the archive. It's free, and there's nothing to buy.

Bought guides on the old Prima Games site? Your account and every guide you own moved here, so there's nothing to buy again. Sign in.

Create a free account Or browse our free guides

PreviousA Duelist’s Dilemma NextAicessar’s Invitation