
Saints Row: The Third Guide Essentials Diversions
Jumps
Steelport is a very dense city and by the end of the game you have probably seen a large amount of it. Still, hidden in the open are numerous ramps that you might never have noticed. These enticing inclines are not obvious, as most are made of everyday items like steps and dirt. Later in the game, when the bridges connecting the islands are raised, you will have some pretty obvious targets for stunt jumping.
Each jump earns you 50 respect and $500 cash. Jumps can be done repeatedly to continue to earn rewards. Also, performing these stunts is a great way to earn respect for big air and to complete that challenge. Generally the best vehicle to use is a motorcycle, but once you have nitrous you can use most cars.
Developer tips
Buying the Nitrous Skill upgrade for your vehicles will help give you an added boost for multiple stunt jumps. (Unlocked at level 26)
Having the Vehicle Delivery upgrade will be a great help when your vehicles fall in the water or are destroyed when trying to make a jump. (Unlocked at level 2)
Be ready, STAG won’t like you jumping over the bridges that they raised in Mission 39. (Stunt Jumps 38–55)
Stunt jumps tips and tactics provided by: Morgan Henry, Tester
Jump 1
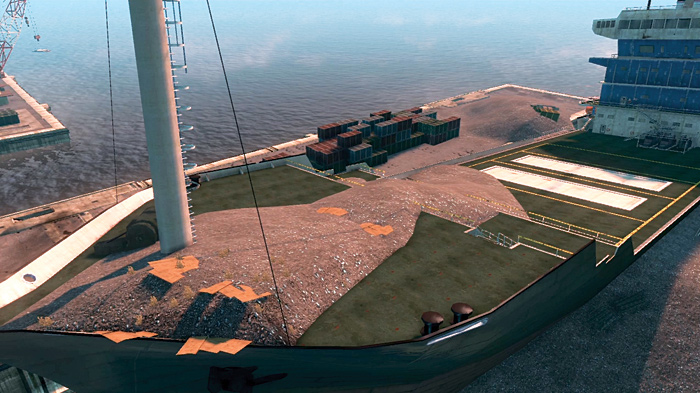
Description: On the ship, jump off the ramp to the area below on the left.
Preferred Vehicle: Kenshin
Other Tips:
There is a jump ramp to get a car onto the ship at the southwest side of the dock.
There is already a Kenshin motorcycle on the deck of the ship.
Jump 2
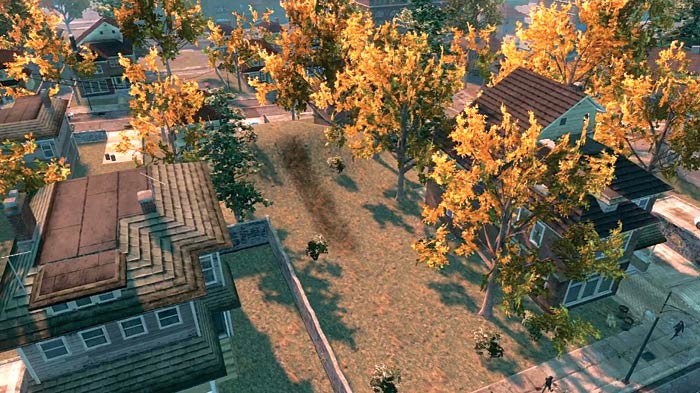
Description: Jump off the grassy ramp onto the street below.
Preferred Vehicles: Kenshin, Kaneda, Torch
Jump 3
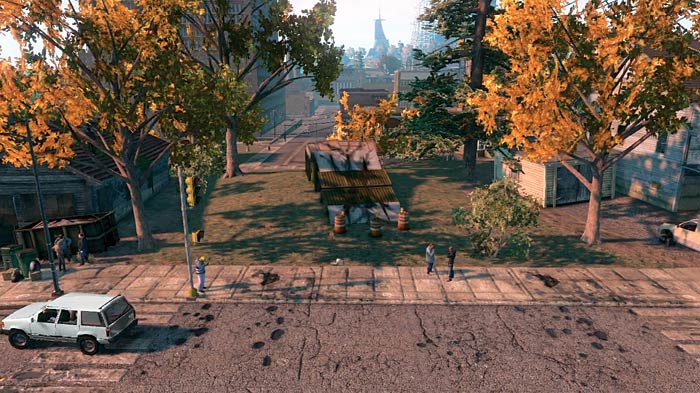
Description: Jump off the ramp onto the street below.
Preferred Vehicles: Kenshin, Kaneda, Torch
Jump 4
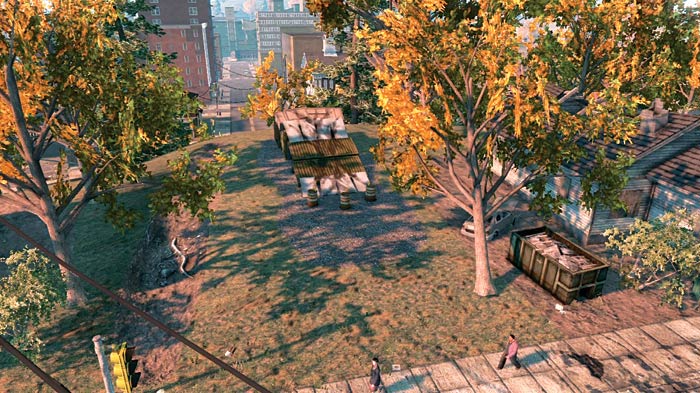
Description: Jump off the ramp onto the street below.
Preferred Vehicles: Kenshin, Kaneda, Torch
Jump 5
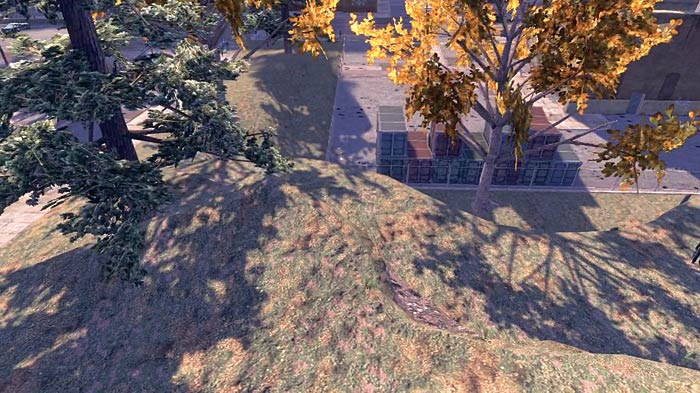
Description: Jump off the grassy ramp into the fenced-in parking lot below.
Preferred Vehicles: Kenshin, Torch
Other Tips: Jump past the large shipping crates, but don’t go too far to the right.
Jump 6
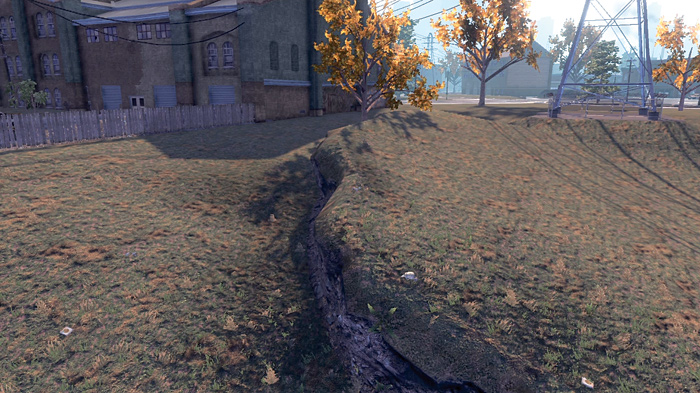
Description: Jump off the grassy ramp and over the wooden fence into the parking lot.
Preferred Vehicles: Torch, Kenshin
Jump 7
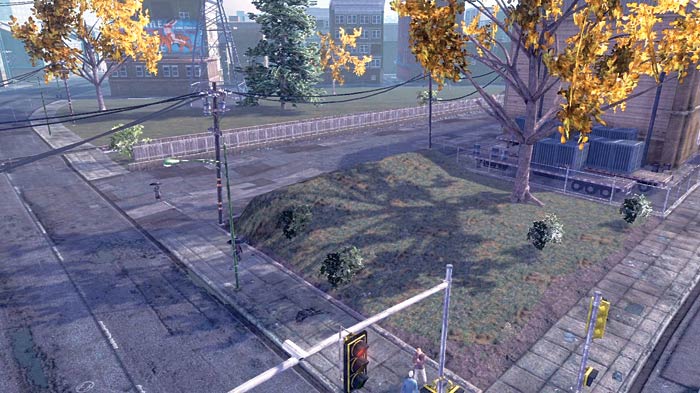
Description: Jump off the grassy ramp into the wooden fence across the road.
Preferred Vehicles: Kenshin, Torch
Jump 8
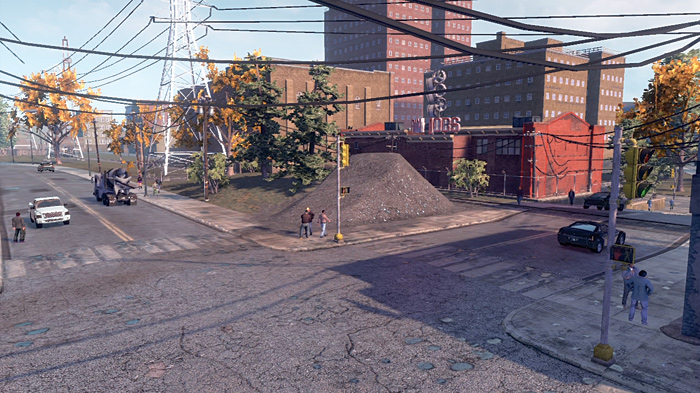
Description: Jump off the gravel ramp and over the Rim Jobs roof.
Preferred Vehicles: Attrazione, Kaneda, Kenshin, Torch
Other Tips:
Try to gain speed by driving down the road before hitting the ramp.
If you aim for the Rim Jobs sign on the roof and hit it, you will also make the jump.
Jump 9
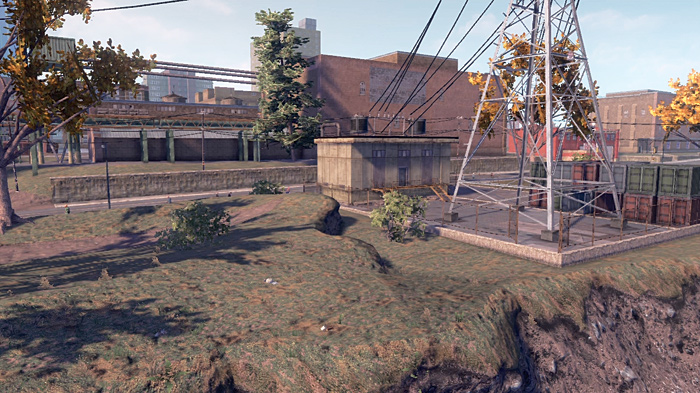
Description: Drive up the dirt path and jump off the grassy ramp, over the fence and into the parking lot.
Preferred Vehicles: Kenshin, Torch
Jump 10
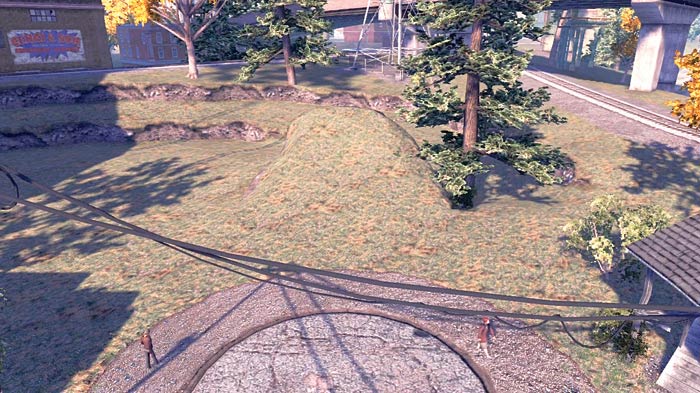
Description: Jump off the grassy ramp and onto the grassy hill above.
Preferred Vehicles: Kaneda, Kenshin, Torch
Jump 11
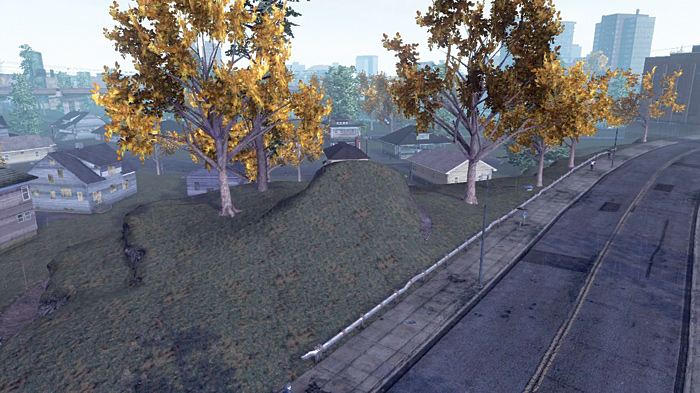
Description: Jump off the grassy ramp and onto the area below.
Preferred Vehicles: Kenshin, Torch
Other Tips : Aim for the spot in the grass right before the gravel parking lot.
Jump 12
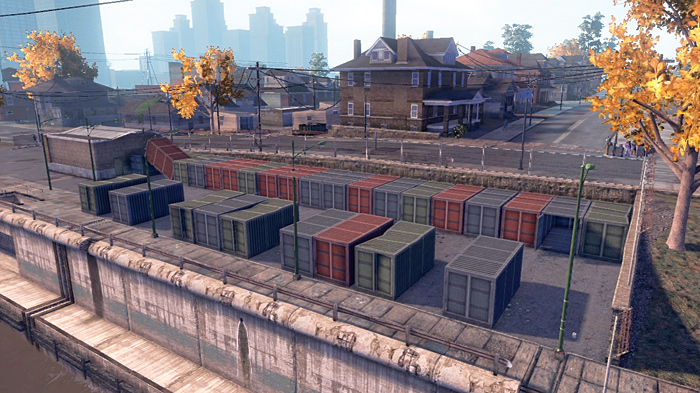
Description: Drive through the fence and onto the row of large shipping crates. At the end of the row, use the shipping crate at an angle as a ramp. Instead of jumping straight off the ramp, slightly turn the bike to the right and jump over the fence and onto the road.
Preferred Vehicles: Kaneda, Kenshin
Other Tips: If you kill the Luchadores’ Gang Operation next to this jump and get rid of the notoriety, you won’t have people shooting at you while you try to make this jump.
Jump 13
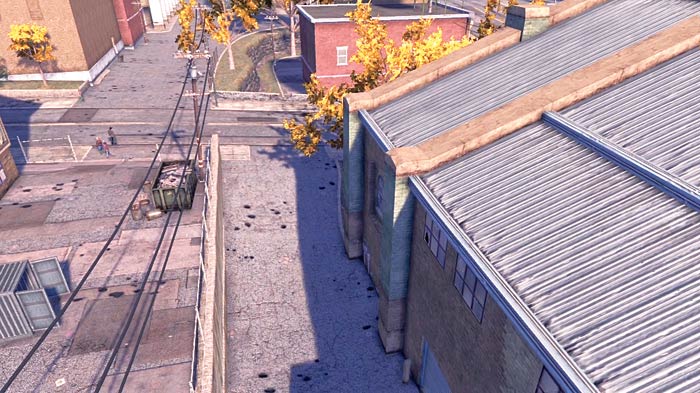
Description: In the alley that slopes downward, use the slope as a ramp. Jump over the slope, crossing the road, and make it over the stone fence into the area behind the building.
Preferred Vehicles: Attrazione, Kaneda, Kenshin, Torch
Other Tips:
Travel to the end of the alley to gain speed before you make the jump.
Don’t jump too far to left or you will hit the boarded-up terrain wall.
Jump 14
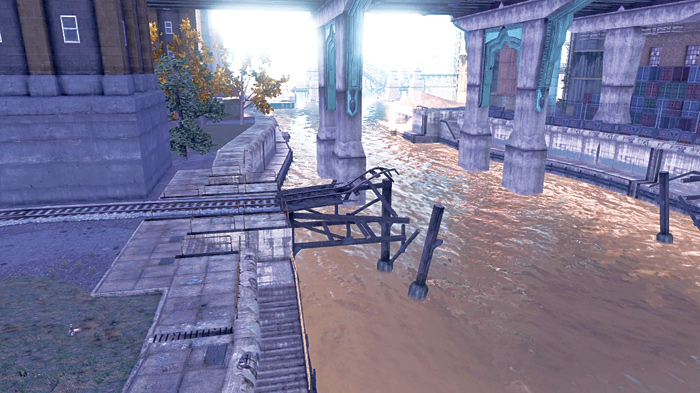
Description: Jump from one side of the broken railroad track to the other side.
Preferred Vehicle: Kaneda
Other Tips: If the vehicle falls in the water and you want to call Vehicle Delivery, run to the road to the north before calling, or your homie might deliver the vehicle to the highway above you.
Jump 15
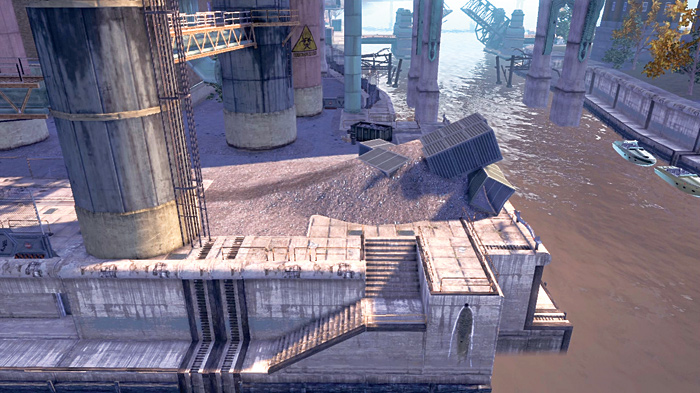
Description: Drive down the alley and jump the ramp to fly over the canal to the other side.
Preferred Vehicles: Kaneda, Attrazione
Other Tips: Be sure to get a fast start before hitting this jump. There is a long alleyway in front of this jump that is great for amping up speed.
Jump 16
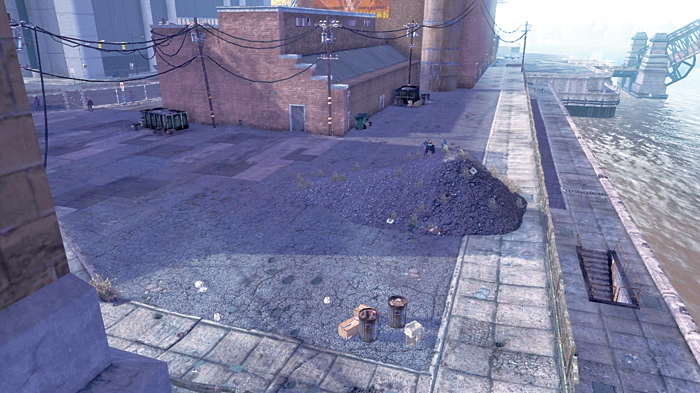
Description: Jump off the rock pile, over the canal, and to the other side.
Preferred Vehicles: Kaneda, Attrazione
Other Tips: Be sure to get a fast start before hitting this jump. Knock down the fence and start driving down the road to gain speed before hitting the jump.
Jump 17
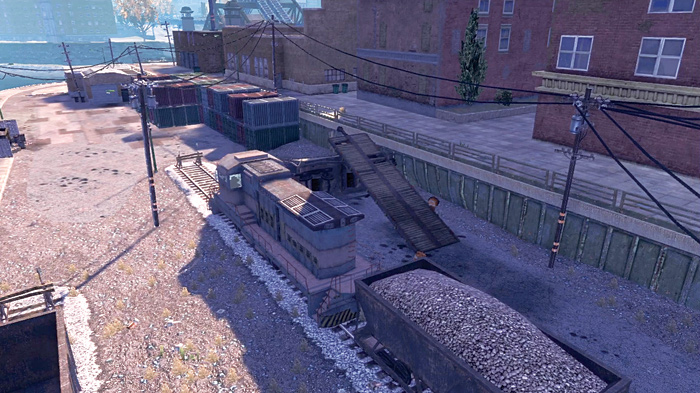
Description: In the train yard, jump off the tipped train car, and jump onto the large stacked shipping crates.
Preferred Vehicle: Torch
Other Tips: If the vehicle lands in the right place, it can kill some gang members in a Morningstar Gang Operation.
Jump 18
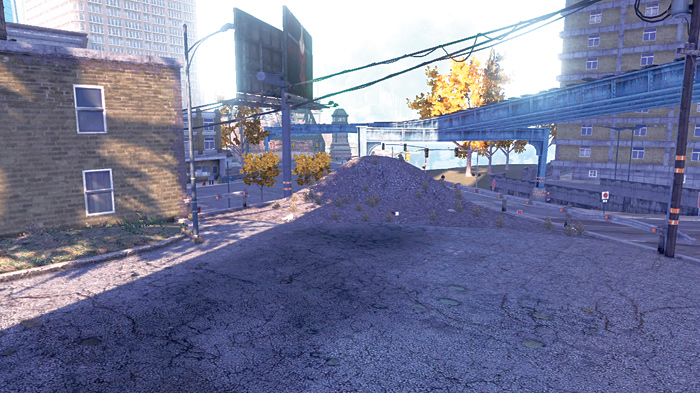
Description: Jump off the dirt pile and onto the road below.
Preferred Vehicles: Kenshin, Torch
Jump 19
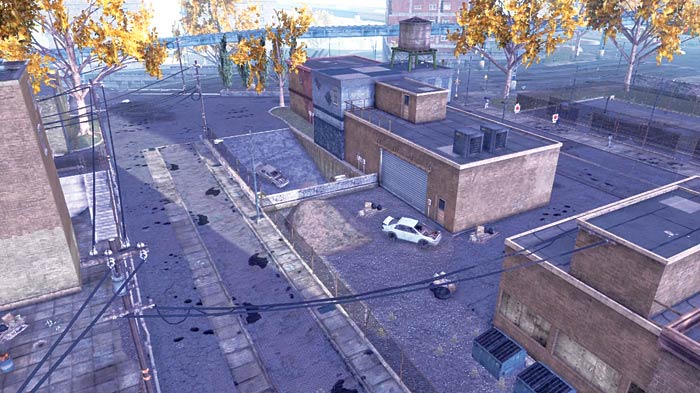
Description: Jump off the dirt pile and over the sewage area.
Preferred Vehicles: Kenshin
Other Tips: Watch out for the Morningstar Gang Operation located nearby.
Jump 20
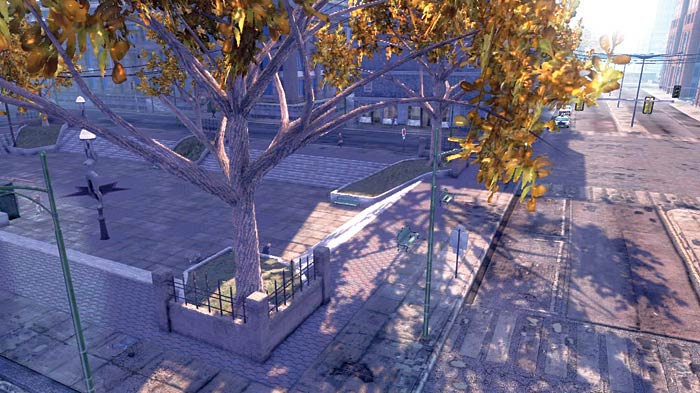
Description: Ride the vehicle over the steps nearest to the fountain and down into the plaza below.
Preferred Vehicles: Any vehicle will work for this jump if you are going the right speed.
Other Tips:
This does not unlock if you complete it while doing Jump #21.
This can easily be performed during Mission 03 (for some money early on), since it isn’t far off the path to the Friendly Fire.
Jump 21
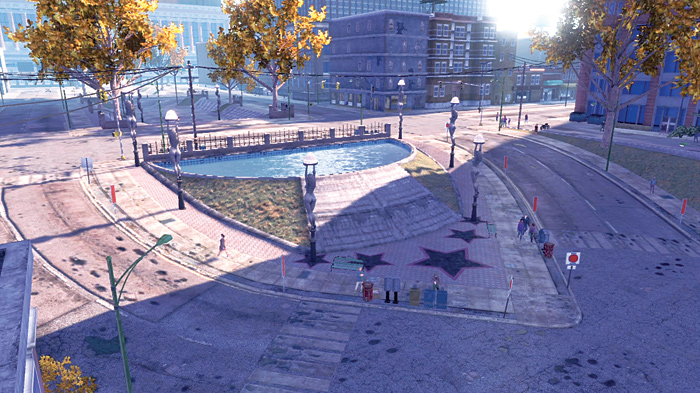
Description: Ride the vehicle up the steps of the fountain and jump over it, without hitting the wall.
Preferred Vehicles: Any sports car or motorcycle
Other Tips:
This can easily be performed during Mission 3 (for some money early on), since it isn’t far off the path to Friendly Fire.
Jump 22
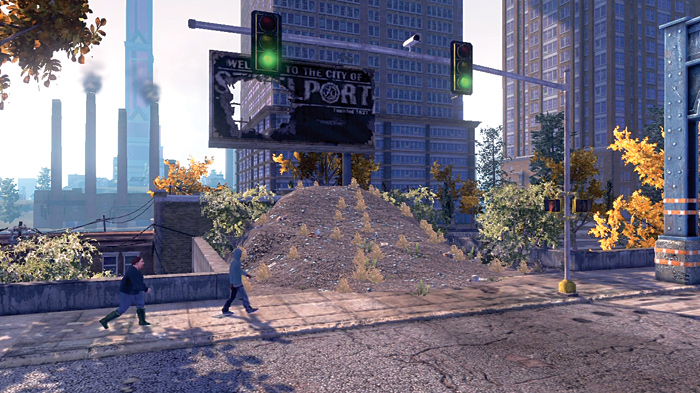
Description: Jump off the rock pile and aim for the hole in the sign.
Preferred Vehicles: Attrazione, Kaneda
Other Tips: The vehicle doesn’t need to make it through the hole in the sign to achieve this.
Jump 23
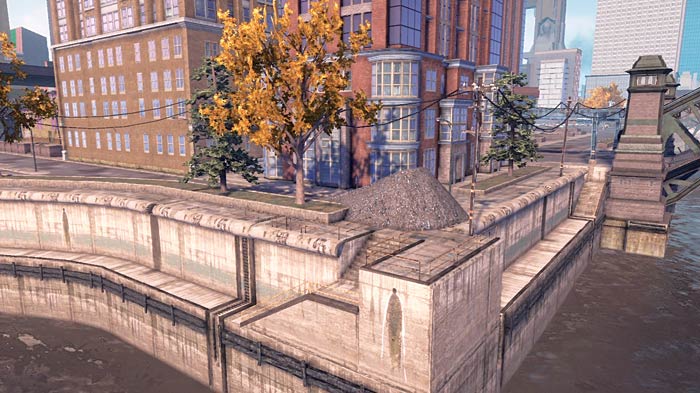
Description: Traveling from south to north, attempt to jump over the canal using this ramp.
Preferred Vehicles: Kenshin, Kaneda
Other Tips:
You may not make it across the whole canal, even at full speed with the fastest bike. As long as you hit the edge of the other side of the canal, you should get credit for the jump.
Jump 24
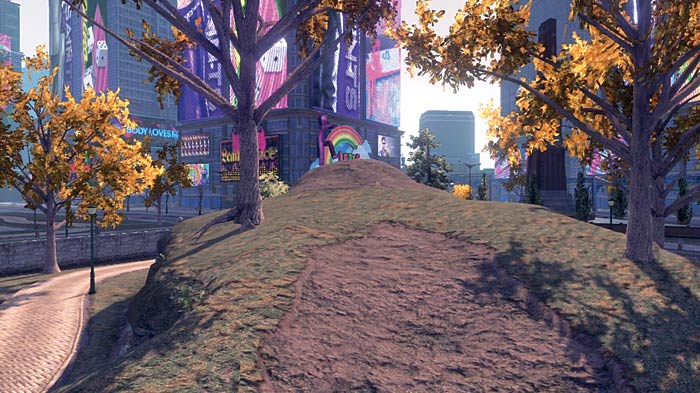
Description: Inside the park, travel along the dirt path and jump off the grassy ramp onto the intersection below.
Preferred Vehicles: Kenshin, Torch
Jump 25
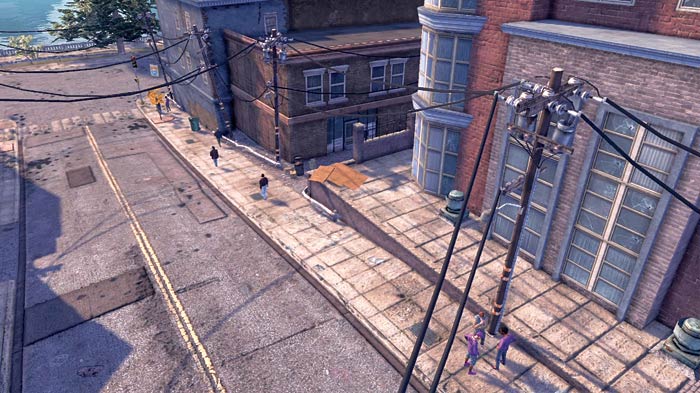
Description: Drive on the raised sidewalk, and jump off the boards into the street.
Preferred Vehicle: Kenshin
Jump 26
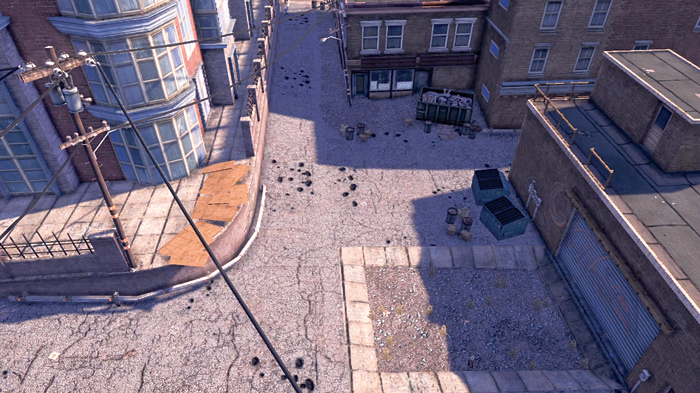
Description: Jump off the boards and into the building wall above the trash cans.
Preferred Vehicles: Kenshin, Kaneda
Jump 27
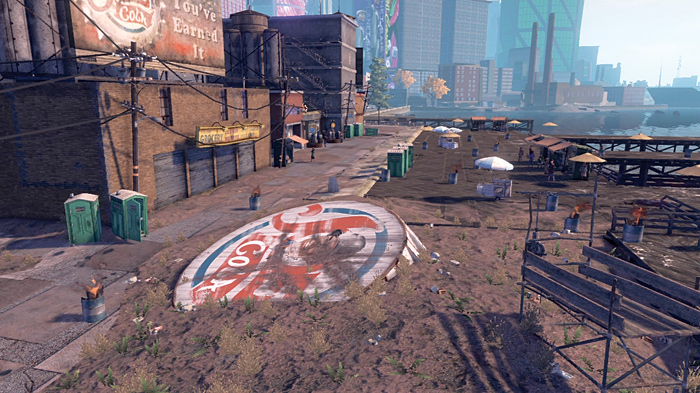
Description: Jump off the giant soda cap onto the wooden area of the dock.
Preferred Vehicles: Kenshin, Torch, Kaneda
Other Tips:
Purchase the Rim Jobs nearby, kill the Gang Operation next to the jump, and then visit the Rim Jobs to clear your notoriety before performing this jump.
Make sure that you jump far enough for this jump to register.
Jump 28
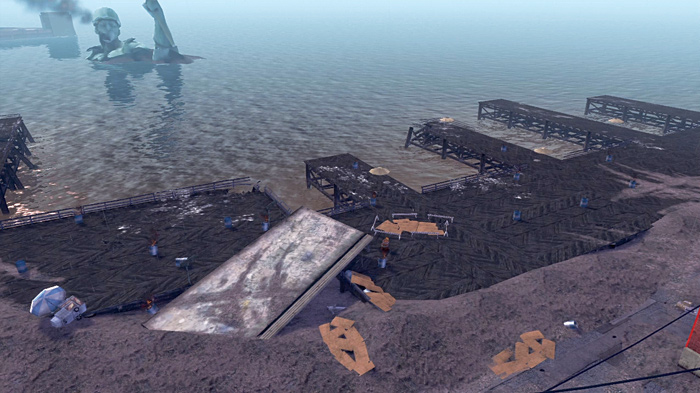
Description: Jump off the wooden ramp and into the water.
Preferred Vehicle: Torch
Other Tips: Make sure to store the vehicle in the garage before you attempt this jump if you want to keep it, because the vehicle will probably end up in the water.
Jump 29
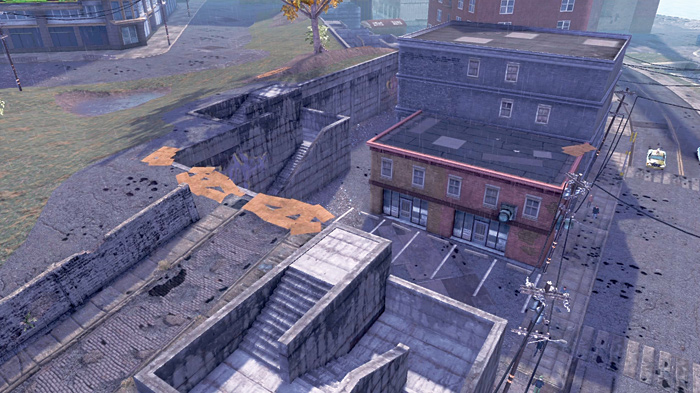
Description: Jump off the plywood onto the roof.
Preferred Vehicle: Kenshin
Other Tips:
Aim for hitting the wall on the roof directly in front of you.
This stunt jump is located off the plywood ramp facing east. The plywood ramp facing south does not count as a stunt jump location. Also, the plywood ramp that is on the roof does not count as a stunt jump location.
Jump 30
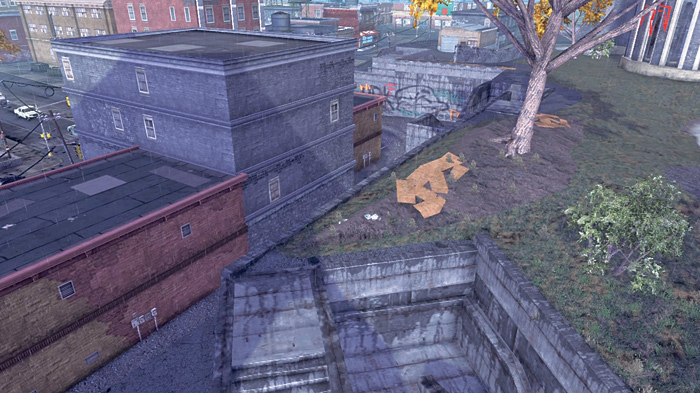
Description: Jump off the plywood on the left and onto the building’s roof.
Preferred Vehicles: Kenshin, Torch
Jump 31
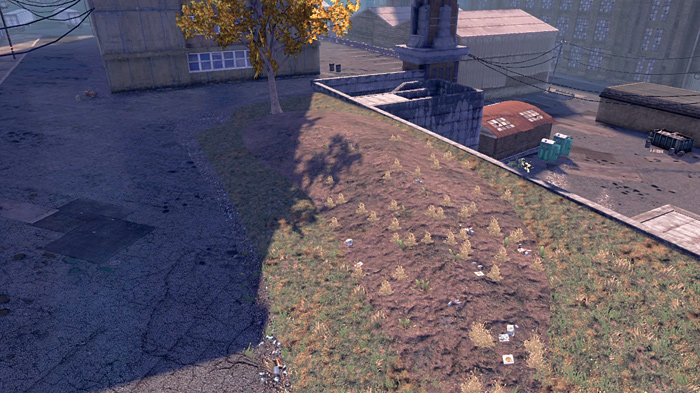
Description: Drive down the marble walkway between buildings and aim for the slight, grassy ramp to jump into the parking lot below.
Preferred Vehicles: Kaneda, Attrazione
Other Tips:
Having nitrous will greatly help with this jump.
Aim for to the left of the taller building, but to the right side of the large parking lot area.
This jump can only be achieved by jumping a great distance across the parking lot. Make sure that you jump far enough for this one to register.
Jump 32
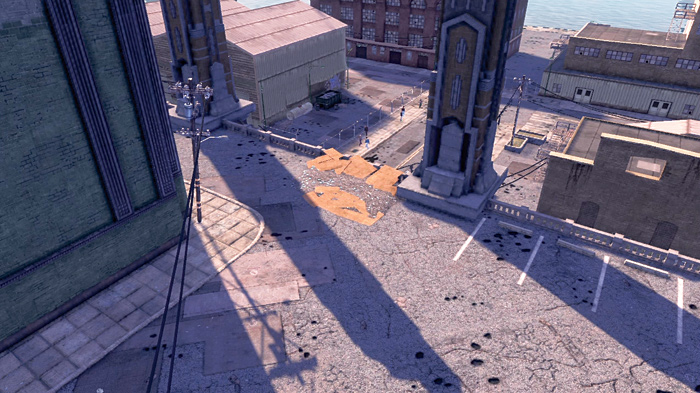
Description: Jump off the plywood ramp and onto the street below.
Preferred Vehicle: Kenshin
Jump 33
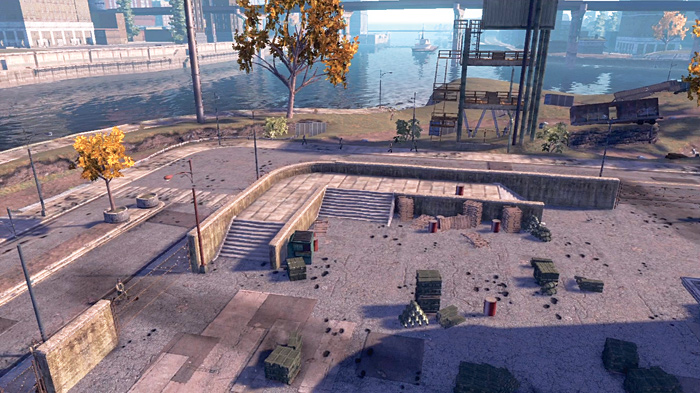
Description: Jump over the right set of stairs, aiming to the left.
Preferred Vehicle: Kenshin
Other Tips: Do this during Mission 3, so that you have a lower notoriety when in the armory area.
Jump 34
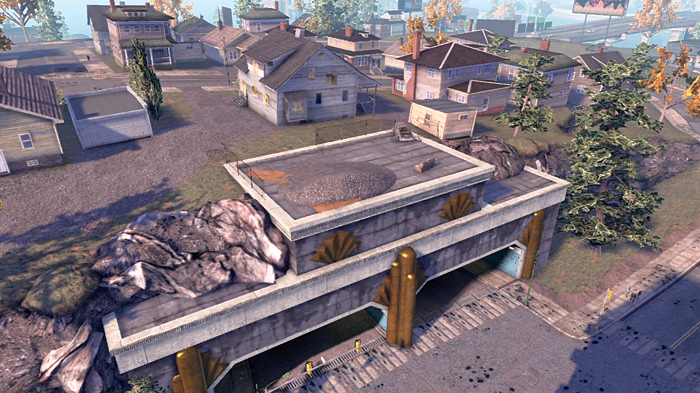
Description: Jump off the rock pile on top of the tunnel entrance to the street below.
Preferred Vehicles: Any sports car or motorcycle
Jump 35
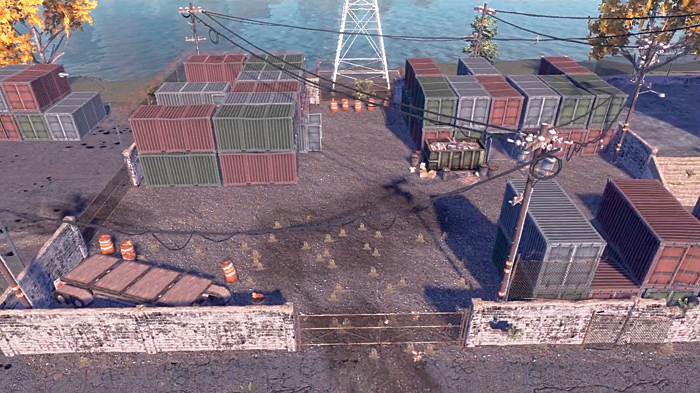
Description: Go through both gates and the construction cones, and over the edge of the cliff into the fenced-in antenna tower area below.
Preferred Vehicles: Attrazione, Torch
Jump 36
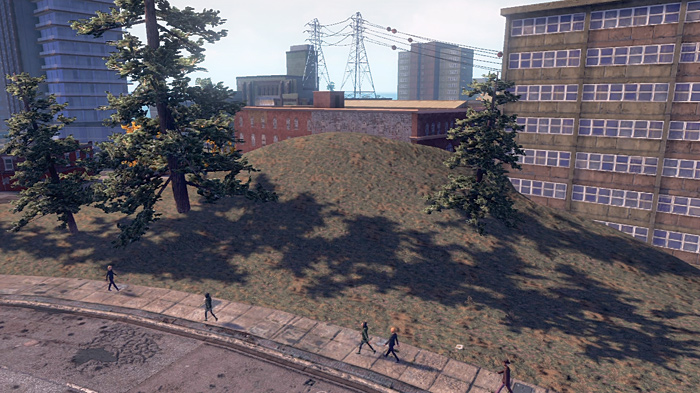
Description: Jump off the grassy ramp onto the building’s roof. This jump is the first step to completing Jump 37.
Preferred Vehicles: Any sports car or motorcycle
Jump 37
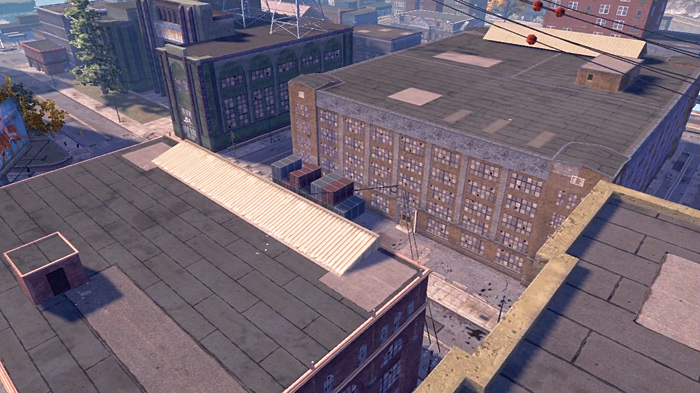
Description: Jump off the grassy ramp (required for Stunt Jump 36) and onto the building’s roof. Then jump off the roof of that building onto the next building.
Preferred Vehicles: Attrazione, Kaneda, Kenshin
Other Tips:
When hitting the second building, try not to jump too far onto it. Sometimes hitting the edge and falling off will achieve the requirement.
When hitting the second building, aim for the center area—hitting too far to the left or the right will not work.
Having nitrous will help with this jump if you are using a car with less speed or pickup.
Jumps 38–55 - After Mission 39
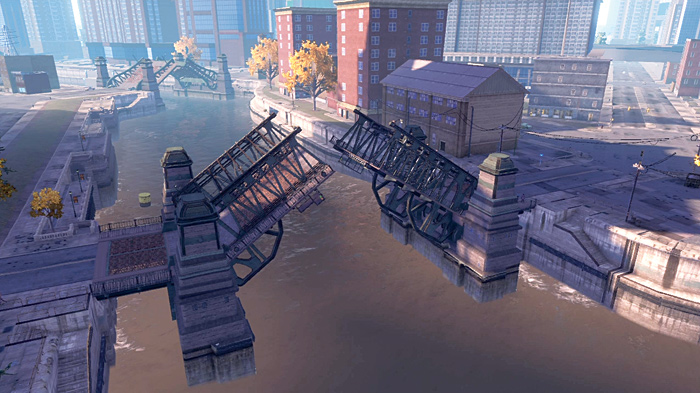
Description: These jumps take place on the bridges raised by STAG in Mission 17. One stunt jump location can be found by stunt jumping over each lane.
Preferred Vehicle: Kenshin
Other Tips:
Some jumps locations can only be achieved by barely making it over the bridge.
Raised bridges with el-train tracks on top, can still be jumped by jumping to the right or the left of the el-train track.
Jumps 56–63 - During and After Mission 41
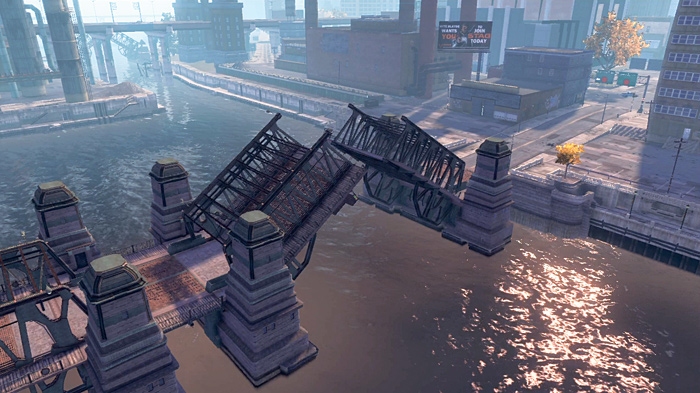
Description: These jumps take place on the bridges that are raised during the Zombie infestation in Mission 19. One stunt jump location can be found by jumping over each lane.
Preferred Vehicles: Kenshin
Other Tips: Some jump locations can only be achieved by barely making it over the bridge.
Buying the Nitrous Skill upgrade for your vehicles will help give you an added boost for multiple stunt jumps. (Unlocked at level 26)
Having the Vehicle Delivery upgrade will be a great help when your vehicles fall in the water or are destroyed when trying to make a jump. (Unlocked at level 2)
Be ready, STAG won’t like you jumping over the bridges that they raised in Mission 39. (Stunt Jumps 38–55)
Stunt jumps tips and tactics provided by: Morgan Henry, Tester
Jump 23
Description: Traveling from south to north, attempt to jump over the canal using this ramp.
Preferred Vehicles: Kenshin, Kaneda
Other Tips:
You may not make it across the whole canal, even at full speed with the fastest bike. As long as you hit the edge of the other side of the canal, you should get credit for the jump.
Jump 24
Description: Inside the park, travel along the dirt path and jump off the grassy ramp onto the intersection below.
Preferred Vehicles: Kenshin, Torch
Jump 25
Description: Drive on the raised sidewalk, and jump off the boards into the street.
Preferred Vehicle: Kenshin
Jump 26
Description: Jump off the boards and into the building wall above the trash cans.
Preferred Vehicles: Kenshin, Kaneda
Jump 27
Description: Jump off the giant soda cap onto the wooden area of the dock.
Preferred Vehicles: Kenshin, Torch, Kaneda
Other Tips:
Purchase the Rim Jobs nearby, kill the Gang Operation next to the jump, and then visit the Rim Jobs to clear your notoriety before performing this jump.
Make sure that you jump far enough for this jump to register.
Jump 28
Description: Jump off the wooden ramp and into the water.
Preferred Vehicle: Torch
Other Tips: Make sure to store the vehicle in the garage before you attempt this jump if you want to keep it, because the vehicle will probably end up in the water.
Jump 29
Description: Jump off the plywood onto the roof.
Preferred Vehicle: Kenshin
Other Tips:
Aim for hitting the wall on the roof directly in front of you.
This stunt jump is located off the plywood ramp facing east. The plywood ramp facing south does not count as a stunt jump location. Also, the plywood ramp that is on the roof does not count as a stunt jump location.
Jump 30
Description: Jump off the plywood on the left and onto the building’s roof.
Preferred Vehicles: Kenshin, Torch
Jump 31
Description: Drive down the marble walkway between buildings and aim for the slight, grassy ramp to jump into the parking lot below.
Preferred Vehicles: Kaneda, Attrazione
Other Tips:
Having nitrous will greatly help with this jump.
Aim for to the left of the taller building, but to the right side of the large parking lot area.
This jump can only be achieved by jumping a great distance across the parking lot. Make sure that you jump far enough for this one to register.
Jump 32
Description: Jump off the plywood ramp and onto the street below.
Preferred Vehicle: Kenshin
Jump 33
Description: Jump over the right set of stairs, aiming to the left.
Preferred Vehicle: Kenshin
Other Tips: Do this during Mission 3, so that you have a lower notoriety when in the armory area.
Jump 34
Description: Jump off the rock pile on top of the tunnel entrance to the street below.
Preferred Vehicles: Any sports car or motorcycle
Jump 35
Description: Go through both gates and the construction cones, and over the edge of the cliff into the fenced-in antenna tower area below.
Preferred Vehicles: Attrazione, Torch
Jump 36
Description: Jump off the grassy ramp onto the building’s roof. This jump is the first step to completing Jump 37.
Preferred Vehicles: Any sports car or motorcycle
Jump 37
Description: Jump off the grassy ramp (required for Stunt Jump 36) and onto the building’s roof. Then jump off the roof of that building onto the next building.
Preferred Vehicles: Attrazione, Kaneda, Kenshin
Other Tips:
When hitting the second building, try not to jump too far onto it. Sometimes hitting the edge and falling off will achieve the requirement.
When hitting the second building, aim for the center area—hitting too far to the left or the right will not work.
Having nitrous will help with this jump if you are using a car with less speed or pickup.
Jumps 38–55 - After Mission 39
Description: These jumps take place on the bridges raised by STAG in Mission 17. One stunt jump location can be found by stunt jumping over each lane.
Preferred Vehicle: Kenshin
Other Tips:
Some jumps locations can only be achieved by barely making it over the bridge.
Raised bridges with el-train tracks on top, can still be jumped by jumping to the right or the left of the el-train track.
Jumps 56–63 - During and After Mission 41
Description: These jumps take place on the bridges that are raised during the Zombie infestation in Mission 19. One stunt jump location can be found by jumping over each lane.
Preferred Vehicles: Kenshin
Other Tips: Some jump locations can only be achieved by barely making it over the bridge.
Buying the Nitrous Skill upgrade for your vehicles will help give you an added boost for multiple stunt jumps. (Unlocked at level 26)
Having the Vehicle Delivery upgrade will be a great help when your vehicles fall in the water or are destroyed when trying to make a jump. (Unlocked at level 2)
Be ready, STAG won’t like you jumping over the bridges that they raised in Mission 39. (Stunt Jumps 38–55)
Stunt jumps tips and tactics provided by: Morgan Henry, Tester