
World of Warcraft: Warlords of Draenor Signature Series Strategy Guide Introduction
Customizing the Game Interface
After playing the game for a while, you may want to adjust some of the options in the game interface to make certain functions faster or more convenient.
The World of Warcraft interface is highly adjustable, so this chapter doesn’t try to cover every way in which you can customize the game. Instead, it lists some commonly used options that may be helpful to new players.
Using Auto Loot
Instead of manually clicking on every piece of loot to send it to your backpack, you can auto loot your corpses, which is much faster:
1. Press Esc to open the Options menu.
2. Click Interface, and click Controls.
3. Change the Auto Loot options as you see fit.
4. Click Okay when you’re done.
In the Auto Loot options, you have several choices. If you check Auto Loot, you only need to right-click to automatically send all loot to your backpack. The other options are better if you’d like to peruse loot more thoroughly before grabbing it.
Open & Close Bags Quickly
b = Open all bags simultaneously
Shift+B = Close all bags simultaneously
F12 = Open backpack
F8, F9, F10, F11 = Open other bags individually
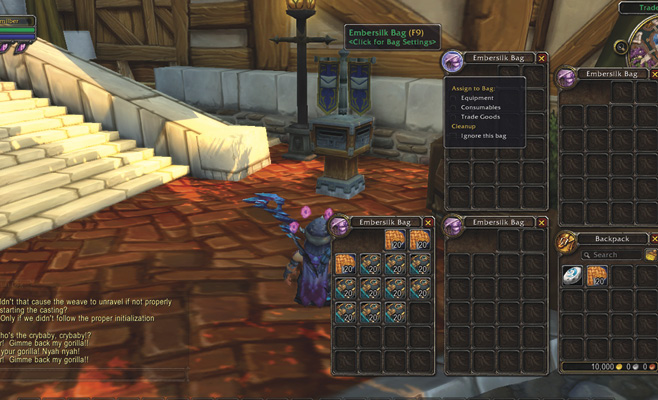
Assign Loot Types to Bags
Change the Resolution of WoW
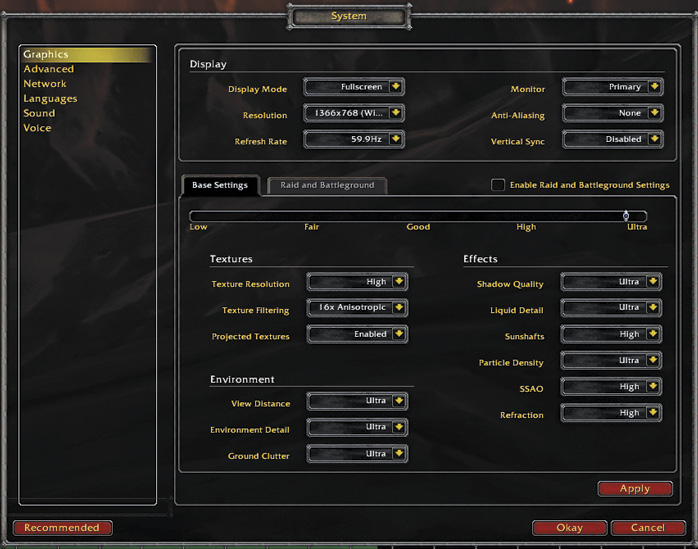
1. Press Esc to open the Options Menu.
2. Click System.
3. Select Graphics.
4. Under the Resolution pull-down, click the correct option for your monitor.
5. Click Okay.
If the game isn’t running quickly enough for your tastes, this is the single fastest way to improve the situation. Lower your resolution and see if that helps.
There are also many other graphical options as well. Try changing these to make the game faster or more attractive. If you don’t know what everything else does, play around with the Overall Quality specifically until you have speeds that suit your interests.
When in doubt, speed is better than graphical quality. Jitters, poor frame rates, and other problems with speed are insidious. They can ruin your gaming experience without it even being obvious that they are at fault.
Turn Off Beginner Tutorials
1. Press Esc to open the Options menu.
2. Click Interface, and click Help.
3. Unclick Tutorials.
4. Click Okay.
This kills the pop-ups that dominate the early experience with the game. You can turn these off if you feel comfortable with World of Warcraft.
If the pop-ups are something you want and that you’d like to see again, you can reset them here, and the game will act like you’re coming back for the first time.
Access Action Bars
Shift+1 = Action Bar 1
Shift+2 = Action Bar 2
Shift+3 = Action Bar 3
Shift+4 = Action Bar 4
Shift+5 = Action Bar 5
Shift+6 = Action Bar 6
Once you know where your actions are located, this is much faster than switching through multiple Action Bars to get where you need. Jumping from bar 1 to bar 5 is just as easy to going from 1 to 2! In addition, keyboard shortcuts are almost always superior to using mouse commands on the interface.
Display Action Bars
Instead of accessing other Action Bars by pressing Shift+2, Shift+3, Shift+4, Shift+5, and Shift+6, you can permanently display other Action Bars on your screen:
1. Press Esc to open the Options menu.
2. Click Interface, and click ActionBars.
3. You have the option to display as many as four additional Action Bars in different places on the screen.
4. Click Okay.
Right Bar corresponds to Action Bar 3.
Right Bar 2 corresponds to Action Bar 4.
Bottom-Right Bar corresponds to Action Bar 5.
Bottom-Left Bar corresponds to Action Bar 6.
Your screen might seem more cluttered at first, but you’ll soon find that it’s a gift from the heavens. Having all of your abilities on the screen at all times ensures that you know how all of your cooldowns are going! It’s also wonderful for crafting; you can set your profession abilities off to one side, away from your regular combat abilities, but still have access to them when needed.
Lock Action Bars
This prevents you from accidentally dragging an icon out of an Action Bar:
1. Press Esc to open the Options menu.
2. Click Interface, and click ActionBars.
3. Check Lock ActionBars.
4. Click Okay.
When you want to reconfigure your Action Bars, uncheck Lock Action Bars. If you’re interested in playing a caster, or if you are truly uncomfortable with keyboard hotkeys, this is essential. It keeps you from accidentally removing your ability instead of using it!
Note that if you want to move a single ability, hold Shift while clicking on the icon you want to move. If you drop it into a spot which already has an icon, click that location but continue to hold Shift. You automatically pick up the now displaced icon and can place it elsewhere. This will be on by default, but you may need to change it or confirm that it’s on.
Auto Self Cast
By selecting this, you tell the game to cast positive spells on your character unless you have another, allied character targeted first. Thus, you can heal yourself during a fight without having to stop and select yourself, and then cast the spell, or cast the spell and hit F1. This way is faster than either of those alternatives.
1. Press Esc to open the Options Menu.
2. Click Interface, and click Combat.
3. Check Auto Self Cast.
4. Click Okay.
This defaults to on, but when grouping, you may want to turn this option off to avoid mistakes. The Self Cast Key defaults to Alt, but can be changed to Ctrl or Shift.
Display Cast Bars for Targets
This option shows the channeling bars for enemy casters. Watching this may help you interrupt their timed spells (although if you see a gray shield on the cast bar, you can’t interrupt the spell). The bars let you see when to use your interruption abilities. Time those attacks so the enemies waste effort on a spell only to have it countered at the last possible moment. This is toggled on by default.
1. Press Esc to open the Options Menu.
2. Click Interface, and click Combat.
3. Check Cast Bars On Targets.
4. Click Okay.
Customize Chat Logs
There are many tiny changes you can make to the way your chat system presents information. Right-click on your chat window’s tabs to begin this process. You can change the font size. You can define which colors appear from any information source. You can also change the background color and intensity of the window itself. This is extremely useful for people who have trouble reading the text; darken the window to make it clearer instead of needing to highlight it when you want to read.
Play around with this system as much as you want. You can’t really break anything. If the windows end up being too strange, simply “reset” them from the same menu and they’re back where they started.
Combat Text Options
You can change the Combat Text options so that you see more on-screen text showing what’s happening during combat:
1. Press Esc to open the Options Menu.
2. Click Interface, and click Floating Combat Text.
3. Check Damage to see the damage you deal, and check any other options you wish to see during combat.
4. Click Okay.
Spell Alerts is a good reminder for new players of when specific spells are ready. You may need to experiment to see which items help you and which get in your way.
Using Key Bindings
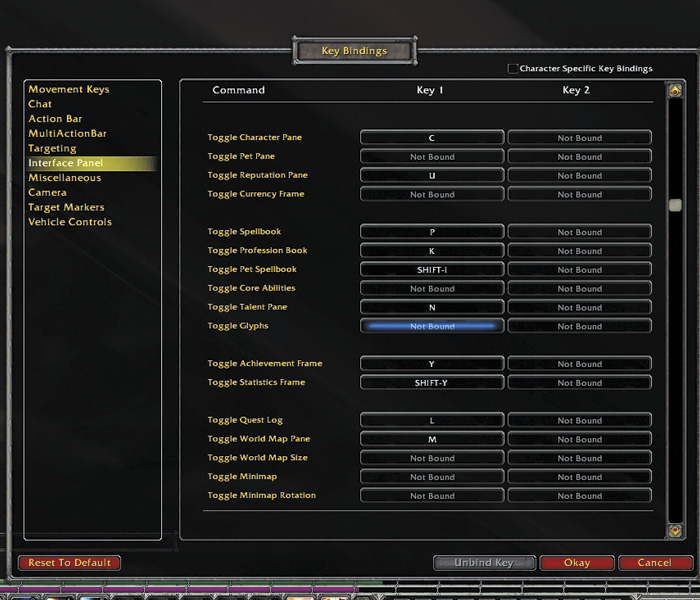
The Key Bindings option serves two purposes: a reminder of shortcut keys already in the game, and mapping your own shortcuts keys.
1. Press Esc to open the Options Menu.
2. Click Key Bindings. A window opens, indicating all the keys that already have shortcuts listed in white.
3. To set up a new shortcut, click the Command you want tied to a specific key. For example, the Talent Pane has a keyboard shortcut (“n”), but the Glyphs Pane does not. Scroll down to Interface Panel Functions, and click Toggle Glyphs.
4. Choose the key you want to bind it to. If that key is already bound, like G is, a red notification appears at the bottom of the menu. You can always reset the Key Bindings to default if needed.
5. Click Okay.
These bindings aren’t limited to your keyboard! You can assign functions to your mouse or other input devices as well.
Other Shortcuts
|
Command |
Effect |
|---|---|
| Press X | Sit or stand |
| Press Z | Unsheathe or sheathe your weapon(s) |
| Shift+P | Open window for all mounts and pets |
| Press V | Show red nameplate and health bar directly over your target in combat |
| Right-click a buff | Remove any positive buff on self |
| Shift+I | Open pet’s spellbook |
| Esc | Close an open window |
| Alt+Z | Turn off game interface |
| PrintScreen | Capture screenshot (screenshots are automatically saved in the World of Warcraft/Screenshots directory) |
Macros
The base game already has many options to consider, but you might want even more once you understand everything. The macro system is in place to help you find the perfect WoW experience.
Macros let you trigger abilities in a more complex manner. You have access to any command in the game through this, and you can even chain multiple commands together. This system is found inside your Options menu. Hit the Escape key and select Macros to see what it’s all about.
Making a Macro
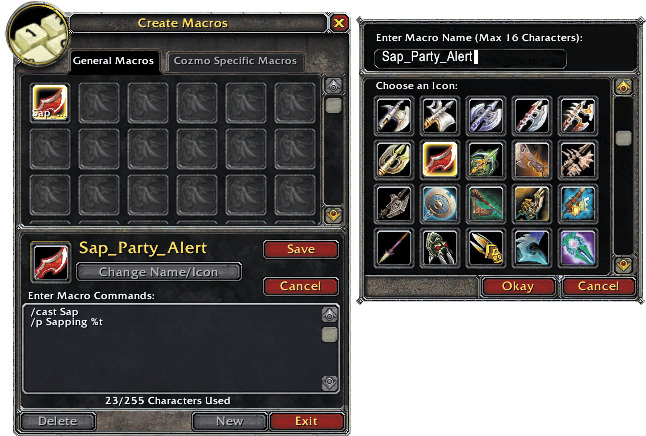
You can make character-specific macros, or you can make ones that are available to all characters on your account. There are thousands of ideas floating around for good macros; one of the best ways to find these is to hunt around class message boards and see what other people have made.
You can also fool around on your own. Click New, select an icon for your macro along with a name for it, and then type in commands. When you’re done, drag the macro onto a valid Action Bar slot, and then you can use the macro like any normal ability.
Standard slash commands work just fine in macros. For example: /say /party /dance /flirt
However, you can also use commands that you wouldn’t normally type in. /cast is the most common one. This lets you trigger abilities through the macro system!
Think of the uses for this! Imagine that you’re a Rogue that is about to Sap a target. You want everyone in the group to know that you’re doing this. Try the following macro:
/cast sap
/p Sapping %t
This macro uses Sap on the currently selected target. It then displays that you are Sapping the monster for your group (along with the actual name of that monster).
To avoid having to type in ability names, open your Spellbook and Shift + left-click the ability while your macro is open. This automatically fills in the /cast part of the macro with the ability in question. It’s that easy.
You might wonder, “Will this work with items too?”
Try it! Shift-click an item in your backpack or bags while the macro system is open. The command that appears is /use, but, yes, this works just like the cast system. You can have a macro trigger your goodies, as long as you have them in your possession when you use the macro.
This is only the tip of the iceberg with macros. Start searching and you’re bound to find a wealth of awesome ideas that are specific to your class or playstyle.