
Star Ocean: Integrity and Faithlessness Guide Part IV: The Maze of Tribulations
Pride Punisher—Gabriel Celeste
Gabriel Celeste is back and stronger than ever in Star Ocean: Integrity and Faithlessness, and as usual, he’s the penultimate super-boss in the game’s optional dungeon.
Stats and Drops
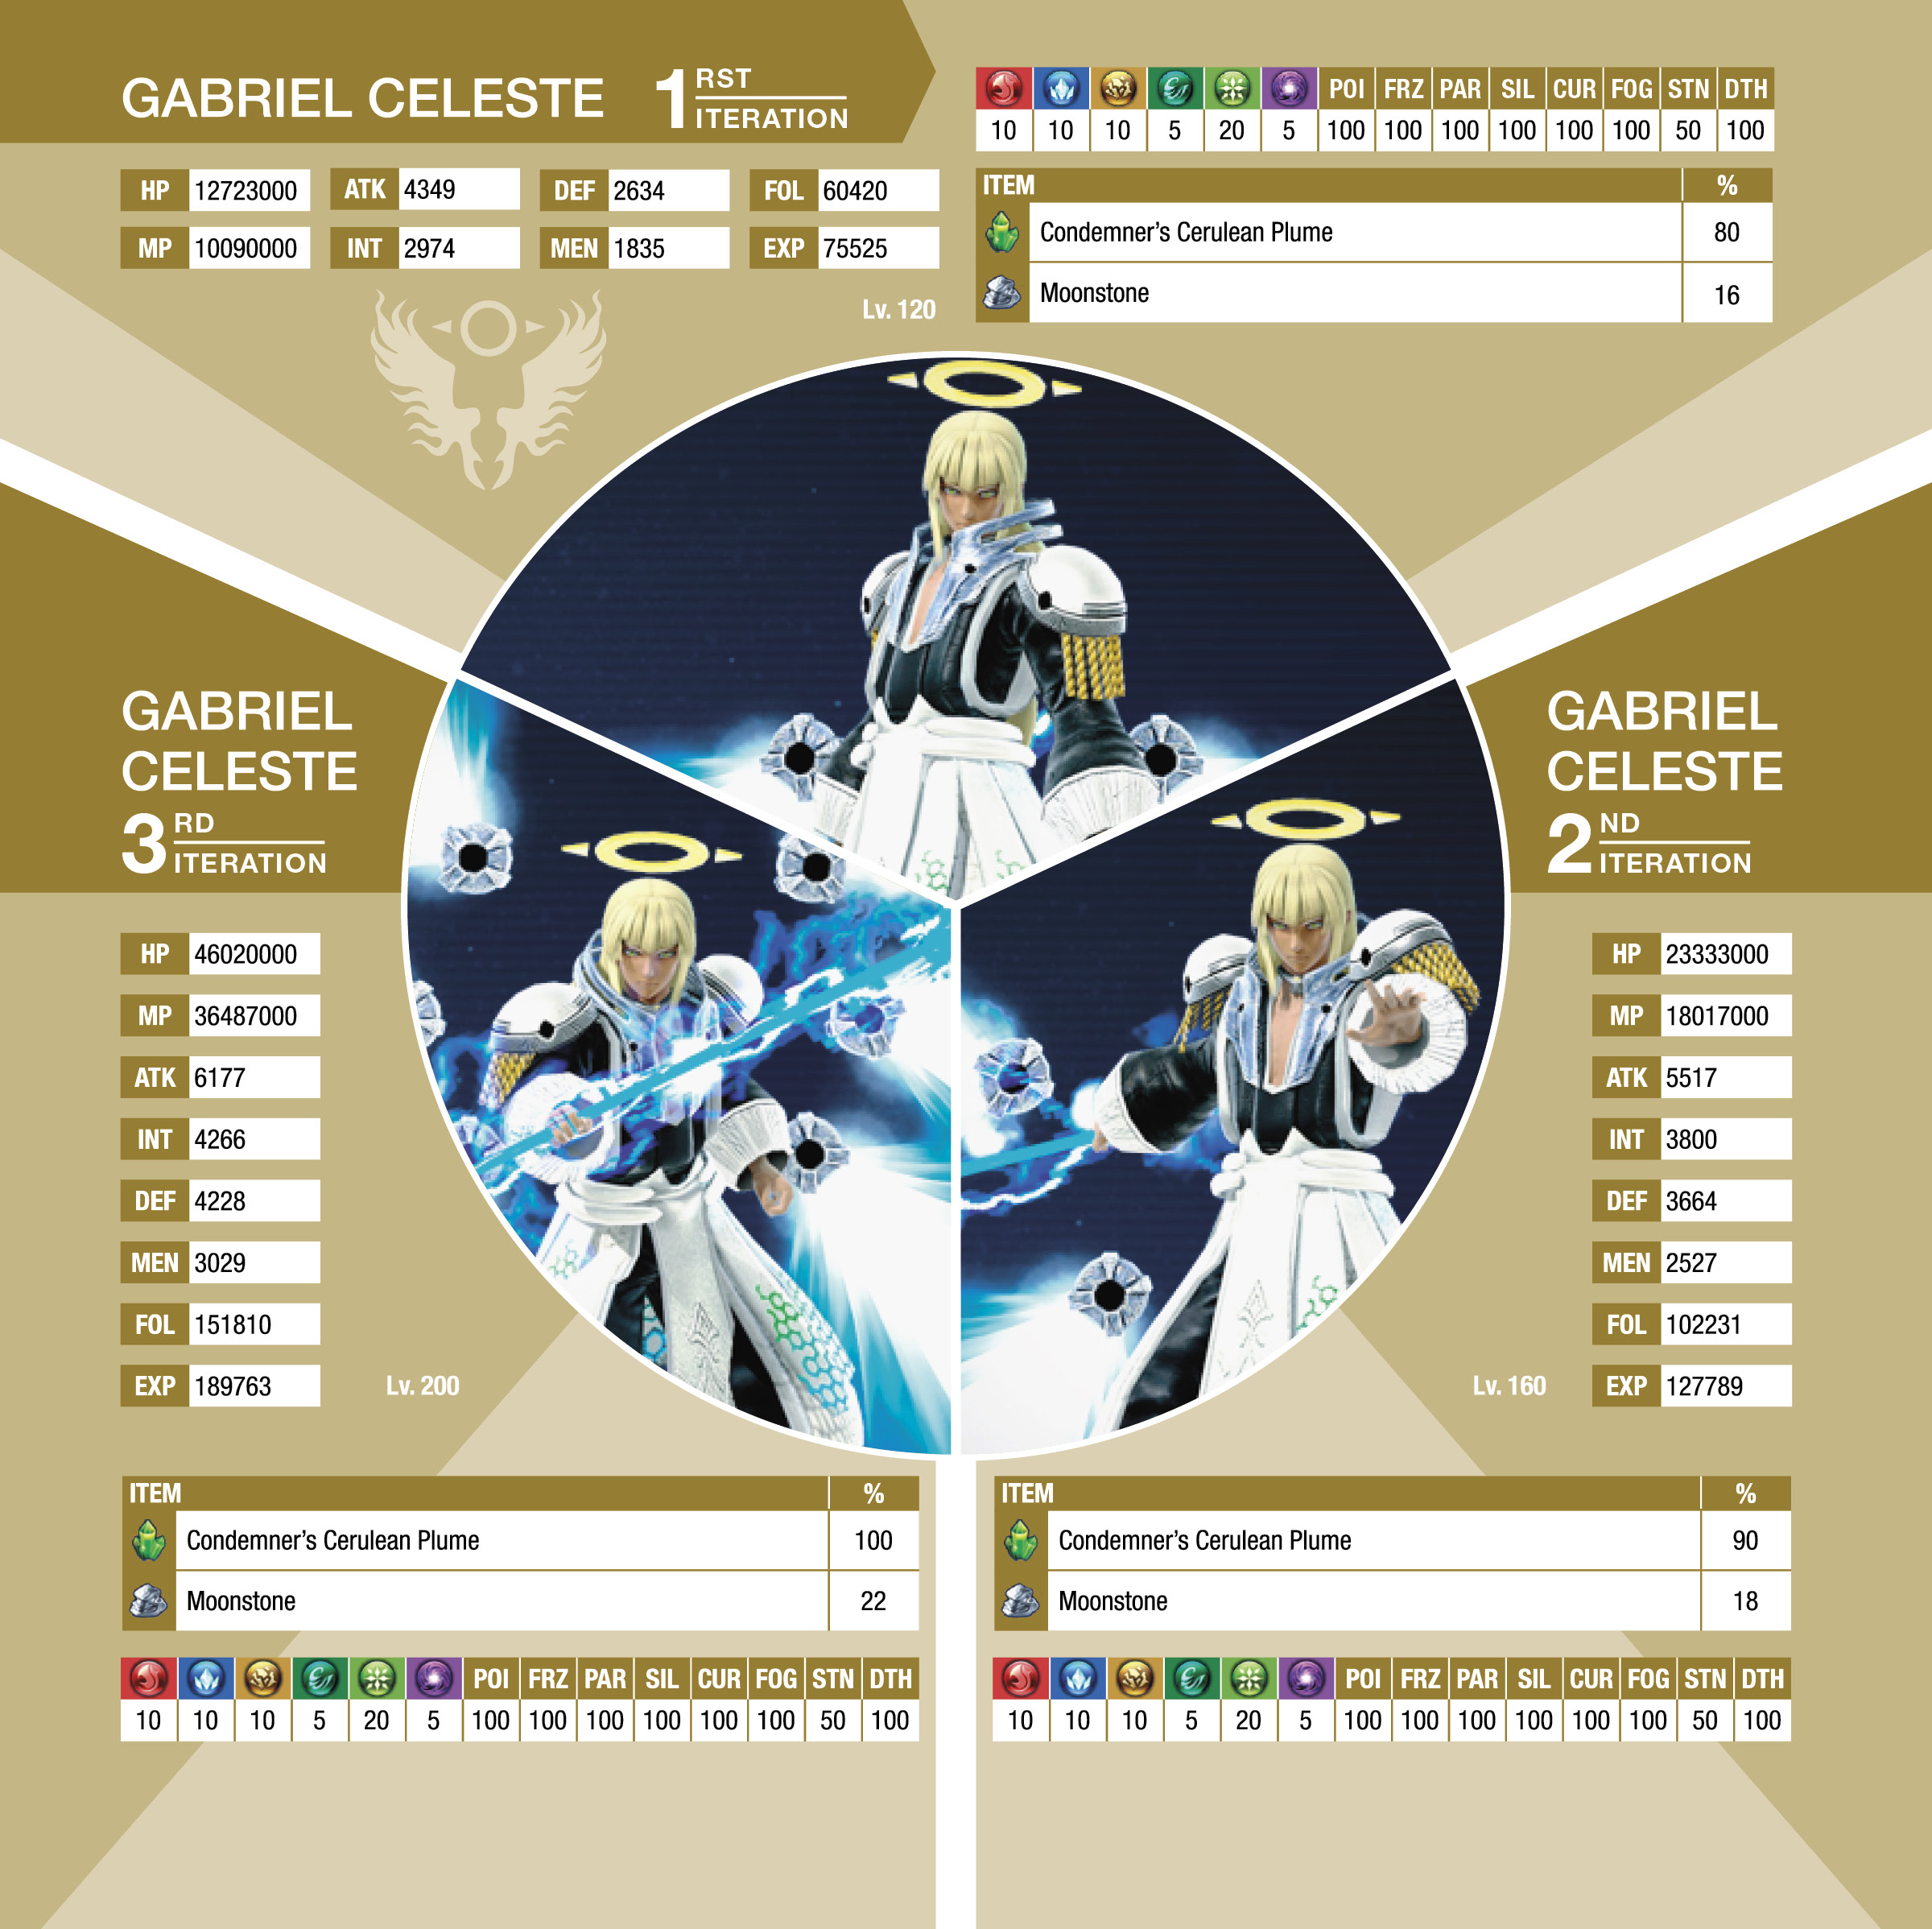
Gabriel’s Abilities
Abject Misery
• A single projectile cutting through the battlefield
• Moderate damage
Brutish Bolt

• Large, devastating area-of-effect storm centered on Gabriel, causing massive damage to those around him
• Hits several times and paralyzes
• Anyone in the storm will most likely die unless they’re invincible from a Heroism Potion or Dead Man Walking role
• More likely to cast when his HP is low
• Keep non-invincible members as far away from him as possible, especially Miki, Fiore, and Emmerson
Celestial Fists of Fury
• A physical damage combo ending with a long-range beam
• Does massive physical damage unless the target has defensive buffs like God Slayer and DEF+ roles/items
• The beam may hit a back line member even if they’re far away
• Can inflict stun
Indiscrimination
• Quickly fires several projectiles all around him, similar to Divine Wave
• Minimal damage, but can cause silence and/or fog
• Cast Cure Condition or use curative items immediately
Partizan Gravepost
• Massive area-of-effect around the divine being, causing low damage
• Extremely fast casting and causes knockdown
• Keep Miki, Fiore, and Emmerson away
Thunderstroke Spear

• Melee-range area-of-effect almost as destructive as Brutish Bolt
• Can cause paralysis; cure with Cure Condition or Basil
• Keep Miki, Fiore, and Emmerson away
Recommended Power Level & Equipment
- All party members are at least Lv. 120 for the first iteration (Lv. 160 for second, and Lv. 200 for third)
- All roles unlocked, with all specialties available
- Restorative consumables stocked, including Blueberry Potions, Blackberry Potions, Fresh Sages, Resurrection Elixirs (requires plenty of Caterpillar Fungi), Vitaliteas, ailment curatives, Signet Card: Resurrection, and Signet Card: Angel Feather+
- All Cathedral of Oblivion weapons, preferably augmented (for second and third forms, all Terpsichorean Interlude weapons obtained and unlocked)
- Equip best armor available, especially ones with special abilities like Reflecting Plate (-10% damage from divine beings)
- Augment your gear as best as you can with the resources you have available: preferably ATK+ and Critical Hit+ augments for Anne and Emmerson, DEF+ on Victor and Fidel, HP+ on Miki, and INT+ on Fiore
- Food: Sukiyaki (50 quality food synthesis) OR Grilled Steak OR Fruit Gummies
Recommended Party Setup
Roles
| Character | ||||
|---|---|---|---|---|
| Fidel | Aggressor | Tri-Ace | God Slayer | Gritty Warrior |
| Miki | Healer | Crusader | Skulker | Sage |
| Victor | Evasionist | Stamina Stockpiler | Defensive Devotee | Turtle |
| Fiore | Lightning Strike => Intelligence Indulger | Solar Emissary | Enchanter | Master Tactician |
| Emmerson | Interceptor | Stun Supporter | Daemon | Item Expender AND/OR Menace |
| Anne | Berserker | Warmonger | Attack Advocate OR Critical Combatant | Dead Man Walking |
| Relia | Vivifier | Holy Mother | Pacifist | Princess |
Battle Set
| Character | Short Range  |
Short Range  |
Long Range  |
Long Range  |
|---|---|---|---|---|
| Fidel | Air Raid | Mirror Blade | Air Slash | Air Slash |
| Miki | Any | Any | Sunflare | Terra Hammer |
| Victor | Mirror Blade | Bloodstorm Revolution | Flying Guillotine | Dragon Roar |
| Fiore | Any | Any | Wind Blade | Thunder Flare |
| Emmerson | Gravity Bullet | Heavenly Flight | Crescent Wings | Crescent Wings |
| Anne | Crescent Locus | Hammer of Might | Electric Fists | Hammer of Might |
Signeturgy ON
| Character | ||||||
|---|---|---|---|---|---|---|
| Miki | Ex Healing | Faerie Light | Faerie Star | Raise Dead | Resurrection | Cure Condition |
| Fiore | Healing | Raise Dead | Arctic Impact OR Wind Blade | Thunder Flare | Void | — |
Setup Explanations
Fidel
God Slayer increases damage dealt to and damage taken from divine beings by 50%, which helps Fidel survive everything, save for Brutish Bolt and Thunderstroke Spear. Air Raid and Mirror Blade are powerful while decently quick enough to build combos reasonably, although you’ll most likely not be controlling Fidel manually for the majority of the battle. Air Slash is Fidel’s only ranged attack, and you might need to use it occasionally when you’re moving him out of range when the battle becomes increasingly difficult. Tri-Ace and Gritty Warrior are excellent survival roles, but these may be switched out with other defensive abilities. However, guard tactics are generally not advised against Gabriel because of his many guard-crushing abilities.
Miki
As usual, she’s your primary healer and raiser. Skulker gives her more survivability, which equates to more leeway for healing allies, as Gabriel will target her less often. However, it can be switched out for Savior. Sage is crucial to cut down on signeturgy casting time, resulting in much quicker Faerie heals. Make sure to turn off all of her offensive signeturgical spells in the set battle skills menu. You can cast them on your own if you have the time.
Victor
Since Gabriel’s main attacks are physical-based, boosting Victor’s DEF and HP ratings is recommended, as well as lowering the chance of being hit critically. Turtle synergizes well with high HP and high DEF, so it’s an incredibly handy role since many of the god’s attacks are sure to lower Victor’s HP below 10%.
Fiore
She’ll be your all-out INT-based signeturgical damage dealer, so stack as much INT as you can. Start the fight using the Lightning Strike role, and then switch it out through the battle menu to Intelligence Indulger for the permanent INT+20% increase. Thunder Flare can inflict an ATK down debuff, so when you have time, you may want to manually control Fiore to combo-cast repeated Thunder Flares. Master Tactician will encourage your allies to move away to safety while increasing her INT by a large margin.
Emmerson
Gabriel is susceptible to being stunned, so use the tried-and-true stunner build. Daemon works on every single enemy in the game and helps speed up battles immensely thanks to its powerful DEF and MEN debuffs. Menace encourages Emmerson’s AI to stay actively shooting while prioritizing quick pot shots, synergizing with the two stunner roles. It’s recommended that you use Crescent Wings for Emmerson’s long-range skills; his other long-range skills have lengthy animations that may hinder your ability to move him out of harm’s way or to heal party members with curatives. If you’ve been diligent in your item use, you might have the Item Expender role unlocked by now (obtained by using items 500 times in battle). Equip this role during battle if the situation becomes dire and you need potions or Fresh Sages tossed out quickly.
Anne
This is a must-have build for the Gabriel and Ethereal Queen battles. Because of her relatively low base HP total, Anne is much too susceptible to dying without it. She doesn’t have ranged attacks, and you need her to be useful, so have her be your Dead Man Walking. With Warmonger and Critical Combatant, she’ll have an extra 40% chance of dealing critical damage while staying active (thanks to “Take more actions +10” factor). With the proper augments, you can potentially boost her Critical Hit figure up to 100%! Alternatively, you can use Attack Advocate in place of Critical Combatant. Controlling Anne or Fiore when your party is stabilized is ideal for optimal damage output. You can perform the following combo for massive damage: Hammer of Might => Hammer of Might => Hammer of Might => Blazing Cannon.
Relia
A universally strong support setup when you’re not farming EXP or SP. Vivifier and Holy Mother are crucial; Vivifier keeps your allies active while Holy Mother decreases the enemy’s activity, which, in turn, increases your survivability.
Battle Guide
Before you enter the fight, make sure to eat the appropriate foods. Eating Sukiyaki is highly recommended for this fight (synthesized with food quality of 50). Otherwise, you can boost your ATK or Critical Hit Rate with either Grilled Steak or Fruit Gummies. Begin the fight as you would against most of the maze bosses. Take control of Miki, Fiore, and Emmerson, and run far, far away. Your front line members shouldn’t go down too quickly if you’ve equipped them well enough.
You can either let Miki heal on her own (which she should do well enough if your roles are set up with the suggested build earlier in this guide), or you can manually control her to ensure that your party’s HP is capped. When everyone is safe from potential Brutish Bolts, you can take control of either Anne or Fiore to perform combos. Be mindful of any status effects that land on your heroes, since many of Gabriel’s attack skills inflict extremely hindering ailments like paralysis, fog, silence, and stun. Stun doesn’t have to be cured since it doesn’t last too long.
The main mechanic to look out for here is Brutish Bolt. If you see the red combat message with Gabriel’s Brutish Bolt startup animation, open the battle menu and take control of Miki so you can be ready to cast Resurrect on Fidel or Victor. Anne should be fine if she’s using Dead Man Walking (as long as she’s healed up enough). Occasionally, Gabriel will run at one of your ranged members. If this happens, open the battle menu immediately and move your fragile members away. He may be looking to wreak some havoc with Brutish Bolt on your back line!

Repeat until Gabriel’s HP is about 35%. Things get scary here, and you’ll know when it does because Gabriel will be covered in an electrical field, signaling his new power. He’ll start using Brutish Bolt and Thunderstroke Spear quite often. Thunderstroke Spear is similar in damage to Brutish Bolt in that it can instantly kill anyone caught in it. If your party is healthy, you can usually out-heal and out-raise the damage output. However, if multiple members go down, you should start using Emmerson and Fiore to raise members while Miki heals Anne. If the need arises, you can set Fidel and Victor’s AI to manual, while invulnerable Anne remains in the fray. Move them away to heal them up, and have them use their ranged skill attacks. When you’re comfortable, you can put them back to automatic AI so they can help burn down Gabriel’s HP.
If Miki ever goes down, make sure to prioritize raising her with Fiore and having one of your other members heal up Anne with a Blueberry Potion. It’s important to spread out these tasks since they take up valuable time from each member. If you have the valuable Item Expender role, this task becomes much easier since it essentially removes the item cooldown timer.

If things get extremely bad, you can resort to using Miki’s Lv. 3 (or higher) Arcadia Reserve Rush. If you have spare Vitaliteas (or a Robust Vitalitea), you can use those and immediately execute Arcadia for a party-wide raise and heal.
After you’ve committed proper deicide, head north from the arena to obtain your well-deserved reward—Apocalypse! Congratulations! Apocalypse should be Miki’s best weapon if this is your first time through the Maze of Tribulations. Have her equip it, and head on out back to the lobby. You can now ascend to the third floor of the maze through the center platform in Indra’s Return.
Terpsichorean Genesis
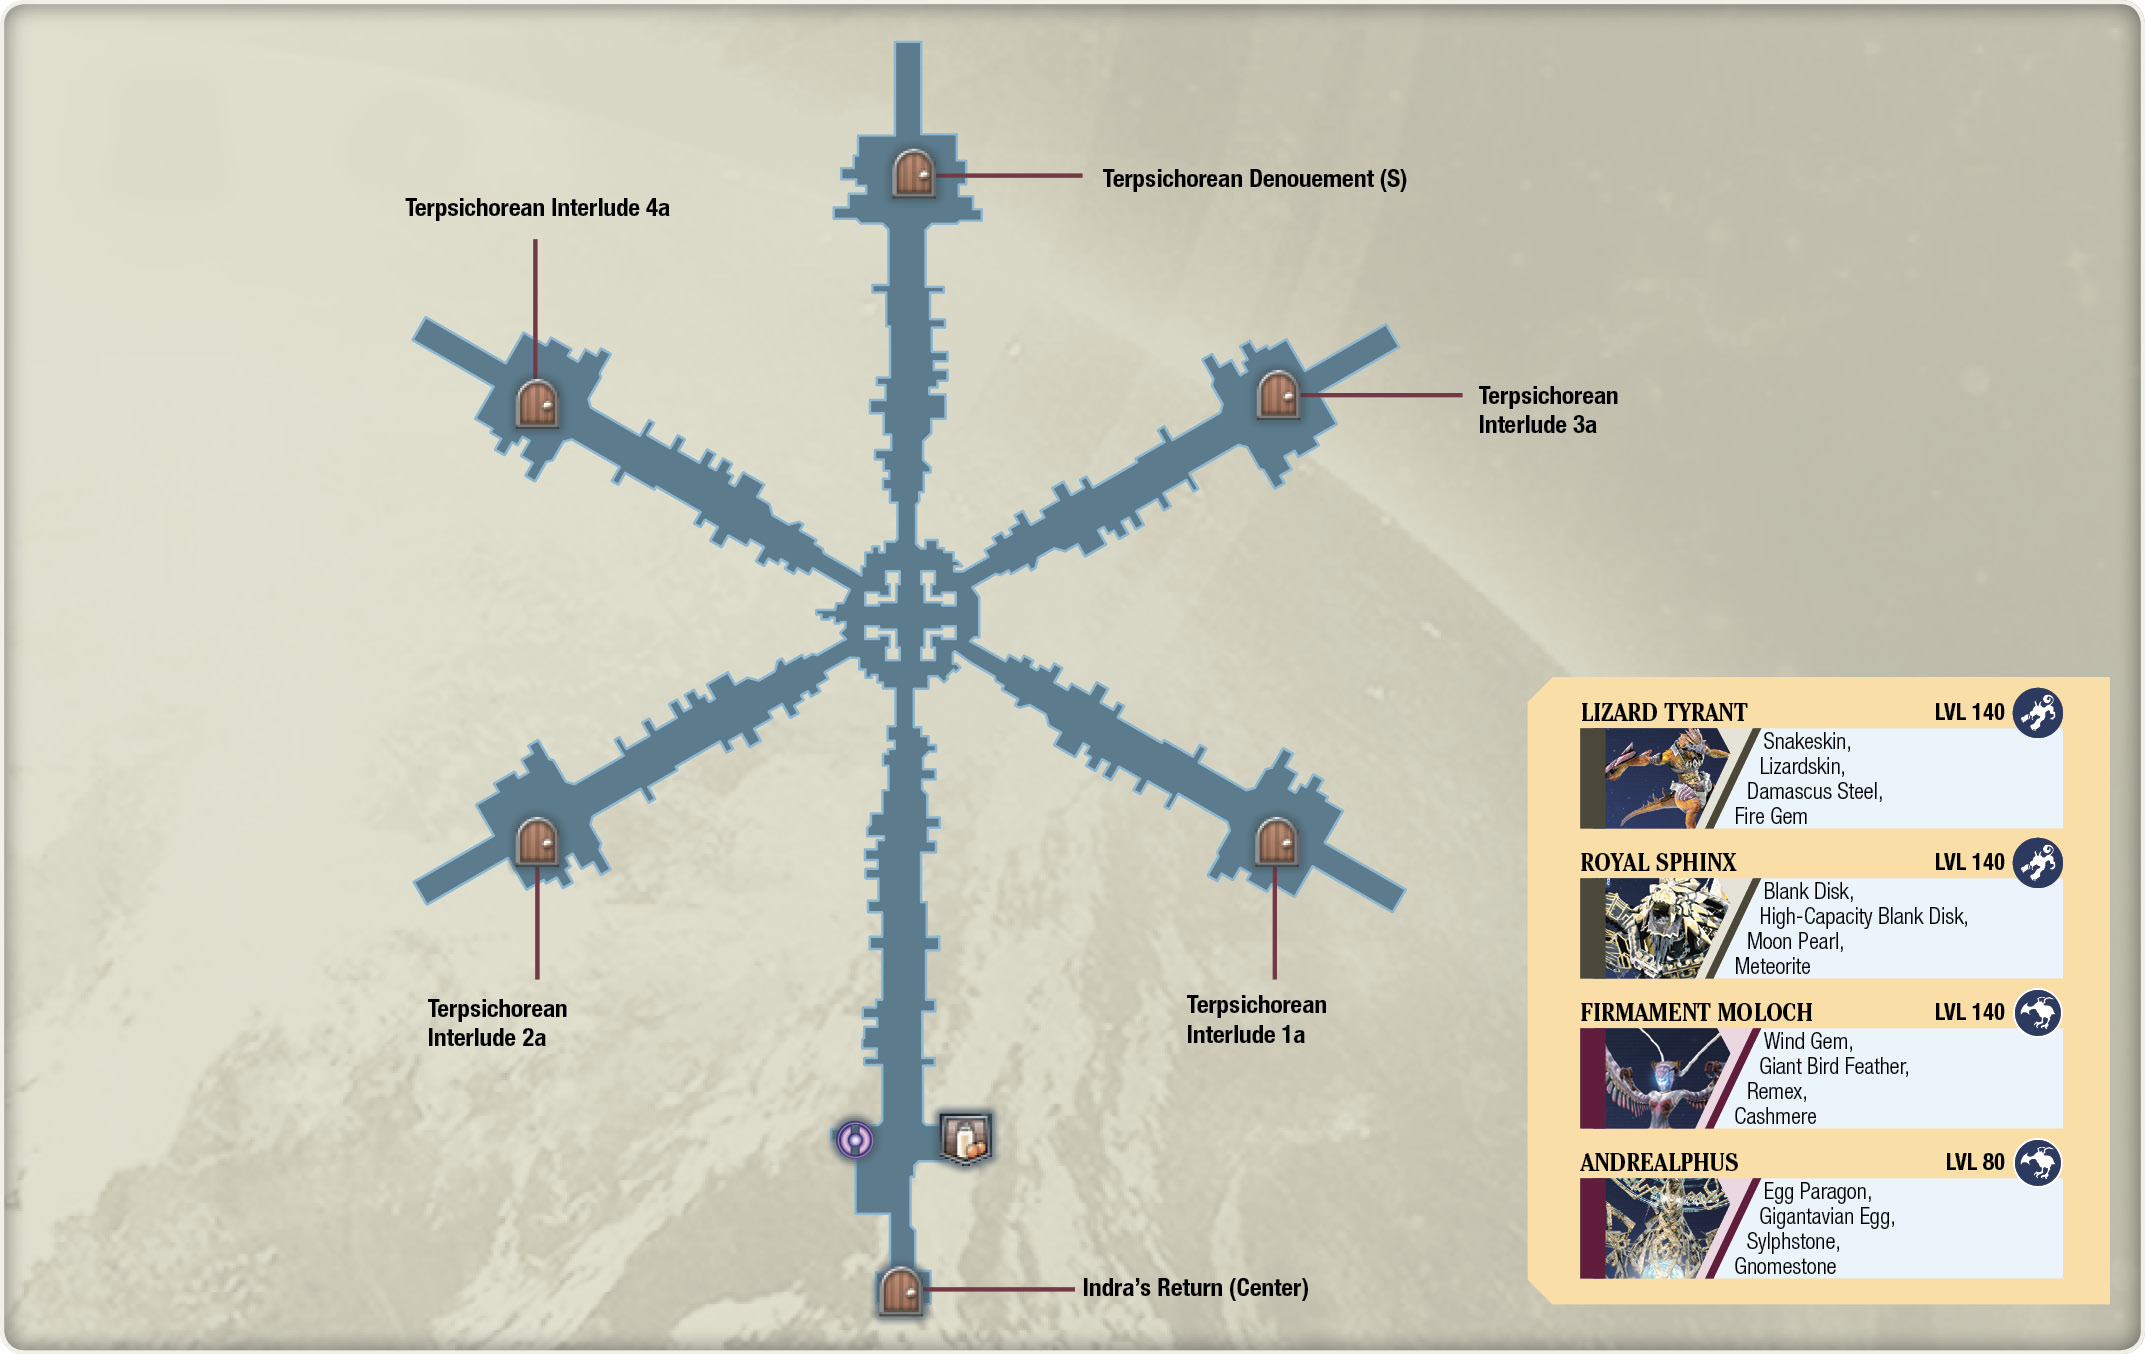
If you haven’t saved your progress, go ahead and do so. There’s a significant difficulty spike here, not only in the boss battles, but also with the standard enemies who are loitering the maze’s hallways. Royal Sphinxes are particularly painful encounters, with their ability to wipe out multiple party members in one shot if you aren’t careful.
If you need to go back to town for item creation supplies or to finish some quests, you should do so before attempting the final floor of the maze. It’s also a good idea to augment all of your gear for a bit of a performance boost. When you’re ready, the queen awaits!
You’ll notice that the layout here is exactly the same as the previous two floors. The only difference is that the subareas of the four prerequisite bosses will have five floors, whereas the previous floor’s areas contained four. You can complete these four intercardinal areas in any order, but be warned: one of these sub-area bosses can be especially challenging!
Terpsichorean Interlude I
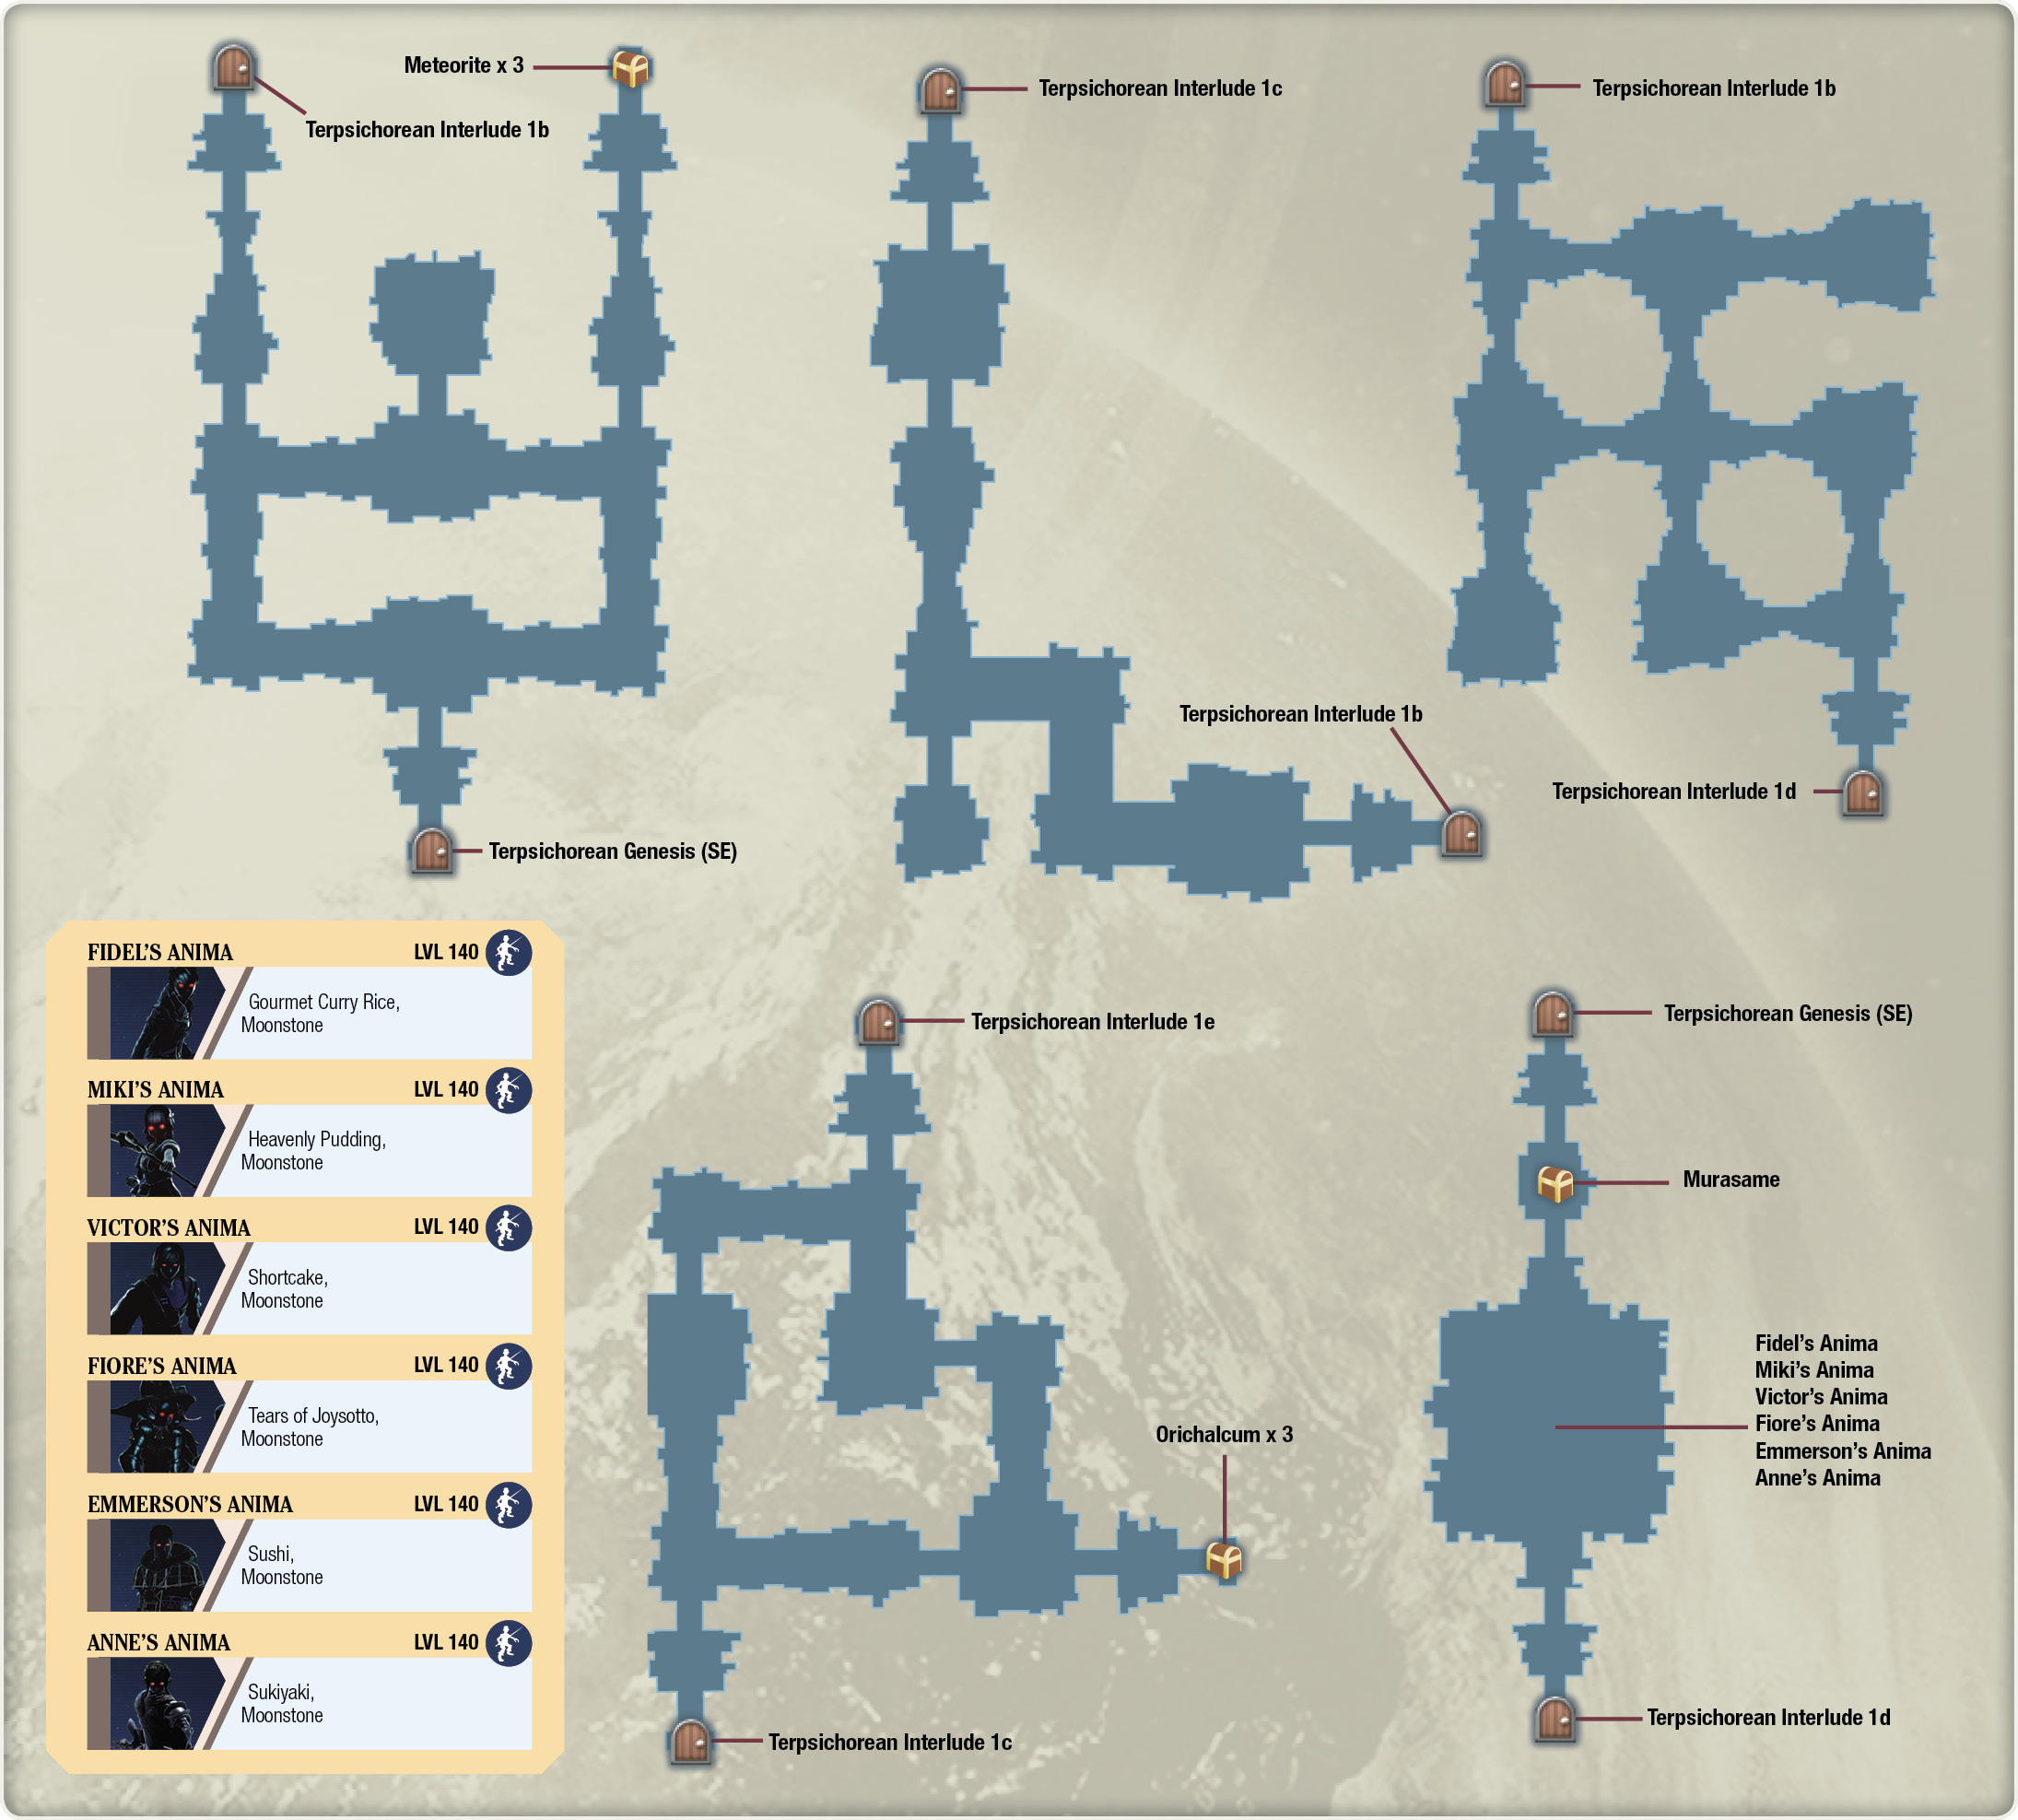
This first area consists of two long hallways running parallel to each other, with three rooms protruding to the north. There’s a chest in the farthest northeast room containing Meteorite x 3. Take the first right, then head north along the east part of the map to reach it. After you grab the meteorites, make your way back out and take your first right, heading west. At the end of the trail, make a right to head up to the second level. A straightforward path here. You’ll reach a fork at the end of the initial path. Turn right here, going north, to get to the third level. Your destination here on the third level is to the southeast. Take the second left along the western path, then take the second right and keep going until you reach the southernmost room. The transport pad here takes you to the fourth level.
There’s a very valuable chest here containing Orichalcum x 3. Get to it by heading all the way east from your starting point. Then, turn around and take the first right, northbound and around a bend. You’ll see a room to the north, with a transport to the boss arena in it. Take the transport, and prepare for one of the most arduous battles you’ll come across in the maze.
This is arguably the most difficult battle in the entire game if you’re not prepared well in advance. This is an epitomic case of offense being the best defense, since it’s nigh impossible to win through attrition against these evil doppelgangers. Not only do they have all of your abilities, but each one of them has more than one million HP. On top of their ridiculous damage output, lockdown combos, status-inflicting spells, and the overall chaotic nature of the six-on-six brawl, they also have a dedicated healer that can heal for around 50% of their max HP at a moment’s notice. They’re essentially as effective as your party, except with absurd amounts of health. The most effective way to deal with this is to assassinate Miki’s Anima as early as possible, but even this is not an easy task thanks to the chaos the opposing team forces on you.
It’s highly recommended that you come into the battle with at least three or four Reserve Gauge stocks. You’ll need them to unleash as much firepower as possible within a small frame of time. Otherwise, Miki’s Anima will start healing up her allies for tens of thousands of hit points, nullifying your efforts.

Before you enter, make sure everyone is healed fully and equipped with proper roles. The most important factor is the Dead Man Walking, Berserker, and Instigator roles combination. You can put these on either Fidel or Anne. Fidel has a more effective Reserve Rush that scales well with high ATK power, but Anne’s Reserve Rush is strong against single targets. Have Fiore or Emmerson equipped with Executioner and any other damage-boosting roles so that they target Miki’s Anima on their own. It’s also important to have Miki equipped with the Skulker role so she’s less likely to be targeted; it’s imperative she doesn’t die early on. Other roles to consider are Holy Mother and Terror Knight, preferably equipped on Relia.

Make sure to have an ATK-enhancing food active before engaging, either Sukiyaki or Grilled Steak. Now, when you enter, you’ll want to (as usual) pause the game with the battle menu. Take control of Miki, and maneuver her away from danger immediately while healing up anyone who needs it. Once party-wide HP is full, open the battle menu and switch to your ATK-enhanced Dead Man Walking damage dealer. Unpause, and quickly select Miki’s Anima as your target, then execute a Lv. 2 Ethereal Blast (or Blazing Cannon if you’re using Anne). As soon as the animation goes off, switch to your other ATK-boosted damage dealer and deplete the rest of your Reserve Rush gauge on Miki’s Anima. Open the battle menu as soon as you can to take control of Miki to stabilize and heal any damaged members. If you’ve done the sequence correctly, it should now be a six-on-five match, with the foes’ healer dead.

It’s not over yet, though. The fight remains incredibly difficult thanks to all of the powerful abilities the enemies still can access. Fiore’s Anima and Emmerson’s Anima can dish out extreme punishment with their long-ranged attacks. Emmerson’s Anima can use Avian Rage from a distance, locking down one of your party members and dealing insane amounts of damage. Try to target him next with Fidel and Anne if you can. If you need to, use Vitalitea or Robust Vitalitea to boost your Reserve Rush gauge so you can make quick work of a remaining threat. Once you’ve put down Miki’s, Emmerson’s, and Fiore’s Animas, go after Anne’s Anima next. She has a 0 DEF rating, so she should go down much easier than the others. Do this all while vigilantly keeping Miki safe and healing up members along the way.
Hopefully, you’ll have all of your teammates alive against just Fidel’s Anima and Victor’s Anima. Send them back to where they came from, and pat yourself on the back for a well-executed strategy!
Your just reward consists of the famous Murasame katana, an upgrade for Victor if this is your first runthrough of the Maze of Tribulations. Equip him with it, and head back out to the lobby.
Terpsichorean Interlude II
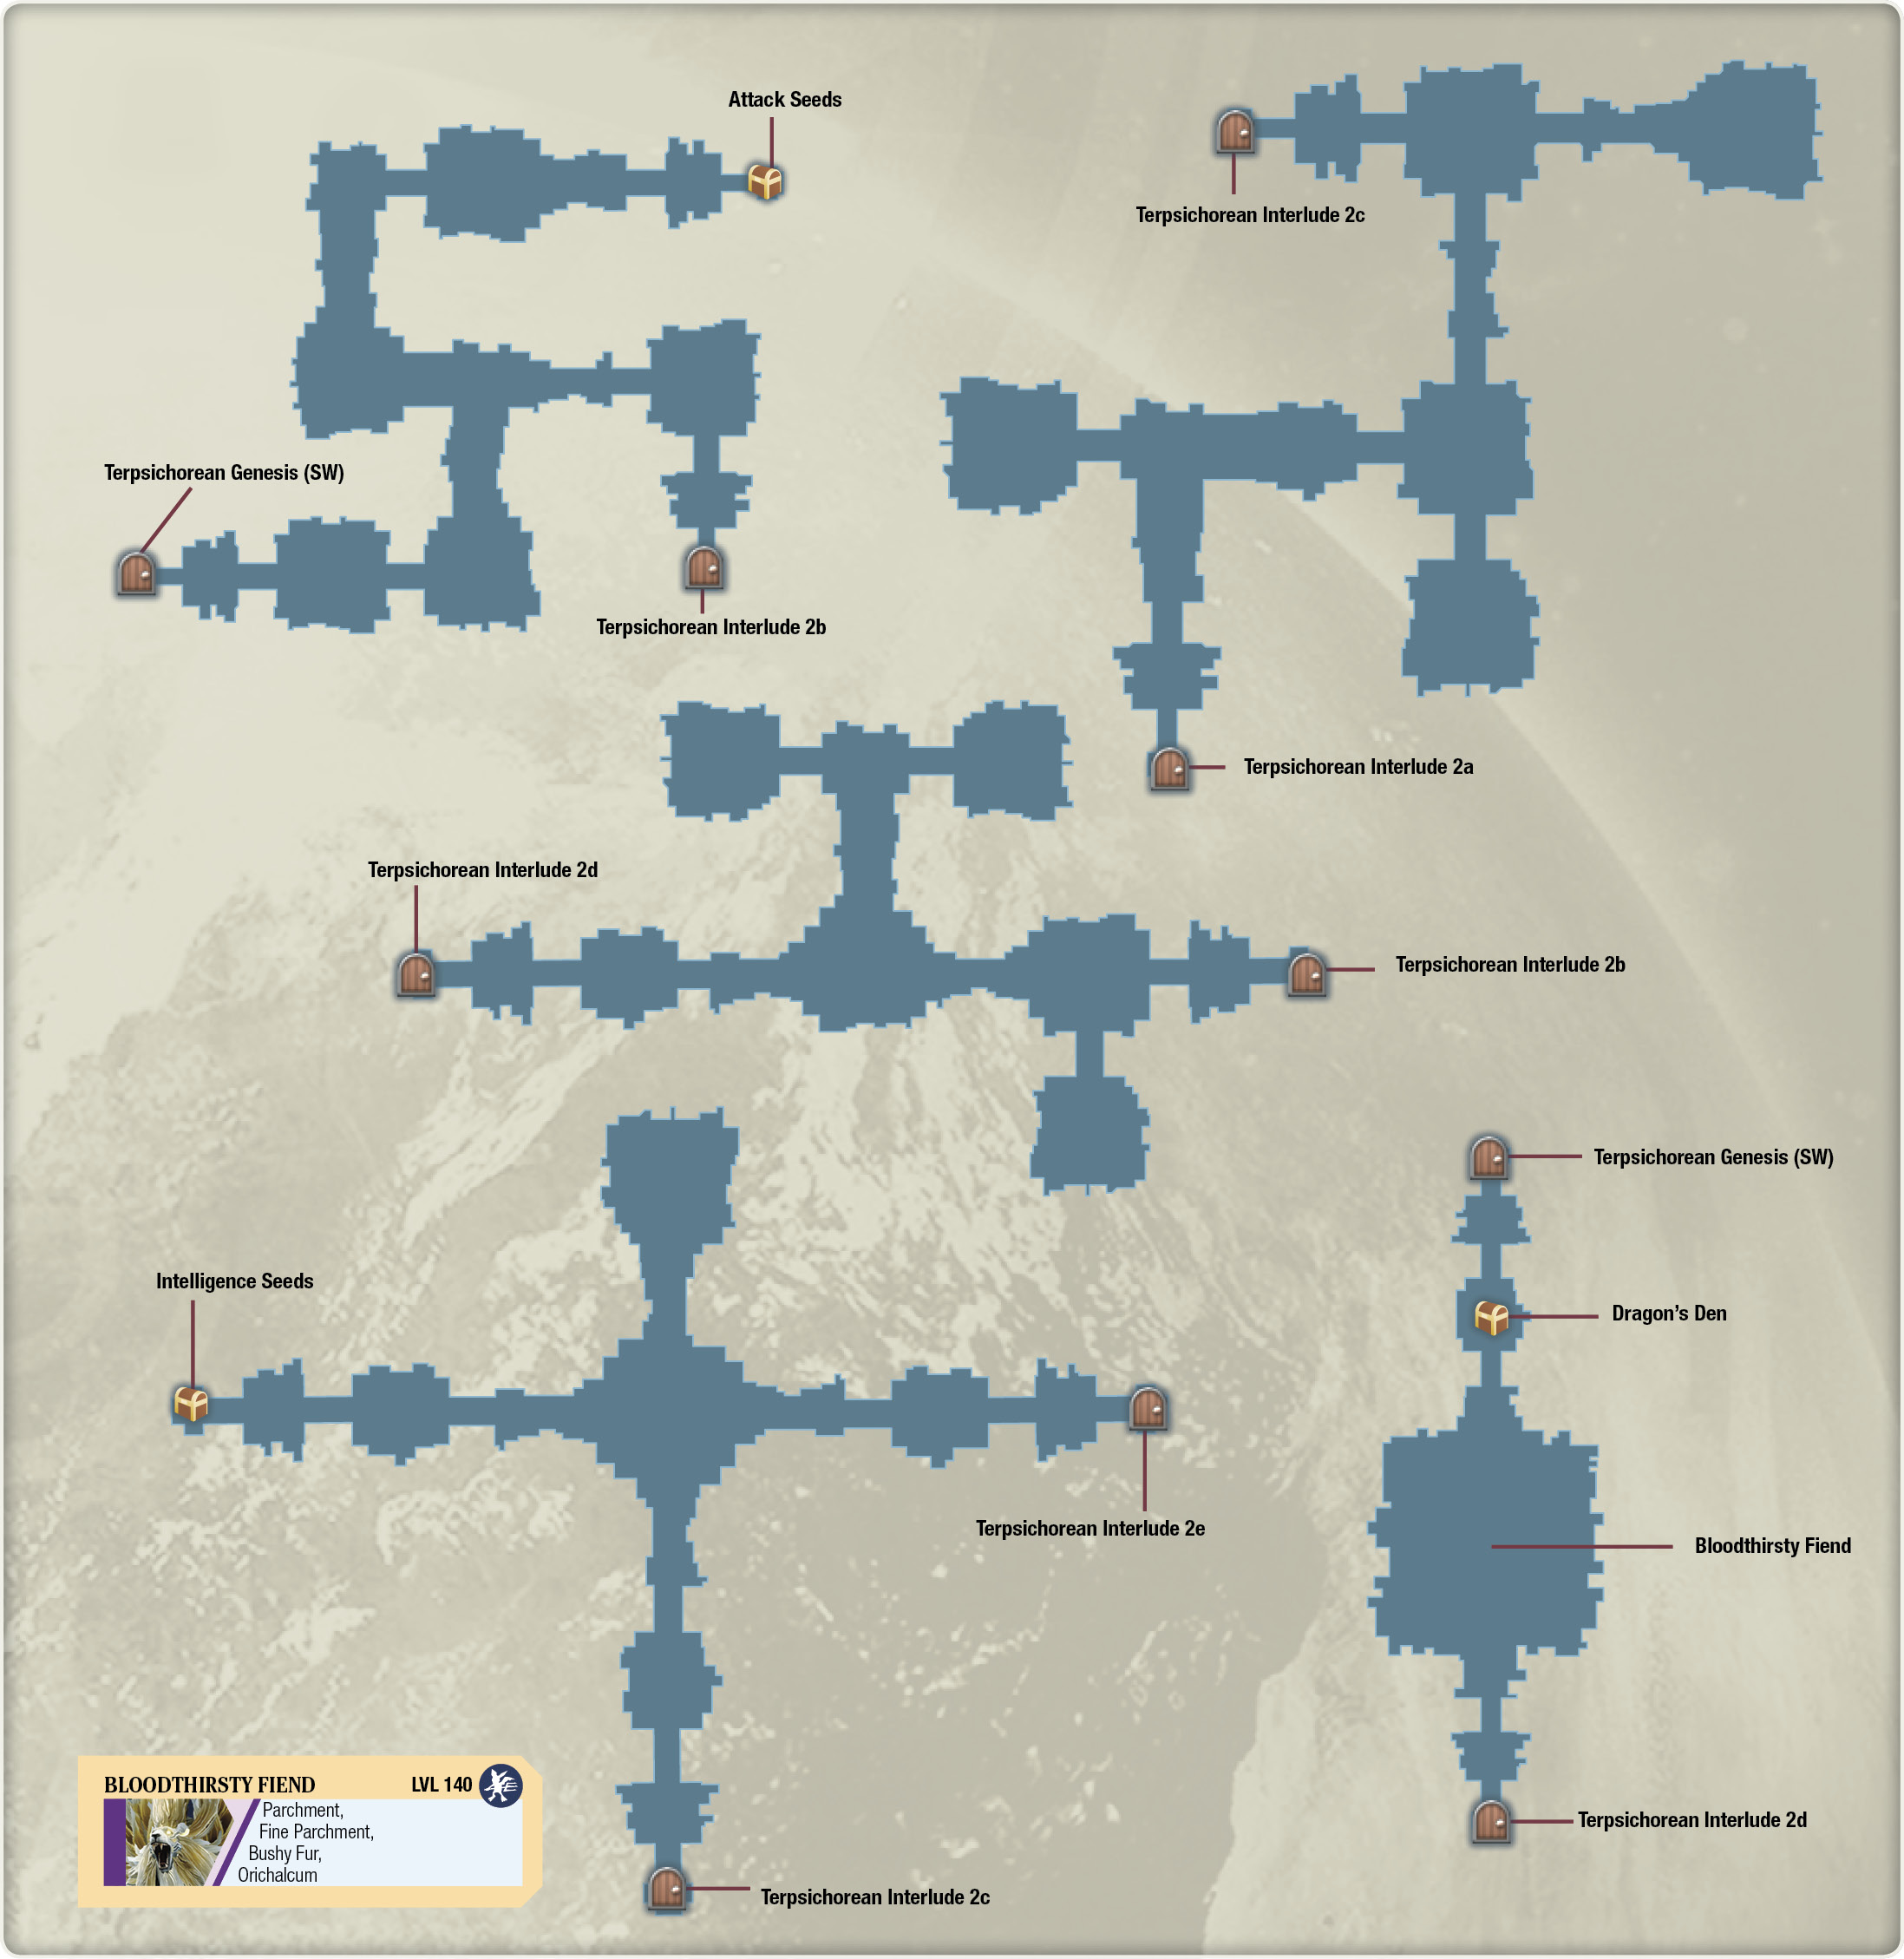
Head east from the start, then turn left at the bend. When you reach a split, taking a left and following the path leads you to a chest holding Attack Seeds in the northeast room. Grab it and then backtrack, taking the other path at the split, going east. It eventually leads you south into the room to the second level. There’s no chest on this floor, so if you want to get to the third level, make a right at the first fork, then take a left at the second fork, going north. At the third split, take a left to take the transport pad to the third level. There’s no chest here, either, and your waypoint to the next level is directly west from the starting point. You can find enemies in the north and south paths if you want to earn some EXP and SP. The fourth level is a cross-shaped layout, with your destination in the east path of the intersection. There’s a chest containing Intelligence Seeds in the westernmost room. Pick them up, fight any enemies along the way, and then turn around and make your way east to the boss arena.
Bloodthirsty Fiend
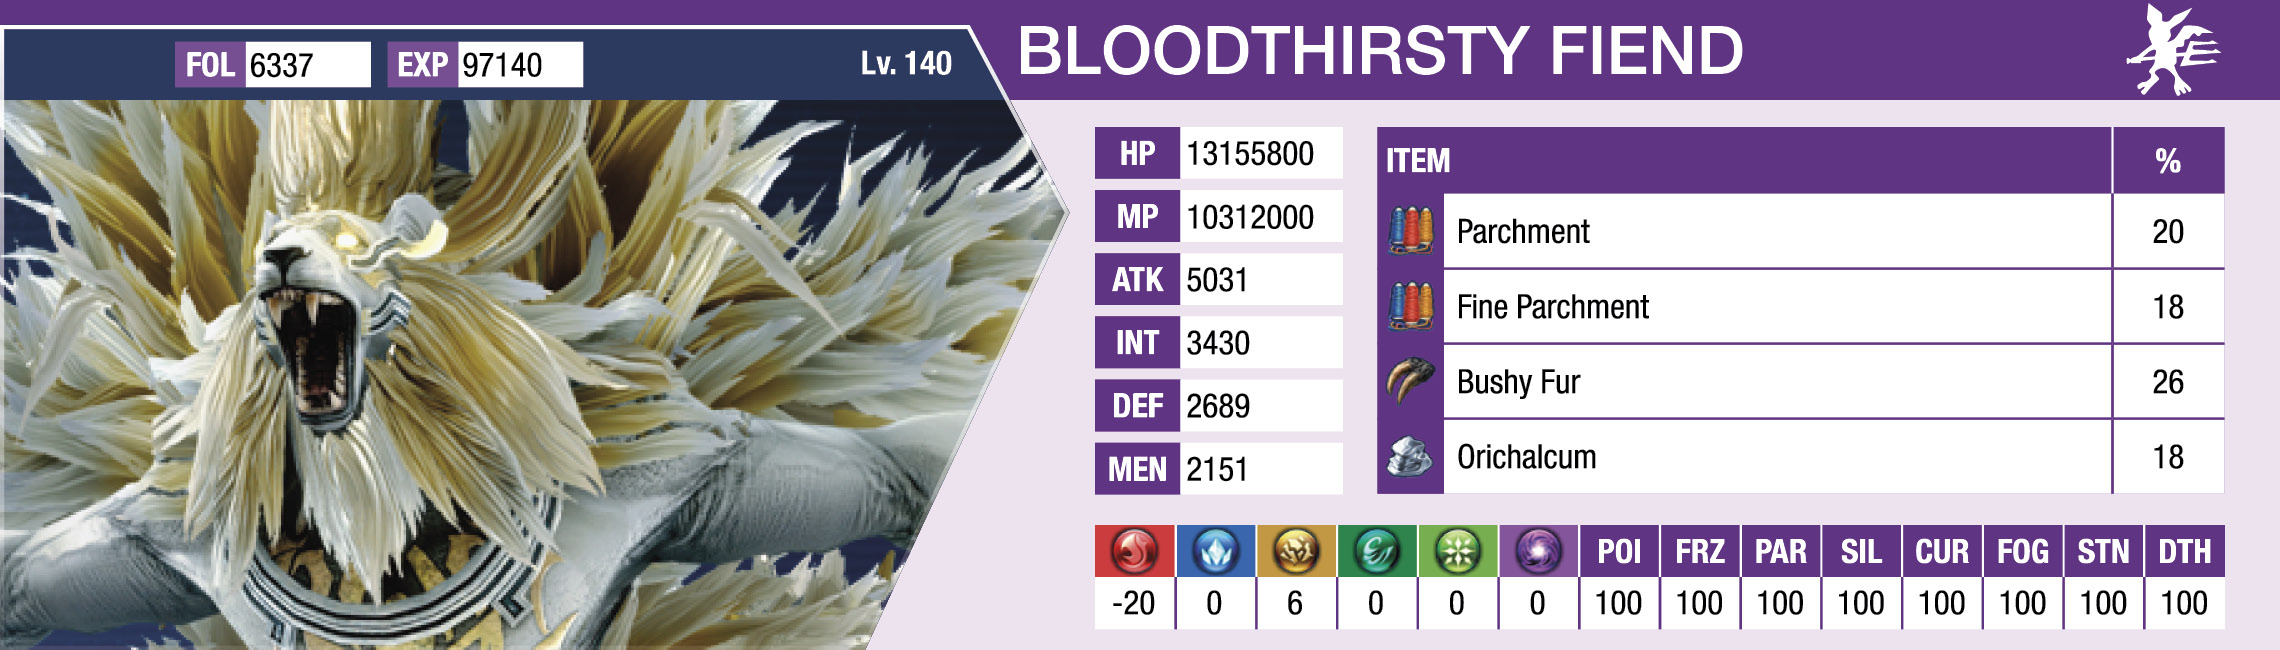
The Bloodthirsty Fiend here is a particularly annoying fight, and you’ll want to set up your party builds leaning toward attack power. It’s recommended that you have the group snack on Grilled Steak or other ATK-enhancing food before the fight. When you’re ready, go ahead and enter the arena.
At the beginning of the battle, take control of your ranged members and healer so you can move them all away from each other. The stinger-equipped Manticore will constantly use an attack skill called Seething Inferno. It randomly seeks out a party member and proceeds to drill into the ground, ending the attack skill with an explosive whirling area-of-effect that instantly kills all but the healthiest party members if they’re hit by both the stinger and the explosion. This fight is all about dealing as much damage as possible while identifying the fiend’s next target. If the fiend goes after one of your fragile members, open the battle menu and take control of its potential victim so you can maneuver out of the way. You’ll be forced to do this frequently if you want to keep your back line members alive.

The Bloodthirsty Fiend can’t be stunned, but it can be inflicted with the Daemon role’s DEF and MEN down afflictions. Equipping one of your attackers (preferably Emmerson) with the Daemon role greatly helps burn the monstrosity down.
There are some other unconventional considerations to take during this fight. You don’t want your ranged damage dealers casting or executing skills that keep them stuck in place for too long. Most of Fiore’s offensive abilities come with high cast and travel times. This is terrible when you’re trying to be as mobile as possible. Most spells end up missing because of the fiend’s propensity for constantly traveling across the battlefield. Additionally, you don’t want your party members stuck in lengthy attack animations, preventing you from evading the adversary’s stinger and area-of-effect combos.
The recommended signeturgical spell to equip for Fiore is Ice Needles in both long-range battle set slots. These almost always hit and do large amounts of damage when combo-casted. Ice Needles also recovers slightly faster than her other spells. It synergizes well with the Emissary of the Blue Sphere role, so make sure to set one of her roles with it. For Emmerson, you can equip Crescent Wings in both long-range battle set slots because of its high damage and relatively fast execution time. For his roles setup, equip Daemon and other damage boosters like Attack Advocate and Critical Combatant to maximize his damage.
As for your melee fighters, have them take on more offensive roles while removing any guard-enhancing ones (most of the Manticore’s attacks crush guard anyway). If you’re leveled and equipped well enough, your close-range fighters should be able to withstand most attacks without suddenly dying. Anne with the Berserker plus Dead Man Walking combo is an optimal build, particular in conjunction with Hammer of Might (which should be assigned to all four battle skill slots). She’ll be invincible while constantly pummeling the flying beast with Hammer of Might’s superb damage and tracking effect.
Victor can be equipped with a few HP-enhancing roles and equipment to survive the inferno. Alternatively, you can play him as a ranged attacker equipped with Dragon Roar and offensive-based roles. This lets you do damage while avoiding taking any yourself, with the caveat that you’re actively switching to Victor when his AI opts to engage at close range.
Since the Bloodthirsty Fiend is a Corrupt-type monster, you can equip Fidel with the Mutant Slayer role, which reduces damage from corrupted monsters by 50% while boosting damage done by 30%. However, you can make your life much easier by equipping Miki with this role. Otherwise, she’ll die in one Seething Inferno combo, which disrupts much of your strategy because you’ll need to raise and heal party members instead of dishing out damage. As long as she can withstand an entire Seething Inferno, an AI-controlled Miki can usually keep up with healing all damage done to the party while they hack at the flying beast. Miki should have all of her non-healing signeturgical spells turned off, as well.
The fiend has a few other attack skills up its furry sleeves, but rarely uses them. When it does, it’s more of a relief since they’re not as devastating as Seething Inferno. Keep at it, and the foe eventually goes down. Your reward for exorcising the monster is a Dragon’s Den orb for Fiore, located in the chest to the north. Have her equip it if it’s an upgrade, and then return to Terpsichorean Genesis through the north room’s transport pad.
Terpsichorean Interlude III
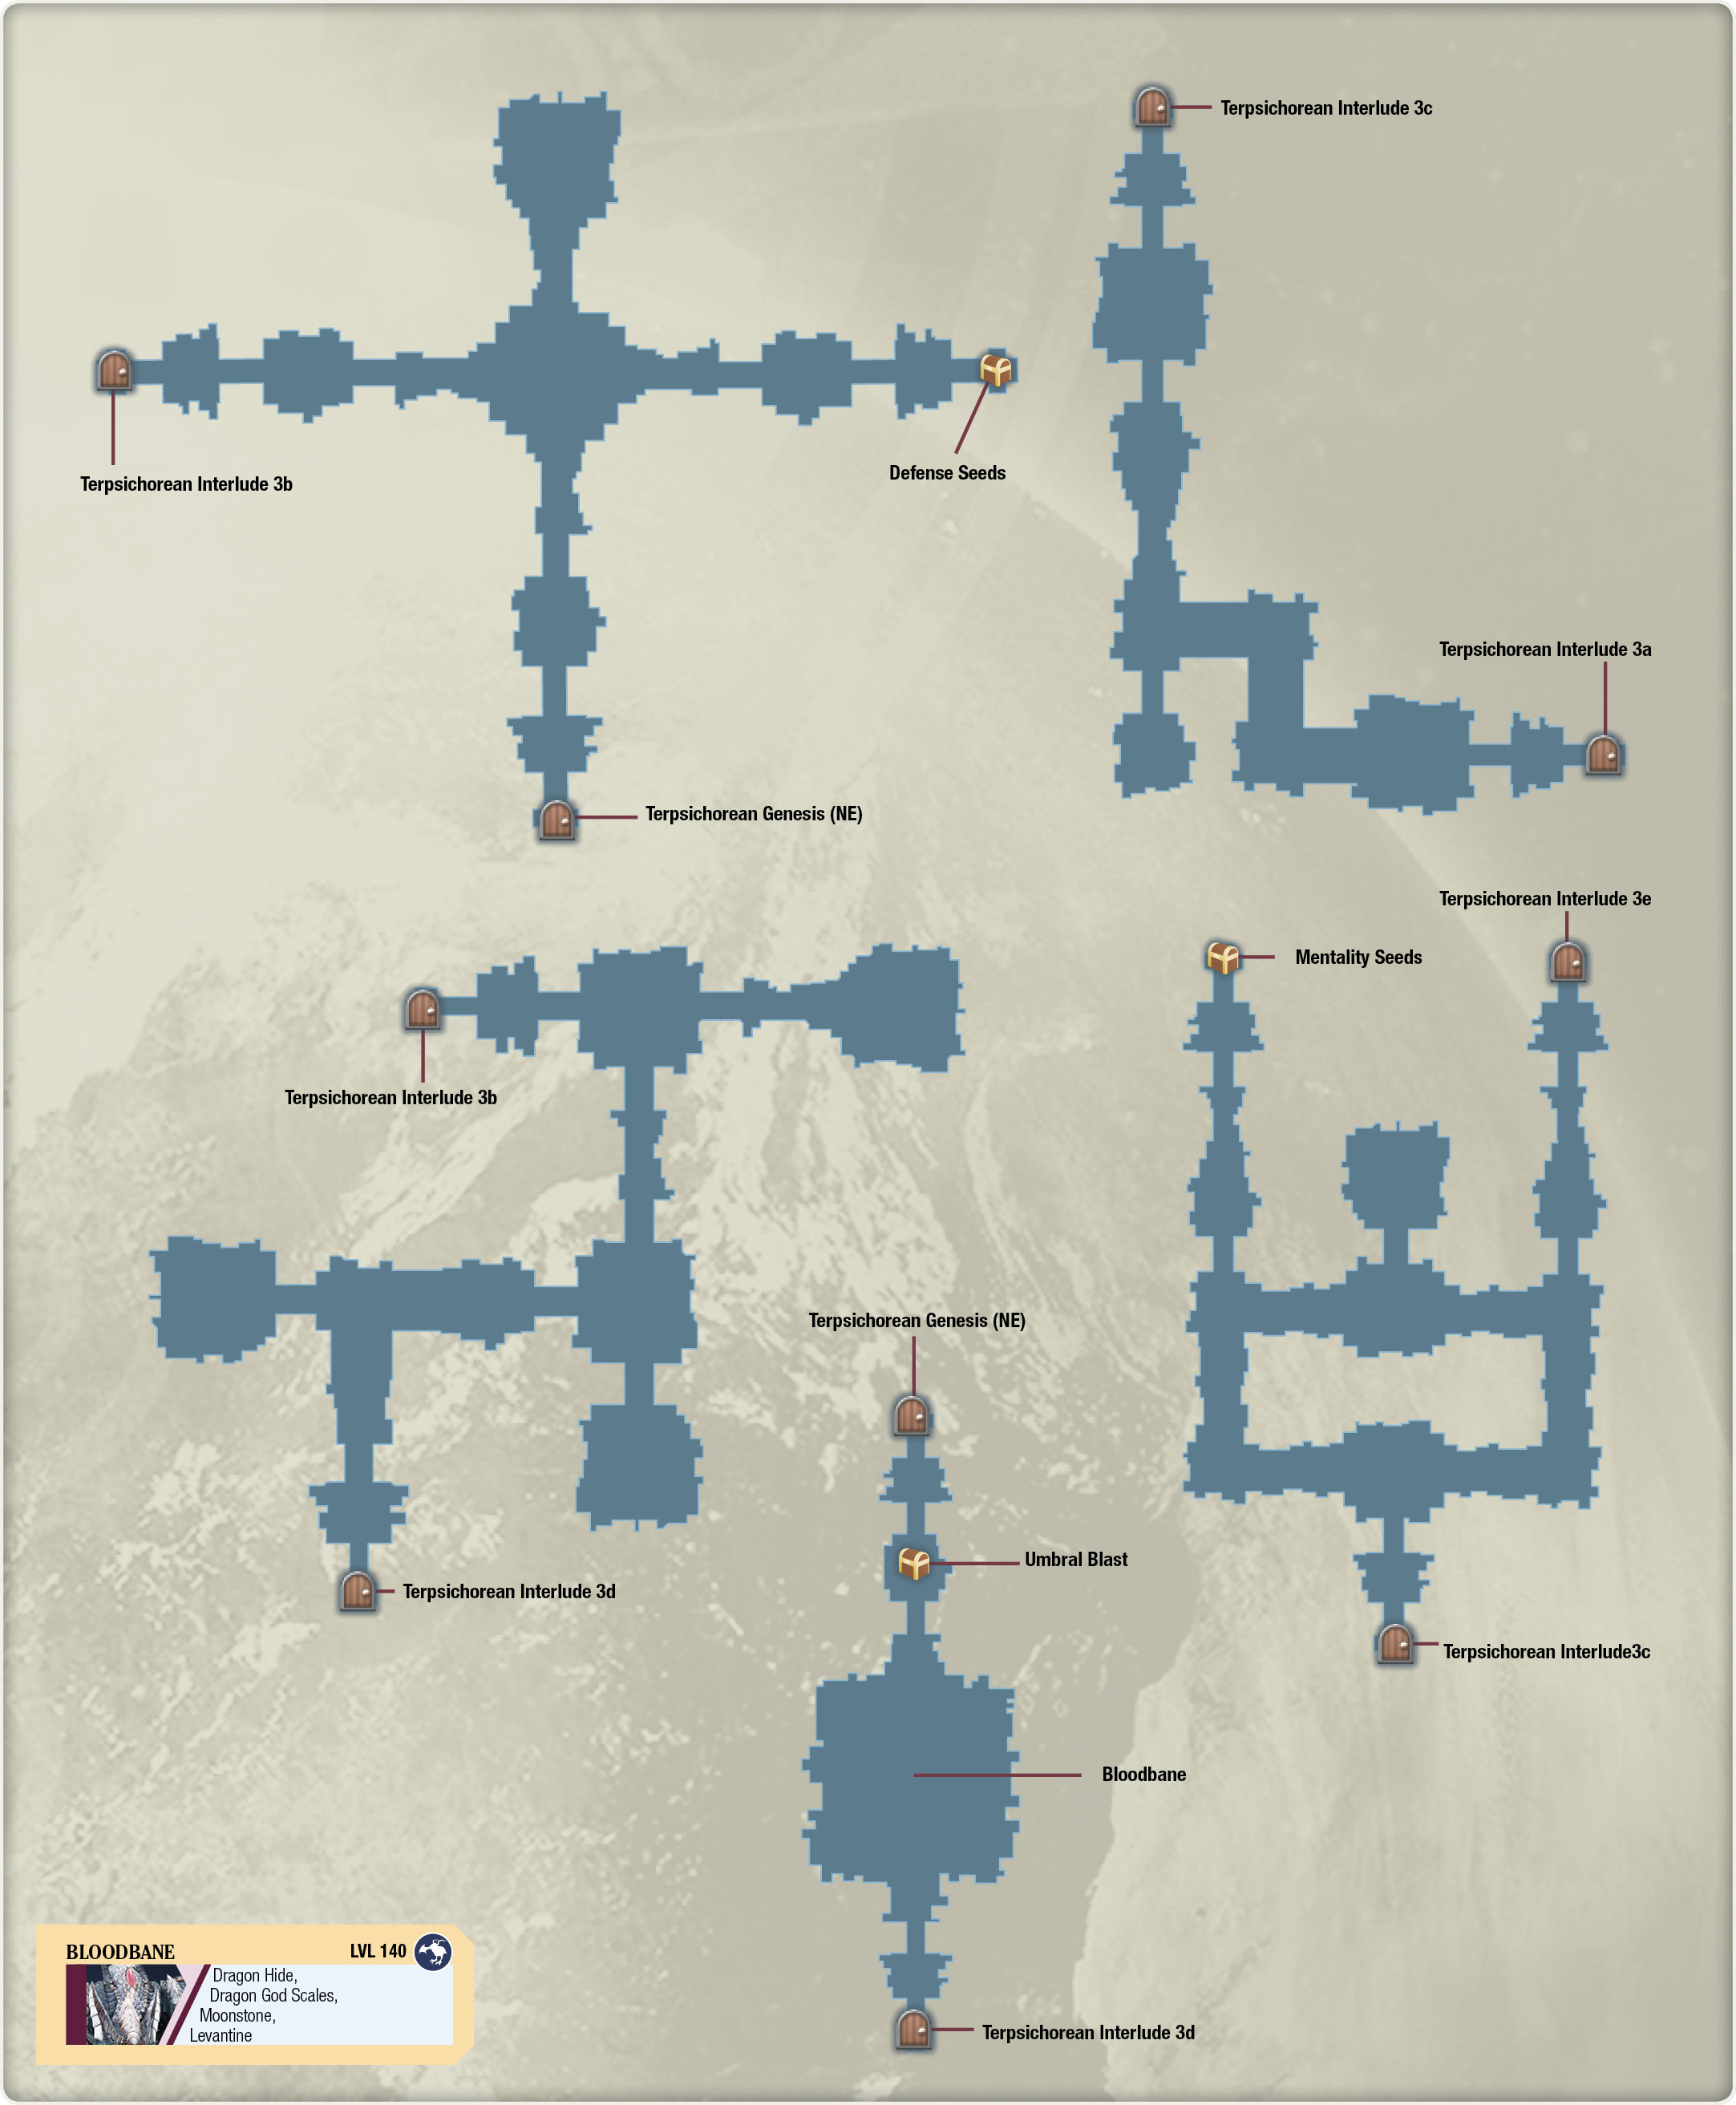
Another cross-shaped level here, with Defense Seeds in a chest in a room at the end of the east path. Pick them up, and then head in the opposite direction to the room at the west to get to the next level. On the second level, run west and follow the bends until you get to a split. Turn right, heading north, to get to the third level. From the starting point here, make a right heading south, then take another right through a door when you can. While heading west, there will be a room to the left, heading south, with a transporter taking you to the fourth level. The fourth level is another familiar layout. There’s a chest in the farthest northwest room. Make a left from the starting point, then go all the way north along the western path. Pick up the Mentality Seeds in a chest here, then head to the other side of the level by making a left turn out of the chest room, going east. When you can go no farther, make a left, and then take the transport pad in a room at the end of the hallway to the boss arena.
Bloodbane
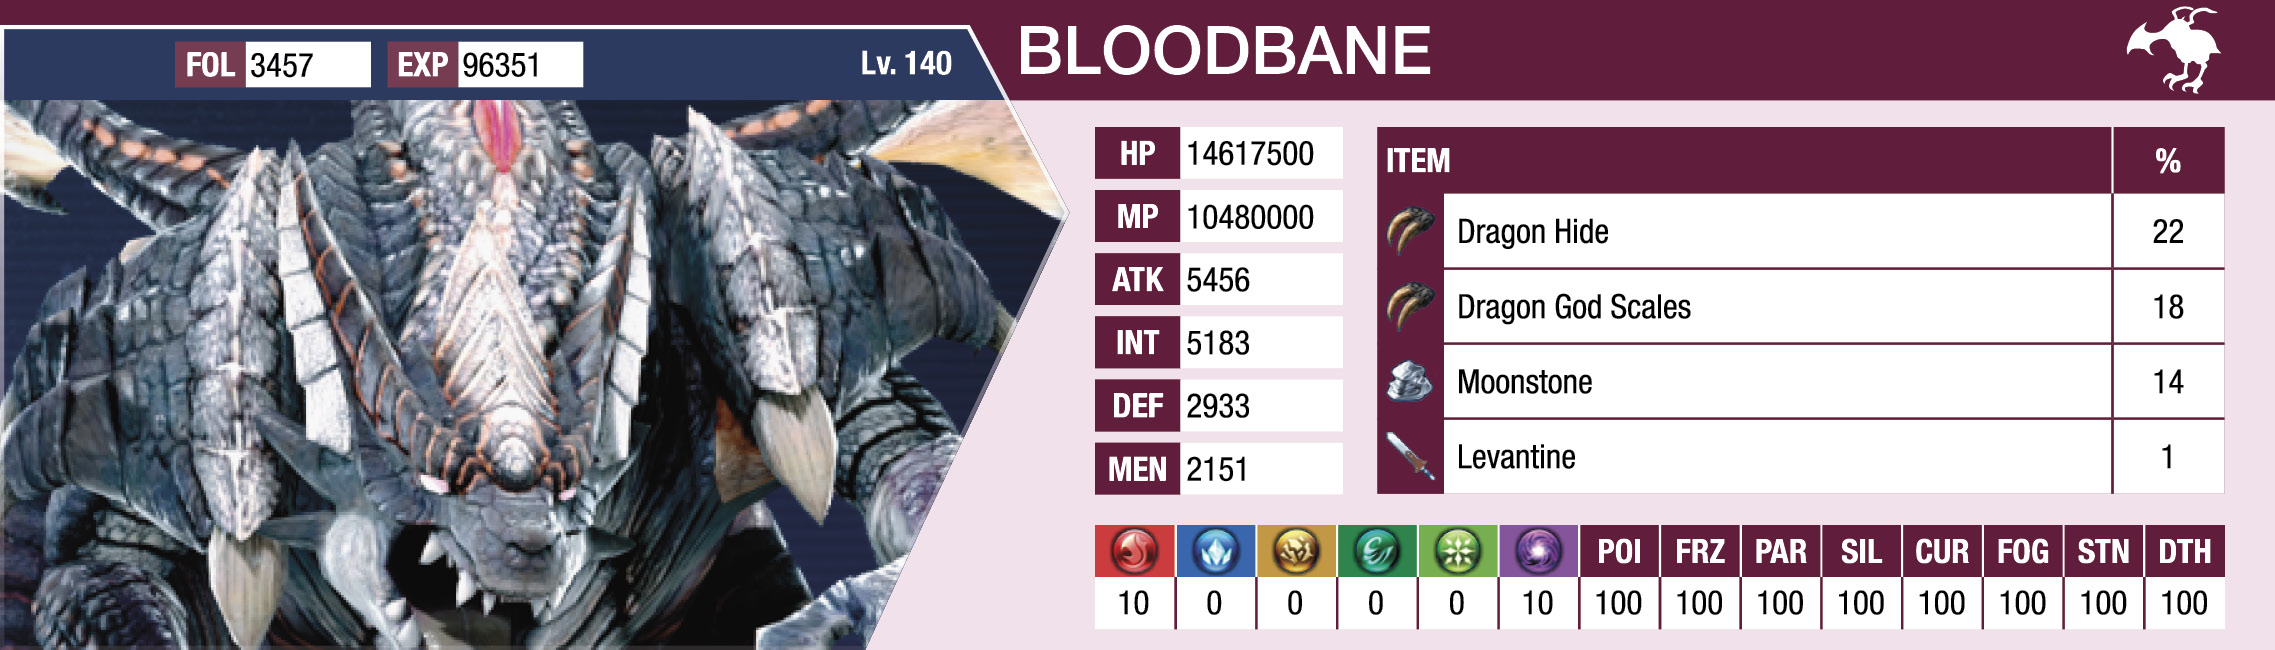
Bloodbane is an avian dark-based dragon with a tendency of casting spells like Vampiric Blade and Shadow Needles. This encounter is similar to that of the Bloodthirsty Fiend in that Bloodbane is fond of picking on random party members to attack. It will often run across the battlefield to attack one of the weaker back line members. Its main physical attack is a tail swipe that crushes guard and can knock its victim down. It’s completely survivable, but it’s recommended that you run your fragile party members away from it.
Most of the damage you’ll be doing will come from Emmerson, Fiore, and Anne (if she’s your designated Dead Man Walking). Bloodbane isn’t susceptible to any status effects, save for Daemon’s DEF and MEN down debuff, so have Emmerson’s roles built for damage, with either Attack Advocate or Critical Combatant roles set. Fiore can do well here by combo-casting Arctic Impact and Ice Needles while equipped with the Emissary of the Blue Sphere role. You’ll also want to have Fidel’s and Victor’s long-range battle sets include their ranged attacks since the dragon is rather mobile. Fidel or Emmerson can equip the Raven Slayer role to boost their damage significantly against the winged wyrm.

Occasionally, Bloodbane will cast Sacred Pain on one of your heroes, but this effect cannot be dispelled. However, Bloodbane’s damage output should still be manageable since its dark-based spells generally won’t kill a full-health character. Additionally, many of its attacks and spells can be guarded and countered, allowing you to build some Reserve Rush gauge. When you’re not busy running from it, you can burn down its health by stacking Anne’s combo ratio and unleashing a 200% Blazing Cannon combo.
When slain, Bloodbane has a chance of dropping Levantine, Fidel’s ultimate weapon. Unfortunately, it’s only a chance at a drop, so if you’re unlucky, you may have to resort to reloading your save file to try again (or complete the entire maze to enter its second iteration). Alternatively, you can try to synthesize if you have a Moonstone (50 quality metal-based synthesis). You can increase the drop chance by having the Ornithology specialty leveled up fully (you should have everything SP-related maxed at this point). The chest north of the arena contains an Umbral Blast phaser weapon. Equip it on Emmerson if it’s better than what he’s currently using, then proceed back to the lobby.
Terpsichorean Interlude IV
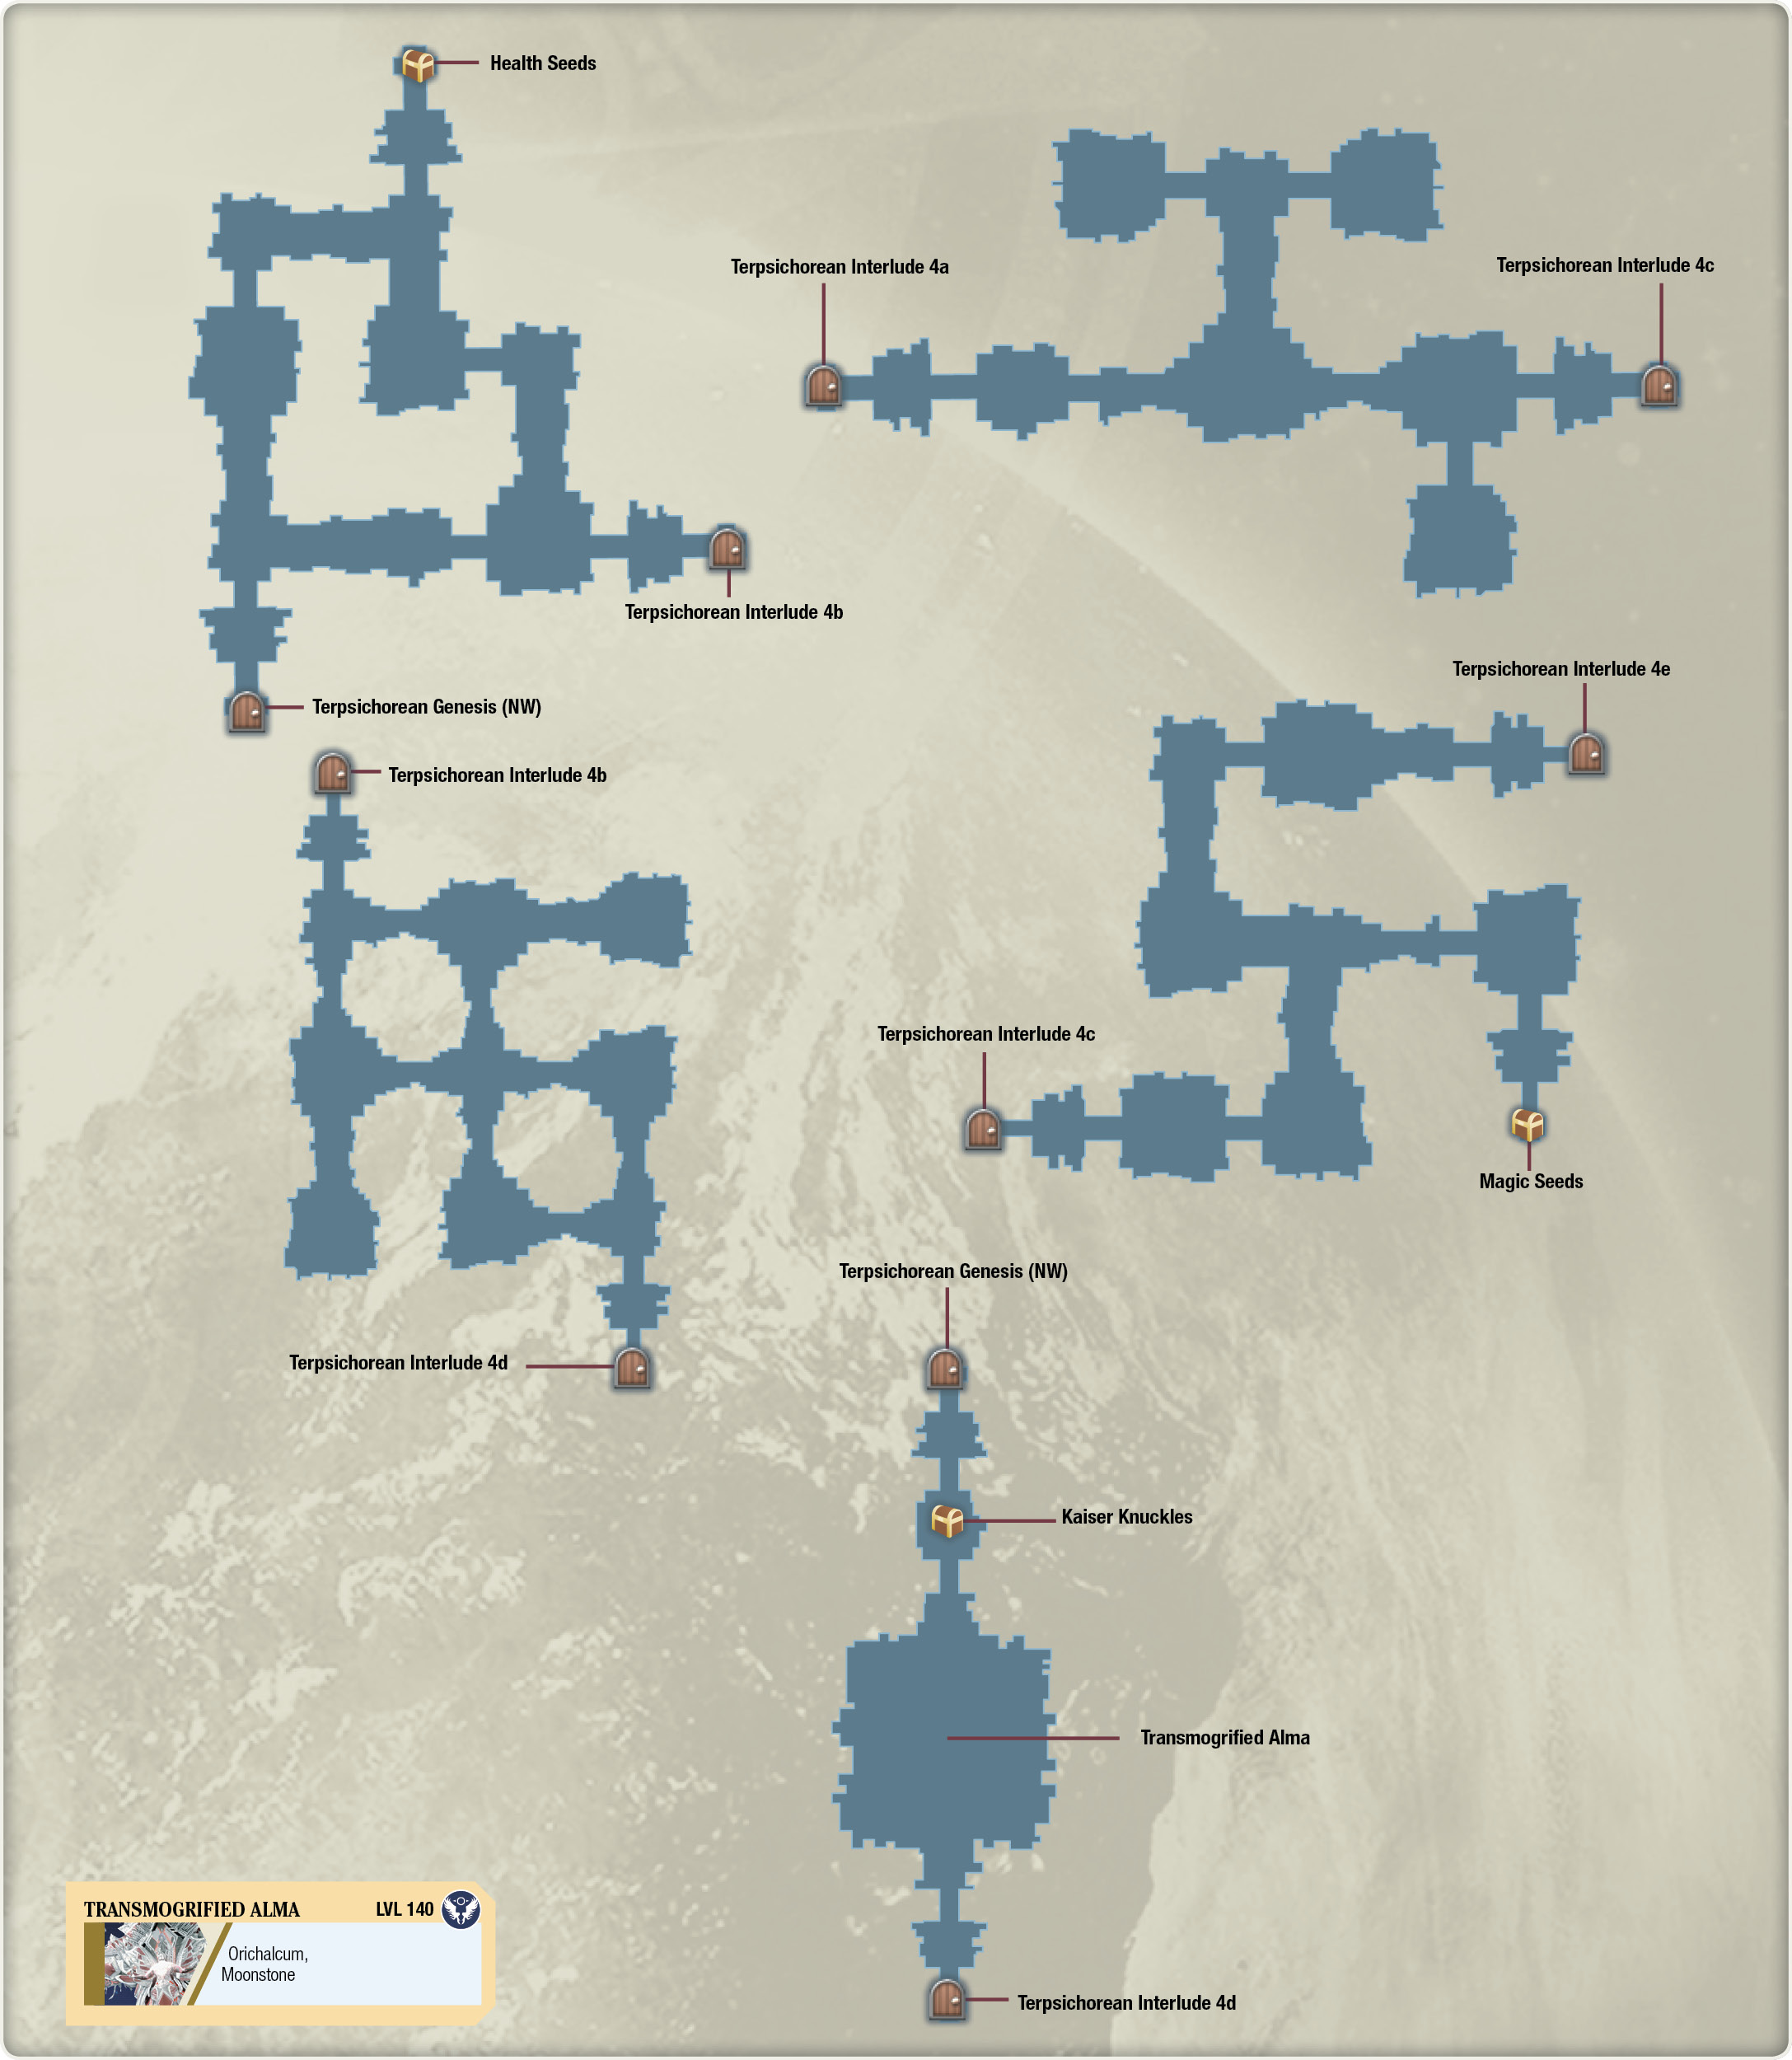
Go straight north from your starting position, and then follow the bend to the right, heading east. Keep going until you hit a fork, and take a left into a room with a chest containing some Health Seeds. Turn around and keep running along a path heading southeast until you come across a divergence. Take a left turn here into a room with a transport pad to the second level. From here, if you run all the way east, you’ll find a transporter to the third level. There are enemies in the other rooms if you need to grind out some EXP for the upcoming boss battle. On the third level, you can get to the exit by heading south, making a left, then your first right, then left, and then right again, taking you to the southeastern area of the map. Go into the room to the south to get to the fourth level. Now, head east here until the trail forces you north. At the fork, if you make a right turn, there’s a chest holding Magic Seeds at the end of the east path. Grab it, and then go back and take the western path instead, eventually leading you to a transport pad in the northeastern section of the level. Now, get ready to face off with General Alma for the third time!
Transmogrified Alma
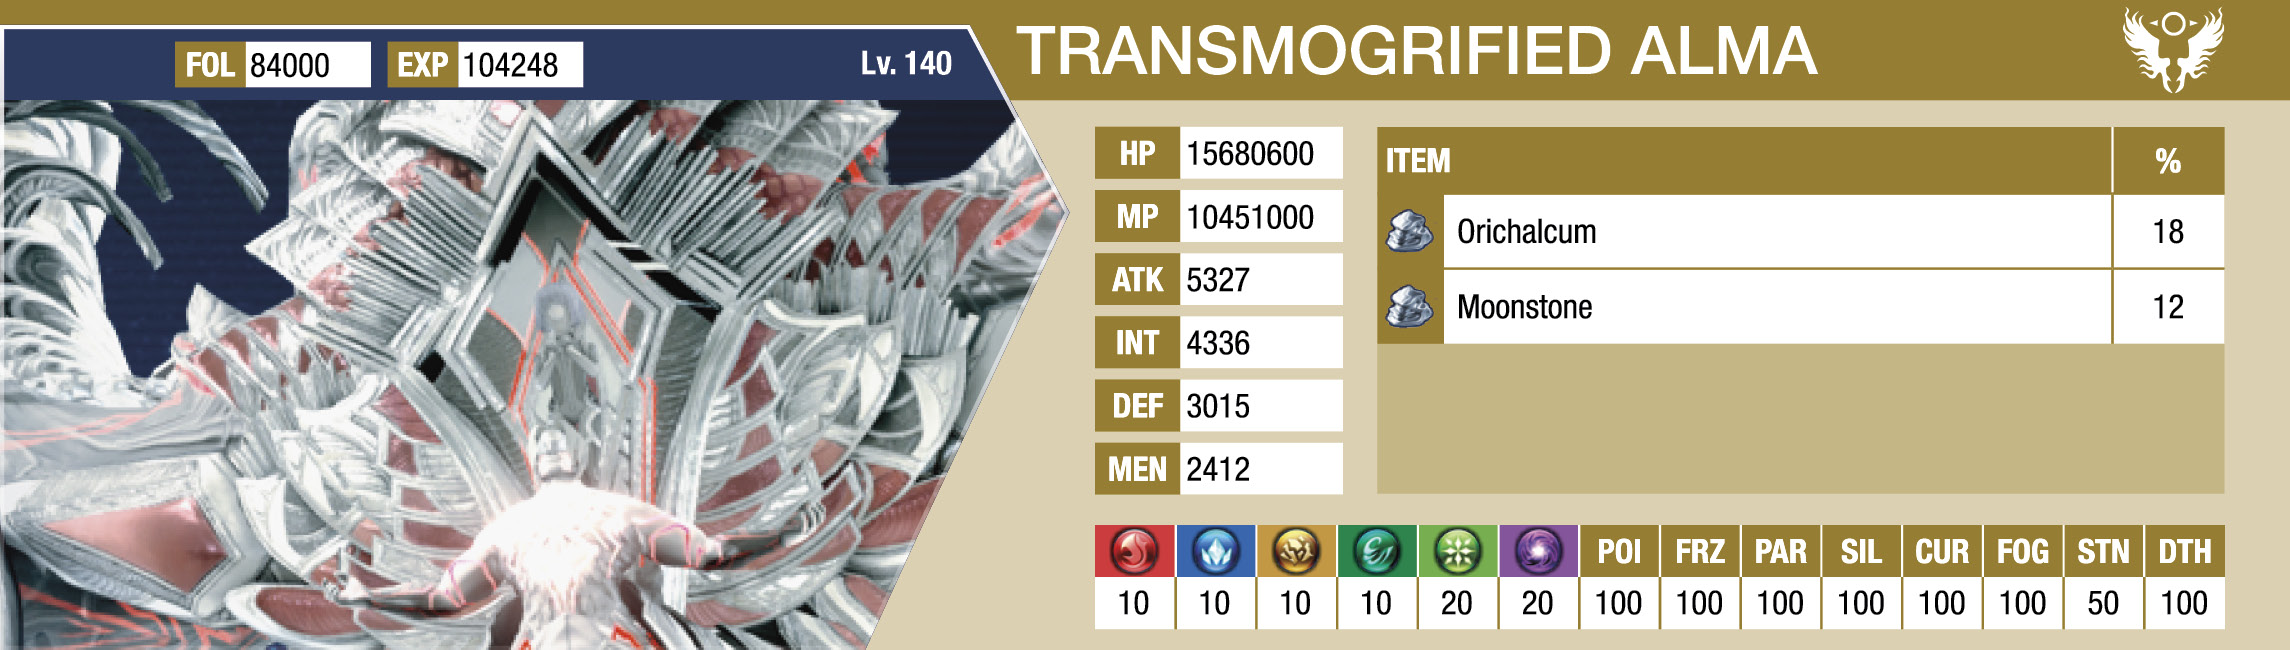
Your third encounter with the Kronos rebel is a bit different than the first two. General Alma and Feria have now been strongly fused together, resulting in a monstrous divine being. Transmogrified Alma retains a few of his human abilities, such as Bosom Blow. He has relatively high ATK and DEF ratings, so you’ll want to have Grilled Steak, Sukiyaki, or Pasta Bolognese here for your choice of food.

For your roles and battle skills setups, you’ll want to go with tried-and-true defensive builds on both Fidel and Victor. Equip Fidel with the God Slayer role and a Reflecting Plate to drastically reduce the damage done to him. For his battle set, equip Air Raid and Mirror Blade. Alma has strong light and dark resistances, so Fiore should be built to deal either wind or ice damage. Arctic Impact and Ice Needles coupled with the Emissary of the Blue Sphere role is effective here. With the Dead Man Walking setup, Anne should be fine because taking 0 damage also nullifies any potential status effects. Emmerson can be on stunning duty, with Stun Supporter, Interceptor, and Daemon roles to effectively keep the abomination dazed and debuffed.
The general has several debilitating ailment-inflicting attacks. Seraphic Rebuke features several projectiles that shoot out and travel around the battlefield, dealing moderate damage and potentially inflicting silence on your members. Alma has access to a combination attack called Baleful Winds. He lunges forward with several lashes, inflicting high damage in a large area in front of him while potentially inflicting fog, freeze, and silence status ailments. Remedy these ailments quickly. While he’ll often target non-melee characters with it, his travel speed is quite slow, making it a bit easier to escape from if you’re attentive.

The general likes to use a physical drilling attack to damage your close-range fighters and break their guard. Ogrefall is a high-damage slam into the ground, followed by a spinning area-of-effect attack. You can avoid it if you move out of the way fast enough.

Feria will arm Alma with powerful signeturgical abilities, telegraphed by four symbols gradually forming in front of Alma’s body. One of these abilities is called Acceleration. Similar to Relia’s time freeze ability, it briefly slows down all of your party members. Another one to look out for is called Aggravation, which lowers all elemental resistances on your entire party. It’s incurable, but it’s manageable for the most part as long as you’re able to heal up efficiently. It’s possible to break these symbols through high-damage skills so that Alma can never cast these ultimate abilities.

If you don’t defeat him quickly, Alma gain access to an ability called Initialization, the last of his symbol-fueled attacks. Initialization itself doesn’t do anything at first except warn you of incoming disaster. After a period of time, though, he’ll unleash a finishing move called Annihilation, a massively destructive area-of-effect with a radius of about half of the battlefield. It will kill any non-invincible characters within its vicinity, so you’ll need to either have your vital healer outside of its detonation or destroy Alma before he can activate it. An effective strategy is to go all out on him while he’s stunned by Emmerson’s normal attacks, so burn your Reserve Rush gauge efficiently at the end of your combo chains before Alma can unleash Annihilation.
Other abilities he’ll have access to during the battle are Angel Feather (which can be dispelled with Fiore’s Void), Deflagration (moderate-damage projectiles), and Healing (heals for about 25% of his total HP).
Once you’ve vanquished the general for the third time, there’s a pair of Kaiser Knuckles awaiting in the room to the north. These knuckles made of Orichalcum come with a nice ATK+5% bonus for Anne. Equip them, and head back out to the Terpsichorean Genesis lobby.
Terpsichorean Denouement
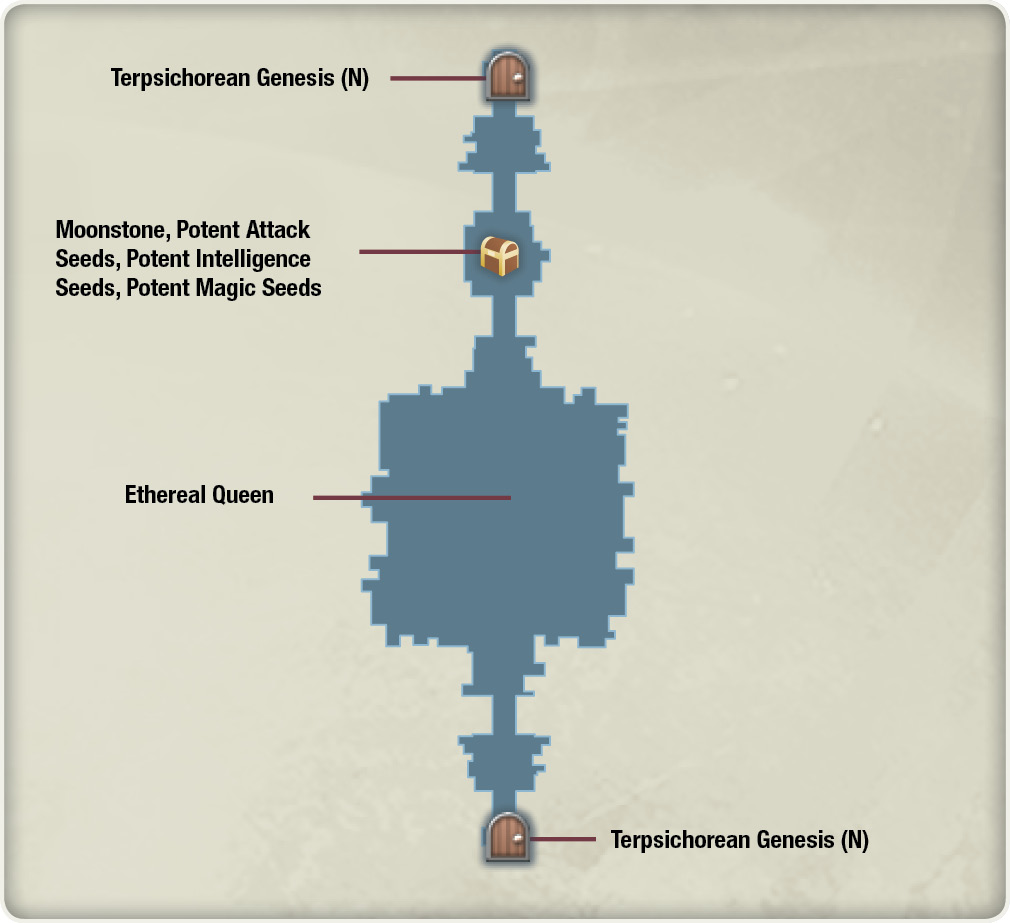
Now that you’ve defeated the four subarea bosses, prepare for the final challenge with the Ethereal Queen! Save your game now if you haven’t done so already, and head to the north part of Terpsichorean Genesis to face the queen of the maze.