
Star Ocean: Integrity and Faithlessness Guide Part IV: The Maze of Tribulations
Chasm of Repose
Chasm of Repose
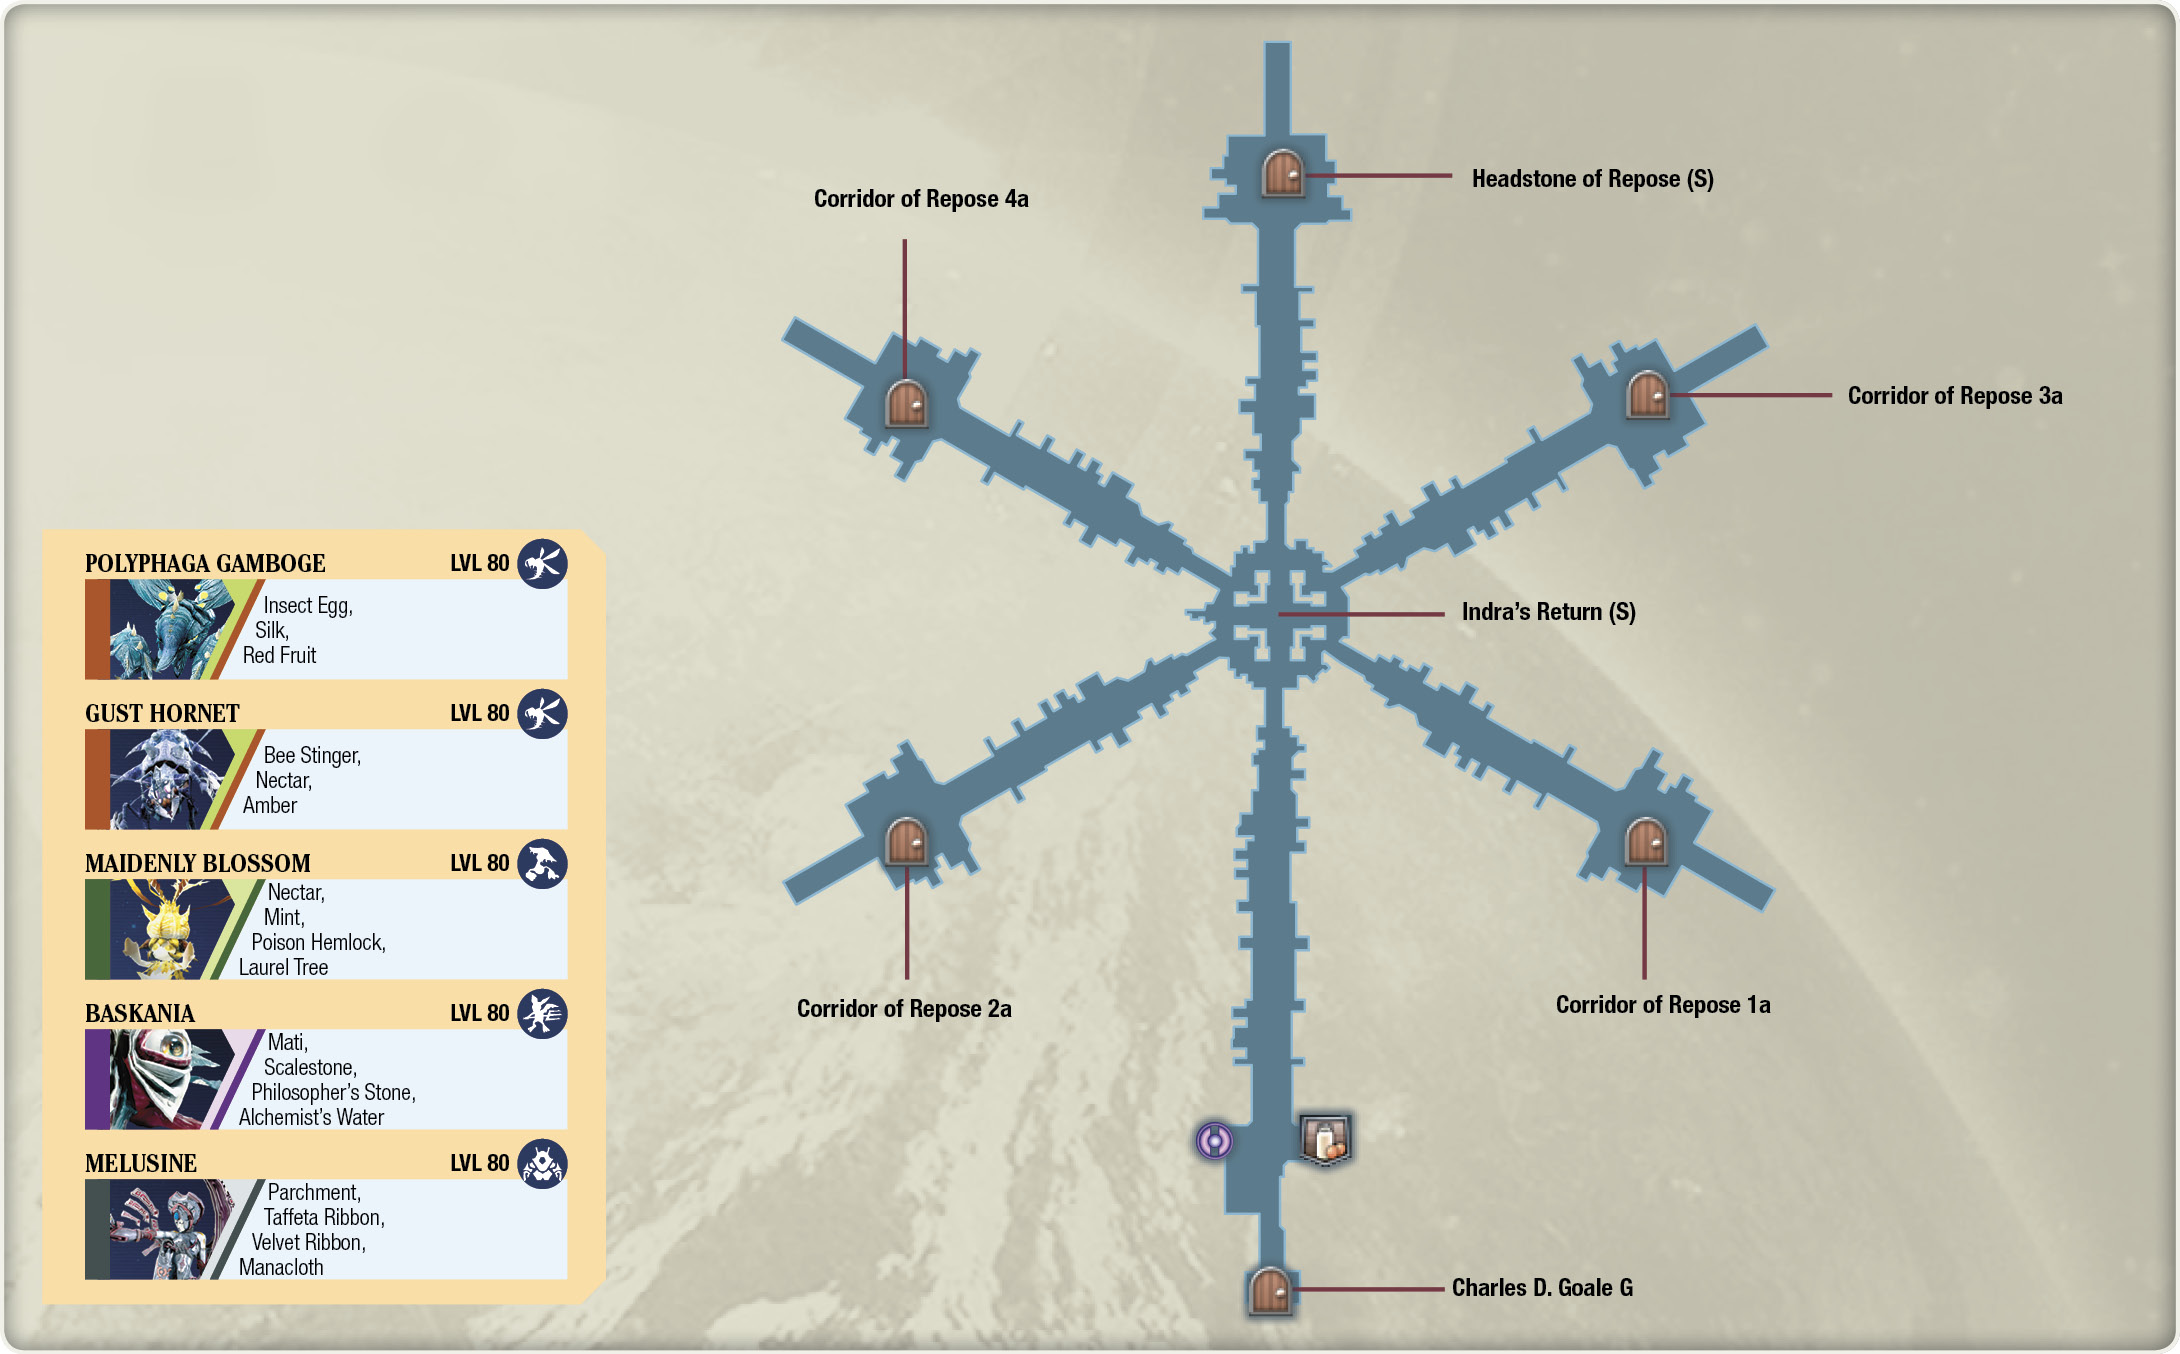
When you enter the Maze of Tribulations from your starship, you’ll start in the Chasm of Repose, which serves as the lobby connecting to the five areas you’ll need to complete before gaining access to the next floor. The southeast path takes you to a transporter to the Corridor of Repose I, the southwest path to the Corridor of Repose II, the northeast path to the Corridor of Repose III, and the northwest path to the Corridor of Repose IV. When you’ve defeated the bosses in these four rooms, the north path’s transporter unlocks, allowing you to face off with the floor’s gatekeeper. This pattern is consistent for the subsequent floors, and you can complete the first four areas in any order you want. The enemies you encounter in each area of the floor are generally the same, save the bosses.
Corridor of Repose I
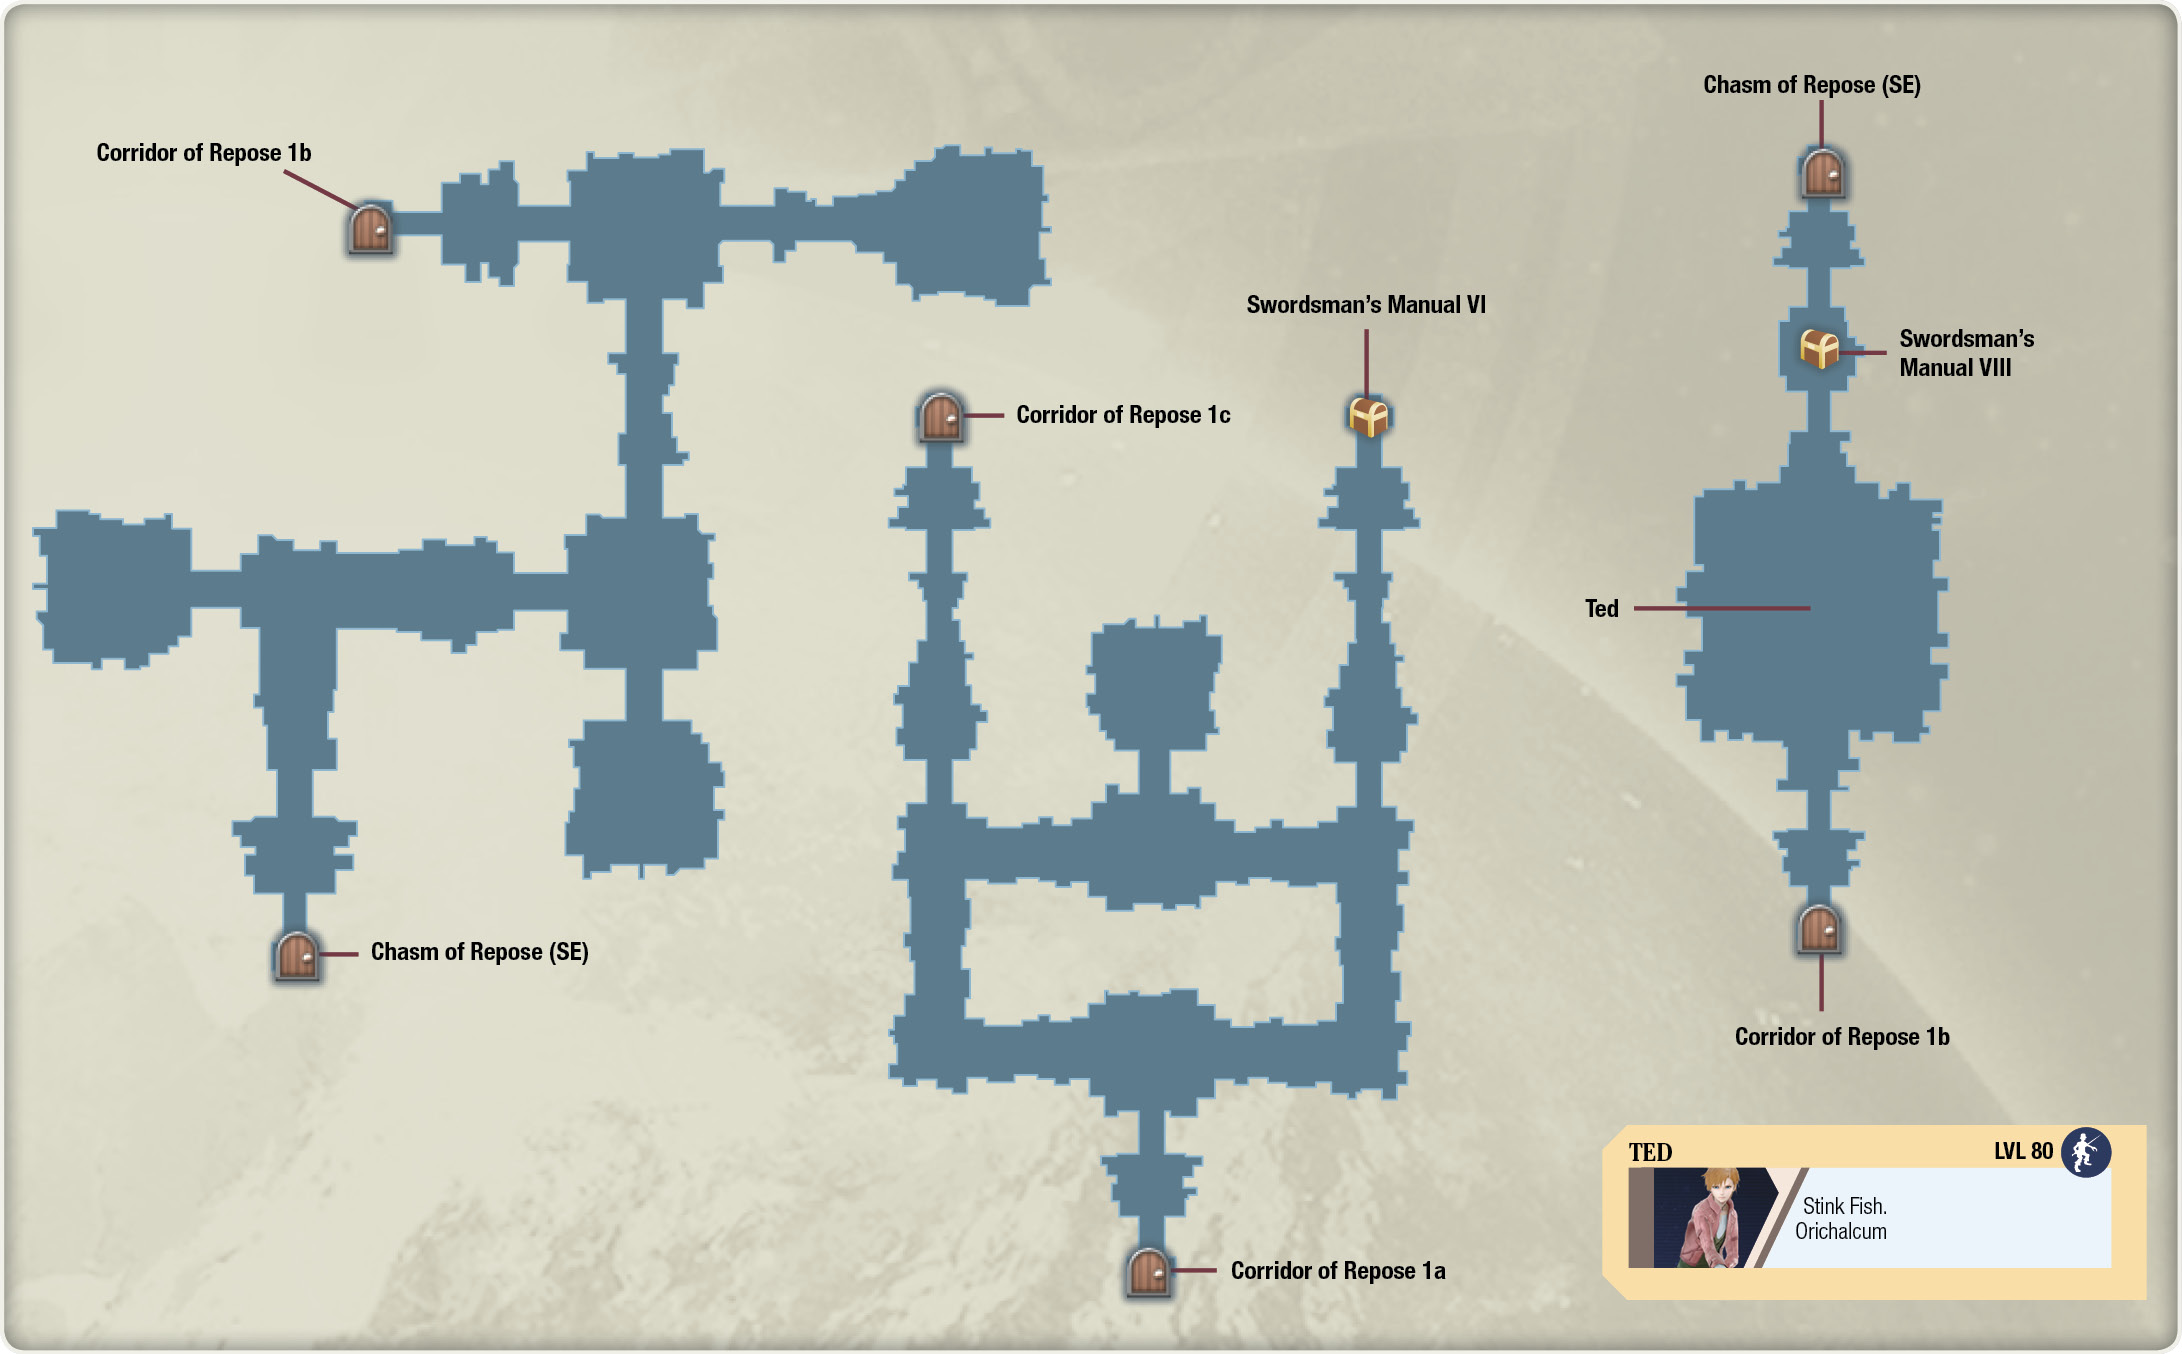
Head north and then east from your current position, and fight any enemies along the way, especially if it’s your first foray into the dungeon (you’re going to need all the EXP and SP you can get for the ultra-powerful bosses you’ll face soon). When you reach the fork, head north, and then go west to transport to the next level. From the start of the second level, if you make a right turn and book it to the northeast part of the level, you’ll find a chest containing a copy of Swordsman’s Manual VI. Pick it up, then head back out and take a right, going west until you come across a fork. Then, take the path north to jump to the boss level. Here, you’ll face off with none other than Ted. Hopefully, he’s just an evil copy of Fidel’s childhood buddy.
As Fidel’s training partner and fellow Sthalian, Ted has access to the same attack skills Fidel does. He’ll use everything ranging from Shotgun Blast to Mirror Blade, with Cyclone Blade being a particular nuisance. These are primarily melee skills, though, so Fiore and Emmerson will generally be safe from harm. Just make sure to keep your close-range fighters healed up throughout the fight. You can opt to guard and counter most of his attack skills, as well. After you total Ted, pick up the Swordsman’s Manual VIII from a chest in the room north of the arena, then take the transporter north of the chest back to the Chasm of Repose.
Corridor of Repose II
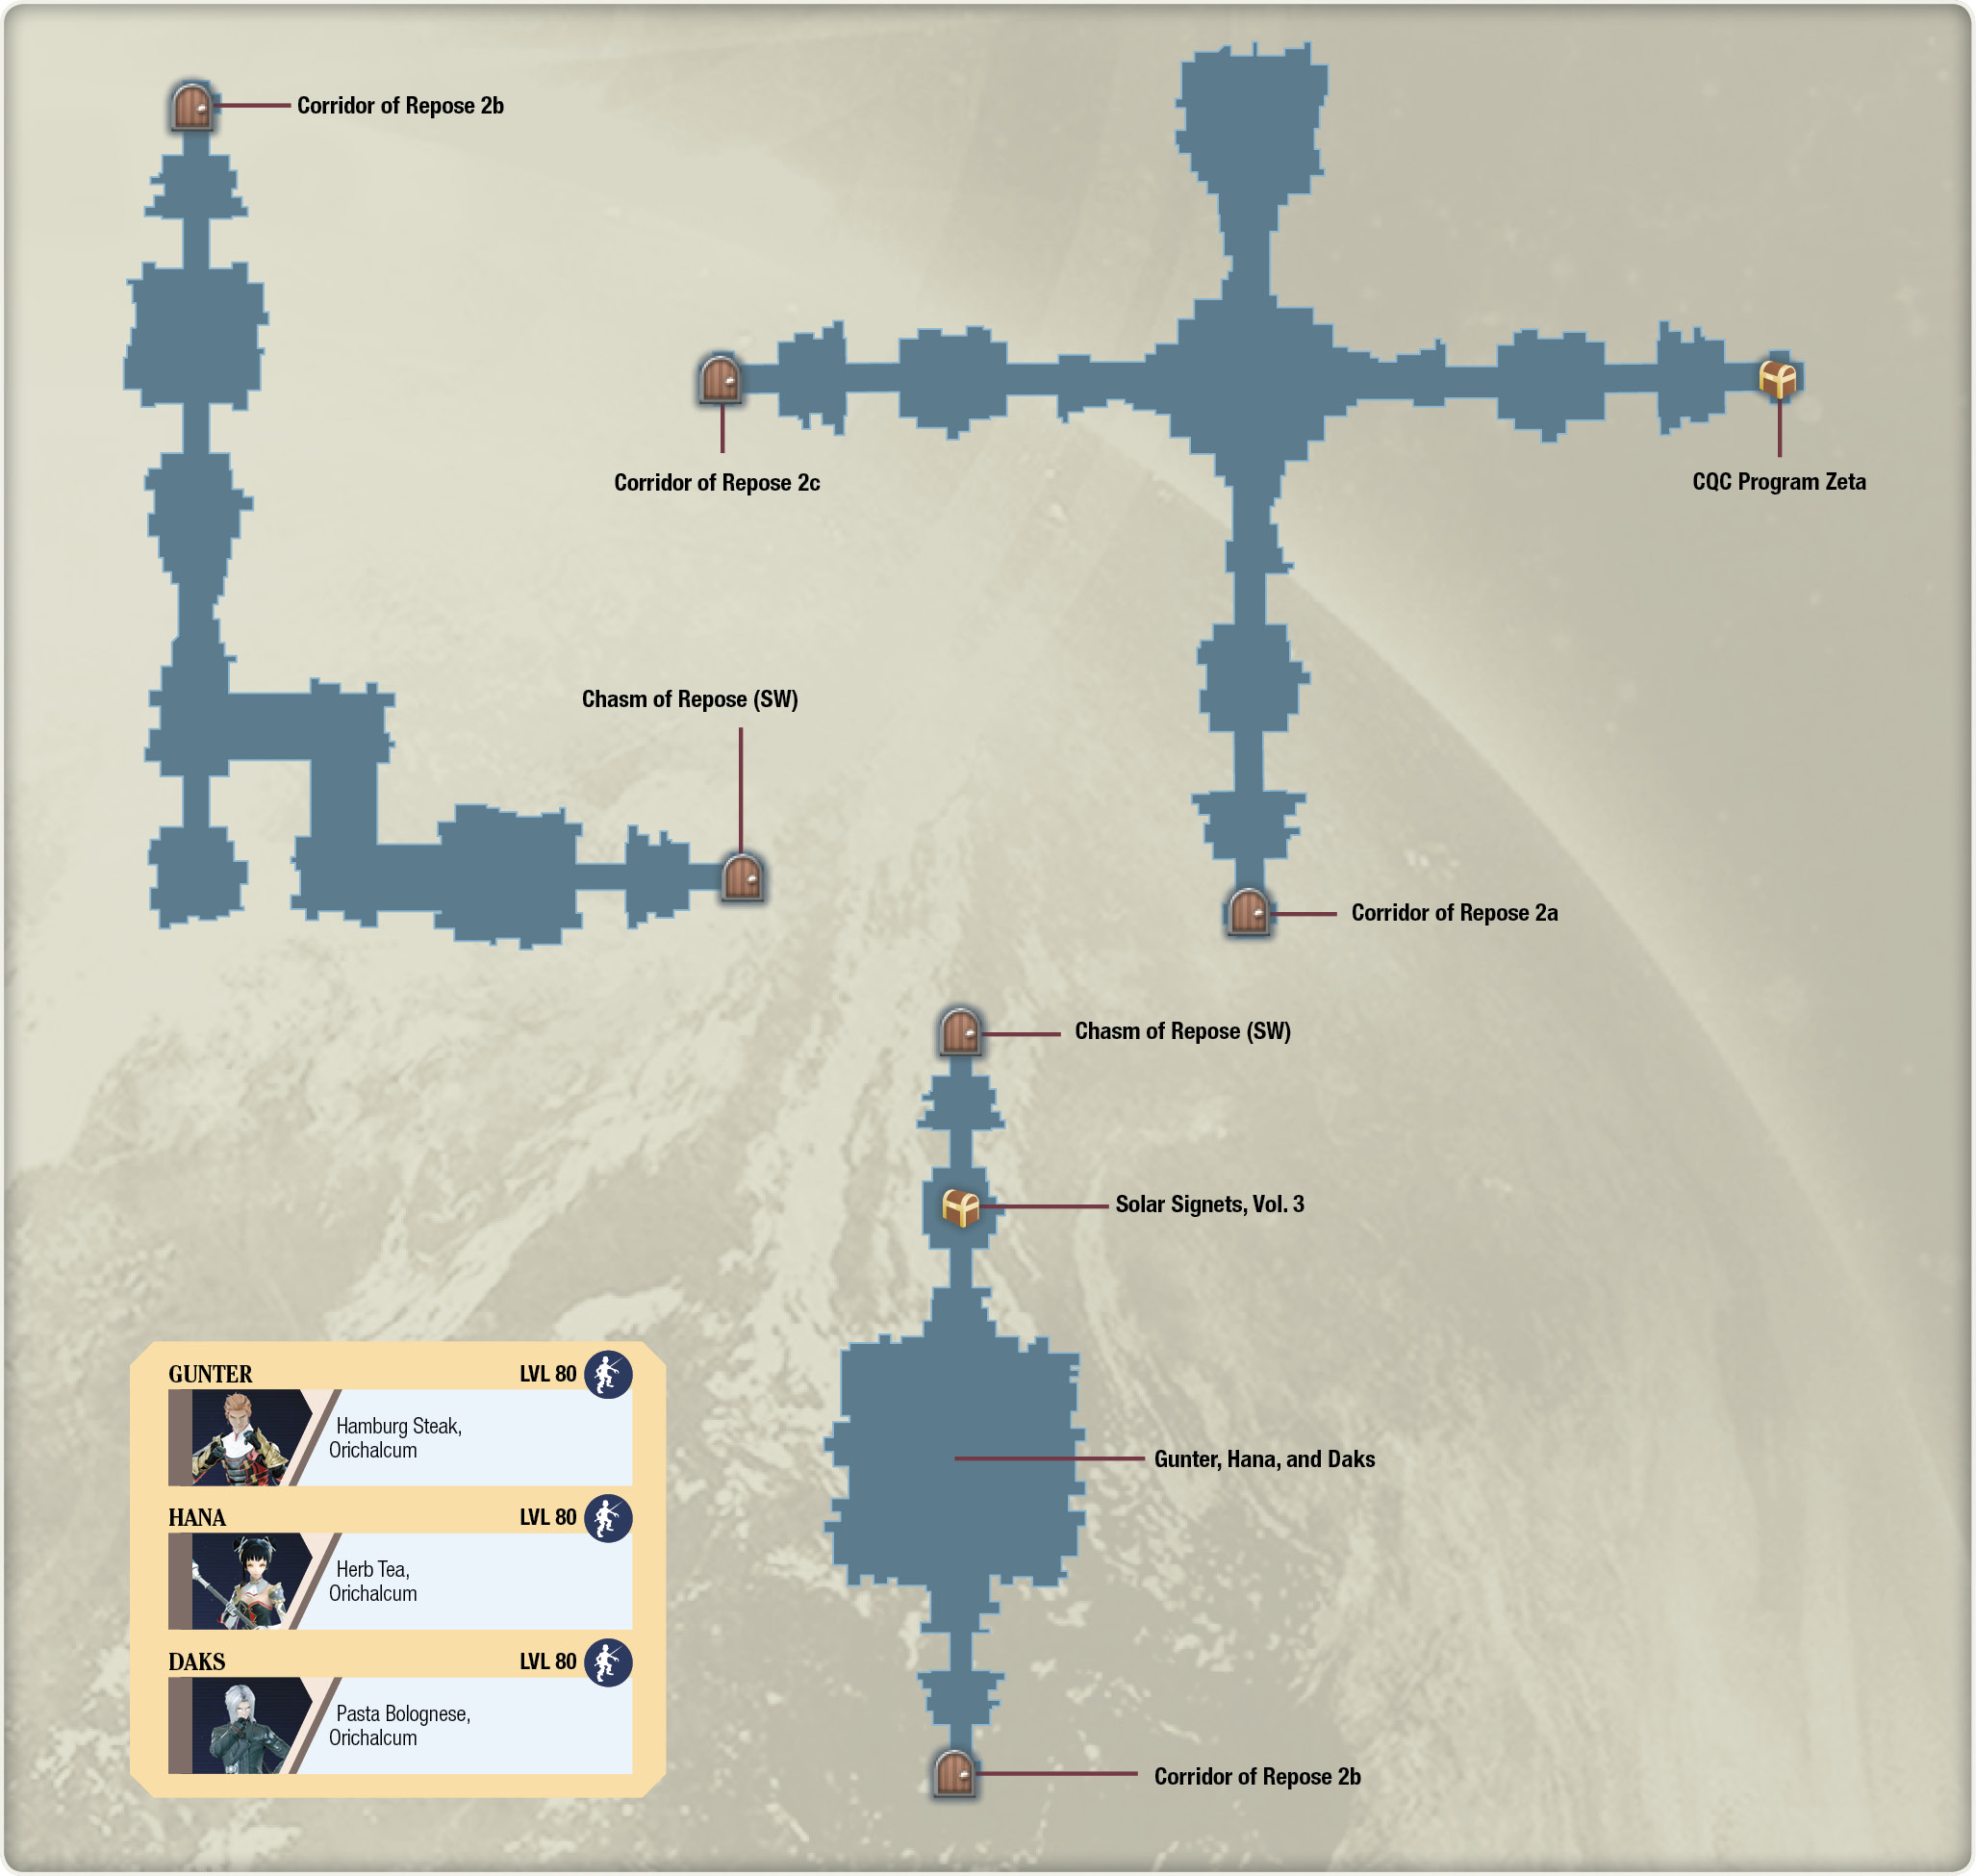
The first level here is relatively straightforward. Follow the path while battling monsters in your way until the path diverges. From there, make a right turn, going all the way north, where you can ascend to the next level. The second level’s layout is cross-shaped. There’s a chest containing a CQC Program Zeta disk in the easternmost room. Grab it and then turn around, heading due west to the opposite end of the level. Take the transporter to confront Victor’s posse, consisting of Gunter, Hana, and Daks in the boss arena.
This trio of the King’s Chosen makes a well-rounded party, with Hana being the supporting signeturge, Gunter the brawler, and Daks the crossbow-wielding sniper. Hana has the least HP out of all of them, and she can buff her allies’ stats with Angel Feather, so it’s wise to take her out first. If she’s successful in casting Angel Feather, make sure to dispel it from her benefactor with Fiore’s Void spell. Without their healer, you can take out the rest of the gang without worrying about enemy signeturgies. After you’ve defeated Victor’s subordinates, you’re rewarded with Solar Signets, Vol. 3 in the chest in the north room. Pick it up, then take the transporter back to the lobby.
Corridor of Repose III
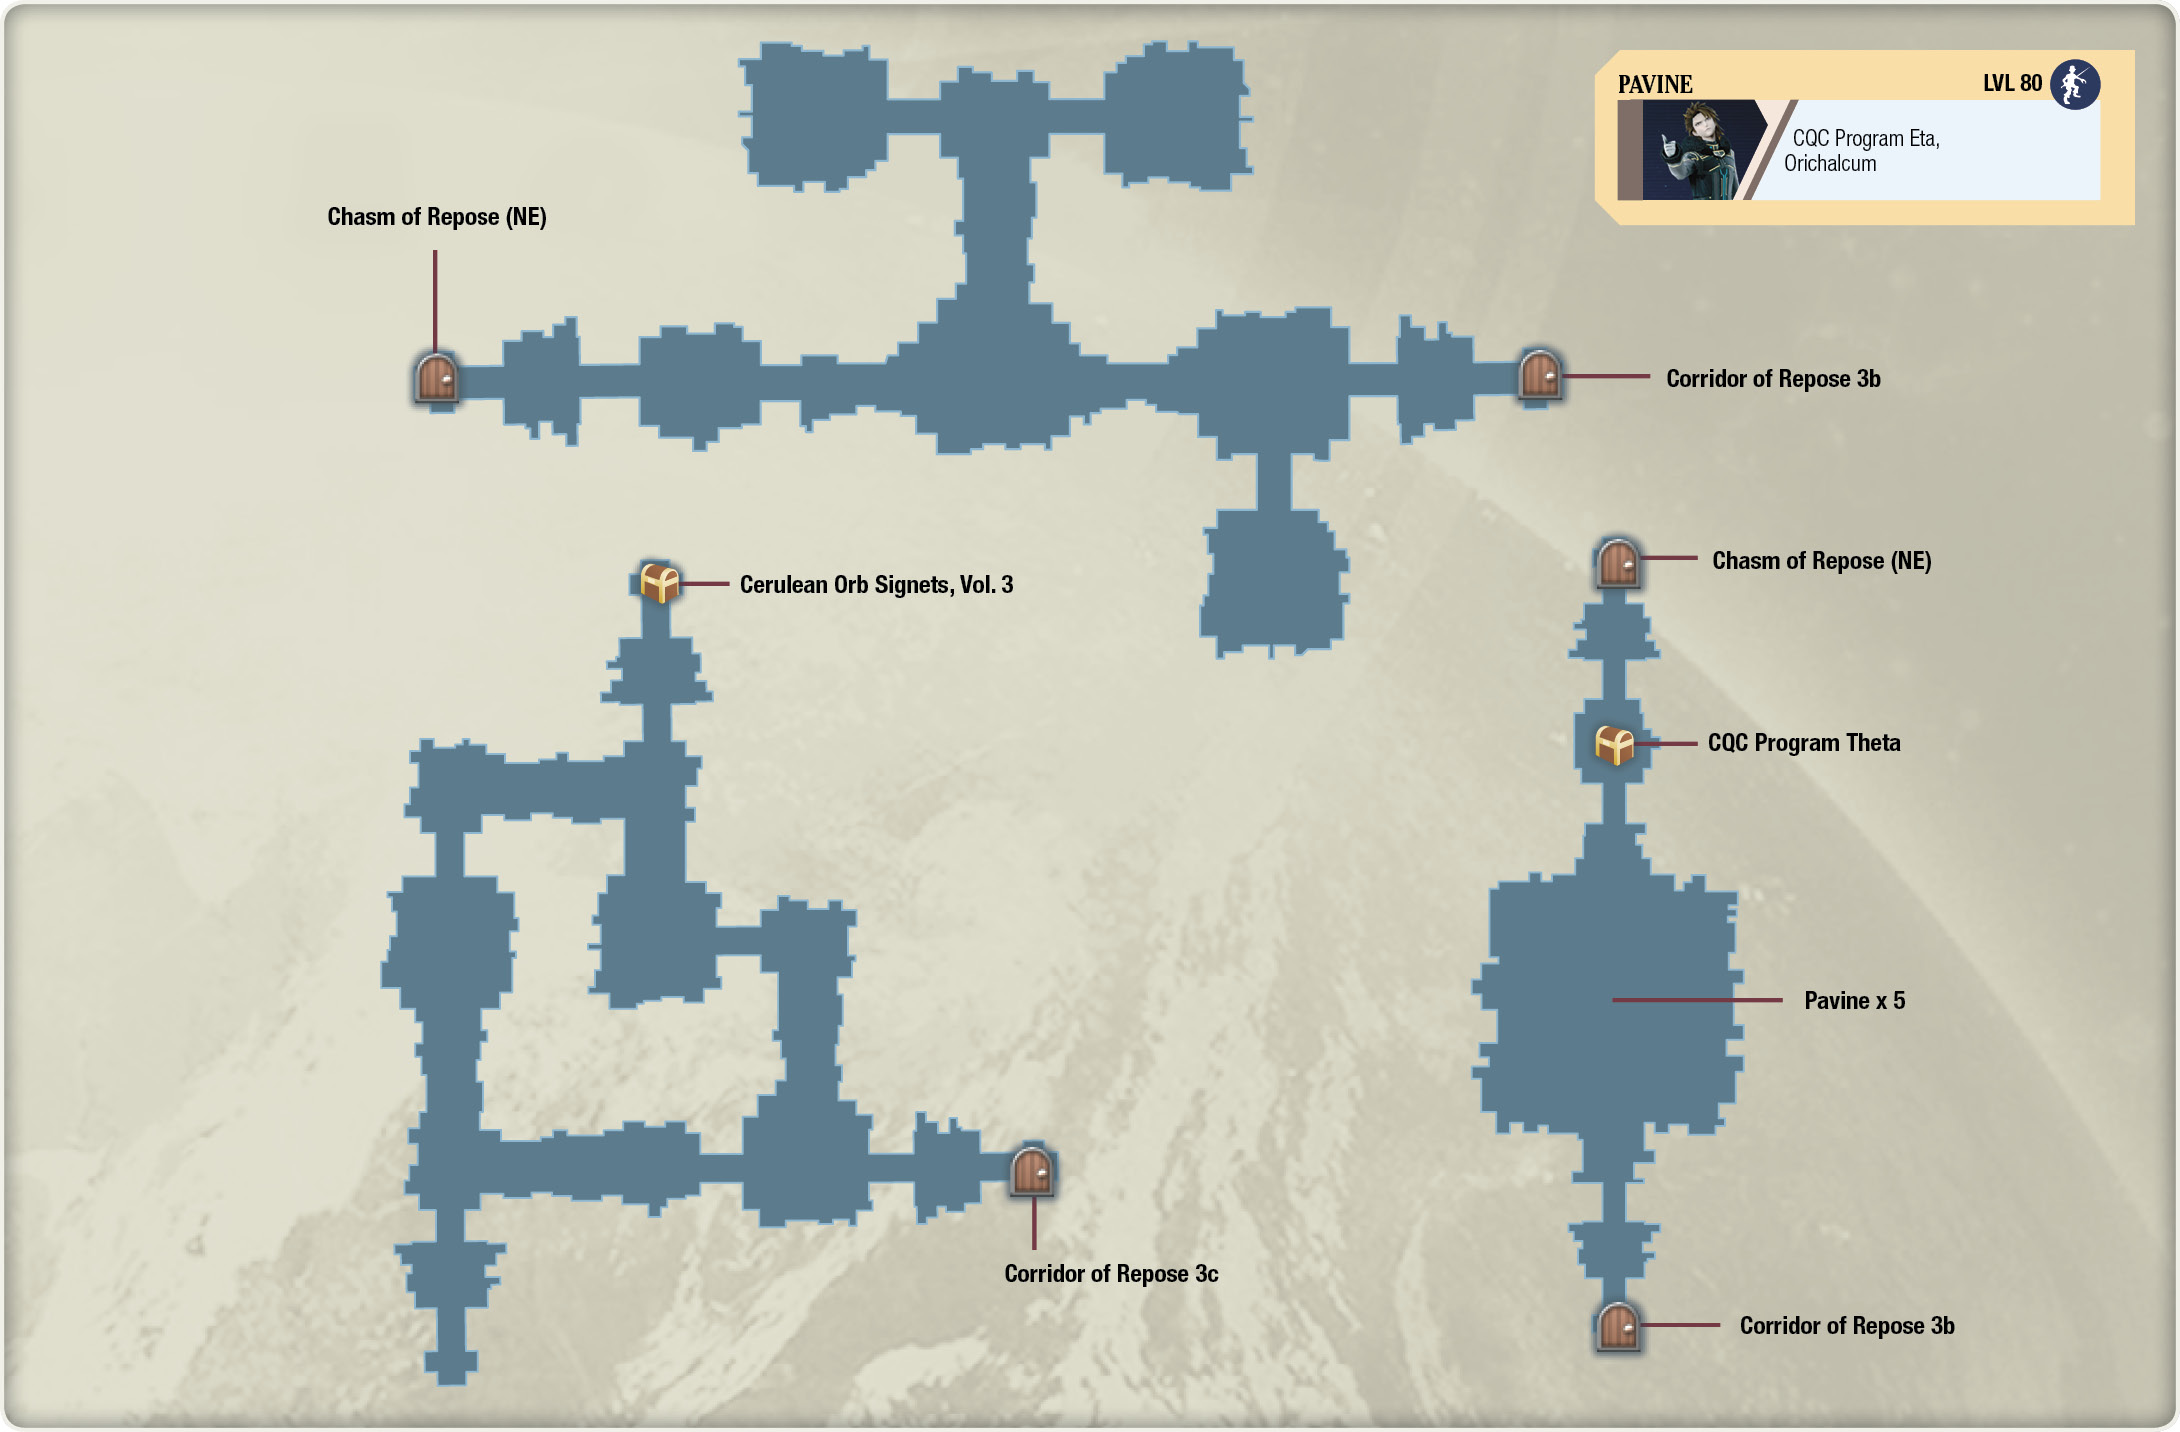
From the starting point here, you can simply go straight ahead to the room farthest east, taking you to the second level. There’s no chest here, so if you want to farm some EXP and SP, you can kill the monsters hanging out in the rooms to the north. Once you’re on the second level, run north until the path forces you to make a right. Keep going until you reach the fork, and then make a left to the room north, where you’ll find a chest containing a Cerulean Orb Signets, Vol. 3 book. Take the book, and then follow the path southward and around a corner. When the path splits, take a left to the transporter, bringing you to the next boss battle.
Pavine’s gunfire was annoying the first time you encountered him, but now, you have to deal with five of him. Try to keep Miki, Fiore, and Emmerson away from each other to minimize area-of-effect damage from Pavine’s Ignition X and Y skills. These explosions may also inflict a fog effect, so be sure to cast Miki’s Cure Condition or use a Jasmine curative on the afflicted. The Pavine foes can also cast a few signeturgical spells, like Wind Blade and Lightning Blast. Lightning Blast can inflict paralysis, so remedy it as soon you can. The fight can get hectic, with the quintuplets being able to transport around the room with their Redeployment skill while pestering your party with knockdown effects from Ignition Burst. An ideal strategy is to focus your party’s fire on a single Pavine by cycling through and controlling your characters in order to issue high-damage skills. You can also have one of your automatically controlled members focus on low-HP targets using the Executioner role. Alternatively, you can use Fidel’s Ethereal Blast Reserve Rush to deal a huge amount of damage to one or more of the Kronos officers.
Once you’ve culled the herd of Pavines, reap your reward of a CQC Program Theta disk in the chest north of the warzone. Then, proceed back to the Chasm of Repose.
Corridor of Repose IV
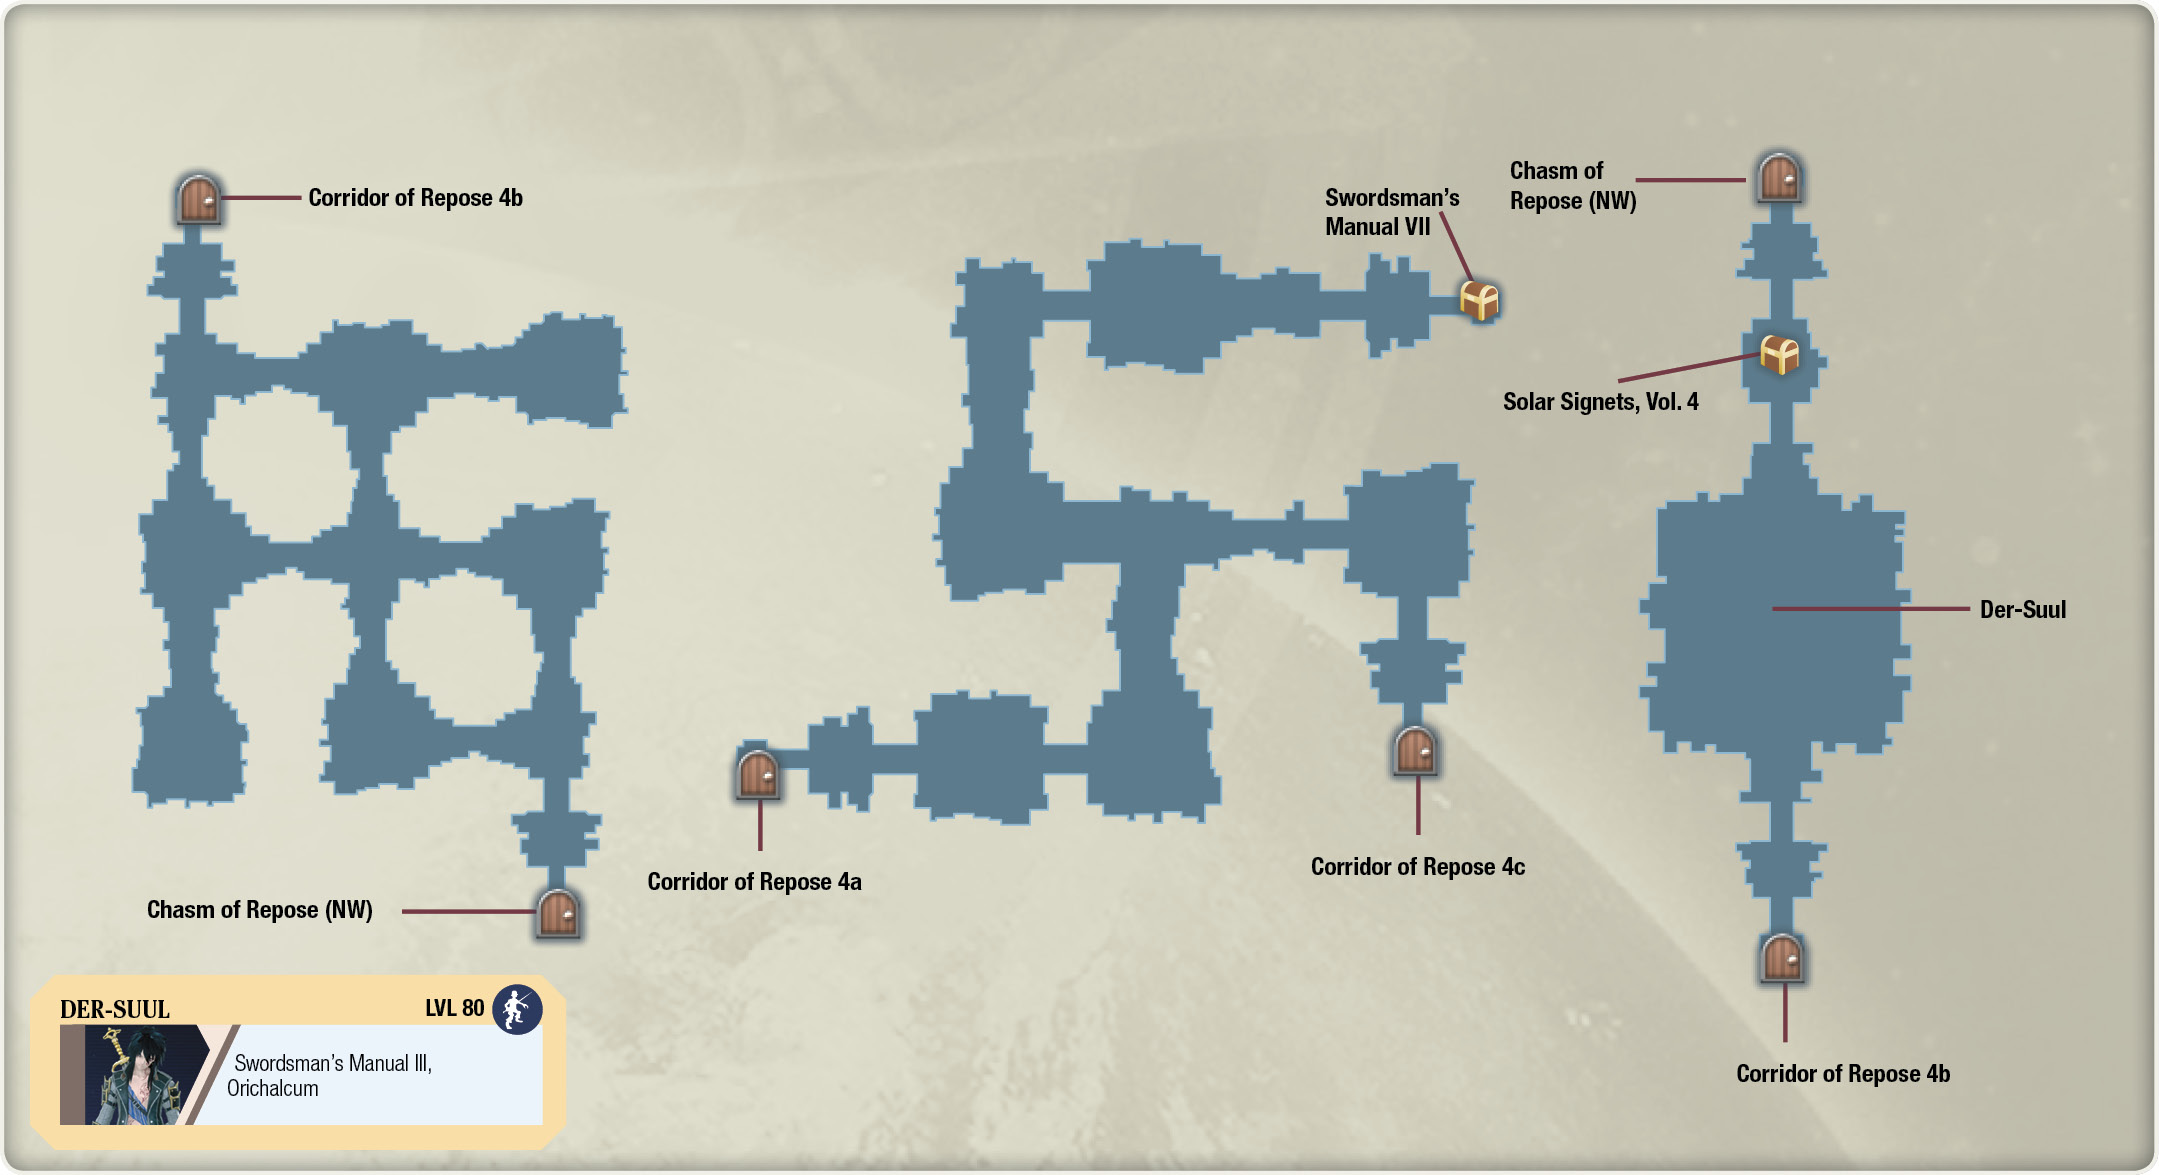
Head north, and either take the left turn or proceed straight ahead. These paths eventually converge at a crossroads. Keep going northwest from the intersection, where you’ll see a room to the north with the level two transporter in it. On the second level, the initial path takes you to a divergence. Take a left here and follow the path until you get to the chest, located northeast of the level. Pick up the Swordsman’s Manual VII book, and then make your way back to take the east path, leading you to the transporter to the fourth boss, Der-Suul.
Here, you get to avenge Fidel’s father for the second time. At first, Der-Suul seems like a pushover, merely swinging at your close-range party members with normal attacks. This is just the calm before the storm. When you’ve whittled his health down to 50%, he has an important lesson to teach you about positioning. At this point, he’ll gain access to his Spicule attack, where he super-jumps into the air and follows that up with a descending ground pound, causing a devastating inferno around him. This destructive physical attack will potentially instantly kill any nearby party members without high HP and DEF ratings. He doesn’t just do this once, either: this is practically the only thing he’ll do from now on. Have everyone but your most defensive melee members as far as possible before you burn his health down.

It’s recommended that you equip long-range signeturgical spells and attack skills on your damage-dealing characters. Also, make sure to manually move Miki as far as possible to raise and heal her friends when needed. Fiore can snipe at Der-Suul from virtually full battlefield distance with Wind Blade, Arctic Impact, or Thunder Flare (which helpfully lowers enemy ATK). Emmerson should have his long-range battle set assigned to Crescent Wings and Avian Rage, while Victor can make do with Dragon Roar and Flying Guillotine. Hopefully you’ve been putting SP into the Warrior Slayer role, which reduces damage done by humans by 50% at max level. Set this on either Fidel or Anne to help them survive the blast as they hack away at Der-Suul. Additionally, the Sharpshooter role can be equipped on Victor to encourage his AI to attack from range. After you defeat the Trei’kuran general, head north to the transporter back to the Chasm of Repose, picking up a copy of Solar Signets, Vol. 4 along the way.
Headstone of Repose
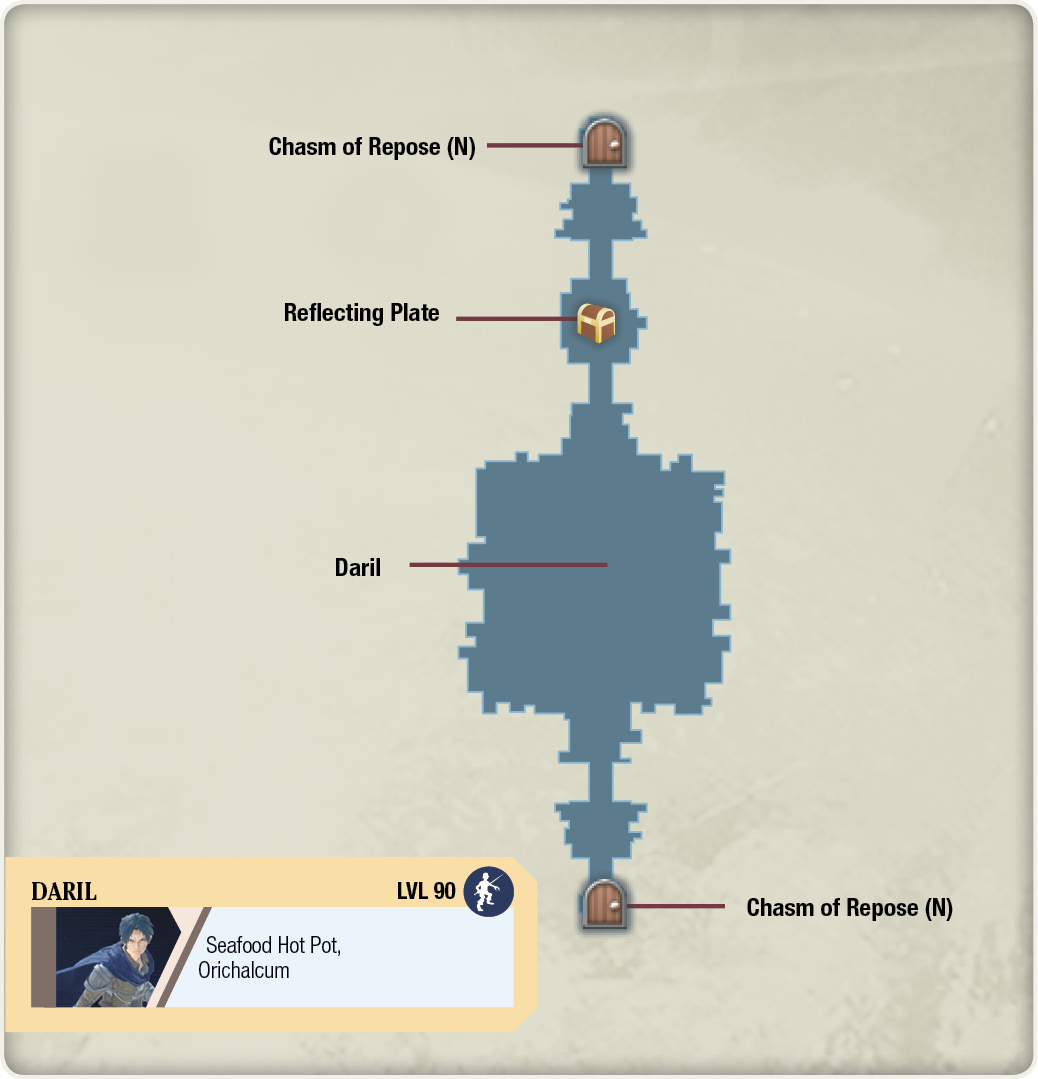
Once you’ve bested the four subarea bosses, you can access the north path’s transporter in the Chasm of Repose lobby. If you haven’t saved yet, make sure to do so now. If you’re in need of supplies, use your Familiar Spirit specialty to restock with Blueberries, Blackberries, Signet Card: Angel Feather +, and Signet Card: Enshelter +. You have a tough battle ahead, so be prepared.
Reunion—Daril
As the protagonist’s father, Daril has all of the abilities you’d expect to see from Fidel. The main ability to look out for is the familial Reserve Rush, Ethereal Blast. You’ll know it’s coming when Daril levitates into the air, donning a pair of giant phoenix wings. This attack can wipe out your entire party at the start of the battle unless you take the proper precautions. Daril loves to do this as his opening move, particularly on Miki. Open the battle menu as soon as the fight starts, and select Miki so you can maneuver far away from the initial area-of-effect damage. Heal and revive anyone you need to. An easy way to do this is to save three Reserve Rush gauges before the fight (or craft and collect Vitalitea potions) and simply cast Miki’s Lv. 3 Arcadia after Daril’s Ethereal Blast.

Once you stabilize, make sure to keep your back line members as far from the fray as possible, where the fight becomes much more manageable. Like Fidel’s Air Raid, Daril’s version is just as deadly, potentially killing any of your non-defensive members in one blow. Be sure to have defensive capabilities on at least one of your melee characters, and be ready to heal up anyone in the vicinity. Signet Card: Enlighten+ can be purchased from Santa, the Mercantilean, and this helps your close-range members survive Daril’s onslaught. As with all of the strong Maze of Tribulations bosses, having Anne or one of your swordsmen equipped with Dead Man Walking is a huge boon in this fight.
Fortunately, Daril needs to build his Reserve Rush gauge, so he won’t execute back-to-back Ethereal Blasts, but expect it to come the longer the battle goes. He won’t just use it on your front line characters, either: he’ll occasionally make a beeline to your healer and more fragile party members before unleashing his wrath. If you see him making a dash for one of your back line heroes, open the battle menu immediately and move your characters out of harm’s way. The area-of-effect coverage is massive, at about half of the entire battlefield. Standing at the opposite end of the battlefield with your ranged attackers and signeturges can’t be emphasized enough. Members with high HP and high DEF can survive the secondary explosion from Ethereal Blast, but most members won’t be able to survive the initial beam coupled with the follow-up, unless, of course, they have invincibility from a Heroism Potion or the Dead Man Walking role.
Daril’s susceptible to status effects like stun and fog. If you have the Stun Supporter and Interceptor roles maxed out, you can have a dedicated normal attacker attempt to keep him afflicted with both of these ailments. Thanks to his range and quick normal attacks, Emmerson is ideal for this role. The preferred roles build on him for this encounter is Interceptor, Daemon, Stun Supporter, and Charlatan. Additionally, you can supplement this strategy by setting Fidel’s Shotgun Blast to one of his close-range attack skills. Fog is incredibly effective against Daril; it makes him much less accurate and unable to rush your back line with Abyssal Gate and Ethereal Blast since it completely disables long-range attacks.
After you’ve defeated Fidel’s father, proceed north, pick up the Reflecting Plate from the chest, and head back out to the Chasm of Repose. You can now ascend to the next challenge, Indra’s Return, by interacting with the center platform of the lobby.