
Welcome to Grizzco Industries
Salmon Run is a co-operative mode that serves up an outstanding challenge to teams of two to four players. Can you defeat three Salmonid waves and collect their Golden Eggs? It’s harder than you might think!

As the newest recruit to Grizzco Industries, it’s imperative that you attend the mandatory employee training. Head to the Grizzco Industries office for your single-player introduction. Mr. Grizz coaches you through two sessions of on-the-job training. Since it can be tough to fend off the Salmonids while reading Mr. Grizz’s instructions, we’ve taken the liberty of including a rundown of your job description.
- Salmonids emerge from the water. Your job is to splat them with ink and collect the Power Eggs they drop.
- Very dangerous Boss Salmonids also emerge from the water. Figure out their weaknesses and splat ’em to collect their Golden Eggs.
- Deliver the Golden Eggs (three per Boss Salmonid) to the egg basket. Inklings can only carry one Golden Egg at a time, so teamwork is crucial.
- Meet the Golden Egg quota for each of the three waves and survive until the timer expires to complete Salmon Run and earn Grizzco Points. Points earned can be exchanged for bonuses.
Basic Rules of Salmon Run
Hazard Level: Select your difficulty setting in 5% increments. The higher the difficulty, the faster the enemies move, the greater the frequency of Boss Salmonids (and more difficult ones), and the greater the frequency and threat of special events. We recommend beginning with a 20% difficulty and adjusting accordingly.
Special Abilities: Special Abilities are provided at random from a pool designed for Salmon Run. Each Inkling is provided with two uses of a random Special Ability (no need to charge the Special Gauge). Each successive wave gets harder, so coordinate with teammates and try to reserve your Special Ability for Waves 2 and 3. Unused abilities are reclaimed at the end of the shift.
Weapons: Weapons are randomly loaned to each Grizzco employee at the start of each wave. Though there’s no telling which weapon you’ll receive, the weapons available are based on a rotating schedule that changes every few days. Coordinate roles with your teammates to best take advantage of the weapons provided. There’s also the potential for two rare weapons to be loaned out to skilled employees. You can only get these rare weapons if the current weapons set contains the random weapon (denoted by a ? in the list). Obtaining them is purely based on chance and does not require a high rank.
Bombs: Each player has the ability to toss standard Splat Bombs.
Life Rings: Grizzco employees who get splatted by Salmonids, or who fall into the water, spawn in a life ring. Surviving teammates must ink the life ring to revive the fallen teammate. The shift ends in failure if the entire team is downed. Players in life rings are revived upon successful completion of a wave. Swim toward your teammates whenever in a life ring.
Communication Signals: Use the “Booyah!” and “This Way” signals to coordinate attacks, call for help, and draw your team’s attention to a particular area. This is especially important if you get splatted or have spotted a Goldie or other Boss Salmonid. These signals are only as effective as each player’s devotion to them. Don’t just summon your allies with signals; be sure to rush to their aid when they call you! Send the signal multiple times to ensure your teammates see it.
Grizzco Points
Exceeding the quota for each wave earns you lots of points, but staying alive is what’s important. Don’t risk getting splatted for an extra Golden Egg if it’s not necessary.
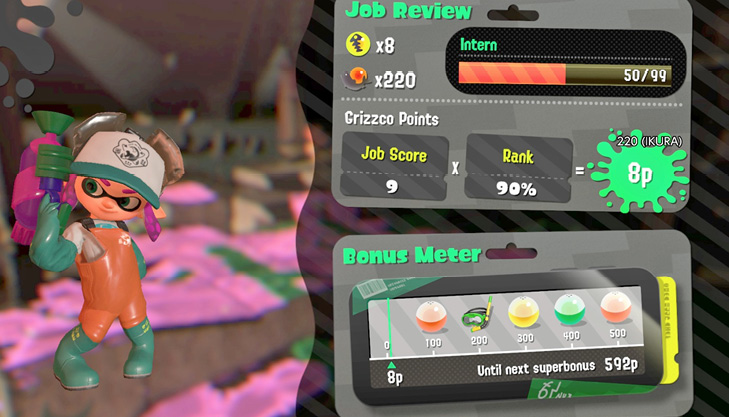
Grizzco Points are based on the number of Golden Eggs and Power Eggs you earn. Golden Eggs are worth more, naturally, so focus on them. The more points you earn, the more bonuses you earn. Redeem your bonuses from the counter outside the Grizzco offices.
Salmon Run takes place as recruitment drives (i.e. seasons). The bonus lineup changes with each recruitment drive. Grizzco Points are reset at the end of each drive, so earn as many points as you can before the season ends.
Grizzco Pay Grade
Grizzco utilizes an employee rating system that dictates your pay grade. Meeting the quota for three waves on successive shifts increases your pay grade by +20 points. Pay grade decreases if you continuously fail to meet a quota. Failing on the first wave decreases your pay grade by -20 points; failing on the second decreases pay grade by -10 points. Failing on the third wave does not affect pay grade.
Titles increase as you rise in pay grade. There are six titles in total, but the first one, Intern, only applies during the tutorial. Once you finish the tutorial, you advance to the Apprentice rank with 40 points.
Title Order:
- Intern (tutorial only)
- Apprentice
- Part-Timer
- Go-Getter
- Overachiever
- Profeshional
Continue meeting quotas and surpass 100 points to advance to the next title, where you begin again with 40 points. Continually fail to where your points dip below zero, and your title degrades by one tier. In this case, you also begin again with 40 points.
The more advanced your title, the better your bonus, but also the greater the difficulty (Part-Timer is more difficult than Apprentice, etc.). Pay grades are reset during each hiring period (i.e. season), while titles carry over from season to season. Bonuses include special gear of the month, daily bonuses in the form of Drink Tickets, and more!
When people of multiple pay grades and titles play together, the difficulty is scaled based on the average pay grade of the players. The higher-ranking players don’t earn as many points, however, as the difficulty is lower than their pay grades.
Points = Job Score * Pay Grade
Job Score = Golden Eggs + (Power Eggs/200)
Pay Grades
| Title | Point Range | Pay Grade |
|---|---|---|
|
Apprentice |
0-19 |
90% |
|
Apprentice |
20-39 |
95% |
|
Apprentice |
40-59 |
100% |
|
Apprentice |
60-79 |
105% |
|
Apprentice |
80-99 |
110% |
|
Part-Timer |
0-19 |
115% |
|
Part-Timer |
20-39 |
120% |
|
Part-Timer |
40-59 |
125% |
|
Part-Timer |
60-79 |
130% |
|
Part-Timer |
80-99 |
135% |
|
Go-Getter |
0-19 |
140% |
|
Go-Getter |
20-39 |
145% |
|
Go-Getter |
40-59 |
150% |
|
Go-Getter |
60-79 |
155% |
|
Go-Getter |
80-99 |
160% |
|
Overachiever |
0-19 |
165% |
|
Overachiever |
20-39 |
170% |
|
Overachiever |
40-59 |
175% |
|
Overachiever |
60-79 |
180% |
|
Overachiever |
80-99 |
185% |
|
Profeshional |
0-19 |
190% |
|
Profeshional |
20-39 |
195% |
|
Profeshional |
40-59 |
200% |
|
Profeshional |
60-79 |
205% |
|
Profeshional |
80-99 |
210% |
|
Profeshional |
100-119 |
215% |
|
Profeshional |
120-139 |
220% |
|
Profeshional |
140-159 |
225% |
|
Profeshional |
160-179 |
230% |
|
Profeshional |
180-199 |
235% |
|
Profeshional |
200-219 |
240% |
|
Profeshional |
220-239 |
245% |
|
Profeshional |
240-259 |
250% |
|
Profeshional |
260-279 |
255% |
|
Profeshional |
280-299 |
260% |
|
Profeshional |
300-319 |
265% |
|
Profeshional |
320-339 |
270% |
|
Profeshional |
340-359 |
275% |
|
Profeshional |
360-379 |
280% |
|
Profeshional |
380-399 |
285% |
|
Profeshional |
400-419 |
290% |
|
Profeshional |
420-439 |
295% |
|
Profeshional |
440-459 |
300% |
|
Profeshional |
460-479 |
305% |
|
Profeshional |
480-499 |
310% |
|
Profeshional |
500-519 |
315% |
|
Profeshional |
520-539 |
320% |
|
Profeshional |
540-559 |
325% |
|
Profeshional |
560-579 |
330% |
|
Profeshional |
580-599 |
335% |
|
Profeshional |
600-619 |
340% |
|
Profeshional |
620-639 |
345% |
|
Profeshional |
640-659 |
350% |
|
Profeshional |
660-679 |
355% |
|
Profeshional |
680-699 |
360% |
|
Profeshional |
700-719 |
365% |
|
Profeshional |
720-739 |
370% |
|
Profeshional |
740-759 |
375% |
|
Profeshional |
760-779 |
380% |
|
Profeshional |
780-799 |
385% |
|
Profeshional |
800-819 |
390% |
|
Profeshional |
820-839 |
395% |
|
Profeshional |
840-859 |
400% |
|
Profeshional |
860-879 |
405% |
|
Profeshional |
880-899 |
410% |
|
Profeshional |
900-919 |
415% |
|
Profeshional |
920-939 |
420% |
|
Profeshional |
940-959 |
425% |
|
Profeshional |
960-979 |
430% |
|
Profeshional |
980-999 |
435% |