
Prima Games eGuides
primagames.com Browse Redeem a code Help
Splatoon 2 eGuide
Sign in My Guides

Sign in or create an account

We'll email you a link. No password needed, and if you don't have an account yet, the link makes one.

By creating an account or signing in, you agree to our Terms of Service and Privacy Policy.

Have a password?

Had an account on the old eGuides site, or a code from a printed guide? Help and troubleshooting

Sign in with a password

By signing in, you agree to our Terms of Service and Privacy Policy.

Check your email

A sign-in link is on its way. It works once and expires in 15 minutes. Open it and you're in, with an account if you didn't already have one.

Contents

  • Changelog
    • Updates
  • Welcome Back to Inkopolis
    • Introduction
    • What’s New?
    • Getting Started
    • Inkopolis Square: Quick Tour
  • amiibo
    • amiibo Support
    • Inkling Girl
    • Inkling Boy
    • Callie & Marie
    • Inkling Squid
  • Octo Canyon
    • Introduction
    • Equipment
    • Octo Canyon Features
    • The Octarians
  • Single-Player Campaign
    • Area 01: Tentakeel Outpost
      • Overview
      • Tentakeel Outpost Collectibles
      • 01: Return of the Octarians
      • 02: Welcome to Octopia
      • 03: Sunset Octocopter
      • Boss Battle: The Octo Oven
    • Area 02: Suction-Cup Lookout
      • Overview
      • Suction-Cup Lookout Collectibles
      • 04: Enter the Octohurler
      • 05: The Octopark
      • 06: Octozeppelin Invasion
      • 07: Back-Alley Cleanup
      • 08: Spinning Campground
      • 09: Octoling Strike
      • Boss Battle: The Octo Samurai
    • Area 03: Beaker’s Depot
      • Introduction
      • Beaker’s Depot Collectibles
      • 10: Octoseeker Shakedown
      • 11: The Floating Garden
      • 12: Octo-Resort Spring
      • 13: Dancing Floors
      • 14: Parking Garage
      • 15: Octoling Assault
      • Boss Battle: The Neo Octostomp
    • Area 04: Slimeskin Garrison
      • Overview
      • Slimeskin Garrison Collectibles
      • 16: Secret Bowling Alley
      • 17: Octocommander Fortress
      • 18: Towering Heights
      • 19: The Experimentorium
      • 20: Propellerland
      • 21: Octolings Ahoy!
      • Boss Battle: The Octo Shower
    • Area 05: Cephalon HQ
      • Overview
      • Cephalon HQ Collectibles
      • 22: Underground Expressway
      • 23: The Octogalaxy
      • 24: Transfer Junction
      • 25: Platform Madhouse
      • 26: Paradise Lanes
      • 27: Octoling Workout
      • Boss Battle: Octobot King II
      • Epilogue
  • Salmon Run
    • Welcome to Grizzco Industries
    • Salmonids
    • Spawning Grounds
    • Marooner’s Bay
  • Ink Battles
    • Getting Started
    • Game Modes
    • Splatfest
    • Square Activities
  • Weapons & Gear
    • How to Purchase Weapons
    • Weapons
      • Splattershot Jr.
      • Splattershot
      • Splat Roller
      • Splat Charger
      • Tentatek Splattershot
      • Splat Dualies
      • Blaster
      • Slosher
      • Aerospray MG
      • Carbon Roller
      • Heavy Splatling
      • N-Zap ’85
      • Splattershot Pro
      • Octobrush
      • Enperry Splat Dualies
      • Krak-On Splat Roller
      • Rapid Blaster
      • .52 Gal
      • Splatterscope
      • Tri-Slosher
      • Firefin Splat Charger
      • Jet Squelcher
      • L-3 Nozzlenose
      • Luna Blaster
      • Dynamo Roller
      • E-liter 4K
      • .96 Gal
      • Goo Tuber
      • Mini Splatling
      • Flingza Roller
      • Splash-o-matic
      • Firefin Splatterscope
      • Dapple Dualies
      • Custom Blaster
      • Aerospray RG
      • H-3 Nozzlenose
      • Clash Blaster
      • E-liter 4K Scope
      • DLC Weapons
      • Sub Weapons
      • Specials
      • Hero Weapons
    • Abilities
      • How Main and Sub Abilities Work
      • Ink Saver (Main)
      • Ink Saver (Sub)
      • Ink Recovery Up
      • Run Speed Up
      • Swim Speed Up
      • Special Charge Up
      • Special Saver
      • Special Power Up
      • Quick Respawn
      • Quick Super Jump
      • Sub Power Up
      • Ink Resistance Up
      • Bomb Defense Up
      • Cold-Blooded
      • Opening Gambit
      • Last-Ditch Effort
      • Tenacity
      • Comeback
      • Ninja Squid
      • Haunt
      • Thermal Ink
      • Respawn Punisher
      • Ability Doubler
      • Stealth Jump
      • Object Shredder
      • Drop Roller
    • Gear
      • Understanding Gear
      • Brands
      • Clothing
      • Headgear
      • Shoes
      • Tester Loadouts
  • Multiplayer Maps
    • Humpback Pump Track
      • Overview
      • Key Locations
      • Recommended Weapons
      • Game Modes
    • Inkblot Art Academy
      • Overview
      • Key Locations
      • Recommended Weapons
      • Game Modes
    • Moray Towers
      • Overview
      • Key Locations
      • Recommended Weapons
      • Game Modes
    • Port Mackerel
      • Overview
      • Key Locations
      • Recommended Weapons
      • Game Modes
    • Musselforge Fitness
      • Overview
      • Key Locations
      • Recommended Weapons
      • Game Modes
    • The Reef
      • Overview
      • Key Locations
      • Recommended Weapons
      • Game Modes
    • Starfish Mainstage
      • Overview
      • Key Locations
      • Recommended Weapons
      • Game Modes
    • Sturgeon Shipyard
      • Overview
      • Key Locations
      • Recommended Weapons
      • Game Modes
  • Multiplayer Atlas
    • Map Features
    • Humpback Pump Track
    • Inkblot Art Academy
    • Moray Towers
    • Musselforge Fitness
    • Port Mackerel
    • The Reef
    • Starfish Mainstage
    • Sturgeon Shipyard

Splatoon 2 Guide › Multiplayer Maps › Starfish Mainstage

Overview

When not hosting musicians, this quaint outdoor concert venue serves as the site of some heated Ink Battles. The mainstage, in the center of the map, is the focal point of most engagements. Inklings seeking to avoid the chaotic center can find plenty of side routes, useful for flanking maneuvers and sneak attacks. Each team also benefits from a large safe zone, each providing two elevated routes to the map’s highly contested center. Make a habit of utilizing the elevated perches, paths, and grates to spread ink and target opponents in the map’s low-lying areas. Mid-range weapons with rapid-fire capability are always a safe bet here.
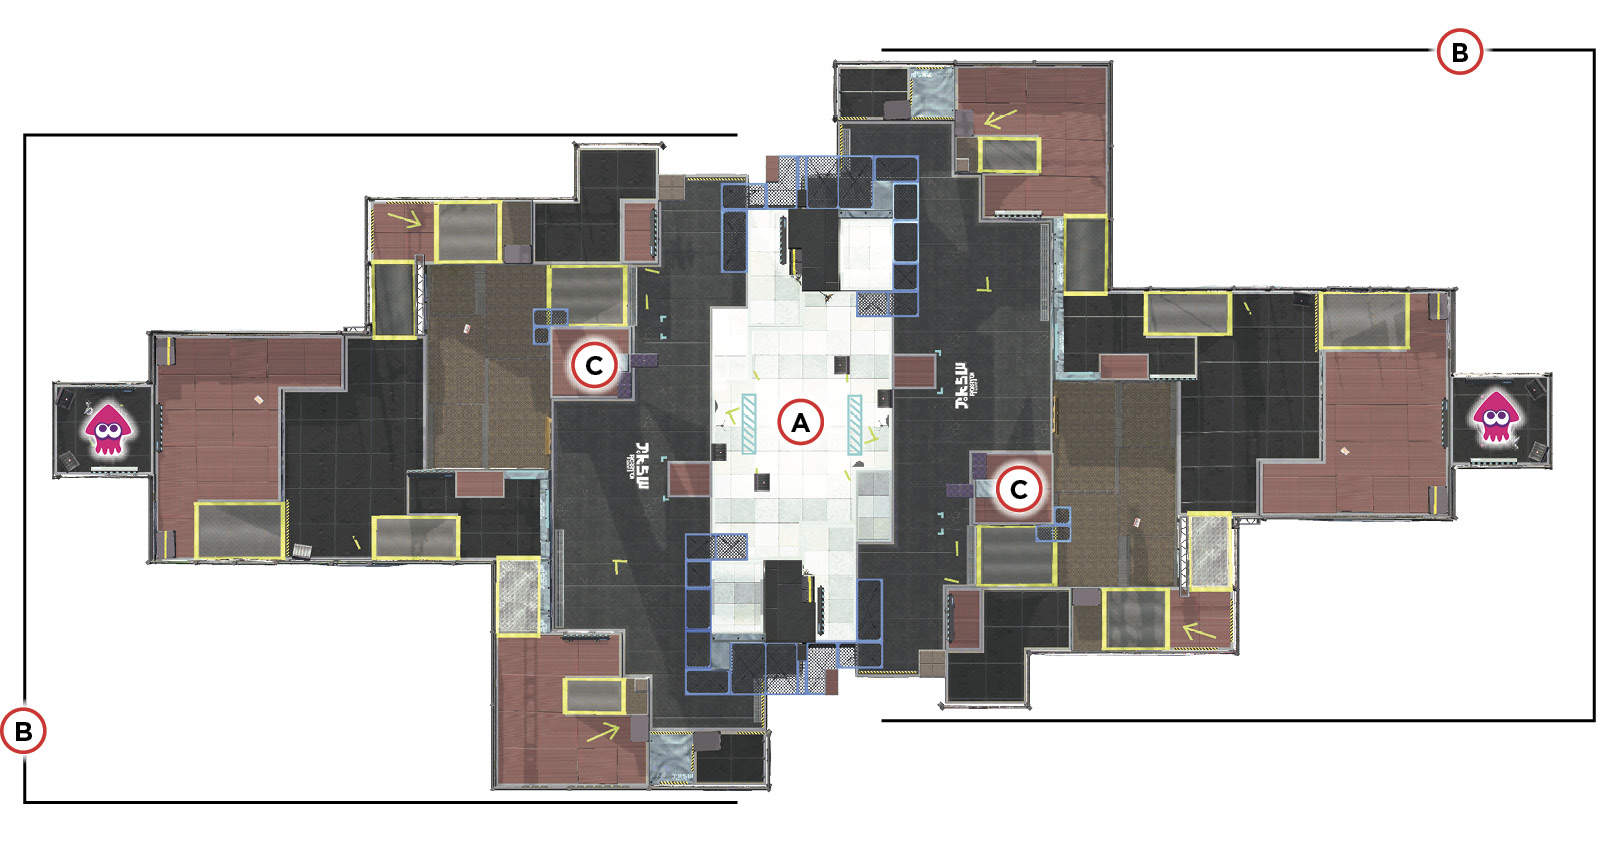
Legend

Key Location

Spawn Point

Keep reading with a free account

The first 3 sections of Splatoon 2 are open to everyone. An account opens the rest of it, and every other guide in the archive. It's free, and there's nothing to buy.

Bought guides on the old Prima Games site? Your account and every guide you own moved here, so there's nothing to buy again. Sign in.

Create a free account Or browse our free guides

PreviousGame Modes NextKey Locations