
Mass Effect 2 Guide Essentials TRAINING
Weapons and Armor
When a peaceful resolution to a problem cannot be reached, then you must resort to violence. There are many conventional weapons you can use in battles, but not every squad member can use all of the weapons.
When you chose your class, you saw that you were limited to specific weapons (although you can acquire weapons training while on a specific mission near the halfway point of the story).
Team members must follow the same rules.
There are several weapon classes available to you and your team, with at least two weapon variations in each class:
- Assault Rifles: These automatic weapons strike a good balance between stopping power and accuracy. Assault rifles are commonly used by soldiers, but you can train Shepard on this weapon if the commander selects a different class.
- Heavy Pistols: These handguns are all-purpose weapons that are effective even at long range. They are the most accurate and powerful weapons outside of sniper rifles Heavy pistol clips are small, though, and need to be reloaded often.
- Shotguns: Shotguns are brute force weapons that deal tremendous damage at close range. They may have a slow rate of fire, but if a shell is delivered point blank, you may need only one squeeze of the trigger.
- Submachine Guns: Submachine guns benefit from a fast rate of fire that can chew up a target’s armor or shields. However, submachine guns are the least accurate of all weapons.
- Sniper Rifles: Sniper rifles combine long-range killing power with lethal accuracy. The trade-off is that they have a slower rate of fire.
- Heavy Weapons: If enemy strength is the question, heavy weapons are the answer. This class of weapon delivers incredible firepower, but ammo is very limited. You must constantly seek out power cells to replenish heavy weapons.
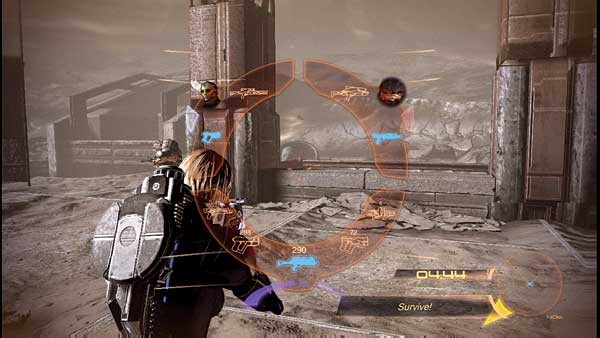
Call up the Weapon Wheel to select the current weapons for you and your squad. Monitor the situation and adjust for the enemy.
All weapons can overheat after firing multiple times. When a weapon overheats, you must switch to another or rely on alternative attacks, such as biotic powers or melee strikes.
There is a universal thermal clip that all weapons except heavy weapons use.
You will spot thermal clips on your missions on shelves or desks—look for the reflection of the clip in the light to easily spot them in intense situations. Fallen enemies also drop thermal clips.
When you pick up a thermal clip, all weapons are partially replenished, not just the weapon you are holding.
Aside from thermal clips, some squad members, including you, have special ammunition they can use that has an added benefit, such as fire damage, or is powerful against a specific type of enemy.
Here are the six different ammunition types you can use:
 Armor-Piercing Ammo:
This round cuts through armor so you can deliver the killing shot.
Armor-Piercing Ammo:
This round cuts through armor so you can deliver the killing shot.
 Cryo Ammo:
Multiple shots with cryo ammo slowly freeze an enemy. Frozen enemies take more physics damage from melee attacks, but they cannot take more damage from weapon attacks or most powers.
Cryo Ammo:
Multiple shots with cryo ammo slowly freeze an enemy. Frozen enemies take more physics damage from melee attacks, but they cannot take more damage from weapon attacks or most powers.
 Incendiary Ammo:
Incendiary ammo catches a target on fire, doing damage beyond the initial shot. Synthetic enemies such as mechs do not suffer from the extra effects of incendiary ammo.
Incendiary Ammo:
Incendiary ammo catches a target on fire, doing damage beyond the initial shot. Synthetic enemies such as mechs do not suffer from the extra effects of incendiary ammo.
 Disruptor Ammo:
This class of ammunition is strong against shields and synthetic enemies, such as mechs and geth.
Disruptor Ammo:
This class of ammunition is strong against shields and synthetic enemies, such as mechs and geth.
 Shredder Ammo:
Shredder ammunition rips through organic enemies, doing extra damage. No extra damage is done against synthetics.
Shredder Ammo:
Shredder ammunition rips through organic enemies, doing extra damage. No extra damage is done against synthetics.
 Warp Ammo:
Warp ammo transforms biotic energy into heavier damage against barriers and armor.
Warp Ammo:
Warp ammo transforms biotic energy into heavier damage against barriers and armor.
Arsenal
Heavy Pistols
| Weapon | Base Damage | Specific Bonuses | Fire Mode | Accuracy | Clip Size/Max Ammo | Located | Restrictions |
|---|---|---|---|---|---|---|---|
| M-3 Predator | 37.2 | Armor: +50% | Semi-auto | Medium | 12/60 | Default | |
| M-5 Phalanx | 109.8 | Armor: +50% | Semi-auto | Medium | 6/24 | Firepower Pack DLC | |
| M-6 Carnifex | 85.4 | Armor: +50% | Single shot | Medium | 6/18 | The Professor mission |
Submachine Guns
| Weapon | Base Damage | Specific Bonuses | Fire Mode | Accuracy | Clip Size/Max Ammo | Located | Restrictions |
|---|---|---|---|---|---|---|---|
| M4-Shuriken | 20.5 | Barrier: +50%, Shield: +50% | Auto | Medium | 24/240 | Standard | Soldier class cannot use |
| M-9 Tempest | 14 | Barrier: +50%, Shield: +50% | Auto | Medium | 50/450 | Tali mission | Soldier class cannot use |
| M-12 Locust | 25 | Armor: +25%, Barrier: +25%, Shield: +25% | Auto | Good | 20/240 | The Master Thief mission | Soldier class cannot use |
Assault Rifles
| Weapon | Base Damage | Specific Bonuses | Fire Mode | Accuracy | Clip Size/Max Ammo | Located | Restrictions |
|---|---|---|---|---|---|---|---|
| M-8 Avenger | 10.8 | Armor: +25%, Barrier: +25%, Shield: +25% | Auto | Moderate | 40/400 | Standard | |
| M-15 Vindicator | 36.8 | Armor: +25%, Barrier: +25%, Shield: +25% | Burst | High | 24/96 | Archangel mission | |
| M-76 Revenant | 21.3 | Armor: +40%, Barrier: +20%, Shield: +20% | Auto | Low | 80/480 | Collector Ship | Soldier class only |
| M-96 Mattock | 50.4 | Armor: +30%, Barrier: +20%, Shield: +20% | Semi-auto | High | 16/64 | Firepower Pack DLC | |
| Geth Pulse Rifle | 10.8 | Armor: +15%, Barrier: +35%, Shield: +35% | Auto | High | 40/480 | Tali mission | Hardcore or Insanity difficulty only |
| Collector Assault Rifle | 17.4 | Armor: +25%, Barrier: +25%, Shield: +25% | Auto | High | 28/280 | Bonus weapon |
Shotguns
| Weapon | Base Damage | Specific Bonuses | Fire Mode | Accuracy | Clip Size/Max Ammo | Located | Restrictions |
|---|---|---|---|---|---|---|---|
| M-23 Katana | 220 | Barrier: +50%, Shield: +50% | Semi-auto | Low | 5/10 | ||
| M-27 Scimitar | 162.7 | Barrier: +50%, Shield: +50% | Semi-auto | Low | 8/16 | ||
| M-300 Claymore | 400 | Armor: +25%, Barrier: +25%, Shield: +25% | Single shot | Low | 1/10 | Soldier or vanguard only | |
| M-22 Eviscerator | 294.4 | Armor: +25%, Barrier: +25%, Shield: +25% | Semi-auto | Low | 3/12 | Cerberus Network | |
| Geth Plasma Shotgun | 250 | Barrier: +50%, Shield: +50% | Semi-auto | Low | 5/10 | Firepower DLC Pack |
Sniper Rifles
| Weapon | Base Damage | Specific Bonuses | Fire Mode | Accuracy | Clip Size/Max Ammo | Located | Restrictions |
|---|---|---|---|---|---|---|---|
| M-92 Mantis | 263 | Armor: +50% | Single shot | High | 1/9 | Standard | |
| M-97 Viper | 82 | Armor: +35%, Barrier: +15%, Shield: +15% | Semi-auto | High | 12/48 | Assassin mission | |
| M-98 Widow | 368.3 | Armor: +50% | Single shot | High | 1/12 | Collector ship | Soldier or infiltrator class only |
| M-29 Incisor | 53.6 | Armor: +25%, Barrier: +25%, Shield: +25% | Burst | High | 15/30 | DLC |
Heavy Weapons
| Weapon | Base Damage | Specific Bonuses | Fire Mode | Accuracy | Clip Size/Max Ammo | Located | Restrictions |
|---|---|---|---|---|---|---|---|
| M-100 Grenade Launcher | 500 | Armor: +25%, Barrier: +25%, Shield: +25% | Semi-auto | High | 10 | Cerberus Facility | |
| ML-77 Missile Launcher | 350 | Armor: +25%, Barrier: +25%, Shield: +25% | Semi-auto | High | 15 | Research | |
| M-622 Avalanche (cryo gun) | 50 | Armor: +700%, Barrier: +700%, Shield: +700% | Semi-auto | High | 20 | Research | |
| M-920 Cain (nuclear weapon) | 10,000 | None | Single shot | High | All available | Research | |
| Collector Particle Beam | 20 | Armor: +50%, Barrier: +50%, Shield: +50% | Auto | High | 500 | Horizon mission | |
| M-451 Firestorm (flamethrower) | 15 | Armor: +35%, Barrier: +15%, Shield: +15% | Auto | High | 500 | Zaeed mission | |
| M-490 Blackstorm (singularity gun) | 500 | Armor: +200%, Barrier: +200%, Shield: +200% | Single shot | High | 5 | DLC | |
| Arc Projector | 400 | None | Single shot | High | 10 | DLC |
Armor
When you begin your mission, you are given standard-issue Cerberus N7 armor. While it’s effective in battle, there are better pieces of armor you can acquire while traveling across the galaxy.
Each piece of armor, such as a helmet or gauntlets, offers a special benefit. These benefits include special protection from incoming fire, increased accuracy for headshots, or extra health.
The effects of the armor are only available when that piece of armor is in use. You may not stack multiple pieces of armor in the same category; for example, you cannot wear two chest plates at the same time.
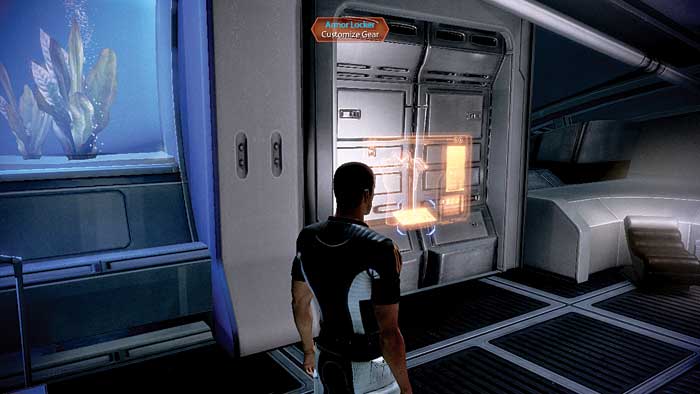
Use the locker in your private quarters aboard the Normandy to change out your armor after acquiring new pieces.
Here is a full list of armor options available to you, including the effects of each piece of armor, and where to acquire it:
Helmet
| Armor Piece | Effect | Location |
|---|---|---|
| N7 Helmet | Increases health by 5%. | Standard |
| N7 Breather Helmet | Increases health by 5%. | Standard |
| Death Mask | Increases negotiation success chance by 10%. | Harrot’s Emporium |
| Kuwashii Visor | Increases headshot damage by 10%. | Ratch’s Wares |
| Archon Visor | Reduces power recharge time by 5%. | Equalizer Pack DLC |
| Capacitor Helmet | Shields recharge 10% faster. | Equalizer Pack DLC |
| Kestrel Helmet | Increases headshot damage by 5%. Increases weapon damage by 3%. Increases shields by 3%. | Aegis Pack DLC |
Chest
| Armor Piece | Effect | Location |
|---|---|---|
| Aegis Vest | Increases health by 5%. | Standard |
| Capacitor Chestplate | Reduces shield delay by 10%. | Rodam Expeditions |
| N7 Chest plate | Increases power damage by 3%. | Harrot’s Emporium |
| Shield Harness | Increases shields by 5%. | Ratch’s Wares |
| Kestrel Torso Sheath | Increases melee attack damage by 10%. Increases weapon damage by 5%. Increases shield strength by 3%. | Aegis Pack DLC |
Shoulders
| Armor Piece | Effect | Location |
|---|---|---|
| N7 Shoulder Guards | Increases weapon damage by 3%. | Standard |
| Amplifier Plates | Increases power damage by 5%. | Gateway Personal Defense |
| Asymmetric Defense Layer | Increases health by 5%. | Ratch’s Wares |
| Strength Boost Pads | Increases melee damage by 25%. | Omega Market |
| Kestrel Shoulder Pieces | Increases shield strength by 8%. Increases melee damage by 10%. | Aegis Pack DLC |
Arms
| Armor Piece | Effect | Location |
|---|---|---|
| N7 Gauntlets | Increases health by 3%. | Standard |
| Heavy Damping Gauntlets | Increases shields by 5%. | Ratch’s Wares |
| Off-Hand Ammo Pack | Increases spare ammo capacity by 10%. | Rodam Expeditions |
| Stabilizing Gauntlets | Increases weapon damage by 5%. | Omega Market |
| Kestrel Arm Sheathing | Increases weapon damage by 3%. Increases shield strength by 3%. Increases melee damage by 10%. | Aegis Pack DLC |
Legs
| Armor Piece | Effect | Location |
|---|---|---|
| N7 Greaves | Increases shield strength by 3%. | Standard |
| Stimulator Conduits | Increases storm speed by 10%. | Omega Market |
| Life Support Webbing | Increases health by 10%. | Sirta Foundation |
| Ordinance Packs | Increases power cells by 10%. | Harrot’s Emporium |
| Kestrel Power Pack | Increases shield strength by 8%. Increases power cells by 5%. | Aegis Pack DLC |
In addition to swappable pieces of armor, there are special armor sets that have unique properties:
| Armor Piece | Effect | Location |
|---|---|---|
| N7 Armor | Increase power damage by 3%. Increases weapon damage by 3%. Increases health by 3%. Increases shield strength by 3%. | Standard |
| Blood Dragon Armor | Increase power damage by 15%. Increases shield strength by 10%. | DLC |
| Cerberus Assault Armor | Increase power cell capacity by 10%. Increases shield strength by 10%. Increases health by 10%. | Cerberus Network |
| Collector Armor | Increase health regen speed by 10%. Increases storm speed by 10%. Increases health by 20%. | DLC |
| Inferno Armor | Increase morality points by 10%. Increases power damage by 10%. Increases storm speed by 10%. | DLC |
| Kestrel Armor | Increase melee damage by 30%. Increases weapon damage by 11%. Increase power cell capacity by 5%. Increases health by 3%. Increases shield strength by 25%. Increases headshot damage by 5%. | Aegis Pack DLC |
| Terminus Assault Armor | Increases storm speed by 10%. Increases shield strength by 15%. Increase ammo reserves (all weapons) by 10%. | DLC |