
Assassin's Creed III Guide Walkthrough
Sequence 07
The Frontier
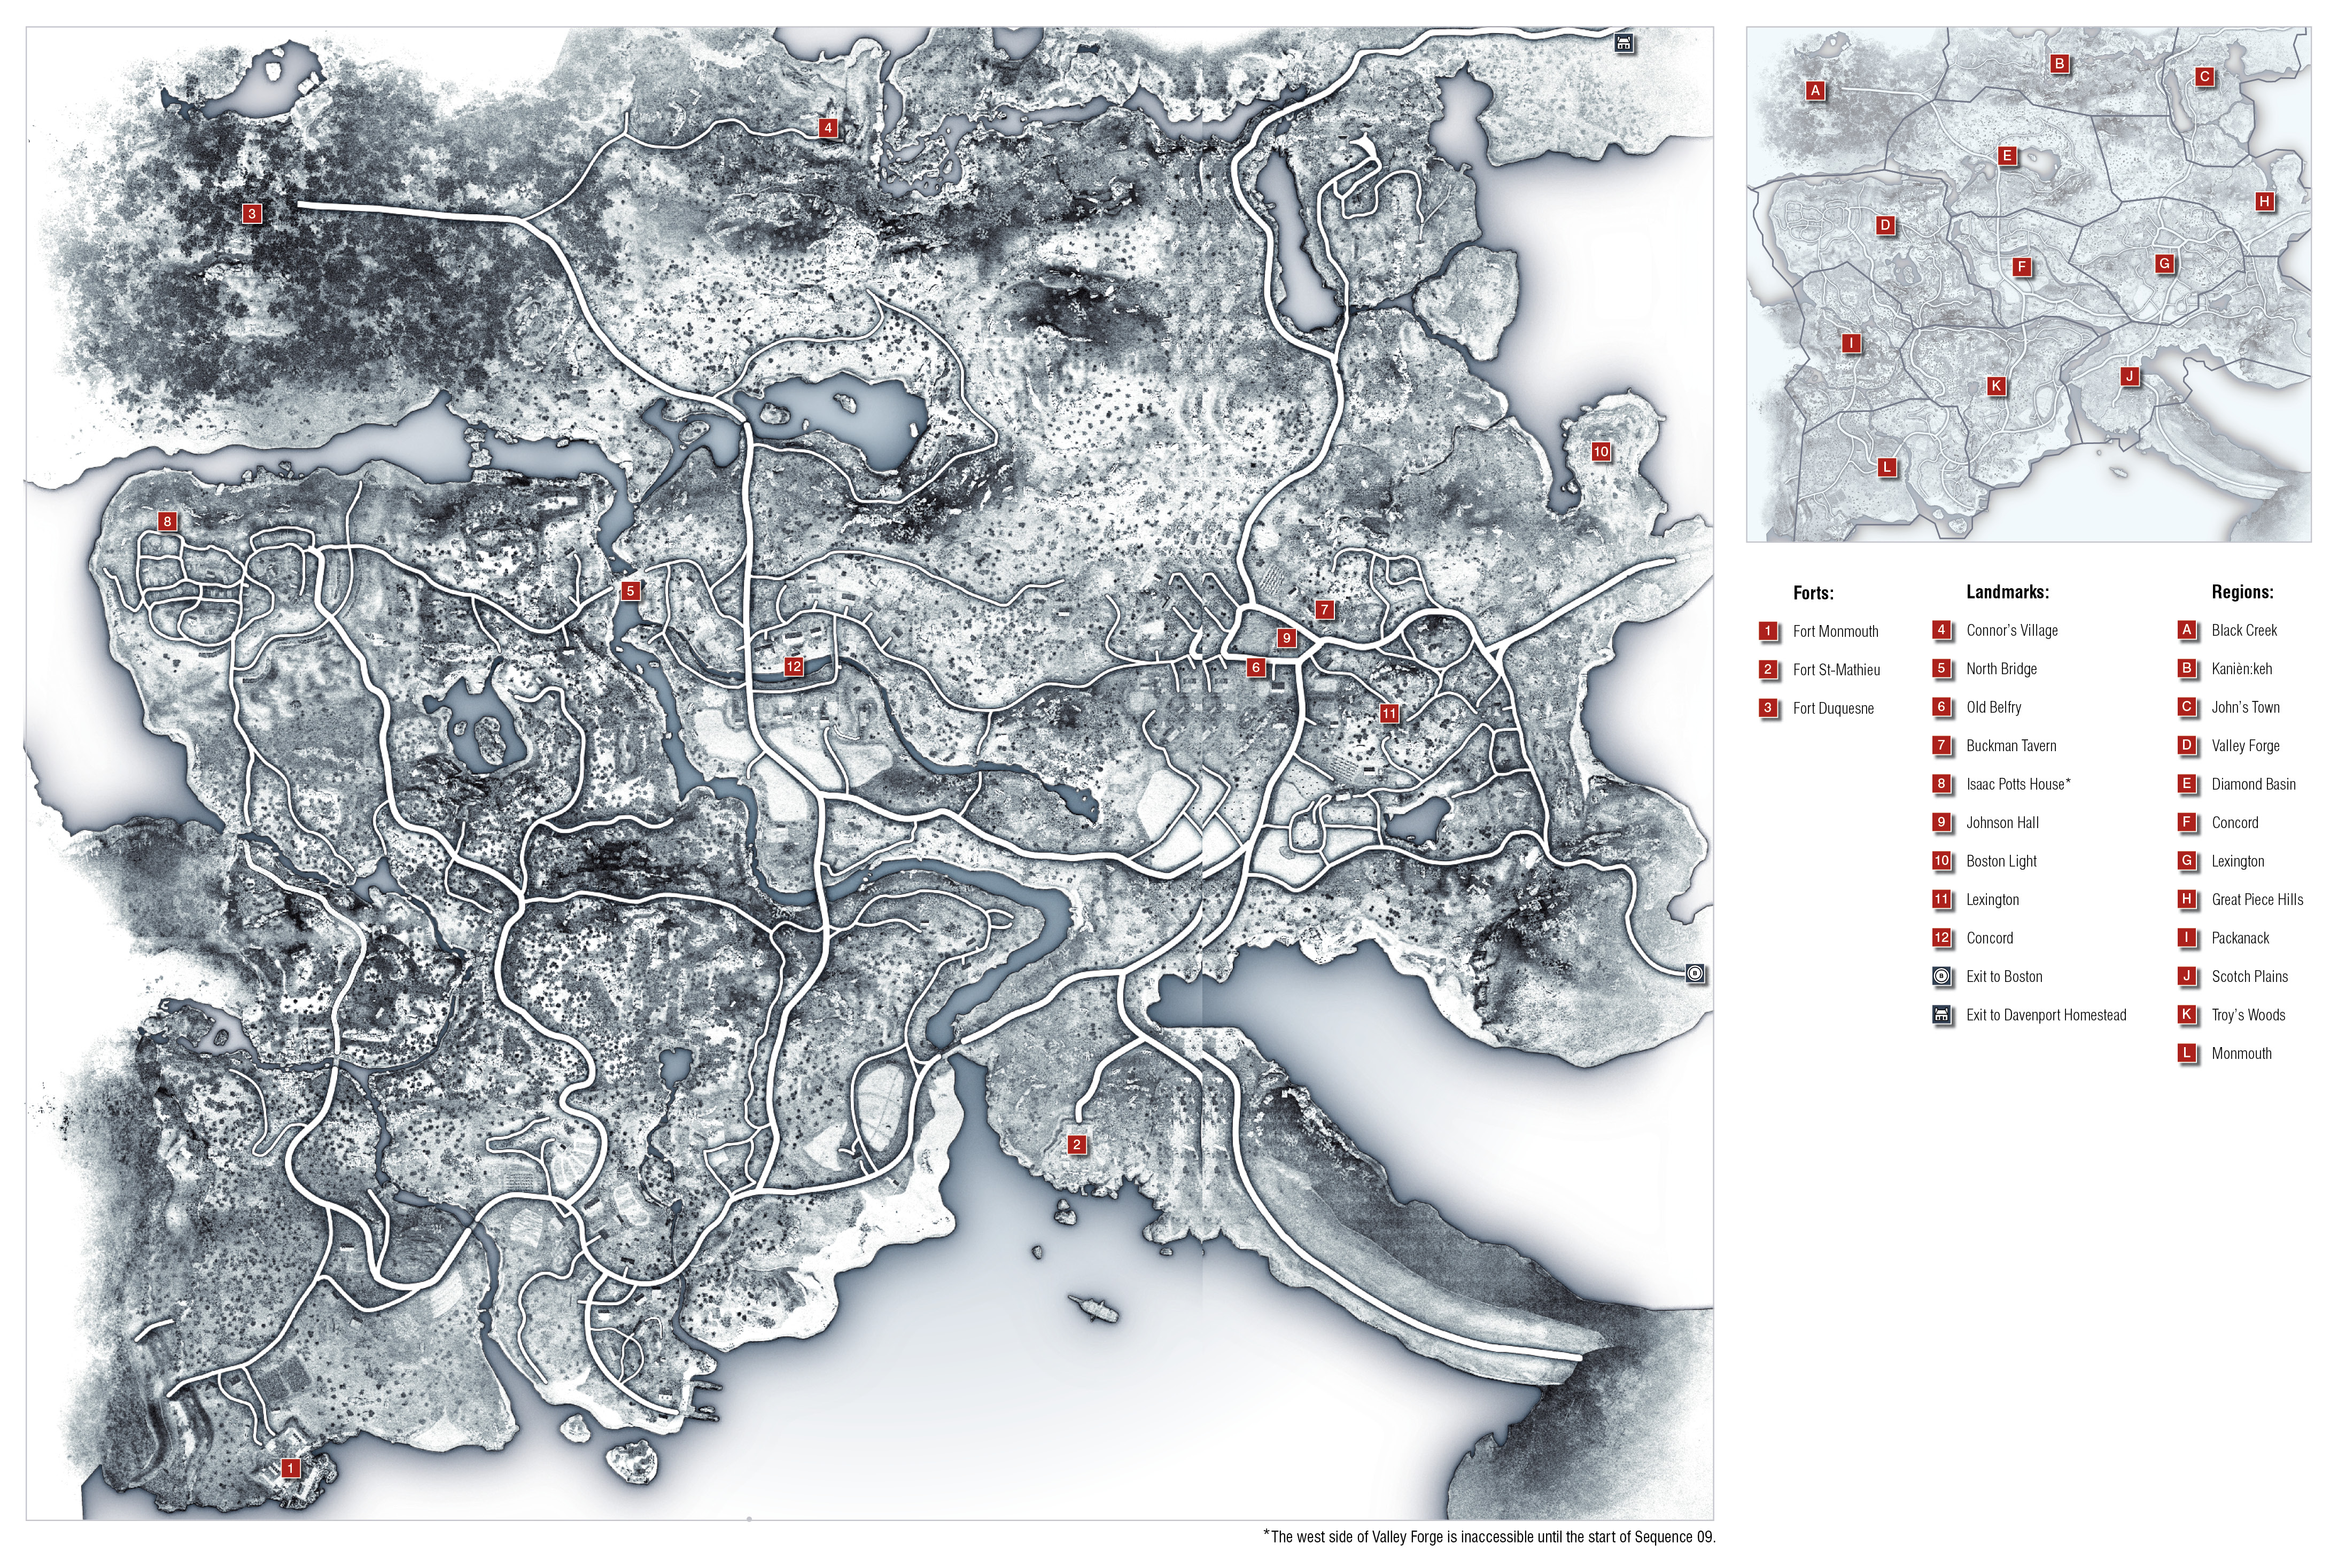
The Midnight Ride
Mission Overview
|
Optional Objectives |
Preparation |
|
|
When you are ready to begin, travel to Paul Revere’s house at the waypoint in Boston. Play resumes in the Frontier area, with the two sharing a horse. You can tap  /
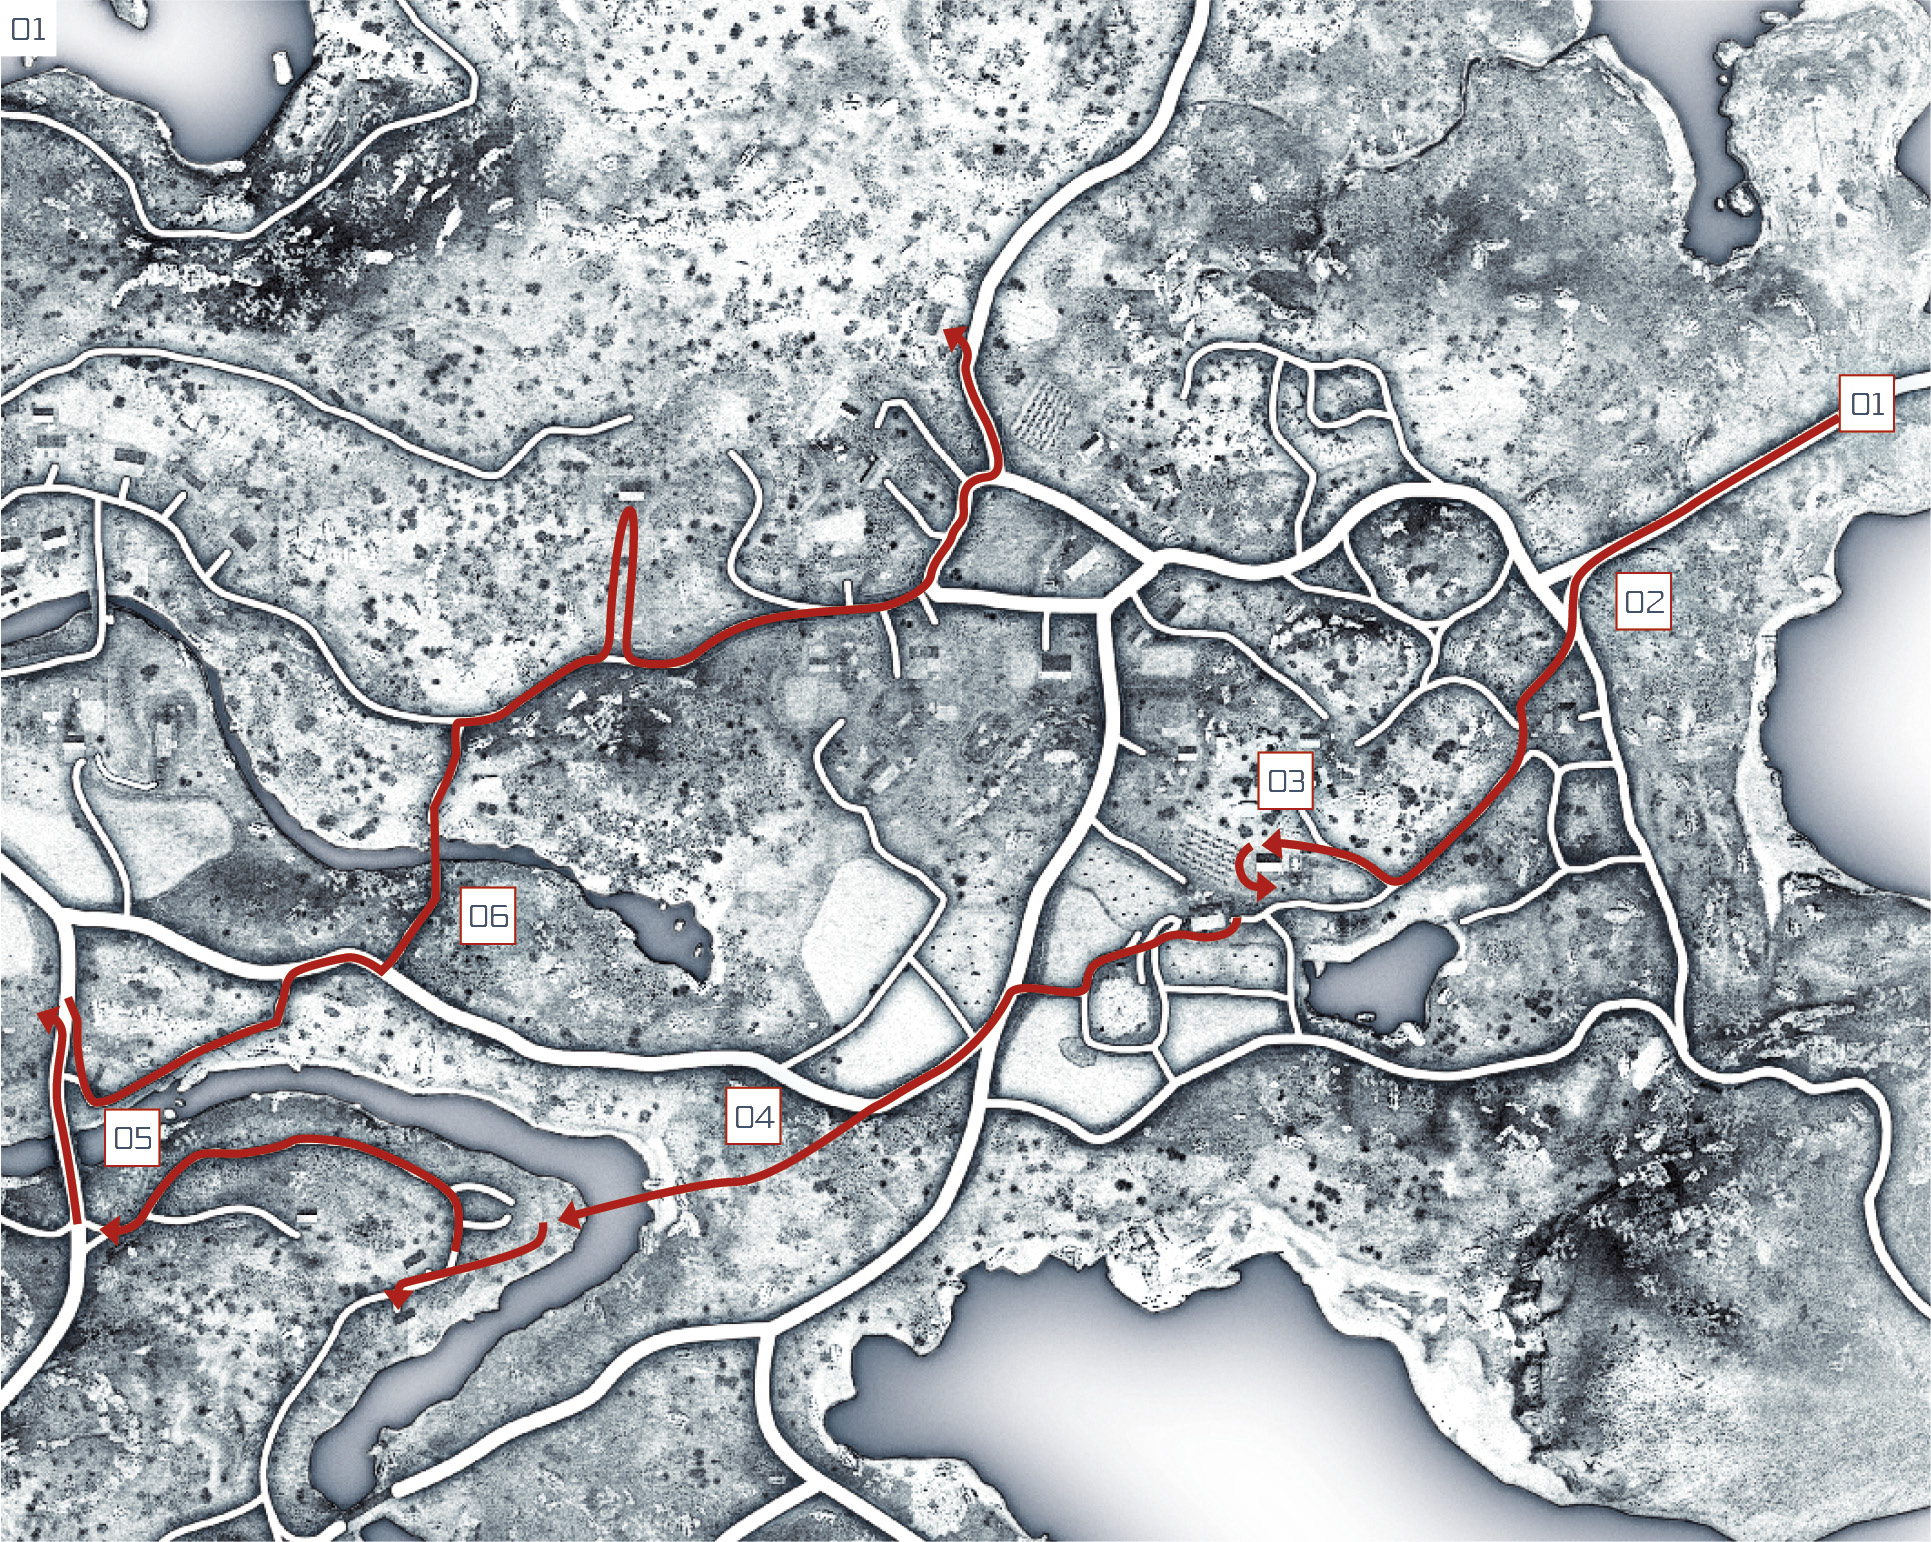
/ to ask Revere for directions during the journey... or follow our annotated map for precise guidance. Each number corresponds to an important step covered in the walkthrough entries that follow: you start, naturally, at position 1.
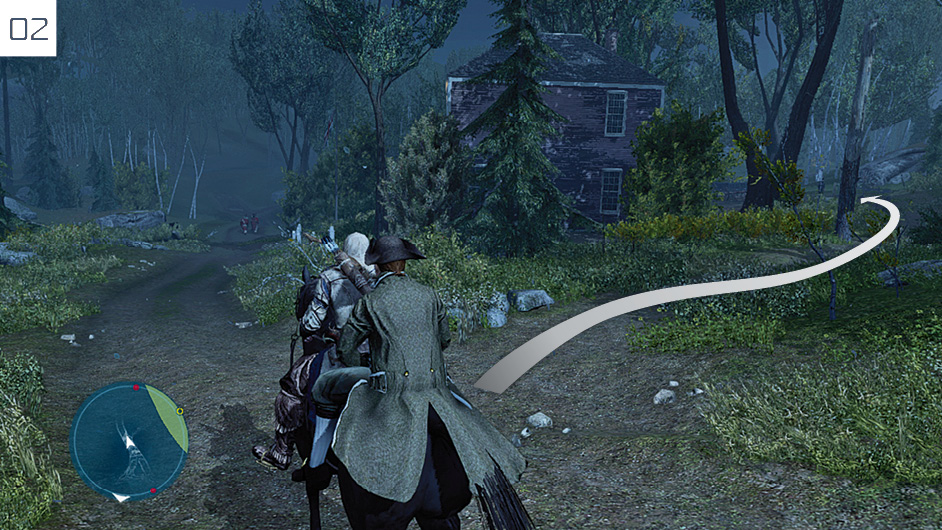
It’s vital that you avoid Redcoat patrols to complete the main Optional Objective. The first will pass by when you reach the first junction; slow to a trot and move along the left fork until they pass. The next part of the journey requires that you follow a faint trail that can be hard to see at first; look for it in the position shown here. Once behind the house, follow the trail to the southwest.
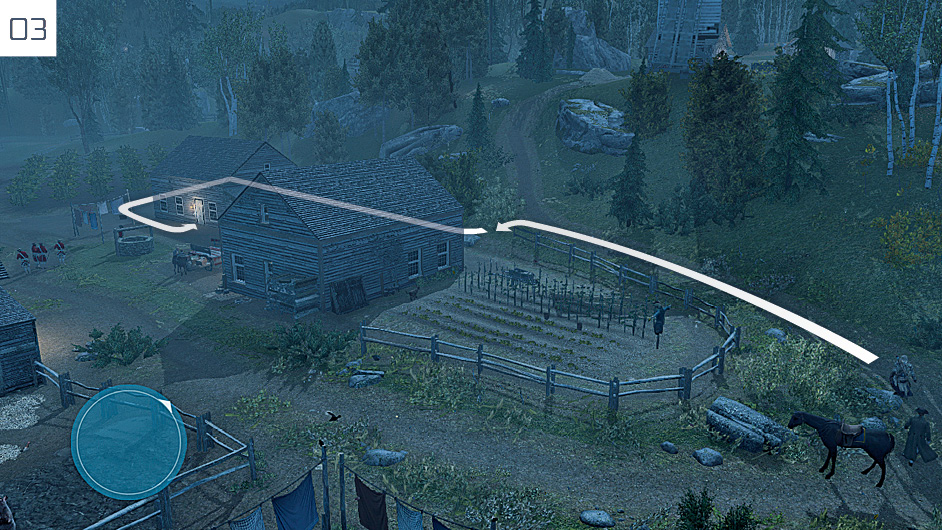
When you approach the first house, don’t ride into the center of town; instead leave the horse and move behind the house as directed here. Check that the coast is clear, then walk around to reach the front door. Approach it and press  /
/ . When the cutscene ends, continue along the path. You can cut through the fields to avoid patrols on the roads: keep a keen eye on the mini-map.
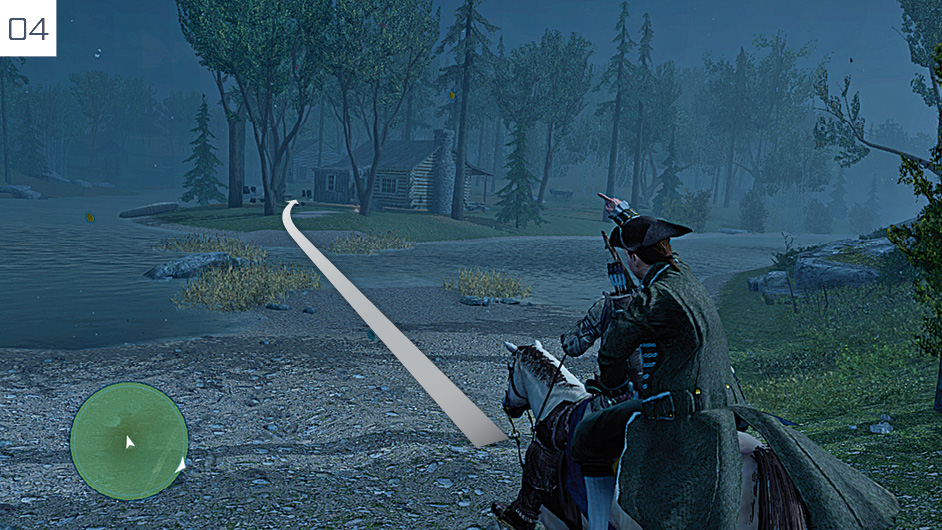
With this shortcut through the wooded area, you can find a secluded crossing where the water is shallow enough for your horse to wade to the opposite bank. After you pass the first house, the door you must knock is at the front of the next building on your left.
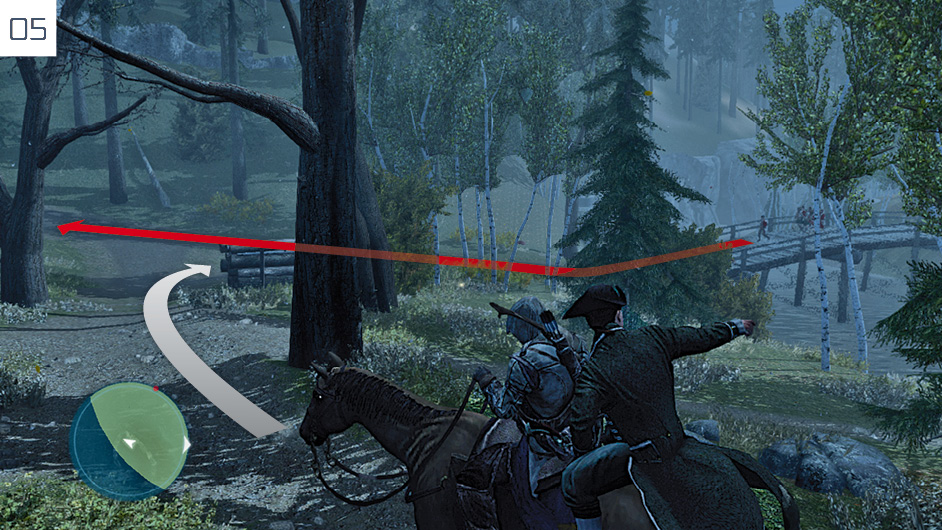
Ride on the riverside trail until you reach a bridge. Wait out of sight until the Redcoat patrol crosses, heading in a southerly direction, then gallop over it and approach the first house on the left. Dismount and approach the door. If you have escaped detection until this point, the first Optional Objective is completed here.
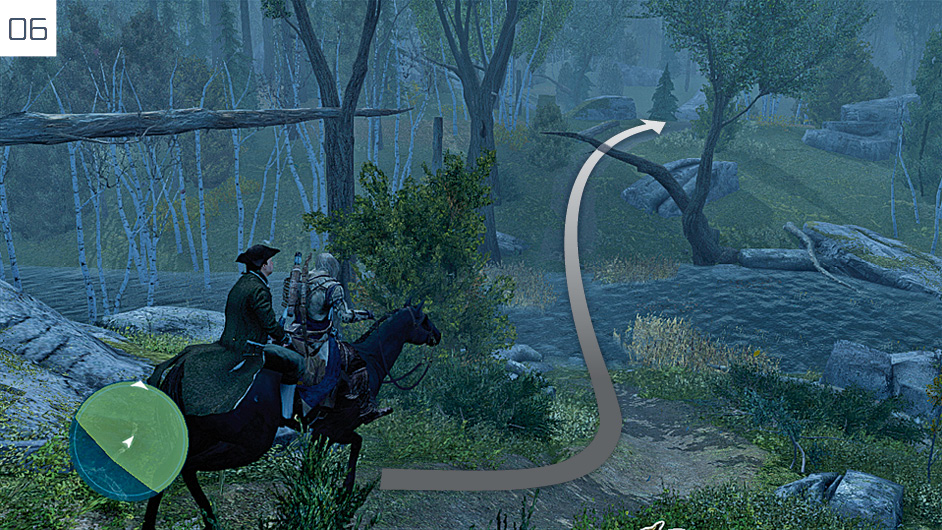
After the cinematic twist, a new Optional Objective is introduced to add an element of haste to the next section of the journey. Immediately after the cutscene ends, turn 180 degrees on the spot and ride behind the first house on your left to find a narrow trail leading east, as shown on our map. When you arrive at the river, you can cross via the ford illustrated here. After you reach the next door – a journey with no further hazards if you follow the path we suggest – more traditional waypoints are employed to guide you to the final destination. On arrival, enter the house to end the Memory.
Lexington and Concord
Mission Overview
|
Optional Objectives |
|
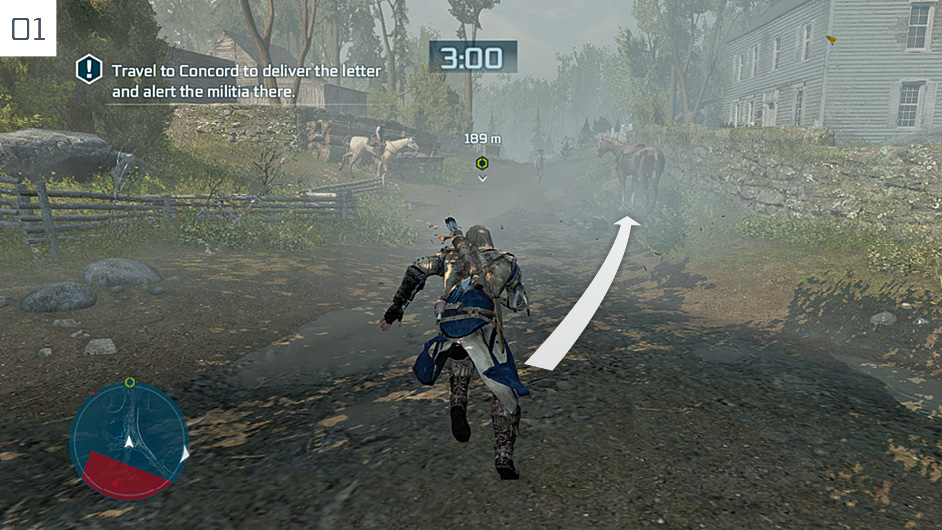
Strike up a conversation with John Parker at the Memory Start marker to begin. When play commences, there is a three-minute time limit to beat. Start by mounting the horse on the right-hand side of the track. The path you travel is the final section of the Midnight Ride journey in reverse order. Stick to the trail, spur your horse at regular intervals for maximum speed, and it is actually a simple journey – despite the chaos unfolding around you.
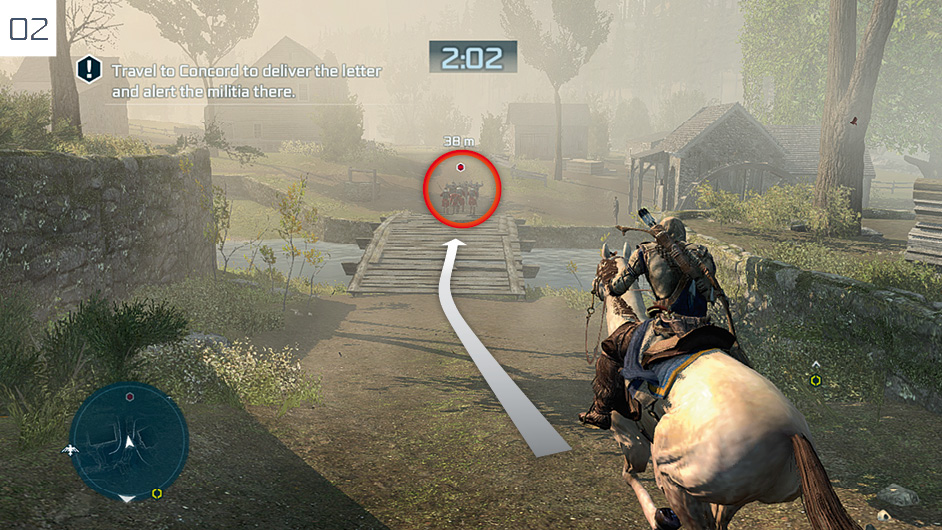
When you reach the west side of Concord, the first Optional Objective appears. To complete it, ride to the red marker in the south when you reach the junction, and ride behind to the soldiers driving their civilian captives along the path over the small bridge. Press  /
/ to leap off and perform an assassination on the Officer at the rear of the group, then kill his three subordinates. You can then jump back on your horse and race through the remaining waypoints.
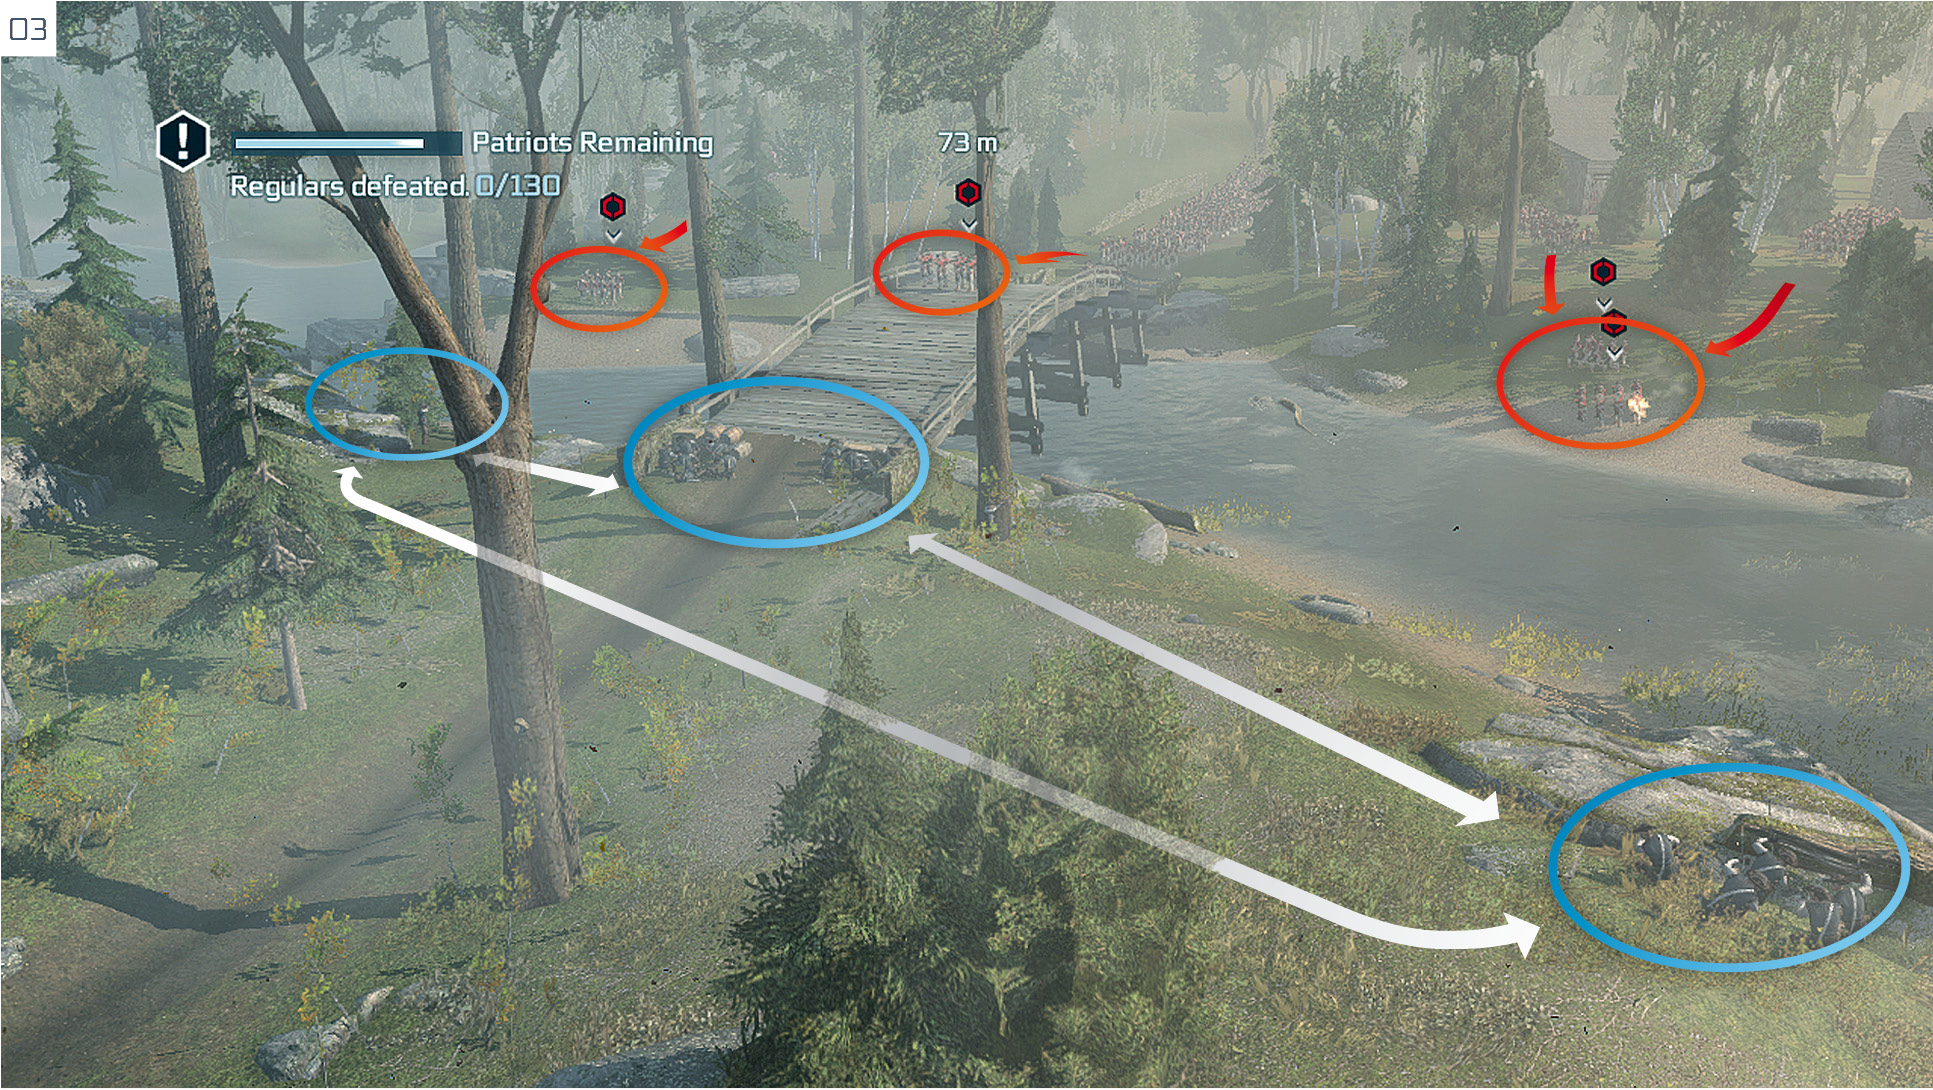
The final part of this Memory sees Connor take charge of three firing lines as they seek to repel the advance of the Redcoats from the opposite bank of the river. The opposing soldiers march into the positions marked on the annotated screenshot here. Connor must ride between his soldiers and issue the instruction to fire at the most appropriate moment. Though the process is simple enough at first, the sheer weight of enemy numbers ensures a frantic finale.
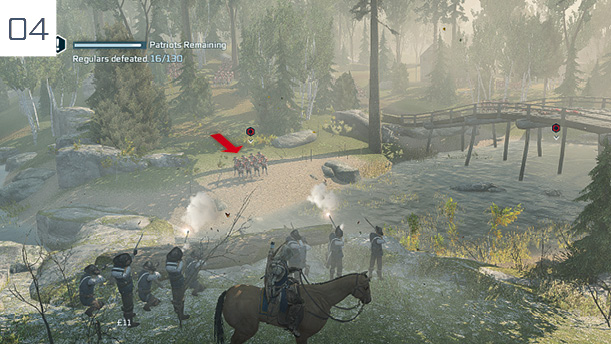
To issue a fire order, press  /
/ inside the circular zone next to each firing line. Try to time these commands to the precise moment that enemy soldiers move within optimal range. This is usually just after they stop their advance (as shown here), which leads to a perfect result and a strike towards the running Optional Objective tally. Use the mini-map to judge which position requires your most urgent attention: red dots (
 ) are moving soldiers, red hexagons (
 ) indicate those within firing range, while flashing red hexagons represent those currently firing on Patriot positions. The bar in the top-left corner of the screen indicates the strength of Connor’s force, and you must defeat 130 Redcoats to win the skirmish. When it ends, move to the waypoint marker to end the Memory.
Conflict Looms
Mission Overview
|
Optional Objectives |
Preparation |
|
|
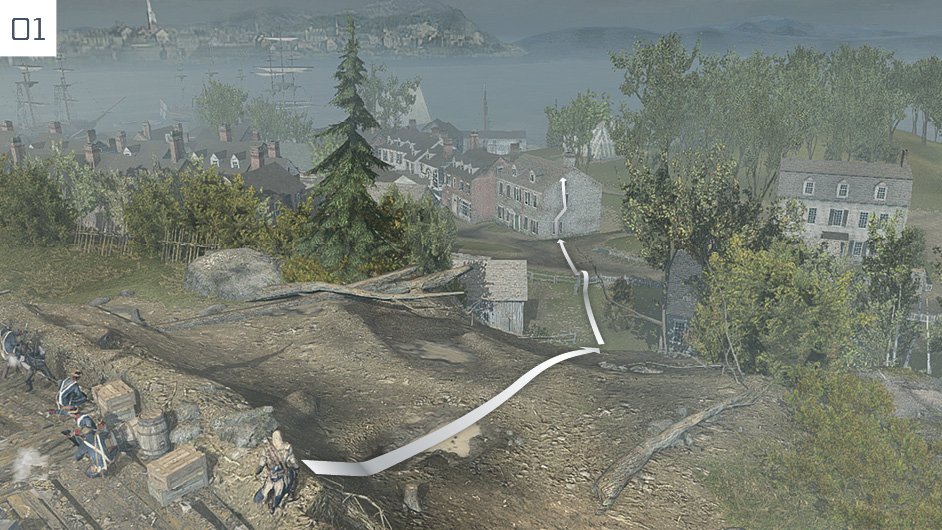
Speak to the soldier at the Memory Start marker to begin. Play resumes in a new region: Bunker Hill. Follow the scout on horseback, then run to Israel Putnam. After the cinematic, begin by following the route illustrated here and climb the first house on the right.
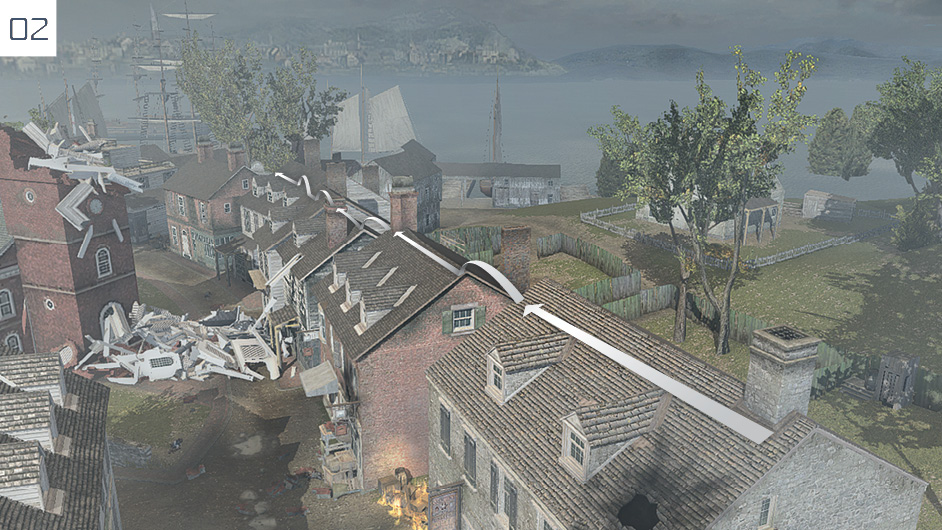
Connor must stay in motion to avoid taking damage from the relentless barrage. Run along the rooftops, taking care to angle your jumps for effortless landings, until you reach the last red brick house in the row.
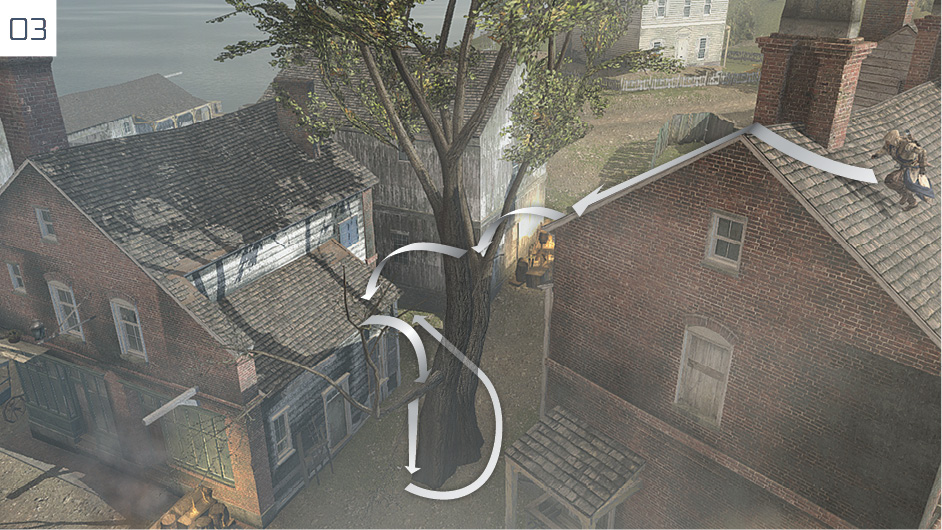
Use the tree (to be specific, the right-hand V-shaped section) and low roof to descend to ground level, then cut through the alleyway to the right of the house.
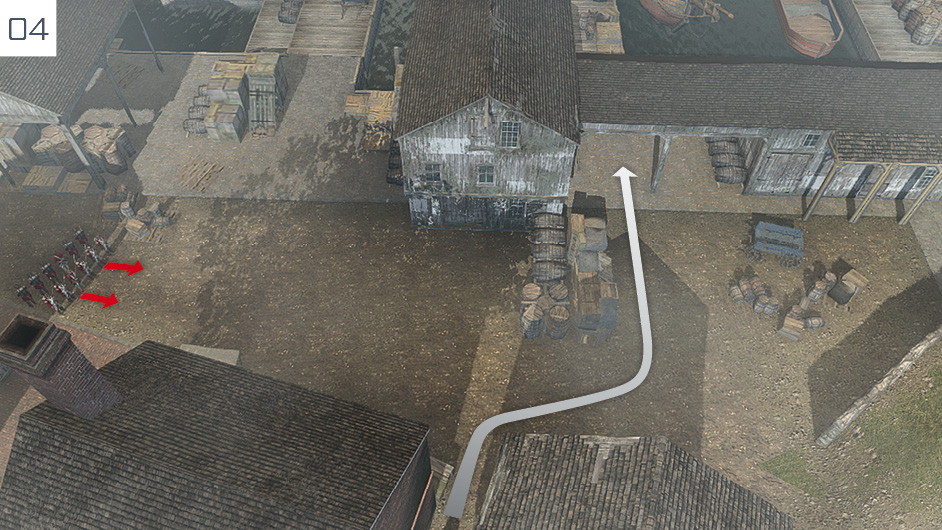
As you exit the alleyway, make a quick dart to the right to move behind the barrels and avoid the Redcoats.
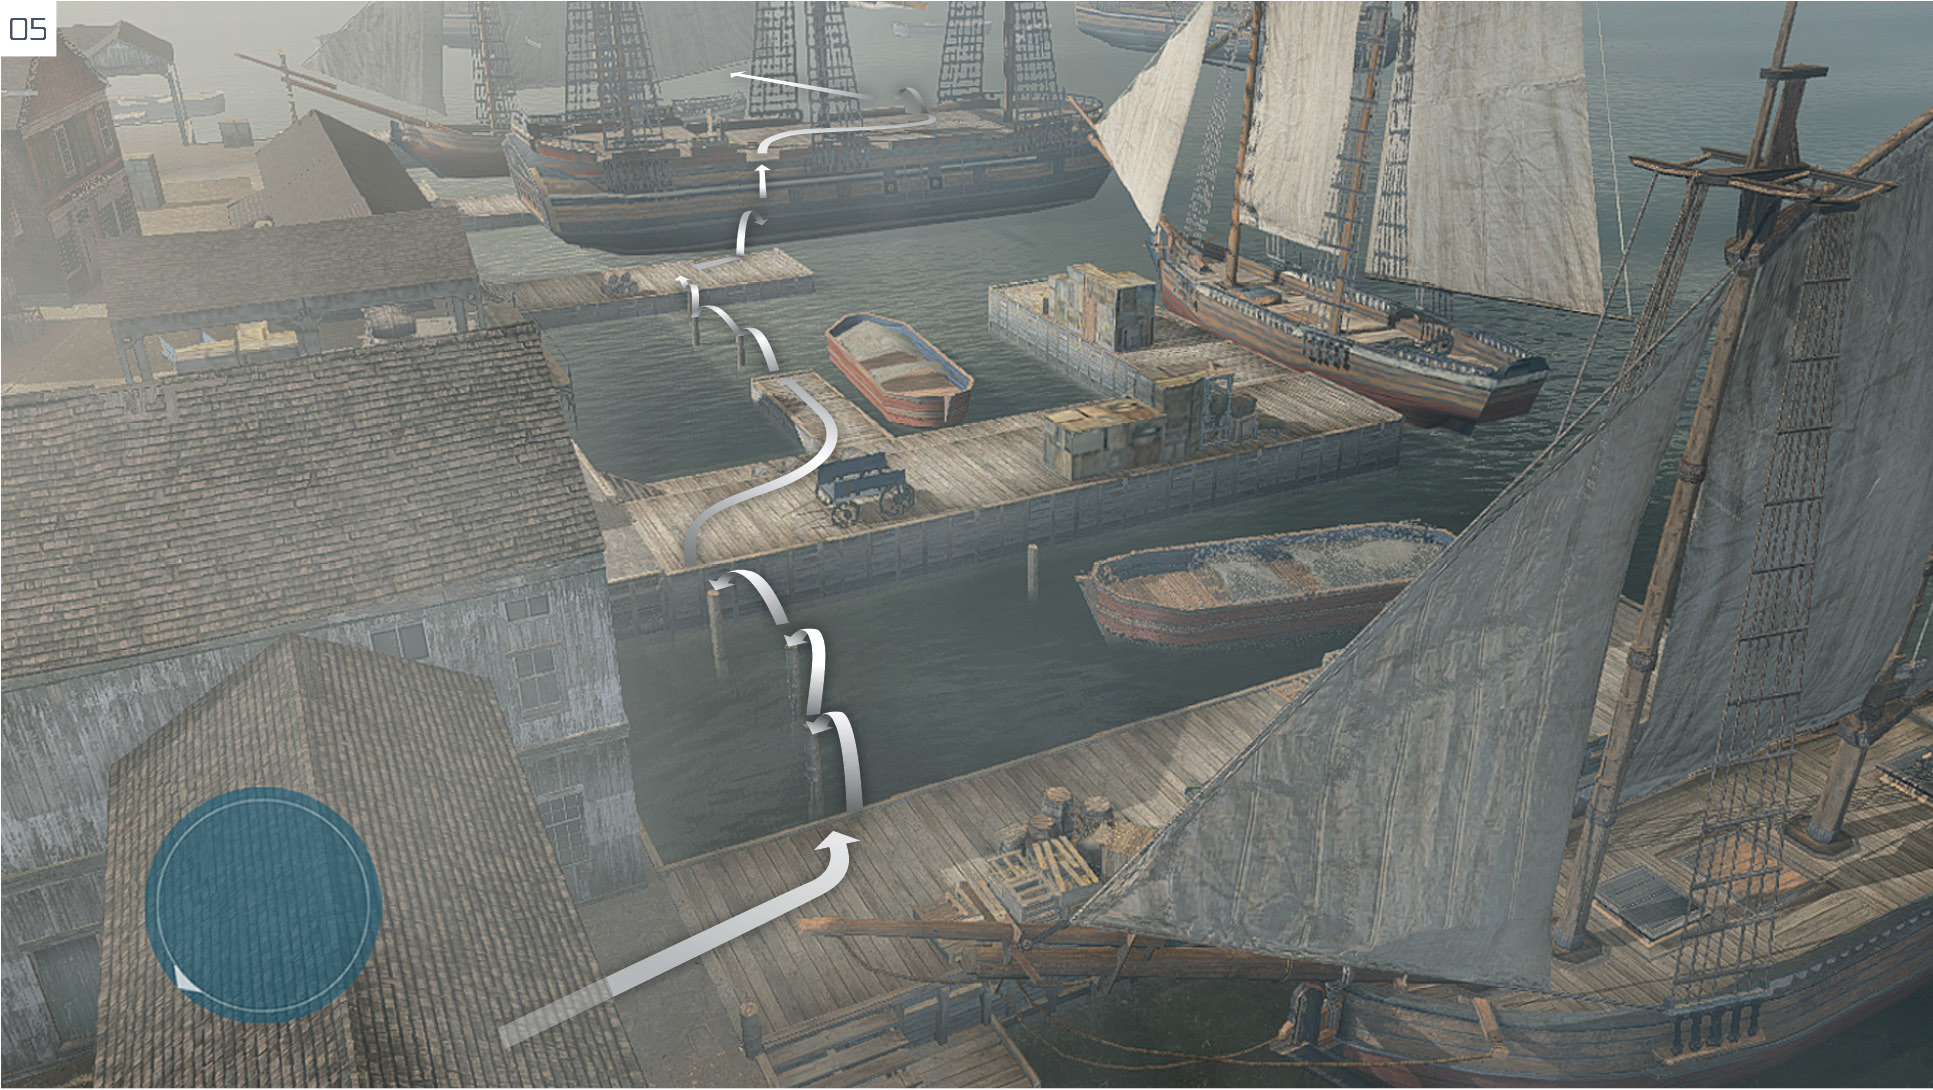
The route illustrated here is quicker than swimming all the way, and features no element of danger. Ignore the waypoint near to the closest vessel for now, and swim to the ship further east. As you approach it, the first Optional Objective ends and two new challenges appear. One compels you to stay undetected; the second (air assassinating a Grenadier) simply complicates the first. Players who prefer action (or wish to leave Optional Objectives until a later date) can ignore our stealth-based walkthrough and fight the soldiers stationed on both vessels instead.
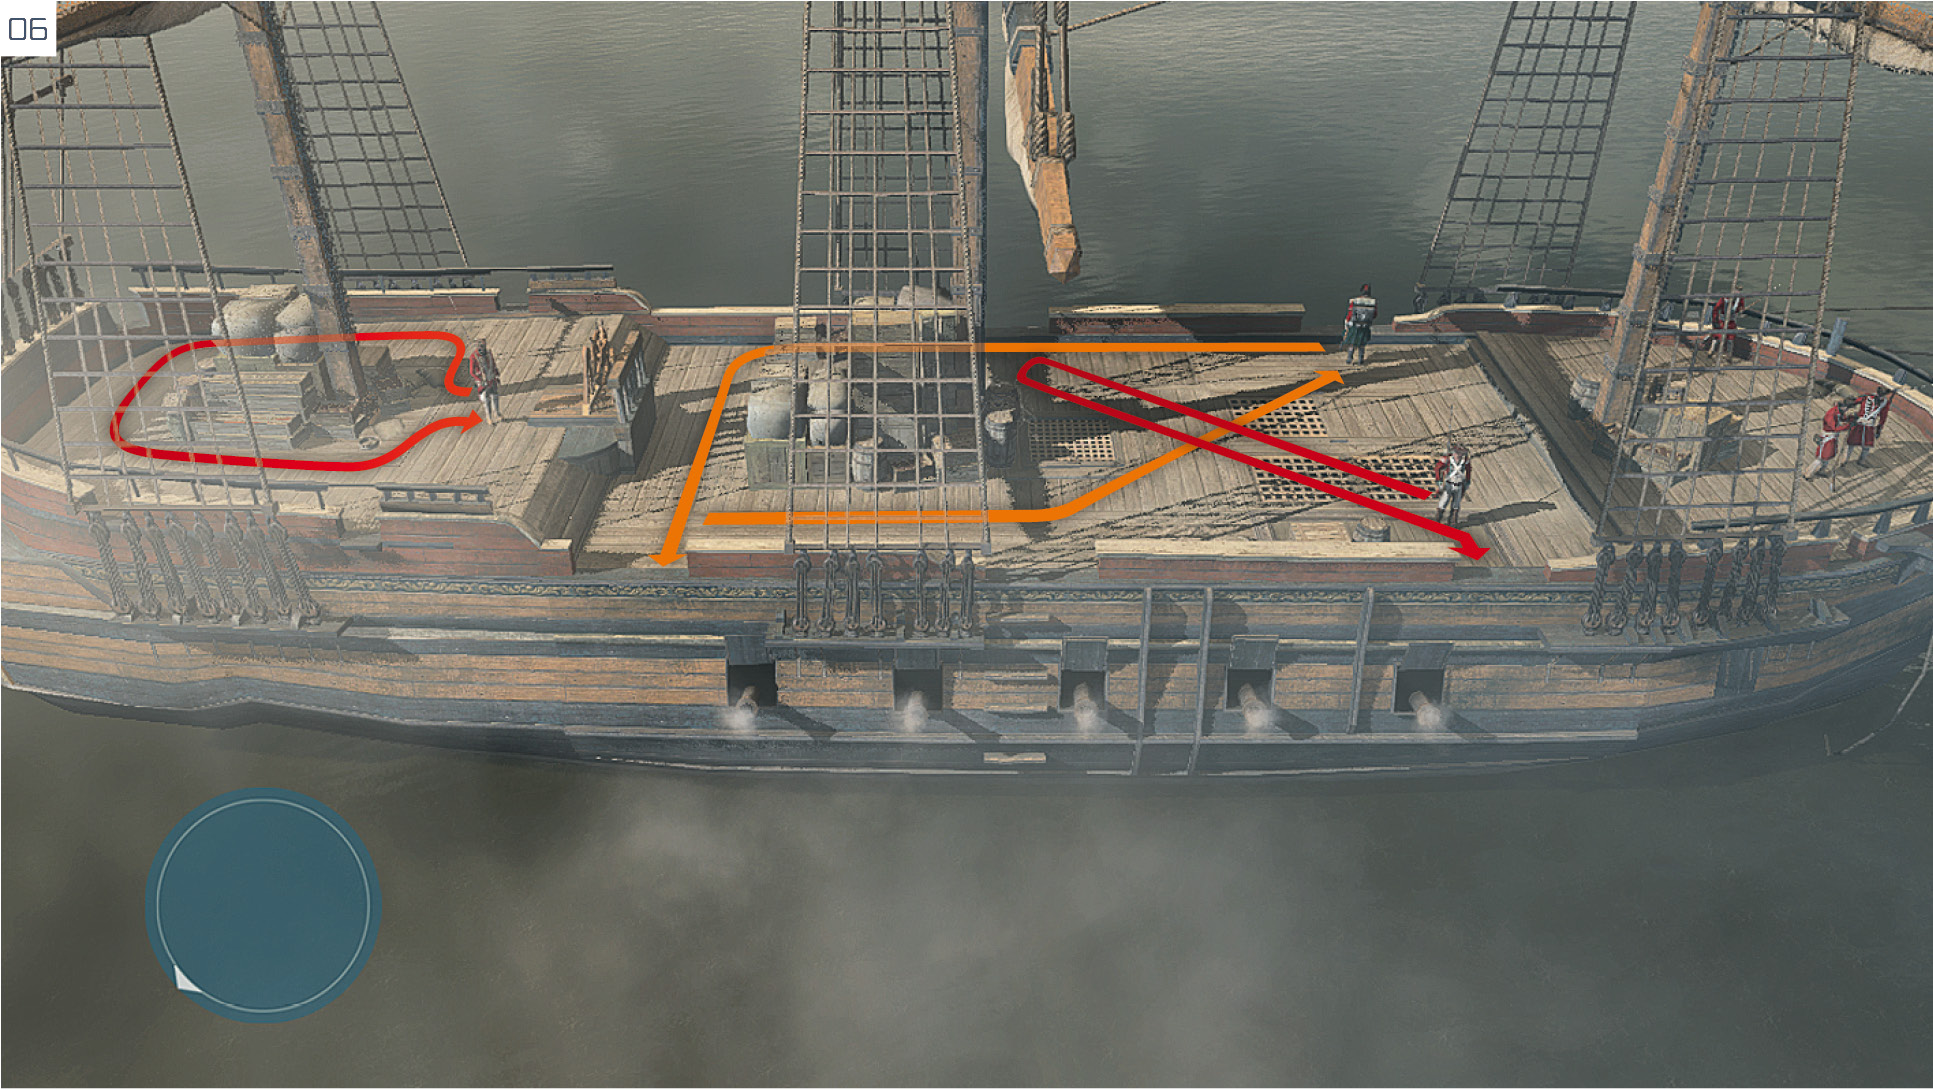
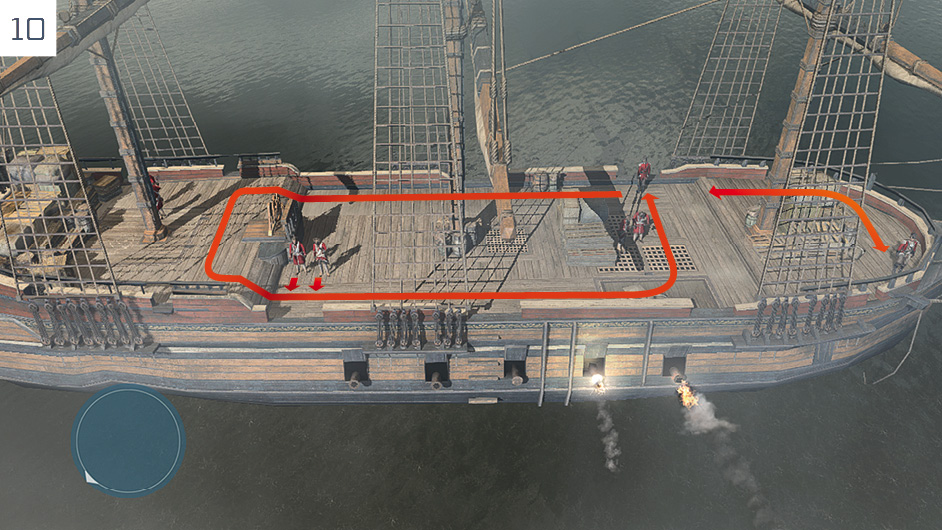
Swim to the boat behind the ship and use it to jump over to the stern. Our annotated screenshot shows the patrol routes of the soldiers on the ship. The target marked in orange is the Grenadier that you must assassinate with a very specific method.
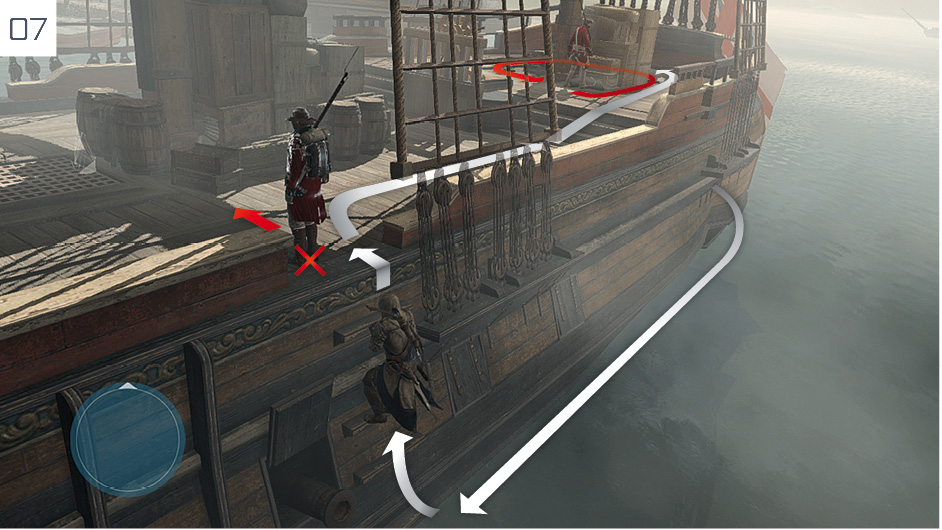
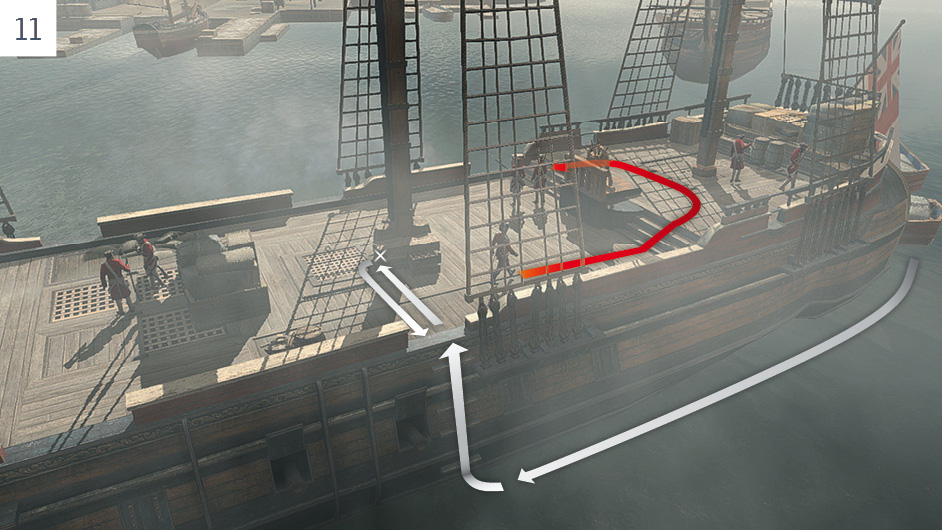
Climb on the port (east) side of the vessel, then carefully move into the position illustrated here. Wait until the Redcoat stands above you, with the Grenadier facing elsewhere on the opposite side of the ship, then perform a ledge assassination to hurl him into the water. You must then climb up and use Fast Walk to move into position behind the crates at the stern before the Redcoat there finishes his short patrol. This is something that you can accomplish immediately, though you can wait for another full rotation of the “clockwork engine” if you lack confidence.
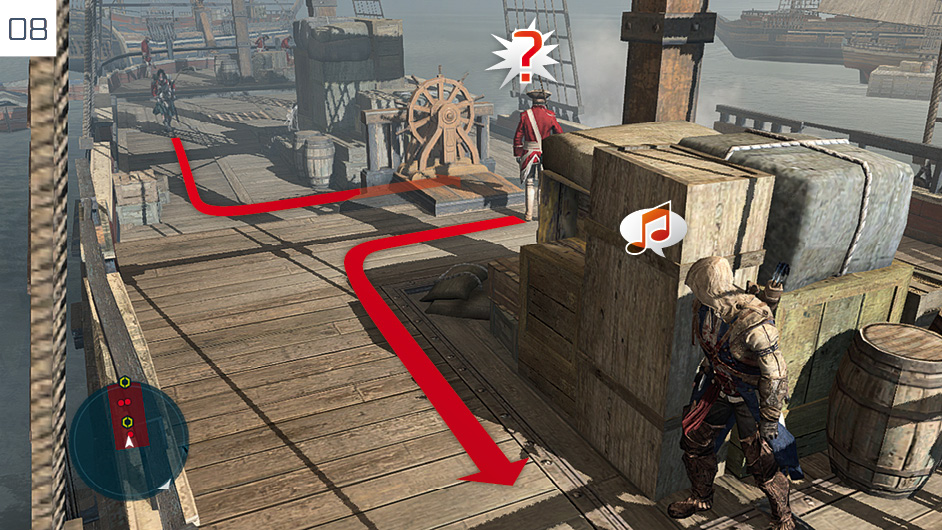
From your position behind the crates, wait until the soldier ends his patrol at the wheel, then use the Whistle ability to force him to investigate. This will enable you to perform a corner assassination before the Grenadier’s patrol brings him into visual range of the act.
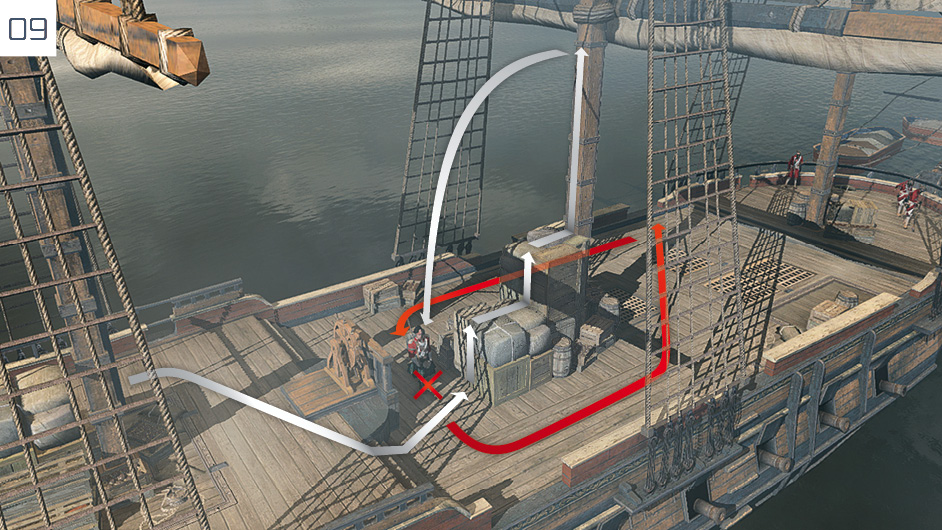
Wait and watch the Grenadier. When he sets off on his patrol, climb the mast (start on the pile of crates) and wait until he moves beneath. Perform an air assassination when he reaches the position behind the crates. You can now calmly walk over and plant the explosives at the waypoint marker, then immediately jump overboard.
Swim to the next ship and, once again, use the boat behind the aft section to begin your climb. Traverse to the port side (where the cannons lie dormant) and observe the two patrols carefully. With all soldiers potentially watching others, this is a puzzle with no apparent solution – until you realize that the answer is both bold and bloodless.
Wait until the patrolling Officer passes your position, then immediately climb up and Fast Walk to the waypoint marker. Press  /
/ as soon as you can to plant the explosives; the Officer may notice but not fully detect Connor at this point. Fast Walk back to the edge of the vessel and dive overboard. Moments later, the explosion will kill all guards instantly. You must now climb back onto the ship and scale the central mast to place a flag. With this final feat accomplished, perform a Leap of Faith into the water and swim towards the shore to end the Memory.
Battle of Bunker Hill
Mission Overview
|
Optional Objectives |
|
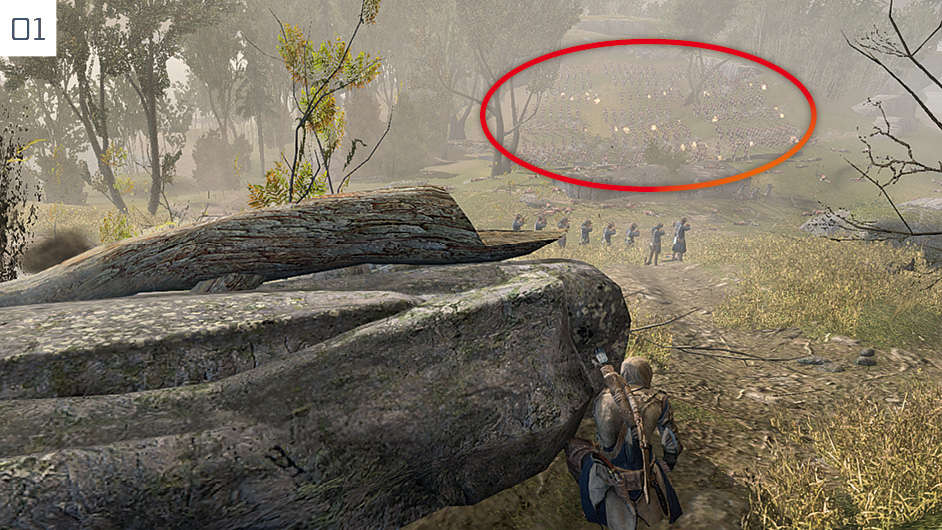
This Memory begins immediately on completion of Conflict Looms. Mount the horse at the waypoint marker and follow the Patriot until you arrive for Putnam’s speech. When play resumes, you must use cover elements and careful timing to cross the battlefield – and, if you wish to complete the Optional Objective, avoid moving under fire. To achieve this, you must make each advance at very specific moments. Look for spoken and visual cues. When you hear cries of “Incoming!” or “Take cover!”, the Redcoat lines are poised to fire. As you hide, watch for widespread bursts of muzzle flashes from the Redcoats (pictured here); when these end, it’s safe to make a dash to the next position.
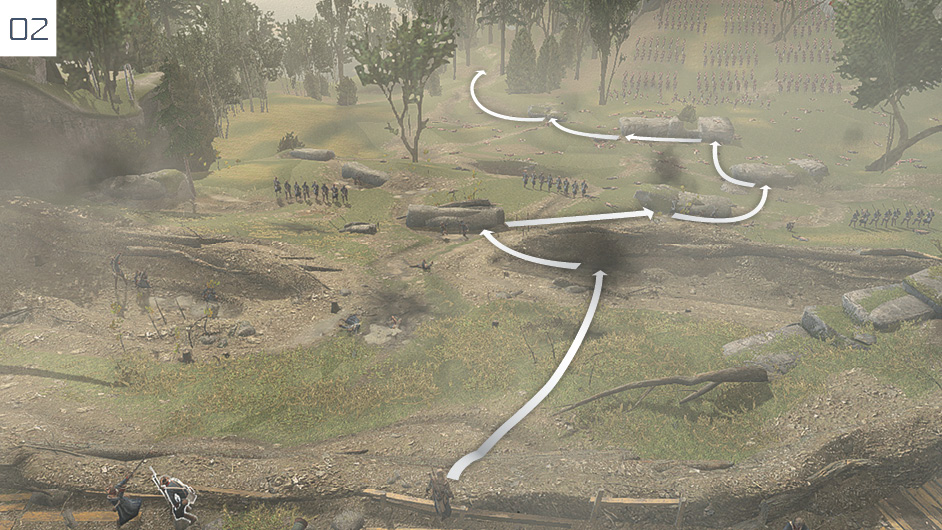
This annotated view of the battlefield presents the optimal route between potential cover positions. There is, naturally, a checkpoint at the start of this set piece, so don’t hesitate to return to the beginning if you fail the Optional Objective.
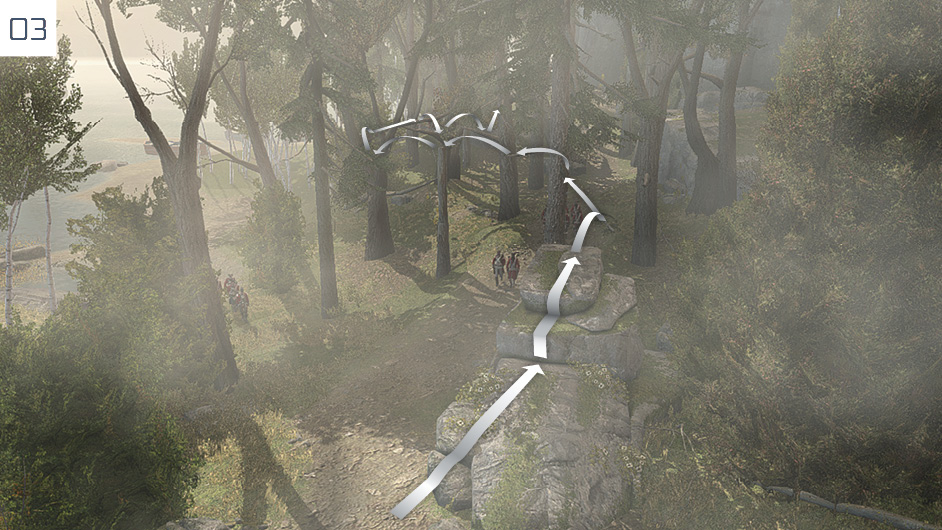
Once you pass safely to the left of the main British forces, two patrols will approach your position. You can either fight them, or bypass them altogether by free running in the trees, as shown here.
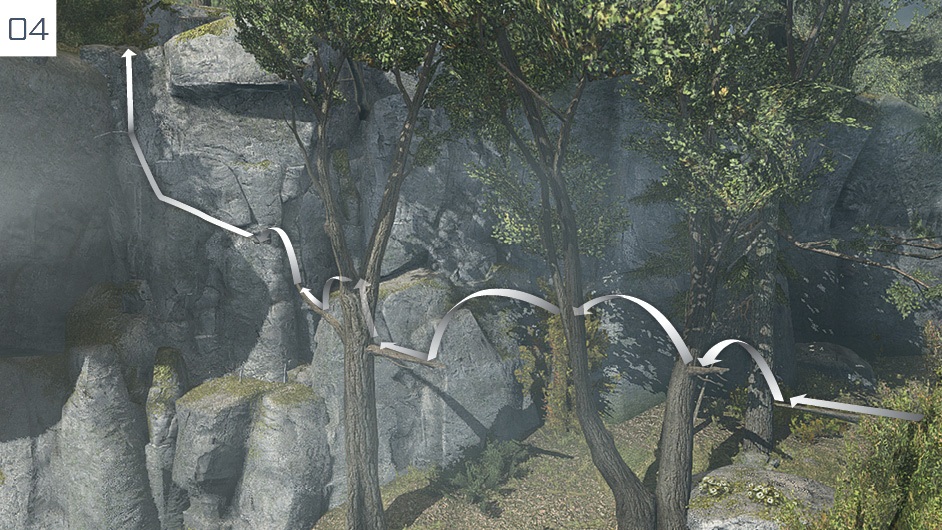
Once you reach the cliff below the waypoint marker, climb via the route illustrated here. When you reach the top, two new Optional Objectives become active: to perform no more than four regular kills, and to air assassinate Pitcairn without being detected.
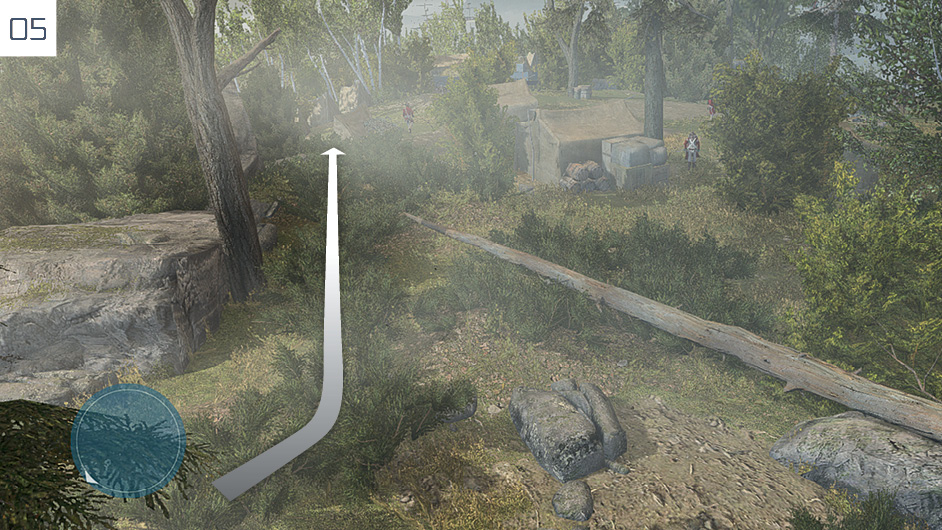
From the top of the cliff, enter the Stalking Zone and use it to carefully approach the hilltop camp.
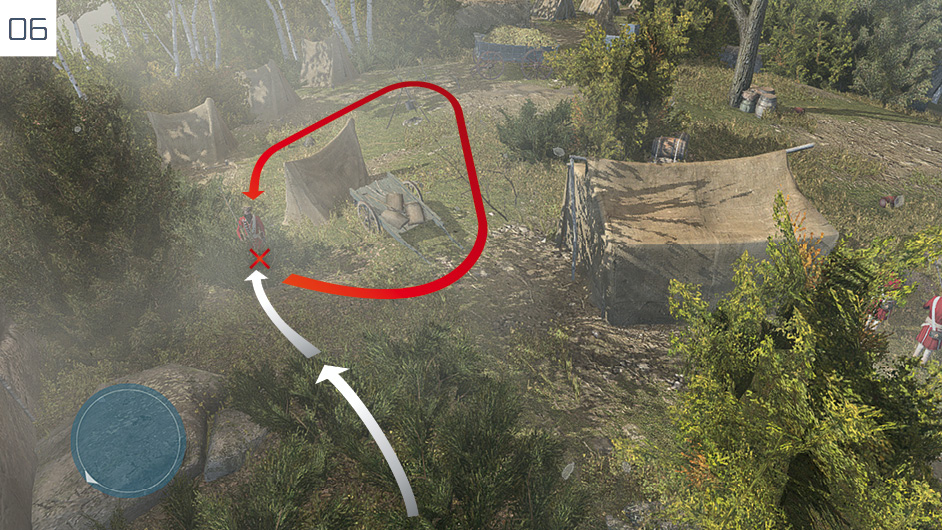
Follow the Stalking Zone as it curves off to the left, then wait and watch the patrolling Redcoat in the area ahead. When his back is turned, cross the gap between the two patches of undergrowth. When he approaches your position, perform a stealth assassination. It’s not strictly necessary to kill him, but it simplifies the next steps immeasurably.
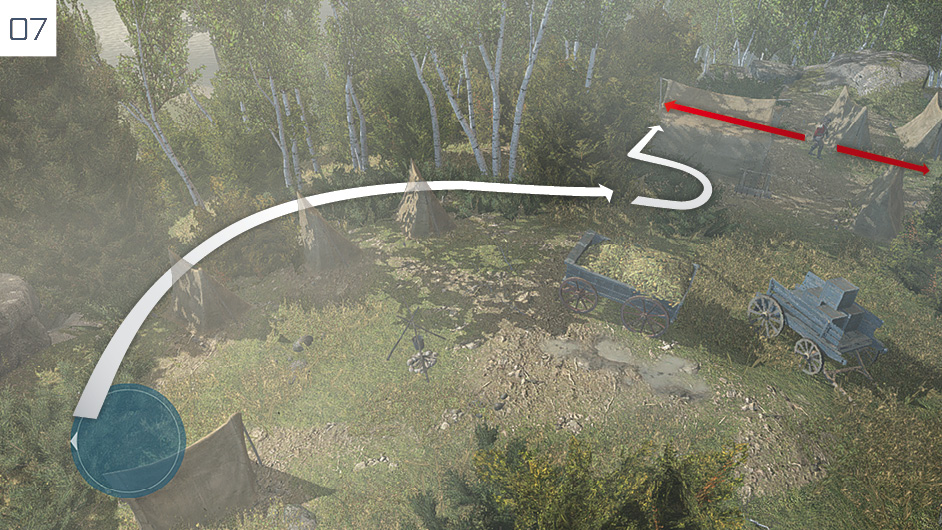
Sneak through the undergrowth behind the tents until you reach another break in the Stalking Zone, by a cart full of hay. Watch the camping area until you see an Officer move out of sight, then Fast Walk into the next patch of undergrowth.
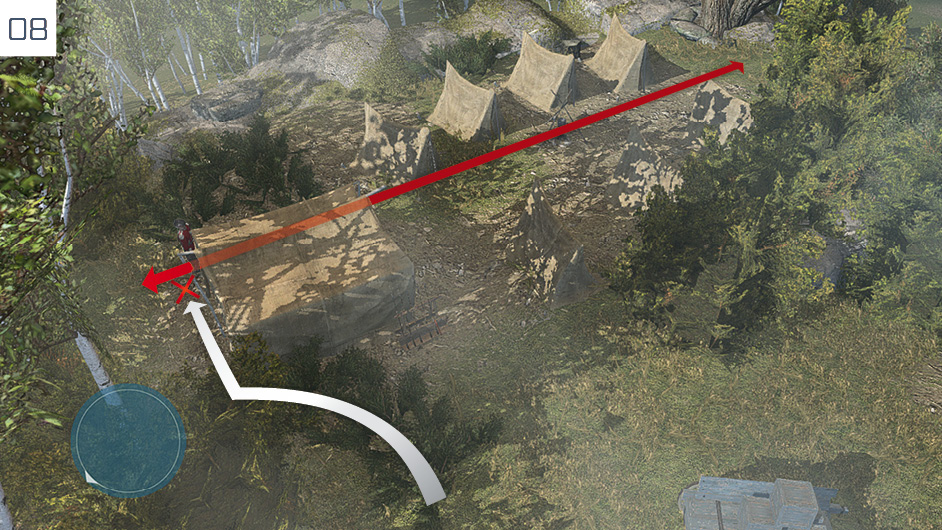
Take up position behind the canvas tent, then perform a corner assassination when the Officer approaches.
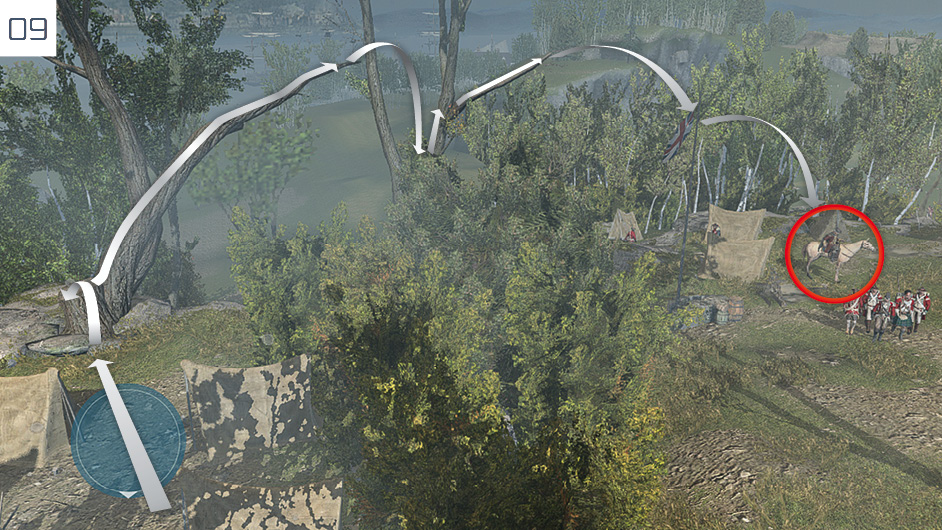
You can now free run through the trees to reach a position above Pitcairn and perform an air assassination. Leap from the first bough into the V-shaped section of the next tree, then tap  /
/ to climb. Run to the end of the branch, then jump over to the flag pole. From here, all that remains is to target Pitcairn and press
  /
/ to begin the closing cinematics of Sequence 07.
Fighting Pitcairn While most Optional Objectives make Memories more difficult to complete, the stealthy approach to assassinating Pitcairn that we present is easier and quicker than engaging him – and his many allies – in open conflict. If you favor a balls-over-brains approach, it’s prudent to dispatch Pitcairn’s men before you engage the Templar himself. While he is vulnerable to the Counter Disarm move, note that you cannot complete a combo or Counter Kill, or harm him during a Kill Streak until his life bar has been depleted. |