
Assassin's Creed III Guide Side Quests
Naval Locations: Captain Kidd's Treasure
Introduced late in Sequence 05, Peg Leg is an elderly sailor who requests that Connor locate and deliver miscellaneous treasures called “Trinkets”. The exact locations of these items, which are stored in tiny chests, are documented in the comprehensive Collectibles section at the end of this chapter. From the start of Sequence 06, you can collect and present Peg Leg with these objects. Once you reach specific collection milestones, you can access special Memories that take place in faraway Naval Locations.
After you speak to Peg Leg and unlock a Captain Kidd Memory, you can travel to the destination via the East Coast map, accessed via Robert Faulkner or any Harbormaster. We suggest that you do so at an early stage. The money that Connor can loot from Chests in each expedition adds up to a small fortune of over £20,000, while the final reward is a special item that can make it easier to complete damage-related Optional Objectives.
Fort Wolcott
Overview
|
Unlock Conditions |
Optional Objectives |
|
|
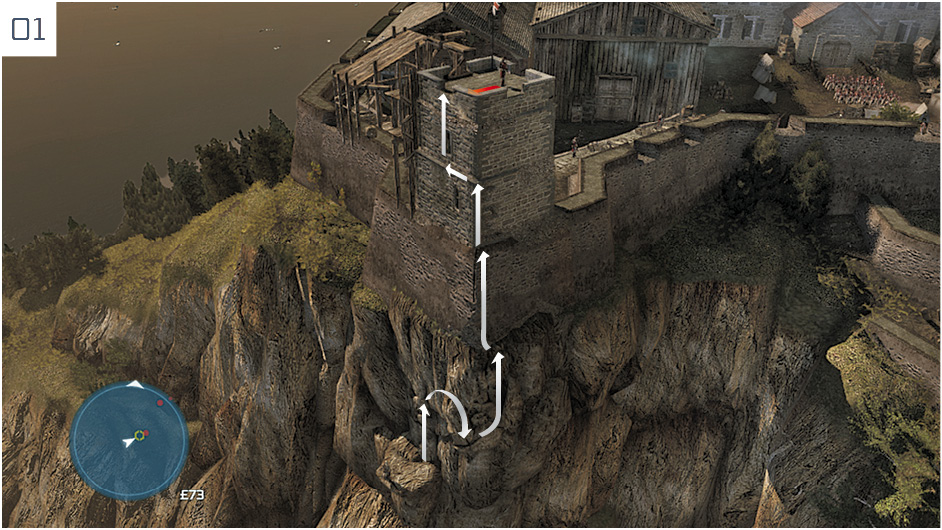
You begin with a dizzying ascent to the top of the tower overlooking the ocean. When you reach the upper ledge, a guard will stand in place until you oblige with a ledge assassination. Climb up to trigger a cutscene. Press against the wall, whistle to attract the next guard, then perform a corner assassination when he moves within range.
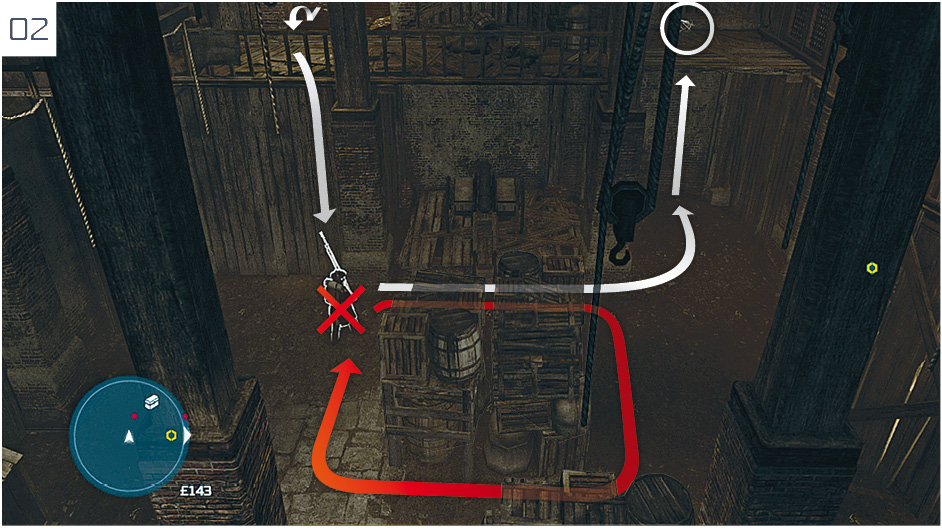
Run onto the wooden balcony and perform an air assassination on the guard patrolling below. From your position on the lower level, follow the route shown here to find a Chest containing £1,250.
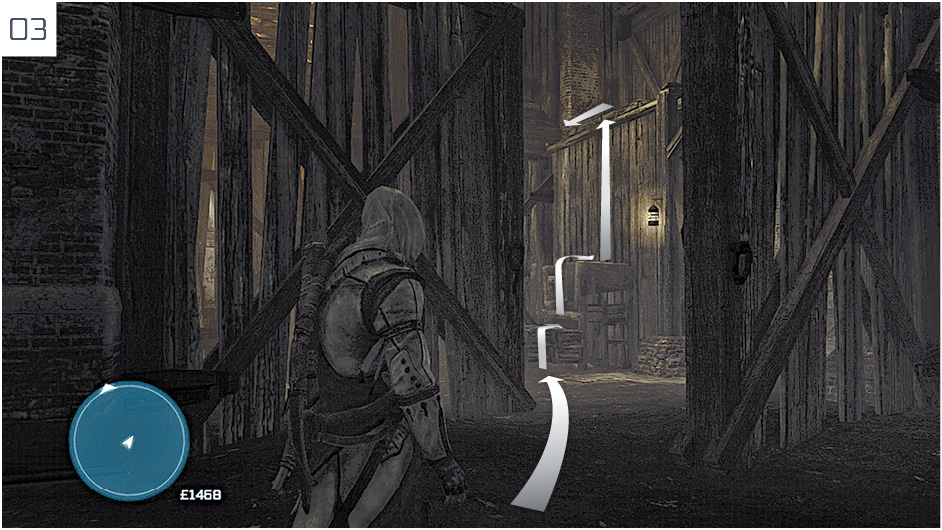
Move through the opening and climb to the upper level. From this point, stealth is mandatory.
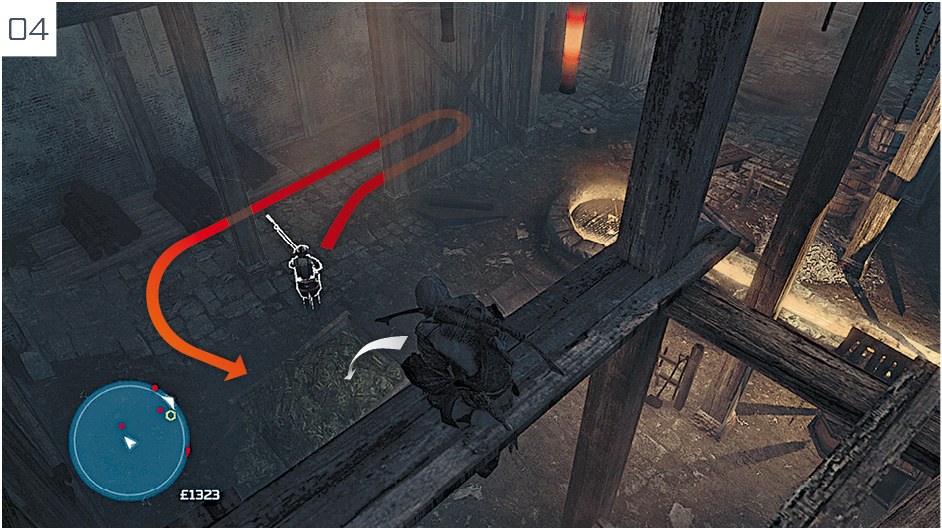
In the next room, turn left and watch the guard below. When he turns away, dive into the hiding place and assassinate him when he returns.
Remain in the hiding place and observe the second guard. When he turns away, run behind him to perform an assassination. Climb up to the balcony and dispatch a third guard with a ledge assassination when he strolls into position.
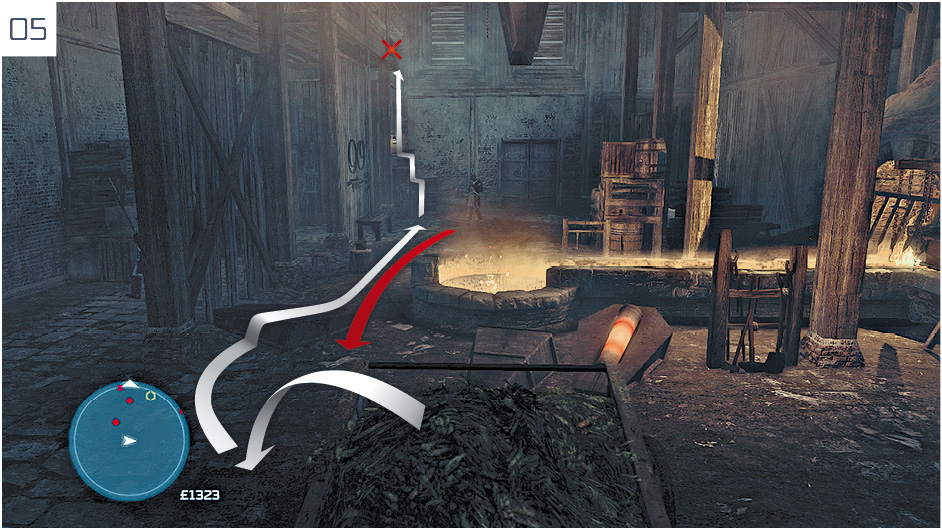
From the upper walkway, traverse via the hanging metal molds – using the Back Eject move when prompted – to reach an opening in the east wall. Jump through to reach the next room.
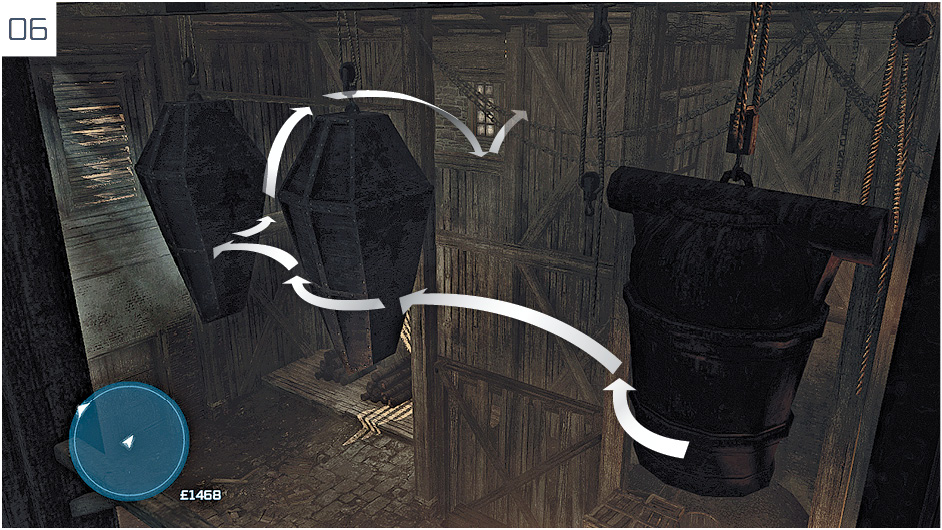
Use the lintels to traverse to the left, then Back Eject into the next room.
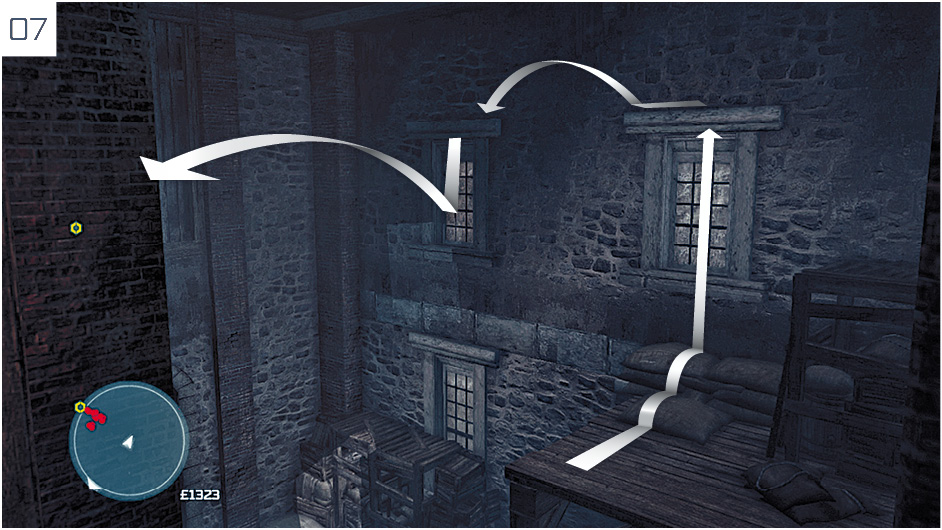
Use the light fixtures to cross the hall, ignoring the soldiers beneath, then jump through the open windows to reach a dormitory. Once inside, open the Chest on the table beside the third bed on the left to obtain £1,500.
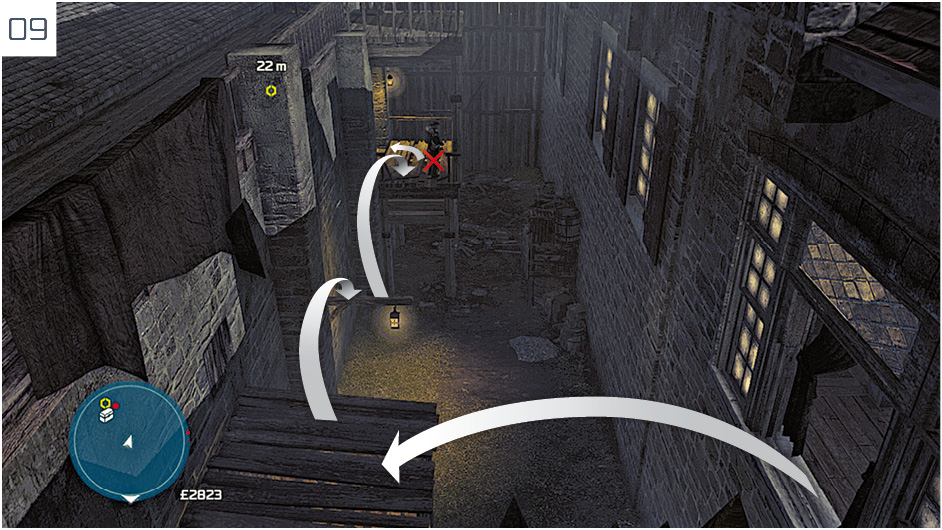
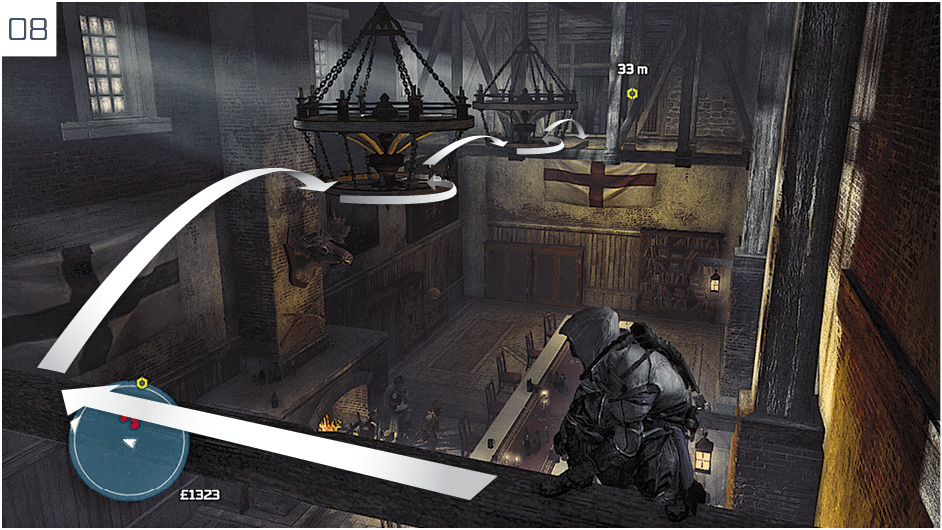
Jump through the next open window and follow the course shown here. Kill the guard with a ledge assassination to complete the Optional Objective.
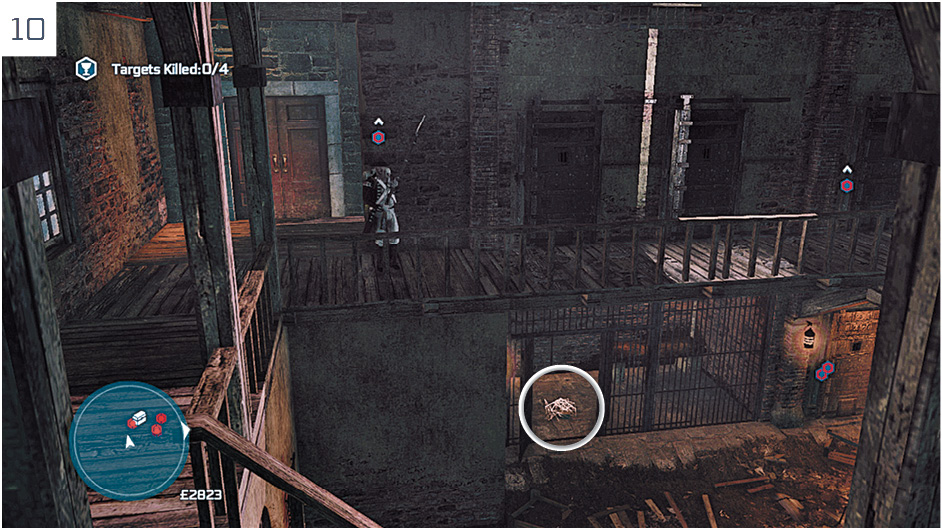
You must now kill the four guards in the prison, then scour the area for a clue in Eagle Vision (it’s in the cell to the northeast, lower level). Before you perform the latter task, though, be sure to open the Chest inside the cell pictured here to obtain £2,000.
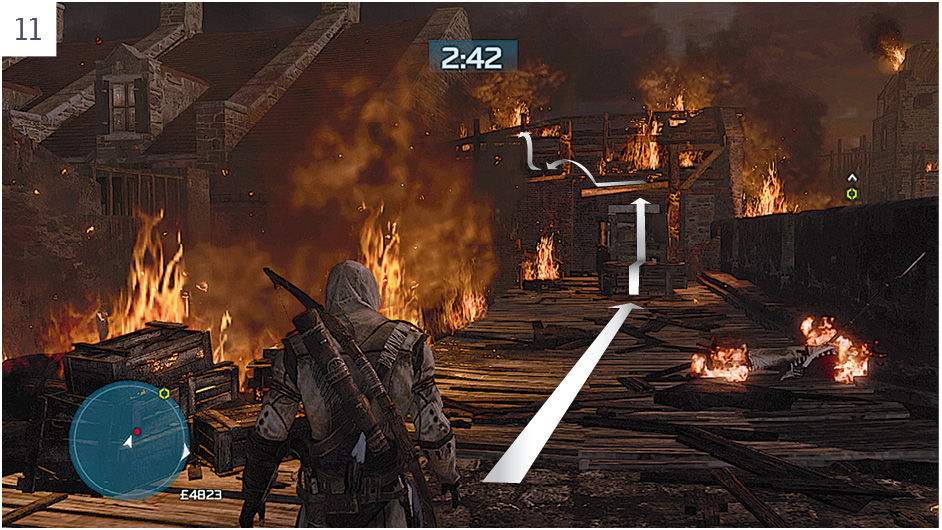
Connor is now confronted by a Grenadier; two successive Weapon Swipes followed by an attack while he lies prone will suffice. After the cutscene, run up the ramp formed by the collapse of the roof, then follow the route shown here to enter a building. Avoid the flames: these will cause you to fail the new Optional Objective.
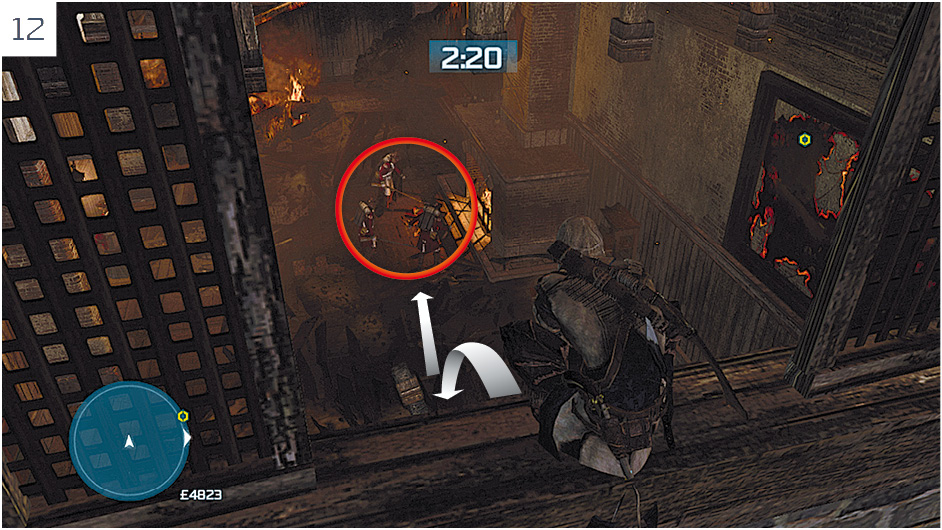
Inside the building, run towards the opening until the floor collapses, then jump through the two windows to reach the position marked here. To complete the Optional Objective and achieve a Kill Streak of three, open the fight with a Counter Kill and then dispatch the next two soldiers without pausing. There is a checkpoint prior to this fight if you need to restart.
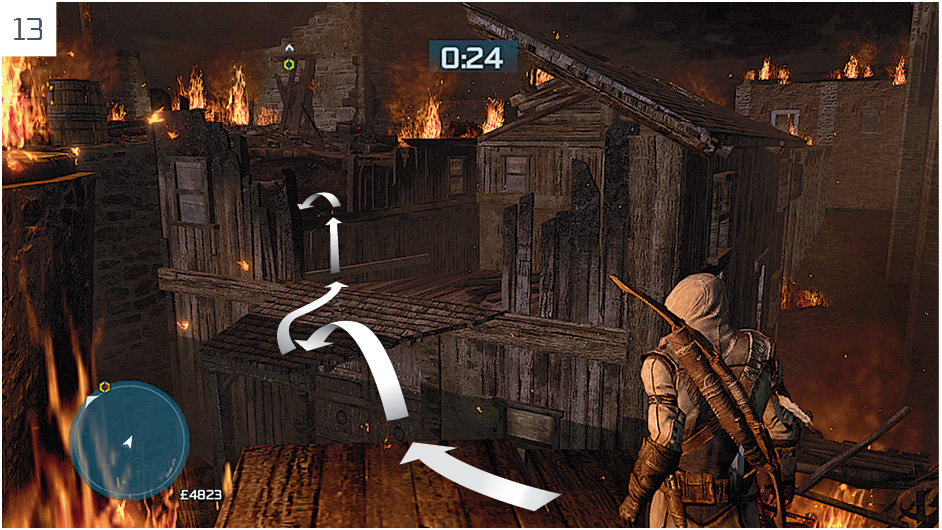
Follow the linear path, avoiding contact with the flames, until you reach the position marked here. Be sure to jump to the left – there is a dead-end to the right in the ruined building.
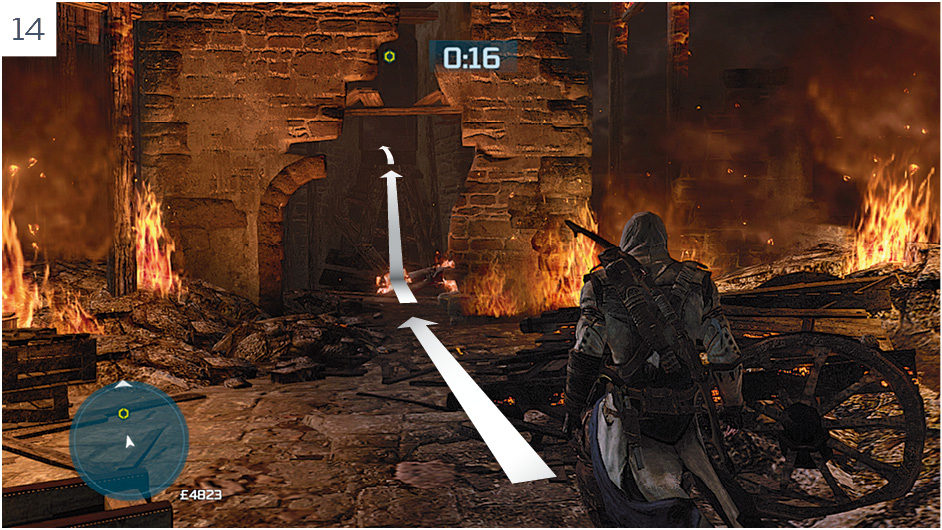
Finally, run through the tower and up the ramp. When you reach the end of this short path, Connor will automatically dive into the ocean below.
Dead Chest’s Treasure
Overview
|
Unlock Conditions |
Optional Objectives |
|
|
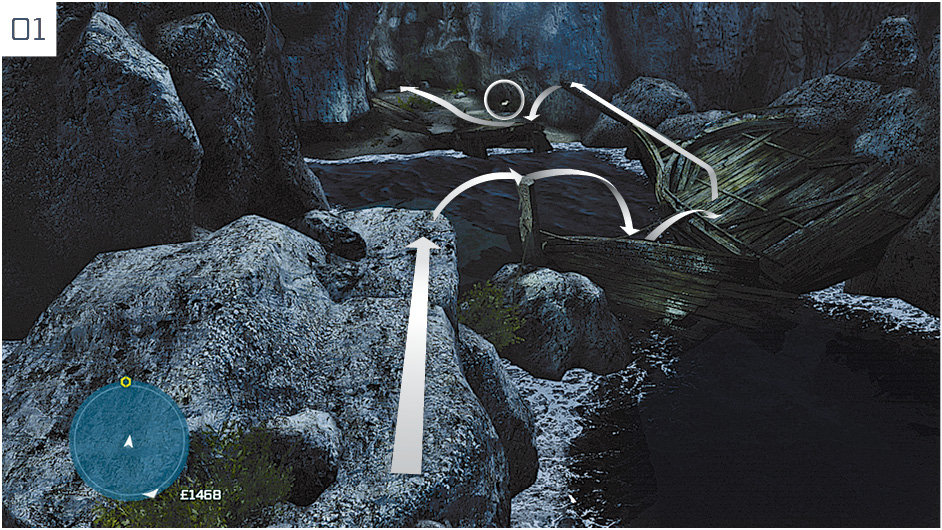
Follow this path and loot the Chest to obtain £3,000 before you approach the cliffs.
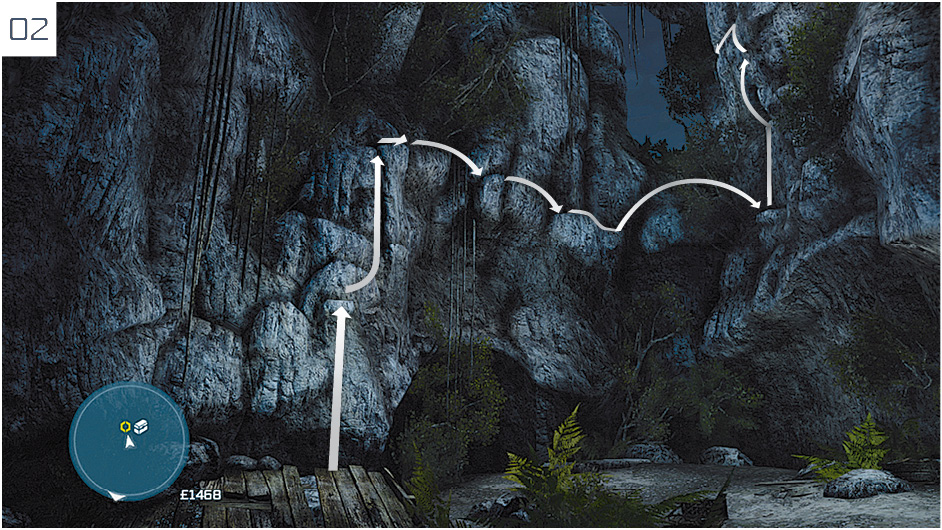
Start your climb, then perform a Back Eject when prompted. Climb as high as you can, then traverse to the left.
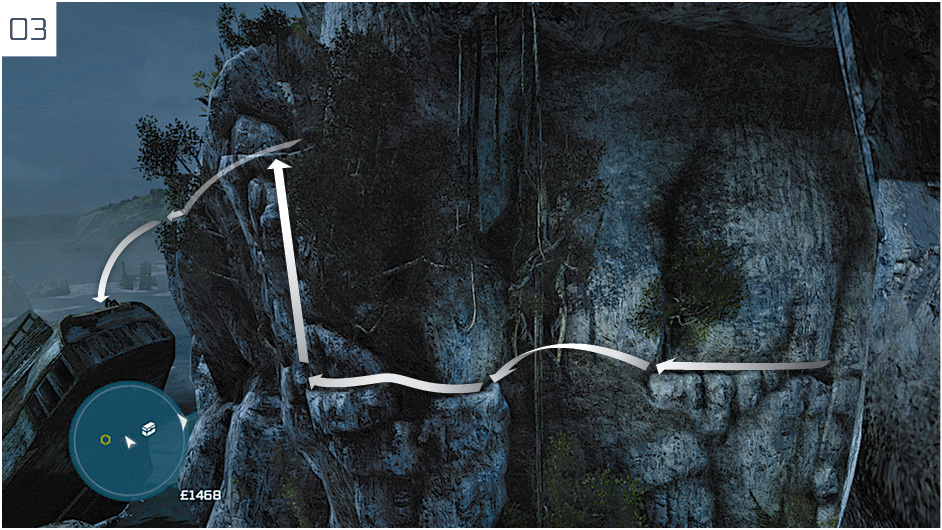
Climb up to reach a path above the cliffs, then follow it until you reach a ruined ship. Leaping to it triggers a cutscene.
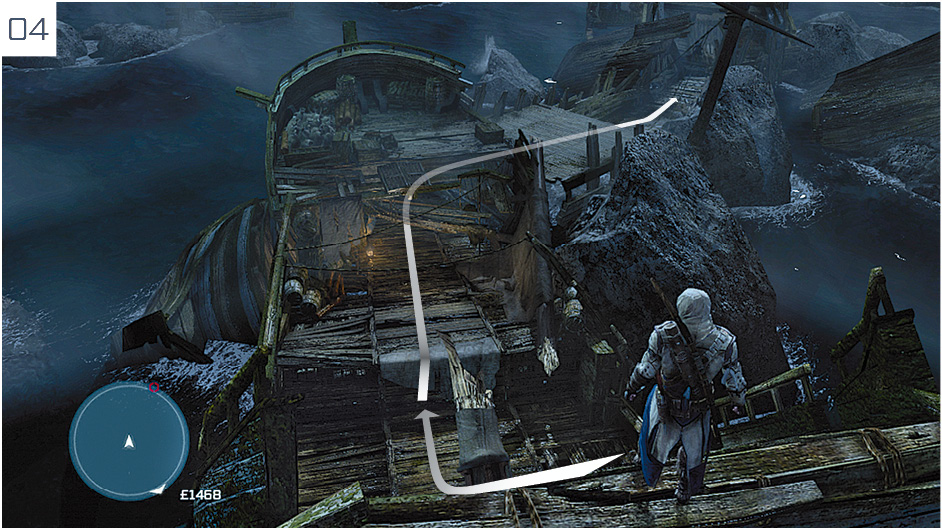
When play resumes, Connor must pursue the mercenary. To complete the Optional Objectives, you must stay within 40 meters of the target and perform three “running assassinations”. These are achieved by simply tapping  /
/ just before Connor reaches a victim while sprinting.
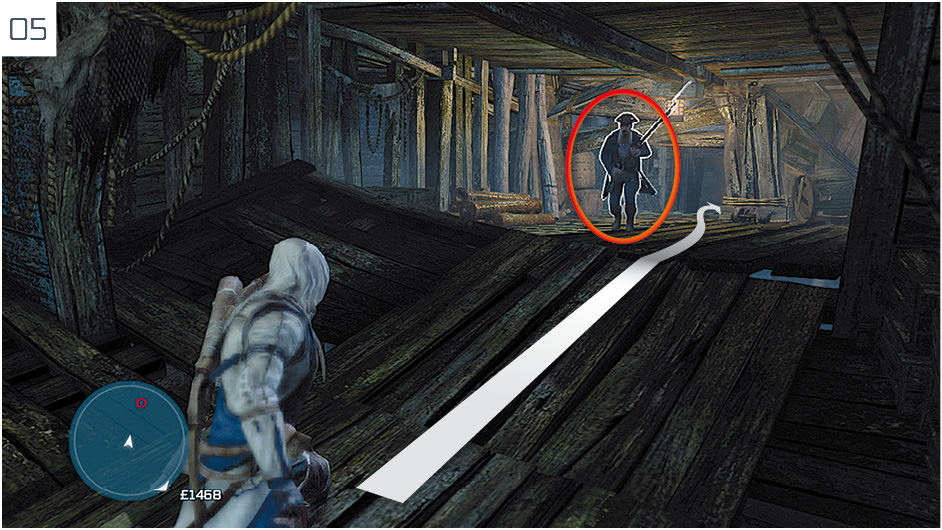
Connor’s first running assassination target can be found in this position.
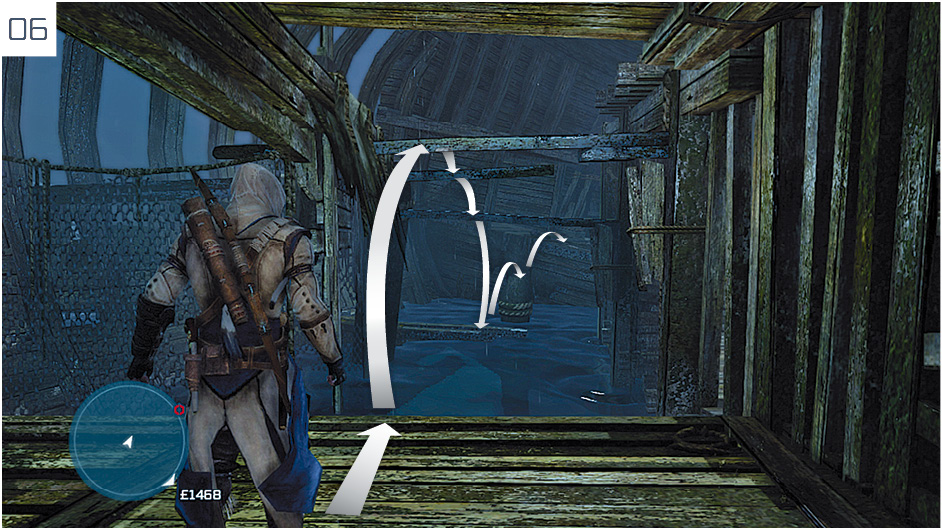
After the kill, duck through the gap and follow this course.
The second running assassination target is found in this location.
Move in this direction after Connor claims his second victim.
Climb above the obstruction to continue the pursuit.
At the top, follow this free run course. You can kill both mercenaries in the marked position simultaneously with a running assassination, completing the first Optional Objective.
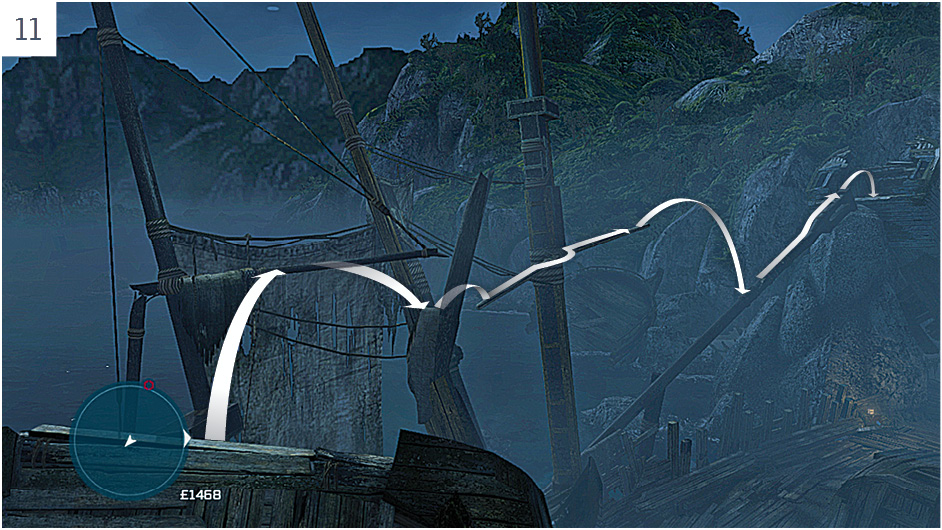
This is the most complicated free running exercise in the chase. To add to the overall urgency, a new Optional Objective is introduced: you must kill the target before he reaches the cave. Don’t panic when the mast falls: this is but a momentary setback.
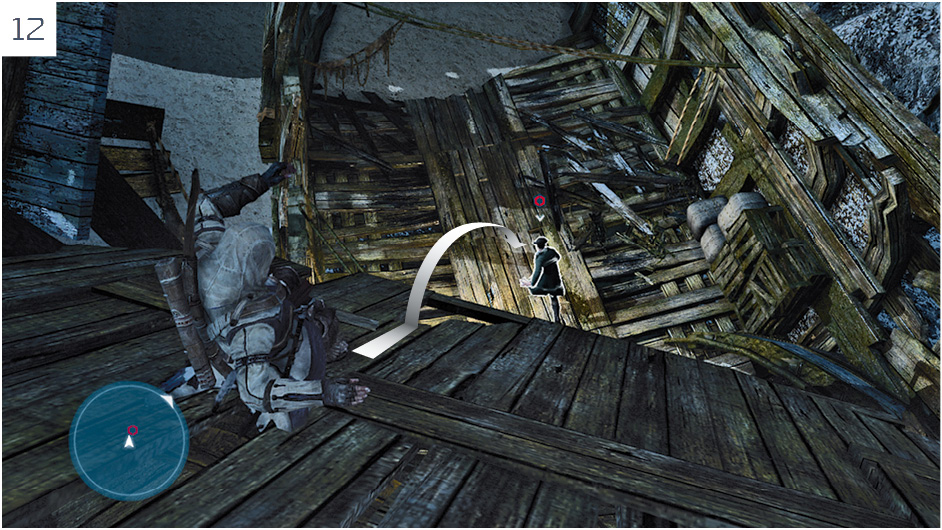
As soon as Connor begins to slide down the deck, press  /
/ to perform an air assassination on the mercenary as he runs beneath.
The Ghost Ship
Overview
|
Unlock Conditions |
Optional Objectives |
|
|
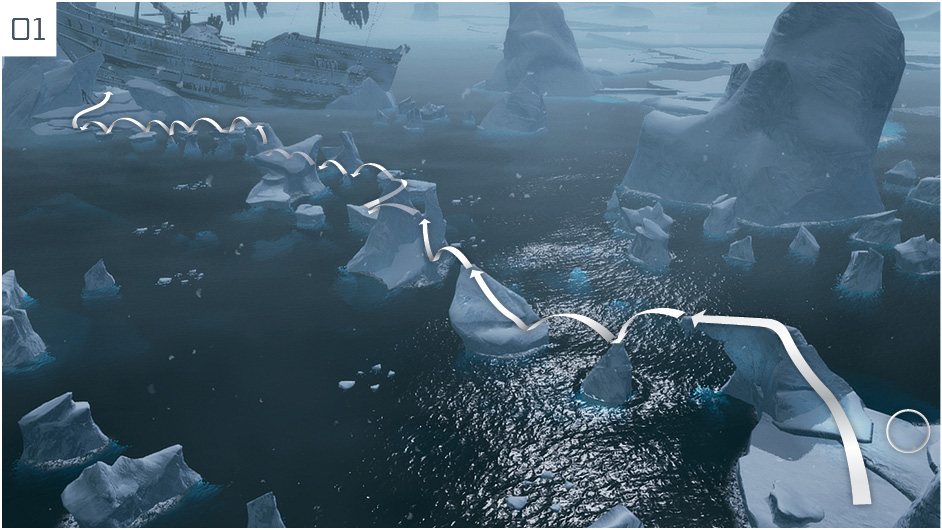
Follow the linear tunnel to reach a cutscene. Two Optional Objectives now appear: you must reach the Octavius within one minute, and do so without falling into the water. Start by sliding down the slope to Connor’s right, open the Chest hidden behind the tent when you reach the bottom, then follow the route shown in this screenshot. There is a checkpoint just before this challenge, so you can restart if you fail.
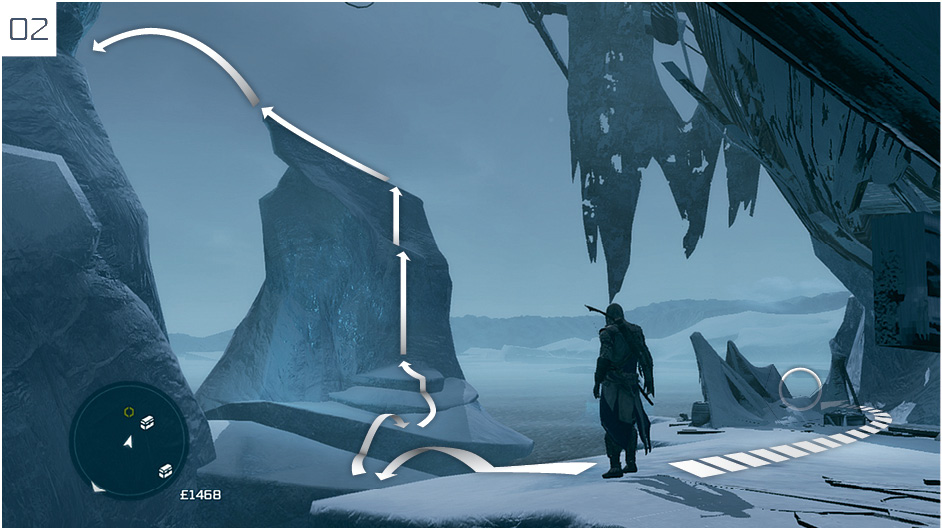
The timed challenge ends when you reach this position, so stop to open the Chest behind the tents before you continue via the route shown here. Though another Chest appears on the mini-map, you cannot plunder it until later.
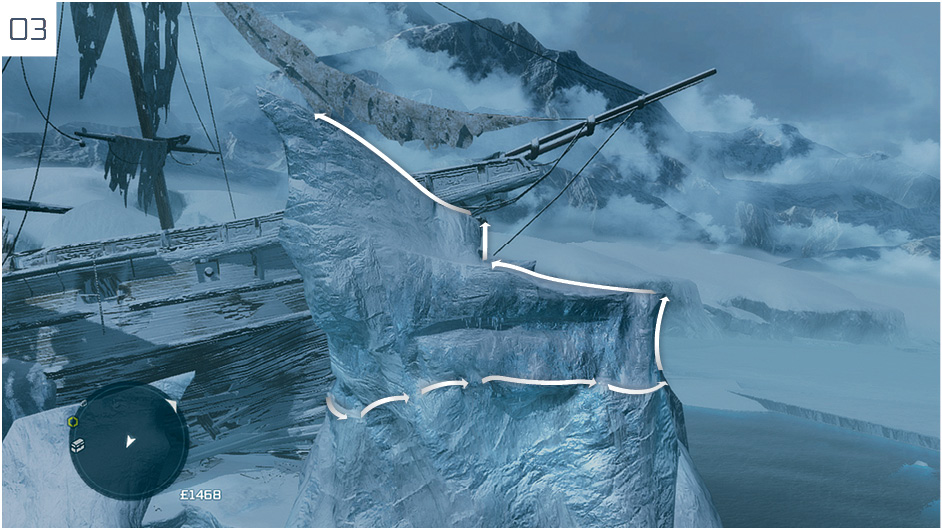
The prohibition on falling in the water remains in effect for the entire Memory, though this section of the climb presents no real danger.
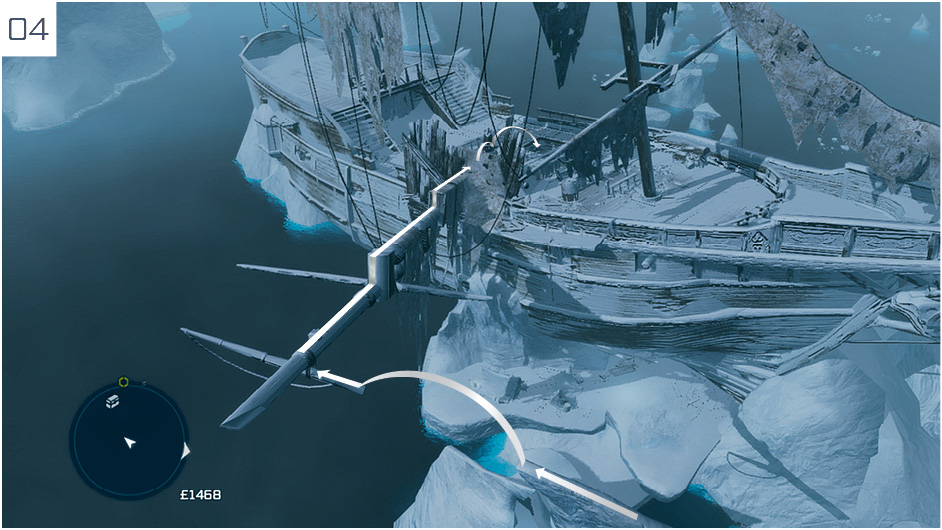
Run down the pole to reach the deck.
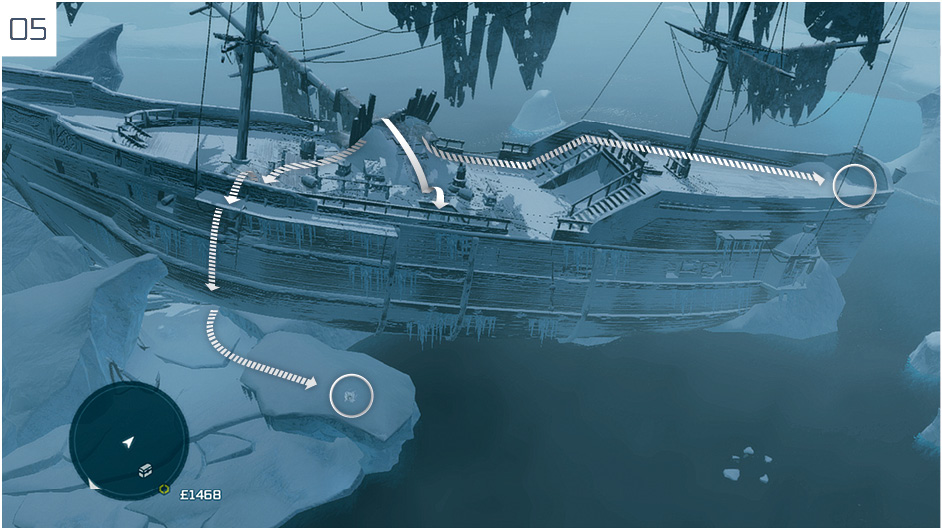
There are two Chests to loot before you move below decks.
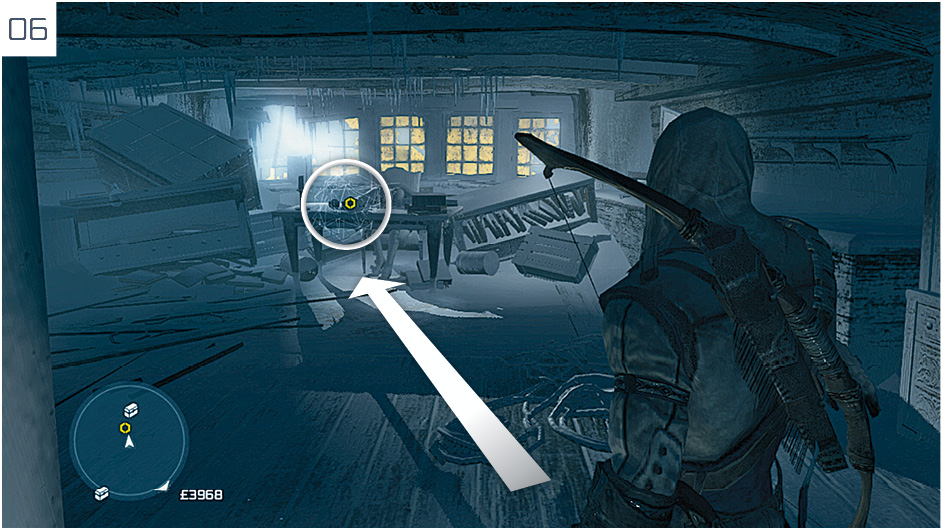
Run up through the opening to the south, then collect the treasure map. Once you leave the captain’s cabin, another cutscene will begin.
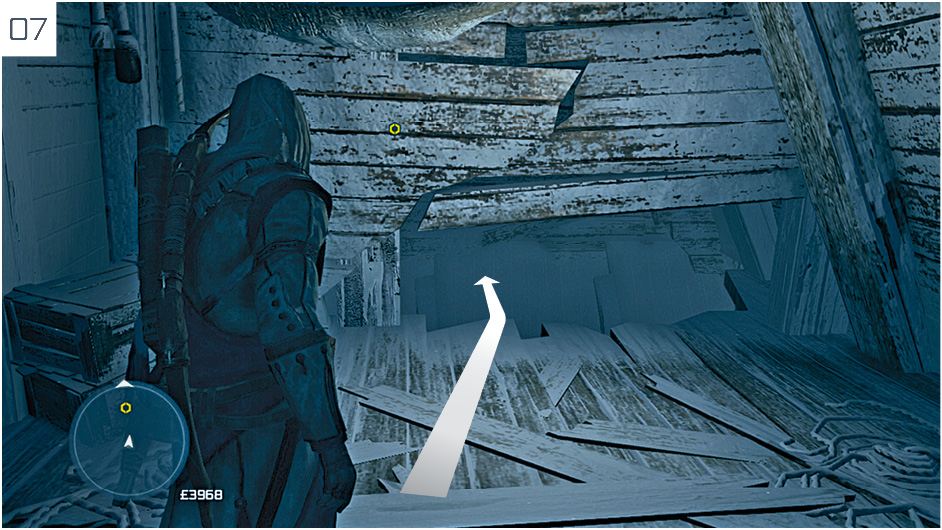
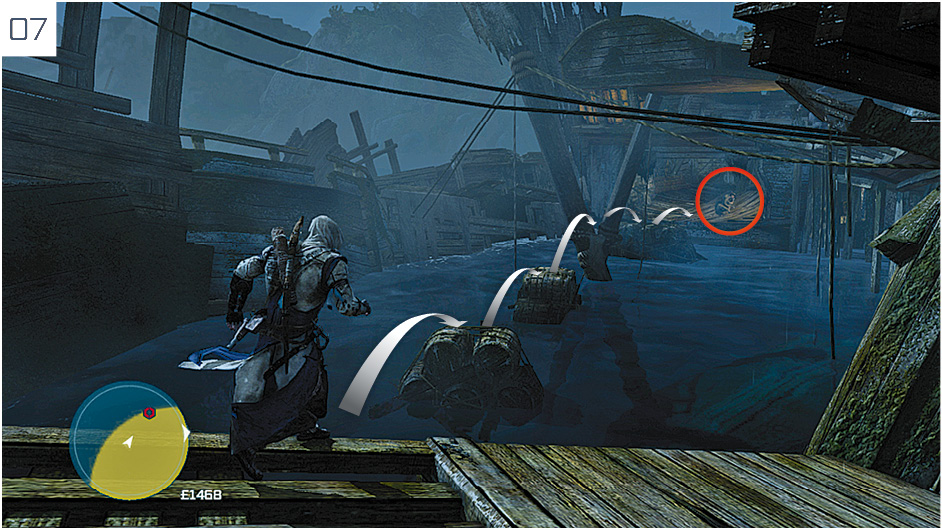
Connor must now escape the Octavius. Start by sliding beneath this gap.
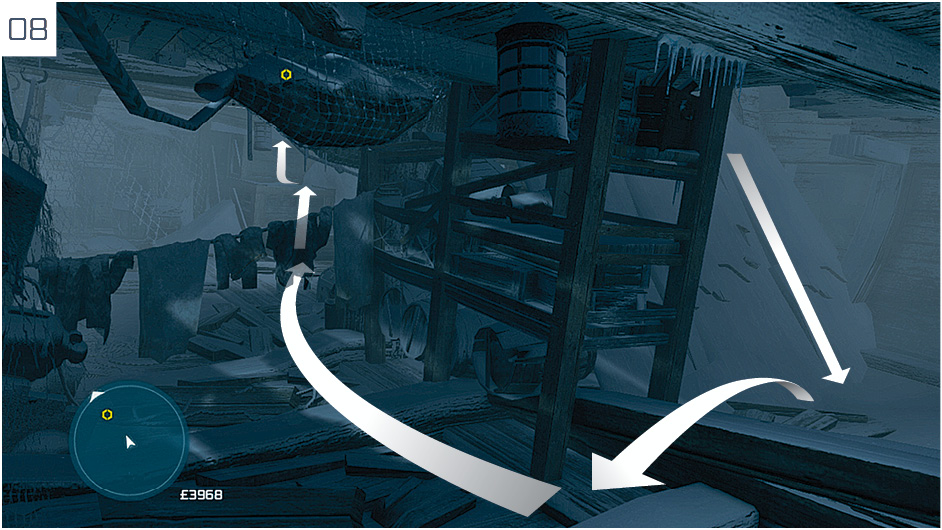
After you pass beneath the washing line, free run over the boxes to the right.
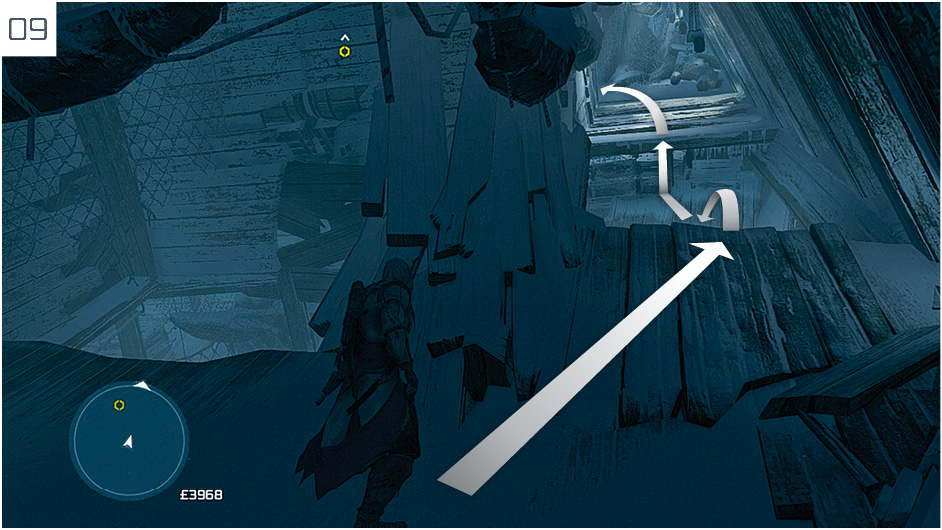
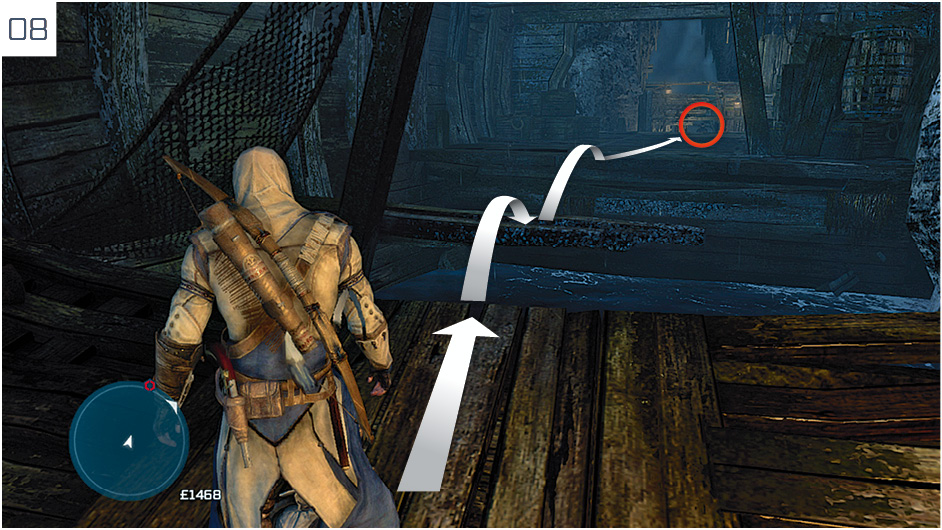
After the floor collapses, follow this path.
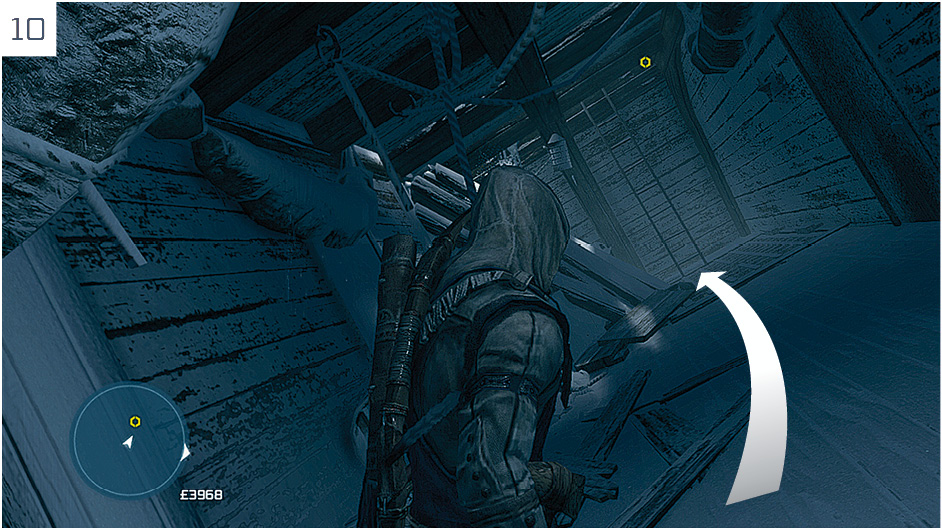
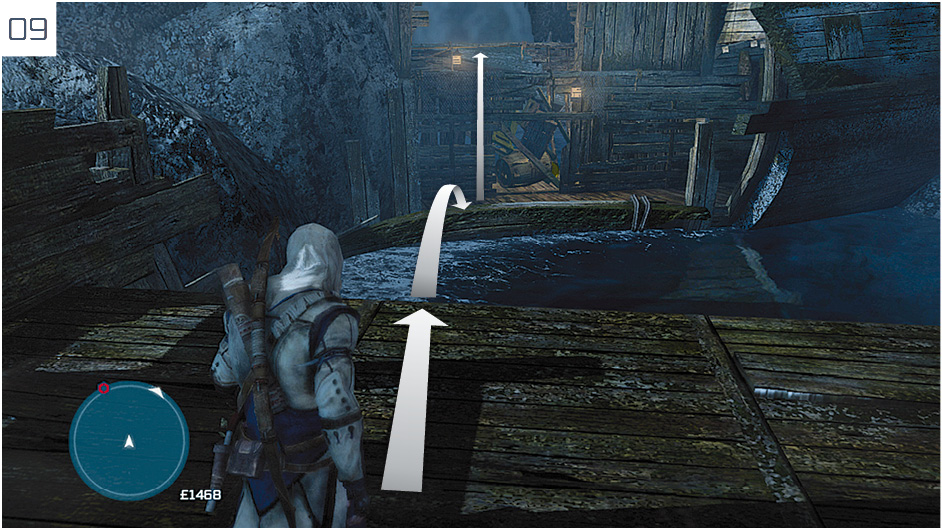
Approach the ladder. After Connor’s fall, a time limit is introduced.
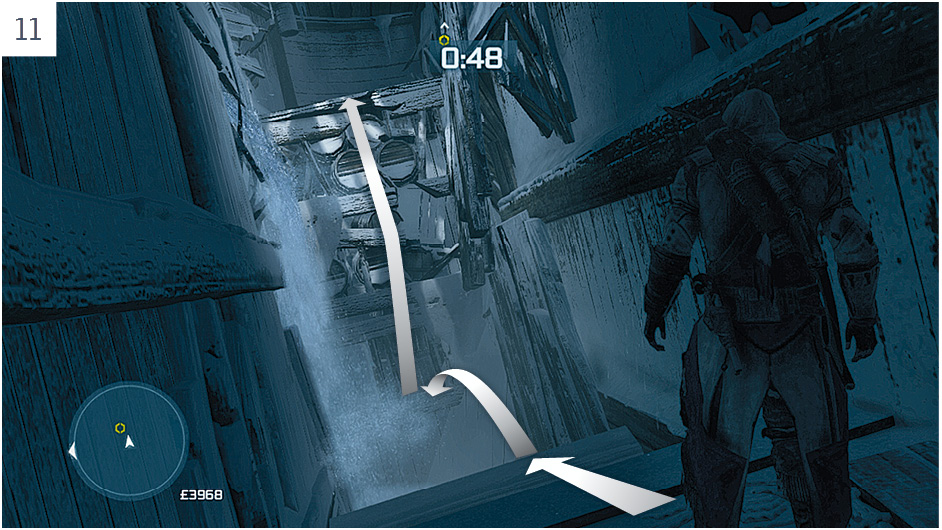
Start by climbing to the top of the surface shown here.
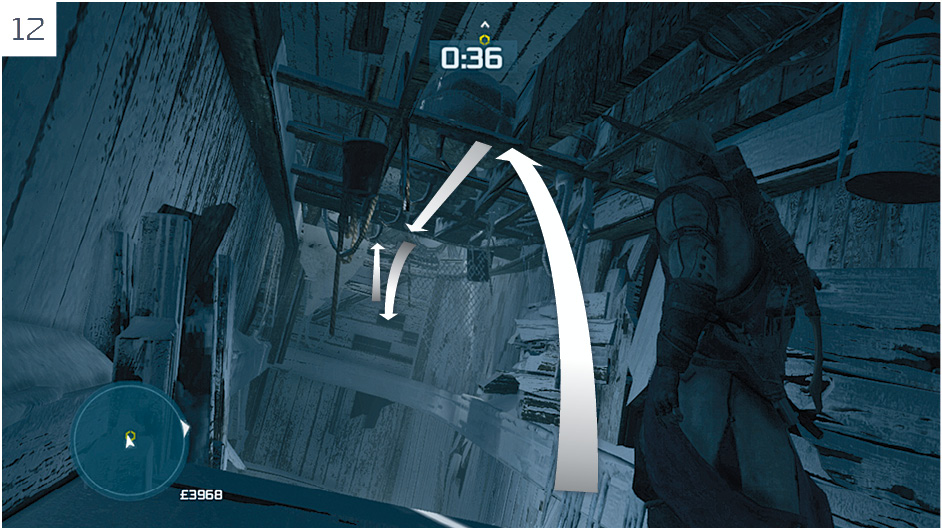
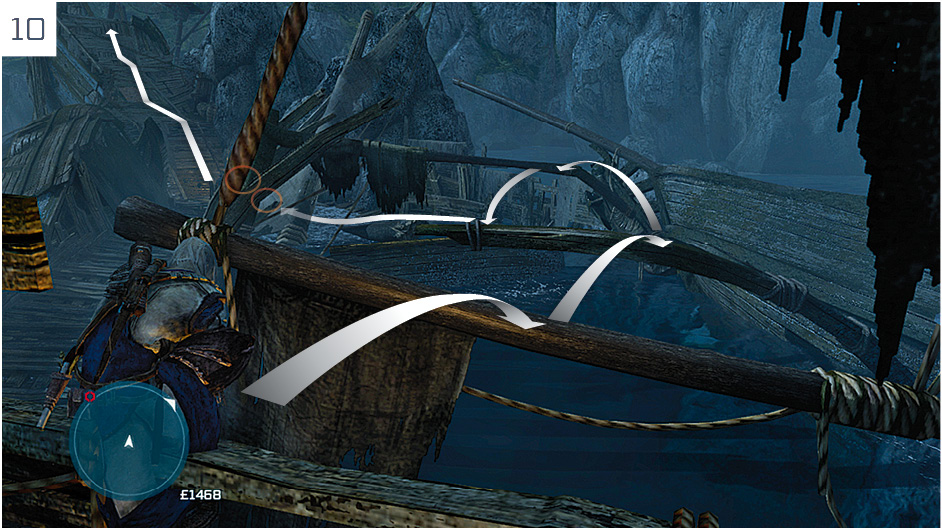
At the top, turn and use the fixtures to reach the far wall. At the end, climb to the top and perform a Back Eject when prompted.
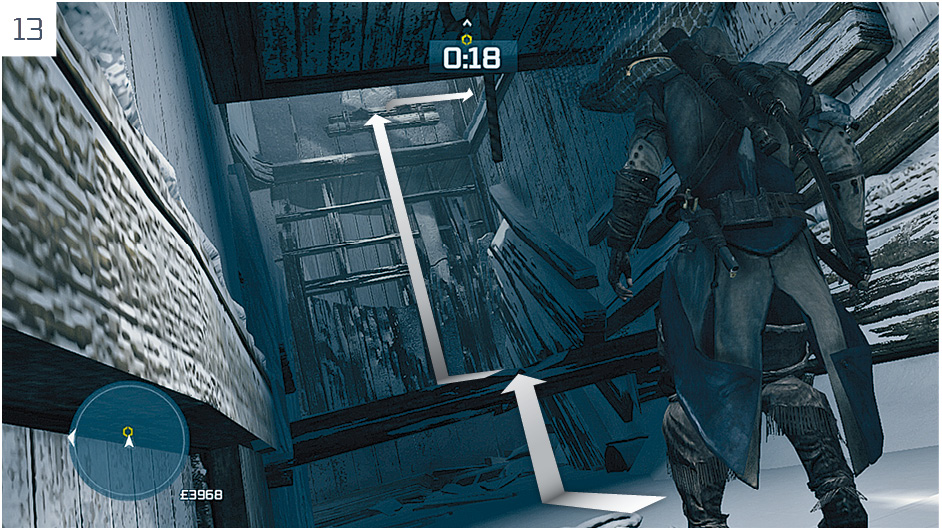
Climb up the next wall and traverse to the right.
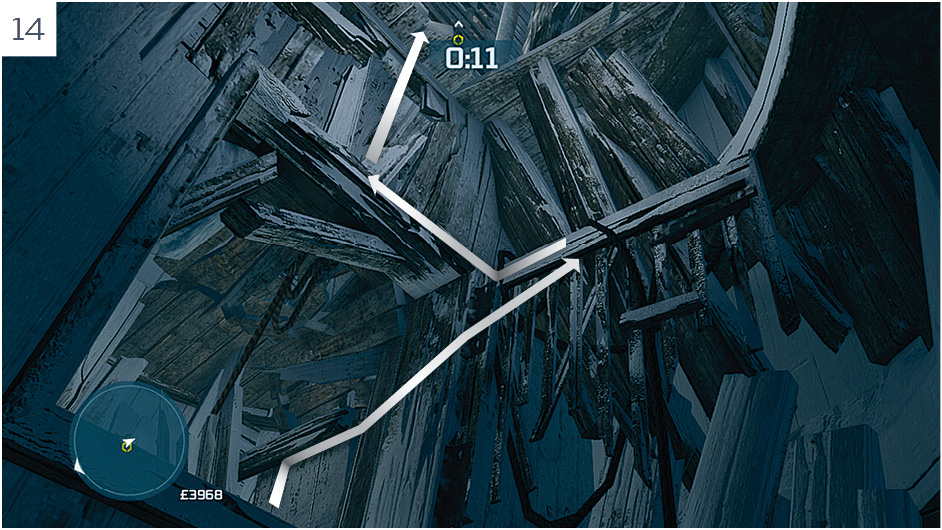
Finally, climb onto the frame of the door and scramble through the opening above to complete the Memory.
The Mad Doctor’s Castle
Overview
|
Unlock Conditions |
Optional Objectives |
|
|
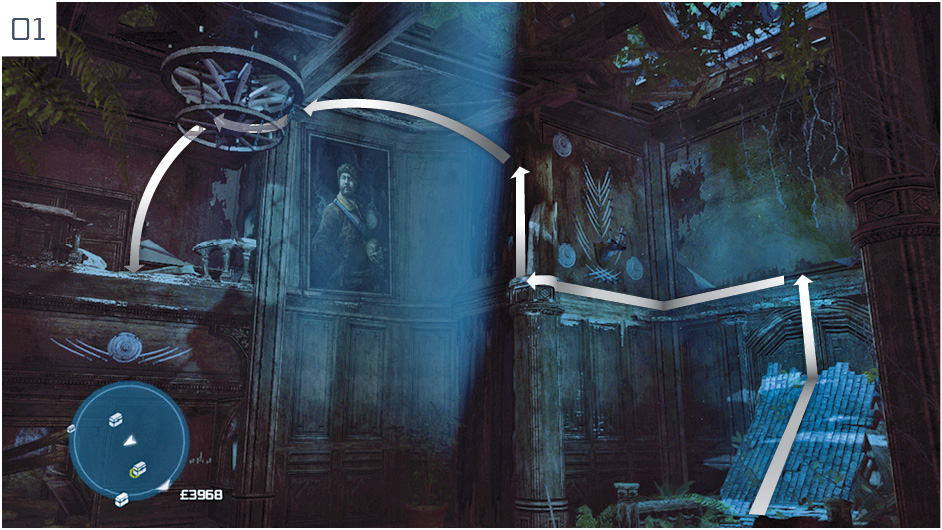
After the opening cinematic, run along the corridor and duck through the small opening. Follow this route to reach the upper level, performing a Back Eject to both reach the chandelier and then spring from it to land on the balcony.
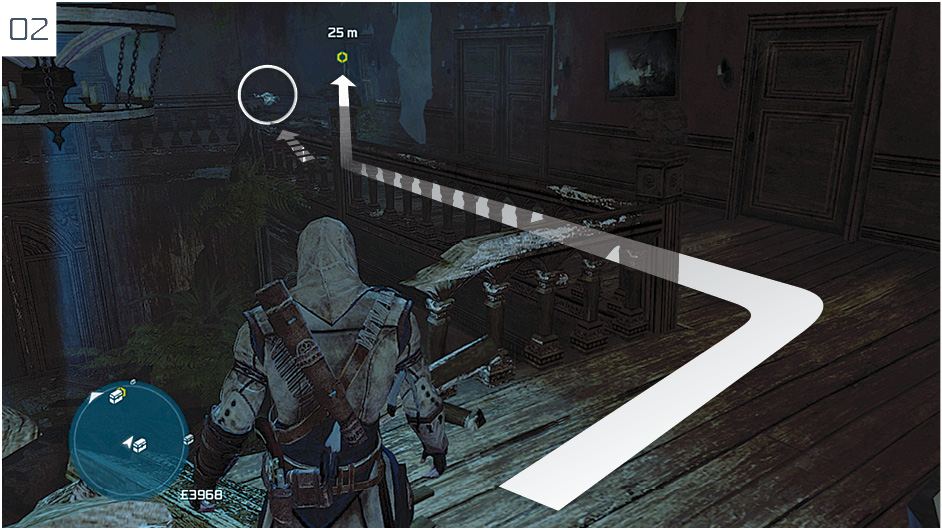
Open the Treasure Chest before you squeeze through the gap, then run through the next doorway to reach a balcony.
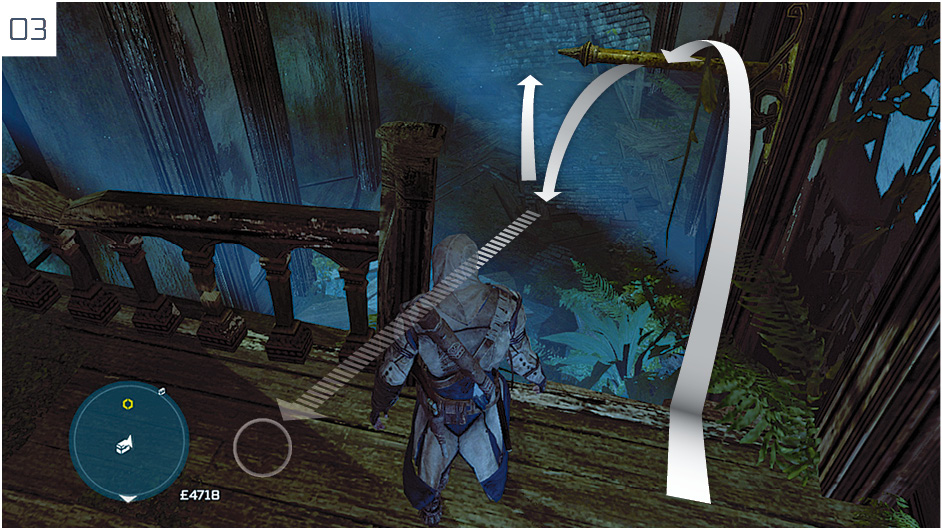
Use the pole to swing down to the lower level, then open the Chest situated a short walk to the north. You should then slide beneath the debris in front of the door to reach the next room.
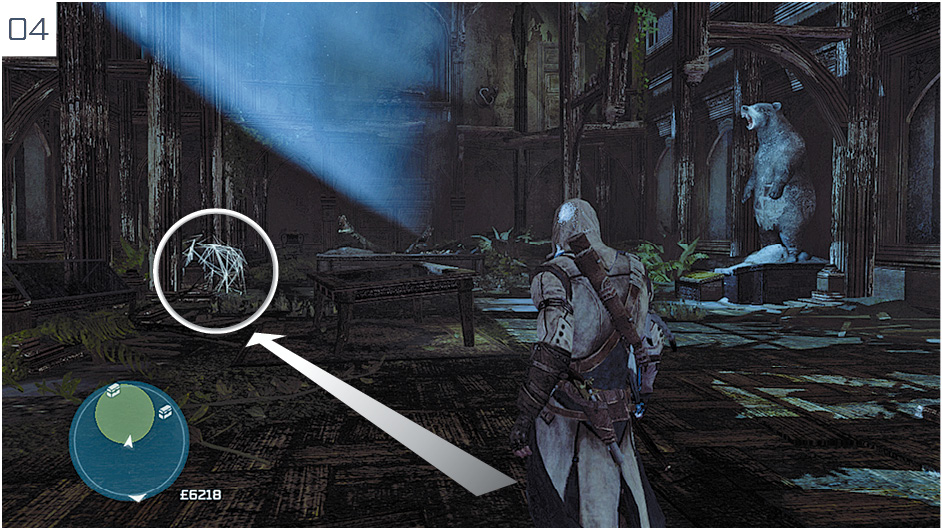
Start by interacting with the clue in this position.
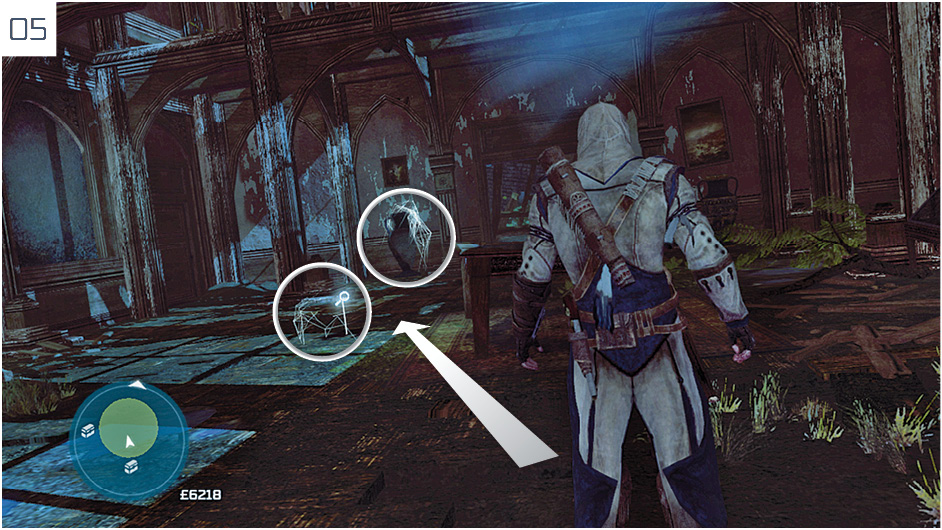
You can then analyze these two additional clues. Before you do so, examine the room to find a stuffed bear. Knowing its precise location will be useful in a moment.
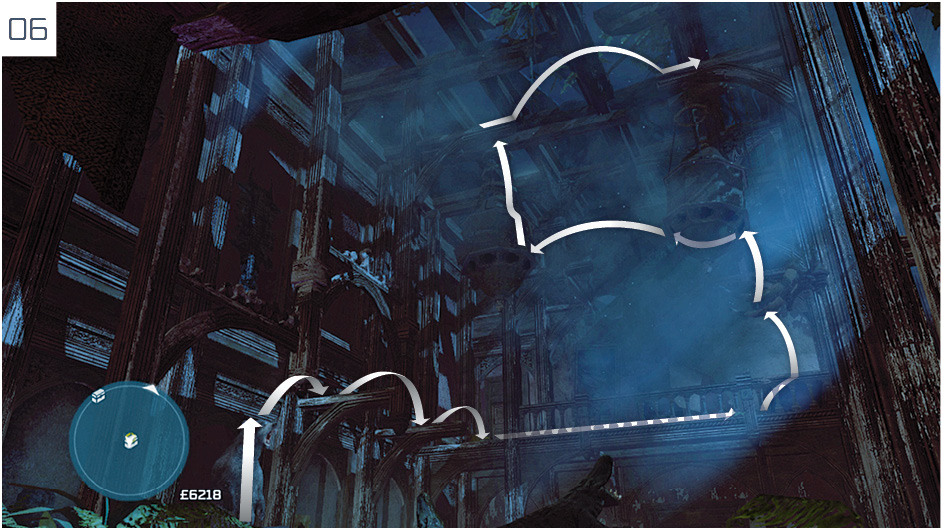
The new Optional Objective must be completed within one minute. To reach the waypoint, follow this route by starting your climb at the stuffed bear. From the lower balcony, swing via the tusks to reach a hanging aviary, then Back Eject to reach another. At this point, climb up to the beam above, then hop onto another beam to the east.
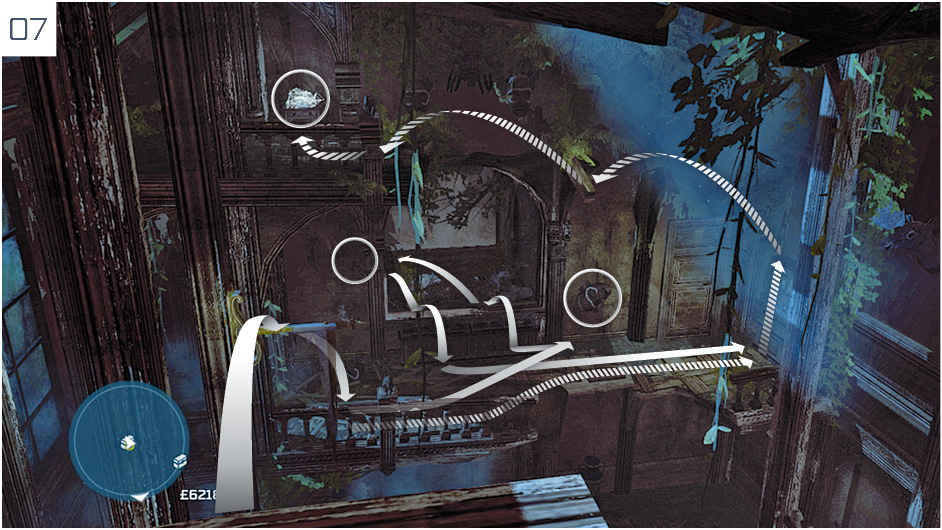
From here, face the waypoint and jump to the pole directly ahead; Connor will then swing down. Open the Chest before you do anything else; note that you will need to perform a Back Eject from the beam above the display cabinet to reach it. Drop back down to continue. Examine the mask to find a mechanism behind it, then walk through the broken display case to examine a musket rack. After the cinematic, interact with the display cabinet to find a secret entrance.
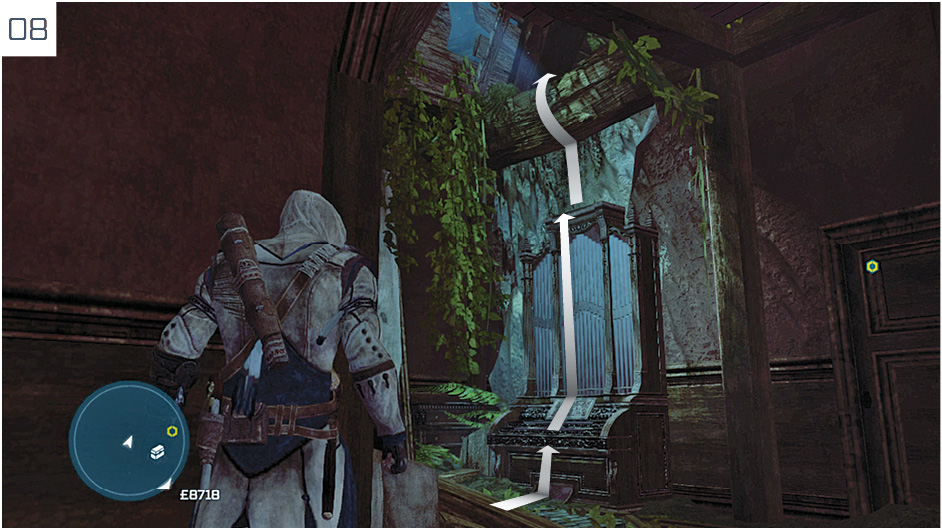
Climb the pipe organ to reach the floor above.
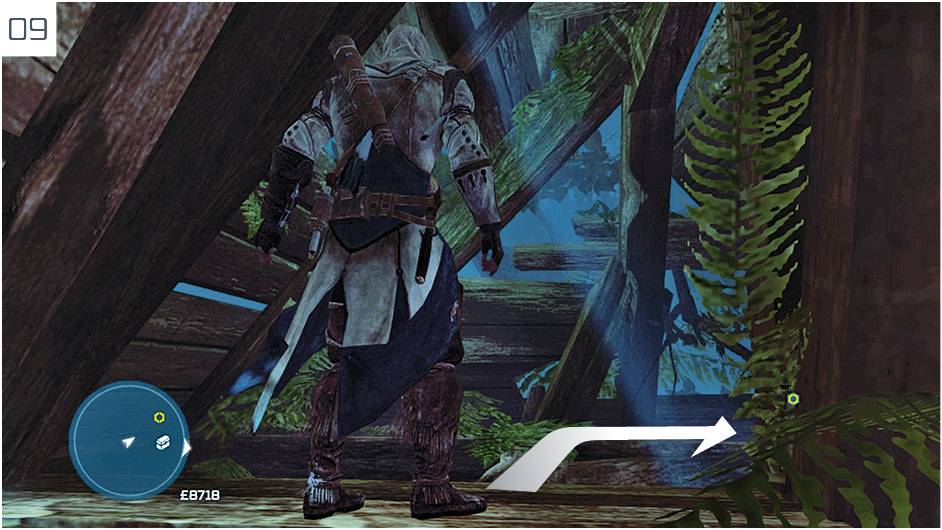
Walk onto the beam, then turn to the right.
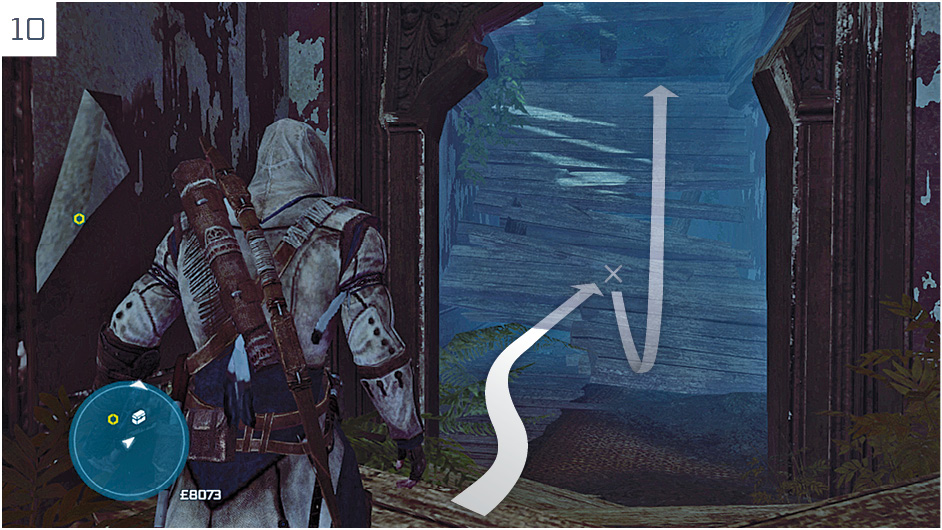
Just before you reach a V-shaped wooden rafter, drop to the floor below. Sprint at the small opening on the left side of the collapsed roof to find a Chest, then return to the upper area as directed.
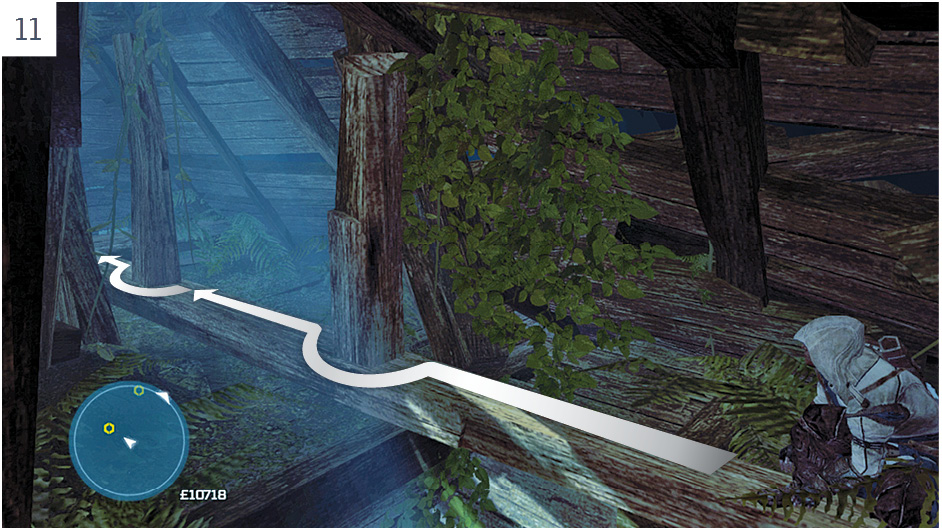
Run along the beam, then drop to the room below.
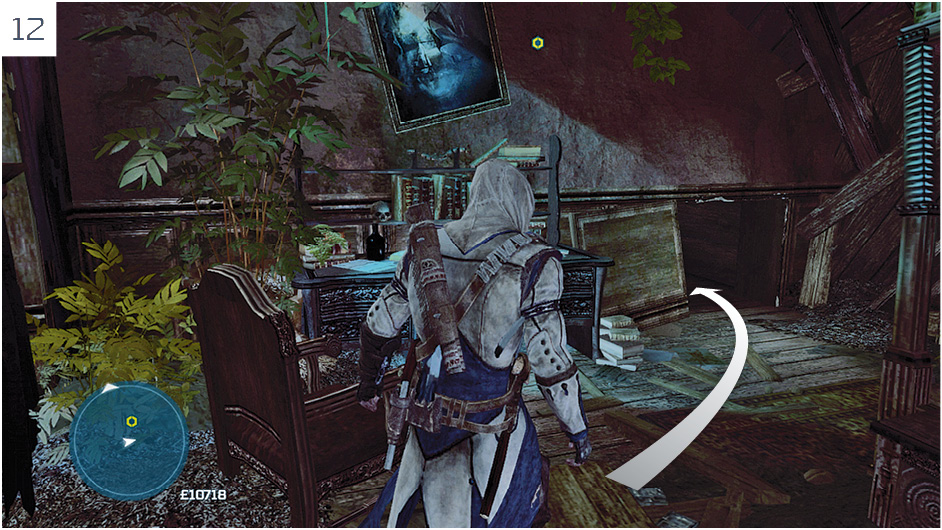
Duck through the small opening in the wall and interact with the back of the painting (note the classic “haunted house” eyeholes) to enter the next room.
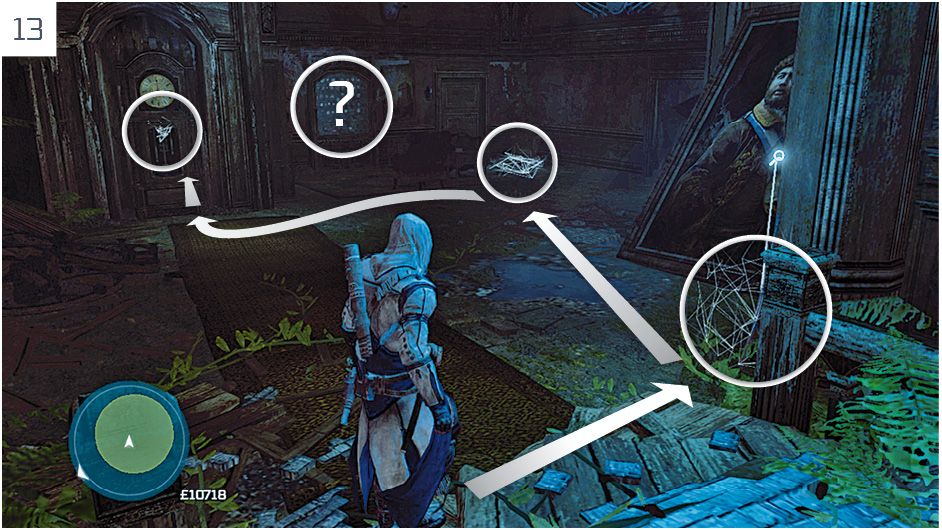
Analyze the clues in the area to trigger a cutscene. The solution to the riddle is to scrutinize the display cabinet filled with timepieces, and note that all hands are positioned to tell the same time: ten minutes to six, or 5:50. Approach the grandfather clock and press  /
/ to interact with it, then align the hour and minute hands accordingly.
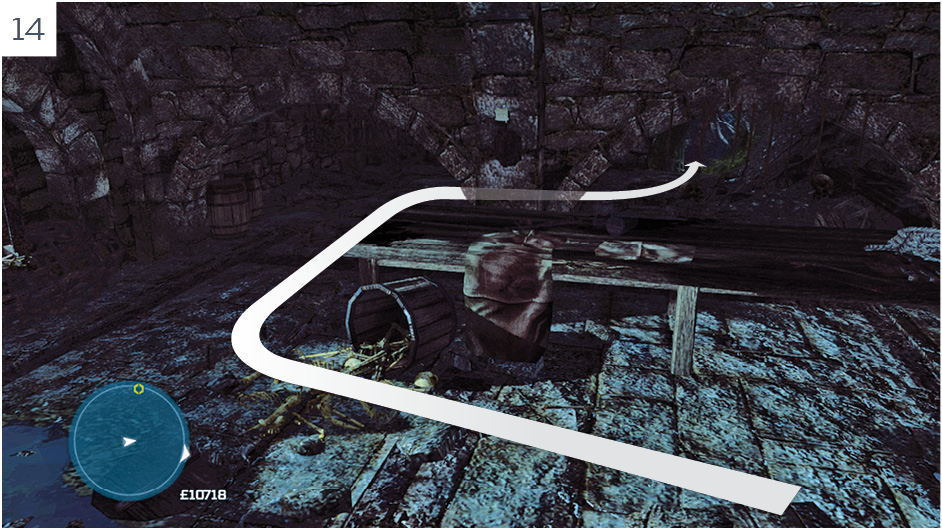
Enter the secret passage and follow the steps to the lower level, then enter the secret passage shown in the cutscene. Approach the waypoint marker to collect the final map portion. In a cinematic back at the Homestead, Connor and Faulkner intuit the precise location documented by the map portions. You can begin this Memory immediately, if you wish.
Oak Island
Overview
|
Unlock Conditions |
Optional Objectives |
Reward |
|
|
|
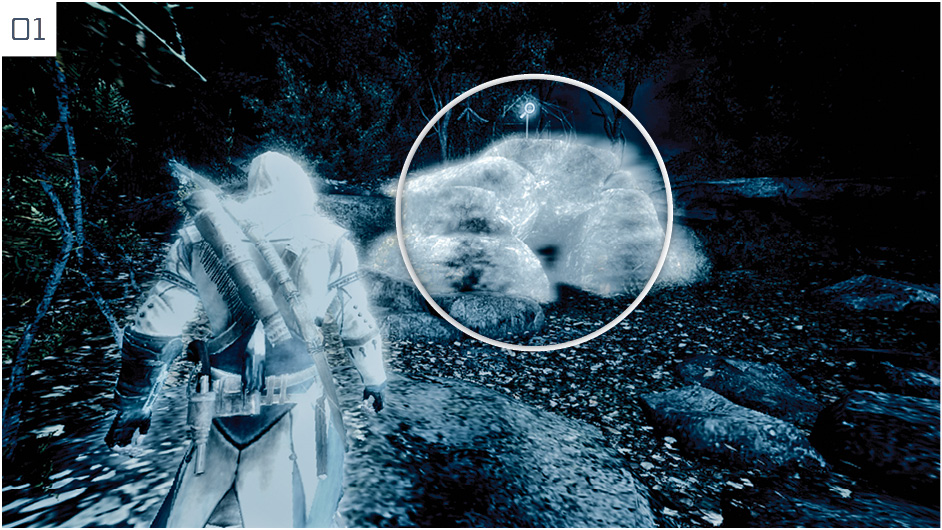
Walk with Faulkner until you reach a clearing, where the first Optional Objective appears. The first clue is found on this rock to the northwest. You can use Eagle Vision to make the search easier: the locations of the four clues are all highlighted at medium-to-close range.
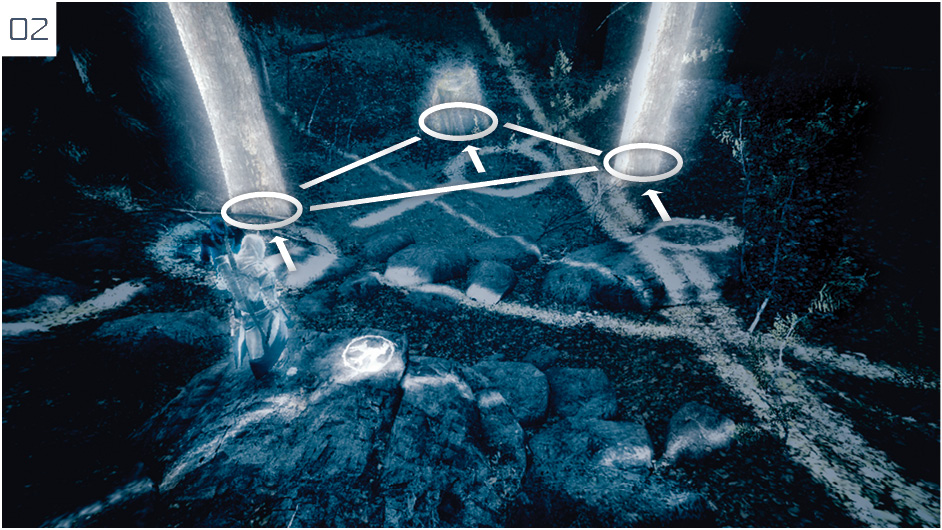
In the puzzle that follows when Connor analyzes the clue, align the overlay as shown here.
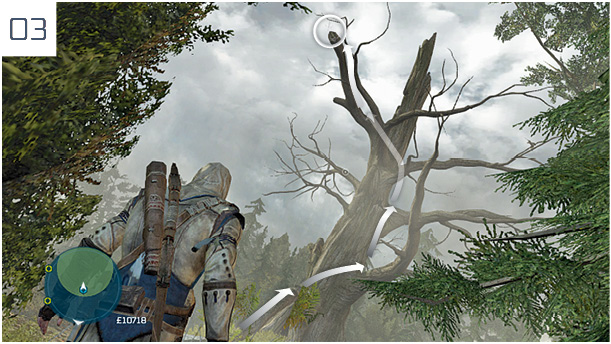
The second clue is in this tree, to the south of the previous clue. Climb to its upper reaches to find it at the end of a branch.
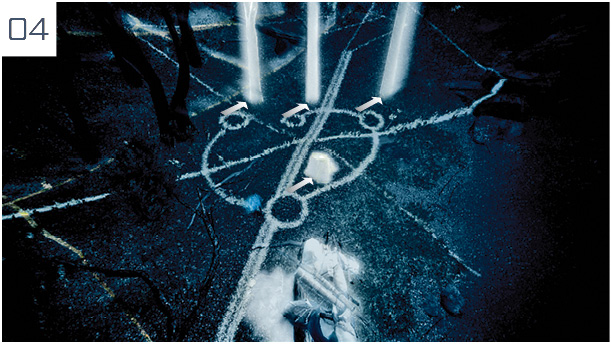
To solve the puzzle, align the overlay as follows, then perform a Leap of Faith to quickly return to the ground.
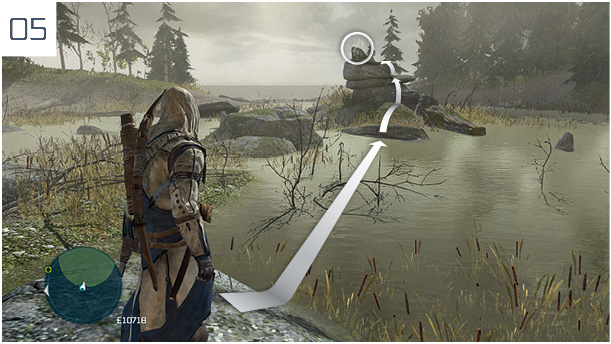
The third clue is on this pile of rocks.
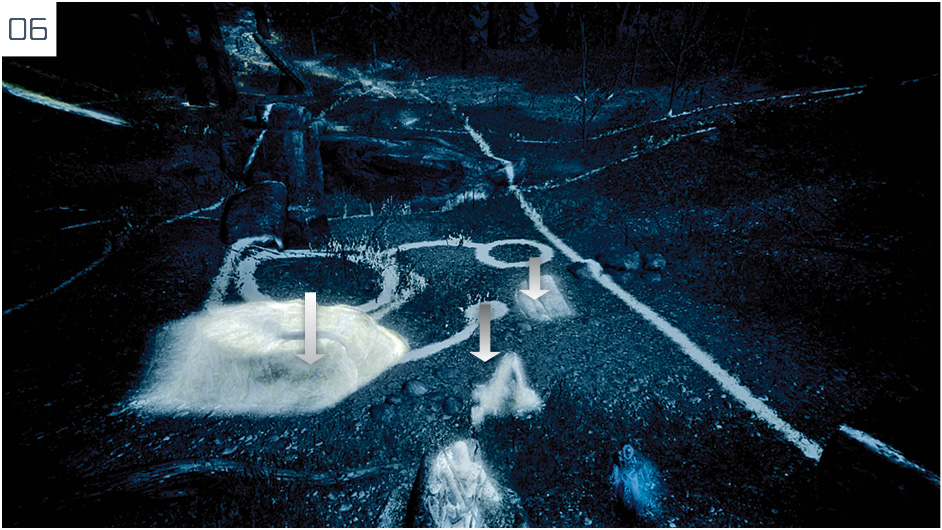
The solution to the puzzle is illustrated here.
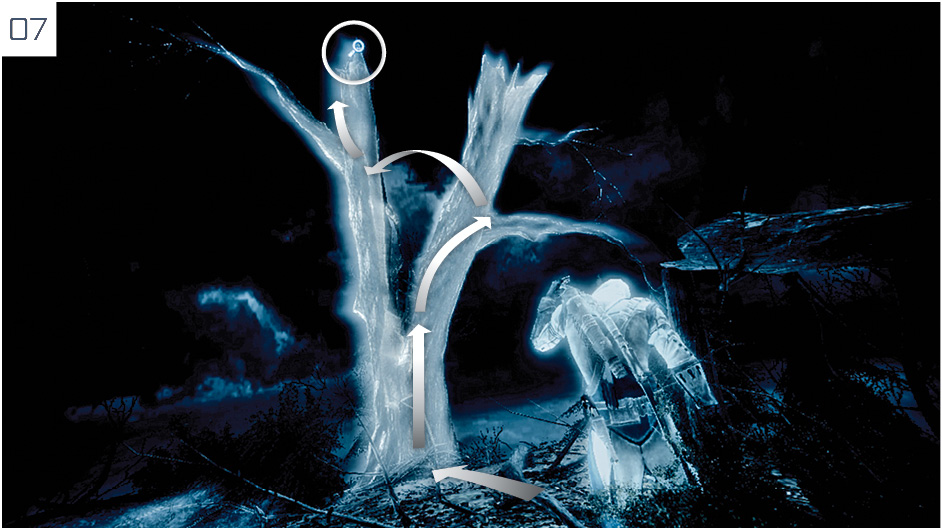
The final clue is in this tree. You can analyze this clue from the upper V-shaped position.
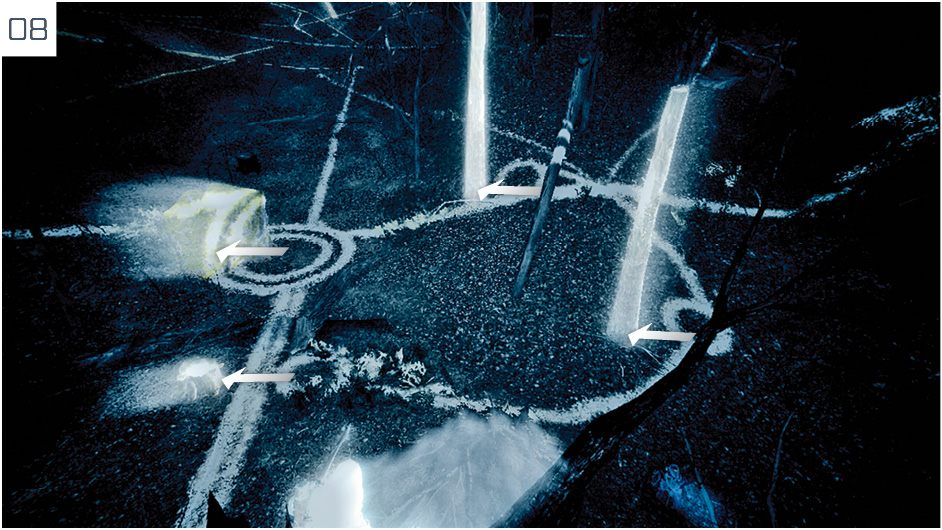
The final puzzle solution is shown here. If you have failed the Optional Objective, you can return to the previous checkpoint to retry after the benefit of an initial “trial run”.
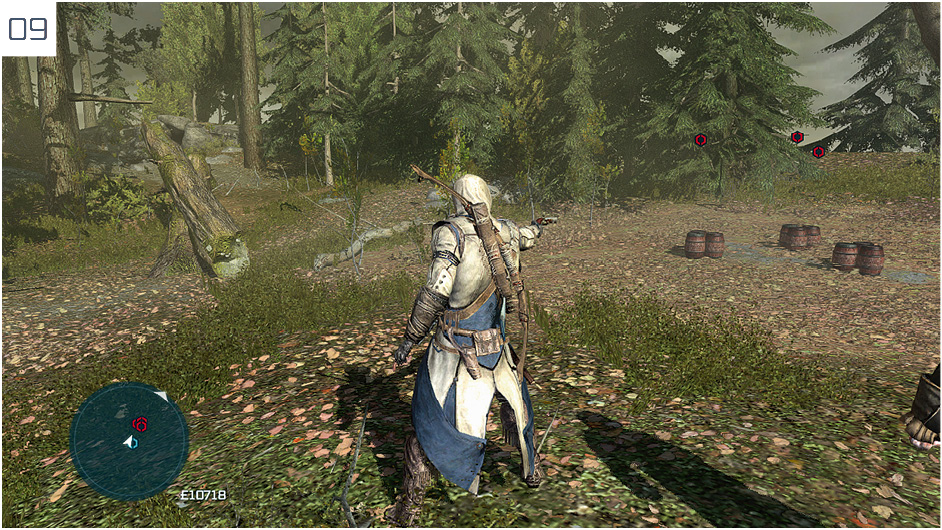
Approach the search zone marked on the mini-map. As Connor nears the position, a pack of three wolves will attack. To complete the accompanying Optional Objectives, you must defeat them with the timed button press minigame as they run in to attack, but without losing more than 30% health. Return to Faulkner at the green search zone and analyze the clue. After the cinematic, shoot one of the powder kegs shown here and perform a Leap of Faith into the water below.
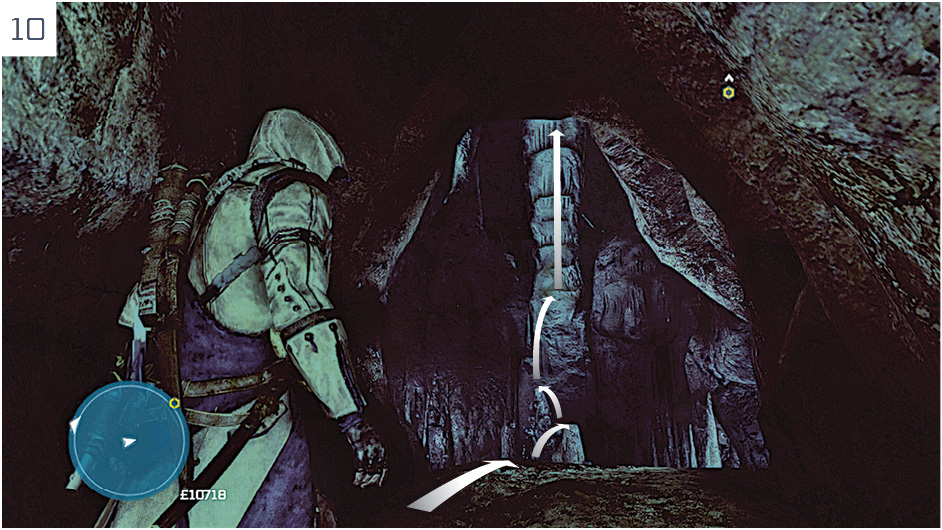
Inside the limestone cavern, swim to the waypoint; dive beneath the obstruction when prompted. Free run over the limestone stalagmites, then climb the far wall.
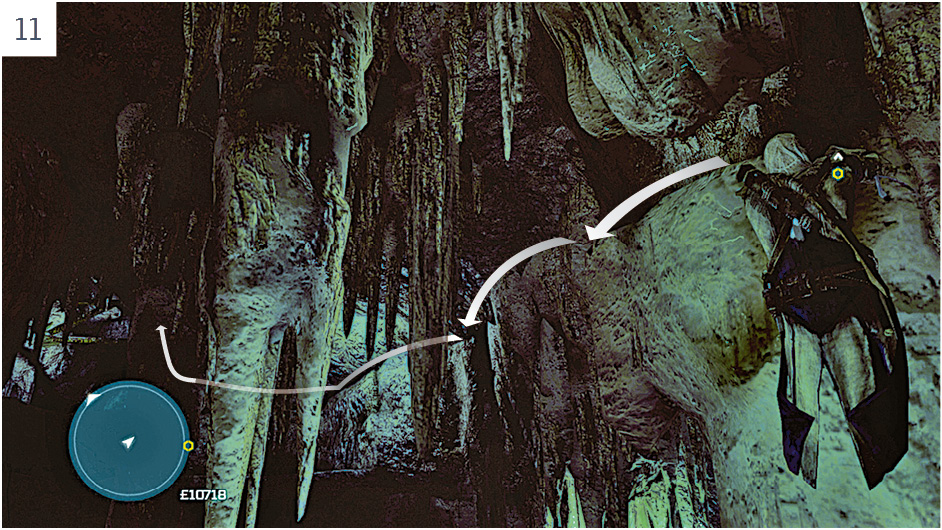
At the top, traverse to the left to reach an opening, then climb up.
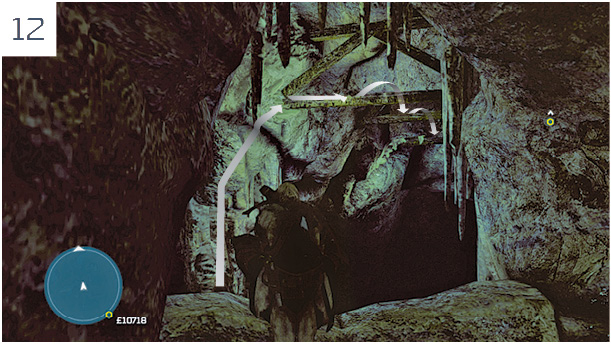
Swing via the supports to continue. Jump through the V-shaped limestone formation to reach a ledge beyond.
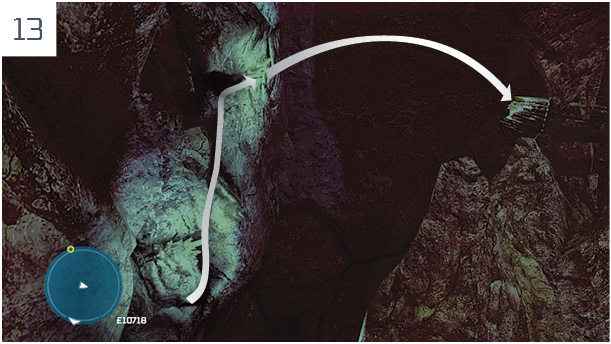
Climb up as shown here, then perform a Back Eject.
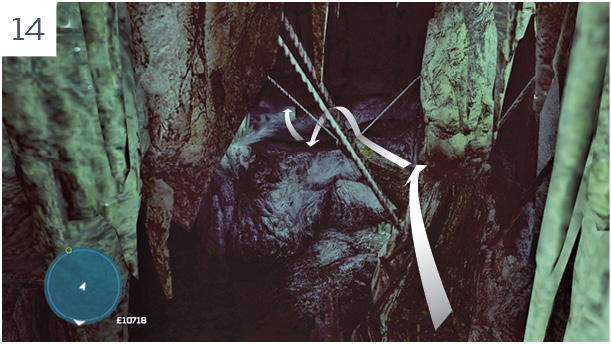
Run along the logs and wooden boards to reach this chamber, then jump straight ahead. When you land, slide beneath the gap.
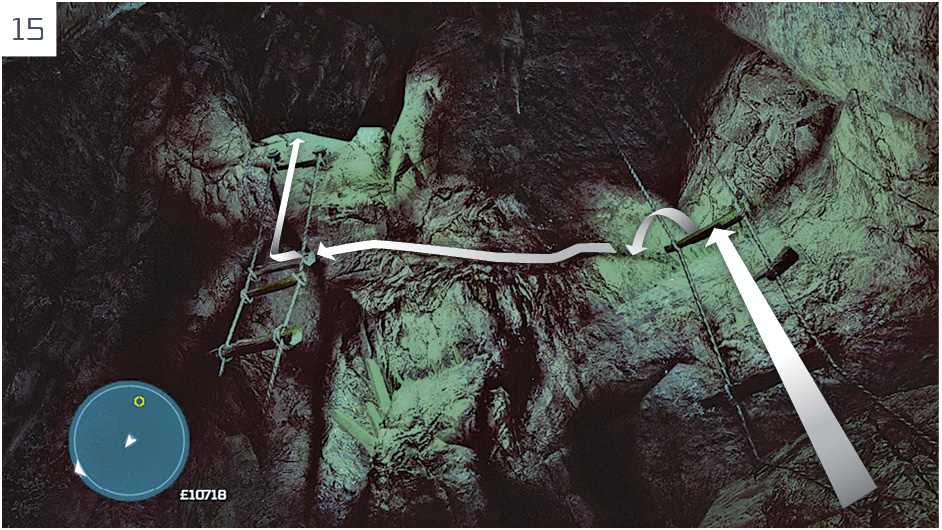
Climb via the decaying ladders to reach a hole above, then run straight ahead to discover Captain Kidd’s treasure. You can only take the mysterious floating object: the other riches, alas, are not for Connor to plunder.
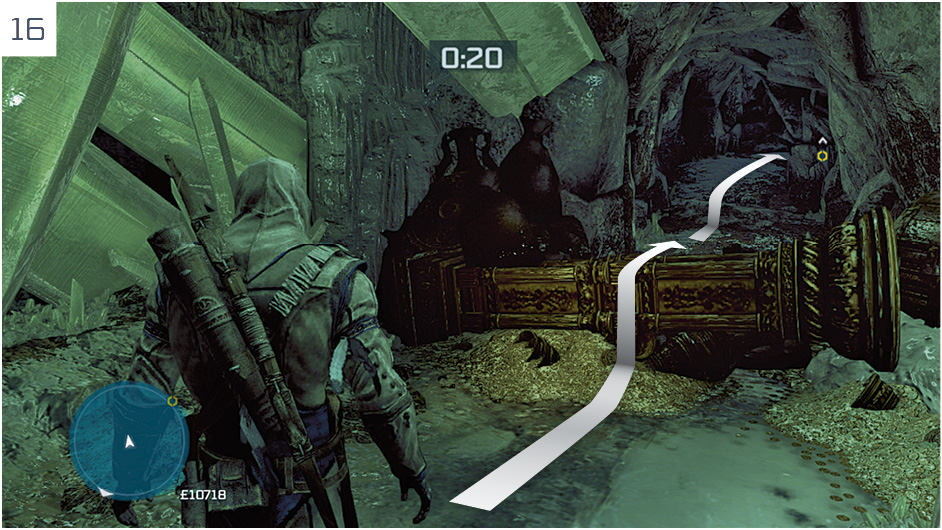
Connor then has twenty seconds to free run through the corridor before the countdown expires. After the closing cutscene, listen carefully when Connor disembarks from the Aquila to hear Shaun explain the origins and purpose of the Shard of Eden in a voice-over. This First Civilization device greatly reduces the likelihood that Connor will be hit by musket or pistol fire while fighting with armed opponents. You do not need to equip it: its effects are automatically and perpetually active.
The Ruins at Cerros
Overview
|
Unlock Conditions |
Reward |
|
|
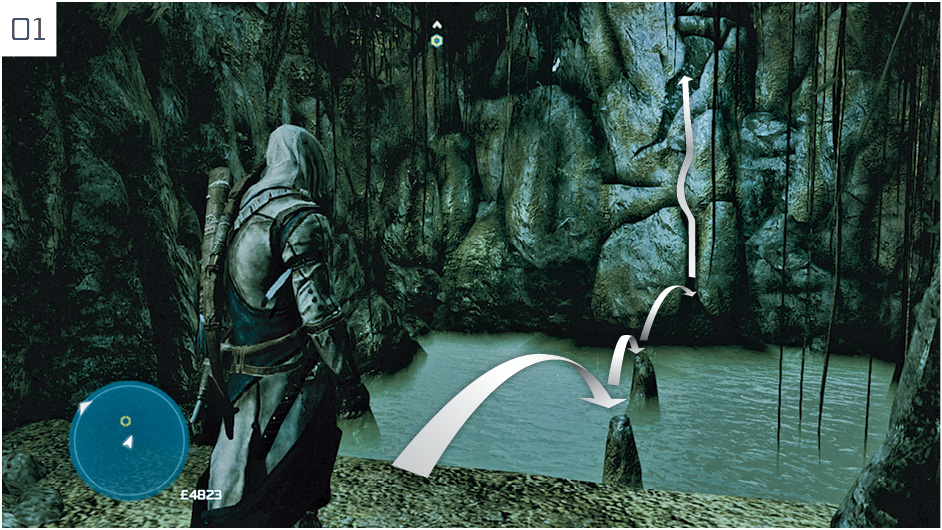
Run through the tunnel until you reach the opening shown here, then climb to reach the jungle above.
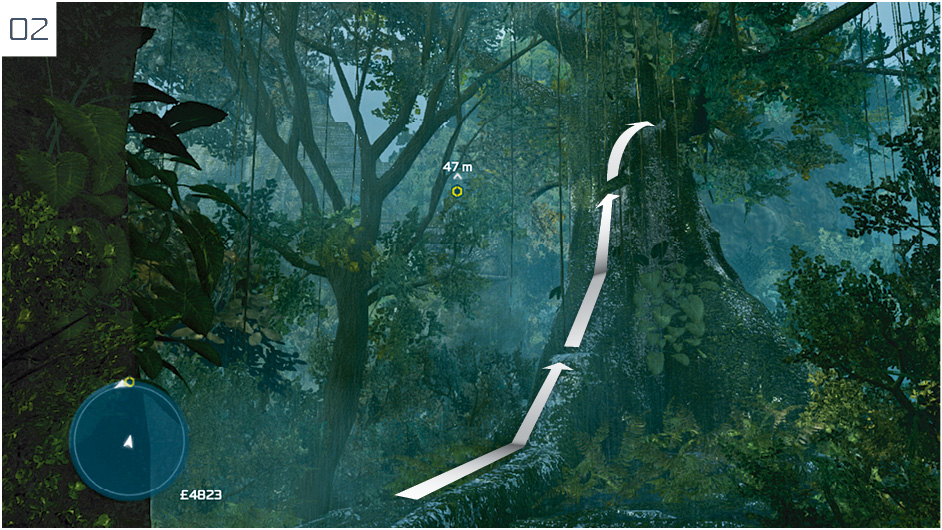
Head for the waypoint until you reach this tree, then follow the marked route to access the only path to the temple.
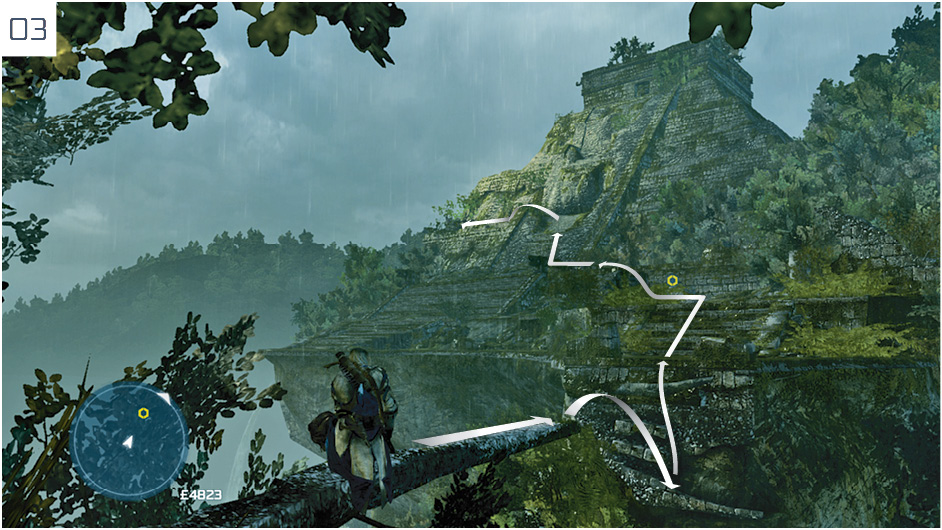
Follow the waypoint markers on the approach to the temple. The final marker is inaccessible from the south face, so move to the west side.
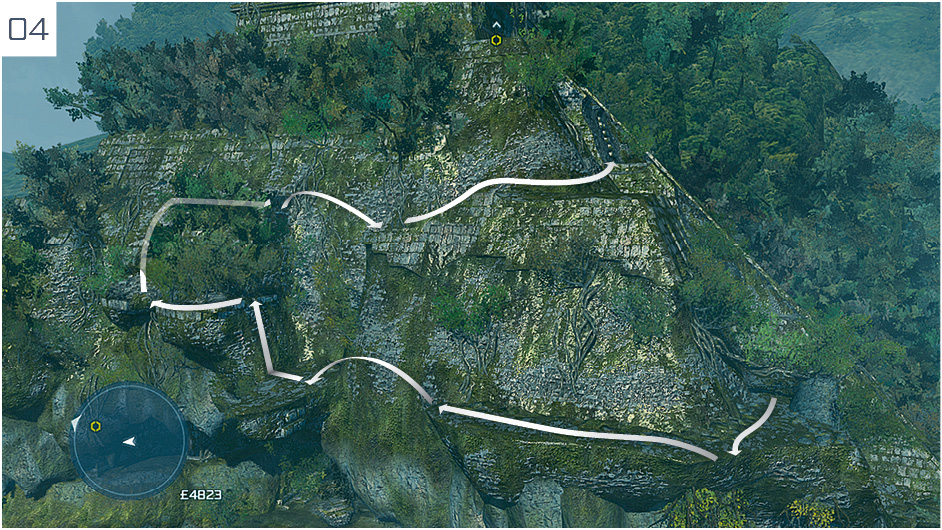
After Connor’s brush with danger, follow the path shown here. Back at the south face of the structure, climb the exposed brickwork to reach a small opening.
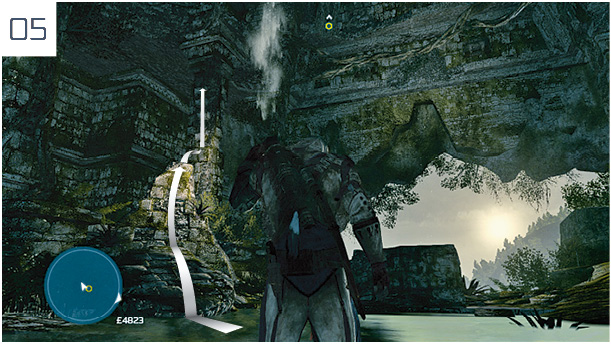
When play resumes after the cutscene, follow this route to reach the level above.
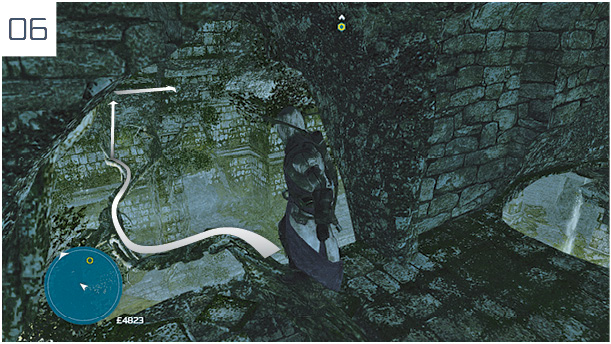
At the opening to the north, free run to reach the opposite side of the temple. In the next corridor, free run to the end and jump to the ledge directly ahead.
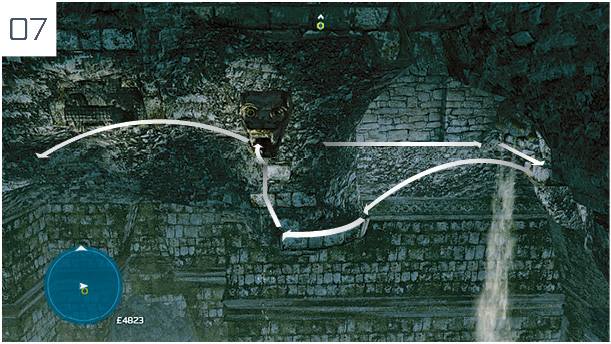
Traverse to the right on the ledge. When the prompt appears, hold  /
/ and tap
  /
/ to perform a Back Eject, then traverse all the way to the left. When Connor can go no further in that direction, ascend to the next floor level.
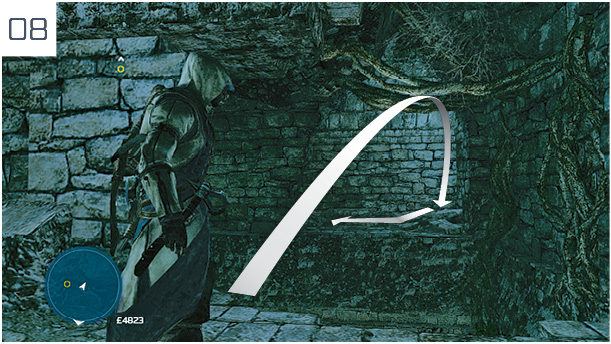
On solid ground, slide under the small gap to the west, then swing via the tree roots to reach the corridor on the south side of the temple as shown here. Follow the corridor until it turns north, then climb the wall directly ahead. At the top, open the sarcophagus to obtain Captain Kidd’s Sawtooth Cutlass, a unique sword. You can equip this at any time by visiting the basement in the Homestead Manor.