
Assassin's Creed III Guide Side Quests
Liberation Missions

Introduced in Sequence 06 during the Memory where Connor meets Stephane Chapheau, and formally unlocked after his induction as an Assassin trainee, completing Liberation Missions to free city districts from Templar control offers rewards that have a rather profound bearing on many other activities in Assassin’s Creed III.
The most obvious benefit is the acquisition of a new Assassin recruit, which means that Connor can call on more allies to assist him in combat (using “tokens”), or send them on missions to gain money, experience and items through Contracts. You also obtain a new Assassin ability, which expands Connor’s repertoire of infiltration, distraction and assassination techniques (see “Assassin Abilities”). Last, but by no means least, victory in each district reduces the likelihood that convoys sent from the Homestead to local merchants will be attacked by Templar forces, and also furnishes Connor with a key to all Treasure Chests in that area – removing the need for lengthy lockpicking sessions.
In short, taking the time to complete Liberations is profitable in a multitude of ways. You might assume that such plentiful rewards would entail some form of almighty struggle to obtain, but that’s really not the case. To complete the liberation of a district, you must simply complete a set number of Liberation Missions within its borders. These are “ambient” challenges that can occur whenever you approach the  icon in your travels – even during most main story Memories. In Boston, the North and South districts each have two varieties of local Liberation Missions. In New York, the North, East and West districts all have three distinct mission types within their borders. Completing three of each Liberation Mission variety within a district unlocks a closing Memory (
 ) where Connor can use the Assassin ability of a new recruit to eliminate a local Templar leader.
In this section, we detail the optimal approach to each district, explaining the challenges that each type of Liberation Mission entails, and identify the specific locations that you should target to avoid heavy Notoriety penalties and other such complications.
General Tips
- Use the Liberation Missions filter on the main map to view the boundaries that separate districts in Boston and New York, and to view the locations of all Liberation Missions without other icons obscuring your overview of the area.
- If you fail an individual Liberation Mission, simply travel away from the area to reset the challenge. There are also no penalties for ignoring Liberation Missions that you pass on your way to another objective.
- Completing a single Liberation Mission in a region permanently removes it from the map. Complete three required missions of a particular variety, and all further instances of that type disappear. You can track your current progress via the Logbook on the main map screen.
- You can vastly cut down on your overall travel time by combining Liberation Missions with other tasks, such as Citizen Missions and hunting for collectibles.
- Once you have completed a single Liberation Mission in an area, you can visit the location marked with the
 icon to speak to Connor’s contact (and future recruit) in the district. There are generally two full conversations prior to the liberation of a district, and a further two immediately after the final Memory. These interactions offer more information on the recruit and their reasons for pledging allegiance to Connor. (MINOR SPOILER: If you would like to know what became of the boy that witnessed Haytham’s exploits in “A Deadly Performance”, we suggest that you converse with Duncan Little in Boston North.)
Assassin Abilities
Liberating a district provides Connor with a new recruit and an Assassin ability. These have a wide variety of applications throughout the events of Assassin’s Creed III, so it makes sense to complete Liberation Missions as soon as they become available. You can choose Assassin abilities by holding  /
/ and selecting the required feat from the right-hand menu with
  . To activate an ability, tap
  /
/ . If a selected ability requires an active target, note that they must be surrounded with the distinctive “highlight” effect for it to work. You can use the Precision Mode feature (
 /
/ ) to specify a particular target.
Note that all abilities are replaced by the Call Backup feature when Connor is in open conflict. This combat-only ability summons an available recruit for every press of  /
/ .
.
 Assassinate

District: Boston Central (Story Memory)
Recruit: Stephane Chapheau
Tokens Used: 1
Notes: Assassinate calls a recruit to kill the targeted individual after a short delay; they will usually engage other adversaries that react to their actions, and may enter combat against entire groups if their presence attracts the attention of nearby guards. If a single Assassinate order coincides with the beginning of open conflict, the Assassin will usually stay to fight until they fall or all hostiles have been dispatched. Even if Connor has no part in battles that occur after activating the Assassinate ability, moving in close proximity to fights or bodies may lead to open conflict if guards notice him.
 Riot
Riot

District: Boston Central (Story Memory)
Recruit: Stephane Chapheau
Tokens Used: 1
Notes: Riot is primarily a diversionary tactic. When used, a Brotherhood agitator will arrive to foment an angry protest in the area of activation, with available civilians accumulating into an angry mob. All potential hostiles in the vicinity will immediately run to contend with the burgeoning riot, which takes them away from sentry posts and patrols to enable easier infiltrations. After a time, events will escalate into an open brawl, with the recruit at its center, where civilians will openly fight the guards; be careful to step away from this, as Connor may be drawn into the mêlée. Naturally, this ability requires the presence of civilians: it is of less utility in low-population areas.
 Marksmen

District: Boston South
Recruit: Clipper Wilkinson
Tokens Used: All
Notes: Boston South is the easiest district to liberate, and yet Marksmen is possibly the most powerful ability at your disposal. To activate it, target an individual that you wish to eliminate, then press  /
/ . After a short delay, all currently available Assassins will open fire, eliminating the specified hostile and up to five targets of opportunity in the immediate vicinity. They will then enter open conflict with all enemies in the area. If conflict is inevitable, this is the most efficient way to begin – and, in many instances, win battles almost immediately.
 Bodyguard

District: Boston North
Recruit: Duncan Little
Tokens Used: All
Notes: Tap  /
/ and all available Assassins will arrive to accompany Connor, walking in his wake. Whenever a hostile enters the “investigation phase” (
 ), one of the Assassins will immediately step forward to assassinate him, then depart from the scene. The ability ends when the last Assassin executes an opponent and leaves. While there are exceptions, especially with larger groups of adversaries, Bodyguard essentially prevents situations where Connor is detected by opponents and enters open conflict. To cancel the ability, and refund “unspent” Recruit tokens after the Assassins escape, press
  /
/ .
.
 Lure
Lure

District: New York North
Recruit: Dobby Carter
Tokens Used: 1
Notes: This ability calls an Assassin to distract and draw a potential hostile away from their post or patrol by performing a theft. A financial sum (and potential consumable) are immediately awarded to Connor’s inventory, but this is a detail. The most important point is that the affected adversary (and any affiliated allies within the vicinity, such as guard partners or patrol colleagues) will immediately chase the recruit as he leads them away from the area. This can even be used when a guard has an active SSI meter as a last-resort gambit to avoid detection. While you can only have one recruit active with the Lure ability at any given moment, it is possible to use it in conjunction with other abilities.
 Ambush

District: New York West
Recruit: Jamie Colley
Tokens Used: 1
Notes: If you are familiar with the use of Trip Mines, then you will soon come to recognize this ability as a permutation that explodes with an Assassin payload once detonated. Tap  /
/ with the Ambush ability selected, and a wide circular marker will appear on the ground. Any prospective adversary – all individuals marked by a red dot on the mini-map – that enter this zone will be attacked immediately by a single recruit. You can place one Ambush marker per active member of Connor’s Brotherhood chapter. The best way to use this ability is to defend potential areas of attack, or lay traps to distract or engage opponents while Connor moves elsewhere. Ambush zones are removed (and the token refunded) when Connor moves more than 70 meters away from the zone. To cancel the order manually, stand within the circle and press
  /
/ .
.
 Covert Escort

District: New York East
Recruit: Jacob Zenger
Tokens Used: 2
Notes: This ability summons a group of available Assassins disguised in military uniforms. In the subterfuge that ensues, Connor will act as a captive as the Assassins pretend to march him to a destination, while actually following his lead. Its primary function is to provide a mobile Blend opportunity and greatly decrease the rate at which opponents detect Connor, both reducing his effective Notoriety and halving the SSI meter fill rate. Even inside a Fort, enemies will only have yellow indicators when they have the Assassin in clear sight. Stationary guards that you encounter while using Covert Escort will stand aside to allow Connor and his “captors” to pass through the entrances without incident; this includes sentries posted outside Forts, and hostiles guarding other Restricted Areas. The only drawback is that you cannot attack while maintaining the subterfuge, and moving outside of the Blend range immediately cancels the active benefits. If open conflict begins, Connor’s escorts will fight all opponents within the vicinity. To cancel a Covert Escort, press  /
/ .
.
South Boston
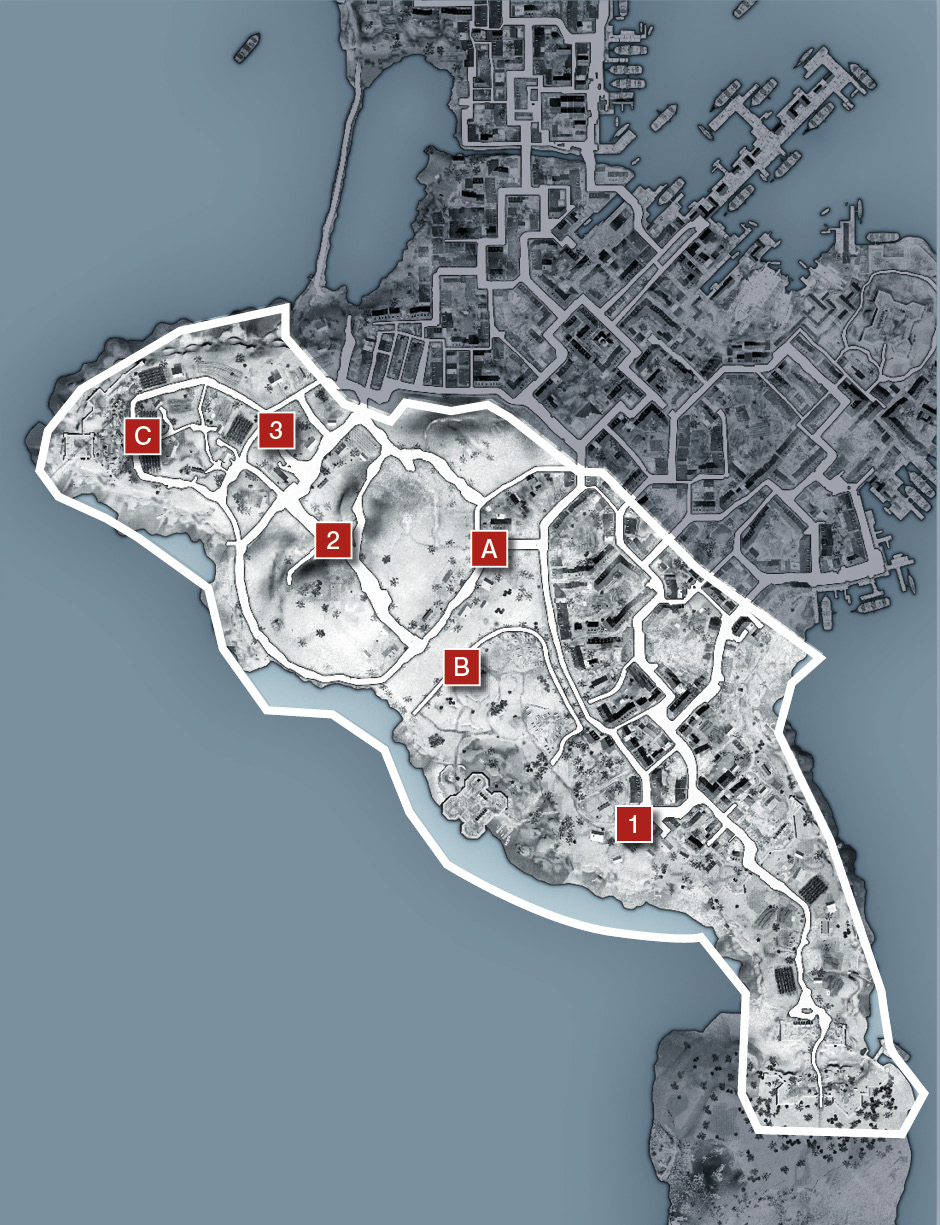
 Defeat Escorts

Connor must eliminate four escorts to free two forced conscripts. Combat begins once you move within range; thereafter, the hostiles will attack both Connor and their captives. The mission is failed if both captives die. The most elementary tactic is to sprint behind the escorts and begin with a double assassination, though these targets
are unremarkable: with a Counter Kill to set up a Kill Streak, each battle should end quickly.
If you are liberating Boston South in one sitting, these missions will elevate Connor to a high Notoriety level. As you will mostly operate in areas with sparse patrols, we suggest that you complete all three required missions and also kill the conscription agents. The Martial Law Memory that ends the liberation is very quick to complete, and has the added benefit of clearing Connor’s Notoriety.
 : Though the escorts and their captives begin in an area close to patrols, you can follow them for a short while until they move to a more convenient ambush position.
 : These reluctant conscripts are situated in an area where their captors are unlikely to obtain support.
 : There is a reasonably large patrol that may pass this position. Check the mini-map and surrounding area before you commit to the attack.
 Kill Conscription Agents

In this mission type, a civilian is pursued by a conscription agent on horseback. As you near the position, call Connor’s steed and ride directly towards the two mounted men. Once the  icon appears to mark the aggressor, gallop towards them and press
  /
/ to perform an immediate horse-to-horse assassination. It’s also possible to just sprint over on foot and pull them from their horse just before they gallop away. Approaching all three targets in this fashion enables you to end these chases before they begin.
 ,
, ,
, : None of the three marked sites should feature patrols.
 Martial Law
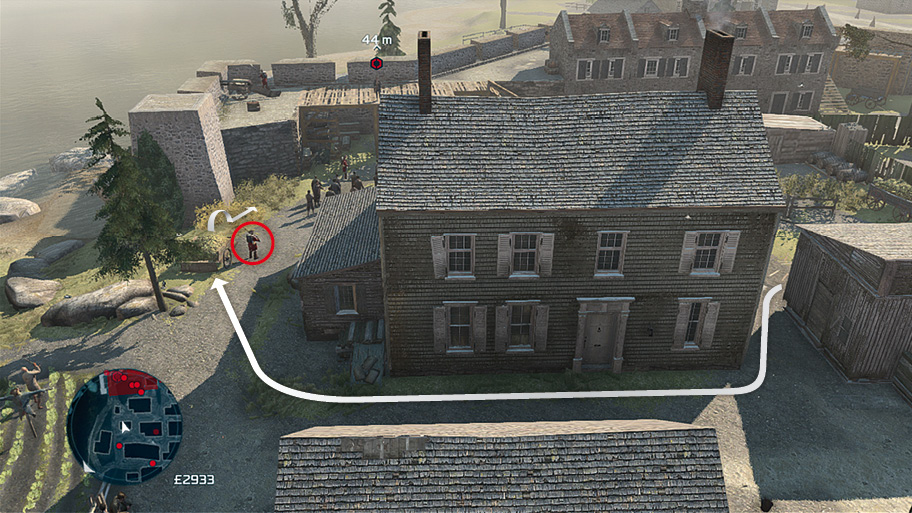
Connor’s contact and prospective recruit can be found in the south of the district. After the opening cutscene ends, sneak around to the north corner of the Restricted Area. Jump into the hay cart and assassinate the guard next to it, then jump out and Blend with the crowd or hide in the Stalking Zone. Once you near the Templar addressing the men below, use the new Marksme n ability to eliminate him.
North Boston
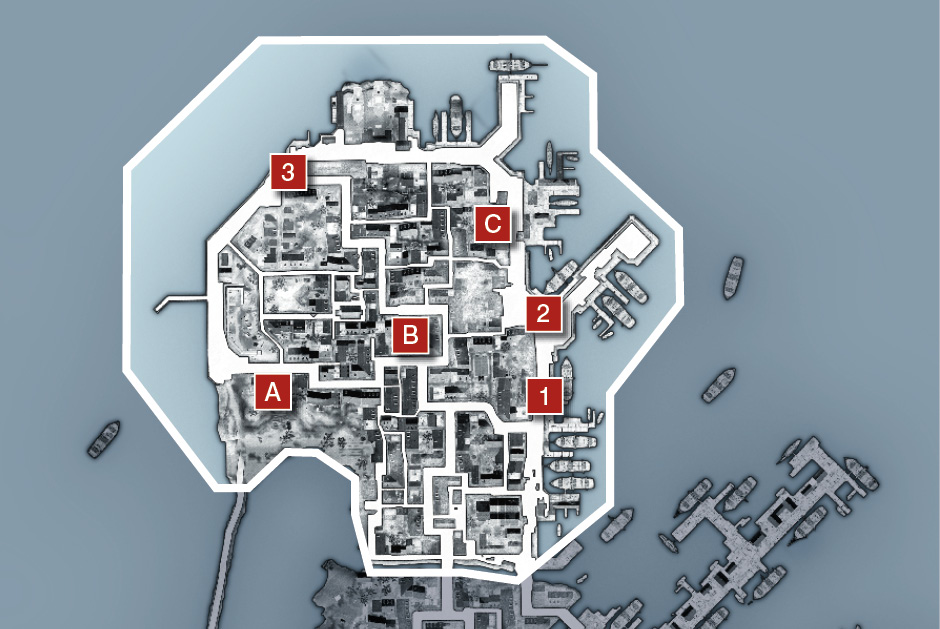
 Protect Merchant
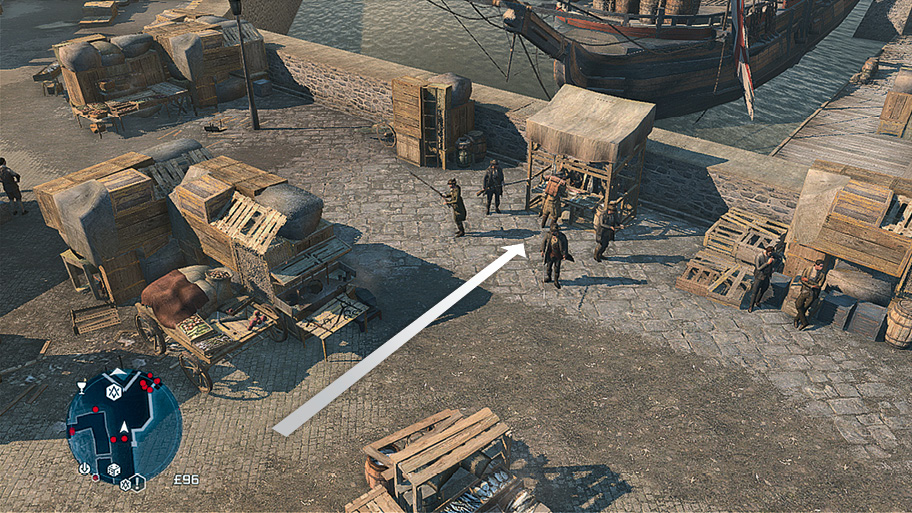
As you approach the mission location, you will see a group of thugs harassing a merchant. Moving in close will lead to immediate combat. Even if you observe events from a distance, combat is inevitable. After a short period of time, one of the thugs – a Grenadier archetype – will automatically run from the scene. You must then catch and kill him with an assassination, while the other mercenaries will give chase and attempt to attack Connor. Complicating matters no end, all patrols in the vicinity will attempt to engage both Connor and the mercenaries, which can become quite chaotic.
There are, fortunately, two strategies that make these missions easier to complete. As open conflict is inevitable, it pays to adopt an aggressive strategy and eliminate the primary target immediately. As soon as you approach the icon, sprint in a direct line for the Grenadier standing at the center of the stall and perform a High Profile assassination. This completes the objective instantly. You can now choose whether to stand and fight (and accept some pretty horrendous Notoriety penalties when local patrols become involved), or take flight and lose your pursuers in the streets or, more obviously, sea. An alternative is to attempt to use an Assassin recruit to deal with the Grenadier instead – but be warned that this can lead to mixed results.
 ,
, ,
, : These three sites offer Connor a clear path to the Grenadier.
 Free Captives

In these locations, Templar agents have captives secured in stocks. Connor must kill all hostiles in the vicinity, then approach the civilian and press  /
/ to free them. You cannot free the prisoners while in open conflict.
 : This is by far the easiest captive to free. Climb the building to the north of the icon, and you can double air assassinate the two Templar guards.
 ,
, : These two sites require that you kill numerous Templar guards in open conflict before you can free the captives, but at least the secluded positions mean that it is unlikely that patrols in the surrounding streets will become involved in the altercation. If you wish, it is possible to provoke a patrol and lure them into these areas, then escape to an elevated vantage point and watch the battle between the Templar gang and the local soldiers unfold. If Connor should become Incognito, even though two factions are still fighting, you can actually free the prisoners while the battle is still raging.
 Gangs of Boston

Enter the tavern highlighted by the Liberation Mission Contract marker ( ) to begin the final mission, then travel to the circular Restricted Area in the very north of the city. When you reach the periphery of the red zone, activate the Bodyguard ability as directed. Calmly walk towards the Templar leader, then assassinate him when you move within range.
North New York
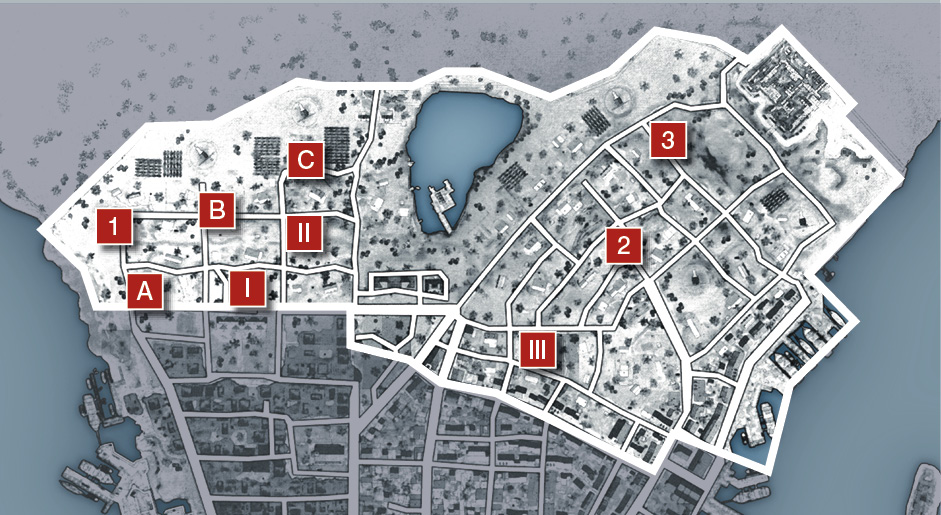
 Beat Up Merchant

In these sites, approach the group of starving children highlighted by the marker. They will request that Connor beat up two nearby merchants, marked by red hexagons ( ), to enable them to steal a little food.
 ,
, ,
, : These locations feature merchants in areas where there are few (if any) patrols. If you have yet to collect it, there is a Peg Leg Trinket on the stall at position
  .
.
 Defend Farmer

Approach the farmer at each site and hear his plea for help with assistance against soldiers determined to exact revenge. A blue circle marks the area that Connor must stay within during the fight that ensues. Two small waves of Redcoats will arrive and attack. You will fail the mission if the farmer’s life bar is depleted – though, as with all Liberation Missions, you can simply leave the area and return to reset the challenge. If you are in danger of being overwhelmed, drop a Smoke Bomb – ideally in an area that encompasses the farmer – to facilitate easy takedowns. Note that completing these missions will drive Connor’s Notoriety level up rapidly.
 ,
, ,
, : Once again, all three marked locations are free of patrols and stationary guards.
 Prevent Evictions

At these sites, you must intervene as tenants meet with bailiffs sent to evict them. Approach the individual marked with a  , and you are given a choice to pay £150 to settle the family’s debt: press
  /
/ to make the bribe when the prompt appears. Alternatively, just rebuff the demand with an attack; you must then defeat his two Redcoat bodyguards. When they fall, the mission is completed. The latter option leads to greater rewards. If you loot the wealthy bailiff he can relinquish over £40 in cash, and high-value trade items or resources. As an aside, players who like to minimize Notoriety maintenance should note that you can actually pay the bailiff, follow him when he separates from the Redcoats, then incapacitate him with an unarmed stealth attack. Looting him enables Connor to retrieve his £150, and help himself to anything else the target is carrying.
 ,
, ,
, : You should be untroubled by patrols at these houses.
 Hoarding Provisions
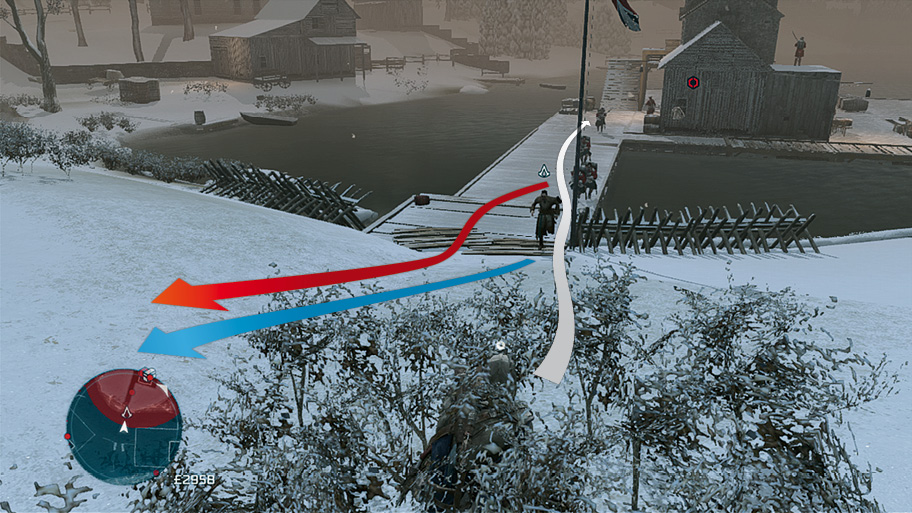
Connor’s district contact appears in the northwest of New York. After the opening cutscene, the closing Memory of this liberation involves infiltrating a Restricted Area to deal with the local Templar leader. Head to the waypoint from the main road to the east. When you approach the Grenadiers protecting the path to the house, hide in the convenient Stalking Zone and use the Lure ability to draw them out of position. Simply sprint along the wooden path and assassinate the Templar to free the north of New York from his greed and tyranny.
West New York
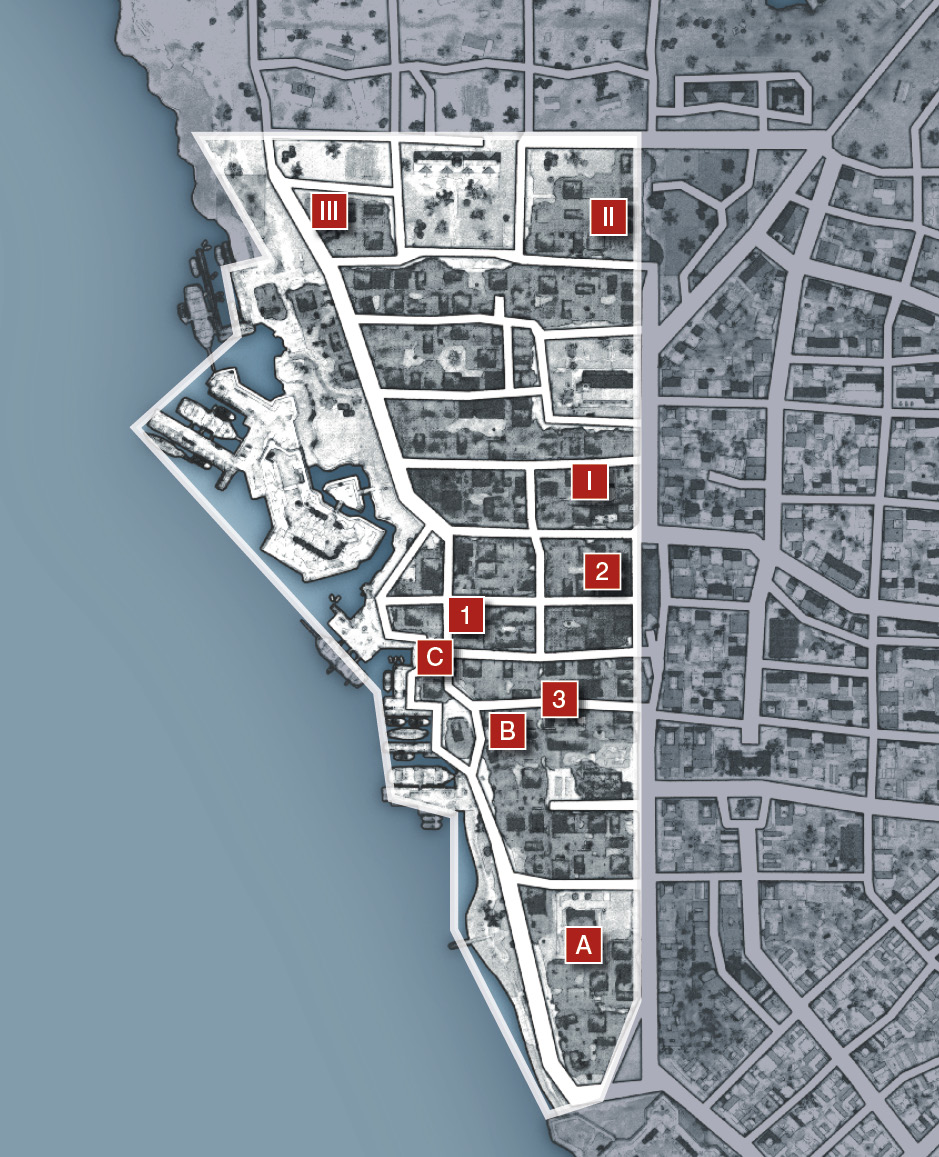
 Burn Infected Blankets

There are two types of site where you must press  /
/ to burn infected bedding. The first is the source of these insidious biological weapons, where you will find a trio of Templars standing next to the bodies of smallpox victims wrapped in the blankets and discussing the process of distributing them. These appear in small Restricted Areas, and necessitate a short fight. Our highlighted suggestions will enable you to avoid these entirely. In the second variety, you will either find the area unattended, or find a civilian with a collection of the blankets. Despite his protestations, you can simply approach them and press
  /
/ to set them alight.
 : Though it lies within a Restricted Area, this site actually has no nearby hostiles. Just walk over to the bodies and blankets, then set them alight.
 : This site has a single citizen with a collection of blankets. There is a patrol that may pass close by; when there are no potential hostile witnesses, interact with the blankets to burn them.
 : This again features a single citizen, and no nearby patrols.
 Carry Sick Civilian

Complete these simple tasks last, as they leave you close to the final Memory of this liberation. Connor must carry three civilians suffering from the effects of the smallpox outbreak to a makeshift inoculation clinic in the ruins. Press  /
/ to pick a patient up, then carry them to the waypoint marker and repeat the button press to lay them down.
 ,
,  ,
,  : All three ailing civilians in these positions lie within 70 meters of the clinic, with no potential complications.
 Put Down Rabid Dogs

These tasks are extremely simple if you use Poison Darts to dispatch the animals humanely, without drama and from a safe distance.
 ,
, ,
, : Move into Poison Dart range, then throw the dart when there are no potentially hostile witnesses. With position
  , approach from the west and turn to run to the north as soon as you throw the dart; there are guards nearby who may react if you linger.
 Protect the Clinic
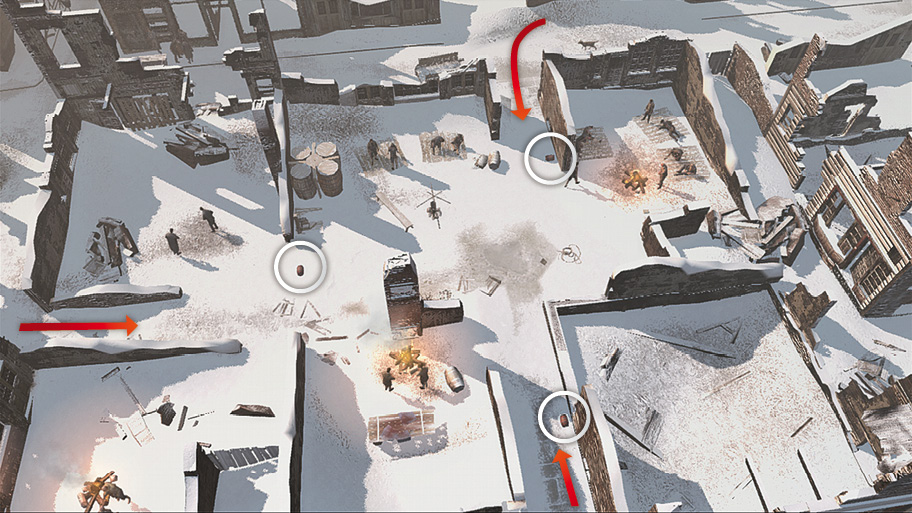
The Memory Start marker appears close to the clinic where you carried sick civilians; interact with Jamie Colley to begin. You then have thirty seconds to prepare before the attack commences. Enemies can enter the area from paths to the north, south, east and west. While you can set up Ambush zones to have recruits leap out and attack hostiles, you can also place powder kegs at choke points to eliminate groups of opponents as they attack. This short Memory ends after you eliminate the final wave.
East New York
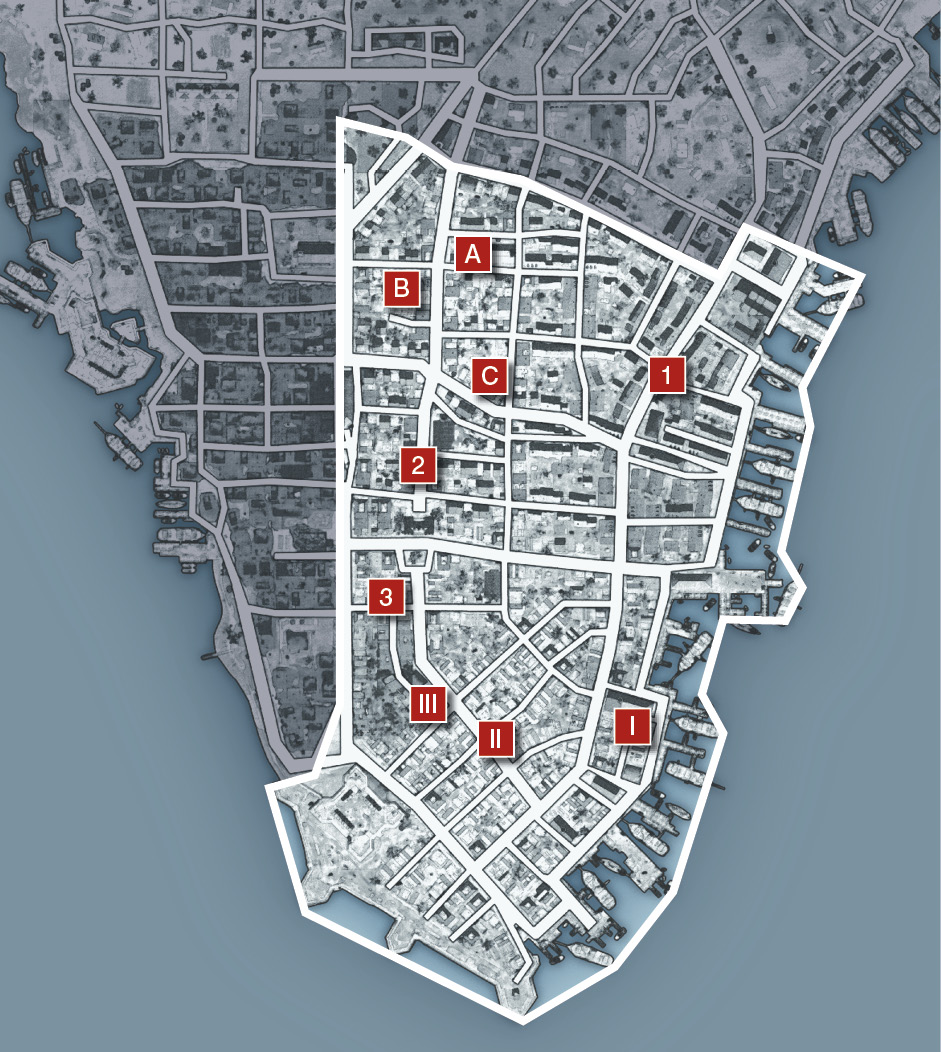
 Beat Up an Officer

Connor must kill or incapacitate three escorts ( ) to automatically subdue an Officer (
 ). These targets will not detect Connor when he is Incognito. The three sites we select here enable you to complete the objectives without initiating open conflict if you use Smoke Bombs.
 : Approach this target by running along the alleyway from the east side to meet them as they walk towards you. Drop a Smoke Bomb in their midst, disable the three escorts, and the Officer should capitulate immediately. Try to time your attack to coincide with the point where they reach a crossroads in the side streets, just past a wooden cart.
 : The Officer and his men will walk into a deserted side street as you approach. Follow them to the approximate center of this alley to reduce the chance of interventions by passing patrols, then use a Smoke Bomb as before.
 : This group can be found in a secluded area, and do not move from their position. Again, start with a Smoke Bomb.
 Prevent an Execution

On arrival in the vicinity of these positions, you will encounter a firing line poised to execute civilians. You must interrupt this and disable all targets marked by  . Using Smoke Bombs or calling on Assassin recruits will enable you to finish each battle in a matter of seconds.
 ,
, ,
, : All three execution sites in the northwest of the district occur in secluded areas, so it is unlikely that patrols will intervene once combat begins. The position at
  features additional soldiers close to the firing line, which makes it slightly more difficult than those that follow. That said, with a well-placed Smoke Bomb, it’s possible to eliminate all targets and escape before the smoke clears.
 Plant False Documents

As you approach these positions, a lone civilian will step forward to speak with Connor. Once he has finished, a target – described as a “snitch”, though not in the sense of the archetype – will appear in the immediate vicinity. You must follow this hyper-vigilant target from a safe distance, Blending and hiding behind objects whenever possible, in order to wait for a very specific opportunity to sneak up behind them and perform a “reverse pickpocket” (hold  /
/ ).
).
 : This target will eventually walk out onto a dock. Stay out of sight until he reaches the end, then sprint behind him (slowing to a walk for the last few steps) when a beggar steps out to ask him for change. Perform the reverse pickpocket while he is distracted.
 : This target appears on a main street, but soon turns left into an alleyway. When he takes a right, he will stop to relieve himself against a wall. Though there are two guards within sight, you can perform the reverse pickpocket and move away before they detect Connor.
 : Stay out of sight (first via a Blend position to the left, then a wooden scaffolding further along) until this target takes a left at the end of the long alleyway. Immediately run to approach him and perform the reverse pickpocket as he speaks to a woman outside a house.
 In the Wolf’s Lair
This Memory Start position appears in the northwest of the district once all other requirements have been met; just enter the tavern to begin. After the cutscene, travel to the waypoint. Infiltrating the Restricted Area is just a simple matter of using the new Covert Escort ability to bypass sentries and move straight for your target to assassinate him. There is a strong chance that the subterfuge will fail once you are on board the ship, however. Should this occur, simply kill the marked target in the battle that ensues. You can then dive overboard and swim out of the zone to complete the Memory.