
Assassin's Creed III Guide Primer
Escaping
It doesn’t take a great deal of provocation to incite many of Haytham’s potential adversaries to violence, or to fail to evade detection during an attempted infiltration. While fighting for a resolution can be a valid strategy, flight is sometimes a more sensible solution. It’s a good idea to at least familiarize yourself with escape techniques during early Sequences, even if your enjoyment of battles usually leads you to be otherwise inclined.
- The first step to escaping is naturally to turn tail and run, moving Haytham out of sight of his chasing opponents. At this stage, the Throw Money ability and Smoke Bombs (see page 45) can be highly effective. Enemies will move to block streets as you encounter them, or stand and open fire if you attempt to climb or free run.
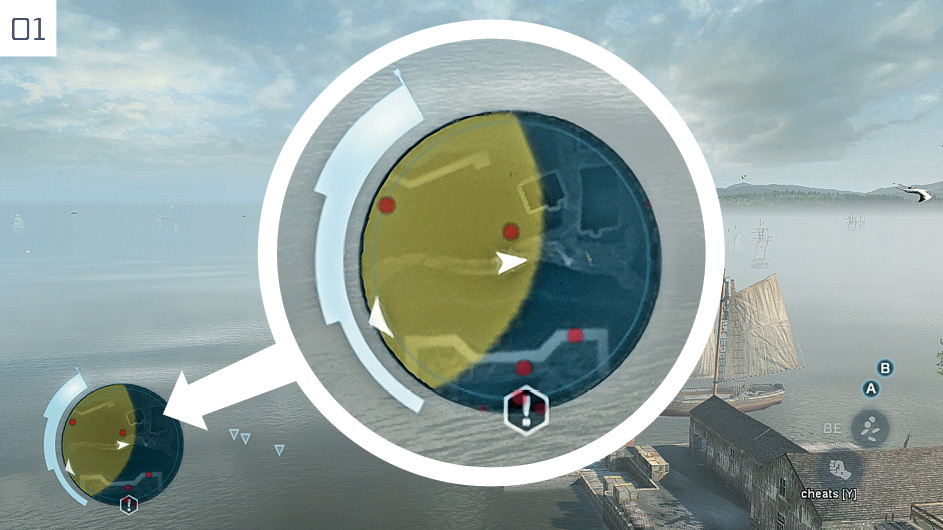
- Once you move out of view, a large yellow circle on the mini-map (
 01) represents the area where Haytham’s opponents will actively search for him (
 ). If you can move out of this zone without attracting further attention, or find a secluded place of refuge (like a hiding place, a Stalking Zone or a crowd to blend in) without being seen, the hostiles will eventually give up the chase. If Haytham is spotted by an alert opponent, however, the circle will be reset to his current location – prolonging the pursuit.
 - Using free run courses and taking to the rooftops can be an effective way to put distance between Haytham and the soldiers on his tail, but sentries posted on top of buildings may spot him from a long distance. Pay these a wide berth if you can. From an elevated position, a Leap of Faith into a hiding place often works well to end a chase.
- If you are close to a large expanse of water, taking a plunge and swimming away from the shore is an easy way to escape. No matter how furious your pursuers may be, their ire is always quelled by the prospect of getting their feet wet. Well, once you move out of musket range, that is. If your adversaries open fire, dive beneath the surface immediately.
There are two new methods of escape in Assassin’s Creed III that warrant a special introduction. Both function in a similar fashion: they do not end the pursuit, but put an impassible barrier between Haytham and any adversaries immediately behind him. Players who enjoyed the multiplayer modes in Brotherhood and Revelations will recognize these techniques as being identical in spirit to the Chase Breaker device.
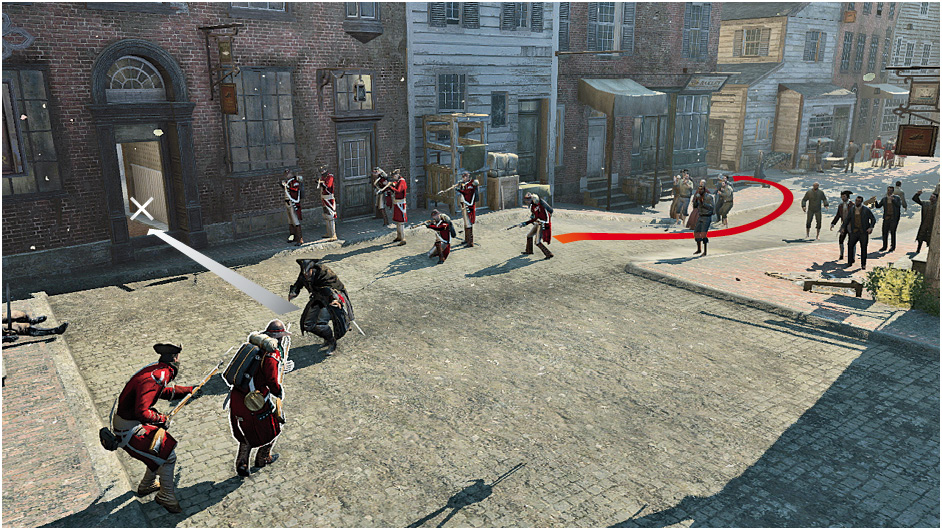
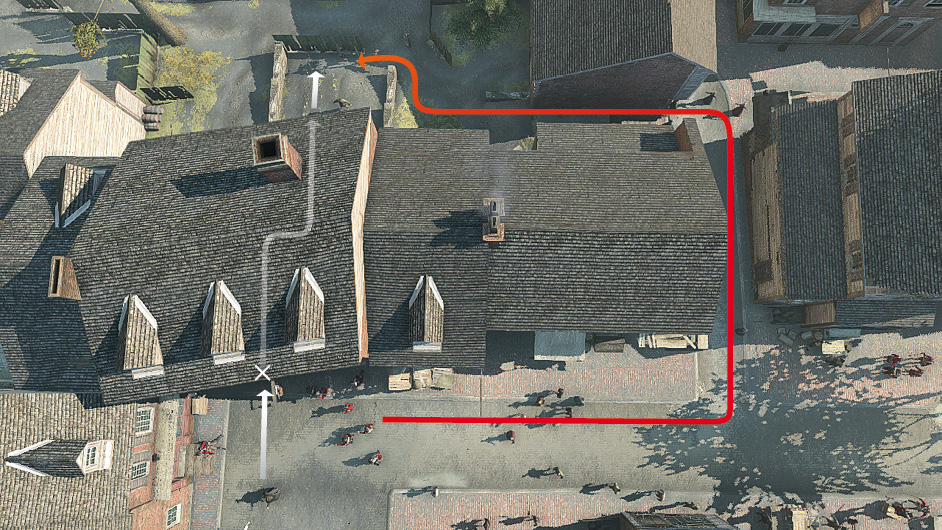
Whenever you espy a building with an open door, Haytham can sprint through it to leave his opponents oblivious to his whereabouts.
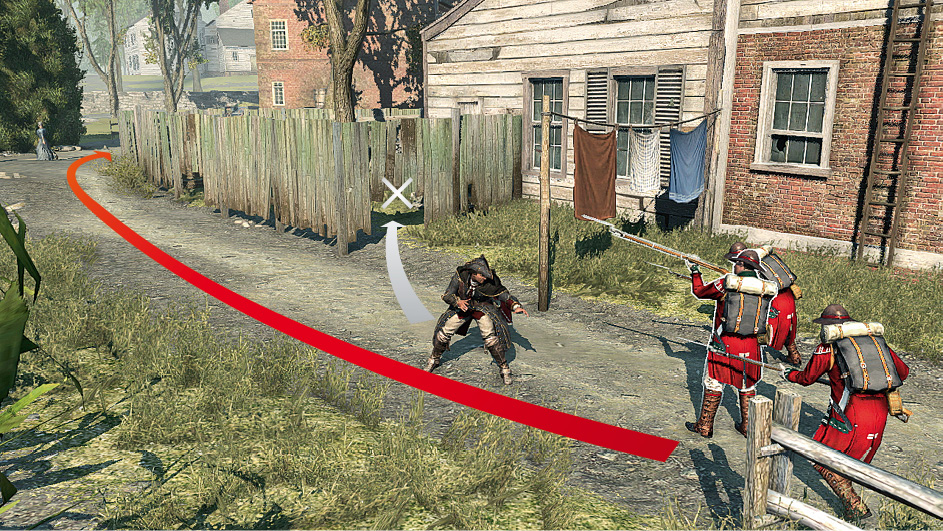
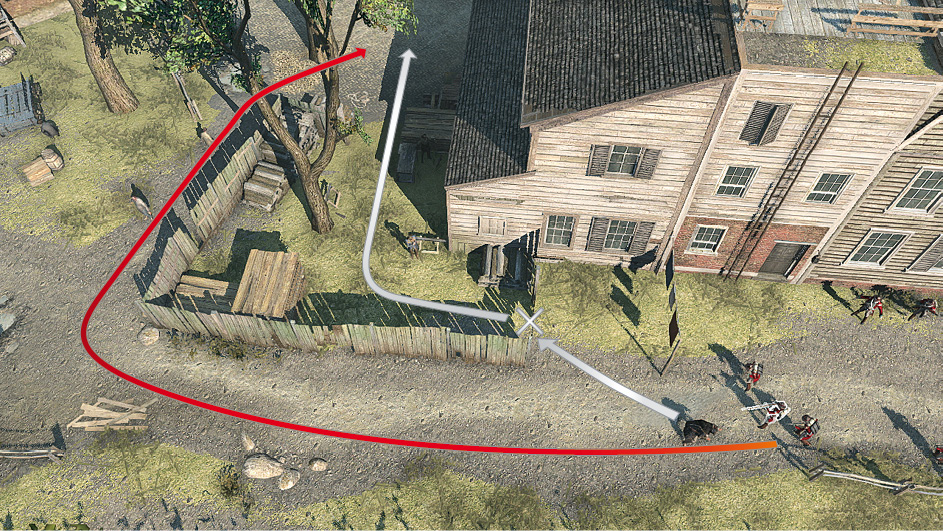
If you see a gap below a fence section, run Haytham towards it (with  /
/ held) to have him slide underneath.
Haytham rarely fights a single adversary at a time once his story is well and truly underway, with the vast majority of confrontations pitting him against several opponents at once. A successful confrontation, then, is one that ends swiftly – so introducing ways to beat opponents decisively is a major feature of this section.
As the Assassin’s Creed III combat system evolves over the course of the story, introducing new weapons, enemy archetypes and a need for greater tactical nuance, the advice we offer here is designed to cover fundamental necessities and techniques with lasting utility. Once open conflict becomes more demanding in later Sequences, you’ll find plenty of essential stats and strategies in the Reference & Analysis chapter.
Combat Basics
- Combat Mode: Once a fight begins, Haytham will automatically adopt a combat stance, and turn to face the enemy you direct him towards. Pay close attention to the highlight that signifies your current target: this shows at all times who you will be attacking. To change this, simply tilt
 in the direction of your preferred target.
 - Attack/Combo Attack: To launch a melee attack on an opponent, press
 /
/ . The amount of strikes required before an opponent falls depends on the weapon type used. Attacking in this fashion is generally only of use when you face few opponents, or a single strong adversary. In battles featuring numerous assailants, you will be far more effective if you employ a counterattacking strategy, a topic that we cover overleaf.
 - Parry: Hold
 /
/ to make Haytham automatically block incoming melee attacks. Early in the story, when you face weak and generic opponents, this makes Haytham effectively invincible, but certain enemy archetypes introduced in later Sequences can break a Parry to create an opening for a follow-up attack.
 - Weapon Swipe: Press
 /
/ to perform a Weapon Swipe. This temporarily breaks an opponent’s guard, enabling Haytham to launch an assault before they recover. This is generally less important in early Sequences, as so few opponents have the ability to deflect the opening blow in a combo. Some adversaries you meet later, however, are effectively untouchable unless you employ this vital “softening up” attack. Performing two consecutive Weapon Swipes on an opponent will cause Haytham to kick their feet from underneath them, rendering them vulnerable to an instant killing blow as they lie on the ground (
 01).
01). - Collecting & Dropping Weapons: Outside of combat, tap
 /
/ to collect or drop weapons. During a fight, you’ll need to hold
  /
/ while you tap the button to achieve the same result. The safest way to immediately drop an acquired weapon is to use the Weapon & Tool Wheel, or the Quick Inventory function: see page 57.
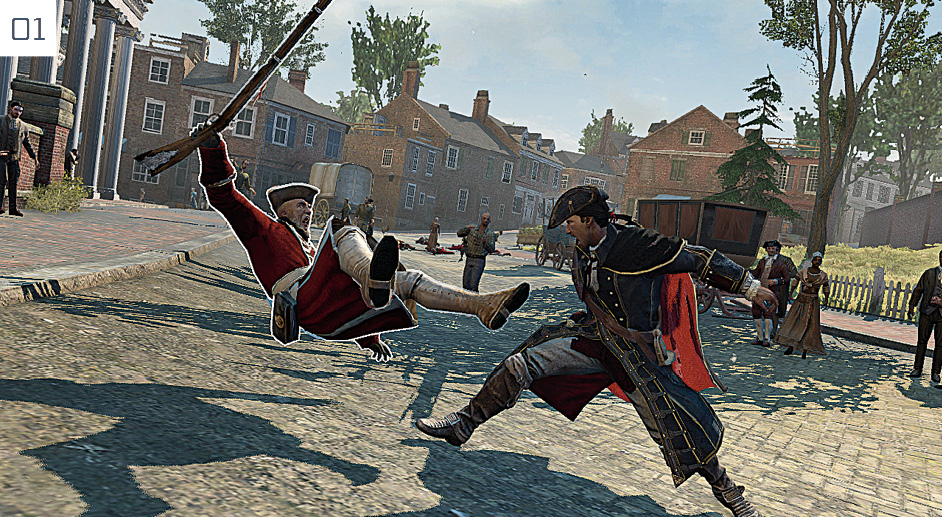
 - Tackle: A non-lethal technique, Tackle is employed while sprinting with
 /
/ to knock a target to the ground. When Haytham is just behind his quarry, tap
  /
/ to make him leap and propel them from their feet (
 02).
02).
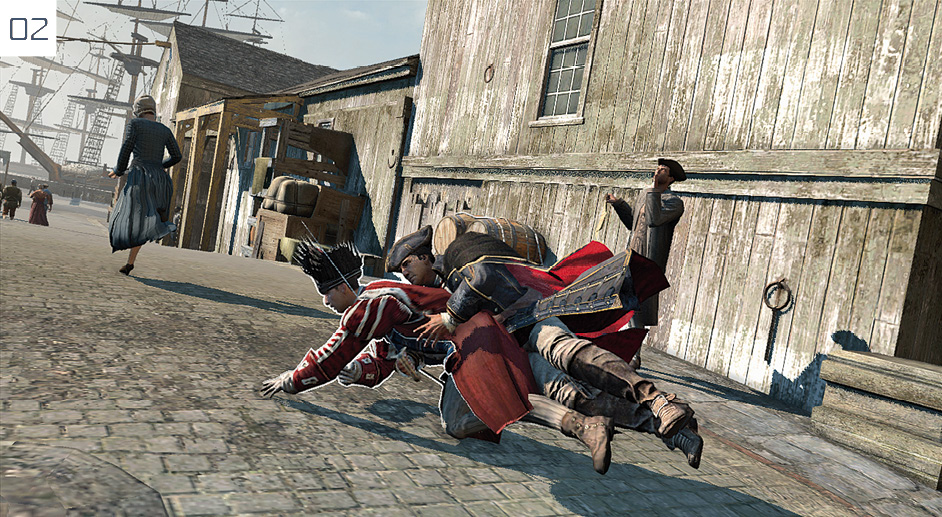
- Escaping a Battle: To leave active combat, hold
 /
/ . This restores standard
  control, enabling you to turn tail and escape. When surrounded, it’s prudent to Parry an attack beforehand, then immediately make a break for the widest and most suitable gap. Of course, this isn’t purely a technique for bidding farewell to a fight: you can use it to reposition Haytham if you feel that the initial battleground doesn’t favor him, or if a nearby location offers a strategic advantage. A narrow alleyway, for example, could limit the effectiveness of enemy marksmen.
The Life Bar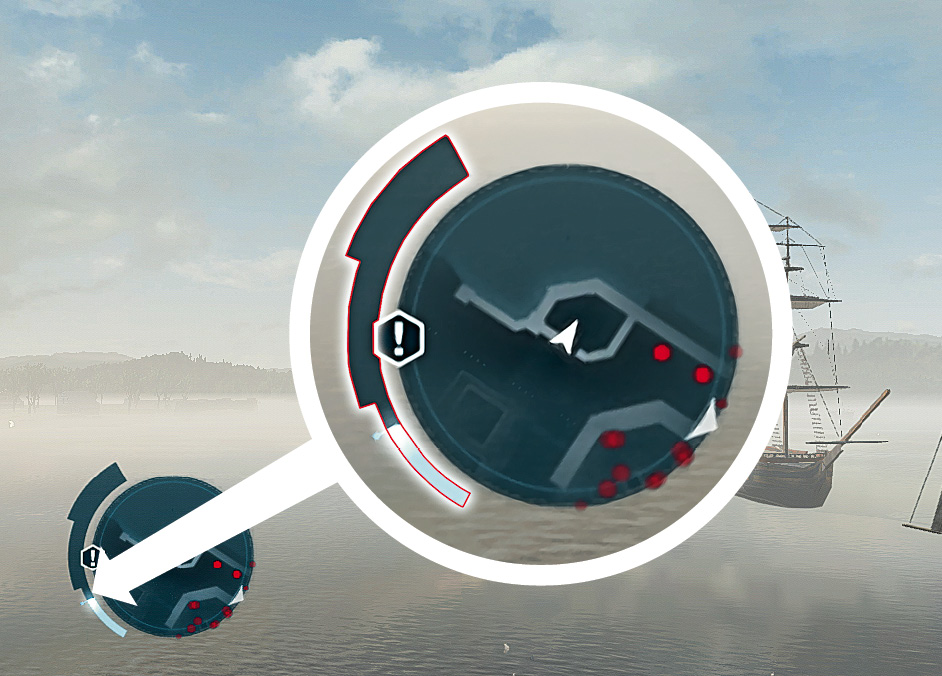 When Haytham is engaged in open conflict or fleeing his aggressors, the Life Bar (situated to the left of the mini-map) is subject to certain limitations. You should notice the varying levels of thickness that divide it into three segments. Whenever damage is sustained in combat, regeneration gradually takes place after a short delay. However, once a segment has been fully depleted, it will not refill until combat ends. |
Counter Techniques
The use of counterattacking moves is the very fundament of the Assassin’s Creed III combat system: without them, and their attendant strategies, battles against large groups of opponents become dispiritingly attritional and difficult. Fortunately, they are relatively easy to master with a little practice at an early stage in the story.
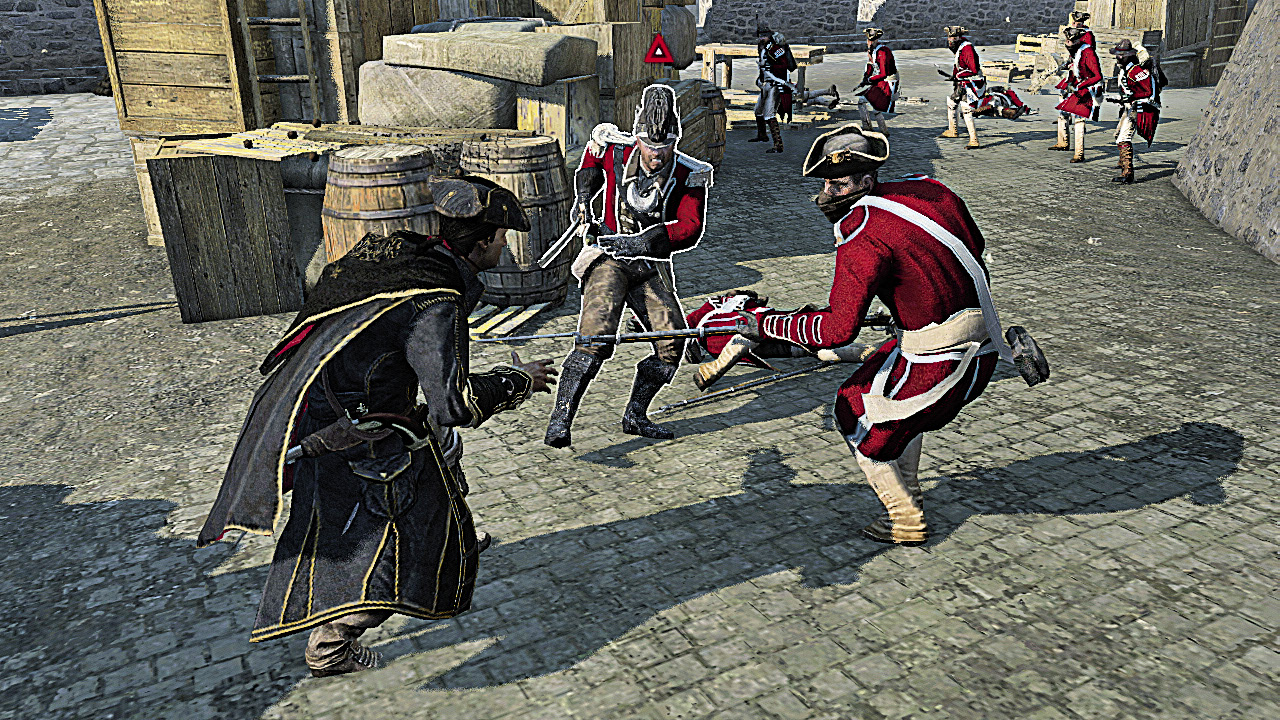
To perform a counter, wait until you see the  icon appear above the head of an opponent. This indicates that they are poised to strike with a melee attack. Tap
  /
/ to set up your counter. (Don’t hold it – this could result in a basic Parry.)

A successful  /
/ press initiates a temporary slow-motion state where you must tap a second button to choose one of four counter moves (see below). If this window of opportunity passes, both the enemy attack and the counter attempt fail.

If two enemies attempt to attack simultaneously – both marked by the distinctive overhead icon – pressing  /
/ alone will lead Haytham to kill both automatically.
With the basic ground rules established, let’s examine the four types of counterattack.
1. Counter Kill: Press  /
/ to kill an opponent instantly. This is by far the most effective and low-risk way to eliminate adversaries in large groups. Though the incredible power of the Counter Kill is tempered by the later introduction of enemies who can evade or parry it – at least until sufficiently weakened – it’s the pillar of sound combat strategy throughout the entire adventure.
2. Counter Disarm: Press  /
/ to make Haytham deftly disarm his attacker. If Haytham is unarmed or using the Hidden Blades, he will claim his opponent’s weapon as his own; if he is already using another type of weapon, the opponent’s weapon will simply drop to the ground. To discard a weapon acquired from an adversary (which, in earlier Sequences, is generally a musket), just select one of your own weapons.
3. Counter Throw: Press  /
/ to hurl an opponent aside. You can use
  to influence the throwing direction. Thrown enemies can be finished with a single attack if you can reach them before they clamber to their feet. Propelling enemies from high buildings or into water is also fatal. If there is a balustrade or other form of low barrier in their path, they will often tumble over it.
4. Special Counter: Press  /
/ to make Haytham counterattack with a weapon selected as his current Tool (which, for Haytham, means the pistol or an acquired musket only). When employed against generic soldiers, this might seem like a waste of a bullet, and hardly worth the time required to reload once the battle is over. The true utility of the Special Counter, though, is only revealed when you later face enemy archetypes who are resistant to the Counter Kill move. Where that fails, a pistol-based Special Counter leads to an instant kill, removing a powerful opponent from the field. If you have no suitable weapon selected, or your pistol is unloaded, Haytham will attempt a standard Counter Kill instead.
Kill Streaks
A Kill Streak is a combat technique whereby multiple opponents can be dispatched with instant-death attacks. This aggressive strategy perhaps makes Haytham more vulnerable to enemy attacks, but enables you to cut down several opponents with unflinching alacrity.
To begin a Kill Streak, Haytham must either defeat an adversary with a combo attack, or perform a successful Counter Kill. During the killing animation, press  towards the opponent you wish to dispatch next (the one highlighted), then press
  /
/ to “stack” a subsequent assault. If successful, Haytham will automatically move and lash out, killing your specified target. During this animation, you can use
  and
and  /
/ to select the next victim. This can, theoretically, be repeated until all combatants, save the victorious Mr Kenway, lie beaten on the ground.
Kill Streaks end instantly if Haytham takes damage, or fails to make contact with an opponent – usually because they are too distant to reach. In pitched battles with aggressive antagonists, you can cancel a Kill Streak (or, essentially, start a new one) with a counterattacking move if an enemy seems poised to land a blow before Haytham reaches the next target.
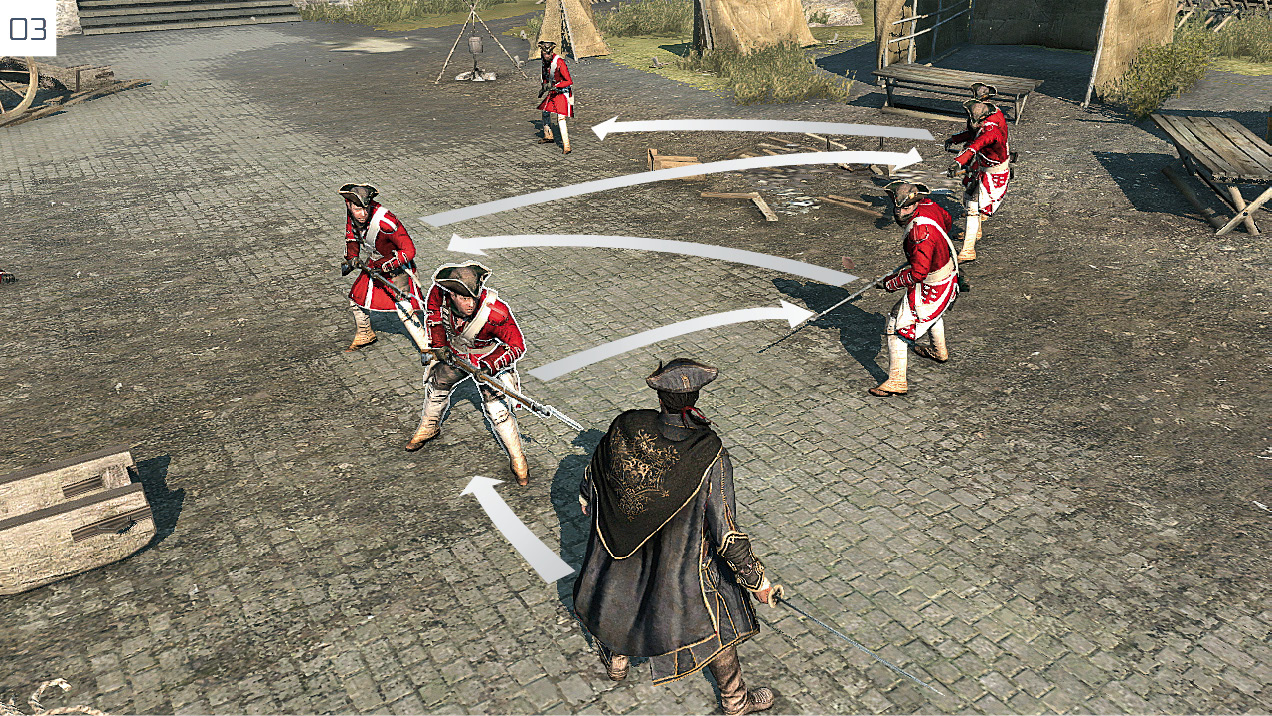
The secret to successful Kill Streaks is to identify a route of opponents that will enable you to kill as many as possible in sequence, adapting your course on the fly as you “join” the moving dots ( 03). However, as with Counter Kills, it’s important to recognize that some opponents are resistant to such attacks. This certainly isn’t a problem you’ll encounter during the opening hours of the adventure, but it will eventually complicate matters by compelling you to avoid such antagonists to keep a Streak active.
Finally, Haytham’s current weapon influences the range and speed of Kill Streak attacks.
Contextual Techniques
Combat situations often call for Haytham to react to events in specific ways, or enable him exploit certain opportunities for swift, uncomplicated takedowns.
Escape Grab/Counter
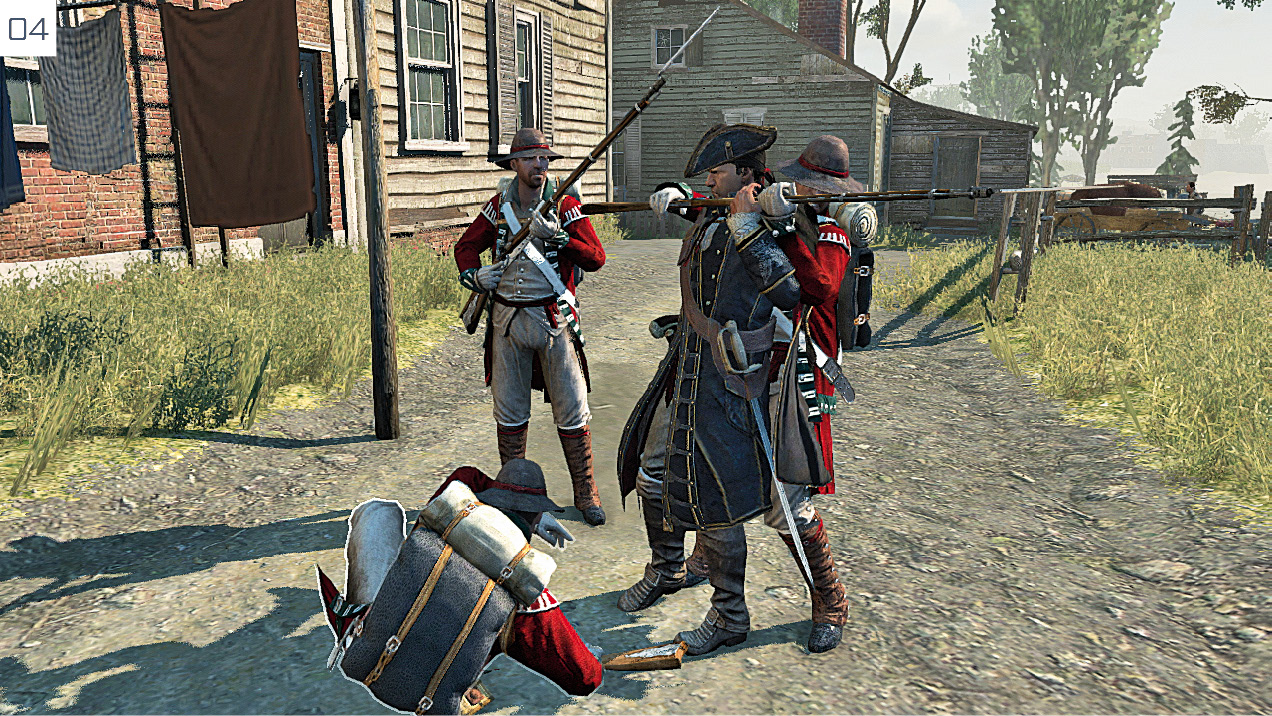
Opponents situated close behind Haytham may attempt to restrain him ( 04), restricting his movements so that their colleagues can lash out without fear of reprisal. If you are quick, you can press
  /
/ to counter and foil the move, generally hurling the assailant to the ground. If you do not react in time, press the same button repeatedly until Haytham wrestles free.
Environment-Based Kills
It can take four or five strikes to down an enemy with a combo attack, but less in situations where the environment offers Haytham a method of dispatching an opponent immediately. As you grow in confidence in combat situations, you’ll gradually begin to recognize and exploit opportunities for context-sensitive takedowns.
If an opponent is driven against a solid surface, Haytham might gain an advantage and dispatch them in one or two blows. Should you notice an enemy close to a drop, Haytham can dismissively kick them over the edge. Even if the resultant fall is not fatal, it temporarily removes an enemy from the fray. Knocking adversaries into deep water, however, is consistently lethal. Any enemy foolish enough to stand between
Haytham and any expanse of blue can be shoved or kicked to their doom; those standing further away can be propelled with the Counter Throw move.
Haytham’s surroundings can even affect Counter Kills and Kill Streaks – though as these special animations do not in any sense accelerate the process of defeating an enemy, it’s a purely visual feature.
Human Shield
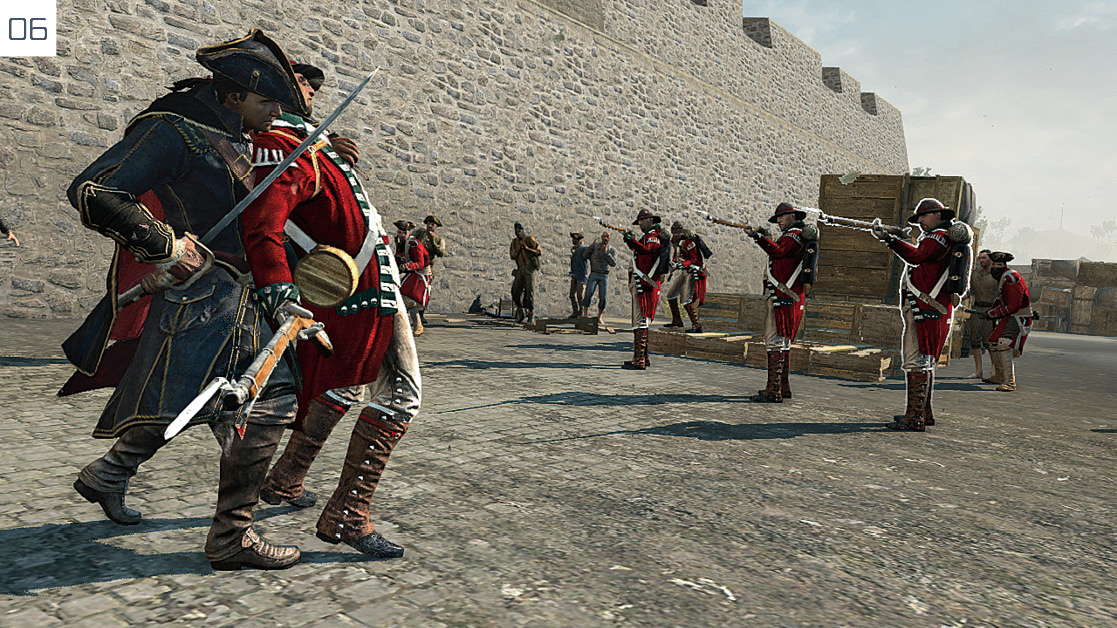
Whenever Haytham fights against large groups of opponents where many are armed with muskets, there is a danger that they will form firing lines – and, after observing a preparatory drill, fire simultaneously. If successful, this leads to significant injury. Fortunately, there are a handful of ways in which this can be avoided.
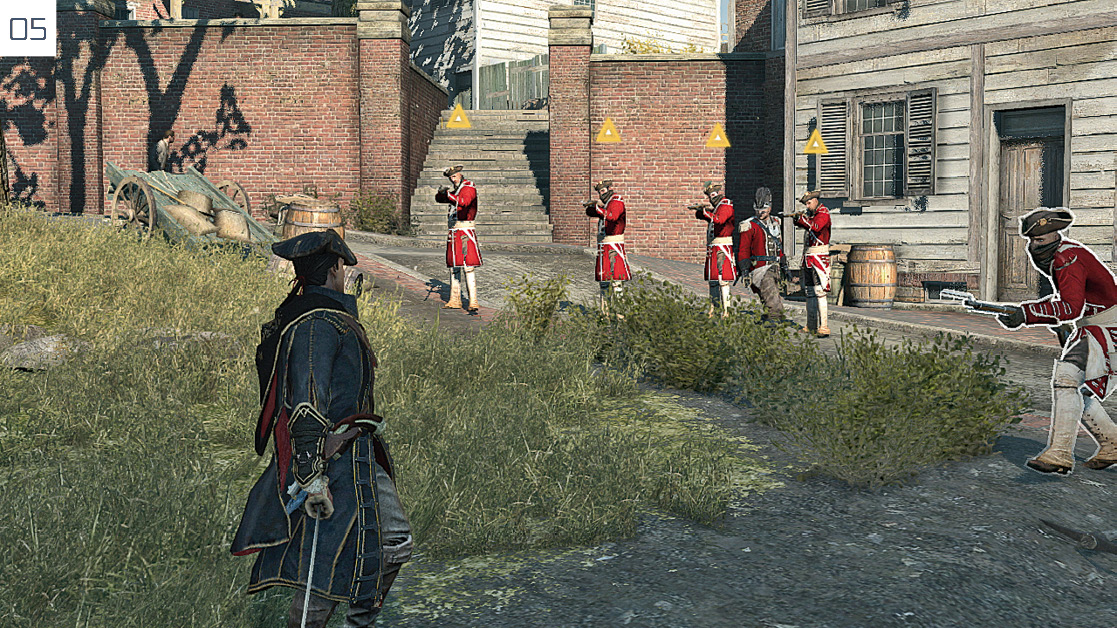
Once they move into formation,  icons will appear over the heads of all soldiers in the active line (
 05). From this point onward, you can grab any opponent within range to use as a human shield by pressing
  /
/ . In the final stage before the firing line finishes its preparations, the camera angle will automatically switch to a perspective that shows their position in relation to Haytham. This is the last-chance saloon: a final opportunity to perform the Human Shield contextual action to survive without damage (
 06).
06).
It can take a few attempts to get a feel for how to react to firing line situations. Don’t panic if you tend to fail at first. There’s a knack to identifying the danger and positioning yourself close to a suitable shield. What’s more, it’s not always strictly necessary to have an opponent nearby to avoid injury.
- Firing lines can be foiled by moving behind cover, which is easier if you break out of combat mode by holding
 and
and  /
/ .
. - If you are sufficiently close to the line, a daring option is to hold
 /
/ and sprint directly at them. At extremely close range, their shots will miss – and you can even kill one and cause the line to break before they open fire.
 - With practice, you can still grab an enemy to act as a bullet sponge even when they are rapidly retreating. Hold
 /
/ to break into a run towards the closest candidate, release it as you move within range, then tap
  /
/ moments afterwards as Haytham slows to a halt.
Weapons
The weapons that Haytham can use in early Sequences all have distinct strengths and weaknesses.
 Sword
Sword
- The sword offers excellent range, which enables Haytham to initiate combos and reach Kill Streak targets over slightly longer distances.
- It is relatively slow to use, though this is rarely an issue against early opponents.
- Haytham cannot claim enemy weapons with the Counter Disarm ability while holding a sword.
 Hidden Blade
- The Hidden Blade is great for Counter Kills, and notable for the brutal fashion in which Haytham eliminates opponents.
- Due to its short range, it is less suitable for maintaining long Kill Streaks and combo attacks.
 Unarmed
- Unarmed Counter Kills, Kill Streaks and combo-based takedowns are non-lethal, though they do permanently incapacitate the target. If you perform a Counter Disarm while unarmed, Haytham will adopt his enemy’s weapon for subsequent attacks.
- Can be very effective if employed in a pure counterattacking strategy.
- Haytham cannot Parry attacks while unarmed against armed opponents – you must either counter, or submit to an incoming blow.
 Pistol
- Hold
 /
/ to aim the pistol at a highlighted target, then release the button to fire. To cancel a shot with the button still held, tap
  /
/ .
.
- Haytham’s pistol is only good for a single shot in active combat, due to its tortuously slow reload time.
- The pistol is better suited to use outside of open conflict, particularly to eliminate specific adversaries. To aim manually, hold
 /
/ to enter Precision Mode. Move the cursor over the required target, then press
  /
/ to fire. Precision Mode increases the range of all firearms.
 Musket
- Muskets can be taken from enemies during a battle with the Counter Disarm move, or collected from the ground (or a gun rack) by tapping
 /
/ .
.
- Muskets are fired in exactly the same way as pistols (though they have superior range and damage), but also function as melee weapons. They are suitable for all basic moves and counters.