
Assassin's Creed III Guide Primer
Assassinations
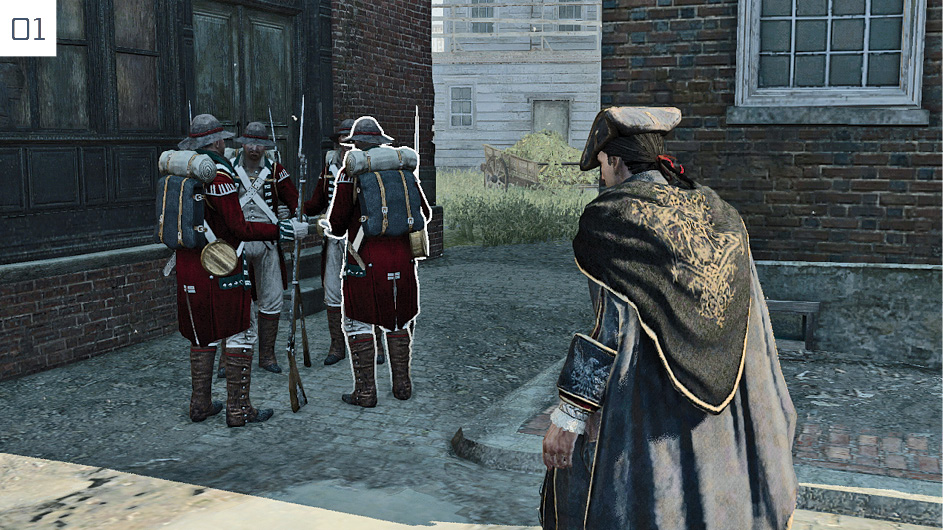
If stealth scenarios in Assassin’s Creed III can be described as a kind of clockwork apparatus, then assassination techniques are the means by which you can break or interrupt the smooth operation of such engines. Whenever there is a need to infiltrate a guarded area, a mixture of sentries and patrols are placed to make it difficult to travel between waypoints without detection. Performing silent assassinations enables you to remove select cogs and wheels, so that a machine designed to prevent your safe passage ceases to function as intended.
There are many different contextual assassination techniques, though they can be separated into two groups: those that are Low Profile, thus suitable for stealth situations, and High Profile kills that are much more likely to attract attention. As a general rule of thumb, an assassination performed with  /
/ alone will be low-key in nature, while holding
  /
/ will lead to a more showy and violent killing move.
Before we document the various types of assassination techniques, here are a few useful guidelines:
- High Profile assassinations function at a greater range than their more discrete Low Profile equivalents. If a target won’t move within range for a stealth kill, and potential witnesses are looking or moving elsewhere, it’s often easier to just go for the spectacular kill and hide the body afterwards.
- Pay close attention to the highlight (
 01) that signifies your current target when you perform assassinations, particularly aerial kills. Be sure to adjust Haytham’s position and the camera to select the correct opponent.
 - Haytham will automatically use his Hidden Blade for most assassinations, but will occasionally use his current selected weapon while stalking a target on foot. Use the Weapon Wheel to manually select the Hidden Blade in advance to avoid this: kills with other weapons can be noisier and more protracted.

Standard Assassination: Performed while level with a target.
- Low Profile: Haytham will stab his target discretely, though this will still lead to consequences in plain view of others. It’s highly effective when employed from behind on a single sentry or patrolling guard; use the Fast Walk ability to close the gap without creating noise.
- High Profile: Haytham will leap and knock the target to the ground as he delivers the killing blow. Note that this can be performed while running.

Double Assassination: Performed while level with two aligned targets in close proximity.
- Low Profile: Haytham will reach out and stab both victims simultaneously.
- High Profile: Haytham will leap and knock both targets to the ground.

Air Assassination: Performed from above a target.
- High Profile Only: Haytham will leap onto the highlighted victim from above, killing them instantly. This move can take down two targets in close proximity.

Hiding Place Assassination: Performed from any kind of hiding place.
- Low Profile: Haytham will reach out and simultaneously grab and stab a target within range, then pull them into his place of concealment. (One notable exception: if sitting on a bench, Haytham will expertly stab his quarry and discretely lower them into his previous sitting position – therefore losing his place of concealment.)
- High Profile: Haytham will leap out to stab a passing adversary.

Stalking Zone Assassination: Only available when concealed in a Stalking Zone.
- Low Profile: Haytham will pull his target into the undergrowth to perform the kill, leaving the body concealed.
- High Profile: Haytham will jump out to kill a target within range.

Ledge Assassination: Performed while hanging from a ledge just below a target.
- Low Profile: Haytham will reach out to grab (and stab) the target, then hurl them over the ledge. This is useful if there are other hostiles on the same level that you really need to avoid, but not so great if there are patrols or guards below.
- High Profile: Haytham leaps up and knocks his quarry to the ground to perform the killing blow. This is the most efficient technique against solitary rooftop sentries.

Corner Assassination: Only available when pressed against a suitable surface.
- Low Profile: Haytham quickly rounds the corner, stabs the victim, then pulls them back and lowers them to the floor.
- High Profile: Haytham bursts into view to leap on his quarry.
Non-Lethal TakedownsSome missions have Optional Objectives that specify that Haytham should not kill any adversaries. In these instances, the full repertoire of assassination moves is of little use for those seeking 100% Synchronization – and yet there is one technique that you can use against solitary opponents: switch to Unarmed. If you then sneak up behind a target and tap |
 /
/ , Haytham will silently incapacitate them.