Assassin's Creed III Guide Primer
Interface & Control Summary
Onscreen Display
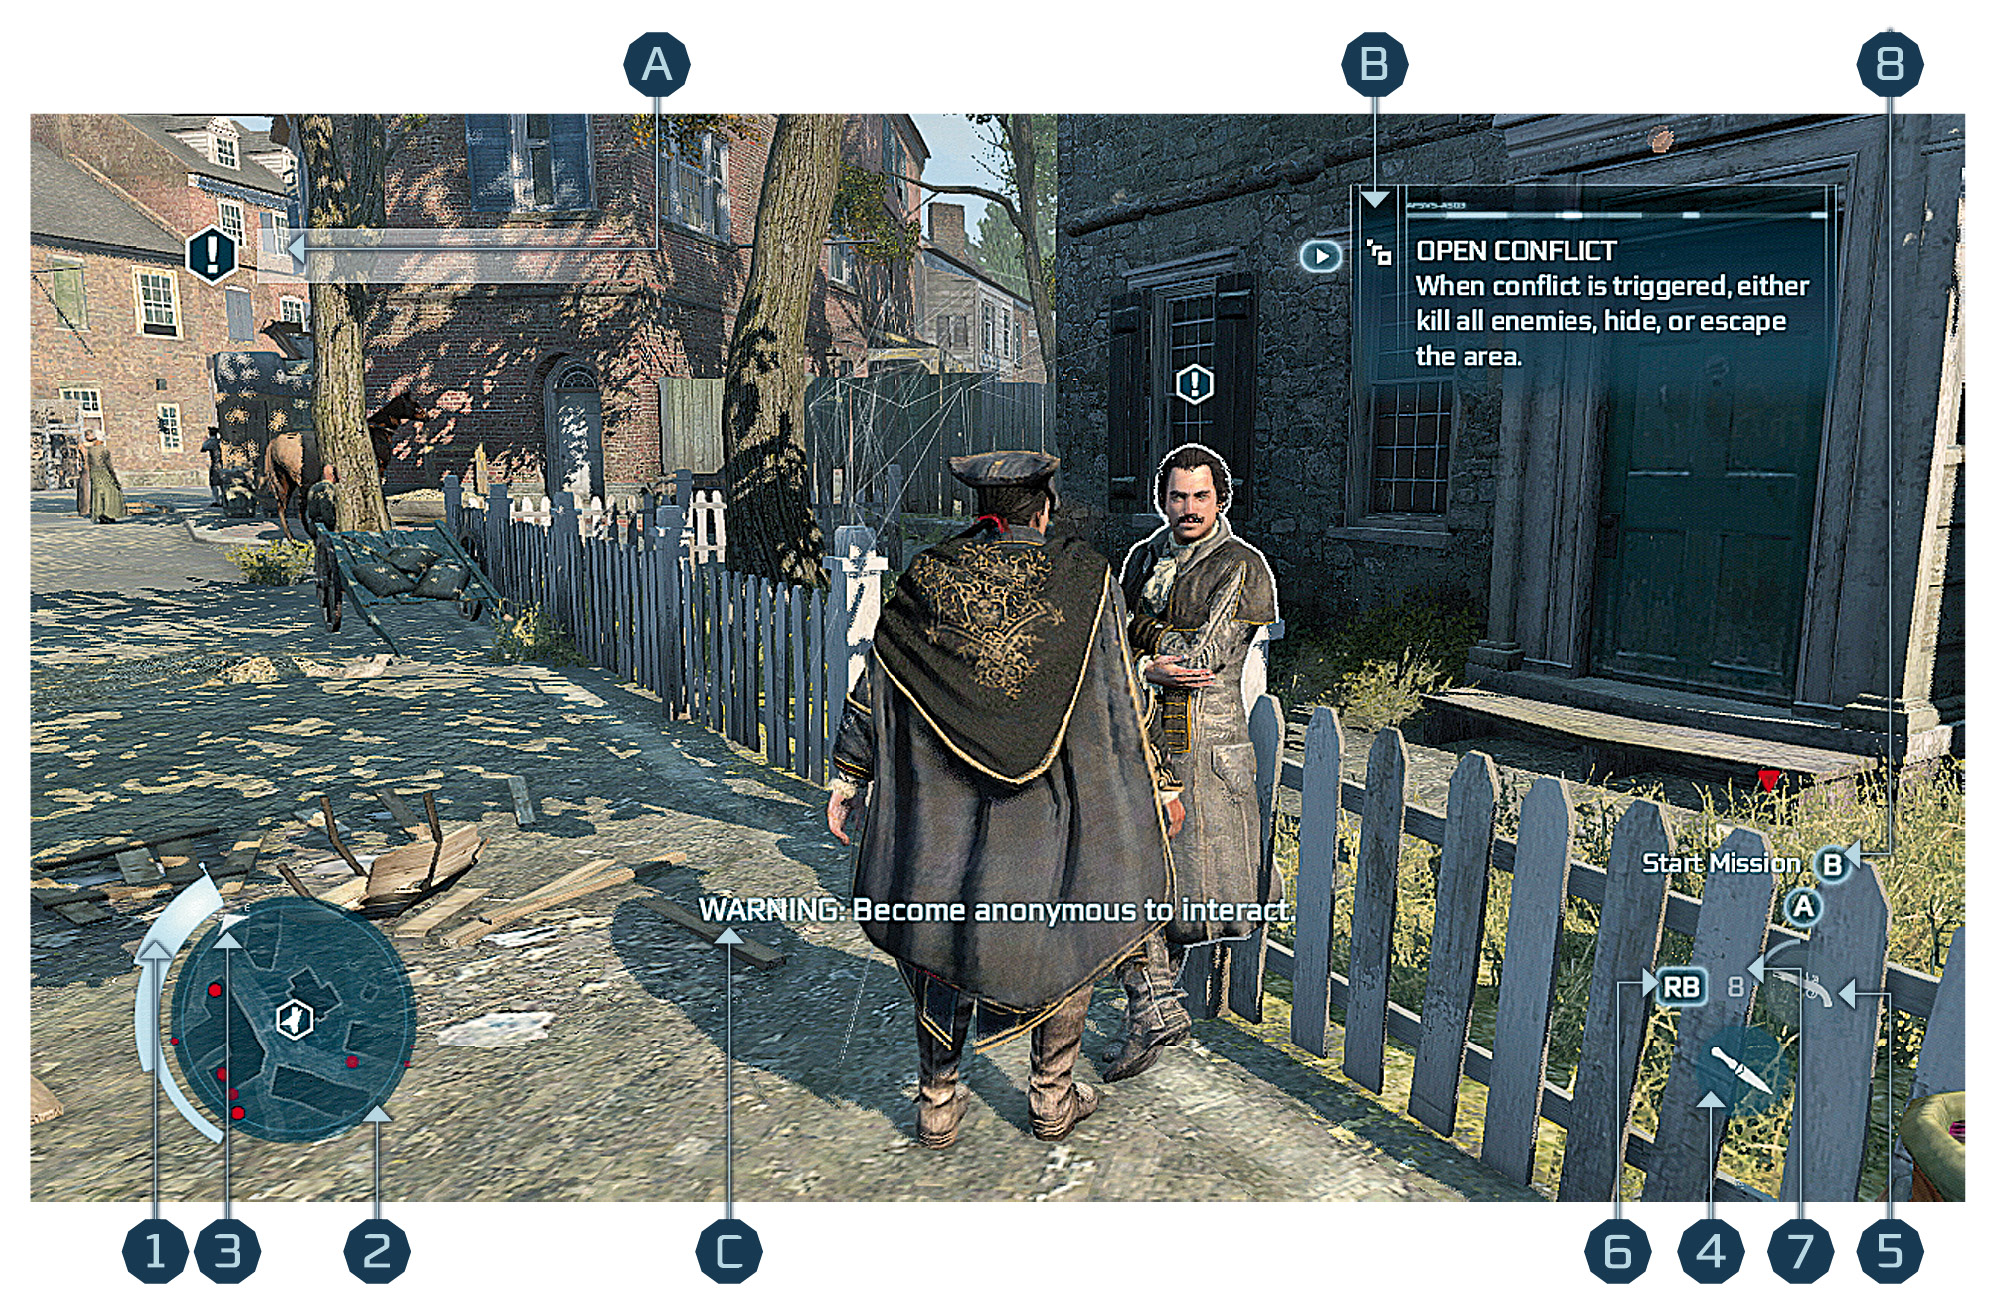
 Life Bar: This shows Haytham’s current state of health. Outside of open conflict, it will always regenerate after a short delay. In combat, only individual sections (as delineated by the three distinct segments of the bar) can regenerate. Lose the first two sections, for example, and they will be unavailable until the battle ends.
 Mini-Map: This illustrates Haytham’s immediate surroundings, including essential details such as potential enemies (red dots) and points of interactivity. See page 39 for details.
 Compass: The arrow attached to the mini-map always points north.
 Weapon: This shows Haytham’s chosen weapon, or his fists if he is unarmed – the primary attack activated with
  /
/ . You can change the weapon you’re using at any time with the Weapon Wheel.
 Tool: Haytham’s currently selected Tool – the secondary attack/action activated with
  /
/ . This can be a ranged weapon (such as a pistol), a special ability (such as Throw Money), or a special device (such as Smoke Bombs). You can change the weapon you’re using at any time with the Tool Wheel. Additional Tools are introduced as you progress through the story. If a Tool cannot be used, this icon is dimmed.
 Reload Prompt: If Haytham has an unloaded firearm equipped, this icon lets you know to reload when an opportunity arises.
 Ammunition: When Haytham is equipped with a pistol or musket, bars surrounding the Tool icon indicate how many shots it can fire before a reload is required. Loaded cartridges are bright white; spent cartridges are grey.
 Controls HUD: This section of the display highlights contextual actions that can be performed with
  /
/ and
and  /
/ .
.
Animus Feedback SystemThe Animus Feedback System (or AFS) regularly posts text on the screen during play, with the nature and relative importance of the message indicated by its position.
|
 Goals and warnings appear in the left-hand corner of the screen. These include mandatory tasks and Optional Objectives.
 Micro-tutorials and background information appear in the right-hand corner of the screen. Whenever a
  /
/ prompt appears, you can press the button to automatically visit the Animus Database or in-game manual. If Haytham receives items (such as money or ammunition gained through looting), his new acquisitions are also briefly documented in this space.
 Critical messages, such as a warning of impending Desynchronization, appear in the center of the screen.
Weapon & Tool Wheel
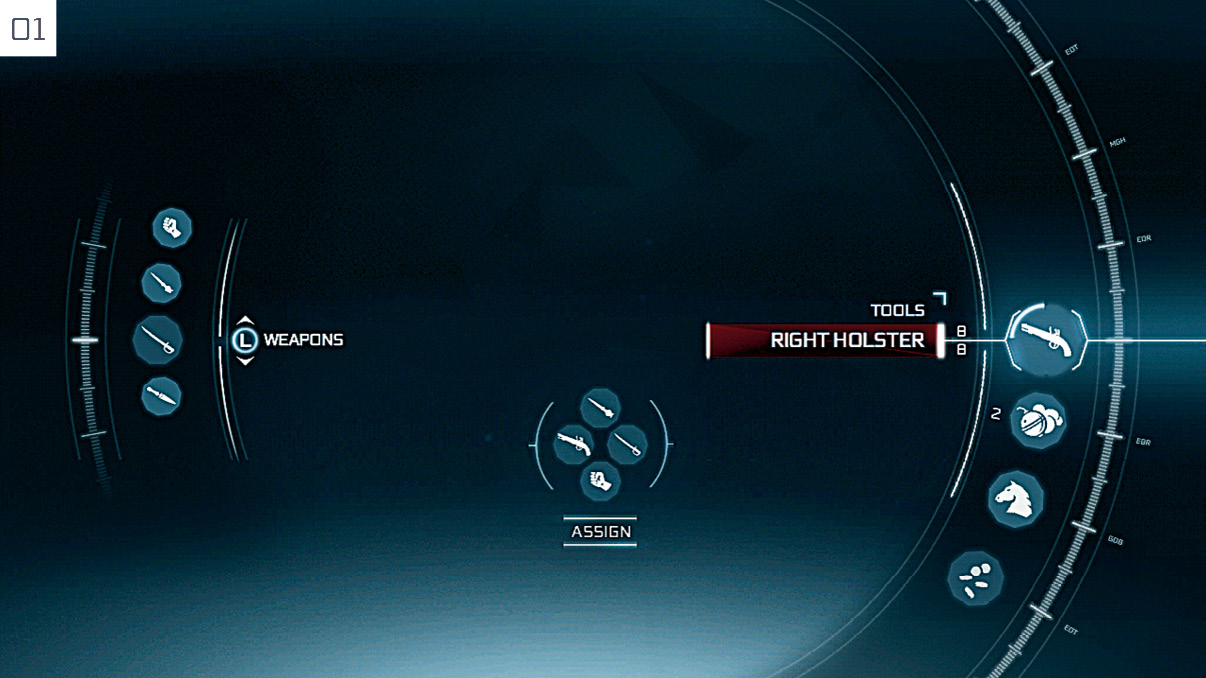
Hold  /
/ to open the Weapon & Tool Wheel interface (
 01). This freezes the action instantly, even if you are in the thick of combat.
- Weapon Wheel: Use
 to select your primary mode of attack from the left-hand Weapon list. Early in the story, Haytham can pick from his sword, Hidden Blade and unarmed combat.
 - Tool Wheel:
 is used to select an item in the Tool section on the right-hand side of the screen.
 - Quick Inventory: You can use this menu to assign four items to slots which can be equipped instantly during play with the appropriate press of
 . To add an item to the Quick Inventory, first highlight it with
  or
or  , then tap the required
  direction.
Pause Menu
Though many features of the Pause menu are self-evident, some perhaps warrant a little further explanation.
- The DNA Tracker is used to gauge your performance in all main story Memories and Optional Objectives on your way to 100% Synchronization, or as close as you care to reach. You can also use this menu to replay previous Memories: see page 59 for further details.
- The Animus Database offers background information and illustrative material for protagonists, major landmarks and many other points of interest. It is updated regularly as you explore the game world and complete Memories. Whenever you see an exclamation point, this indicates the presence of a new or revised entry.
- Reload Last Checkpoint & Restart Memory only appear while you are participating in a main Memory or side quest. The former moves you back to one of many checkpoints that divide missions into manageable portions; the latter returns you to the very beginning. These can be extremely useful if you are attempting to complete all Optional Objectives.
- Leave Animus ends Desmond’s current session in the machine (storing his progress up to the last checkpoint), and returns you to the Grand Temple. You can then check his emails on a computer close to the Animus, or engage in optional conversations with his Assassin cohorts. To reenter the Animus, approach it and press any of the primary action buttons.
Default Controls Summary
|
XBOX 360 |
PS3 |
SUMMARY |
|
|
|
Used for basic movement; also employed for directing attacks during combat. |
|
|
|
Used to control the game camera. |
|
|
|
Operates the Quick Inventory; used to instantly equip one of four weapons and items. You can customize the available slots via the Weapon & Tool Wheel. |
|
|
|
Appears in the Controls HUD; used to perform context-specific actions, but principally to perform manual jumps, the Fast Walk ability, and to break an enemy’s defense. |
|
|
|
This is the second button featured in the Controls HUD. As well as being the main button for interactions, it’s a regular feature in all areas of the game – particularly climbing (releasing and grabbing ledges) and combat (it’s the gateway to the entire counterattacking system). |
|
|
|
The primary attack button; also used to perform assassinations. |
|
|
|
Activates the currently selected Tool. |
|
|
|
Hold to switch to High Profile mode, which enables activities such as faster movement, free running and climbing. |
|
|
|
Activates Precision Mode, which is generally used to manually aim weapons. You can either hold it for as long as required, then release to return to standard movement, or tap it quickly to toggle it on and off. |
|
|
|
Hold to open the Weapon & Tool Wheel, which is used to pick weapons or equipment. Tap it to reload firearms. |
|
|
|
Calls allies into the fray. It’s only used in specific situations in early Sequences, but grows in significance later in the story. |
|
|
|
Activates Eagle Vision. |
|
|
|
Forces the game camera to face directly ahead. |
|
|
|
Enters/leaves the Pause menu. When AFS entries appear onscreen alerting you to new Animus Database entries, it can also be used to jump straight to them with a single button press. |
|
|
|
Opens the main map. |