Prima Games eGuides Assassin's Creed III eGuide

Sign in or create an account

We'll email you a link. No password needed, and if you don't have an account yet, the link makes one.

Assassin's Creed III eGuide Multiplayer

Game Modes

Introductory Sessions

Mode:

Non-competitive

Duration:
Objective:

Practice kills, stuns, and Escape sequences.

Notes & Tips:
  • These three sessions are only intended as one-off tutorials. However, you can replay them as many times as you like to experiment with different approaches.

Playground

Mode:

Non-competitive

Duration:
Objective:

Find and kill assigned targets in any way you see fit.

Notes & Tips:
  • Use it to explore maps and practice your Abilities.

Simple Deathmatch

Mode:

Competitive

Duration: 1 round of 10 minutes
Objective:

Achieve the highest score by killing assigned targets.

Notes & Tips:
  • This is a simplified version of Deathmatch. The rules are broadly the same, though you cannot access your Ability Sets.
  • Simple Deathmatch is the best mode for new players to familiarize themselves with basic multiplayer concepts. Complexities such as the Compass and Abilities are disabled, the maps are tiny, and each competitor is assigned a unique character, which means that targets are very easy to identify.
  • With no Abilities or Perks at your disposal, blending with moving groups is the key to success on these small, congested maps.

Deathmatch

Mode:

Competitive

Duration: 1 round of 10 minutes
Objective:

Achieve the highest score by killing assigned targets.

Notes & Tips:
  • Each player’s skin is the only one of its kind in this mode, though you can use Abilities or Perks that create duplicates.
  • You are both predator and prey, and can only kill your assigned target.
  • You cannot trigger Chases, but your Approach Meter still allows you to earn Kill Bonuses.
  • There is no Compass for any player in this mode. This means that Deathmatch is all about line of sight and paying attention to your target’s portrait outline. If the portrait outline is not blue (meaning your target is not in your line of sight), run to a new large open area and slow down. If the outline turns blue, use low profile actions to approach your target. If the outline doesn’t turn blue, run to a different area and try again. Once you are close to your target, the background of the portrait becomes blue too, which will help you identify it.
  • Deathmatch maps are very small, so it pays to get into moving cover as soon as you spawn. Your pursuer is never very far away.
  • The higher your rank, the more pursuers will hunt you.
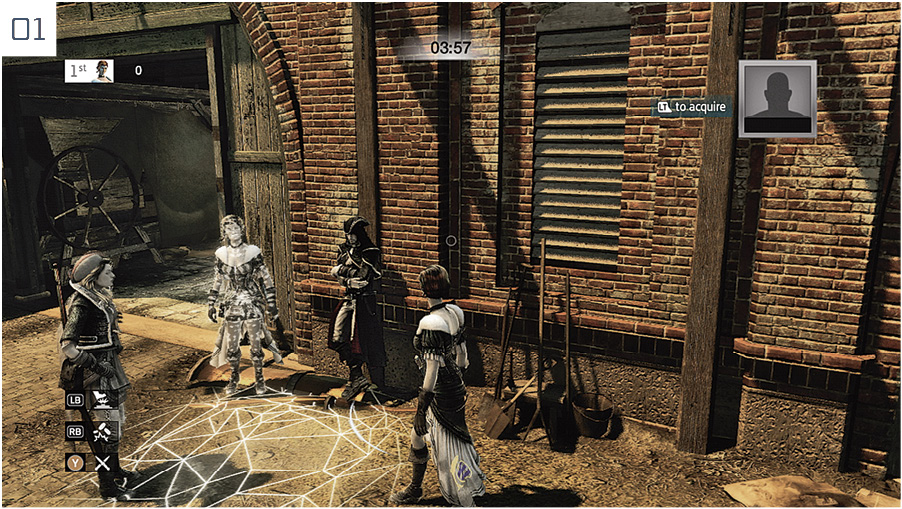
  • Blender is a useful Perk in Deathmatch. Creating a lookalike of your character whenever you blend offers a more-than-welcome life insurance – though beware that pursuers might identify you if they see you in the process of creating a duplicate ( 01).
  • Animus Hack can be lethal in this game mode, as there are no lookalikes. The moment you activate this Streak, and provided you’ve spent enough time in the session to identify each unique character, you can rack up kills at an incredible rate.
  • When you think you have spotted your target, be aware that they could be Disguised.
  • Smoke Bombs are great to use defensively. The moment you spot an incoming pursuer, watch them approaching and throw your bomb when they’re close for an easy stun.
Sample Ability Set
Abilities

Animus Shield

Smoke Bomb

Knives

Perks

Kill Buffer

Blender

Streak & Bonus

Animus Hack

Scavenger

Wanted

Mode:

Competitive

Duration: 1 round of 10 minutes
Objective:

Achieve the highest score by killing assigned targets.

Notes & Tips:
  • You are both predator and prey, but you may only kill your contracted target.
  • It’s harder to hide in Wanted than in Deathmatch as your pursuer has a Compass. However, there are duplicates of your character wandering around, making it easier to blend and lure your pursuer into killing a civilian.
  • Use your Compass to anticipate a target’s route through an arena, and you may be able to catch him or her out as they round a corner.
  • When you blend with a group, try to select one with at least one duplicate of your character.
  • It can sometimes be more efficient to take the time to identify and escape a pursuer before tracking your own target. Staying alive enables you to complete Streaks and earn more points. This is especially true when you’re trying to activate the Animus Hack Kill Streak.
  • If you manage to approach your target from behind an obstacle, jump on the obstacle and perform the kill from there for an easy bonus.
  • When you’re following a target that hasn’t noticed you, don’t always rush to get a cheap kill. Silently fast walking behind them may enable you to kill them as they’re performing a kill themselves, which will net you more points.
  • In this very hectic mode, defensive Abilities can enable you to survive longer and get more kill opportunities. The Animus Shield often proves particularly useful in this sense.
  • When you use a Chase Breaker to escape a pursuer, consider stopping and Blending immediately as you exit. Your pursuer will expect you to run away frantically and may lose you completely ( 02).
  • If you are first with a high score, you will usually be pursued by two or three characters at the same time. In such instances, consider playing defensively. Blend in a group with at least one lookalike (more, ideally), and your rivals will need to employ Abilities to identify you – something that they won’t always have access to.
  • Don’t run away after you kill a target. You will often be pursued yourself, and sprinting will only make you easier to identify.
Sample Ability Set
Abilities

Morph

Poison

Pistol

Perks

Sentry

Blender

Streak & Bonus

Streak +550

Score x2

Assassinate

Mode:

Competitive

Duration: 1 round of 10 minutes
Objective:

Identify, acquire and assassinate the target of your choice to achieve the highest score.

Notes & Tips:
  • There is no pre-assigned target in this mode. The key is to acquire one, simply by pressing /. However you can acquire anyone you encounter, including civilians. Therefore your goal is to be very cautious, keep a low profile and watch your surroundings. Every time you notice someone behaving strangely, running or performing other High Profile actions, quickly acquire them and try to make a discrete approach to achieve a kill with the best possible bonus.
  • As a rule, you will perform fewer kills than usual in this mode. It takes time to acquire your target, so be cautious: discretion and keen observation are pivotal. Maximizing your points haul for each kill is vital, as you will enjoy fewer opportunities to score.
  • Identifying your pursuer with a Lock exposes them and empties their Approach Meter.
  • You do not have a proper Compass in this mode; however, up to four arrows show you the general direction of nearby players ( 03). As you approach your target, the arrow turns into a thin arc, then a full circle, so you can rarely use it to determine the exact position of your potential target. As an indicator of where you should begin a hunt, though, these prove invaluable. A very effective strategy is to use the arrows to travel directly towards a target. As soon as an arrow turns into an arc or a circle, be stealthy and blend until you spot a target that you can acquire.
  • Acquiring and killing a civilian reveals you to others, though there are no further penalties.
  • Always acquire your target before you attempt anything else. You won’t be able to use your moves or Abilities efficiently until you have acquired a target.
  • Disguise is not as useful in this mode (since there are no portraits representing pre-assigned contracts), unless you know someone is stalking you. In that case, go round a corner, Disguise and turn around to surprise them.
  • Decoy and Bodyguard can be combined for some effective defensive strategies. Activate either whenever you know that a pursuer has identified you to lure them away, giving you a chance to acquire them. If you add the Pistol for ranged kills, this can prove to be a very balanced Ability Set.
  • If a target is stunned in front of you, consider acquiring it immediately (even if you had acquired someone else beforehand), as this will give you the time to secure the Focus bonus before you perform the kill.
Sample Ability Set
Abilities

Decoy

Bodyguard

Pistol

Perks

Resistance

Overall Cooldown

Streak & Bonus

Mass Morph

Shadow Approach

Manhunt

Mode:

Team-based

Duration: 2 rounds of 5 minutes
Objective:

Achieve the highest team score, hiding together as targets, and performing valuable kills as hunters.

Notes & Tips:
  • Both teams take a turn as hunters and hunted.
  • While hunted, blend with a crowd of civilians that includes at least one lookalike. Otherwise, use Morph or Bodyguard to confuse your pursuers with lookalikes. You can even fortify your position with a well-placed Tripwire Bomb, or employ a Smoke Bomb instead.
  • Hiding with your team is the best way to rack up noteworthy points totals. If one of you is killed, there will always be someone on hand to score an easy stun before fleeing.
  • When on the offensive, coordinate with your allies to perform multiple kills.
  • Wipe works very well in Manhunt to reveal targets that are hidden among lookalikes, and to prevent them from knocking you down with Abilities. Money Bombs and Firecrackers can be used for the same purpose.
  • Morph is also a fantastic choice, as you can use it remotely. When you suspect a target is hidden in a group of civilians, Morph the entire group from afar and your target will be revealed as the odd one out ( 04).
  • You will usually have opportunities to perform high-score kills with Poison Darts in Manhunt games, as you’ll often be facing two or three enemies at a time. Add the Hot Pursuit and Unstoppable perks for a well-rounded offensive Ability Set.
  • An amusing strategy is to hide in a haystack and create a lookalike (with Blender) right next to your position. A pursuer will be likely to attack your doppelganger, allowing you to perform an easy stun.
Sample Ability Set
Offense Set Defense Set
Abilities

Firecrackers

Morph

Wipe

Disguise

Poison Dart

Knives

Perks

Hot Pursuit

Blender

Unstoppable

Overall Cooldown

Streak & Bonus

Mass Morph

Silent Mass Morph

Minor Hack

Revelation

Artifact Assault

Mode:

Team-based

Duration: 1 round of 10 minutes
Objective:

The team with the highest number of captured artifacts wins.

Notes & Tips:
  • You will score by stealing the other team’s artifact from their base and carrying it back to yours.
  • You are a pursuer while in your territory, but become a target once in enemy territory. When you are carrying the artifact, enemies can kill you even in your own territory.
  • When your team’s artifact has been stolen, your Compass will blur each time you move close to your home base, rendering it useless.
  • It is vital that you learn the safest route back to your base after stealing the artifact. Using Chase Breakers can be crucial to your success.
  • Knives are particularly useful when defending, as they enable you to stop a fleeing enemy in their tracks and recover your artifact.
  • When defending, consider camping close to your Artifact and intercept any opponent who steals it.
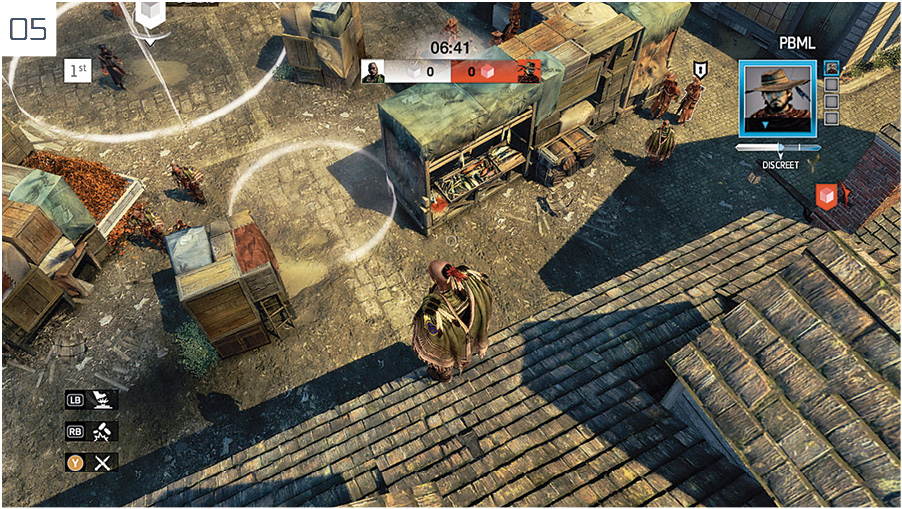
  • Use Tripwire Bombs to protect your Artifact; these will knock down any opponent who triggers them. Place your Bomb in the middle of an obvious entry/exit point or at the nearest Chase Breaker to your base to increase your chances of success ( 05).
  • Use the Disguise or Morph Abilities to blend in before making a dash for the enemy artifact. Drop a Firecracker or Smoke Bomb to facilitate your escape.
  • While attacking, it’s best not to use the Blender Perk – if you inadvertently brush against a crowd your opponents may spot one of the civilians transforming, revealing your position.
  • Look out for Tripwire Bombs when you approach the enemy artifact, and while escaping the immediate vicinity.
  • The Unstoppable and Hot Pursuit Perks are particularly useful, especially if you adopt a defensive role, giving you an edge while chasing a fleeing enemy.
  • If a rival manages to steal an Artifact, use Closure to temporarily seal all Chase Breakers and stop the thief.
  • A great strategy is to have two people trying to steal the enemy team’s artifact, and two others defending your team’s Artifact. If you have a strong lead, you can consider focusing most of your team on defense to ensure victory.
  • Closure can also be used offensively. After you’ve stolen the Artifact, run towards your objective and activate Closure to stop pursuers. If you can also activate Animus Shield, this protects you from ranged attacks, maximizing your chances to score.
  • Hide behind a wall or an obstacle near the enemy team’s Artifact, and use Glimmer to become invisible. You can then steal the Artifact and return to your base.
  • Another effective strategy is to steal the Artifact and then activate Teleport to quickly bring it back to your base.
Sample Ability Set
Defense Set Offense Set
Abilities

Tripwire Bomb

Disguise

Closure

Glimmer

Pistol

Disruption

Perks

Hot Pursuit

Overall Cooldown

Unstoppable

Resilience

Streak & Bonus

Shadow Approach

Silent Streak +250

Vision

Minor Hack

Domination

Mode:

Team-based

Duration: 1 round of 10 minutes
Objective:

Achieve the highest score by capturing territories and defending them.

Notes & Tips:
  • Your team’s priority is to capture as many territories as possible at the same time. To capture a territory, all you have to do is step inside the marked area and remain there until the capture gauge is fully filled. The more allies that are in a territory at the same time, the faster a capture occurs. The team that fills the scoring gauge or obtains the highest score at the end of the countdown wins.
  • When you defend a territory that you have captured, you are considered a pursuer and can kill any member of the opposing team that is contesting your capture. Conversely, when you contest a territory controlled by the opposing team, you are their prey. This means that you can only stun your rivals, who will often have the time to regain consciousness before you have finished capturing the territory.
  • When you attack an enemy-controlled territory, your sole priority is to remain alive for as long as possible while in the marked area. Use abilities to increase your chances.
  • The members of each team have the same skin, so Abilities that enable you to change your appearance can be extremely useful.
  • A good way to defend a territory is often to use stealth. Blend within a crowd or use a hiding place inside the territory and rotate the camera to keep an eye on all possible points of entry. You will easily spot any member of the opposing team that rushes towards the objective. Abilities that create lookalikes of your character are quite useful, as they enable you to survive longer.
  • The Pistol is of great benefit while defending a territory. You only need to briefly leave a place of concealment to fire it, and it removes the need to cross open ground to intercept an interloper.
  • If you notice a rival closing in for a kill, consider dropping a Smoke Bomb, as this has an area of effect that can neutralize multiple targets.
  • If you happen to encounter a member of the opposing team on your way to a territory, feel free to stun them for the benefit of your entire team.
  • You can sprint or free run to reach a territory as long as you are not in the line of sight of anyone inside. As you get close and become visible to a potential defender, walk and try to act as civilians do in order to allay suspicions. Use an Ability if you don’t want to take any chances. For example, use Disguise just before you reach a territory. This means any enemies defending it won’t identify you as you change skins.
  • If you stun a target inside a territory, keep that target in sight until they revive.
  • If an unidentified opponent enters your territory, stay blended and watch everyone within the area to detect clues on who the interloper might be. Abilities that reveal targets are especially useful for players focusing on defense.
  • Don’t automatically respawn (by pressing /) if you get stunned, as you will regain control of your character faster if you just wait. Respawn only if you’re sure that you have lost the territory that you were defending, as this will usually teleport you to a position closer to another territory.
  • Coordinate with your allies to have one character defending each captured territory, and the others trying to conquer new ones. Not only do you score points by doing so, but you also prevent the opposing team from scoring. Teams that cooperate will almost always enjoy an overwhelming advantage over those that act as a ragged collection of individuals.
  • Resilience is very useful when you defend a territory as it enables you to recover faster when enemies use Abilities against you.
  • Use Glimmer when you are on the periphery of a territory, ideally around a corner or behind an obstacle ( 06). This will enable you to capture the territory without being spotted by your enemies. If they look at your position from a distance, they will simply not see anything.
Sample Ability Set
Abilities

Disguise

Glimmer

Disruption

Perks

Overall Cooldown

Resilience

Streak & Bonus

Silent Streak +250

Scavenger

Wolfpack

Mode:

Cooperative (1-4 players)

Duration: Up to 25 sequences Objective:

Achieve the highest score by killing targets in timed sequences.

Notes & Tips:
  • Your priority in every timed sequence is to reach the score threshold before the end of the countdown. This can be achieved by killing AI-controlled targets. For each sequence, you will usually have as many targets as there are members in your team.
  • To save time, which this game mode is all about, run as long as your target cannot see you, then complete your approach by fast walking.
  • The usual Bonuses apply, but you can also get extra points by killing a target at the same time as your teammates. In addition, you can get more bonus points by completing secondary objectives that appear onscreen.
  • Discuss the selection of Abilities with your teammates. Choose Ability Sets that complement each other well or expand your tactical options.
  • More generally, this game mode is all about communication. This is especially true in Hardcore. You need to speak with your teammates at all times to act as an efficient unit while synchronizing your kills, identifying the team member best positioned to intercept a fleeing target, and so forth.
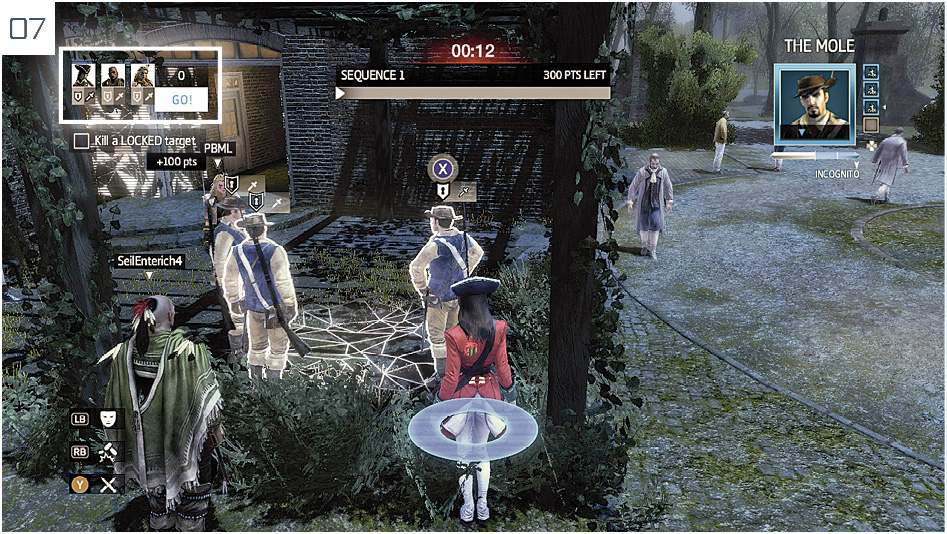
  • It is essential to synchronize your kills to maximize your score with every wave of enemies. Use the OSD in the top left of your screen as a visual guide. All members of your team are represented with their portrait. If you see a padlock icon below a portrait, it means that player has locked their target. If you see a sword icon, it means the player is within killing range of the target. If you see an orange outline blinking around the portrait, it means that player is being detected by their target. When all team members have locked their targets, a “Go!” prompt appears onscreen, allowing you to synchronize the kills and maximize your score ( 07).
  • You get special Sync Kill opportunities for waves 10, 16, 22, and 25. Synchronize your kills as usual to get a massive kill bonus ( 08).
  • Every once in a while, you will have a chance to kill an extra target. There’s no penalty for missing this opportunity, but it offers you a way to secure additional points.
  • Press / or to display the characteristics of your targets. Each has specific traits that will enable you to determine how best to approach them. For example, the Alert enemy type will detect you when you are in their line of sight, forcing you to approach stealthily. Conversely, those described as Short Sighted or Fools will only detect you if you perform obvious High Profile actions in front of them. You can find a detailed description of all traits in the Animus Database menu.
  • At the end of each session, you will receive an additional score bonus based on time remaining: 10 points per second in Standard, 30 points per second in Difficult, and 75 points per second in Hardcore.
  • In Hardcore, you really need to maximize your score to reach milestones. One essential step to fulfill is to secure Variety bonuses, which requires that you obtain 15 different Kill bonuses throughout the session. Make sure to start by performing all types of approaches (from Reckless to Incognito), then try to use other forms of kills (such as Poison, Aerial Kills and so forth). If every participant manages to get all Variety Bonuses, this will be a massive boon for the team.
  • Try to Ground Finish all of the targets before they disappear. You can do this multiple times by locking the targets that have been killed by your allies ( 09). If every teammate does this consistently, you will accumulate plenty of additional points throughout each session. This is especially important in Hardcore.
  • In Hardcore, it’s essential to make sure that every target is taken care of by a single team member. If you make the mistake of having two allies on one target, you will lose time tracking the final victim, which you simply cannot afford in this difficulty level. To ensure that you avoid this mistake, use the OSD in the top right corner of the screen. Ideally, there should be one blue triangle (each representing a teammate) per target. For advanced waves of enemies, consider switching targets with a teammate when you are closer to each other’s current quarry.
  • On all difficulty levels, but especially on Hardcore, only pay attention to the additional objectives if they will net you more points than a normal kill. For example, if the additional objective requirement is to perform an Aerial Kill for 100 points, it makes sense to stick to a more profitable high-yield stealth finish. You will usually get other chances later on to use similar kills (in our example, Aerial Kill) which will reward you with an improved points haul, or which will help you to reach the Variety Bonuses more efficiently.
  • Your team should avoid using all of its abilities in a single wave of enemies. This enables you to react more efficiently during an emergency, such as a when a target is fleeing.
  • Smoke Bombs can enable you to kill multiple targets simultaneously (within the same radius/area of effect) and get big scores ( 10).
  • Craft Poison Darts to reduce the Cooldown and make the ability available as often as possible. The Pistol is also useful for killing targets that run away.
  • Abilities that reveal targets (such as Wipe) are very useful for later waves where enemies disguise themselves. For experienced players who can identify their targets without any help (using the line of sight and portrait outline), it makes more sense to favor Abilities that make it easier to approach targets undetected, such as Disguise and Glimmer.
Sample Ability Set
Standard Difficult/Hardcore
Abilities

Firecracker

Disguise

Wipe

Glimmer

Poison Dart

Pistol

Perks

Resilience

Overall Cooldown

Resistance

Kill Buffer

Streak & Bonus

Streak +250

Streak +550

Boost Cooldowns

Scavenger

Wolfpack-specific Icons

Wary

Fighting Target

Suspicious

Extra Target

Detected

Revive

Fleeing Target

Game Categories

Game Categories are Game Modes or combinations of Game Modes linked thematically.

Name

Theme/Rule

Game Types

Limitations

Free For All

Solo play

Wanted, Assassinate, Deathmatch

-

Team Objectives

Team play

Manhunt, Artifact Assault, Domination

-

Simple Deathmatch

Learn the basics

Simple Deathmatch

No abilities

Wolfpack

Co-op play

Wolfpack

*

Private

Custom games with friends

All

No XP or awarded

* In “Invite Only Wolfpack”, you can only play with your friends. Other players cannot join the game session.