
Assassin's Creed III Guide Side Quests
Forts
Overview
|
Name |
Region |
Location |
|
Fort St-Mathieu |
Frontier |
South, close to the New York exit. |
|
Fort Monmouth |
Frontier |
Southwest corner of the map, west of a Harbormaster. |
|
Fort Duquesne |
Frontier |
Northwest of the map, to the north of Valley Forge. |
|
Fort Hill |
Boston |
Easternmost portion of the city. |
|
Fort Independence |
Boston |
Southwest, near the Boston Common landmark. |
|
Fort Washington |
New York |
West, near the docks. |
|
Fort Division |
New York |
Northeast, close the to the Frontier exit. |
Forts are areas marked by large, circular Restricted Areas. Though there is no formal Memory or quest giver that commissions you to conquer these strongholds, liberating all seven Forts is an important step on the road to 100% Synchronization. It also enables you to reduce the taxes levied on convoys that travel to each map, and to gain access to a single Chest stored inside.
Each Fort has a large number of Redcoat soldiers within the red boundary. Connor moves to level 2 Notoriety the moment he enters the Restricted Area, which means that any hostile that espies him will immediately move to investigate and, on full detection, attack immediately. Entering open conflict at any point will automatically lead to the sounding of the alarm, which will cause all soldiers in the vicinity to attack. Furthermore, all entrances and exits to the Fort may slam shut, preventing easy access – or, perhaps more pertinently, a simple escape if Connor is sealed inside.
To conquer a Fort, Connor must complete the following steps:
- Kill the Fort Captain: This individual is of the powerful Jäger archetype (see page 225), and is marked by a
 icon.
icon.
- Ignite the Powder Reserve: This small building is also marked by a
 icon. Interact with the door (
 /
/ ), and a ten-second countdown will begin. Once it elapses, the reserve will explode. Naturally, this causes the surrounding area to erupt in confusion.
- Lower the Flag: The final step, only available once the Captain and Powder Reserve have been dealt with, is to approach and lower the British flag (marked by the
 icon; again, press
  /
/ ). This ends the Fort liberation immediately, with British troops replaced by Patriots in the closing cutscene. As a small additional bonus, the Fort's icon becomes a new Fast Travel position.
You can kill the Captain and ignite the Powder Reserve in any order you please. However, it’s important to note that you cannot interact with a Powder Reserve or lower a flag while in open conflict.
These are the basic ingredients of liberating a Fort, common to all seven sites that Connor visits. However, the manner in which you accomplish each objective is entirely at your discretion. If you would like to brazenly barge through the gates and engage the entire occupying force in a colossal melee, you can do just that.
In this section, we offer stealth walkthroughs for all seven Forts. However, it is important to note that we do not claim to offer the stealth walkthrough: there are almost always alternatives, or different permutations. Over the course of near-countless playtests, however, these are the strategies that were most consistently successful. As each Fort can feature variations in the positioning of certain guards, you can never quite know what awaits you inside. If you notice something different, either adapt your strategy accordingly, or Fast Travel out and reenter the area to reset it.
General Guidelines & Tips:
- The three Forts in the Frontier can be conquered from the start of Sequence 05. As Connor does not acquire his full arsenal of weapons and Tools until Sequence 06, this is more difficult – but by no means impossible. The Forts in Boston can be liberated once you complete “Boston’s Most Wanted” in Sequence 05, while the two sites in New York can be approached after “Missing Supplies” in Sequence 09.
- Always enter a Fort with a full complement of Poison Darts. These are tailor-made for killing Captains, and are requisite for our stealth walkthroughs.
- You must complete all three mandatory steps to conquer a Fort. If you leave the area before you lower the flag, the Fort will be restored to its original state on your return.
- When the alarm sounds, some Captains will run to engage Connor in combat with their troops, while more craven commanders will seek refuge elsewhere in the Fort. If you favor a direct approach to liberation, it’s worth noting that killing a Captain will cause some of his nearby subordinates to turn and flee.
- In Boston and New York, you can call on Assassin recruits to aid with the infiltration, and to kill targets on your command – the Marksman ability is particularly effective. Note that using Assassins can lead to unforeseen variations on the behavior and movement of hostiles within a Fort.
- Infiltrating a Fort is easier when it is raining, as this reduces the range of detection for all guards; this is further reduced during blizzards in snowy conditions.
- There are occasional variations in guard positions that occur in accordance with the time of day. Where relevant, our walkthroughs always indicate if it is better to sneak through the perimeter during daylight hours or under cover of night.
- Though you cannot interact with Powder Reserves in open conflict, some Forts have stray Powder Kegs in close proximity. You can shoot these to blow up the Powder Reserve instantly. If you then sprint directly to the flag (assuming you killed the Captain first), you only need kill the hostiles that follow before you can interact with the flagpole.
- Finally, the Chests found inside Forts contain significant rewards, but their locks must be picked manually – and these are the toughest locks you will encounter. After positioning the sticks in the requisite positions (slow, measured rotations lead to faster detection of each “sweet spot”), you must ensure that both remain static as you tap
 /
/ rapidly. The speed at which you press the button is vital. If you do not spring the mechanism within the time limit, you must try again.
 Fort St-Mathieu
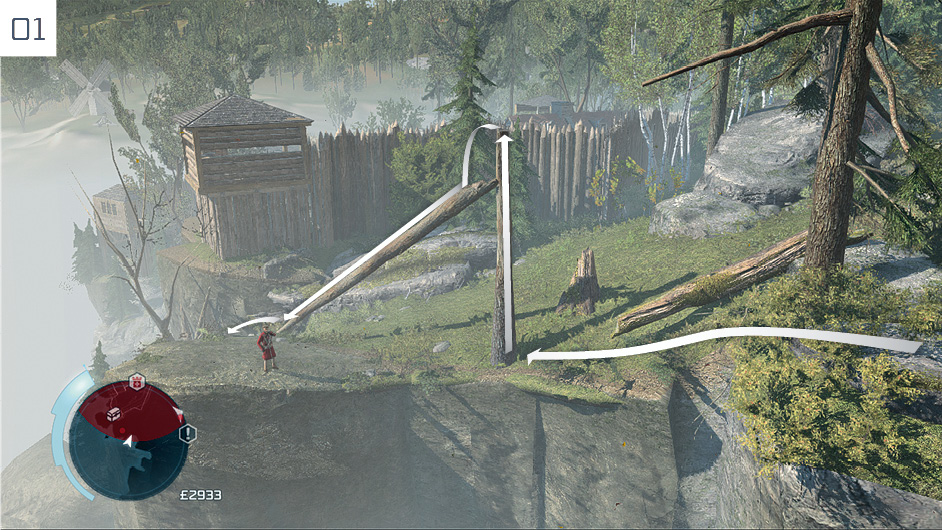
Approach the Fort from the east, ideally during daylight hours. Either ignore or neutralize the guard standing by the cliff, then slide down the slope as shown here. As a point of interest, there are cougars in this area. We have noticed several instances where one will actually attack and kill the sentry if you stop and wait out of sight. If you have the patience, this may be a good opportunity to obtain the “Eye Witness” Achievement/Trophy.
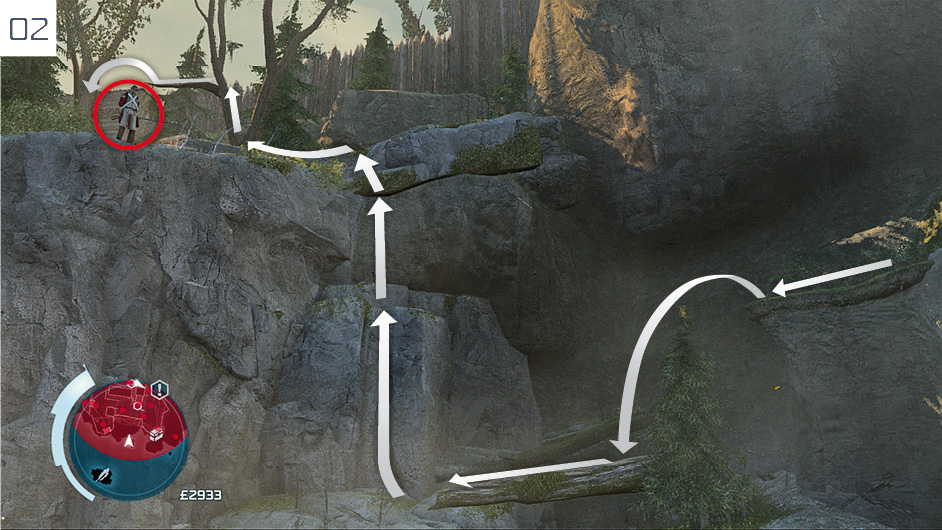
Climb the cliff as directed here. You can kick the guard over the edge, or safely ignore him. Climb the tree and move into the closest V-shaped section.
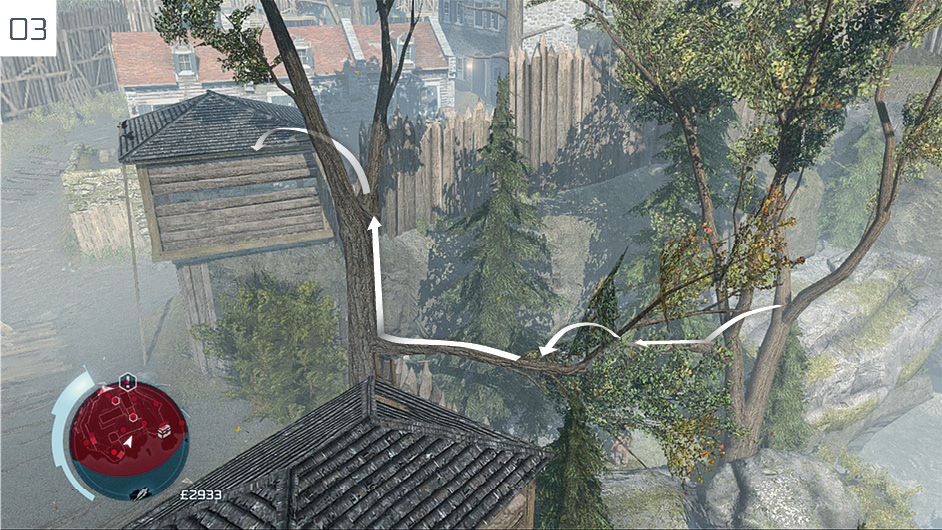
Follow the route shown here to reach the roof of a lookout tower. Don’t worry about the guard in the first tower to the left: he won’t notice Connor.
Watch the guard below, then leap down into the hiding place when he moves to the left part of his patrol route. When he returns to the hay cart, assassinate him quietly. (If you are entering at night, there is a chance that there will be other patrols that pass through this area on much longer routes. Use the whistle ability and disable these from the hay cart, one at a time.)
Climb onto the rooftop a short walk to the north then, using the sloped surface and chimney to avoid detection, wait until the Captain moves close to the well. This is your cue to emerge briefly and hit him with a Poison Dart.
Immediately walk back to the south edge of the roof and drop back down behind the logs. If the two guards stationed next to the Powder Reserve investigate the death of the Captain, interact with the door to start the explosion timer, then quickly climb up and position Connor next to the flag. Once the explosion occurs, press  /
/ immediately to lower the British ensign. If the two guards do not investigate the Captain’s death, sneak over to the door to start the timer, then hide in the hay cart until the camp returns to a standard routine. You can then wait for a quiet moment to reach the flag.
 Fort Monmouth
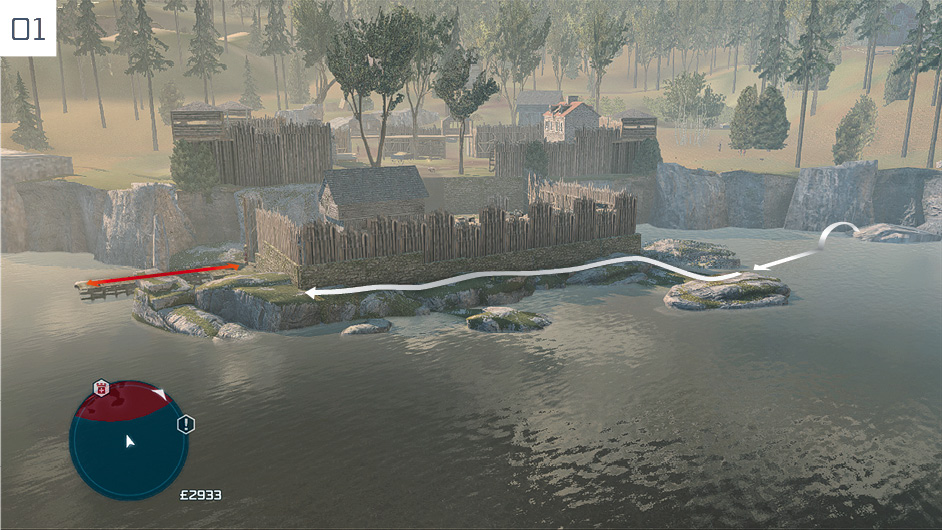
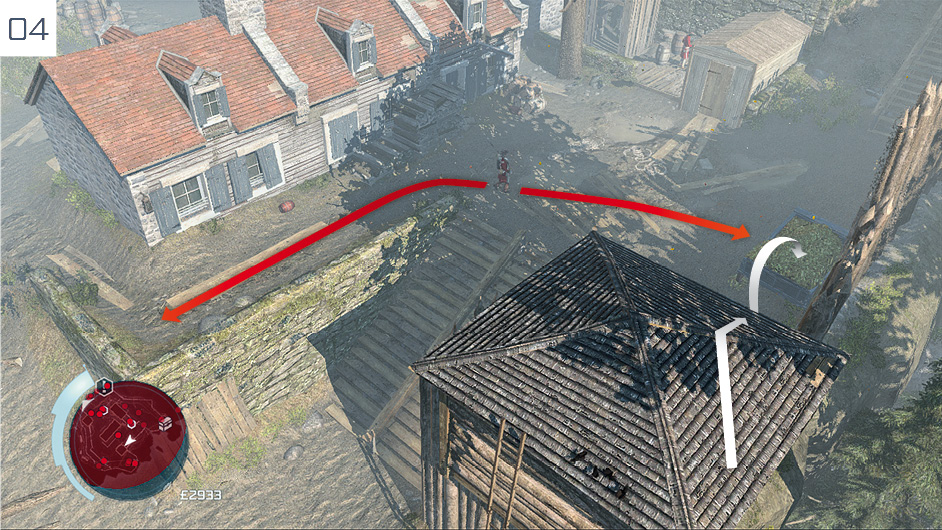
Fort Monmouth is easier to conquer at night, as this removes two potentially awkward soldiers from the initial stage of the infiltration. Approach the Fort from the northeast via the route shown here, then stop and observe the two guards on the jetty.
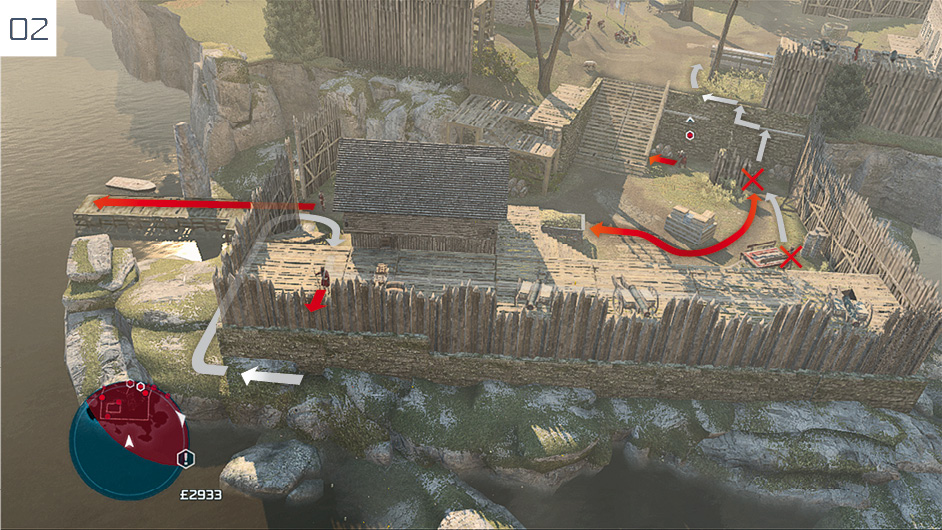
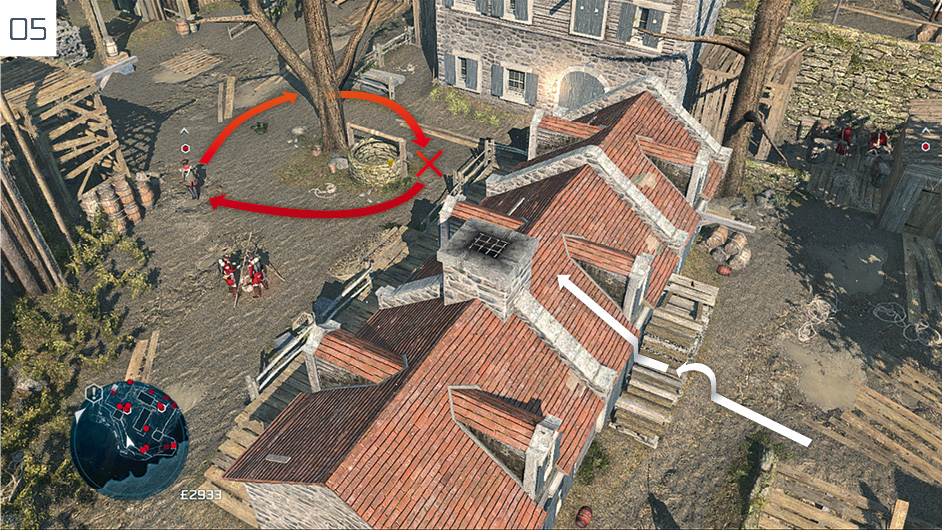
Slip inside the Fort when the two guards begin to walk to the left. Move below the elevated walkway and proceed to the end of the Stalking Zone. Watch the movements of the patrolling Officer, then assassinate the guard close to the cart by pulling him into the undergrowth. When the Officer approaches the Powder Reserve, walk up behind him and perform an assassination. You can then climb up into the Stalking Zone. Take the time to traverse to the left, and climb up when you reach the branch: this means that Connor is shielded from view by the pile of logs as he transitions from the climb to a crouching position.
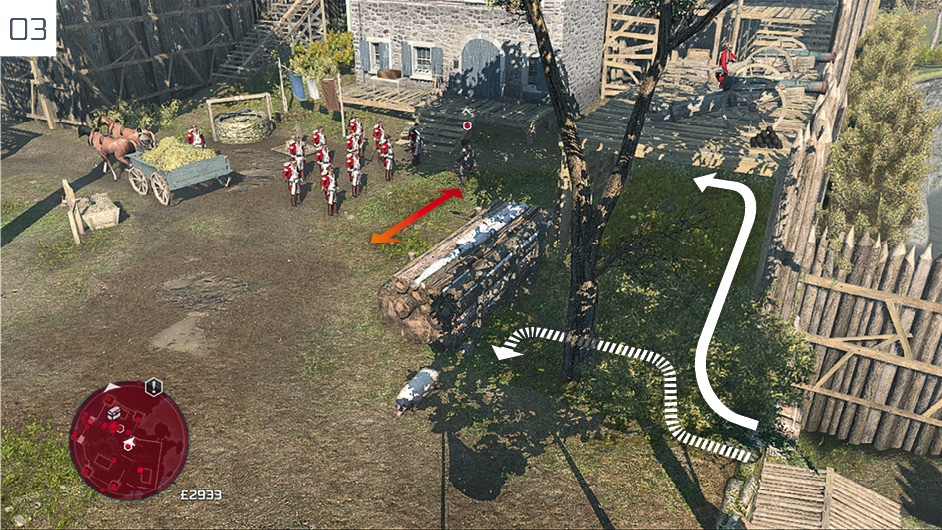
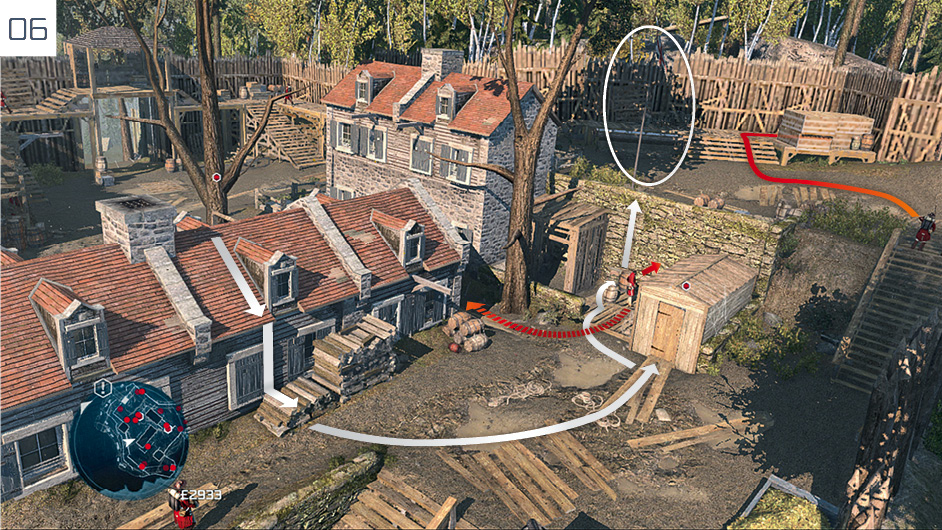
There are two potential methods to eliminate the Captain without entering open conflict. The first and perhaps least consistent (marked by a dotted line) is to wait until a soldier patrolling to the left moves out of sight, then strike when the Captain moves to the left of his men: press up against the left corner of the logs, whistle to attract his attention, then perform a corner assassination when he moves within range. The alternative (solid line) is to move to the right of the Captain in the Stalking Zone, then send a Poison Dart once you have him in your sights. Immediately retrace your steps to the Powder Reserve, breaking the line of sight, to stall SSI meters once you move behind the logs: with a little luck, you can drop back down and interact with the door before Connor is detected.
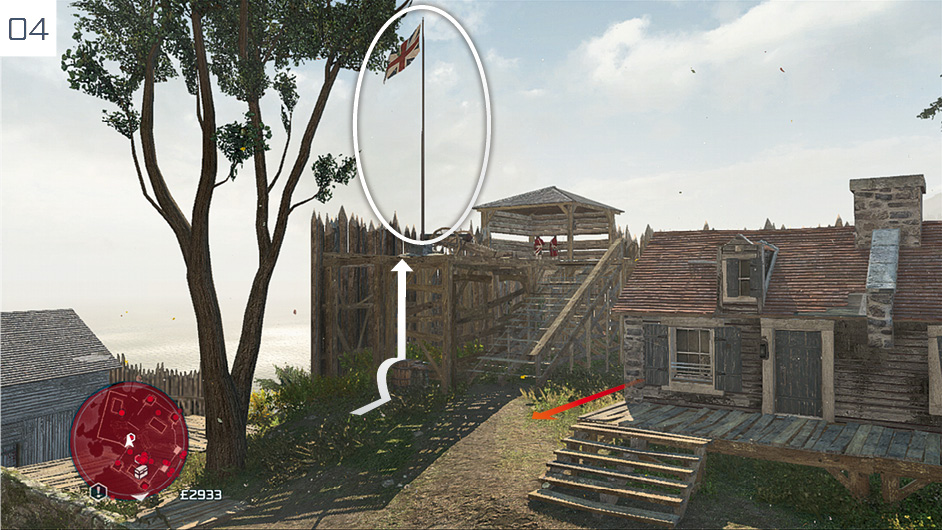
Immediately run back into the Stalking Zone that you passed through when entering the Fort before the countdown expires to hide. Once the chaos and confusion subside and an opening presents itself, make your way to the flag.
Alternative Captain Strategy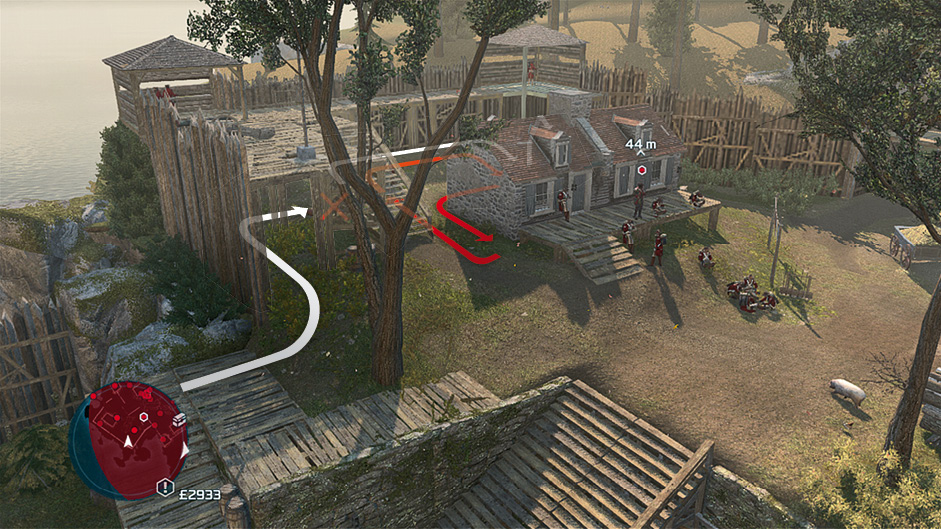 There is a very occasional variation that occurs where the Captain will not be addressing his men on the east side of the Fort, but idling with them close to the buildings to the west. This seems more common at dawn and shortly before dusk. They will not move from this position unless you Fast Travel or reload. It’s something of a detour to poison the Captain (and entails assassinating the soldier sawing in the lower area), but it’s not phenomenally difficult. After you hit the Captain, hide in a Stalking Zone until things calm down. |
 Fort Duquesne
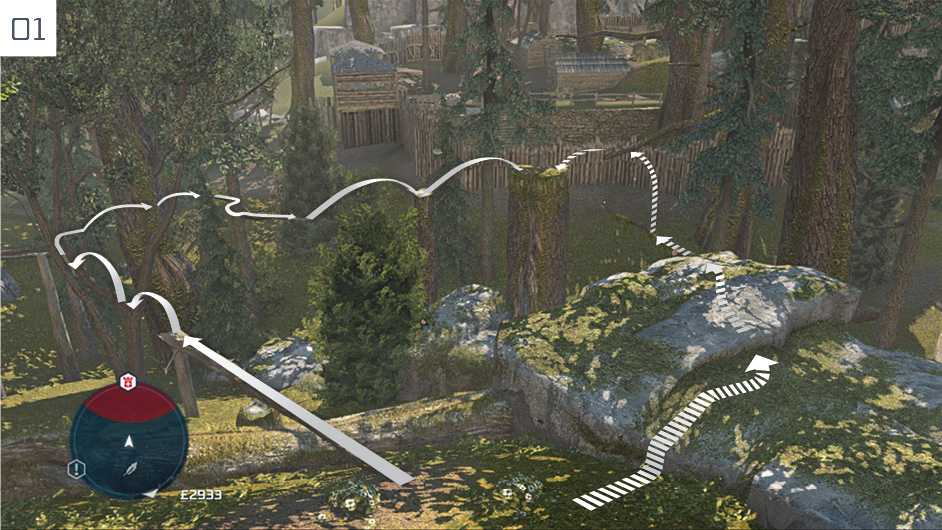
Approach Fort Duquesne from the northeast. There is a sentry on the cliff to the west once you enter the Restricted Area. The optional route (marked by a striped line) is much shorter, but carries a risk of detection. The longer path to the left is safer. Both routes lead to the same position on the large cut tree trunk.
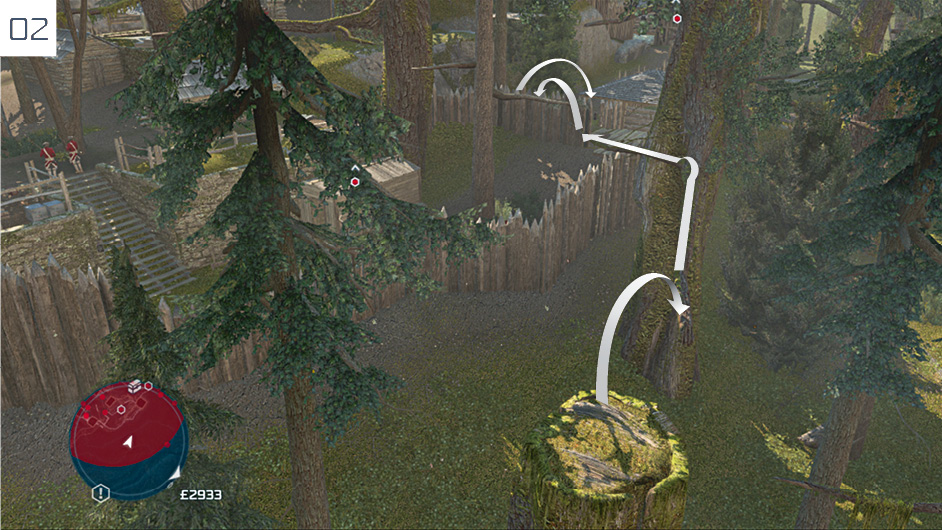
From the tree trunk platform, use the branches to reach the small roof.
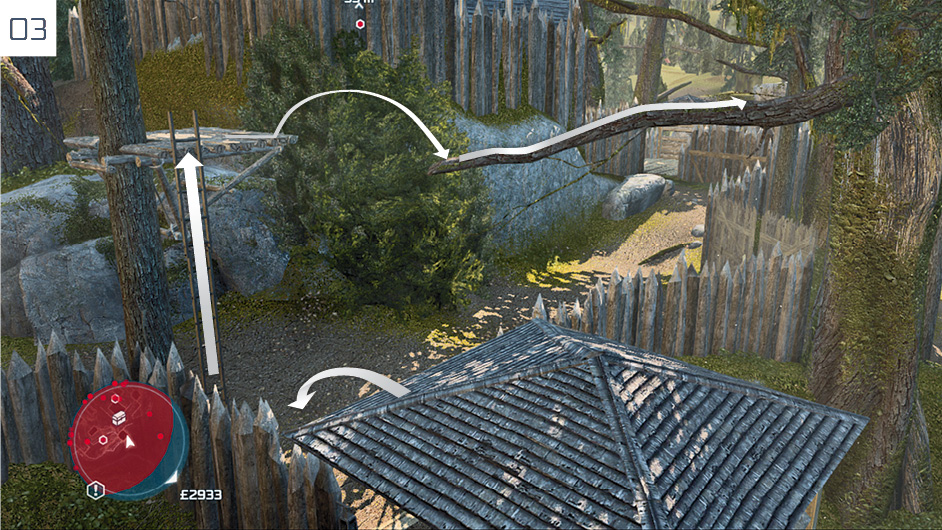
Check to the west and consult the mini-map to ensure that the Captain isn’t looking on or approaching, then make your way to a small branch at the end of the route shown here.
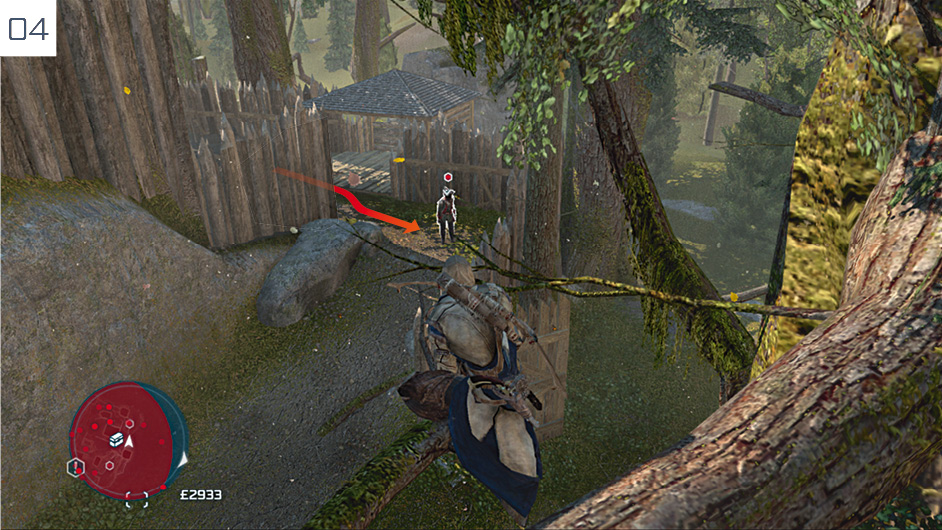
From this position, you avoid alerting the guard dog and his handler below. Equip the Poison Darts and, once the Captain moves into view, hit him with a single dart. Immediately turn around and backtrack to the bottom of the ladder.
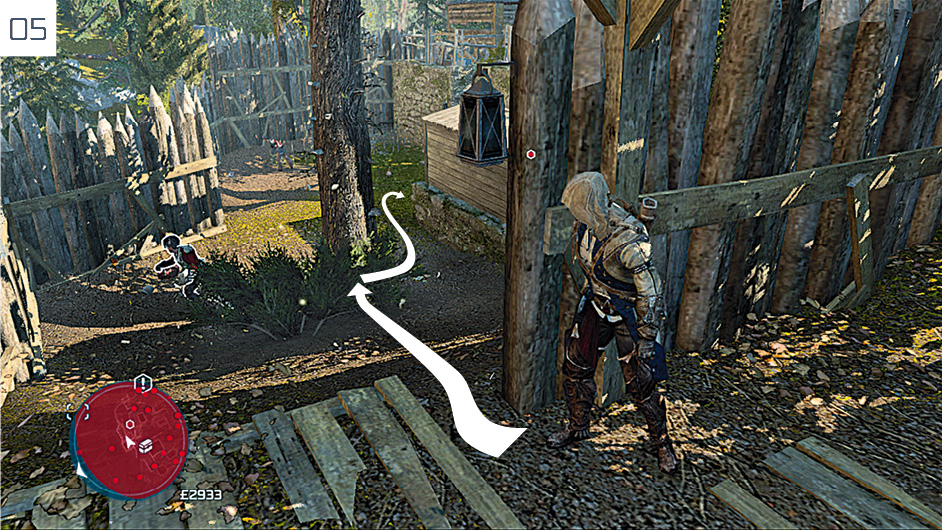
Walk inside the empty sentry post and watch the Officer feeding the chickens. Sneak into the Stalking Zone just behind him to perform an assassination. You are then free to calmly walk to the Powder Reserve.
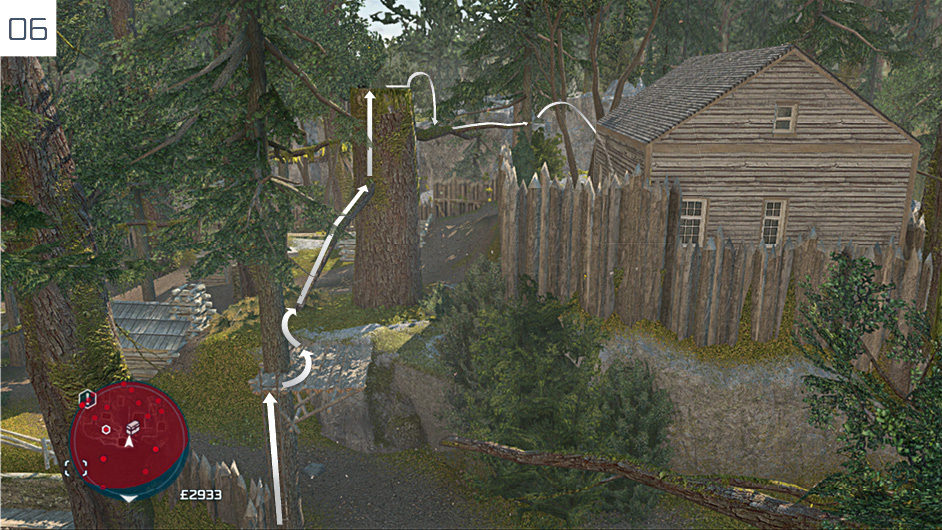
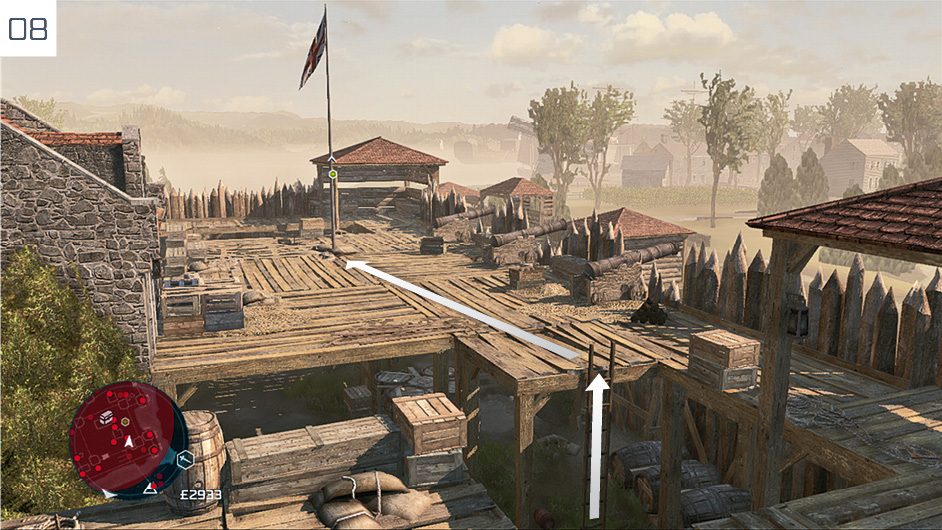
Run back to the ladder and climb it to reach the platform above as the explosion timer counts down, then follow the simple free run course shown here to reach the flag behind the building. Press  /
/ immediately as you land to trigger the final cutscene without a single moment of open conflict.
 Fort Hill
We suggest that you have at least three Poison Darts in your inventory for this infiltration. Approach the northwest side of the Restricted Area and observe the two guards stationed outside the entrance shown here. One will move away from the door to walk a short patrol. When he stops, hit him with a Poison Dart from a place of concealment. Once his companion moves to investigate, repeat the feat. (In later Sequences or post-story play, you may find that a Patriot patrol will obligingly dispatch the two Redcoats shortly after you arrive.)
Go through the entrance and be sure to move no more briskly than Fast Walk pace when you enter the room at the end of the tunnel: there are two guards to your left, though they are facing elsewhere. Take a right and climb up the stairs to reach the Fort’s inner courtyard.
Perform a corner assassination on the guard to your left as you exit the corridor, then go to the nearby Stalking Zone and kill the Redcoat who is busy working; note that this target does not appear at night. Move to, and enter, the hay cart when the next guard turns his back to you, and assassinate him from your hiding place. Walk to the Stalking Zone while the Captain is looking away, and hit him with a Poison Dart when he moves within range. Once he falls, start the Powder Reserve explosion timer, then make your way to the nearby flag for an instant Redcoat eviction once the countdown ends.
 Fort Independence
Approach the Fort from the east, kill the Redcoat on the outer edge of the Restricted Area and climb up via the wooden crates. Air assassinate the guard in front of you, then hide behind the wooden boxes. When the patrolling guard spots the body of your victim, whistle to draw his attention and take him down too. Wait until no one is watching, then jump down into the hay cart and dispatch the patrolling Redcoat. You can now climb up via the barrels and hide behind the corner. Whistle to attract the soldier patrolling in the alleyway and eliminate him. Jump to the rooftop and perform a Leap of Faith in the hay cart on the other side of the houses. Stealthily assassinate the Captain from your hiding place when all witnesses are facing elsewhere. Wait until the coast is clear, run up the stairs and head towards the Powder Reserve.
Hide behind the corner and assassinate the lone guard patrolling along the wall, if need be by whistling. Wait until the two guards patrolling on the ground level turn away and quickly go down to blow up the Powder Reserve. Climb back up via the wooden barrels and retrace your steps.
You can now run to the flag by following the path shown here. Having eliminated patrols in this area earlier, you shouldn't encounter any enemies on the way.
 Fort Washington
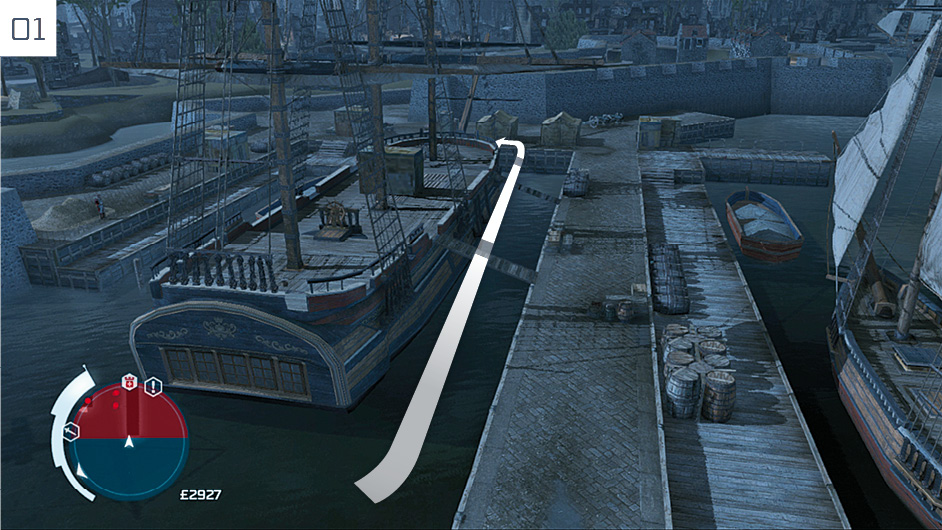
Pack plenty of Trip Mines and a full set of Poison Darts for this outing; if you are visiting during the day, you should also ensure that you have an Assassin recruit available. The easiest (and purest) way to complete this Fort is to infiltrate it late at night, with the moon high in the sky. Doing so reduces the number of guards in the area, and means that the Captain is in a much more accessible position. Either way, the optimal stealth approach necessitates a long swim to approach the Restricted Area from the northwest. Swim between the largest ship and the dock to avoid detection.
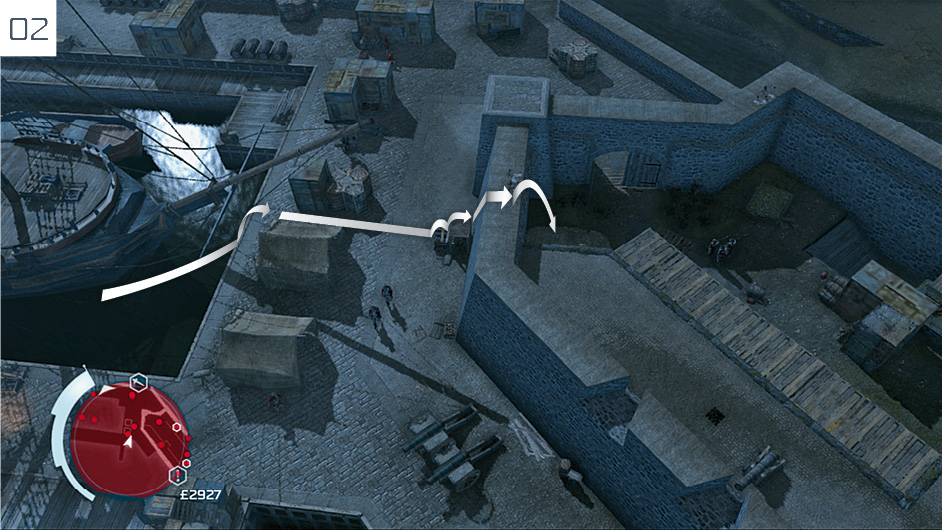
When the guards patrolling outside walk to the south, slip behind them and climb up on the Fort wall. Immediately perform a Leap of Faith to the haystack below.
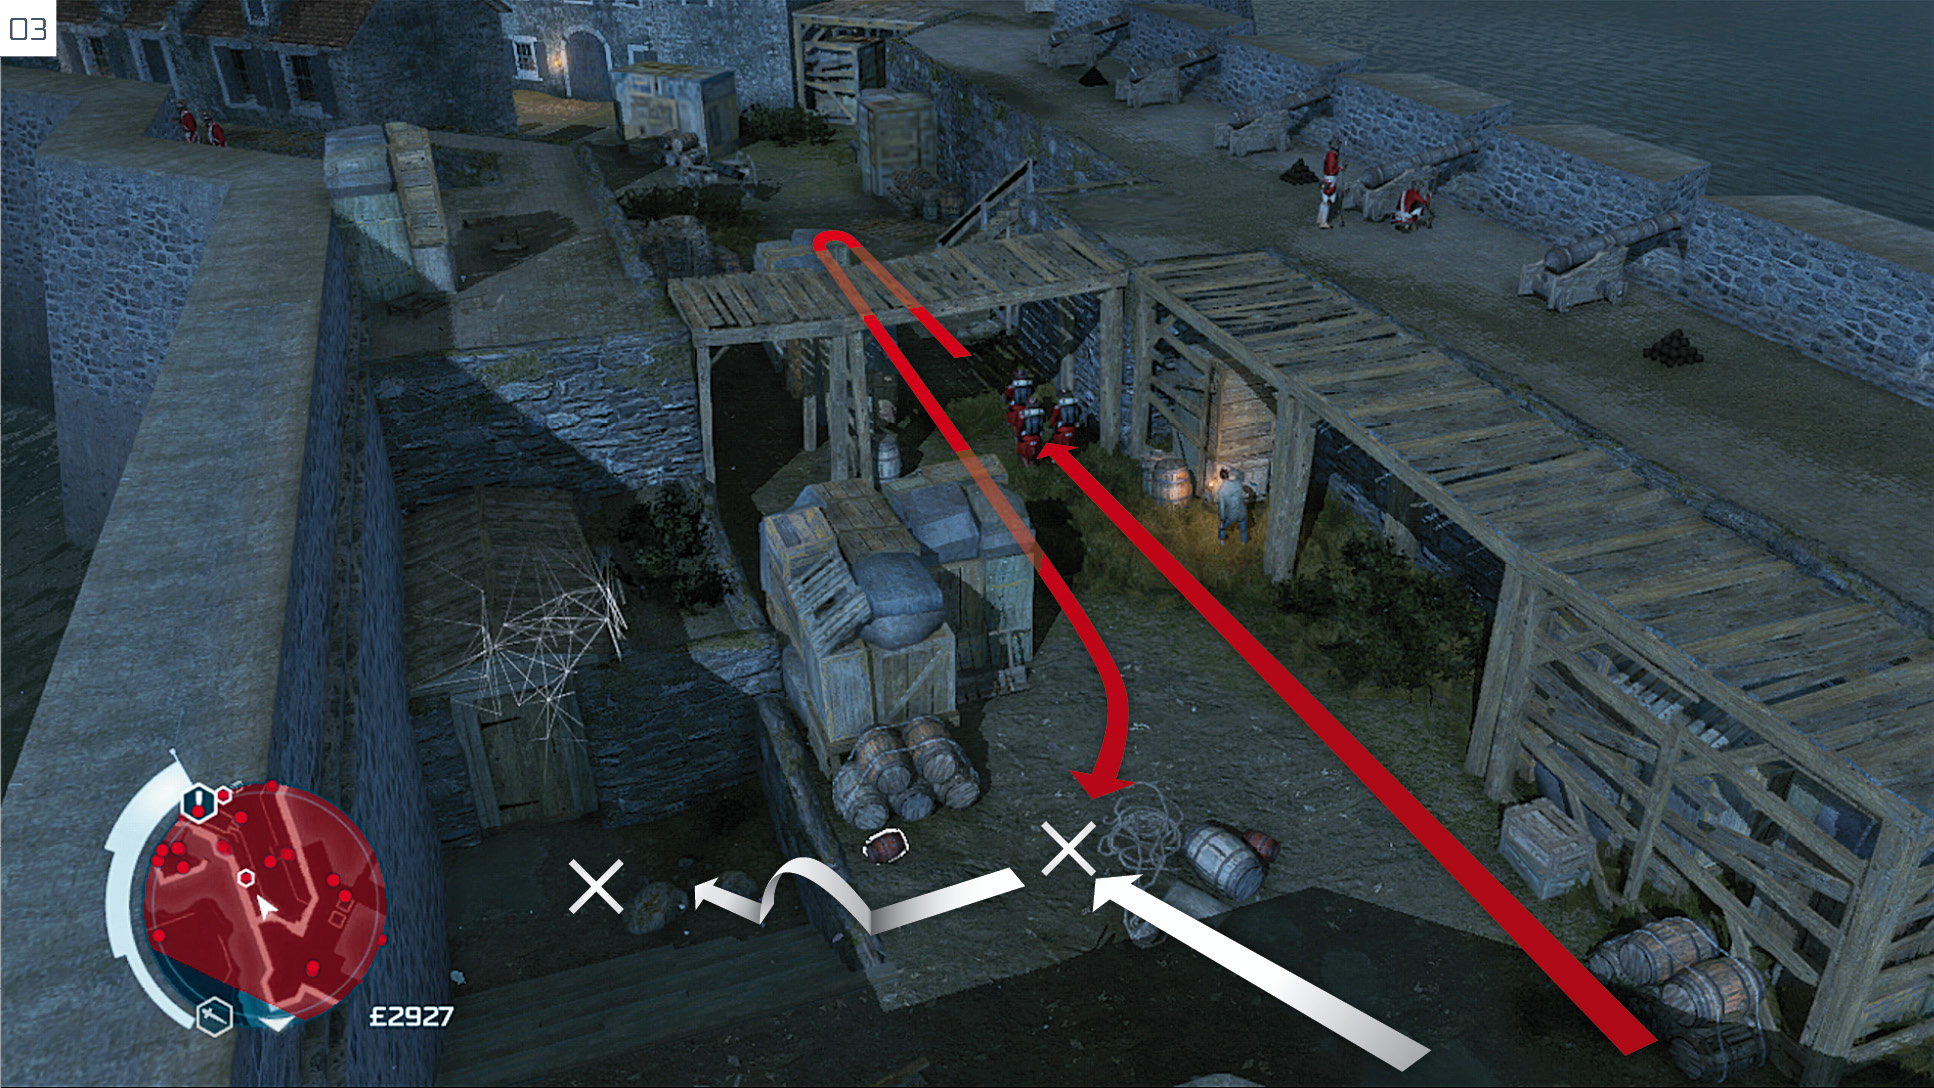
Wait for the three patrolling guards to approach Connor’s place of concealment. When they turn away, emerge and quickly plant Trip Mines in the precise positions marked here. The first will be triggered by the patrol on their return; the second will ensure that the blast detonates the Powder Reserve. This is the point where the paths of the day and night walkthroughs separate.
Night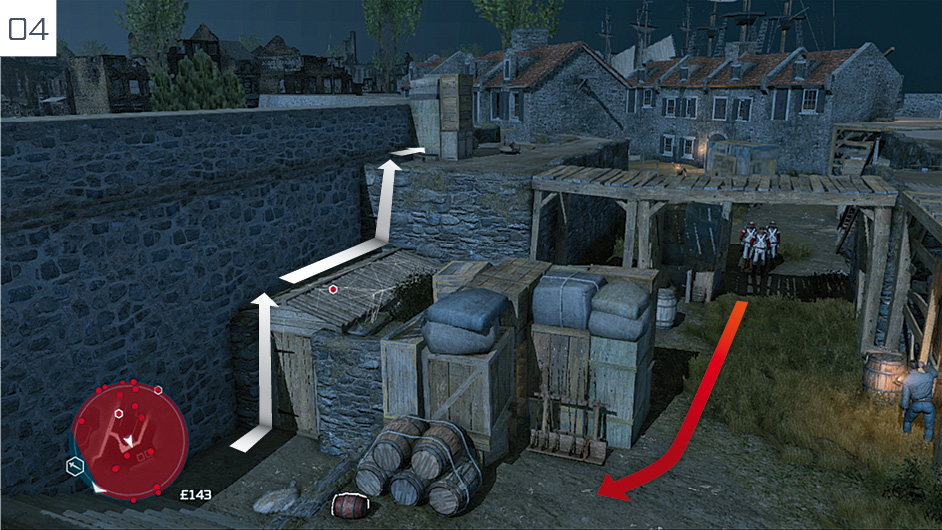 After planting both Trip Mines, quickly climb to the upper wall and hide against the edge of the crates, as shown here. When you see the patrol below on their way to your trap, it’s safe to move on. 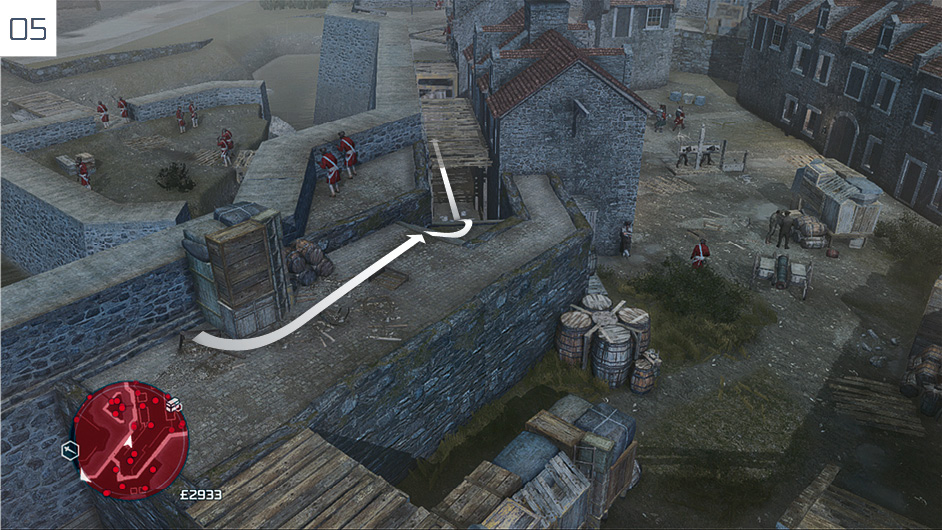 Fast Walk past the two oblivious sentries, then head down the steps. 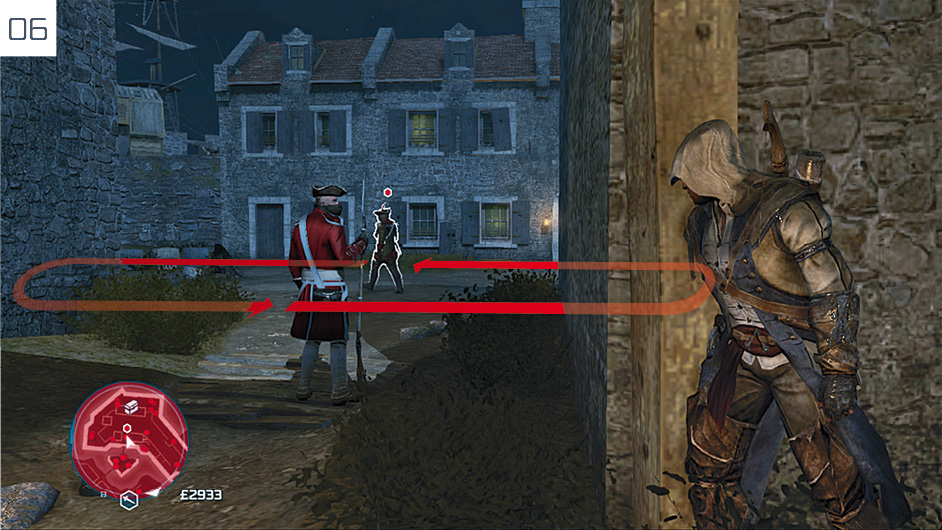 At the bottom of the steps, press up against the wall and watch the area where the Captain is patrolling. When he moves to the far right, assassinate the guard directly ahead. You can then either take a slight risk and stay out in the open to hit the Captain with a Poison Dart once he walks into view, or cautiously retreat behind the corner and poison him when he investigates the body. 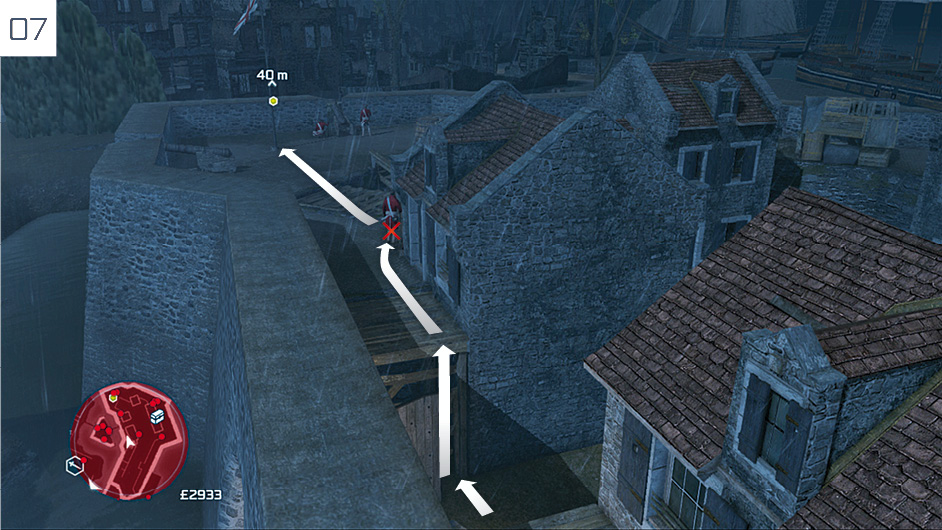 Speed matters here: quickly climb up via the route shown and assassinate the guard with his back to Connor, then Fast Walk to the flag. Be ready to press |
 /
/ when you reach it, as there is a chance that the two guards further ahead will turn as the commotion surrounding the Captain’s demise attracts their attention.
Day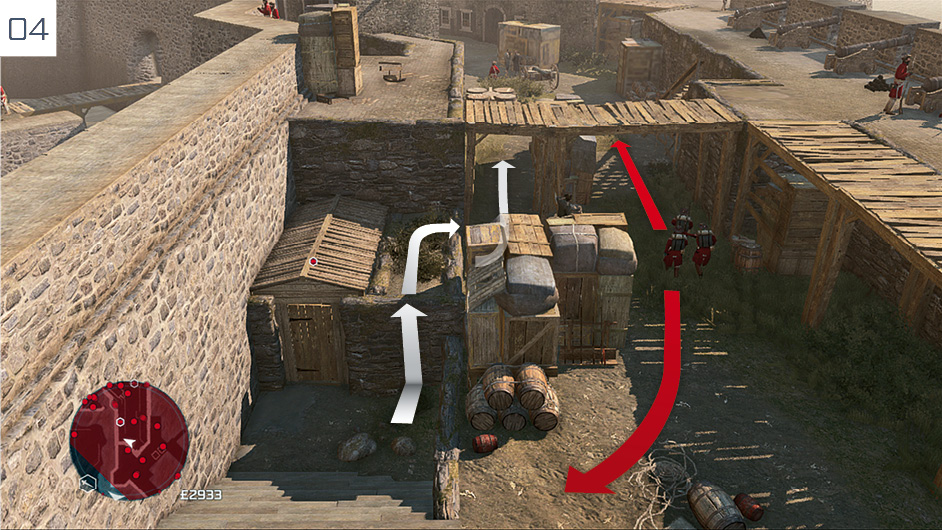 Having planted the Trip Mines, quickly climb to the right of the Powder Reserve, then drop down and hide behind the stacked crates to avoid the patrol as it makes its return journey. 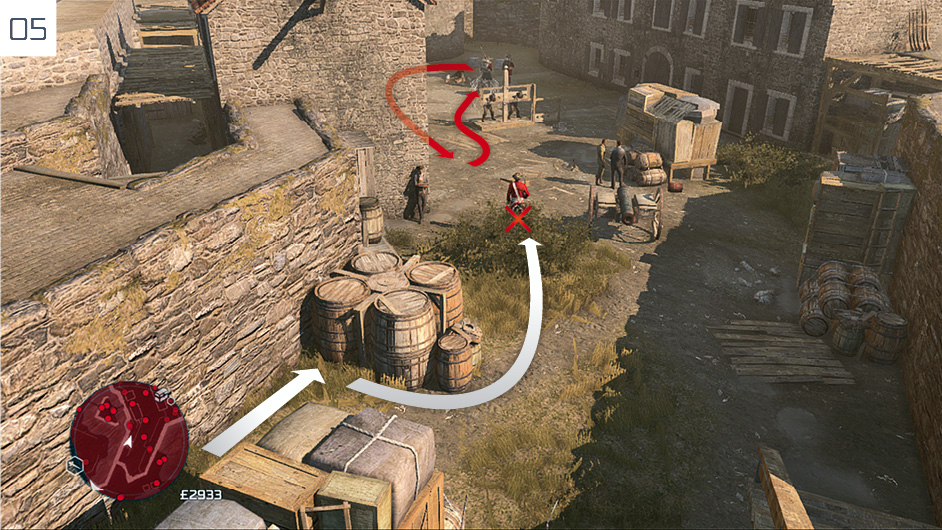 Pause behind the barrels to ensure that the patrol in the area ahead is not facing Connor, then move into the Stalking Zone behind the sentry. If you can reach this before the Powder Reserve explosion occurs, all should be well. Wait until the patrolling Grenadier and his companion move away, then quietly assassinate the adjacent guard. 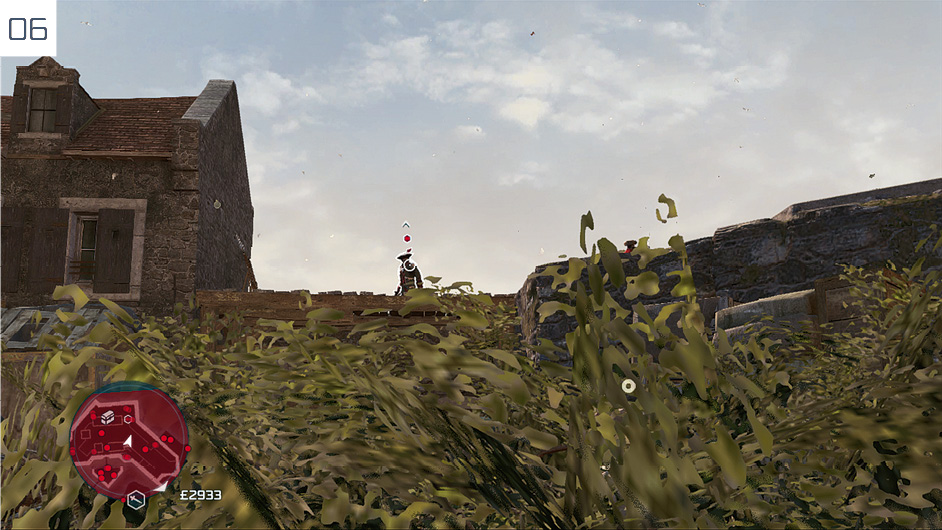 Inside the Stalking Zone, turn to the right and watch the wooden platform. When the Captain moves into view, target him and call a recruit to perform a generic assassination. 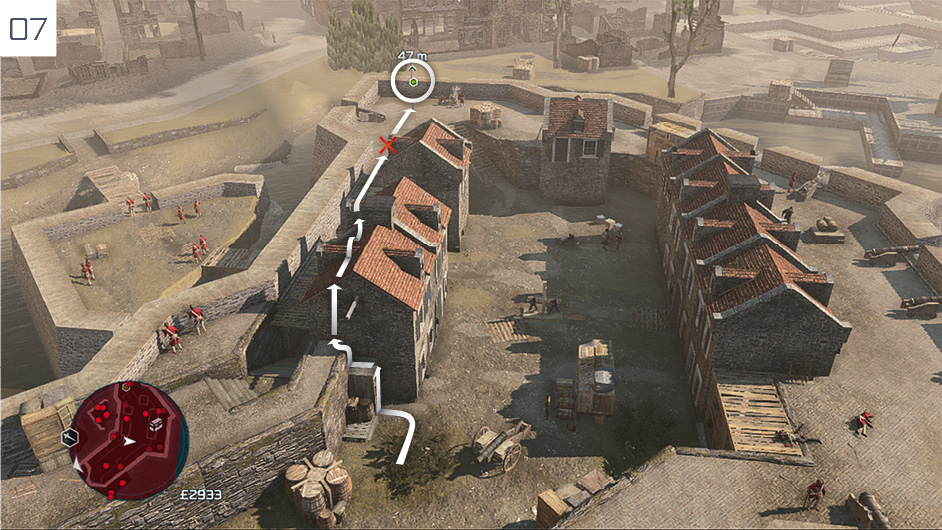 There is no need for subtlety at this point: just exit the Stalking Zone and make a purposeful sprint for the flagpole via the route shown here, remaining on the left-hand side of the initial rooftops to avoid detection. There is a sentry just before the end of the second row of buildings. Briefly stop to assassinate him prior to the final approach to the flag. |
 Fort Division
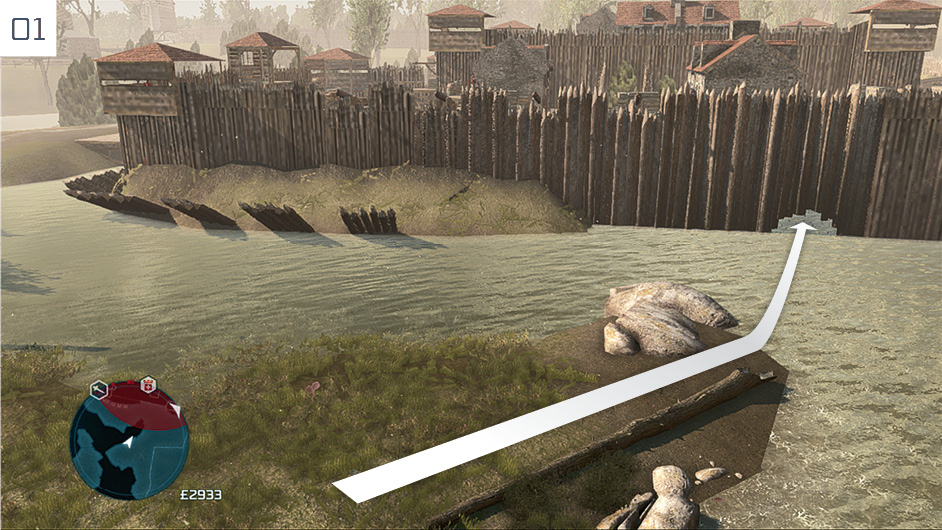
Approach the Fort via the unguarded marshland to the southeast. As you near the outer wall, you will notice a small hole in the stockade. You can swim through this without fear of detection.
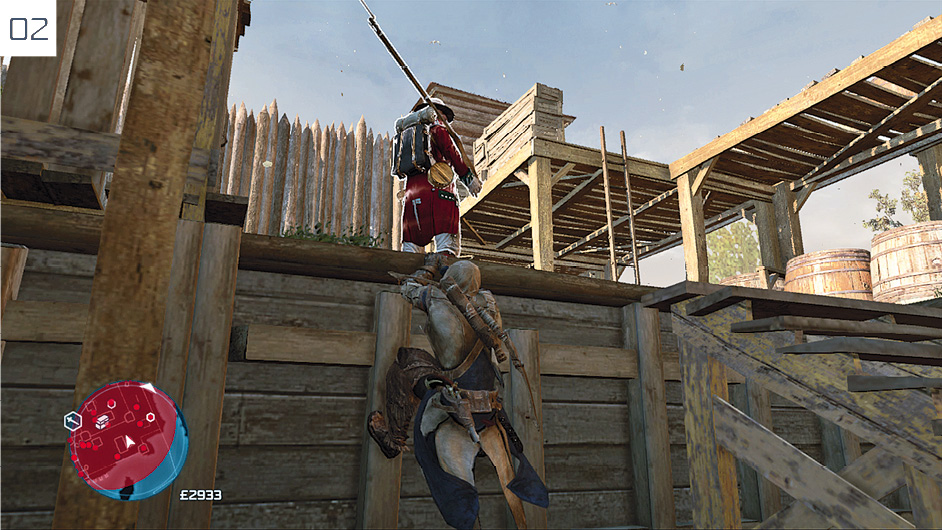
Inside the Fort, ignore the soldier to your left and swim to the guard directly ahead. Perform a ledge assassination.
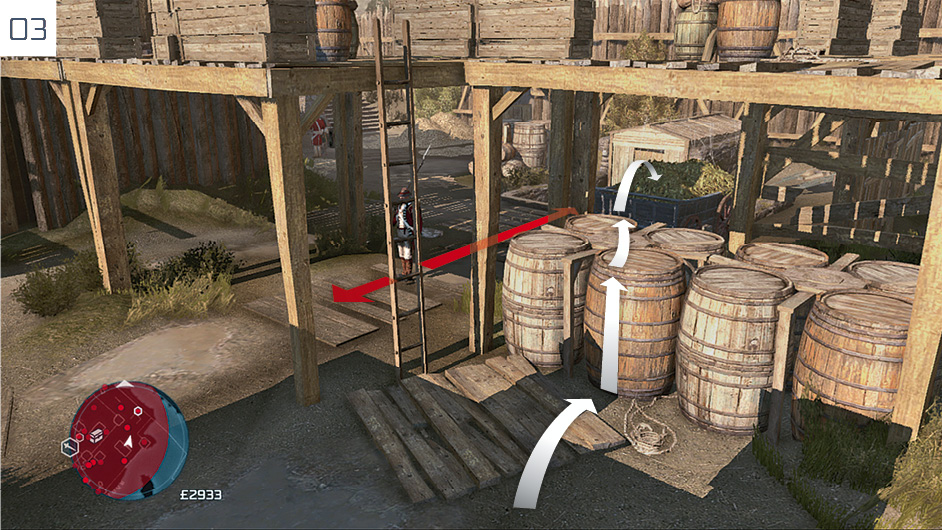
There is a guard who walks a short patrol between the nearby Powder Reserve and a position close to the barrels shown here. Wait until he approaches the Powder Reserve, then leap over the barrels to land in the hay cart. You can then assassinate the guard quietly on the return leg of his journey.
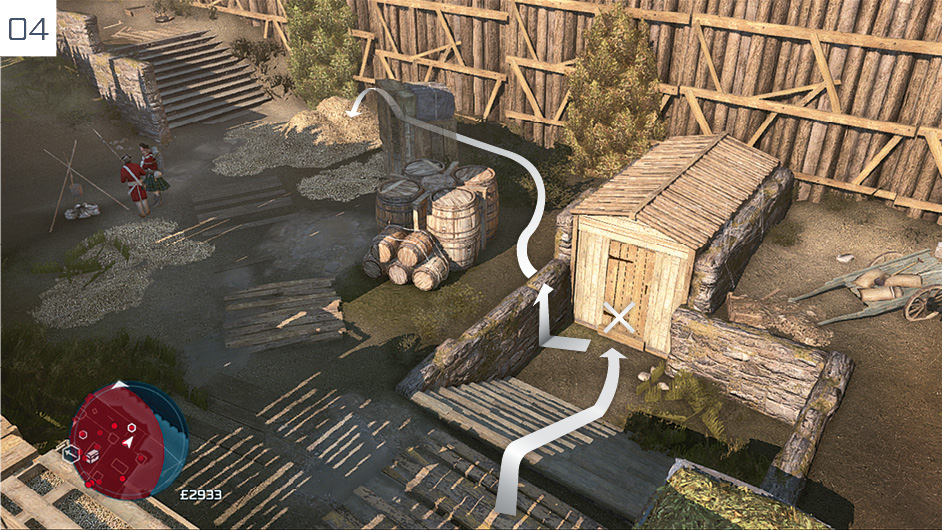
Approach the Powder Reserve and interact with the door to begin the explosion countdown. Immediately follow the path shown here to take refuge in the pile of hay. The Grenadier and his companion will move to regard the damage, then split up to investigate the two hiding places. When the Grenadier reaches your position, perform an assassination from inside the hay pile; you can then wait for his companion to return to his original position, and whistle to repeat the same feat.
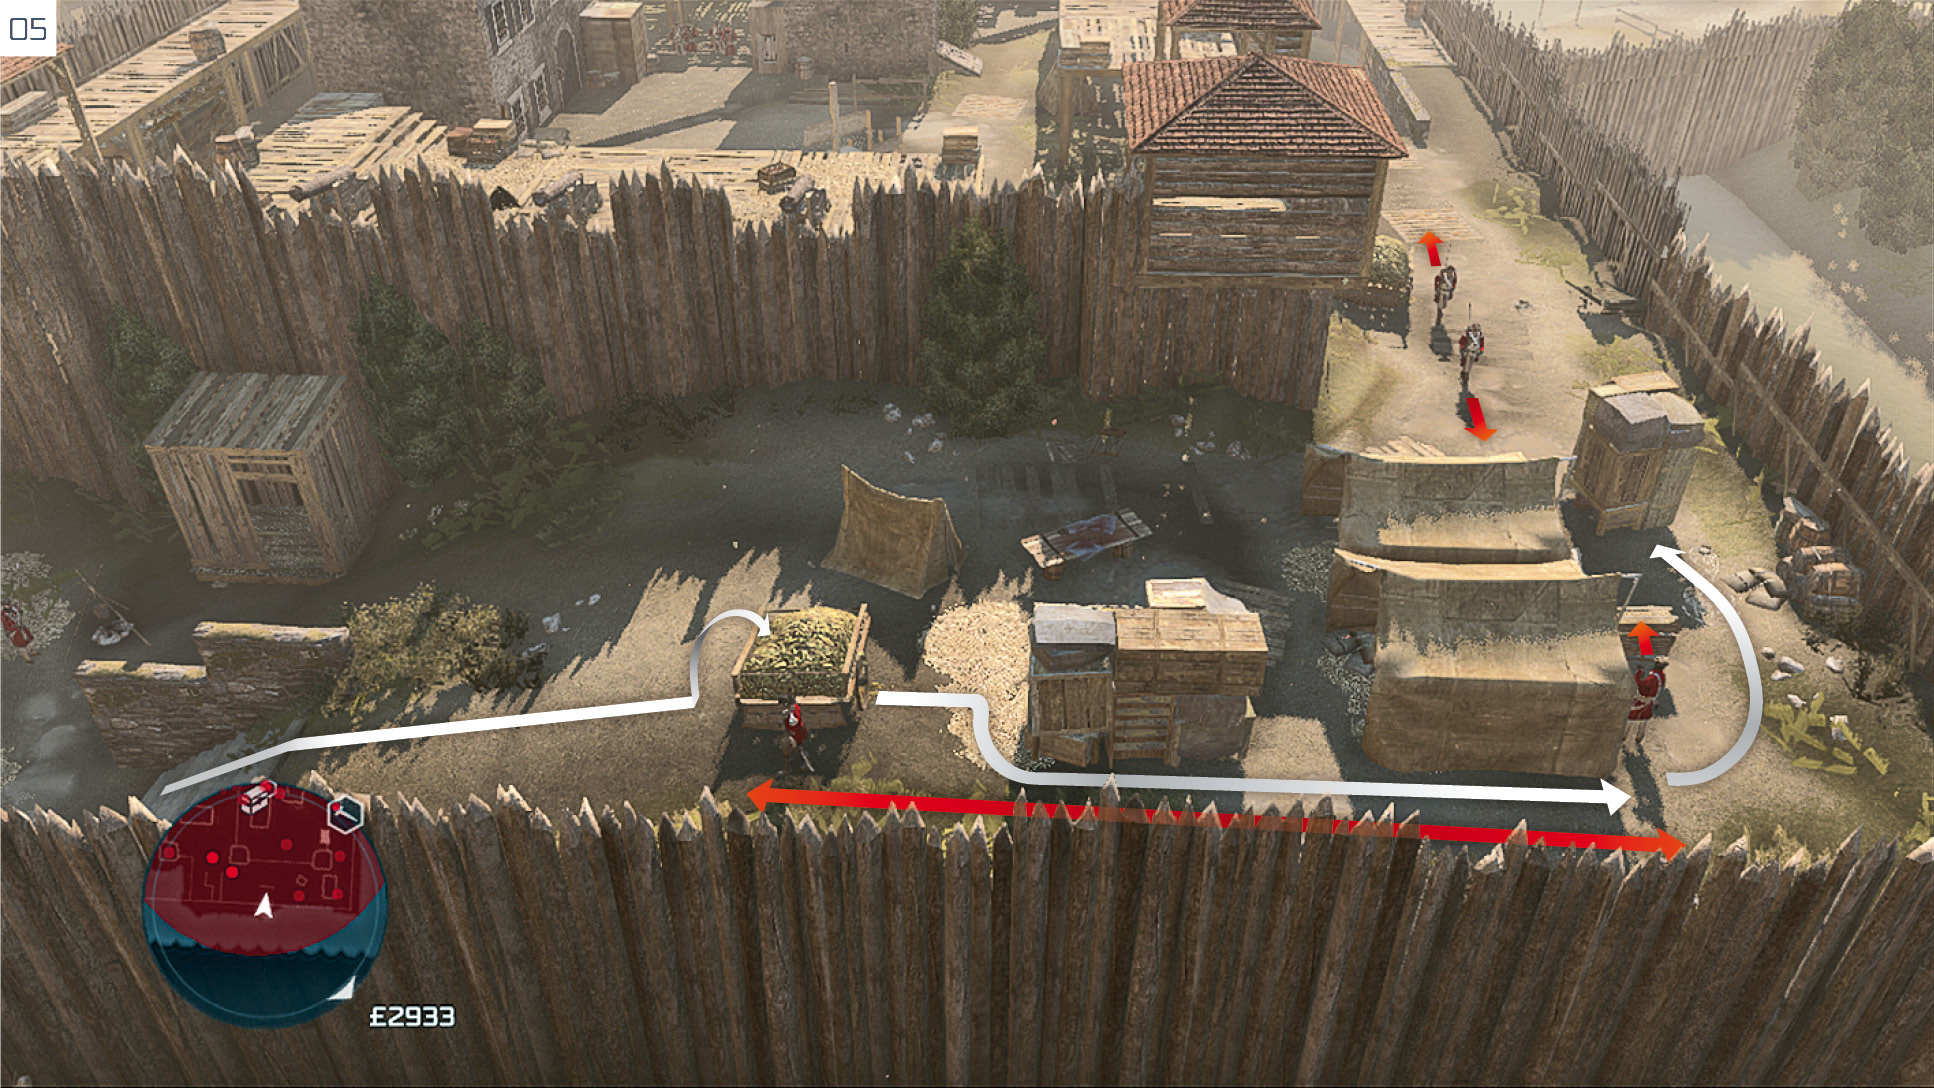
Watch the Officer from your position in the hay pile and wait until he moves away from the cart. This is your opportunity to transfer to the hay cart. Assassinate the Officer on his return. You can now emerge and perform a corner assassination on the next guard in line. Move up to the crates and wait until the two patrolling soldiers further ahead are walking away from you. After a second or two, whistle: this will attract only the soldier to the rear. Perform a corner assassination when he moves within range; you can then eliminate his partner when he returns. If both should move towards you at once, retreat before Connor is detected and try again.
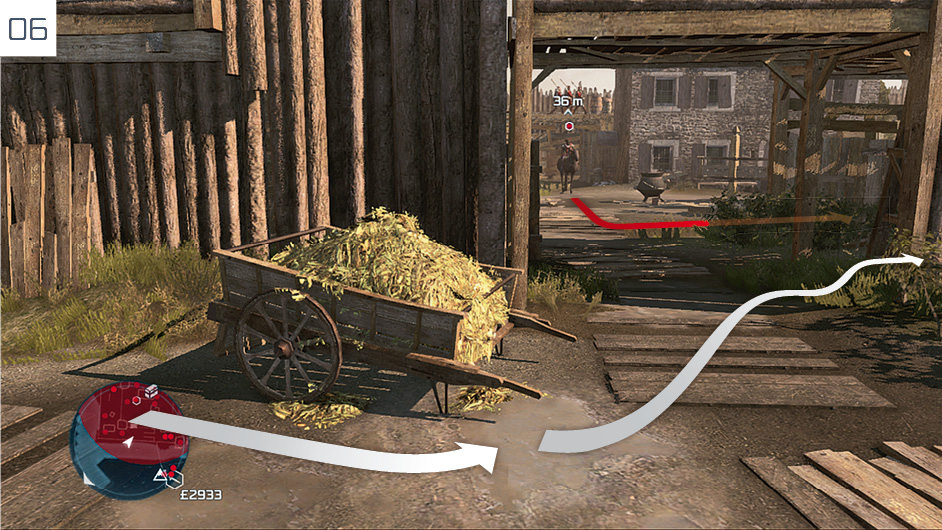
Wait out of sight at the hay cart and watch through the opening. After the Captain rides by on his horse, and all other soldiers are looking elsewhere, Fast Walk into the grassy, partially fenced-off area to the right.
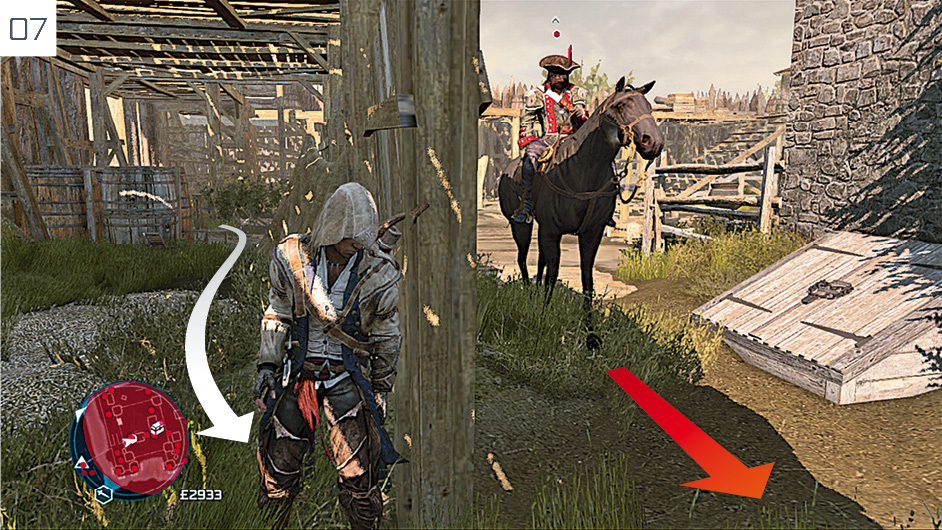
Move along the “corridor” until you reach the position shown here. Select the Hidden Blade. Wait until the Captain reaches your position, ensure that there are no potential witnesses in the distance, then step out and press  /
/ to pull him from the saddle and assassinate him.
Finally, climb the nearby ladder and make the short, triumphant walk to the flag to end the liberation.