
Assassin's Creed III Guide Reference & Analysis
The Homestead
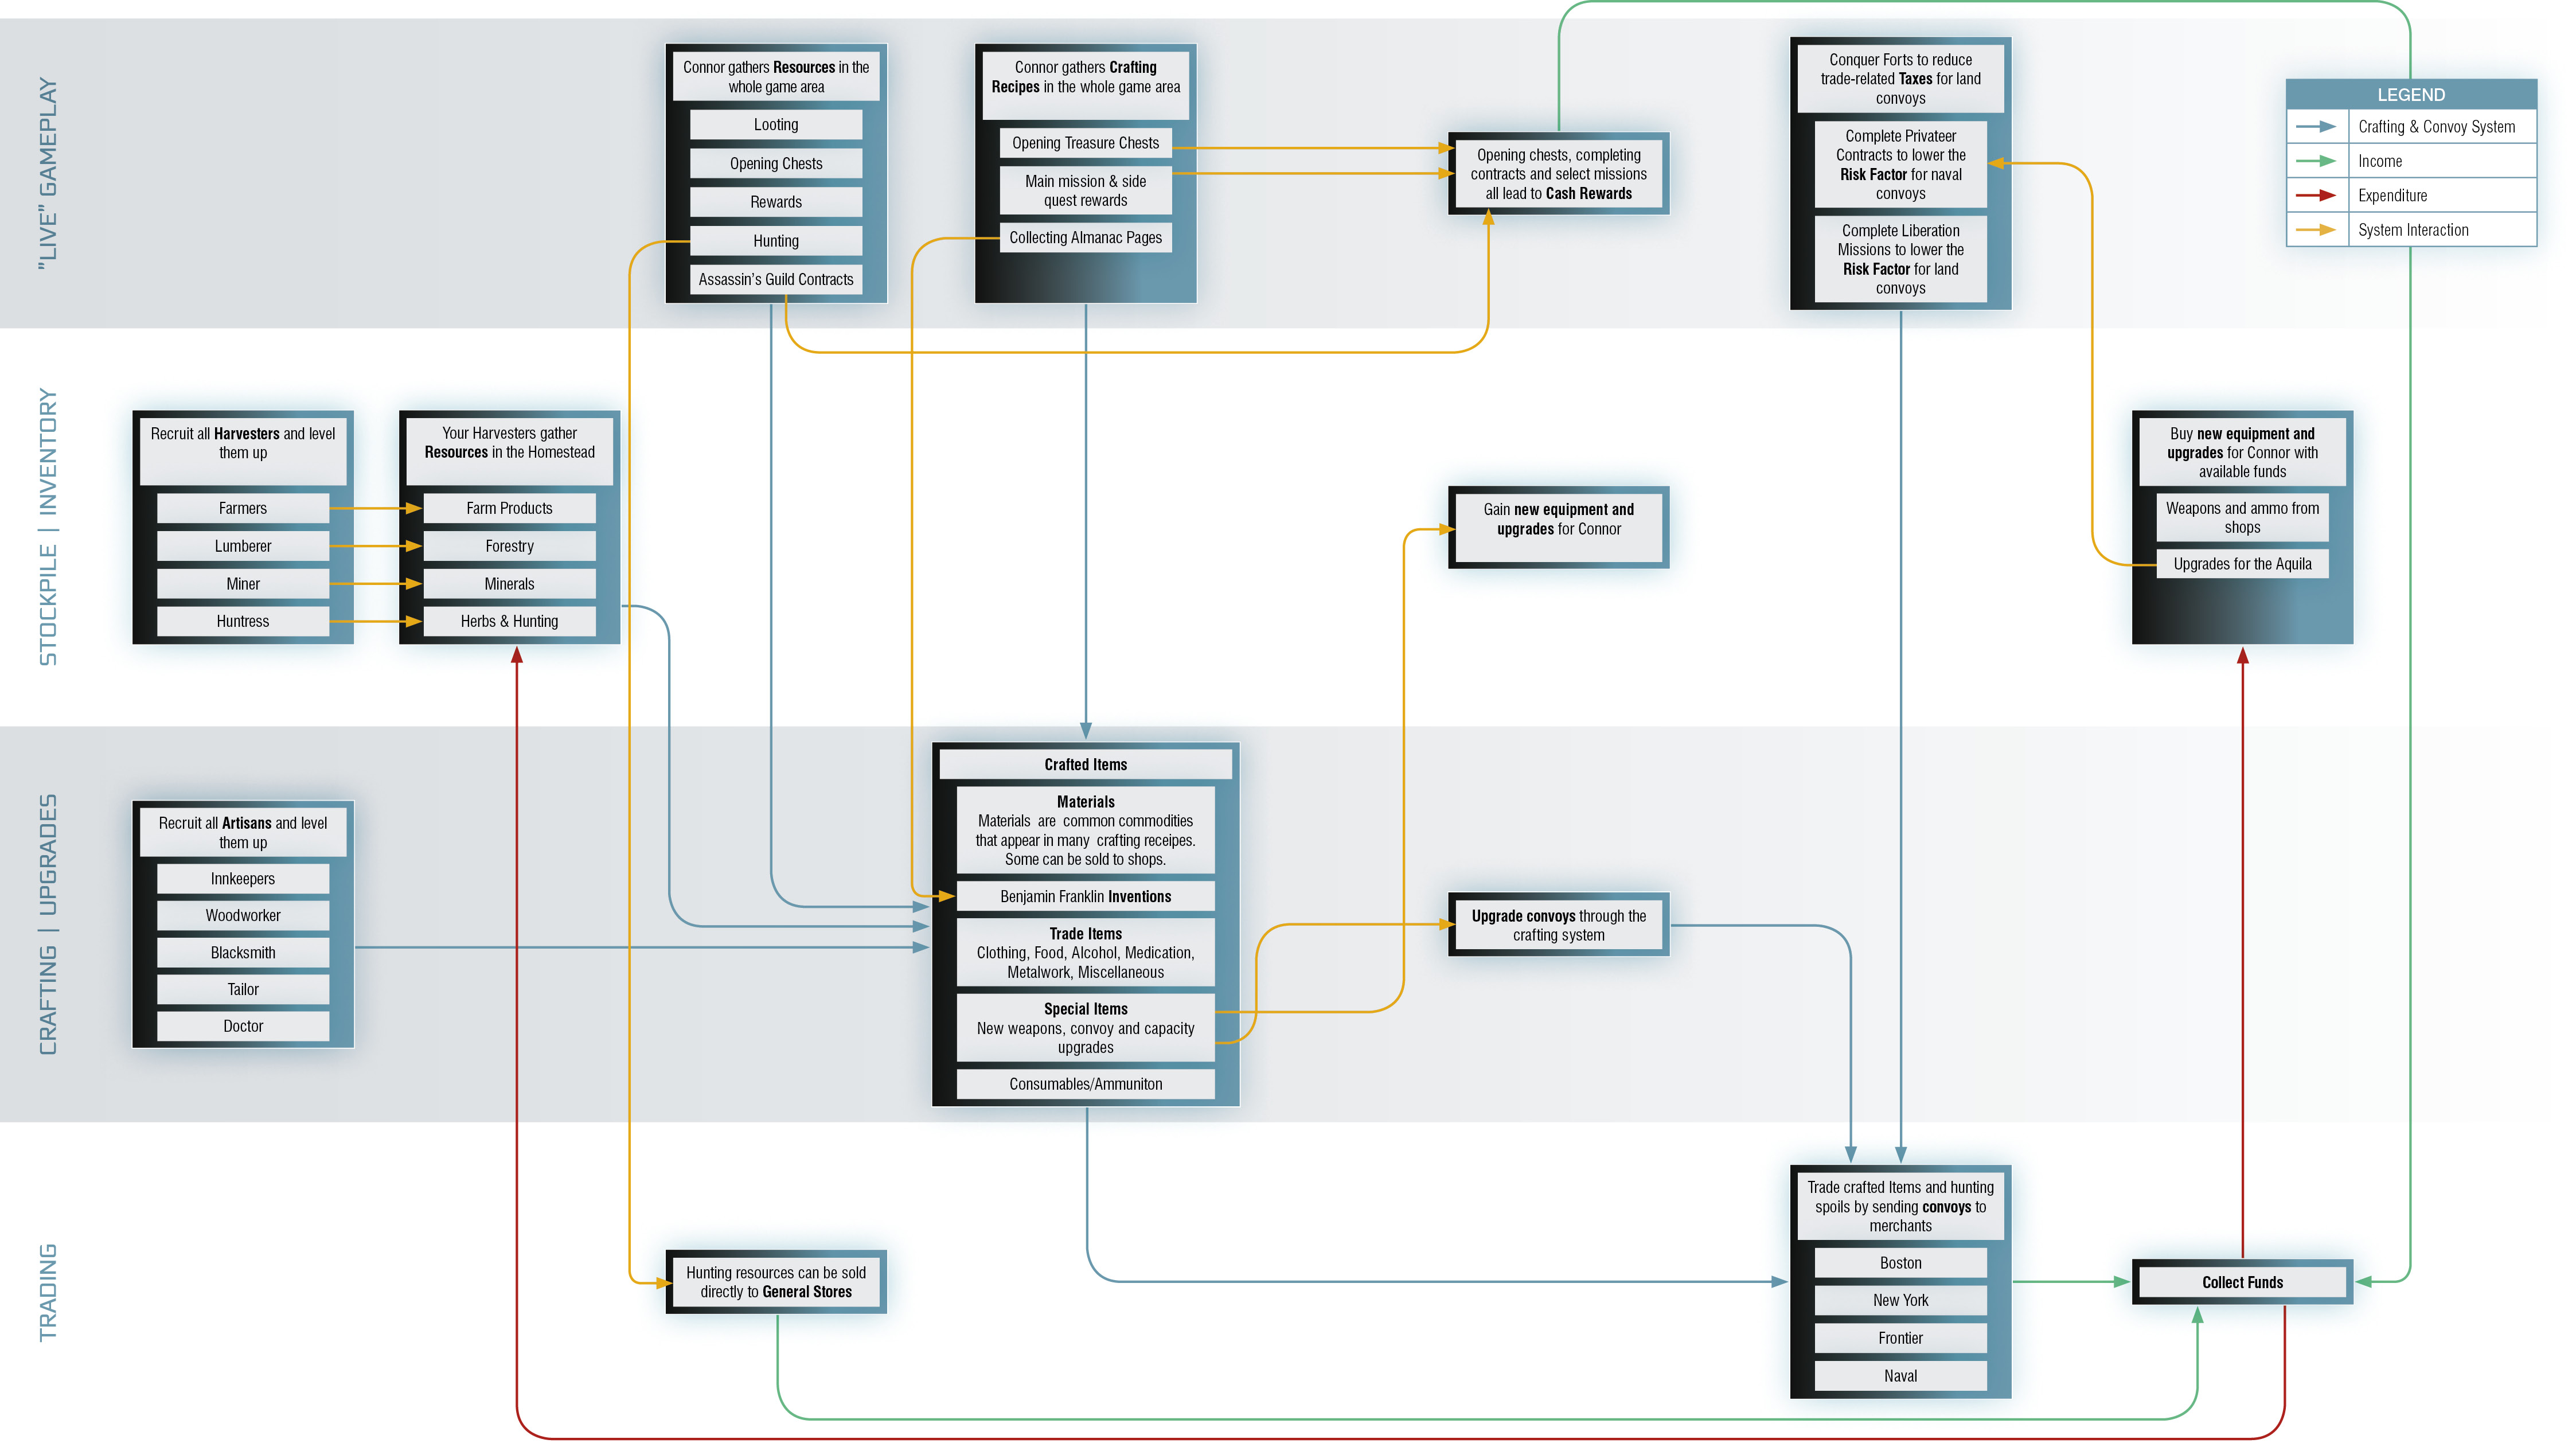
The following diagram offers an overview of the entire economic landscape in Assassin’s Creed III, showing how a wide range of related activities (including money-making opportunities and potential investments) are interconnected. It should be immediately clear that the Homestead lies at the heart of this system. It is the only realistic way to generate large amounts of cash, and to access the best items and upgrades – either through buying them from General Stores, or by calling on the Homestead’s artisans to craft them.
The majority of Homestead operations – purchasing raw materials, crafting and sale of products through convoys – are performed via the Accounting Book interface. You can find the master Accounting Book inside the Manor, but there are also identical copies of it in all General Stores throughout the major game regions. To interact with the Accounting Book, simply press  /
/ .
.
Recruiting Workers
Once the feature is unlocked towards the end of Sequence 05, you can gradually recruit two categories of workers at the Homestead:
Artisans are people who can craft items within their lines of expertise using resources that you must source and supply. Once again, this is achieved via the Accounting Book interface. There are five Artisans in total:
- Lance (Woodworker): can craft weapons, and consumables.
- Oliver & Corinne (Innkeepers): can craft food and alcohol.
- Big Dave (Blacksmith): can craft weapons, metalwork, war supplies, consumables and inventions.
- Lyle White (Doctor): can craft medication.
- Ellen (Tailor): can craft capacity upgrades (such as pouches) and clothing.
Harvesters are people who grow or gather resources. You can then buy these resources from them via the Accounting Book. There are four Harvesters in total:
- Godfrey & Terry (Lumberers): provide Forest products.
- Warren & Prudence (Farmers): provide Farm products.
- Myriam (Huntress): provides Hunting products and Herbs.
- Norris (Miner): provides Minerals.
All workers can gain levels that facilitate access to better resources or more advanced crafting possibilities. They level up each time you complete one of their respective events or missions, which can only be done sequentially. The following diagram shows the unlock conditions for each of these side quests, with arrows representing when a completed mission unlocks a new one.

Gathering Resources
There are a wide variety of ways to gather resources, though some are markedly more efficient than others.
 Looting & Pickpocketing
You can obtain resources by pickpocketing civilians or guards. Every viable target can be pickpocketed at least twice. With each “lift” you perform on the same individual, the probability that they will react and cause a commotion will increase – unless you take steps to avoid discovery, such as Blending between attempts.
The items that you obtain depend on the class of the individual you target. With civilians, the quality of potential rewards is determined by the individual’s wealth, which can be interpreted by their attire; rags for the poor, regalia for the rich. Naturally, guards are risky pickpocket targets and will react with violence if they catch Connor in the act. Potential hostiles only yield refills for Connor’s consumables and small sums of cash; you can only obtain resources and crafted items from civilians.
The order in which you obtain loot is randomized: every time you perform a successful pickpocket, you can receive applicable rewards detailed in the accompanying table, in any order.
Which items you receive by looting dead or incapacitated NPCs is governed by the same rules as pickpocketing, though the direct prohibition on killing civilians means that this usually only applies to guards. However, there are occasional scripted instances where you can loot dead civilians, and occasions where firing lines, grenade volleys and general attacks performed by enemies can lead to the death of innocent bystanders.
Pickpocketing Rewards
|
VICTIM |
Possible Reward #1 |
Possible Reward #2 |
Possible Reward #3 |
Possible Reward #4 |
|
Civilian: Poor |
One resource from “Group 1” |
One resource from “Group 1” |
£1-5 (50% chance) |
- |
|
Civilian: Medium |
£8-15 |
One resource from “Group 2” |
£8-15 (50% chance) |
- |
|
Civilian: Rich |
£8-15 |
One resource from “Group 3” |
£30-50 |
Crafted item (50% chance) |
|
Guards |
Consumable |
Cartridges (x3) |
£8-15 |
Cartridges (x3) |
Reward Categories
|
“Group 1” Resources |
“Group 2” Resources |
“Group 3” Resources |
Crafted Items |
Consumables |
|
Chicken Feathers, Charcoal, Oak Bark, Sand |
Beeswax, Butter, Fresh Water, Milk, Bee Balm, Catnip, Lavender, Sage, Snakeroot, Clay |
Apples, Honey, Eggs, Caraway, Rosemary, Roses, Glass Bottles, Flax, Hog Lard, Vegetables, Wheat, Madder, Barley, Rye, Wool, Salt |
Stomach Ache Medicine, Snakebite Medicine, Hair Accessory, Paper, Digestive Tonic, All-Purpose Remedy, Deer Jerky, Cough Syrup, Bread, Ciders, Eye Drops, Toy Dolls, Cold Medicine, Skin Irritation Medicine, Ales, Spirits, Golden Rings, Tea, Buttons, Soap, Pomade |
Smoke Bomb, Rope Dart, Arrows (x6), Trip Mine, Poisoned Dart |
 Buying from Harvesters
Once you recruit the four available Harvesters, you can buy the resources they produce. By completing their related side quests, you can increase their level – and, by doing so, gain access to new resources.
To purchase Harvester-produced resources, use the Stockpile entry in the Accounting Book. Connor can have a maximum of ten units of each item in his Stockpile at any given time (which is kept separate from his
personal inventory). There is also a “cooldown” system for purchases made from Harvesters. With every unit that Connor purchases, you must wait approximately two minutes per item for the Harvester to generate replacement stock. Purchase ten valuable Beaver Pelts to immediately load onto Convoys, for example, and you must wait twenty minutes to purchase a full ten additional units.
Harvester-Produced Resources
|
Category |
Level |
Resource |
Price (£) |
|
Farm Products (Farmer) |
1 |
Beeswax |
2 |
|
Eggs |
5 |
||
|
Honey |
5 |
||
|
Milk |
4 |
||
|
2 |
Apples |
6 |
|
|
Fresh Water |
5 |
||
|
Vegetables |
8 |
||
|
Wool |
10 |
||
|
3 |
Cow Hide |
15 |
|
|
Pork |
17 |
||
|
Poultry Meat |
16 |
||
|
4 |
Barley |
25 |
|
|
Flax |
27 |
||
|
Rye |
30 |
||
|
Wheat |
24 |
||
|
Forest (Lumberer) |
1 |
Charcoal |
5 |
|
Oak Bark |
3 |
||
|
Oak Lumber |
8 |
||
|
2 |
Ash Lumber |
12 |
|
|
Kindling |
5 |
||
|
Walnut Lumber |
10 |
||
|
3 |
Pine Lumber |
15 |
|
|
Spruce Lumber |
16 |
||
|
4 |
Hickory Lumber |
30 |
|
|
Maple Lumber |
27 |
||
|
Rosewood Lumber |
32 |
||
|
Herbs (Huntress) |
1 |
Catnip |
3 |
|
Snakeroot |
5 |
||
|
2 |
Rosemary |
7 |
|
|
St John’s Wort |
9 |
||
|
3 |
Madder |
9 |
|
|
Hunting (Huntress) |
1 |
Beaver Pelt |
160 |
|
Deer Pelt |
120 |
||
|
Hare Meat |
20 |
||
|
Hare Pelt |
30 |
||
|
2 |
Fox Pelt |
100 |
|
|
3 |
Bear Pelt |
240 |
|
|
Wolf Pelt |
130 |
||
|
Minerals (Miner) |
1 |
Clay |
8 |
|
Iron Ore |
12 |
||
|
Sand |
3 |
||
|
2 |
Copper Ore |
15 |
|
|
Limestone |
10 |
||
|
Rock Salts |
8 |
||
|
3 |
Lead Ore |
16 |
|
|
Sulfur |
22 |
||
|
4 |
Gold Ore |
35 |
|
|
Silver Ore |
32 |
 Completing Assassins Guild Contracts
As you complete Liberation missions, you obtain Assassin recruits that you can send on Contracts throughout the North American colonies.
Each contract that your recruits successfully complete furnishes you with certain rewards, which are revealed in advance. Considering the time it takes to complete a contract, this is not an efficient way to gather resources. However, the cumulative sum of items that you will obtain while completing this metagame is not inconsiderable. If you ensure that you have Assassins engaged in missions while you attend to other activities from Sequence 06 onwards, this will help to increase your total resources available for crafting and trade.
 Hunting
The hunting map (press  /
/ to bring up the main map, then use
  to select the appropriate entry) shows the various hunting regions of the Frontier, each of which is frequented by four indigenous species. These are represented by icons in the top-right corner of the screen; those that you have yet to encounter are marked by a paw print with a question mark (
 ). The Davenport Homestead counts as a single hunting region, and features seven creatures in total.
Hunting Regions
|
Name |
Animals |
|
|
Black Creek |
|
Bobcat, Elk, Hare, Beaver |
|
Kanièn:keh |
|
Fox, Deer, Hare, Cougar |
|
John’s Town |
|
Bear, Fox, Elk, Hare |
|
Valley Forge |
|
Elk, Hare, Raccoon, Beaver |
|
Concord |
|
Raccoon, Hare, Beaver, Deer |
|
Monmouth |
|
Hare, Raccoon, Elk, Fox |
|
Davenport Homestead |
|
Elk, Deer, Fox, Beaver, Raccoon, Wolf, Hare |
|
Diamond Basin |
|
Deer, Wolf, Cougar, Beaver |
|
Great Piece Hills |
|
Bobcat, Hare, Wolf, Elk |
|
Packanack |
|
Bear, Bobcat, Hare, Beaver |
|
Scotch Plains |
|
Raccoon, Deer, Hare, Cougar |
|
Troy’s Wood |
|
Wolf, Hare, Deer, Elk |
|
Lexington |
|
Hare, Raccoon, Deer, Fox |


 Snares & Bait
Accessed via the Tool Wheel, bait and snares are employed solely for hunting. Bait is used to attract animals, which can be killed directly by Connor or caught in a pre-planted snare. You can also place snares (hold  /
/ until the meter is full) close to woodland clues in order to catch creatures. When a snare is set, wait for a notification that an animal has been caught, then hurry to retrieve the trapped animal before it escapes or is stolen.
You can refill your stock of bait and snares by crafting via an Accounting Book if you have the requisite resources and Homestead artisans, or by purchasing supplies from General Stores and Peddlers.
Snares & Bait: Pouch Capacity & Upgrades
|
Name |
Capacity/Upgrade |
Availability |
|
Default Bait Pouch |
10 |
- |
|
Default Snare Pouch |
10 |
- |
|
Snare Pouch Upgrade 1 |
+5 |
Through crafting |
|
Snare Pouch Upgrade 2 |
+5 |
Through Uplay |
Animals can be broadly divided into two categories: aggressive and passive.
- Aggressive animals (primarily bears, wolves, bobcats and cougars) will stalk and attack Connor if they see him. They are represented as enemies on the mini-map. To kill them, you need to either use ranged weapons from a distance, take them by surprise with an assassination (particularly from above) or let them attack you and successfully complete the timed button-pressing minigame to kill them. The most dangerous animals (such as bears) may require longer and more involved chains of button presses to defeat, and there will be devastating consequences if you fail. Male elk may also charge and attempt to gore Connor if he startles or attacks them. Unlike natural predators, however, they will generally leave him be if a respectful distance is maintained.
- Passive animals (such as hares and beavers) will flee the moment they see or hear Connor. To kill them, you can use a ranged weapon from a distance, a melee weapon at close range or plant snares to trap them. To lure animals to a specific position, distribute bait close to Stalking Zones or hiding places, then wait until they approach and strike from your place of concealment.
Animals slain while hunting can be skinned to obtain resources, which can be sold or used to craft new items. With practice, it’s a highly lucrative diversion. Though securing the services of the Huntress at the Homestead will enable you to purchase a selection of animal products directly, there are certain animals that only Connor can kill and skin.
While hunting is not a particularly complicated activity, the following tips will nonetheless be of great service:
- To increase the spawn rate of animals in a location, look for clues in Eagle Vision. Once you examine these, animals may appear in greater numbers, and the individual creature referenced when Connor scrutinizes the clue will be highlighted on the mini-map with the
 icon. Using bait near clues can attract multiple animals.
- As a rule, animals will not see Connor if he is concealed within Stalking Zones, hiding places or situated out of sight in higher branches. A few animal types also have a blind spot directly behind them. As a general rule, though, most creatures will detect Connor immediately whenever he moves in the open.
- Though Connor can obtain multiple resources from a single animal, the method employed to kill it determines the quality of the pelt obtained. Pristine pelts are by far the most valuable items that you will gather while hunting, while pelts damaged during the hunt – particularly if you use firearms – are worth significantly less. The cleanest kills are performed with the Hidden Blade via assassination moves. Aggressive animals slain with the Hidden Blade via the timed button press minigame always yield perfect pelts. Other suitable killing techniques are the Poison Darts, bow and snares.
- One of the easiest hunting strategies is to find the start point of a tree-based free run course, examine nearby clues, then make your way to a high branch and remain still. You can then air assassinate animals that pass beneath Connor. If creatures are not moving within range, toss bait to the floor below to attract them. You can optionally set snares in suitable positions before you begin to potentially gather animal resources with maximum efficiency.
- Inside hunting regions, you will find certain areas where a species is dominant and plentiful, with a remarkably high spawn rate. Try to make note of these whenever you encounter them. For example, the small island (and its surrounding area) on the far west side of the Packanack region is positively teeming with bears. Completing the Hunting Society side quests is a great way to discover such unique zones.
- Some clues correspond to specific species: for example, there is a particular type of small bush that indicates the presence of deer. In time, you won’t even need to examine them to know which animal you will find, which can enable you to move on if you are searching for a very particular type of creature.
- Whenever you are travelling through the Frontier or Homestead, have the bow or Poison Darts and Hidden Blade equipped in anticipation of opportunistic kills. It’s amazing how many animals will inadvertently move within range, and fast reactions can provide you with welcome bonuses.
Overall, hunting is an excellent way to gather hunting resources and generate income. It requires little investment (other than restocking Tools), it’s never particularly demanding and, occasional attacks from predators and random guard encounters notwithstanding, rarely dangerous once you are accustomed to the challenges faced in the Frontier. The hunting spoils that offer the most profit when traded via convoys are the Bear Pelt and Beaver Pelt, which have a base value of £240 and £160 respectively. If you load a convoy with these items, you can make incredible profit – even at an early stage in the story.
Hunting RESOURCES
|
Icon |
Name |
Weaknesses |
Potential Resources |
|
|
Fox |
Bait, snares |
Fox Pelt (£100), Fox Tail (£20), Damaged Fox Pelt (£12) |
|
|
Bear |
Bait, air assassinations |
Bear Pelt (£240), Bear Grease (£20), Bear Claws (£10), Damaged Bear Pelt (£40) |
|
|
Cougar |
Bait, Poison Darts |
Cougar Fangs (£10), Cougar Pelt (£90), Damaged Cougar Pelt (£4) |
|
|
Wolf |
Bait, bow (while stalking) |
Wolf Fangs (£10), Wolf Pelt (£100), Damaged Wolf Pelt (£10) |
|
|
Bobcat |
Bait, snares, Poison Darts |
Bobcat Claws (£10), Bobcat Pelt (£70), Damaged Bobcat Pelt (£4) |
|
|
Hare |
Bait, snares, blind spot behind them |
Hare Pelt (£30), Rabbit’s Foot (£4), Damaged Hare Pelt (£2) |
|
|
Beaver |
Bait, snares; they are also incredibly slow |
Beaver Pelt (£160), Beaver Teeth (£10), Castoreum (£30), Damaged Beaver Pelt (£12) |
|
|
Raccoon |
Bait, snares, blind spot behind them |
Raccoon Pelt (£60), Damaged Raccoon Pelt (£2) |
|
|
Deer |
Bait, blind spot behind them |
Deer Heart (£10), Deer Marrow (£4), Venison (£40), Deer Tail (£6), Deer Pelt (£120), Damaged Deer Pelt (£12) |
|
|
Elk |
Bait, blind spot behind them, air assassinations |
Elk Pelt (£140), Elk Antlers (£20), Elk Heart (£10), Elk Meat (£60), Damaged Elk Pelt (£16) |


Gathering Recipes
Recipes reveal the ingredients required to craft items. There is one recipe for each of the items that can be crafted in the game, though you can also “blind craft” by using the tables in the Crafting section to choose the correct ingredients and artisans.
From Treasure Chests
The most common way to obtain recipes is by opening chests, which are found in the Frontier, Boston and New York.
- Chests in Boston and New York can be opened by picking their locks, unless you own a special key for the district where the chest is found. Chest keys are obtained by completing Liberation Missions. In the Frontier, you automatically obtain a key to all regional chests at the start of Sequence 05.
- General Stores sell maps that reveal specific collectibles, including chests. Once you have purchased a map, the chests will appear on your in-game main map – even in areas that you have yet to explore. If you are working on a tight budget, you can spare the expense by using our maps instead.
From Rewards
You can also obtain crafting recipes through main storyline progression and optional challenges.
Recipes: Rewards
|
Recipes |
Unlock Condition |
|
Twin Holsters |
Complete Sequence 05 |
|
Consumables |
Complete Sequence 03-06 |
|
Small Saddle Bags |
Complete Sequence 09 |
|
Medium Saddle Bags |
Complete Sequence 10 |
|
Large Saddle Bags |
Complete Sequence 12 |
|
Benjamin Franklin Inventions |
Complete Almanacs (see page 200) |
|
Pouch Upgrades |
Complete quests at the Homestead (see page 193) |
 Crafting
The Crafting Process
Crafting is accomplished via the Accounting Book interface. The “Crafting” entry of the Accounting Book features three sections:
- Recipes: Shows the list of all recipes that you have already obtained. If you select one, the required resources and artisans automatically appear in the appropriate slots. You can also “blind craft”: that is, attempt to craft items without a recipe. However, if you attempt a combination that does not correspond to a possible recipe, the resources are lost. All items in our crafting tables except Special Items can be crafted without collecting the recipe beforehand as long as you have the required resources and suitably trained artisans.
- Artisans: Each recipe requires the skills of one or two artisans, each at a specific minimum level.
- Resources: Resources are the physical ingredients used to create new items, and are sorted in categories. To find out how to gather or purchase resources.
One you have selected a recipe, note the price in the bottom-left corner of the screen and press  /
/ to craft a single unit of that item. As you create additional units, the price charged by the artisan will increase by steady increments. Depending on the object you are creating, there is a point where this rudimentary “supply and demand” system might seriously impact your potential profits. However, if you leave an individual item for a time, the base cost will be restored after a relatively short “cooldown” period.
Crafted Items & Recipes
In the tables that follow, we document all crafting recipes, including the requisite artisans and resources.
- Consumables: These are the items that appear in Connor’s selection of Tools. Though they can be crafted, it is often easier (and less demanding) to replenish your stocks by looting corpses, or even by purchasing them from merchants.
- Inventions: Once you have collected all pages from an individual Almanac, you receive the recipe for one of Benjamin Franklin’s inventions. There are no real rewards for this, though each object crafted will appear at the Manor, and crafting all inventions is required to reach 100% Synchronization.
- Special Items: These are probably the most valuable items you can craft, and include new weapons, capacity upgrades and, to maximize your trade profits, convoy upgrades. Weapon recipes require an item called Special Iron Ingot. You can obtain seven of these by completing the Miner’s quests and an additional five by opening a Chest behind the Manor.
- Materials: Materials are crafted items whose main purpose is to be reused in other crafting recipes. Individually, they have very little value if you attempt to sell them via convoys. It’s only once you reuse them in a second crafting recipe that they acquire their full value and enable you to make significant profit.
- Trade Items (Alcohol, Clothing, Food, Medication, Metalwork, Miscellaneous, War Supplies, Woodworks): These items have no purpose other than to be sold using convoys to deliver them to merchants.
Consumables
|
Recipe |
Ingredients |
Price (£) |
|
Arrow |
Blacksmith (Lv. 1), Woodworker (Lv. 1), Iron Ore (from Miner), Kindling (from Lumberer) |
10 |
|
Bait |
Innkeeper (Lv. 1), Hare Meat (from Huntress or hunting), Poultry Meat (from Farmer), Vegetables (from Farmer) |
5 |
|
Cartridge |
Blacksmith (Lv. 1), Lead Ore (from Miner) |
15 |
|
Poisoned Dart |
Blacksmith (Lv. 1), Doctor (Lv. 2), Lead Ore (from Miner), Sulfur (from Miner) |
225 |
|
Rope Dart |
Blacksmith (Lv. 2), Tailor (Lv. 1), Cow Hide (from Farmer), Flax (from Farmer), Weapon Blades (crafted Material), |
125 |
|
Smoke Bomb |
Blacksmith (Lv. 3), Black Powder (crafted Material), Clay (from Miner), Dyes (crafted Material) |
50 |
|
Snare |
Woodworker (Lv. 2), Cow Hide (from Farmer), Kindling (from Lumberer) |
15 |
|
Trip Mine |
Blacksmith (Lv. 4), Black Powder (crafted Material), Clay (from Miner), Flints (crafted Material) |
150 |
Inventions
|
Recipe |
Ingredients |
|
Busybody |
Blacksmith (Lv. 2), Iron Ore (from Miner), Sand (from Miner) |
|
Electrostatic Generator |
Blacksmith (Lv. 4), Doctor (Lv. 3), Copper Ore (from Miner), Iron Ore (from Miner), Sand (from Miner) |
|
Franklin Stove |
Blacksmith (Lv. 3), Iron Ore (from Miner), Silver Ore (from Miner) |
|
Glass Armonica |
Blacksmith (Lv. 4), Charcoal (from Lumberer), Sand (from Miner) |
|
Joseph Priestley Soda Apparatus |
Innkeeper (Lv. 1), Fresh Water (from Farmer), Glass Bottles (crafted Material) |
|
Kite and Key |
Tailor (Lv. 2), Kindling (from Lumberer), Linsey-woolsey (crafted Material) |
|
Leyden Jar |
Blacksmith (Lv. 2), Copper Ore (from Miner), Fresh Water (from Farmer), Glass Bottles (crafted Material) |
|
Orrery |
Blacksmith (Lv. 1), Woodworker (Lv. 2), Copper Ore (from Miner), Rosewood Lumber (from Lumberer) |
|
Watt Steam Engine |
Blacksmith (Lv. 3), Fresh Water (from Farmer), Iron Ore (from Miner) |
Special Items
|
Recipe |
Ingredients |
|
“Broken Sword” Knife |
Blacksmith (Lv. 2), Special Iron Ingot (from Miner quest), Weapon Blades (crafted Material) |
|
Cartridge Pouch 1 |
Tailor (Lv. 1), Hare Pelt (from Huntress or hunting) |
|
Cartridge Pouch 2 |
Tailor (Lv. 2), Deer Pelt (from Huntress or hunting), Sewing Threads (crafted Material) |
|
Cartridge Pouch 3 |
Tailor (Lv. 3), Fox Pelt (from Huntress or hunting), Sewing Threads (crafted Material) |
|
English Flintlock Pistol |
Blacksmith (Lv. 2), Woodworker (Lv. 2), Flints (crafted Material), Oak Lumber (from Lumberer), Special Iron Ingot (from Miner quest) |
|
French Coat Pistol |
Blacksmith (Lv. 2), Flints (crafted Material), Iron Ore (from Miner), Special Iron Ingot (from Miner quest) |
|
Iron Blade War Club |
Blacksmith (Lv. 1), Woodworker (Lv. 2), Ash Lumber (from Lumberer), Special Iron Ingot (from Miner quest) |
|
Italian Flintlock |
Blacksmith (Lv. 3), Woodworker (Lv. 3), Flints (crafted Material), Maple Lumber (from Lumberer), Special Iron Ingot (from Miner quest) |
|
Land Convoy |
Woodworker (Lv. 1), Oak Bark (from Lumberer), Oak Lumber (from Lumberer) |
|
Land Convoy Capacity Upgrade |
Woodworker (Lv. 1), Kindling (from Lumberer), Pine Lumber (from Lumberer) |
|
Lincoln’s Sword (Replica) |
Blacksmith (Lv. 4), Silver Ore (from Miner), Special Iron Ingot (from Miner quest) |
|
Naval Axe |
Blacksmith (Lv. 3), Woodworker (Lv. 3), Hickory Lumber (from Lumberer), Special Iron Ingot (from Miner quest) |
|
Naval Convoy |
Woodworker (Lv. 2), Bear Grease (from hunting), Oak Bark (from Lumberer), Spruce Lumber (from Lumberer) |
|
Naval Convoy Capacity Upgrade |
Woodworker (Lv. 3), Kindling (from Lumberer), Maple Lumber (from Lumberer) |
|
Naval Duckfoot |
Blacksmith (Lv. 3), Flints (crafted Material), Lead Ore (from Miner), Special Iron Ingot (from Miner quest) |
|
Poison Dart Pouch Upgrade |
Tailor (Lv. 1), Beaver Pelt (from Huntress or hunting), Hare Pelt (from Huntress or hunting), Sewing Threads (crafted Material) |
|
Quiver 1 |
Tailor (Lv. 1), Woodworker (Lv. 2), Ash Lumber (from Lumberer), Cow Hide (from Farmer) |
|
Rope Dart Pouch 1 |
Tailor (Lv. 1), Hare Pelt (from Huntress or hunting), Sewing Threads (crafted Material) |
|
Royal Navy Sea Service Flintlock |
Blacksmith (Lv. 4), Flints (crafted Material), Gold Ore (from Miner), Special Iron Ingot (from Miner quest) |
|
Royal Pistol |
Blacksmith (Lv. 3), Flints (crafted Material), Silver Ore (from Miner), Special Iron Ingot (from Miner quest) |
|
Saddle Bags Large |
Blacksmith (Lv. 4), Tailor (Lv. 3), Gold Ore (from Miner), Sewing Threads (crafted Material) |
|
Saddle Bags Medium |
Blacksmith (Lv. 4), Tailor (Lv. 3), Sewing Threads (crafted Material), Silver Ore (from Miner) |
|
Saddle Bags Small |
Blacksmith (Lv. 4), Tailor (Lv. 3), Copper Ore (from Miner), Sewing Threads (crafted Material) |
|
Smoke Bomb Pouch Upgrade |
Tailor (Lv. 1), Cow Hide (from Farmer), Sewing Threads (crafted Material) |
|
Snare Pouch 1 |
Tailor (Lv. 1), Sewing Threads (crafted Material), Wolf Pelt (from Huntress or hunting) |
|
Trip Mine Pouch 1 |
Tailor (Lv. 2), Cow Hide (from Farmer), Sewing Threads (crafted Material), Fox Pelt (from Huntress or hunting) |
|
Twin Holsters |
Tailor (Lv. 2), Rosewood Lumber (from Lumberer), Wolf Pelt (from Huntress or hunting) |
|
War Tomahawk |
Blacksmith (Lv. 2), Special Iron Ingot (from Miner quest) |
|
Washington’s Battle Sword (Replica) |
Blacksmith (Lv. 4), Silver Ore (from Miner), Special Iron Ingot (from Miner quest) |
Materials
|
Recipe |
Ingredients |
Price (£) |
|
Barrels |
Woodworker (Lv. 1), Oak Lumber (from Lumberer) |
35 |
|
Belt Buckles |
Blacksmith (Lv. 2), Copper Ore (from Miner) |
40 |
|
Black Powder |
Blacksmith (Lv. 3), Lead Ore (from Miner), Rock Salt (from Miner), Sulfur (from Miner) |
75 |
|
Buttons |
Woodworker (Lv. 2), Hickory Lumber (from Lumberer) |
55 |
|
Candles |
Tailor (Lv. 1), Beeswax (from Farmer) |
27 |
|
Disinfectant |
Doctor (Lv. 1), Apples (from Farmer) |
31 |
|
Dyes |
Tailor (Lv. 2), Vegetables (from Farmer) |
35 |
|
Flints |
Blacksmith (Lv. 2), Iron Ore (from Miner), Lead Ore (from Miner), Limestone (from Miner) |
65 |
|
Flour |
Innkeeper (Lv. 1), Wheat (from Farmer) |
50 |
|
Glass Bottles |
Blacksmith (Lv. 1), Sand (from Miner) |
30 |
|
Inks |
Tailor (Lv. 2), Woodworker (Lv. 3), Madder (from Huntress) |
35 |
|
Linsey-woolsey |
Tailor (Lv. 1), Flax (from Farmer), Wool (from Farmer) |
65 |
|
Nails |
Blacksmith (Lv. 1), Iron Ore (from Miner) |
40 |
|
Paper |
Tailor (Lv. 1), Woodworker (Lv. 2), Flax (from Farmer), Oak Bark (from Lumberer) |
55 |
|
Sewing Threads |
Tailor (Lv. 1), Wool (from Farmer) |
35 |
|
Weapon Blades |
Blacksmith (Lv. 2), Charcoal (from Lumberer), Iron Ore (from Miner) |
45 |
|
Weapon Handles |
Woodworker (Lv. 2), Maple Lumber (from Lumberer) |
55 |
Alcohol
|
Recipe |
Ingredients |
Price (£) |
|
Ales |
Innkeeper (Lv. 1), Barley (from Farmer), Barrels (crafted Material) |
125 |
|
Ciders |
Innkeeper (Lv. 1), Apples (from Farmer), Barrels (crafted Material) |
106 |
|
Spirits |
Innkeeper (Lv. 1), Barley (from Farmer), Barrels (crafted Material), Rye (from Farmer) |
155 |
Clothing
|
Recipe |
Ingredients |
Price (£) |
|
Belts |
Tailor (Lv. 1), Belt Buckles (crafted Material), Cow Hide (from Farmer) |
120 |
|
Boots |
Tailor (Lv. 2), Belt Buckles (crafted Material), Fox Pelt (from Huntress or hunting) |
170 |
|
Clothing |
Tailor (Lv. 1), Buttons (crafted Material), Linsey-woolsey (crafted Material) |
210 |
|
Coonskin Hat |
Tailor (Lv. 2), Raccoon Pelt (from hunting), Sewing Threads (crafted Material) |
145 |
|
Fine Clothing |
Tailor (Lv. 3), Buttons (crafted Material), Linsey-woolsey (crafted Material), Wolf Pelt (from Huntress or hunting) |
305 |
|
Fine Hats |
Tailor (Lv. 3), Beaver Pelt (from Huntress or hunting), Hare Pelt (from Huntress or hunting) |
165 |
|
Fine Shoes |
Tailor (Lv. 3), Beaver Pelt (from Huntress or hunting), Belt Buckles (crafted Material) |
215 |
|
Fox Tail Scarf |
Tailor (Lv. 2), Fox Tail (from hunting), Sewing Threads (crafted Material) |
125 |
|
Hats |
Tailor (Lv. 2), Beaver Pelt (from Huntress or hunting) |
135 |
|
Moccasins |
Tailor (Lv. 2), Elk Pelt (from hunting), Sewing Threads (crafted Material) |
185 |
|
Quilts |
Tailor (Lv. 2), Dyes (crafted Material), Linsey-woolsey (crafted Material), Sewing Threads (crafted Material) |
265 |
|
Shoes |
Tailor (Lv. 1), Belt Buckles (crafted Material), Hare Pelt (from Huntress or hunting) |
120 |
|
Tool Belts |
Tailor (Lv. 2), Woodworker (Lv. 1), Belt Buckles (crafted Material), Cow Hide (from Farmer), Nails (crafted Material) |
175 |
|
Wigs |
Tailor (Lv. 2), Dyes (crafted Material), Sewing Threads (crafted Material), Wool (from Farmer) |
185 |
Food
|
Recipe |
Ingredients |
Price (£) |
|
Bread |
Innkeeper (Lv. 1), Eggs (from Farmer), Flour (crafted Material), Milk (from Farmer) |
124 |
|
Deer Jerky |
Innkeeper (Lv. 1), Rock Salt (from Miner), Venison (from hunting) |
120 |
|
Deer Marrow Soup |
Innkeeper (Lv. 1), Deer Marrow (from hunting), Fresh Water (from Farmer), Vegetables (from Farmer) |
55 |
|
Jugged Hare |
Innkeeper (Lv. 1), Hare Meat (from Huntress or hunting), Vegetables (from Farmer) |
58 |
|
Meat Pies |
Innkeeper (Lv. 1), Flour (crafted Material), Hare Meat (from Huntress or hunting), Pork (from Farmer) |
142 |
|
Salt |
Innkeeper (Lv. 1), Rock Salt (from Miner) |
35 |
|
Salted Elk Meat |
Innkeeper (Lv. 1), Elk Meat (from hunting), Rock Salt (from Miner) |
130 |
|
Shepherd’s Pie |
Innkeeper (Lv. 1), Pork (from Farmer), Poultry Meat (from Farmer), Vegetables (from Farmer) |
81 |
|
Smoked Elk Meat |
Innkeeper (Lv. 1), Elk Meat (from hunting), Maple Lumber (from Lumberer) |
97 |
|
Tea |
Innkeeper (Lv. 1), Honey (from Farmer), Rosemary (from Huntress) |
52 |
|
Venison Heart |
Innkeeper (Lv. 1), Deer Heart (from hunting), Vegetables (from Farmer) |
53 |
Medication
|
Recipe |
Ingredients |
Price (£) |
|
All-Purpose Remedy |
Doctor (Lv. 2), Glass Bottles (crafted Material), St John’s Wort (from Huntress) |
119 |
|
Bandages |
Doctor (Lv. 1), Tailor (Lv. 1), Disinfectant (crafted Material), Linsey-woolsey (crafted Material) |
226 |
|
Cold Medicine |
Doctor (Lv. 1), Barley (from Farmer), Catnip (from Huntress), Glass Bottles (crafted Material) |
123 |
|
Cough Syrup |
Doctor (Lv. 2), Glass Bottles (crafted Material), Honey (from Farmer) |
115 |
|
Daffy’s Elixir |
Doctor (Lv. 2), Barley (from Farmer), Glass Bottles (crafted Material), Rye (from Farmer) |
165 |
|
Digestive Tonic |
Doctor (Lv. 2), Flax (from Farmer), Glass Bottles (crafted Material) |
137 |
|
Eye Drops |
Doctor (Lv. 3), Glass Bottles (crafted Material), Rosemary (from Huntress) |
132 |
|
Hysteria Medicine |
Doctor (Lv. 4), Castoreum (from hunting), Glass Bottles (crafted Material) |
155 |
|
Insect Repellent |
Doctor (Lv. 1), Catnip (from Huntress), Glass Bottles (crafted Material) |
98 |
|
Medical Charts |
Doctor (Lv. 4), Inks (crafted Material), Paper (crafted Material) |
225 |
|
Medical Equipment |
Blacksmith (Lv. 2), Doctor (Lv. 4), Disinfectant (crafted Material), Iron Ore (from Miner) |
208 |
|
Poisons |
Doctor (Lv. 2), Glass Bottles (crafted Material), Sulfur (from Miner) |
132 |
|
Pomade |
Doctor (Lv. 1), Bear Grease (from hunting), Deer Marrow (from hunting) |
107 |
|
Skin Irritation Remedy |
Doctor (Lv. 3), Glass Bottles (crafted Material), Rosemary (from Huntress), St John’s Wort (from Huntress) |
141 |
|
Snakebite Antidote |
Doctor (Lv. 2), Glass Bottles (crafted Material), Snakeroot (from Huntress) |
115 |
|
Soap |
Innkeeper (Lv. 1), Bear Grease (from hunting), Charcoal (from Lumberer), Rosemary (from Huntress) |
62 |
|
Stiffness Remedy |
Doctor (Lv. 3), Elk Antlers (from hunting), Elk Heart (from hunting) |
85 |
|
Stomachache Medicine |
Doctor (Lv. 1), Catnip (from Huntress), Charcoal (from Lumberer), Glass Bottles (crafted Material) |
103 |
Metalwork
|
Recipe |
Ingredients |
Price (£) |
|
Brass Rings |
Blacksmith (Lv. 3), Copper Ore (from Miner), Fresh Water (From Farmer) |
85 |
|
Golden Rings |
Blacksmith (Lv. 4), Gold Ore (from Miner) |
120 |
|
Lanterns |
Blacksmith (Lv. 2), Tailor (Lv. 1), Candles (crafted Material), Iron Ore (from Miner) |
159 |
|
Mining Tools |
Blacksmith (Lv. 1), Woodworker (Lv. 1), Iron Ore (from Miner), Maple Lumber (from Lumberer) |
119 |
|
Plows |
Blacksmith (Lv. 1), Woodworker (Lv. 1), Iron Ore (from Miner), Walnut Lumber (from Lumberer) |
102 |
|
Silver Rings |
Blacksmith (Lv. 3), Silver Ore (from Miner) |
102 |
|
Woodworking Tools |
Blacksmith (Lv. 1), Woodworker (Lv. 1), Hickory Lumber (from Lumberer), Iron Ore (from Miner) |
122 |
Miscellaneous
|
Recipe |
Ingredients |
Price (£) |
|
Bear Pendant |
Blacksmith (Lv. 4), Tailor (Lv. 3), Bear Claws (from hunting), Elk Pelt (from hunting), Gold Ore (from Miner) |
260 |
|
Bear Rugs |
Tailor (Lv. 3), Bear Pelt (from Huntress or hunting) |
190 |
|
Beaver Tooth Knife |
Woodworker (Lv. 1), Ash Lumber (from Lumberer), Beaver Teeth (from hunting) |
57 |
|
Blankets |
Tailor (Lv. 2), Linsey-woolsey (crafted Material) |
145 |
|
Bobcat Pendant |
Blacksmith (Lv. 3), Bobcat Claws (from hunting), Copper Ore (from Miner) |
90 |
|
Bricks |
Woodworker (Lv. 1), Clay (from Miner) |
48 |
|
Cougar Pendant |
Blacksmith (Lv. 3), Copper Ore (from Miner), Cougar Fangs (from hunting) |
90 |
|
Glass Windows |
Blacksmith (Lv. 1), Woodworker (Lv. 2), Pine Lumber (from Lumberer), Sand (from Miner) |
113 |
|
Hair Accessory |
Tailor (Lv. 1), Deer Tail (from hunting), Sewing Threads (crafted Material) |
103 |
|
Mounted Elk Antlers |
Woodworker (Lv. 2), Beeswax (from Farmer), Elk Antlers (from hunting), Spruce Lumber (from Lumberer) |
100 |
|
Playing Cards |
Innkeeper (Lv. 1), Dyes (crafted Material), Paper (crafted Material) |
180 |
|
Rabbit Foot Charm |
Blacksmith (Lv. 3), Rabbit’s Foot (from hunting), Silver Ore (from Miner) |
104 |
|
Toy Dolls |
Tailor (Lv. 2), Dyes (crafted Material), Wool (from Farmer) |
125 |
|
Water Drum |
Woodworker (Lv. 3), Ash Lumber (from Lumberer), Bear Grease (from hunting), Elk Pelt (from hunting) |
162 |
|
Wolf Pendant |
Blacksmith (Lv. 4), Tailor (Lv. 2), Elk Pelt (from hunting), Silver Ore (from Miner), Wolf Fangs (from hunting) |
210 |
War Supplies
|
Recipe |
Ingredients |
Price (£) |
|
Ammunition |
Blacksmith (Lv. 3), Black Powder (crafted Material), Iron Ore (from Miner) |
182 |
|
Artillery |
Blacksmith (Lv. 4), Woodworker (Lv. 3), Flints (crafted Material), Iron Ore (from Miner), Oak Lumber (from Lumberer) |
260 |
|
Firearms |
Blacksmith (Lv. 3), Flints (crafted Material), Iron Ore (from Miner), Weapon Handles (crafted Material) |
252 |
|
Horseshoes |
Blacksmith (Lv. 1), Iron Ore (from Miner), Nails (crafted Material) |
117 |
|
Officer Swords |
Blacksmith (Lv. 4), Silver Ore (from Miner), Weapon Blades (crafted Material), Weapon Handles (crafted Material) |
267 |
|
Saddles |
Tailor (Lv. 3), Beaver Pelt (from Huntress or hunting), Cow Hide (from Farmer) |
165 |
|
Ship Masts |
Woodworker (Lv. 1), Spruce Lumber (from Lumberer) |
56 |
|
Ship Sails |
Tailor (Lv. 2), Linsey-woolsey (crafted Material), Sewing Threads (crafted Material) |
205 |
|
Swords |
Blacksmith (Lv. 3), Weapon Blades (crafted Material), Weapon Handles (crafted Material) |
220 |
Woodworks
|
Recipe |
Ingredients |
Price (£) |
|
Buckets |
Woodworker (Lv. 1), Pine Lumber (from Lumberer) |
55 |
|
Crates |
Woodworker (Lv. 1), Walnut Lumber (from Lumberer) |
50 |
|
Fine Furniture |
Woodworker (Lv. 3), Hickory Lumber (from Lumberer), Pine Lumber (from Lumberer), Walnut Lumber (from Lumberer) |
125 |
|
Fishing Rods |
Woodworker (Lv. 1), Sewing Threads (crafted Material), Spruce Lumber (from Lumberer) |
116 |
|
Furniture |
Woodworker (Lv. 2), Pine Lumber (from Lumberer), Walnut Lumber (from Lumberer) |
80 |
|
Torches |
Blacksmith (Lv. 3), Woodworker (Lv. 1), Black Powder (crafted Material), Pine Lumber (from Lumberer) |
208 |
Optimal Crafting Strategy
The following table offers a selection of the most profitable trade items that you can craft in each Sequence. This takes into account the fact that most Homestead workers only gain levels as you progress through the Sequences, enabling you to craft more elaborate items gradually as you advance in the main storyline.
The profits are calculated with a mathematical formula that factors in the cost of the resources, the artisan fees, as well as the added value contributed by the labors of your artisans – all of which is computed to provide you with the best returns on investment.
To make the most of this table, cross-reference it with the “Merchant Multipliers” table in the section that follows: this will allow you to identify which merchants offer the best multipliers during each Sequence. Doing so will enable you to optimize your profit from the crafting and convoy systems.
Trade Items: Best Returns per Sequence
|
|
|
|
|
|
|
|
|
|
|
|
|
|
|
Crafting: Summary
If you are at all confused by the relative complexity of the crafting system, here is a concise summary that offers a recap of the most important points we have discussed so far:
- Crafting requires resources, raw ingredients that you can gather by hunting with Connor (for hunting resources only), or by purchasing them from your Harvesters at the Homestead. You will also obtain resources from other activities, but these do not guarantee a regular supply.
- Crafting requires recipes, which you can collect from chests and as rewards, or recreate by consulting our tables.
- Finally, crafting requires artisans, who will transform your resources into trade items. Each artisan advances in level as you complete their related side quests, which enables you to craft more elaborate items.
- Once you have all of the required ingredients, you can craft using the Accounting Book interface. The most lucrative goods to craft are trade items, which can be sold via convoys to make big profits. Crafting Special Items will offer you new weapons and capacity upgrades – and, to increase the profitability of trading, additional convoys and convoy upgrades. Finally, crafting is the only way to create inventions that are required to reach 100% Synchronization.
- Never sell crafted items from the Materials category: the returns are negligible, as they are meant to be crafted a second time as part of more complex recipes.
- Some trade items provide better returns on investment than others. Always try to craft the most lucrative items first (see the “Trade Items: Best Returns per Sequence” table), and stop crafting specific items when the gradual artisan cost increments become too expensive and reduce your potential profits.
 Convoys
Main Features
Convoys enable you to sell your resources and crafted items via land and, later, naval routes to accumulate vast profits thanks to the wondrous effect of “multipliers”.
To send a convoy, simply use the Trading entry of the Accounting Book. Every convoy features a default number of slots for cargo, which can each be filled with a single unit of an item (for example, Apples). You can craft additional convoys, as well as capacity upgrades for all convoys (both land and naval) to increase the amount of slots available. These upgrades belong to the Special Items crafting category. Try to unlock all convoys and capacity upgrades as soon as you can: more convoys and greater quantities of cargo per convoy will enable you to increase your returns on each trade trip.
What makes convoys quite ridiculously profitable is that they enable you to sell your wares at a price point enhanced by multipliers. For obvious reasons, it is much more rewarding to sell items of high value (in other words, trade items), rather than cheap raw materials such as basic resources. For example, a convoy filled with resources such as Walnut Lumber (£10 per unit) will net you very little, whereas a convoy filled with Crates (a crafted trade item made of Walnut Lumber) has a base value of £50. Six convoy slots filled with Walnut Lumber add up to a mere £60 (6x10), whereas six slots filled with Crates have a base value of £300 (6x50). Factor in a multiplier of 3 or 4, and you can see how huge the difference can be – hundreds, or even thousands of pounds per convoy.
However, it’s worth noting that certain animal pelts that you can acquire by hunting (or even purchase from the Huntress) actually offer miraculous returns when traded via convoys. Unlike trade items (which require you to pay for resources and artisan fees), spoils that you acquire through hunting are free of charge, thus enabling you to secure maximum profits. While all unspoiled animal skins offer a fine return, the Beaver Pelt and Bear Pelt are the most valuable goods to hunt. With a base value of £160 and £240 respectively, they are extremely lucrative items.
Merchant Multipliers
Merchant multipliers are determined by seasonal conditions that represent the law of supply and demand, and are only available when you trade with them via convoys. Essentially, every merchant will buy items from you with a multiplier that varies depending on your current Sequence. A “x3” multiplier means that the merchant will buy the goods for three times the standard shop price.
To make the best possible profits, therefore, your goal should always be to trade with merchants that offer the best multipliers in each Sequence. Of course, the more convoys and capacity upgrades you unlock through crafting, the greater your profits will be.
Note that most merchants apply lower multipliers to certain categories of items. For that reason, you should avoid selling them the types of goods referenced in the “Devaluated Item Categories” column.
Merchant Multipliers
|
Merchant |
Multiplier per Sequence |
Devaluated Item Categories |
||||||||
|
05 |
06 |
07 |
08 |
09 |
10 |
11 |
12 |
|||
|
Land Convoy |
Boston: Hancock’s Store No. 5 |
x3.8 |
x3.7 |
x3 |
x3 |
x3.5 |
x3 |
x2.8 |
x3.5 |
Alcohol, War Supplies, Metalwork |
|
Boston: Elizabeth Murray’s Fineries |
x3.4 |
x3.5 |
x3.2 |
x3.4 |
x3.2 |
x3.3 |
x3 |
x3.6 |
Woodwork, Alcohol, Clothing |
|
|
Boston: Child’s Still House & Dry Goods |
x4.5 |
x3.3 |
x3.8 |
x3.3 |
x2.8 |
x3.5 |
x3.5 |
x3.4 |
Medication, Food, Miscellaneous |
|
|
New York: Rhinelander’s Sugars |
- |
- |
- |
x3.8 |
x4 |
x4.7 |
x4.5 |
x5.2 |
Medication, Food |
|
|
New York : De Lancey’s Imports & Goods |
- |
- |
- |
x4 |
x4.2 |
x4 |
x4.6 |
x5 |
Woodwork, War Supplies, Metalwork |
|
|
New York : Van Brugh’s Spices |
- |
- |
- |
x2.7 |
x3.8 |
x3.2 |
x3.6 |
x4.8 |
Alcohol, Food |
|
|
Frontier : The Walking Haberdashery |
x3 |
x4 |
x3.6 |
x3 |
x3.5 |
x4.3 |
x3.8 |
x4.3 |
Food, Metalwork, Clothing |
|
|
Frontier : The Milliner’s Wares |
x3 |
x3.5 |
x3.5 |
x3.5 |
x3 |
x4.5 |
x3.4 |
x4.2 |
Medication, War Supplies, Metalwork |
|
|
Frontier : Murdoch’s Barter |
x3 |
x3.8 |
x3.2 |
x3 |
x3.5 |
x3.1 |
x3.3 |
x4.4 |
Woodwork, War Supplies, Alcohol, Miscellaneous |
|
|
Naval Convoy |
Louisbourg |
- |
- |
- |
- |
x5.2 |
x4.8 |
x4.6 |
x6.1 |
Medication, War Supplies, Metalwork |
|
The Bahamas |
- |
- |
- |
- |
x5.1 |
x4.7 |
x5.2 |
x6 |
Woodwork, Clothing, Alcohol, Food |
|
|
Saint-Augustine |
- |
- |
- |
- |
x4.8 |
x4.4 |
x4.8 |
x6.5 |
Clothing, War Supplies |
|
|
Virgin Islands |
- |
- |
- |
- |
x4.7 |
x5.2 |
x5.3 |
x6.3 |
Food, Alcohol, Miscellaneous |
|
Additional Factor #1: Travel Time
To fully determine the most efficient way to make profits with convoys, you need to take three additional factors into account. The first is the total travel time, which determines how long it takes for a convoy to reach its destination, which triggers your immediate payment and enables you to restock the convoy for another trip. The first merchant you choose to trade with determines the base travel time of your convoy.
Convoys: Base Travel Time
|
Merchant |
Base Travel Time (min.) |
|
|
Land Convoy |
Boston: Hancock’s Store no. 5 |
12 |
|
Boston: Elizabeth Murray’s Fineries |
12 |
|
|
Boston: Child’s Still House & Dry Goods |
12 |
|
|
New York: Rhinelander’s Sugars |
22 |
|
|
New York : De Lancey’s Imports & Goods |
22 |
|
|
New York : Van Brugh’s Spices |
22 |
|
|
Frontier : The Walking Haberdashery |
17 |
|
|
Frontier : The Milliner’s Wares |
17 |
|
|
Frontier : Murdoch’s Barter |
19 |
|
|
Naval Convoy |
Louisburg |
38 |
|
The Bahamas |
35 |
|
|
Saint-Augustine |
32 |
|
|
Virgin Islands |
42 |
If you sell all goods in your convoy to a single merchant, the total travel time of the convoy remains unchanged. However if you trade with additional merchants, the journey is extended as follows:
|
First Destination |
Additional Destination |
Travel Time Added (min.) |
|
Boston |
Boston |
+2 |
|
New York |
+12 |
|
|
Frontier |
+7 |
|
|
Frontier (Murdoch’s Barter) |
+9 |
|
|
New York |
Boston |
+2 |
|
New York |
+2 |
|
|
Frontier |
+2 |
|
|
Frontier |
Boston |
+2 |
|
New York |
+7 |
|
|
Frontier |
+2 |
|
|
Frontier (Murdoch’s Barter) |
+4 |
|
|
Frontier (Murdoch’s Barter) |
Boston |
+2 |
|
New York |
+5 |
|
|
Frontier |
+2 |
|
|
Louisburg |
The Bahamas |
+2 |
|
Saint-Augustine |
+2 |
|
|
Virgin Islands |
+6 |
|
|
The Bahamas |
Louisburg |
+5 |
|
Saint-Augustine |
+2 |
|
|
Virgin Islands |
+9 |
|
|
Saint-Augustine |
Louisburg |
+8 |
|
The Bahamas |
+5 |
|
|
Virgin Islands |
+12 |
|
|
Virgin Islands |
Louisburg |
+2 |
|
The Bahamas |
+2 |
|
|
Saint-Augustine |
+2 |
Travel time is an essential variable to factor in when you are choosing a merchant with a high multiplier. For example, if a merchant in Boston has a x3 multiplier, whereas another from New York has a x4 multiplier, it may actually make more sense to trade with the store in Boston. Within a comparable duration, you will be able to send two convoys to Boston (12 minutes, twice, for a total effective multiplier of x6) against only one to New York (22 minutes, with a x4 multiplier). However, this is only true if you actually have the opportunity to access an Accounting Book after 12 minutes, which may not be the case if you’re otherwise engaged in a mission.
The most profitable decision, then, should be determined by how close you will be to an Accounting Book for the foreseeable future. If you will be undertaking a major main story Memory, for example, a longer journey that offers a higher multiplier is the wiser choice.
Additional Factor #2: Risk
Every time you send a convoy there is a risk, expressed as a percentage, that the convoy might be attacked. The risk directly depends on how many merchants you intend to trade with for a single convoy: the more merchants you involve, the greater the risk.
- For land convoys, you can reduce the risk factor inherent to each merchant’s route by completing Liberation Missions. Each district that you free from Templar influence lowers the risk rate for all convoys sent to the local merchant.
- For naval convoys, the risk tends to be higher than for land convoys. However you can reduce the risk factor for each sea route by completing Privateer Contracts. Each of these missions directly lowers the risk percentage. If you finish all Privateer Contracts for a given route, this will enable you to reduce the risk significantly.
Additional Factor #3: Taxes
Taxes only affect land convoys. The process governing how taxes are applied is actually quite simple. Every possible land destination is found either in Boston, New York or the Frontier. All three regions are under the influence of Forts: two in Boston, two in New York and three in the Frontier. Forts are initially commanded by forces sympathetic to Templar interests, but you can liberate them to reduce the tax penalties.
Whenever you send a convoy through a region that has at least one Fort under Templar control, a 15% tax is levied on your convoy for each active Fort, up to a maximum tax rate of 30% for Boston and New York, and 45% for the Frontier.
Make it a priority to liberate all seven Forts at a fairly early stage in the story – ideally in Sequence 06 or 07 for Boston and the Frontier, and in Sequence 09 for New York. This will enable you to make more substantial profits with land convoys for the rest of the game.
 Defending Convoys
For every convoy that you send, there is a chance that it will be attacked, even if you have completed all Liberation Missions. You will be notified by an onscreen message when hostiles attempt a heist, and you must then decide how to save your wagons and stock within the specified time limit.
Attacks on your land convoys only occur in the Frontier. If you are not in that area, you can finish your current business (time limit permitting) and then Fast Travel there instantly; note that this has no effect on the countdown. On arrival, look for the  icon that marks the location of a convoy under siege. When you approach this destination, you will see your convoy’s escort in
conflict with the attacking forces ( 01). To save your investment, just kill all marked hostiles in the vicinity. You can then return to your business elsewhere, leaving the convoy to continue to its destination.
If you are busy, you can assign Assassin recruits to save the convoy via the Guild Menu. Hold  /
/ , then press
  /
/ to display the appropriate screen. You will see the Defend Convoy option in the bottom-right corner of the screen. Press
  /
/ to check the details of the mission, which works just like a normal contract, with the Success Rate dependent on the current prowess of the recruits you assign to it. If your recruits succeed in their mission, you have the added benefit of receiving additional rewards; if not, they will be unavailable for their period of convalescence, and you will lose the entire convoy.
Naval convoys can be lost at sea suddenly and without warning or further recourse. Despite this danger, they will still turn a handsome profit over a long enough timeline, but you should always save your most lucrative trades for land convoys.
Should you lose a land or naval convoy, you will need to gather resources and craft a replacement. While this isn’t a colossal expense, the value of the goods lost can be quite significant. If you decide to leave the game idling while land convoys are in transit, we would advise that you take the time to periodically check the Logbook on the map screen to ensure that your assets are not under attack. If they are, a new entry will reveal how long you have left to save them.
Convoys: Summary
- Sending a convoy is performed via the Accounting Book interface, which can be accessed at the Manor or inside any General Store.
- To maximize your profits, make sure you unlock as many convoys and capacity upgrades as possible: the more total slots available, the greater your profits will be.
- Only ever sell trade items or expensive hunting resources (all pristine pelts are profitable, but Bear Pelts and Beaver Pelts especially so). Selling materials or raw resources is a waste, occupying slots that could be put to much better use. Ideally, choose the most profitable goods, and use them to fill a whole convoy.
- Select the merchants that you trade with based on their multipliers, which vary depending on your current Sequence. Try to avoid selling items from a category that a merchant consignee devaluates.
- To limit the risk factor, try to trade with as few merchants at the same time as possible – and ideally only one per convoy. For naval convoys, complete all Privateer Contracts on a route you intend to take to lower the risks. For land convoys, you can achieve the same result by completing Liberation Missions.
- To eliminate taxes applied to land convoys, liberate the game’s seven Forts.
- Finally, if a land convoy is under attack, defend it within the allotted time or send Assassin recruits via the Guild Menu.