Prima Games eGuides
primagames.com Browse Redeem a code Help
The Legend of Zelda: A Link Between Worlds eGuide
Sign in My Guides

Sign in or create an account

We'll email you a link. No password needed, and if you don't have an account yet, the link makes one.

By creating an account or signing in, you agree to our Terms of Service and Privacy Policy.

Have a password?

Had an account on the old eGuides site, or a code from a printed guide? Help and troubleshooting

Sign in with a password

By signing in, you agree to our Terms of Service and Privacy Policy.

Check your email

A sign-in link is on its way. It works once and expires in 15 minutes. Open it and you're in, with an account if you didn't already have one.

Contents

  • How to Play
    • Save Data Management
    • Understanding the Game Screens
    • Subscreens
    • Overworld Maps
    • Playing the Hero
    • Environment
  • Gear and Items
    • Consumable Items
    • Collectible Items
    • Dungeon Collectibles
    • One-of-a-Kind Items
    • Equipment and Gear
    • Quest Items
    • Weapons and Their Upgrades
    • Swords and Upgrades
  • Friends and Fiends
    • Enemies
    • Citizens of Hyrule and Lorule
    • Mini-Game Characters
    • Bosses
  • Walkthrough
    • Link's Awakening
      • Link's House
      • Hyrule Field
      • Blacksmith's Forge
      • Hyrule Castle
      • Sanctuary
      • Graveyard
      • Secret Passage to the Sanctuary
      • Sanctuary
    • Seeking Sahasrahla
      • Rude Awakening
      • Hyrule Castle
      • Kakariko Village
      • Hyrule Field Explorations
    • The Eastern Palace
      • Eastern Palace
    • Great Explorations, Part I
      • Hyrule Field
      • Meet Mother Maiamai
      • Kakariko's Secrets
      • Head for the Desert
    • House of Gales
      • House of Gales
    • Tower of Hera
      • Tower of Hera
    • The Master Sword
      • Hyrule Field
      • Lost Woods
      • Buy Something, Will Ya?
      • Hyrule Field
      • Hyrule Castle
    • Great Explorations, Part II (in progress)
      • Lorule Blacksmith
      • Lorule Field
      • What A Dump!
      • Lorule Field
      • The Skull Woods
      • Lorule Lake Region (Lorule)
      • Graveyard Region (Lorule)
      • Dark Ruins Region (Lorule)
      • Death Mountain (Lorule)
    • The Thieves' Hideout
      • The Thieves' Hideout
      • Thieves' Town
      • Sand Rod Action
    • The Desert Palace
      • Desert Palace
      • Titan's Mitt Tour
    • The Skull Woods
      • Skull Woods
    • The Dark Palace
      • Dark Palace
    • The Swamp Palace
      • Swamp Palace
    • Turtle Rock
      • Turtle Rock
    • The Ice Ruins
      • Ice Ruins
    • The Final Battle
      • Lorule Castle
  • Tour of Hyrule
    • Introduction
    • Lost Woods Region
    • Death Mountain Region
    • Sanctuary & Zoras Domain Region
    • Kakariko Village Region
    • Hyrule Castle Region
    • Eastern Ruins Region
    • Desert Region
    • Southern Ruins Region
    • Lake Hylia Region
  • Tour of Lorule
    • Introduction
    • Skull Woods Region
    • Death Mountain Region (Lorule)
    • Graveyard Region
    • Thieves Town & Lorule Castle Region
    • Dark Ruins Region
    • Misery Mire Region
    • Lorule Lake Region
  • Legendary Checklist
    • Items and Gear
    • Hyrule Chests
    • Lorule Chests
    • Pieces of Heart
    • Lost Maiamais

The Legend of Zelda: A Link Between Worlds Guide › Tour of Hyrule

Sanctuary & Zoras Domain Region

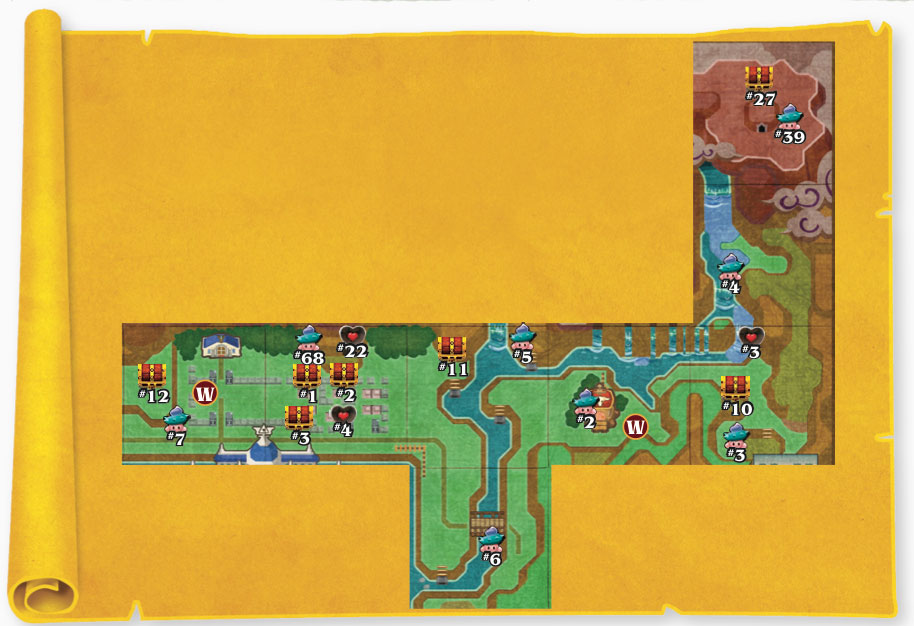
This region of Hyrule lies just north of Hyrule Castle. Here you’ll find the Sanctuary, where the good people of Hyrule go to worship, along with the Graveyard, which lies right near the Sanctuary. (Rumor has it there’s a secret passage in the Graveyard that leads into the Sanctuary.) Cross the wooden bridge to the east of the Graveyard and then go north along the river, and you’ll arrive at the Witch’s House. Here you may purchase powerful potions in exchange for the various monster parts you discover while slaying enemies. After you clear the Eastern Palace, Link gains the ability to merge and cross the river to the east of the Witch’s House—this lets him make his way to Zora’s Domain, where the Zora Queen, Oren, lives.

Special Items (Sanctuary & Zora’s Domain Region)

ItemNotes
Blue Potion Refills all of Link’s hearts! The Witch will brew some up for you in exchange for 10 monster tails and 200 Rupees.
Forgotten Sword A sharp sword that the Captain forgot.
Lamp In a chest in the secret passage that leads from the Graveyard to the Sanctuary. Useful for lighting braziers and Link’s surroundings. Can also be used as a short-range weapon.
Purple Potion Unleashes a powerful attack against nearby foes. Find 10 monster guts and 60 Rupees, and the Witch will brew this potion for you.
Red Potion Restores eight hearts. Once you have a bottle, the Witch can brew this healthy potion for you for 50 Rupees.
Yellow Potion Makes Link invincible for a short time. The Witch will brew some up for you in exchange for 10 monster horns and 100 Rupees.
Zora’s Flippers Given by Oren, the Zora Queen, after Link buys the smooth gem in Kakariko Village and brings it to Oren.

Chests (Sanctuary & Zora’s Domain Region)

Chest (Contents)Notes
Hyrule Chest #1 (Lamp) In the secret passage that leads from the Graveyard to the Sanctuary.
Hyrule Chest #2 (Red Rupee) In the secret passage that leads from the Graveyard to the Sanctuary.
Hyrule Chest #3 (Small Key) In the secret passage that leads from the Graveyard to the Sanctuary.
Hyrule Chest #10 (Red Rupee) On a high ledge near a pit on the way to Zora’s Domain (merge around to reach it).
Hyrule Chest #11 (Silver Rupee) Inside the Treasure Hunter cave near the river to the northeast of Hyrule Castle (you must bomb open the cave).
Hyrule Chest #12 (Silver Rupee) Surrounded by wooden pegs on the high ledge to the west of the Sanctuary grounds (the hammer is required).

Pieces of Heart (Sanctuary & Zora’s Domain Region)

Piece of HeartNotes
Piece of Heart #3 In a secret cave behind the second waterfall south of Zora Lake (Zora Flippers are required to reach it).
Piece of Heart #4 In the Graveyard’s secret passage to the Sanctuary, on a high ledge (merge around to reach it).
Piece of Heart #22 Kept in the high cave north of the Graveyard. You must bomb open a fissure in Lorule and travel through the fissure to reach the cave.

Lost Maiamais (Sanctuary & Zora’s Domain Region)

MaiamaiNotes
Lost Maiamai #2 Stuck to the wall inside the Witch’s House.
Lost Maiamai #3 Stuck to the high wall above the pit on the way to Zora’s Domain (merge around to reach it).
Lost Maiamai #4 Underwater in Zora Lake (just outside the Zora Queen’s cave).
Lost Maiamai #5 Stuck to the wall above a ladder along the Zora River (Zora’s Flippers are required to reach it).
Lost Maiamai #6 Underwater near the wooden bridge along Zora River.
Lost Maiamai #7 Stuck to the wall just southwest of the Sanctuary.
Lost Maiamai #68 High on the cliff north of the Graveyard. You must bomb open a fissure in Lorule and travel through the fissure to reach it.

Keep reading with a free account

The first 3 sections of The Legend of Zelda: A Link Between Worlds are open to everyone. An account opens the rest of it, and every other guide in the archive. It's free, and there's nothing to buy.

Bought guides on the old Prima Games site? Your account and every guide you own moved here, so there's nothing to buy again. Sign in.

Create a free account Or browse our free guides

PreviousDeath Mountain Region NextKakariko Village Region