
Dragon Age: Origins Guide Essentials Companions
Understanding Companions
Companions
In Ferelden, you can only trust a few adventurers with your life, and even with the ones who volunteer to stand with you against the Blight cannot all be trusted. Companions are your allies in battle, the NPCs who team with your PC and who you control on your quests.
Choose companions based on your PC’s needs. If you play a mage, you will definitely need a warrior like Alistair, possibly a rogue like Leliana, and maybe another warrior like Sten or another mage like Wynne for healing if you concentrate on DPS.
You run into only a handful of companions on your travels, as they are scattered from Ostagar to Orzammar. Know them well, for they are as vital as your own flesh and blood.
Grey Warden Companions
|
Companion |
Location |
|
|---|---|---|
|
Warrior |
||
|
Dog (Mabari) |
War Dog |
|
|
Rogue |
||
|
Warrior |
Landsmeet |
|
|
Mage |
||
|
Warrior |
||
|
Warrior |
Downloadable Content |
|
|
Warrior |
||
|
Mage |
Circle Tower |
|
|
Zevran Arainai |
Rogue |
Random Encounter |
Understanding Companions

Companions aren't simple NPCs who point you toward the next quest; they think, have opinions, fall in and out of favor with your decisions, and level along with you. Without companions, you would be a one-person party.
To grasp the intricacies of companion interaction, read through the following pages and familiarize yourself with what works and what doesn't work for your current party make-up.
After companion basics, each companion receives a dedicated section with everything you need to know about your favorite ally.
The Supporting Cast chapter details other famous characters of the land; consider it a list of the important NPCs and relevant game info to aid you on your quests.
Approval Ratings
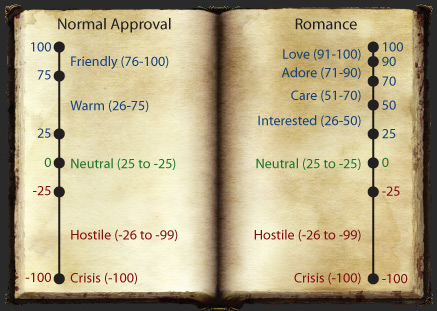
Your approval ranges from -100 to 100, with all companions beginning at zero when you first meet them.
The higher the approval rating, the more the companion enjoys your company and will be willing to follow your lead. A low approval rating equals a disgruntled companion, and one who might walk out on the group at any moment.
In most cases, the approval rating caps at 74 unless you are either "friendly" or in a romance with a companion.
You can warm up to companions by talking with them every chance you get and exploring all their dialogue options; you get a friendly rating with a companion by doing each NPC's personal quest.
Approval Chart
Your approval rating with companions ranges from -100 to 100. However, you can only get to max positive approval if you are either "friendly" or having a romance with the companion. You can get "friendly" if you do each companion's personal quest.
Gifts
You can give some specific items from your inventory to companions to increase approval.
All gifts can be given to all companions, but each companion prefers a specific type of gift that gives a higher approval rating if you match companion and gift appropriately.
Dialogue can also be initiated based on gifts being given, and is a component of the romance dialogues with some of the party members. See the Items chapter for the complete listing of all gifts and matching companions.
Companion Gifts
Whenever you hand a gift to a companion (drag it from the inventory to the appropriate companion picture on the left), the item disappears from party inventory permanently.
An item thus given provides a bonus to that character's approval rating (from +1 to +10) based on the following rules:
- Base approval bonus: +5
- If companion likes the gift: +5
- For every gift given before: -1
- If the companion's approval is negative at the moment of gifting: half the value of the bonus.
- Minimum approval bonus: +1
Only certain items labeled as "gift" can be given for approval rating boosts. Giving the wrong gift to the wrong companion will raise the companion's approval by only half of what it would.
Certain gifts that are "plot" are given back to the player if they are given to the wrong character.
When you donate gifts to companions, listen for the audio clue and watch for the rising heart that displays the approval bump number. Because there are limited gifts in the game, don't just give them away randomly; it's always better to hear a "Wow!" than a "Thanks, I guess."

Companion Quests
Most companions have a personal quest that you can help them undertake. Some are more involved than others.
For example, you have to slay a dragon in Morrigan's personal quest, but only knock on a door with Alistair for his.
Complete all your companions' quest if you can, because this will solidify your friendship with them. See the individual companion sections for how to unlock each one.
Romance
You can romance four of the companions in the game: Alistair (female PC only), Leliana (male or female PC), Morrigan (male PC), and Zevran (male or female PC).
Some companions are easier than others to heat things up with. Alistair and Zevran, for example, are more likely than the women to be interested in what you have to say if you're of the preferred gender.
If you can advance the romance far enough, sleeping with them is possible, though only once and it will happen at party camp. See the individual companion sections for tips on how to seduce a partner.
Plot Abilities
Companions can be inspired by your leadership. If you increase a companion's approval rating high enough, they will gain one of several bonuses to their primary attribute.
For example, a warm Wynne will gain "Inspired: Minor Willpower" and a warm Alistair will gain "Inspired: Minor Constitution."
There are four levels for the plot abilities—minor, moderate, major, and massive—and each upgrades the bonus the companion gets to an attribute, so keep pumping up the approval rating of the companions you prefer to travel with, and they'll become better party members. Plot abilities can degrade, though, if you lose sufficient approval with a companion.
Crisis Moments
When talking to the companions, or if you make decisions in the game that are contrary to a companion's goals, the companion will definitely not approve. If they disapprove, you lose approval rating and they will certainly have words with you.
When you are in a romance, the companion may break up with you. If you aren't in a romance, or if it continues after the romance is over, they will reach a "crisis" point where they say they have to leave.
You still have a chance to talk them out of it, and if you're successful, they will stay. But if they reach crisis for a second time it's over. The companion will leave for good. See the individual companion sections for the crisis moments and how to avoid them.