
Dragon Age: Origins Guide Essentials Companions
Morrigan
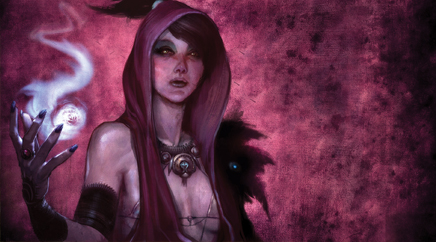
Her mother claims to be Flemeth. If that's true, then Morrigan might well be a very powerful witch, for the tales of the daughters of Flemeth tell of twisted, monstrous women who can kill a man with fear.
She was made to accompany the surviving Grey Wardens; the payment, Flemeth said, for saving their lives at the Tower of Ishal. Morrigan is the offensive-minded companion mage.
Morrigan at a Glance
Starting Attributes
- Strength: 14
- Willpower: 21
- Cunning: 12
- Dexterity: 15
- Magic: 26
- Constitution: 12
- Class : Mage
Recommended Build: DPS Mage
Increase Morrigan's spells in Primal and her shapeshifter specialization to deal more damage in combat.
Starting Talents
- Shapeshifter: Spider Shape
- Primal: Winter's Grasp
- Spirit: Mind Blast
- Entropy: Vulnerability Hex, Disorient, Horror, Drain Life, Death Magic
Location
Unlock Condition
When you seek out the Ancient Treaties in the Korcari Wilds, Morrigan will find you. After the battle at the Tower of Ishal, Morrigan will join your party.
Combat Advice
Morrigan's early spells open up possibility for future combat dominance. Start out with the Cold chain and get to Cone of Cold and Blizzard as soon as you can.
After Mind Blast, increase your defense tenfold with Force Field, then inch up to gain Crushing Prison for a powerful single-target root/damage spell.
Build on her Entropy spells also and pick up Sleep, Waking Nightmare, and Death Cloud. Don't forget, you can get Bear Shape at level 8, Flying Swarm at level 10, and Master Shapeshifter at level 12.
Most mages must stay in the rear to be effective. Not necessarily with Morrigan. Use her ranged spells early, until your mana is low or the enemy engages in melee, then switch to one of your specialization forms and deal effective melee damage.
Your spells are more powerful, but it's a nice luxury to be able to adapt to the ever-changing combat dynamics.
Dialogue Choices
As with any companion, Morrigan has dialogue choices whenever you interact with her, and sometimes she will initiate a topic.
However, at important points in the game, you should know about plot-specific and camp-specific dialogue that could change the game for your companion.
Listen to all her tales to know more about her (and to increase your approval rating), but be careful, Morrigan is quick to disapprove if you don't agree with her cynical and judgmental views.
Personal Quest
To embark on Morrigan's personal quest, you must do the following, in order:
- Retrieve the Black Grimoire from Irving's room in the "Broken Circle" quest. Give the book to Morrigan.
- Become warm with Morrigan.
- Finish "Broken Circle" quest line.
- Go back to camp and she'll disclose how she's learned about her past, and how you have to kill Flemeth. Accept.
- Leave Morrigan at camp and do not include her in the party. Return to Flemeth's Hut.
- Talk to Flemeth. Tell her you are here to kill her.
- She'll transform in a dragon. Kill her. (Have fun!)
Flemeth will have a key on her. Grab the key and open the door to her hut. Open the chest in her hut and grab the grimoire and Morrigan's best magical robes there. The robes are significantly better version of what she starts the game in.
- Go back to the camp and talk to Morrigan. Give her the grimoire.
- She'll have a long talk with you. Now you are friendly with Morrigan.
Crisis Moment
Morrigan doesn't have any one big event, but she can get cross often with you in dialogue. Be careful to say what she wants to hear or you'll lose approval quickly.
Romance
Morrigan only likes men. Don't even try to court her if you're female. Begin by asking her questions about her upbringing and her powers.
To make her friendly when she's ready, talk to her in camp and she'll say, "Tis a curious thing. I do not know how to describe it." She'll only say this line once, so make sure to say the right things. Choose:
- "What? Is something wrong?"
- "Why would I do that?"
- "Because I need you here."
- "I was hoping to be more than friends."
To take it further and get romance started, start a conversation in camp after getting the Circle Tower grimoire and she will say, "I have a thought." Respond with:
- "Oh? What's on your mind?"
- "And? What's in it for me?"
- "My tent does get rather cold..."
After killing Flemeth and returning to Morrigan, she'll talk to you after you give her Flemeth's Grimoire. During the conversation say:
- "Flemeth is dead, you are free."
- "Yes, but I intend to keep it for myself."
- "What? That's it? Just a thank you?"
- "What was that last bit again?"
To get Morrigan to invite you back to her tent, you have to be at care approval rating (50+ approval and romance active). Morrigan will not sleep with you if she's in love with you (90+ approval). She's into flings, and it only happens once.
Gifts
Morrigan's critical eye is not reserved solely for others. Knowing or not, she has a simple fondness for jewelry and is very particular about her appearance.
|
Gift |
Found In |
Location |
|---|---|---|
|
Black Grimoire |
Irving's Quarters |
Circle Tower |
|
Flemeth's Grimoire |
Chest |
Flemeth's Hut |
|
Gold Amulet |
Garin |
|
|
Golden Demon Pendant |
Corpse |
Urn of Sacred Ashes Room |
|
Golden Mirror |
Garin |
|
|
Golden Rope Necklace |
Barlin |
|
|
Locket |
Locked Chest |
Village Store in Haven |
|
Silver Brooch |
Varathorn |
Dalish Camp |
|
Silver Chain |
Vanity |
Senior Mage Quarters in Circle Tower |
|
Silver Medallion |
Dragon Hoard |
Upper Level of Elven Ruins |
|
Tribal Necklace |
Barrel |
Top Floor of Tower of Ishal |
Highlights
- Morrigan may teach the shapeshifter specialization if she warms up to you.
- Listen to her banter with Alistair on party walks. It's quite amusing.
- Morrigan's mother, Flemeth, and Morrigan play a crucial part in the beginning and end of your journey. Don't cause her to leave too early.
- A loner, Morrigan stands away from the others in the corner of camp. Seek her out by her own little camp area if you want to chat.