
Gears of War 2 Guide Cog Armory
Heavy Weapons
Heavy weapons are a new and special weapon class in Gears of War 2. While you carry a heavy weapon, you move more slowly, and you cannot use your other weaponry; equipping another weapon causes you to drop the heavy weapon.
The tradeoff is that heavy weapons are very powerful. They tend to be sharply limited in supply. You often have to wrest them from the cold, dead hands of downed Locust who previously used them against you. When you get them, use them for all they’re worth.
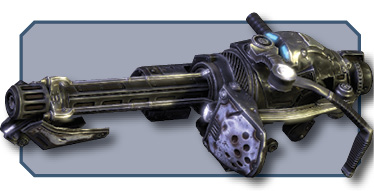
Mulcher
Weapon Statistics
| Clip Size | n/a |
|---|---|
| Max Ammo | 500 |
| Rate of Fire | 1000/m |
| Reload Time | n/a |
Damage Statistics (Player),Short/Medium/Long
|
Casual Damage |
Casual Melee |
|
100/100/60 |
120 |
|
Normal Damage |
Normal Melee |
|
70/70/42 |
84 |
|
Hardcore/Insane Damage |
Hardcore/Insane Melee |
|
50/50/30 |
60 |
Damage Statistics (AI)
|
Casual Damage |
Casual Melee |
|
40/40/24 |
48 |
|
Perfect Active Reload Bonus |
Special Weapon Notes |
|
n/a |
None. |
Description: The Mulcher is a devastatingly powerful chaingun. You usually find it in the hands of the Grinder or very rarely on the ground. You don’t often get a chance to use it, but when you do, it shreds Locust easily.
The Mulcher has to be planted to spin up, preferably on cover, though you can also plant it in the open. You can fire it while you’re moving, but it is almost absurdly inaccurate.
The Mulcher does not reload. Instead, you cool it down by holding the reload button, similar to turrets and Troika in the game.
Whenever you have the chance to grab the Mulcher, bring it along. There few enemies or situations that it can’t handle in the campaign.
Close Range: The Mulcher isn’t great at close range, but it depends on the situation. If you’re at close range with your enemies lined up in front of you or out in the open, they’re as good as dead.
If the action is up close and you’re getting swarmed on all sides or attacked by highly mobile enemies, the speed reduction can be problematic. Don’t hesitate to drop the Mulcher for a moment to clear the area if necessary; you can always pick it up again afterward.
Medium Range: Fantastic at medium range, the Mulcher can devastate any Locust presence out in the open. It’s ideal for stopping a rush on your position by any number of Locust troopers. It’s also great against heavier Locust forces at this distance.
Long Range: The Mulcher isn’t ideal at long range. While its field of fire is impressive, the natural spread of the shots renders it less dangerous over great distance. Drop it and use a better long-range tool. Then carry it along to the next batch of enemies at a more suitable distance.
Cover: The Mulcher isn’t well suited for dealing with enemies behind hard cover. You can make an impressive show of chipping away at the rock around them, but it won’t penetrate. You may be better off using grenades or picking off dug-in foes with other weaponry.
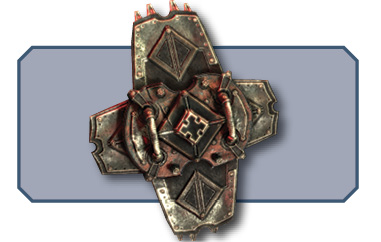
Boomshield
Weapon Statistics
|
Special Weapon Notes |
|
Blocks all damage from the front. Blocks less damage as shots approach the user’s side. |
Description: Not exactly a weapon, the Boomshield is a superb defensive tool. While you hold the Boomshield, you can use only pistol-class weaponry. In return, the Boomshield makes you nearly invulnerable to frontal fire from the Locust.
You can plant the Boomshield in the ground as a piece of stationary cover, allowing you to use your other weaponry. You can also use it to perform a brutal melee execution…
Unlike a meat shield, which gradually deteriorates in a messy fashion, the Boomshield soaks up even heavy firepower without breaking.
Note that you have to ‘deploy’ the Boomshield by aiming to make it active. Doing so slows your rate of movement further. However, unlike a meat shield, you can Roadie Run (albeit at a slower pace) as you carry the Boomshield, so you aren’t quite as speed-limited.
The Boomshield is very powerful. Any time you find it in the campaign, pick it up and take it with you for as long as you can. Whenever you need more firepower, you can simply plant it. The rest of the time, you can easily sponge up Locust fire from the front.
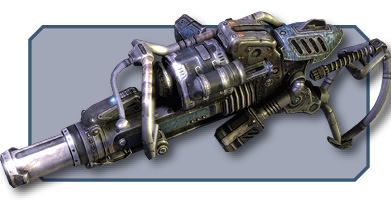
Mortar
Weapon Statistics
| Clip Size | 1 |
|---|---|
| Max Ammo | 100 |
| Rate of Fire | 60/m |
| Reload Time | 3.5 |
Damage Statistics (Player),Short/Medium/Long
|
Casual Damage |
Casual Melee |
|
1600/1600/960 |
n/a |
|
(direct) 2000/2000/1200 |
|
|
Normal Damage |
Normal Melee |
|
1120/1120/672 |
n/a |
|
(direct) 1400/1400/840 |
|
|
Hardcore/Insane Damage |
Hardcore/Insane Melee |
|
800/800/480 |
n/a |
|
(direct) 1000/1000/600 |
Damage Statistics (AI)
|
Casual Damage |
Casual Melee |
|
800/800/480 |
n/a |
|
Perfect Active Reload Bonus |
Special Weapon Notes |
|
18%-22% more damage, 23%-28% larger blast radius. |
Mortar shell splits into 10 bomblets, all dealing full damage. Mortar blasts cause nearby Locust to cower. |
Description: The powerful Mortar is a standoff weapon, perfect for dealing with clustered Locust forces at a distance. However, it is bad for dealing with quick foes or enemies up close. Its explosive power makes up for this shortcoming when you face Locust groups in many parts of the campaign.
The Mortar must be planted and aimed carefully. While it’s planted, you can hold the fire button to increase the distance of the shot. After you fire, you’ll see a hash mark on the rangefinder marking the last shot’s distance. This helps you fix your range when you need to fire multiple shots at the same area.
The Mortar’s arcing trajectory sends the projectile into the air. It then detonates, raining havoc down on your foes. Using the Mortar requires lots of open space, and you’re exposed for a fair amount of time while you aim. Don’t go using it when you’re under heavy fire up close!
You can fire the Mortar from the hip. Doing so launches the bombshell straight ahead (Mortar bowling…), but this is a desperation move at best.
The Mortar’s explosions can seal Locust Emergence Holes.
Close Range: The Mortar is exceptionally poor at close range. You can fire it from the hip up close and hope to blast your opponents quickly. In general, you’re better off dropping this weapon for a moment and then picking it up when the area is clear.
Medium Range: This weapon’s effectiveness varies at medium range. Sometimes it’s great, and sometimes it’s just okay. Evaluate the situation; if there are lots of enemies clustered at medium range and you’ve got good cover, go for it. You can usually take out many enemies with just a few shots.
However, if you face highly mobile foes—say, Wretches or Bloodmounts—you may not have the time to line up a shot safely. The same is true if you’re under heavy fire by Drones; exposing yourself to sight the shot may be too risky.
Long Range: The Mortar is generally quite good at long range. The only difficult part is finding the correct distance. But since you usually have more time, you can afford to take a test shot and then home in on your targets and obliterate them.
Cover: The Mortar is great for dealing with cover. The shots burst in the air and rain down fury from above. There are few situations in which Locust can take cover from well-placed Mortar shells.