
LEGO Jurassic World Guide Console Walkthrough: Movie 4
Level 20: Showdown
When the team enters the Innovation Center, they find it eerily deserted at first. Then they run into Hoskins and learn something about his insane experiments. Get ready for the final level of LEGO Jurassic World!


| True Survivor Stud Requirement |
|---|
| 75,000 studs |
Innovation Center
The relentless raptor crew refuses to give up the chase. After giving Hoskins a taste of his own medicine, the pack starts hunting Owen, Claire, and the boys again. But this time you’re on Claire’s turf!


| Icon | Story Characters | Abilities |
|---|---|---|
 |
Gray Mitchell | Bone-Build, Small Access, Photography |
 |
Zach Mitchell | Repair, Illumination (Torch) |
 |
Owen Grady | Climb, Rope/Vine Cutter, Droppings Rummage, Dino Heal, Camouflage |
 |
Claire Dearing | Jurassic World Access, Scanner, Agile |
Get to the Upper Exhibit Hall
Tag to Claire and move to the right along the back wall to find the sparkling area that marks a WiFi spot. Use Claire’s scanner there to reveal a climbing wall. Tag to Owen and climb to the top; then leap to the yellow bar. Shimmy to the left along the bar until the pipe breaks open. The blast of steam unearths the bones in the fossil sandpit.

MINIKIT: JW Access Panel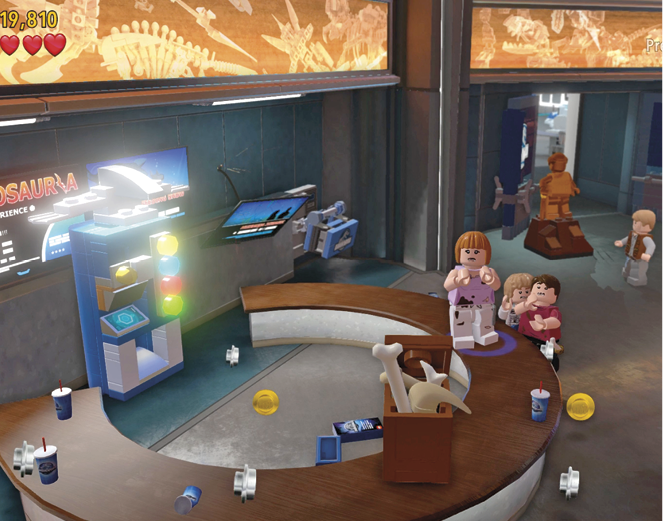 From the start, send Claire leftward to use the Jurassic World access panel. Build-it pieces pop out behind the nearby desk. Assemble them into a Minikit! |

Tag to Gray and assemble the fossils into a bone ladder. Tag to Claire, climb the ladder, and head left to the park access panel next to the huge double helix sculpture. Use Claire’s access and enter the three-button code to slide open the security cabinet. Tag to Owen and cut the cable winch to drop the DNA sculpture, shattering it into multicolor pieces.

Assemble the pieces into a big hammer contraption with a push switch. Push the green side of the switch until the device activates, smashing an exhibit to reveal a small-access vent. Send Gray into the vent. He emerges on the other side of the display cabinet that blocks the team’s exit.

Smash the display of the huge T. rex skeleton head and use the yellow/black tiles to complete the slide track. Then tag over to any other character and push the display case along the track all the way to the blue floor patch. Now everybody can come through the gap.

Another raptor, Charlie, lurks just across the room. Send Zach sneaking into the dark alcove on the back wall. Hit the button prompts to fight off the raptor that attacks, and then use the pump-switch to power the nearby Jimmy Fallon hologram. When Charlie heads over to investigate, hustle down the spiral staircase.

Suddenly, another raptor, Echo, bursts into the hall. Tag to Owen, activate his Camouflage ability, and sneak past Echo to the roped-off exhibit. Uncloak and smash the exhibit; then assemble the pieces into a catapult. Turn the red wheel crank to load and fire the catapult, distracting the raptor.

Tag to Zach and use his wrench to fix the smoking control panel to the left. This activates a big hologram that attracts the attention of the full raptor crew! It also triggers the mission-ending cutscene: Owen, Claire, Zach, and Gray all rush outside. Unfortunately, so do the raptors. But as the Indominus Rex shows up to the party, the situation takes a surprising turn.
Boardwalk Showdown
You have new allies for the final showdown with the Indominus Rex. But you’ll have to do some prep work before you’re ready for a frontal assault on the powerful hybrid monster.

| Icon | Story Characters | Abilities |
|---|---|---|
 |
Gray Mitchell | Bone-Build, Small Access, Photography |
 |
Zach Mitchell | Repair, Illumination (Torch) |
 |
Owen Grady | Climb, Rope/Vine Cutter, Droppings Rummage, Dino Heal, Camouflage |
 |
Claire Dearing | Jurassic World Access, Scanner, Agile |
 |
Raptor 1 | Pounce, Scent Tracking |
 |
Raptor 2 | Pounce, Scent Tracking |
Build a Big Gun

You have a raptor in your party now. Isn’t that nice? Go to the right and smash the bench next to the unfinished dino switch on the wall. Use the pieces to complete the switch; then tag to your raptor and pull the dino switch to open the door. Tag to Zach, enter the dark room, and turn on the lights using the switch. Tag to Gray and crawl into the small-access hatch in the room.

Upstairs, go left and jump to the pole top. Hop across to the photo spot atop the big, glowing amber block. Use Gray’s photo ability to snap a shot of the Indominus Rex. The flash annoys it, and its angry roar shatters the amber underneath Gray. Jump down and assemble the shattered pieces into some kind of unfinished mechanism. It needs more pieces.
Tag to the raptor and sniff the misty yellow scent-spot just behind the device. Follow the scent trail until you find the blue/white pieces of a boost pad. Assemble them, tag to an adult, and use the pad to get in boost position. Tag to Gray and get boosted onto the other glowing amber block. Take another photo of the Indominus who shatters the block for you. Now use the broken pieces to finish building the mechanism…which turns out to be some sort of cannon. What does it fire? Let’s find out.

Win the First Round
While you’ve been running around building cannons, your other raptors have kept the Indominus Rex at bay. But they need your help now. Tag to any human character and hop into the cannon’s gunner chair.
MINIKIT: Shoot the Flyers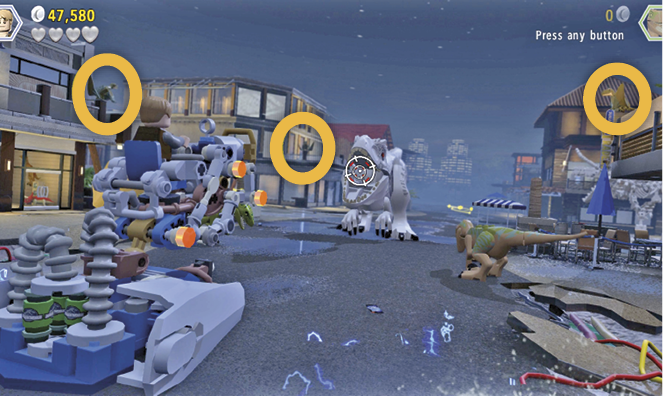 Target the three Dimorphodons sitting on high perches (all circled in our shot). Nail all three to earn a Minikit. |
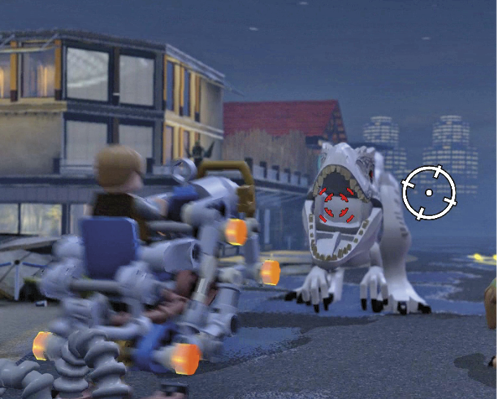
Here’s how the fight works. First step: When the Indominus roars directly at the cannon, a red target marker appears in its mouth. Use the left stick to move your aiming reticle over that red marker and then press Attack to fire. The cannon shoots a stuffed dinosaur into the monster’s mouth. (That’s right: a stuffed dinosaur.) The fluffy toy causes the Indominus to start gagging.
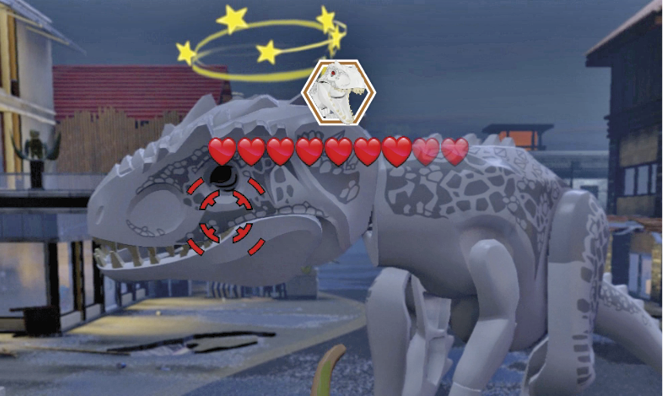
Second step: Quickly tag to one of the two raptors and use your Attack button to assault the big white dinosaur until you stun it. The Rex turns its head sideways and another red target appears; this one on the side of its face. Stars spin around its head too.
Third step: Now either raptor can use its Pounce attack on that face target! Just hold down the Use button to bring up the aiming reticle, move it over the Rex’s face, and press Attack to unleash the pounce.

The Indominus takes damage but recovers and spits out the stuffed animal after a few seconds. It then launches some nasty-looking stomp attacks that send shock waves across the ground. But your cannon is out of its range, so just weather the response and wait for the creature to open its mouth (and the red target) again. Repeat the previous sequence. If you get in the attacks described above, this round ends after only a few turns.
When the round ends, watch the cutscene: Claire has ordered the opening of Paddock 9. She helps guide the occupant by tossing a flare in the desired direction. Guess who wants to join the scrum?

Win the Second Round
You’ve weakened the big beast, but it still has plenty of fight left. Your raptors need more help, but you have time to find a pair of easy-to-get Minikits stashed nearby. (See our next Minikit sections.) Then tag to the raptor in your party and use the scent spot at the recycling bin on the street’s left side.
Follow the scent trail until the raptor unearths some build-it pieces in front of the dumpster. Use them to assemble a raptor rail beneath the digital Mosasaurus display above. Use the raptor’s Pounce to reach the rail and rip down the display. Then assemble the pieces into a ladder.
MINIKIT: Droppings RummageSend Owen Grady to rummage in the big steamy droppings pile on the right side of the street, just left of the gate. Owen tosses out an intact Minikit for collection!  |
MINIKIT: Vending Machine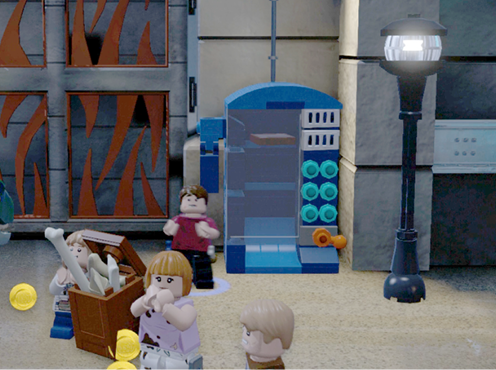 Send Zach Mitchell to repair the smoking blue vending machine on the right side of the street, just right of the gate. When fixed, it spits out pieces of a Minikit. Assemble them and grab it. |
Help Your Dinos
Tag to Owen and climb the ladder. Explore the small droppings pile in the balcony’s back-right corner to find a red crank switch. Attach it to the lift platform and wait until Claire uses the glowing jump circle to hop aboard. Then crank the platform up to full height. Tag to Claire and leap to grab the cable and zipline across the street. Use the park access panel and enter the three-button code to lower the canopy below.

Tag to Owen, climb up the canopy, and then scale the climbing wall handholds to the rope winch. Slice the rope with Owen’s knife to release the chopsticks sign. As it swings and falls, it weakens the Indominus Rex with a heavy jolt of electricity.

Tag to the T. rex and follow the onscreen button prompts to step up its attack on the Indominus. Next, tag to a raptor and pull the dino switch by the open fire hydrant to raise the nearby door. Send the other raptor to use the raptor bar on that door. On the roof, move into the action icon and use it to make a leaping attack.

Win the Head-Butt Battle
The game ends with two of the most fearsome land creatures in the history of the Earth slamming headfirst into each other in a classic battle for dominance. Tap your controller buttons according to the onscreen prompts to drive the Indominus Rex backward until you trigger the final cinematic sequence.

Congratulations! You just beat 20 difficult levels of LEGO Jurassic Park. Now you can go back through the missions in Free Play Mode with the Story’s full cast of characters available. With a complete set of the game’s special abilities at your disposal, you can collect all of the Minikits and Amber Bricks in every Story level.
After that, take a crack at the Hub areas, where collectibles abound!