
LEGO Jurassic World Guide Console Hub Areas
Isla Sorna
Isla Sorna revisited is the hub you travel through when playing Movie 3, the part of LEGO Jurassic World based on the third Jurassic Park movie, Jurassic Park III.
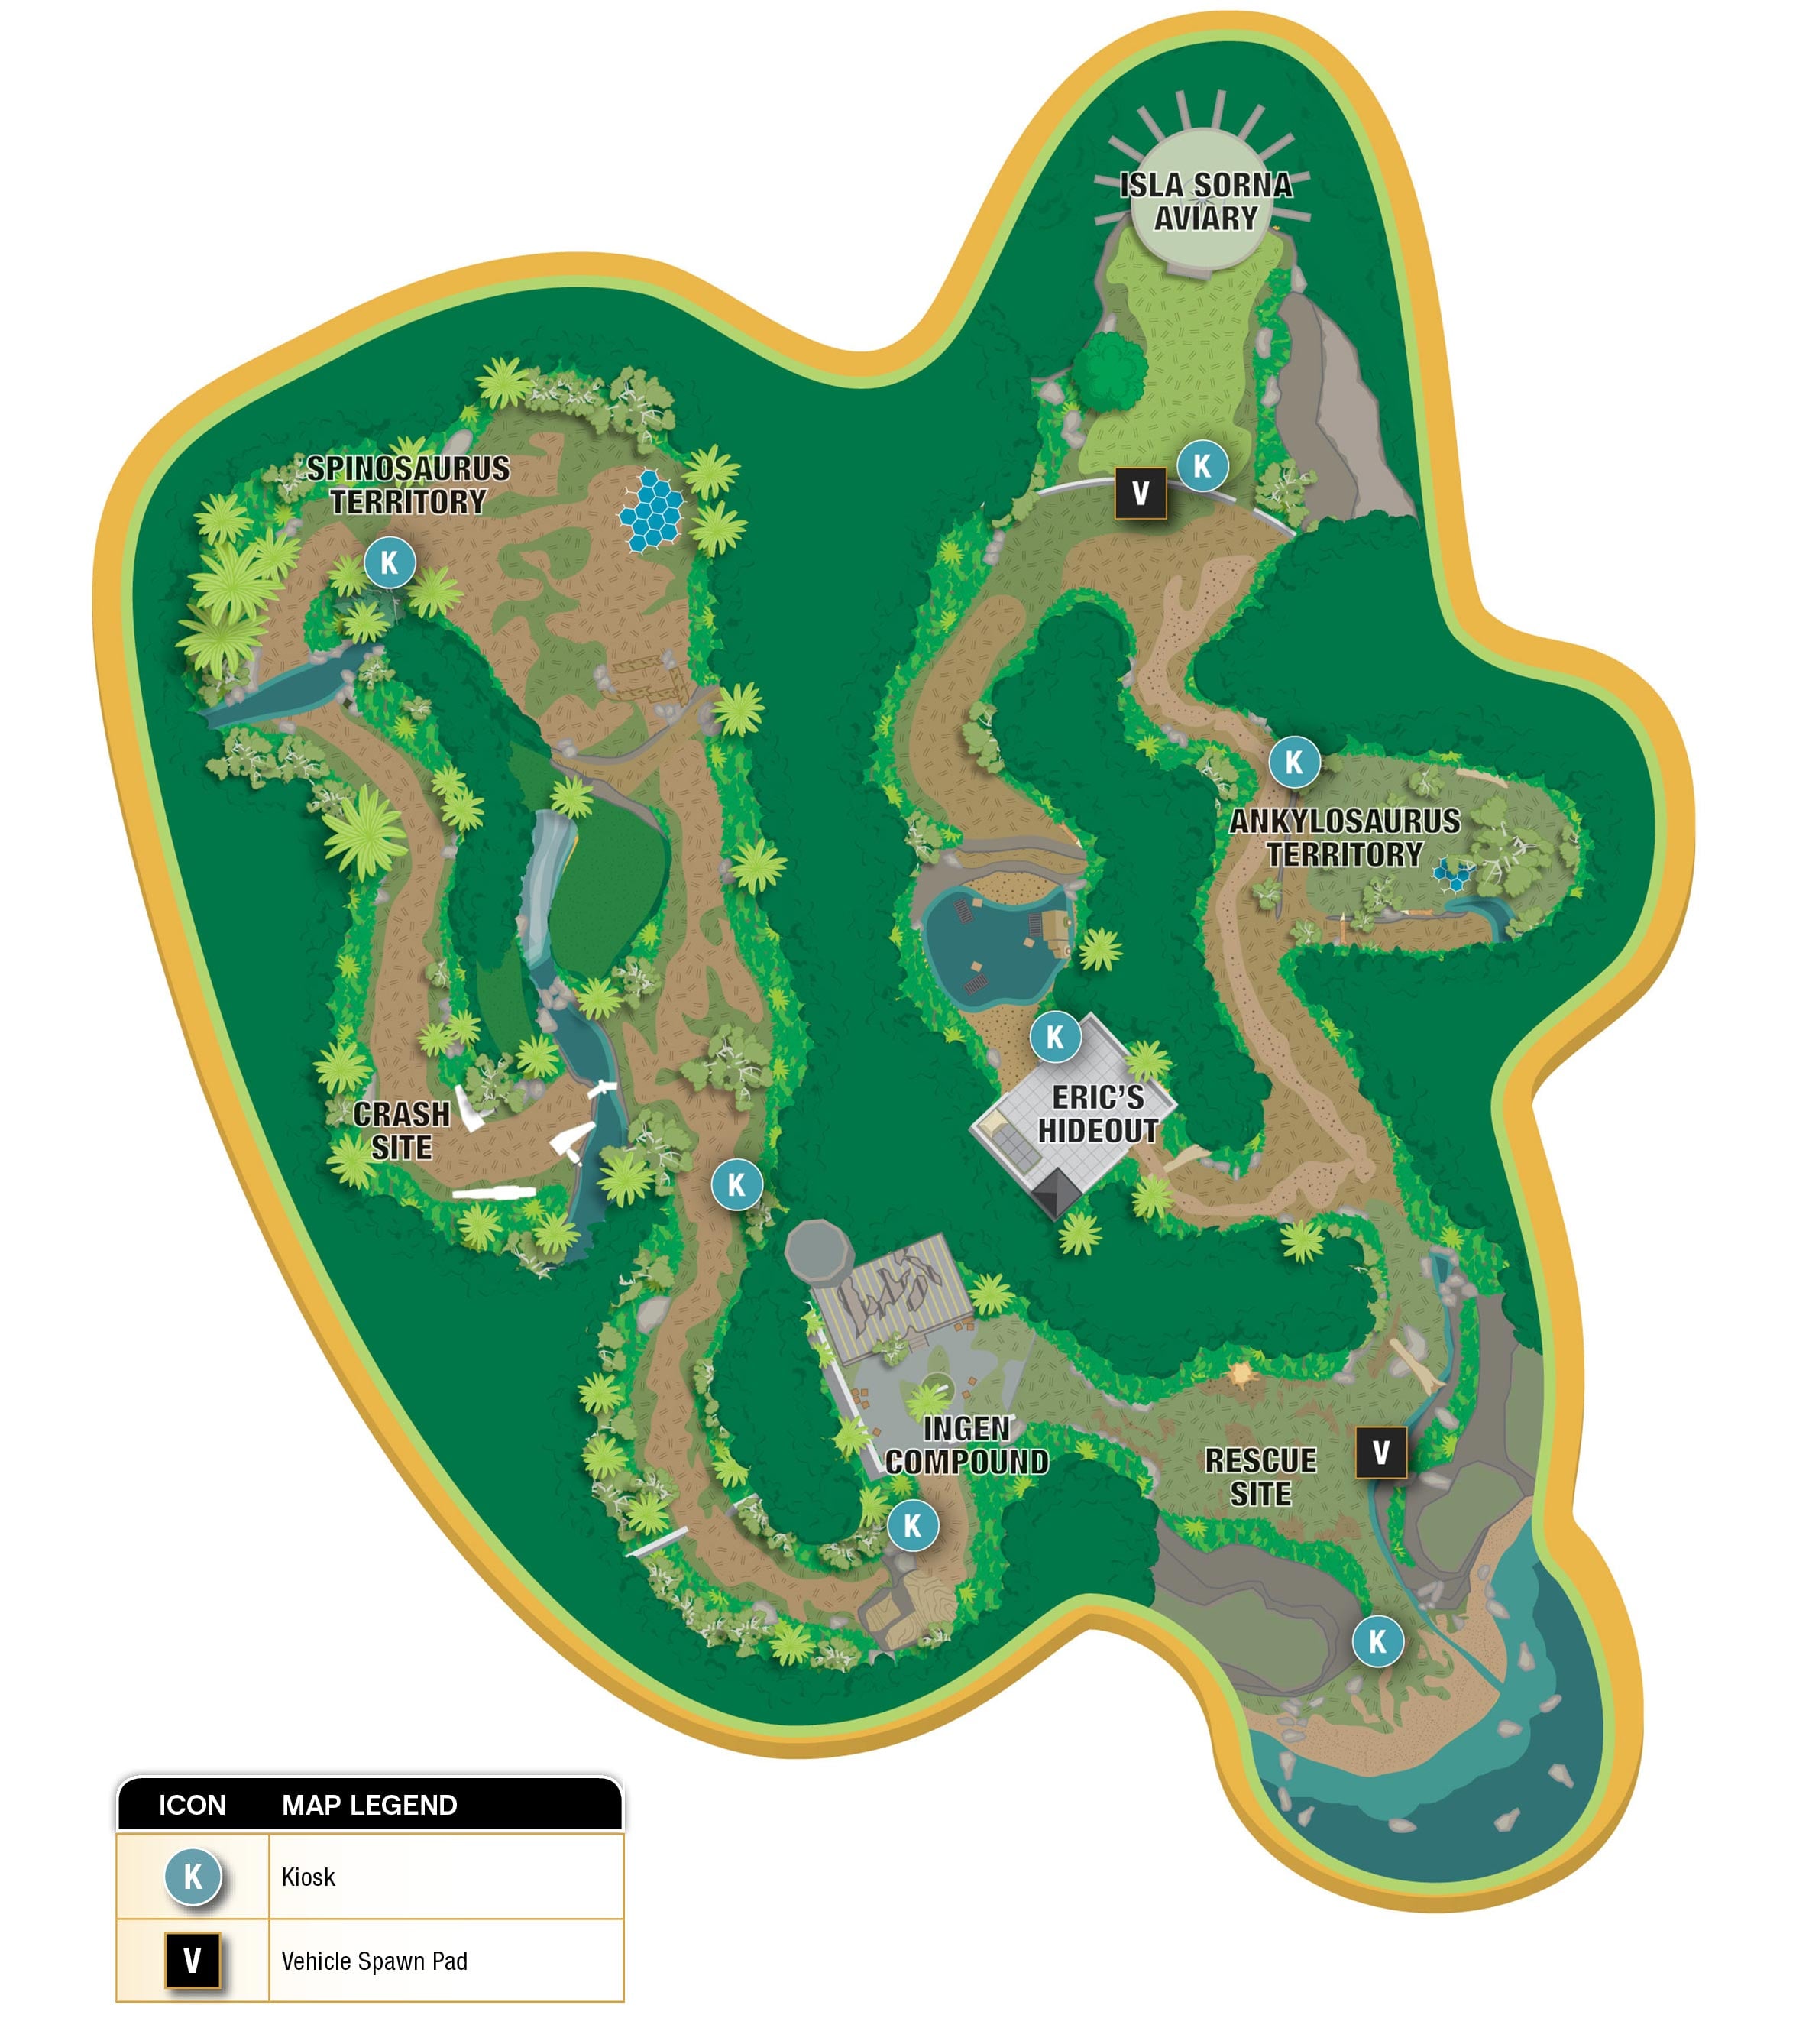
InGen Compound
This is the area around InGen research lab that you explored in level 13, “The Breeding Facility.” Five simple Gold Brick challenges can be found here.
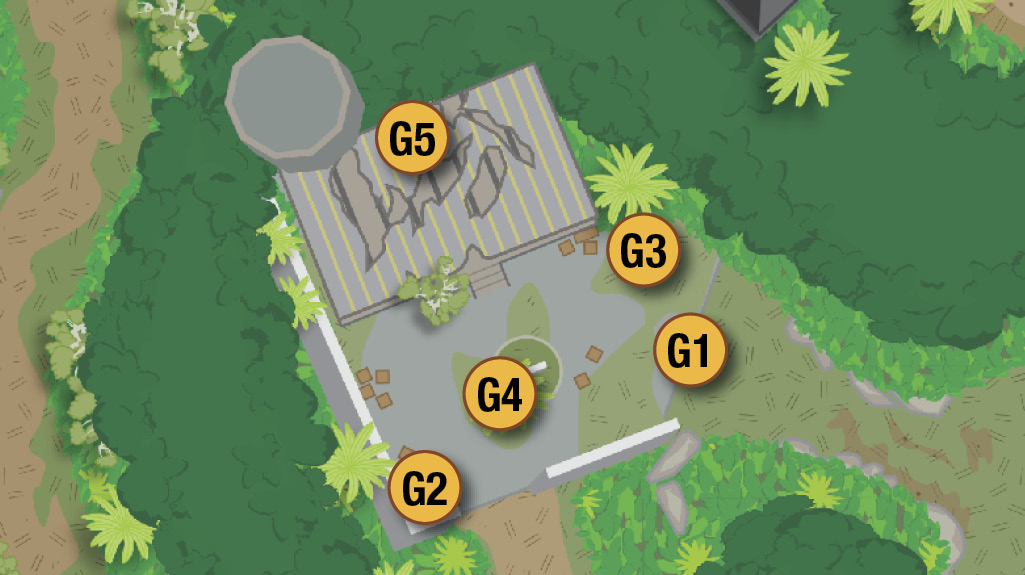
InGen Compound Challenges
| Icon | Type | Notes |
|---|---|---|
| G1 | Gold Brick | A lone Compy attacks when you step onto the paved area. Defeat it to trigger a wave of Compy attackers. Knock out the enemies within the time limit. |
| G2 | Gold Brick | Shoot the electric switch in the yard with an electric rifle. |
| G3 | Gold Brick | Switch to a raptor and pull the dino switch. |
| G4 | Gold Brick | See “Find G-E-N.” |
| G5 | Gold Brick | After you shatter the glass entrance with a scream character, solve the academic panel inside the facility. |
Find G-E-N

Switch to a raptor and follow the yellow mist scent trail that starts in front of the InGen sign. At trail’s end, the raptor digs up a tile with the letter “G.” Pick it up and put it on the InGen sign. Switch to a sharpshooter and target the bull’s-eye atop the fence to get the “E.”

Switch to a character with the Scream ability and shatter the glass door to enter the facility. Inside, use a crowbar character to pry open the cabinet and get the letter “N.” Take it out to complete the sign. The Gold Brick appears on the facility’s porch (G4).
Crash Site
This area filled with airplane debris features a Worker In Peril and three Gold Bricks, one of which is for rescuing the worker. Also note a raptor scent trail that begins in this area ends in the next area, Spinosaurus Territory. The Gold Brick that you find counts toward the total listed for that area, not this one.
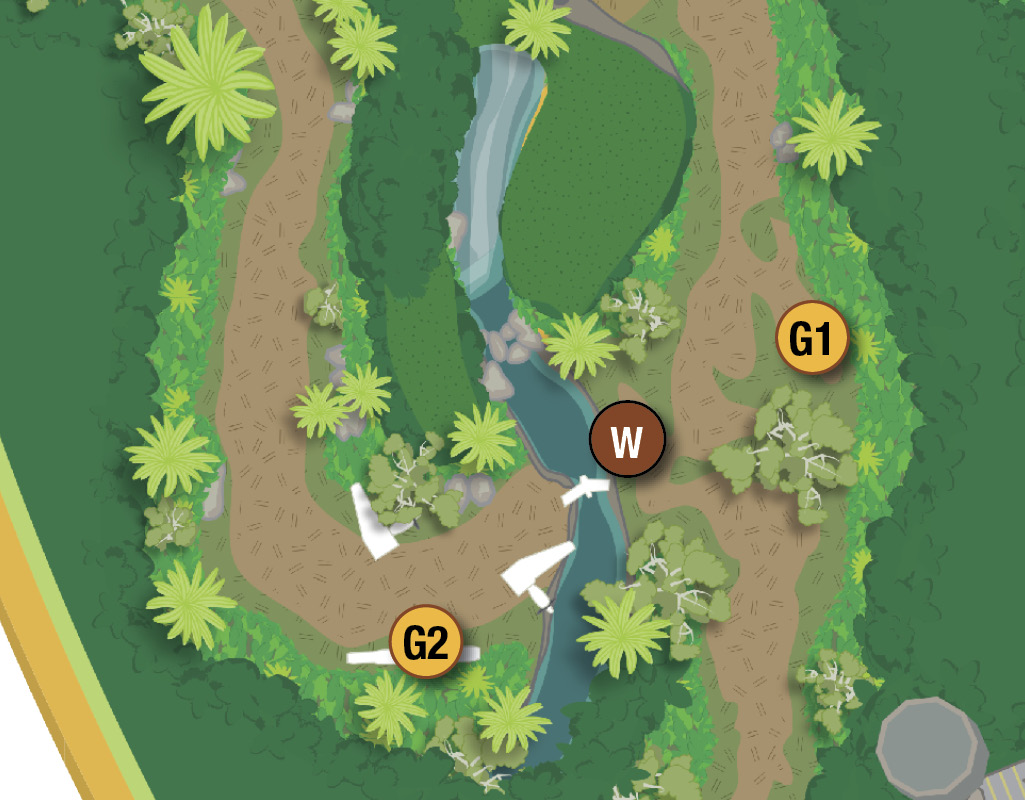
Crash Site Challenges
| Icon | Type | Notes |
|---|---|---|
| W | Worker In Peril | Cut through vines near the tailpiece bridge over the stream to find a rope winch. Slice that too to cut down Ben Hildebrand from the tree. |
| G1 | Gold Brick | See “Three Nest Eggs.” |
| G2 | Gold Brick | Use a charging dinosaur to smash open the cracked airplane fuselage and snag the Gold Brick from the cargo hold. |
Three Nest Eggs
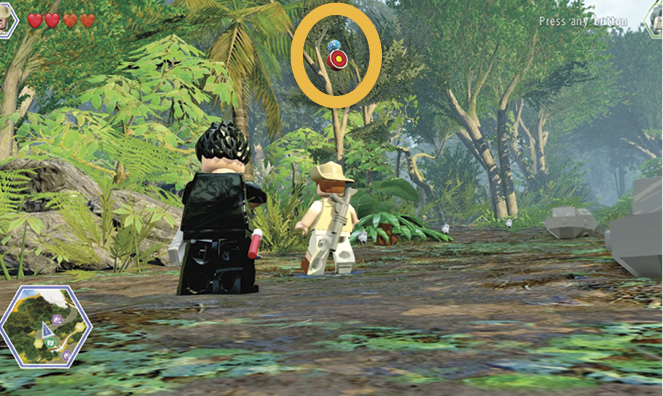
Numerous baskets of eggs sit alongside the main path next to the big tree (G1). Three of the baskets (with colored eggs) are all one egg short. Walk across the tailpiece that forms a bridge over the stream and continue through the airplane debris until you reach the bull’s-eye up in the tree. Sharpshoot it to get the speckled blue egg; then go and put it in the basket with the matching eggs.
Go back to the crash debris and dig up loose dirt next to the airplane fuselage to find the speckled pink egg and take it to its matching basket. Then head up the path to the droppings pile at the cliff’s edge.
Rummage through the droppings to find the speckled orange egg and put it in the basket with its matching eggs to earn the Gold Brick.

Spinosaurus Territory
This big clearing includes a useful Dinosaur Spawner. Look for a Worker In Peril, six Gold Bricks (including one for saving the worker), and a valuable Red Brick. Note that one of the Gold Brick challenges is a raptor scent trail that actually starts back at the Crash Site area. Note also that you must assemble the spawner’s control panel from a pile of build-it parts before you can use it.
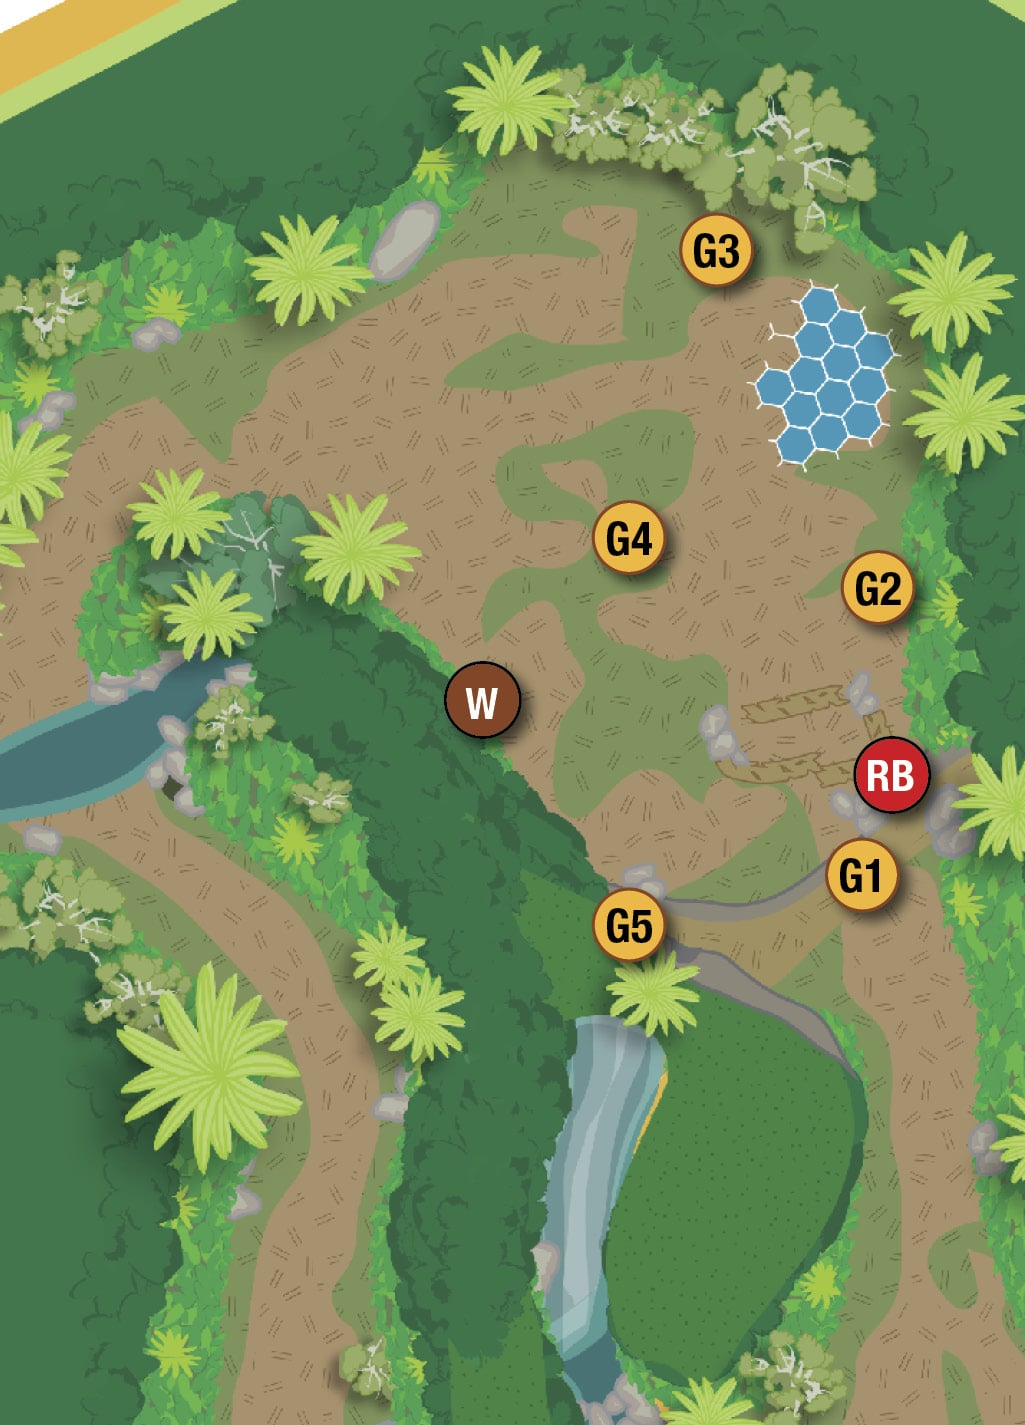
Spinosaurus Territory Challenges
| Icon | Type | Notes |
|---|---|---|
| G1 | Gold Brick | Back at the Crash Site, switch to a raptor and follow the scent trail that starts at the tailpiece bridge. It leads up the trail to the cliff edge where the raptor unearths a Gold Brick. |
| G2 | Gold Brick | Rummage in the droppings pile; then assemble the build-it pieces into a phone booth. A Gold Brick falls out! |
| G3 | Gold Brick | Water the plant root near the dino spawner. Jump to the twirl poles that sprout from the flower that grows and swing over to the green vine. Climb the vine and jump through the Gold Brick. |
| G4 | Gold Brick | Spawn a T. rex from the dino spawner and use its roar to shatter the amber block in the center of the clearing. This triggers an attack wave of bone Velociraptors! Destroy the enemies within the time limit to earn the Gold Brick. |
| G5 | Gold Brick | See “Cave Brick.” |
| W | Worker In Peril | Send the T. rex you just spawned over to the worker trapped in a bone cage and bite off the dino-strength barrier to free Nash and earn a Gold Brick. |
| RB | Red Brick | Spawn a Compsognathus and find the opening in the logs. Work your way through the short maze to reach the Red Brick. |
Cave Brick

Approach the dark cave up on the cliff overlooking the clearing. To reach the cave mouth, spawn a T. Rex and roar at the amber rock face below the cave. It shatters to reveal a climbing wall.
Use a climber to scale the wall up to the cave mouth. Switch to a character with illumination and enter the cave to grab the Gold Brick.

Eric’s Hideout
This is the same enclosure and island where you completed Level 14, “Eric Kirby.” Look for five Gold Bricks in this fairly straightforward area.
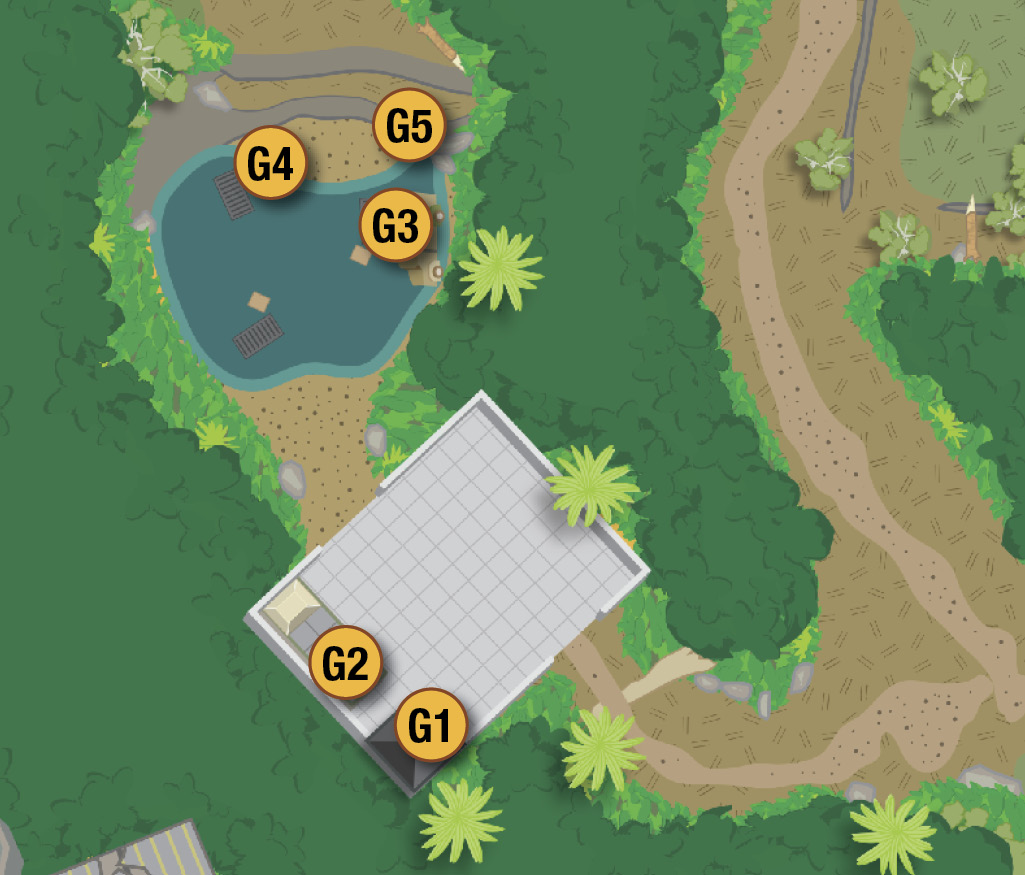
Eric’s Hideout Challenges
| Icon | Type | Notes |
|---|---|---|
| G1 | Gold Brick | See “Scan & Slam the Vent.” |
| G2 | Gold Brick | Switch to a dilophosaurus and spit to break apart the three black LEGO blocks in the area. The third one is in the open garage just to the right of the observation tower. |
| G3 | Gold Brick | Switch to Eric Kirby and hop across the water to the crate next to the Compy swarm. Stop there and toss a bottle of T. rex scent to scatter them. Grab the brick from the truck hatch that pops open. |
| G4 | Gold Brick | Water the plant root on the shore just across from the truck to grow a wild vine with two bounce-pad flowers. Bounce to the second flower; then bounce up again to the Gold Brick floating above it. |
| G5 | Gold Brick | Back on shore, use the goo spit of a Dilophosaurus to break apart the black LEGO near the truck and reveal a cave. Switch to an illumination character (like Ian Malcolm with a flare) to enter and grab the brick inside. |
Scan & Slam the Vent

Switch to a character with a scanner and use it on the sparkling wall in the enclosure to reveal a cracked LEGO wall. Bash it open with a charging dinosaur to reveal a small-access vent.

Switch to a character with small-access ability and crawl in the opening to emerge on the small balcony above. Grab the Gold Brick there and crawl back to the ground.
Ankylosaurus Territory
This area features a nice variety of collectibles. Heal a sick dino, rescue a worker, and complete a race, all of which earn a Gold Brick each. Also look for three more Gold Bricks and a Red Brick. Here’s a tip: You need a custom dinosaur to get one of the Gold Bricks—a Velociraptor with a T. rex head; now it can roar like a big dino!
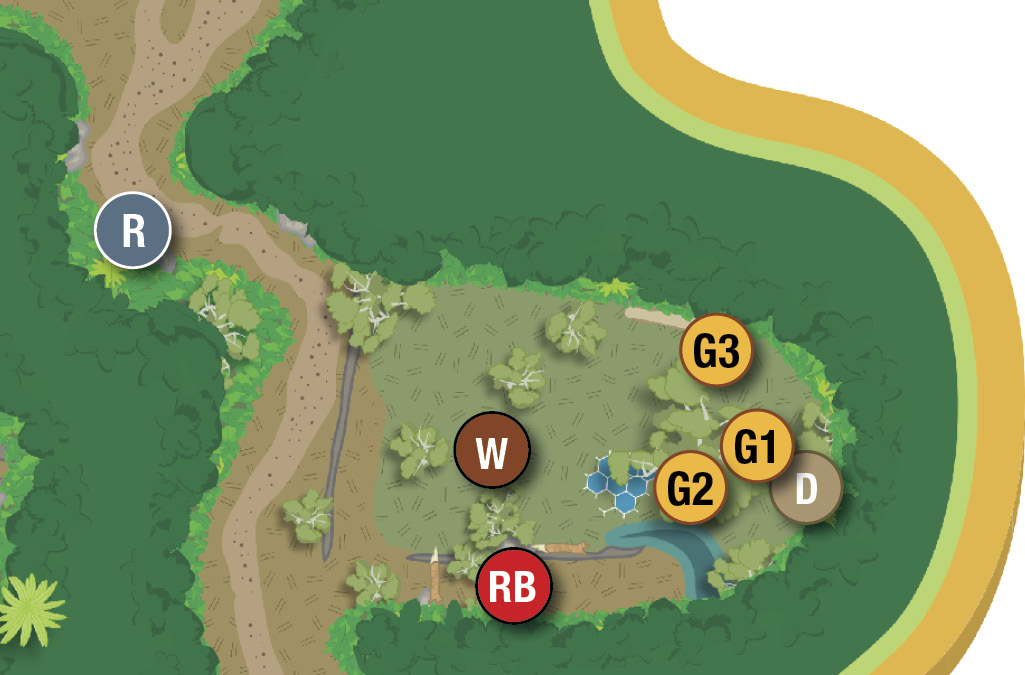
Ankylosaurus Challenges
| Icon | Type | Notes |
|---|---|---|
|
W |
Worker In Peril |
Pull out the worker stuck under the log to pick up a Gold Brick. |
|
RB |
Red Brick |
A big nest sits nearly hidden on a narrow terrace to the right just as you enter the area. Deliver three lost eggs to the nest and get a Red Brick in return! One egg is on the ground at the base of the tree not far from the kiosk. Another is behind the wall of vines near the sick dino. The third is on the terrace where the nest sits, just beyond it. |
|
G1 |
Gold Brick |
Have Eric Kirby toss a bottle of T. rex scent to chase the Compy pack away from the loose dirt pile near the sick dino. Dig in the dirt to find a Gold Brick. |
|
G2 |
Gold Brick |
Use a dinosaur with charge ability to bash open all four of the cracked LEGO boulders around the area. You find a Gold Brick inside the fourth rock, regardless of order. |
|
G3 |
Gold Brick |
Here’s a really tricky one. There’s a Gold Brick inside that amber rock in the clearing. But you can’t spawn a large dinosaur at the dino spawner here, so you need a custom dinosaur to shatter the amber. At a Dinosaur Customizer in the Visitor Center or the Innovation Center, add a head with the Roar ability (like T. rex) to a small or medium dinosaur like the Velociraptor. Return to Ankylosaurus Territory and use that dinosaur to roar at the amber rock, releasing the Gold Brick inside. |
|
D |
Sick Dino |
See “Healing Ingredients.” |
|
R |
Race |
Spawn a Gyrosphere at the Aviary vehicle pad and drive up to the starting gate at the top of the path. This race runs straight down the path to the beach. Beat the time for each gate to win a Gold Brick. |
Healing Ingredients (Sick Dino)
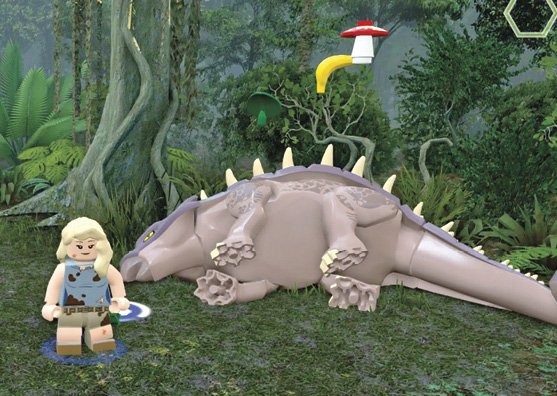
The sick Ankylosaurus in the clearing really needs your help. Rummage in its droppings to reveal the items you need. First, grapple open the log just right of the dino to find a mushroom to feed it. Then head across the clearing, switch to a raptor, and follow the scent trail that starts on the narrow terrace (near the Red Brick nest) to find a banana for the dino.
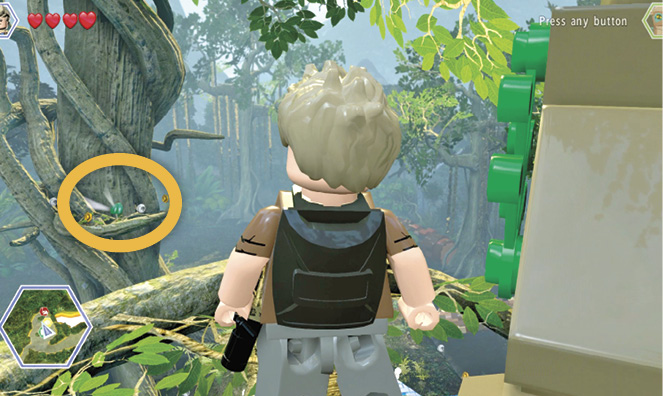
The last ingredient is trickiest. Send a character with the small-access ability into the low hatch in the big tree next to the Dino Spawner. You emerge on a high branch. Spot the glowing leaf up high on the next tree over. Switch to Billy Brennan and make a parachute glide across to get the leaf. Then glide down to the dino and give him the final ingredient.
Isla Sorna Aviary
This huge space is unlike anything you’ve seen before. It calls for a lot of flying—far more than any of your humans can do with a mere parachute. But the dino spawner here lets you produce Pteranodons and Dimorphodons, so you’re all prepared.
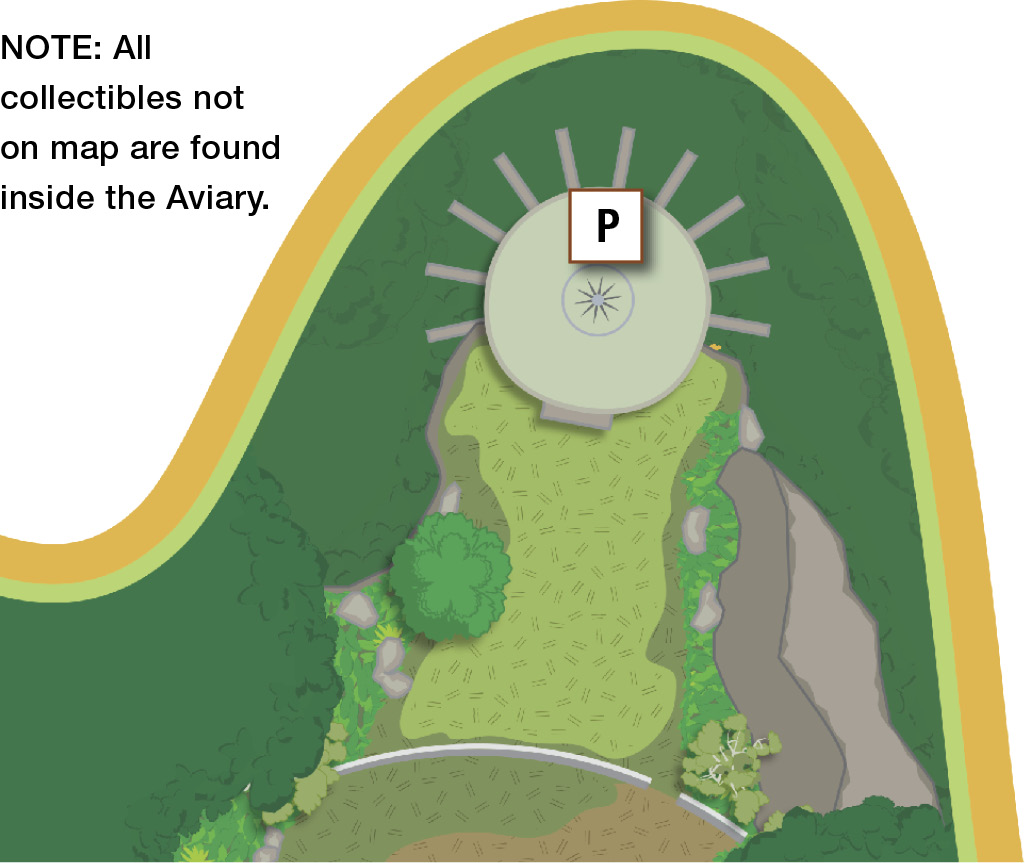
Isla Sorna Aviary Challenges
| Icon | Type | Notes |
|---|---|---|
| P | Photograph | Find the photo spot near the window on the entry level before you descend the stairs into the aviary. |
| G1 | Gold Brick | Fly a dino through the rock arch to snag a Gold Brick floating in the center. |
| G2 | Gold Brick | Smash three skeleton crews: a band directly across from the spawner; a lone picnicker on the low, small outcropping; and a bony tennis match on the narrow peninsula sticking out from the side opposite the spawner. |
| G3 | Gold Brick | Defeat Troodons defending their eggs down on a lower plateau. Knock out the enemies and win the brawl to pick up a Gold Brick in the middle of the three eggs. |
| G4 | Gold Brick | Fly a Pteranodon to the center bridge and pull then release the walkway switch to smash the debris blocking the way. Glide Billy across the bridge gap; then switch to a crowbar character and pry open the gate. Walk left to the closed gate; you can see the Gold Brick just beyond it. Switch to the Pteranodon and pull then release the switch above the walkway to open the gate. Switch back to your human character to walk in and grab the brick. |
| G5 | Gold Brick | Walk Billy Brennan onto the diving board and press Use. Fly through the stud circles and land on the small platform to get the Gold Brick. |
| R | Race | Just above the spawner is the first gate of an aerial checkpoint race. Hit all the gates in time to earn a Gold Brick. |
| RB | Red Brick | See “Pulling Switches.” |
Pulling Switches (Red Brick)

Fly a Pteranodon across the aviary to the three-level mesh corridors and land on the icon at the switch. Press Use to pull the switch. This lowers the lifts one level.
Now switch to the baby Pteranodon one level below and move it leftward through the opening in the lift. Keep going left until the baby drops down to the second level. Tag back to the adult Pteranodon and press Use to release the switch, which raises the lifts back up one level. Tag back down to the baby Pteranodon then move left into the brown cage to drop the baby down to the third level.
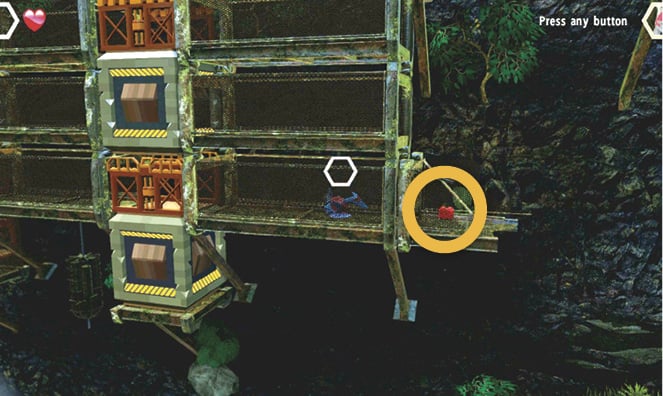
Now walk the baby to the right as far as possible; then tag back to the adult Pteranodon. Pull the switch again to lower the lift. Tag back to the baby and go all the way to the Red Brick at the far right end of the bottom level walkway.