
Prima Games eGuides
primagames.com Browse Redeem a code Help
LEGO Jurassic World eGuide
Sign in My Guides

Sign in or create an account

We'll email you a link. No password needed, and if you don't have an account yet, the link makes one.

By creating an account or signing in, you agree to our Terms of Service and Privacy Policy.

Have a password?

Had an account on the old eGuides site, or a code from a printed guide? Help and troubleshooting

Sign in with a password

By signing in, you agree to our Terms of Service and Privacy Policy.

Check your email

A sign-in link is on its way. It works once and expires in 15 minutes. Open it and you're in, with an account if you didn't already have one.

Contents

  • Console
    • Welcome to LEGO Jurassic World!
      • Introduction
      • The Basics
    • Characters & Vehicles
      • Introduction
      • How to Unlock & Collect Characters
      • Character Abilities
      • Story Characters
      • All Collectible Characters
      • Dinosaurs
      • Vehicles
    • Walkthrough: Movie 1
      • Level 01: Prologue
      • Level 02: Welcome to Jurassic Park
      • Level 03: Park Shutdown
      • Level 04: Restoring Power
      • Level 05: Visitor Center
    • Walkthrough: Movie 2
      • Level 06: Isla Sorna
      • Level 07: InGen Arrival
      • Level 08: The Hunted
      • Level 09: Comms Center
      • Level 10: San Diego
    • Walkthrough: Movie 3
      • Level 11: Landing Site
      • Level 12: The Spinosaurus
      • Level 13: Breeding Facility
      • Level 14: Eric Kirby
      • Level 15: The Bird Cage
    • Walkthrough: Movie 4
      • Level 16: Jurassic World
      • Level 17: Gyrosphere Valley
      • Level 18: Out of Bounds
      • Level 19: Under Attack
      • Level 20: Showdown
    • Free Play Walkthrough: Movie 1
      • Free Play Mode
      • Level 01: Prologue
      • Level 02: Welcome to Jurassic Park
      • Level 03: Park Shutdown
      • Level 04: Restoring Power
      • Level 05: Visitor Center
    • Free Play Walkthrough: Movie 2
      • Level 06: Isla Sorna
      • Level 07: InGen Arrival
      • Level 08: The Hunted
      • Level 09: Communications Center
      • Level 10: San Diego
    • Free Play Walkthrough: Movie 3
      • Level 11: Landing Site
      • Level 12: The Spinosaurus
      • Level 13: Breeding Facility
      • Level 14: Eric Kirby
      • Level 15: The Bird Cage
    • Free Play Walkthrough: Movie 4
      • Level 16: Jurassic World
      • Level 17: Gyrosphere Valley
      • Level 18: Out of Bounds
      • Level 19: Under Attack
      • Level 20: Showdown
    • Hub Areas
      • Introduction
      • Jurassic Park
      • Jurassic Park: The Lost World
      • Isla Sorna
      • Jurassic World
    • Checklists
      • Achievements & Trophies
      • Cheats
      • Amber Bricks
      • Red Bricks
    • Hub Area Challenges: Jurassic Park
      • Isla Nubar Helipad
      • Brachiosaurus Plains
      • Visitor Center
      • Raptor Territory
      • Jurassic Park Gate
      • Dilophosaurus Territory
      • Triceratops Territory
      • Herbivore Territory
      • Tyrannosaurus Enclosure
      • East Dock Route
      • Carnivore Territory
      • Tour Route Exit
      • Gallimimus Territory
      • Tyrannosaurus Territory
    • Hub Area Challenges: Jurassic Park The Lost World
      • Stegosaurus Territory
      • Mobile Site Lab
      • Hunting Plains
      • Hunter Camp
      • Long Grass
      • Communications Center
    • Hub Area Challenges: Isla Sorna
      • Ingen Compound
      • Crash Site
      • Spinosaurus Territory
      • Eric's Hideout
      • Ankylosaurus Territory
      • Isla Sorna Aviary
    • Hub Area Challenges: Jurassic World
      • Main Street
      • East Boardwalk
      • West Boardwalk
      • Mosasaurus Arena
      • Gyrosphere Valley
      • Shady Grove
      • Safari Plains
      • Isla Nebular Aviary
      • Indominus Territory
  • Handheld
    • Characters
      • Characters
    • Walkthrough: Movie 1
      • Level 01: Raptor Transfer
      • Level 02: The Dig Site
      • Level 03: Raptor Enclosure
      • Level 04: Triceratops Recovery
      • Level 05: T. Rex Enclosure
      • Level 06: T. Rex Chase
      • Level 07: The Raptor Pack
      • Level 08: Kitchen Escape
      • Level 09: Main Hall
    • Walkthrough: Movie 2
      • Introduction
      • Level 10: Finding Sarah
      • Level 11: Camp Sabotage
      • Level 12: Mobile Lab
      • Level 13: Attack on the Camp
      • Level 14: The Long Grass
      • Level 15: Compound
      • Level 16: Radio Tower
      • Level 17: San Diego Docks
      • Level 18: San Diego Streets
    • Walkthrough: Movie 3
      • Introduction
      • Level 19: Spinosaurus Escape
      • Level 20: Spinosaurus vs. T. Rex
      • Level 21: The Crash Site
      • Level 22: Lab Interior
      • Level 23: Corridor Chase
      • Level 24: Eric's Hideout
      • Level 25: The Coast
      • Level 26: Pteranodon Nests
      • Level 27: Spinosaurus Showdown
    • Walkthrough: Movie 4
      • Introduction
      • Level 28: Raptor Research Area
      • Level 29: Raptor Pig Hunt
      • Level 30: Indominus Paddock
      • Level 31: Gyrosphere Escape
      • Level 32: Indominus Escape
      • Level 33: Main Street
      • Level 34: The Alpha
      • Level 35: Raptor Pursuit
      • Level 36: Boardwalk Showdown
    • Hub Areas
      • Innovation Center
      • Medium Dinosaur Paddock
      • Large Dinosaur Paddock
    • Checklists
      • Checklists
    • PlayStation Vita Trophies
      • PlayStation Vita Trophies
    • Videos
      • Level 2, Amber Brick
      • Level 6, Red Brick
      • Level 9, Amber Brick
      • Level 10, Red Brick
      • Level 14, Amber Brick
      • Level 17, Amber Brick
      • Level 19, Red Brick
      • Level 22, Amber Brick
      • Level 25, Red Brick
      • Level 28 Red Brick
      • Level 30, Amber Brick
      • Level 31, Amber Brick
  • Maps
    • Jurassic Park
    • Lost World
    • Isla Sorna
    • Jurassic World

LEGO Jurassic World Guide › Console › Free Play Walkthrough: Movie 2

Level 09: Communications Center

Compound

AMBER BRICK: Shoot the targets

Use the raptor scent tracker near the first gate. This leads to build-it pieces near the neon garage sign. Use the build-it pieces to create an electric target. Tag to Barry and shoot the target to reveal a second one. Shoot the second target to spawn the Amber Brick.

Radio Tower

MINIKIT: Dark Alcove

After you get across the footbridge on the second floor, smash the wall structure to reveal a dark area behind the Buddy Boost. Send a character like Ian Malcolm or Zach Mitchell in with a light source to find the Minikit.

MINIKIT: Shoot the Skeleton

After you swing across the twirl poles to the pink/blue agility wall, drop to the platform below. Switch to any character with a rifle and shoot the bull’s-eye with the skeleton sitting on it to earn a Minikit.

MINIKIT: Small-Access Vent

After Kelly Malcolm shatters the glass cabinet on the top walkway with her Scream ability, smash the LEGO in the left corner to reveal a low hatch. Send a small-access character like Gray Mitchell inside to emerge on a small balcony directly below with a Minikit (circled).

Rooftops

MINIKIT: Fix the Blue Dishes

Characters with the Repair ability like Eddie Carr can fix the three broken blue satellite dishes on the rooftops. One is in the back-right corner after your first zip-line trip. The second is on the balcony walkway after you hop across the light poles. The third is near where you land after the second zip-line trip, over on the far roof where Nick Van Owen waits.

MINIKIT: Billboard Bull’s-Eye
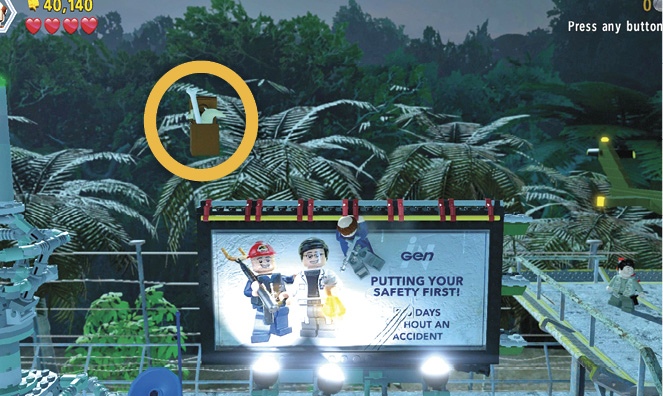
Switch to a character with a rifle and shoot the bull’s-eye on the billboard sign on the rooftop with the helipad. Hop up the handhold blocks revealed and slide left on the hang bar until you’re under the floating Minikit. Then jump up to snag it.

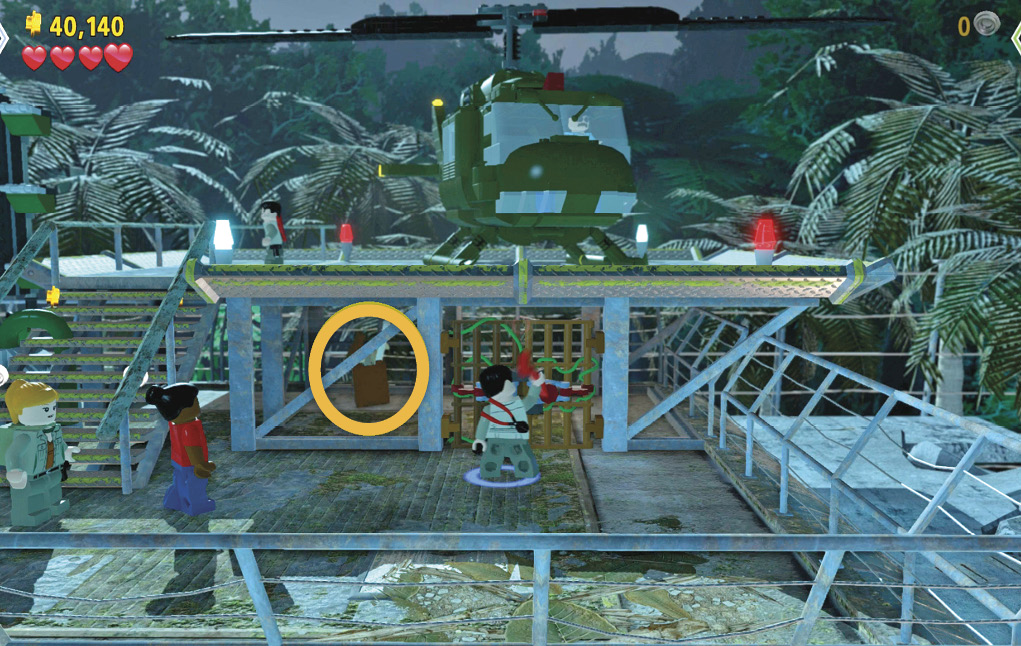
MINIKIT: Crowbar Storage

Switch to Nick Van Owen (even though he’s also on the helipad) and use his crowbar to pull open the gate directly underneath the helipad. Enter the compartment to grab the Minikit inside.
Keep reading with a free account

The first 3 sections of LEGO Jurassic World are open to everyone. An account opens the rest of it, and every other guide in the archive. It's free, and there's nothing to buy.

Bought guides on the old Prima Games site? Your account and every guide you own moved here, so there's nothing to buy again. Sign in.

Create a free account Or browse our free guides

PreviousLevel 08: The Hunted NextLevel 10: San Diego