
LEGO Jurassic World Guide Console Walkthrough: Movie 3
Level 13: Breeding Facility
The abandoned InGen installation holds a number of surprises, mostly unpleasant. But don’t miss the Amber Brick that Amanda Kirby can access right away from the main lobby.


| True Survivor Stud Requirement |
|---|
| 48,000 studs |
Lab Interior
You start outside in the facility’s courtyard. Everything is quiet. Too quiet. But surely it’s safer inside than it is out here?

| Icon | Story Characters | Abilities |
|---|---|---|
 |
Alan Grant (Isla Sorna) | Dig, Rope/Vine Cutter, Bone-Build |
 |
Paul Kirby | Repair, Grapple |
 |
Amanda Kirby | Scream, Agile |
 |
Billy Brennan | Climb, Photography, Glide |
 |
Udesky | Sharpshoot (Rifle), Tracker |
Override the Security Shutter
Enter the lobby to find a security shutter blocking passage into the lab. First, tag to Amanda Kirby and refer to our Amber Brick section. Then tag to Alan Grant and slice the vines on the vending machine in the back-left corner. Tag to Amanda Kirby again and use her Scream ability to shatter the vending machine’s glass. Tag to Udesky and pick up the override mechanism component that falls out of the vending machine. Follow the blue tracks until Udesky finds the build-it pieces; then assemble them into the override mechanism. Turn the crank to open the security shutter.

AMBER BRICK: Lobby Jump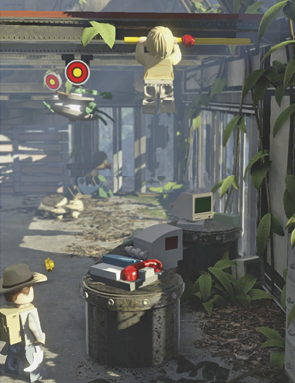 Use Amanda Kirby to hop on the desk in the lobby then jump to the grab bar directly above. Walk carefully across the narrow ceiling struts to the far side. Climb the ladder and then the stairs to the Amber Brick that unlocks the Troodon!  |
MINIKIT: Sharpshoot the Lobby Lights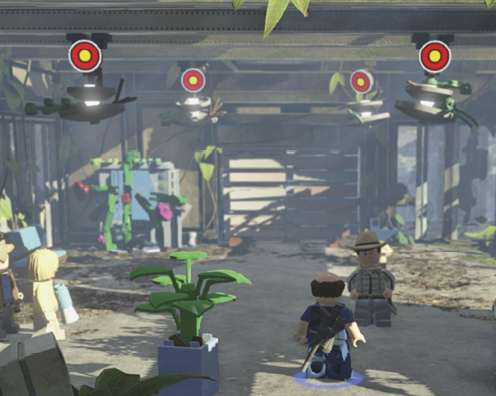 Shoot out all four bull’s-eye ceiling lights in the lobby to earn a Minikit. |
Repair the Robots
When you go through the doors, a Compsognathus pack attacks! Several packs of smaller dinosaurs roam the area, so be ready at all times. Fight through the Compys; then move rightward into the central lab. Tag to Paul Kirby, send him tumbling down the stairs, and then repair the blue robot arm by the back windows with Paul’s wrench. The repaired arm lifts up a fallen section of walkway.
Send Billy back upstairs and use his parachute to glide across the gap and land on the newly lifted section. Go push the equipment crate to the end of the red/black slide track. The crate gets stuck at the track’s end, so tag to Paul Kirby and use his grapple hook to pull it down.

Add the build-it pieces that burst out of the crate to another robot arm directly above. The repaired arm in turn fixes one of the egg incubators. The incubator top makes a very nice bounce pad as well! Tag to Alan Grant and bounce from the incubator to the raised walkway to the right.

Build a Makeshift Ladder
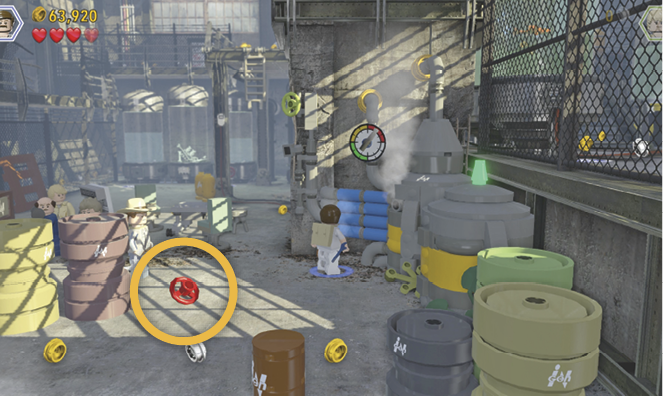
Hop through the hole in the fencing to the floor below. You need to reach the walkway at upper right, but the lower half of the ladder is missing. To fix the ladder using bones, first send Dr. Grant to slice through the vines wrapped around the broken blue steam pipes. Then tag to Paul Kirby and repair the pipes with his wrench. The steam pressure blows a red wheel valve off the nearby pressure tank.

Pick up the red wheel valve, cross the room, and put it on the leftmost specimen tank. Turn it to drain fluid into the center tank with the bones. Then turn the valve on the rightmost specimen tank. This increases the pressure in the center tank and it bursts. Tag to Alan Grant and bone-build the pieces into a ladder. Tag to Billy Brennan and climb the ladder.
Photograph the Specimens
Here you can complete the mission by heading downstairs past all the tanks to the photo spot with the raptor’s head apparently inside the tank near the exit door, and then snap a photo there. This triggers the mission-ending cinematic and you jump into a wild chase sequence. However, if you want to pick up a Minikit first, check out the following section.


MINIKIT: Take Four Extra Tank PhotosGet four shots of the lab’s specimen tanks before you take the mission-ending photo of the Raptor near the exit door. Just step into each dino icon and press Use to take the photo. The first photo spot (shown in our screenshots) is hidden under a canister at the bottom of the stairs and just a step to your right; smash the canister and step into the icon to take the photo. The next two spots are nearby and clearly visible. But skip past the fourth spot, the one at the tank with the Raptor’s head visible. Instead, use the spot by the last specimen tank, the one with a teddy bear floating in it! This earns you the Minikit. (If you take the Raptor’s photo first, you trigger the cutscene and can’t take the teddy bear photo.)   |
Corridor Chase

Raptors rule the facility. They burst from windows and vents as you flee. Good luck.
| Icon | Story Characters | Abilities |
|---|---|---|
 |
Amanda Kirby | N/A |
 |
Billy Brennan | N/A |
Run!
As in all prior chases, your characters run automatically. Your job is to simply steer the character from side to side or jump. After you pass through the first doorway, Alan Grant, Paul Kirby, and Udesky all peel off and head to the right. You can tag back and forth between Billy Brennan and Amanda Kirby as you run, but neither one is faster or jumps higher in this chase. Two Minikits are available en route.

MINIKIT: After Second DoorwayFrom the start, run through the first doorway then veer slightly to the right and get ready! A Minikit is to the right side, just after the second doorway. |
MINIKIT: Hidden in the LabThe second Minikit is actually less tricky to collect even though it’s harder to see. When the characters reach the end of the first corridor, they slide under a fallen tree, turn to your right, and then sprint into a big open laboratory filled with abandoned equipment. The camera now gives you a side view of the chase. You run right through a green crate, a tall blue/white microscope station, and a low brown pallet all lined up against the railing. The Minikit is ahead on the middle of the track.  |

Watch the scene as everyone reunites. It looks like a Raptor trap for a moment, but cagy human ingenuity prevails.

Hub Transit 13
Escaping the dino-infested breeding facility puts you on the right track. Unfortunately, it’s a track blocked by a fallen tree atop a crushed car.

| Icon | Story Characters | Abilities |
|---|---|---|
 |
Alan Grant (Isla Sorna) | Dig, Rope/Vine Cutter, Bone-Build |
 |
Paul Kirby | Repair, Grapple |
 |
Amanda Kirby | Scream, Agile |
 |
Billy Brennan | Climb, Photography, Glide |
 |
Udesky | Sharpshoot (Rifle), Tracker |
Lift the Bone Obstruction
When you reach a big skeleton blocking the path, tag to Alan Grant and dig up the loose dirt spot to uncover a build-it pile. Assemble the pink/blue swing bar atop the log to the right and tag to Amanda Kirby. Use her Agile ability to jump to the bar and swing over the log.

A Compsognathus family starts pouring out of its den to attack Amanda. Smash the gray LEGO rock with green foliage on top and use the build-it pieces to seal off the Compy cave. Then smash the two brown/black crates and use the build-it pieces to assemble a big industrial jack. Turn its red crank switch to jack up the skeleton and let the others through.

Now tag to Alan Grant and use his Raptor claw to cut through the vine wall and proceed down the trail. This triggers the opening cutscene of the next level.
