
LEGO Jurassic World Guide Console Walkthrough: Movie 4
Level 16: Jurassic World
Welcome to Jurassic World! Twenty-two years after the events of Movie 1, John Hammond’s vision of a fully functioning dinosaur theme park has finally become a reality on Isla Nublar, thanks to the Masrani Global Corporation. As the game’s final movie begins, we see a pair of brothers, Zach and Gray Mitchell, arriving at the island for a visit. Their aunt, Claire Dearing, is the park’s operations manager.


You learn that Masrani Global has created a new hybrid dinosaur, the Indominus Rex, a creature 50 feet long when fully grown. The company has hired an exotic animal specialist named Owen Grady to explore safety and training issues with the park’s security team. Simon Masrani himself wants Owen to inspect the Indominus paddock.

| True Survivor Stud Requirement |
|---|
| 70,000 studs |
Raptor Research Arena
Meet Owen Grady, the ex-Navy guy who happens to be really good with dangerous monsters. He’s particularly fond of working with Velociraptors. As the mission begins, Owen is trying to get “fresh bacon” delivered for training purposes.


| Icon | Story Characters | Abilities |
|---|---|---|
 |
Owen Grady | Climb, Rope/Vine Cutter, Droppings Rummage, Dino Heal, Camouflage |
 |
Barry | Electric Rifle, Tracker, Grapple |
Fire the Pig Cannon!

Tag to Owen Grady and smash the nearby crate filled with small green build-it pieces. Use them to assemble the rest of the LEGO climbing wall. Climb to the ledge and use Owen’s knife to slice through the vines snagging the pig crate. Watch as the crate swings free…and the crane slams it into the pickup truck below! The pig escapes across the yard.
Use the build-it pieces of the shattered truck and crate to assemble a cannon—a porcine cannon, no less. Tag to Barry and pick up the tracking item, a birthday candle. Follow the blue tracks until Barry unearths build-it pieces. Assemble them into a cake with candles. The pig emerges from hiding to chow down on cake.

Approach the pig and press the Ride button to mount it. Ride the pig onto the blue platform in front of the cannon to load the animal. Tag to Barry and use his grappling hook on the orange grapple point to pull back the cannon then fire it. The pig flies over the wall into the raptor arena.

MINIKIT: Veggie KitBefore climbing the ladder and stairs to access the raptor arena, head to the right and smash the crate full of green LEGO pieces to the big tent’s left. Assemble the build-it pieces into a Minikit!  |
Release the Velociraptors!
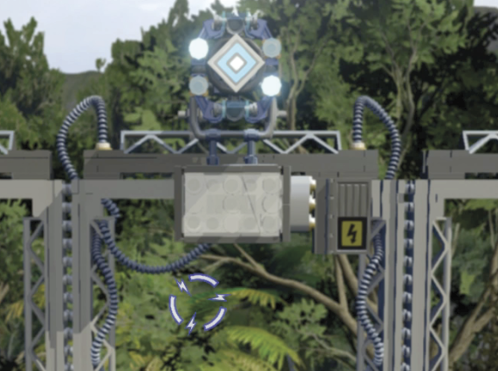
Tag to Owen and climb the newly lowered ladder, and then the stairs to the metal walkway. Proceed to the open platform on the right. Use Owen’s knife to slice the ropes on both winch handles, dropping LEGO pieces. Tag to Barry and use his grappling hook on the orange loop up high in the middle to pull down more pieces. Now you can assemble the hopping build-it pieces into a new kind of ranged target.
This diamond-shaped blue/white bull’s-eye is an electric target. Only electric rifles (such as the one conveniently equipped by Barry) can activate electric targets. As with any ranged attack, hold down the Aim button and move your aiming reticle over the bull’s-eye. Then release the Aim button to fire. This sends juice down to the raptor cages, releasing the creatures into their “play” area.

Tag to one of the raptors and move across the yard to one of the two “dino switches.” Approach the device and press the Use button. The raptor locks his jaws on the switch and pulls it out until the green activation light comes on. This raises a new electric target behind Owen and Barry. Repeat this at the other dino switch to raise a second electric target.

Tag to Barry and use his electric rifle to shoot both of the electric targets. This charges the exit gate and releases the four Velociraptors into their paddock. Watch as the creatures display high intelligence and the ability to communicate with sounds and gestures. Looks like that poor pig’s bacon is cooked, doesn’t it?
Raptor Tracking


Now you get to direct a quick demonstration of the raptors’ ability to work together and solve problems. Note how well the pack responds to Owen Grady’s prompting as they face each new challenge in tracking down the pig.
| Icon | Story Characters | Abilities |
|---|---|---|
 |
Raptor 1 | Pounce, Dino Switches, Scent Tracking |
 |
Raptor 2 | Pounce, Dino Switches, Scent Tracking |
Climb Via Raptor Rails
Head rightward to the fenced enclosure to spot the pig, who scoots through a small-access hatch. Smash the tires and the blue crate to get a pile of hopping LEGO pieces. Guess what? Raptors are so smart they can build too! Assemble the pieces into a bounce pad. Before you use the pad, see the next Minikit section. Then bound from the pad to the raised walkway.

MINIKIT: Kit in the CageBefore you use the bounce pad, go inside the cage and smash through the LEGO plants to reach a Minikit at the end of the passage. 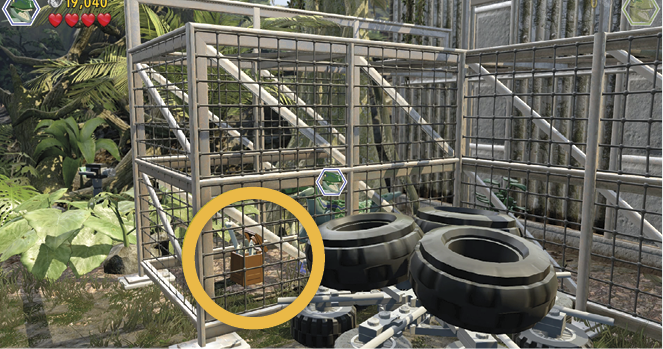 |
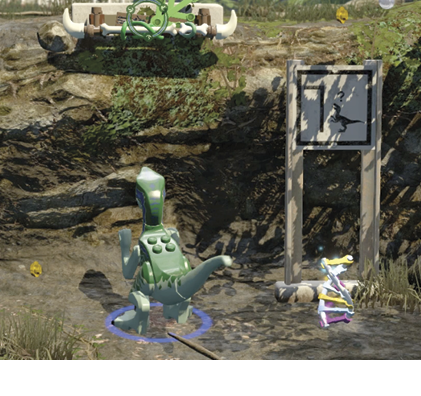
Follow the walkway and hop down into the next yard to spot the pig again. Smash the blue crate by the sign and assemble the build-it pieces into a “raptor rail” at the top of the next wall. Raptors can use their Pounce ability to leap to these rails. Hold down your Special Ability button, use the left stick to move the targeting reticule over the rail, and then release the button to pounce to the rail and swing to the upper level.

Follow the trail and hop over the stream to spot the pig again. Smash the crates against the rock wall and use the pieces to assemble another raptor rail. Jump on the rail to pull it down and overload the nearby mechanism, raising the shutter to reveal another raptor rail. Use it to swing up another level.
Solve the Cage Puzzle
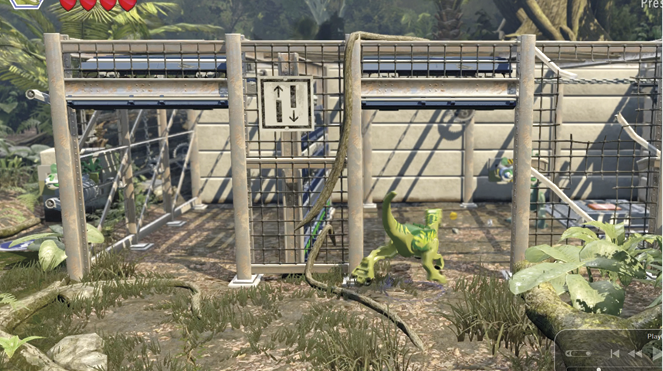
Approach the cages and smash the equipment outside. Reassemble the pieces into a dino switch and pull it to open the interior cage door. While still pulling the switch, tag to the other raptor and send him through the interior door to the next dino switch. Pull that switch to open another entry door, tag back to the first raptor, and bring him through the newly opened door. Finally, walk each raptor onto one of the two red floor switches to open the exit gate on the right. Exit the cages.
Track the Pig to the Pen
Move directly over the nearby piece of cake on the ground. The yellowish mist around it is the beginning of a “scent trail.” Press Use/Activate to start following the trail. Follow the yellow scent markers from spot to spot until you flush the pig again. It smashes pieces as it escapes through an access hatch.

Assemble the pieces to repair the dino switch, but don’t pull it yet. First, walk one raptor on the lift platform to the right. Then use the other raptor to pull the switch, which raises the platform to the next level. Now smash some LEGO vines to reveal a raptor rail and pounce on it.

Tag down to the raptor still on the lower level and use the raptor rail at the top of the wall-climbing vines to swing to the upper level. Head to the right and smash the blue dumpster bins blocking access to the dino switch. Assemble the build-it pieces to fix the switch then pull that switch. Tag to the other raptor and pull the switch on the left side. This opens the access gate into the raptor yard. Back home! Release the both switches and run both raptors into the yard.

MINIKIT: Explosive Build-ItBefore you track the pig scent, use a raptor to smash the stacks of red tubes in the enclosure and assemble the pieces. Pull the dino switch and then release it to detonate the explosives. This reveals a Minikit. |
Approach the cake slice to the right and press Use to lock into the scent trail. Follow the puffs of yellow mist around the yard until you flush the pig one last time. The porker had nowhere to go, so it’s time for Owen and Barry to step in.
Save the Pig
Have Owen rummage in the droppings pile on the left to dig out a pile of build-it pieces. Assemble them into an elaborate carousel of distraction items. Tag to Barry and shoot the electric target to fire up the device. Pick up the red crank switch that falls at Barry’s feet.

Use the red switch on the crank and turn it to open the exit gate and escape. This triggers a cutscene: First, a fellow named Hoskins wants Owen to “field test” his control over his four raptors, Blue, Charlie, Delta, and Echo. Then Claire Dearing asks him to inspect the Indominus paddock for “vulnerabilities.”

Indominus Paddock
Inspection Item #1: The Indominus Rex dinosaur seems to be missing from the paddock. Hmmm, that could be a vulnerability. Owen, Barry, and Ellis the dino handler all enter the area to investigate.
| Icon | Story Characters | Abilities |
|---|---|---|
 |
Owen Grady | Climb, Rope/Vine Cutter, Droppings Rummage, Dino Heal, Camouflage |
 |
Supervisor Nick | Jurassic World Access, Scanner, Repair |
 |
Handler Ellis | Electric Charge |
Cross the Diggings
Walk to the right until you reach a deep trench that blocks passage. The Indominus clearly has some big claws. Tag to Supervisor Nick, a high-level Jurassic World employee who carries a scanner. Approach the sparkling blue sensor console and use Nick’s scanner to reveal an access switch.
Like the sensors, only high-level employees like Nick have access to these special Jurassic World switches. Press Use and watch the three-button code appear onscreen, memorizing the order. Then enter the correct sequence. This lowers the ladder.

Climb the ladder, follow the walkway across and down, and hop back into the paddock. Tag to Owen Grady and rummage in the dino droppings to find some build-it pieces. Use the pieces to add handholds to the climbing wall then climb over the huge log blocking the way. Use Owen’s knife to cut the vines holding the log so it drops. The others can hop over now.

Proceed to the right until you see the sinkhole collapse. Tag to Supervisor Nick and use his Repair ability to fix the well’s blue pump mechanism. Jump up and down three times on the glowing green pressure pad to fire up the pump and fill the hole with well water. Hop across the pads to reach the other side.

Approach the wall to trigger a quick scene: Wow, those claw marks are very high up. And suddenly you get really bad news from the park control station: The Indominus Rex is still in the paddock!
Distract the Indominus Rex
Follow the path to the right until you reach the charge station—the electricity is out. Tag to Handler Ellis and hold down the Use button to charge the station with his stun-rod. This triggers a cinematic: The Indominus appears, and poor Ellis gets taken for a ride.

Tag to Owen and hold down the Use button until you activate his Camouflage ability. Sneak past the dinosaur; then deactivate stealth and rummage in the droppings pile. Assemble the build-it pieces into a wind-up rabbit that distracts the Indominus. Unfortunately, the big beast catches up to the rabbit right in front of the exit gate.

Escape the Paddock!

Tag to Supervisor Nick and approach the sensor panel next to the cage. Use Nick’s scanner to lower the cage, and then continue moving to the right. Proceed to the next sensor panel and scan again to extend a series of block handholds on the wall. Tag to Owen Grady and jump up from block to block to the observation deck.
AMBER BRICK: Nick Lowers the CageAfter tagging to Supervisor Nick and using his scanner ability to lower the cage, find an Amber Brick in the middle of the cage. |

When you arrive on the deck, use Owen’s knife to cut the winch rope to drop a crate full of meat. Assemble the fallen meat pile into a dino-meal that zips down the zipline and lures the Indominus away from the main gate. Tag to Supervisor Nick and use his Jurassic World access on the control panel to the gate’s right. Observe the three-button code and enter the sequence to open the gate.
Proceed through the gate to trigger the level-ending cinematic: Owen and the supervisor get out of the paddock, but somebody else manages to get a foot in the door too.

Hub Transit 16
This hub transition sequence is more involved than usual. Here you control the Mitchell brothers, Gray and Zach, as they move through the Jurassic World village and into the park’s amazing Gyrosphere Valley.

| Icon | Story Characters | Abilities |
|---|---|---|
 |
Gray Mitchell | Bone-Build, Small Access, Photography |
 |
Zach Mitchell | Illuminate (Torch), Repair |
Spawn a Pachy

Follow the light blue studs across the park village, turning left at the Juice Bar and continuing past the Petting Zoo entrance until you reach the pachycephalosaurus pavilion. Tag to Gray Mitchell and use his Small-Access ability to crawl into the access hatch and get past the closed gate. Inside, use the red button to open the exterior gates.
Jump to grab one of the two hanging handles to pull it down. (It may take a few hops before you snag the handle.) Tag to the other Mitchell brother and do the same with the other handle to open the interior gate.
Smash the crate in the next room and reassemble the pieces into a Dino Spawner. Step on the dino icon and use the spawner to produce a Pachycephalosaurus. It’s a playable character, so tag to the dinosaur. The Pachy automatically steps onto the elevator lift and rides up into the arena.

Bash Stuff

The arena announcer introduces “the biggest bonehead of the Cretaceous period” and three solid rock pillars rise out of the ground. Run straight at each pillar while holding down the Attack button to trigger the dinosaur’s fearsome head-slam charge. When all three pillars are shattered, three more Pachys are released into the arena. Knock out all three challengers to wrap up the show. You automatically tag back to one of the Mitchell brothers.
Ride the Gyrosphere


Follow the blue stud route out of the pavilion and along the waterfront all the way to Gyrosphere Valley. Enter to find a park worker panicking because the gyro-track is broken. Interact with the blue LEGO computer mechanism to fix it and spawn the gyrosphere. Walk to the gyrosphere and press your vehicle entry button to hop inside. Use the left stick to steer. Drive over to the gyro-roll pad by the closed gate. (A Mr. DNA double helix hint is next to it.) Steer onto the pad so the sphere settles.
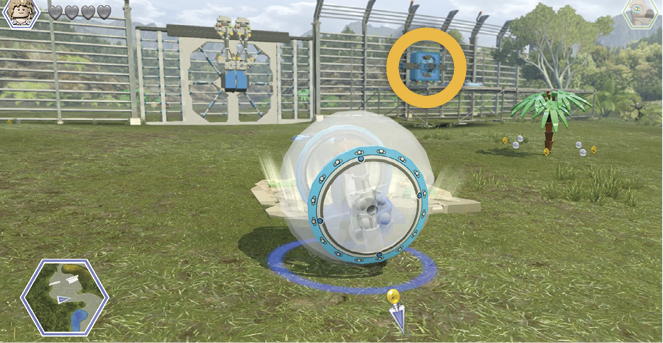
Hold the left stick forward to turn the pad’s roll bars and lower the gate. Once the gate locks open, your Gyrosphere drives off the pad. Drive down the valley as it curves around and eventually reaches a tall fence with a much bigger gate. (There are many interesting things to see and do along the route, but as always, we recommend that you finish the Story before going hub exploring.) A big locking mechanism (circled in our screenshot) hangs on the fence above a platform to the left of the gate.

Drive to the gyro-launch pad at far right to bounce your sphere onto the platform. There, drive into the roll pad and push the stick forward to rotate the roll bars; this exposes the gate’s lock mechanism.
Now drive off the platform and steer to the gyro-launch pad on the ground in front of the gate. Boom! The pad launches your Gyrosphere right into the gate, banging it open! Drive through the open gate to trigger the opening scene of the next level.
