
LEGO Jurassic World Guide Console Hub Areas
Jurassic World
Jurassic World is the hub you traveled through while playing Movie 4. This is a busy, fully functional park with working attractions, throngs of park visitors, and plenty of interaction with live dinosaurs.
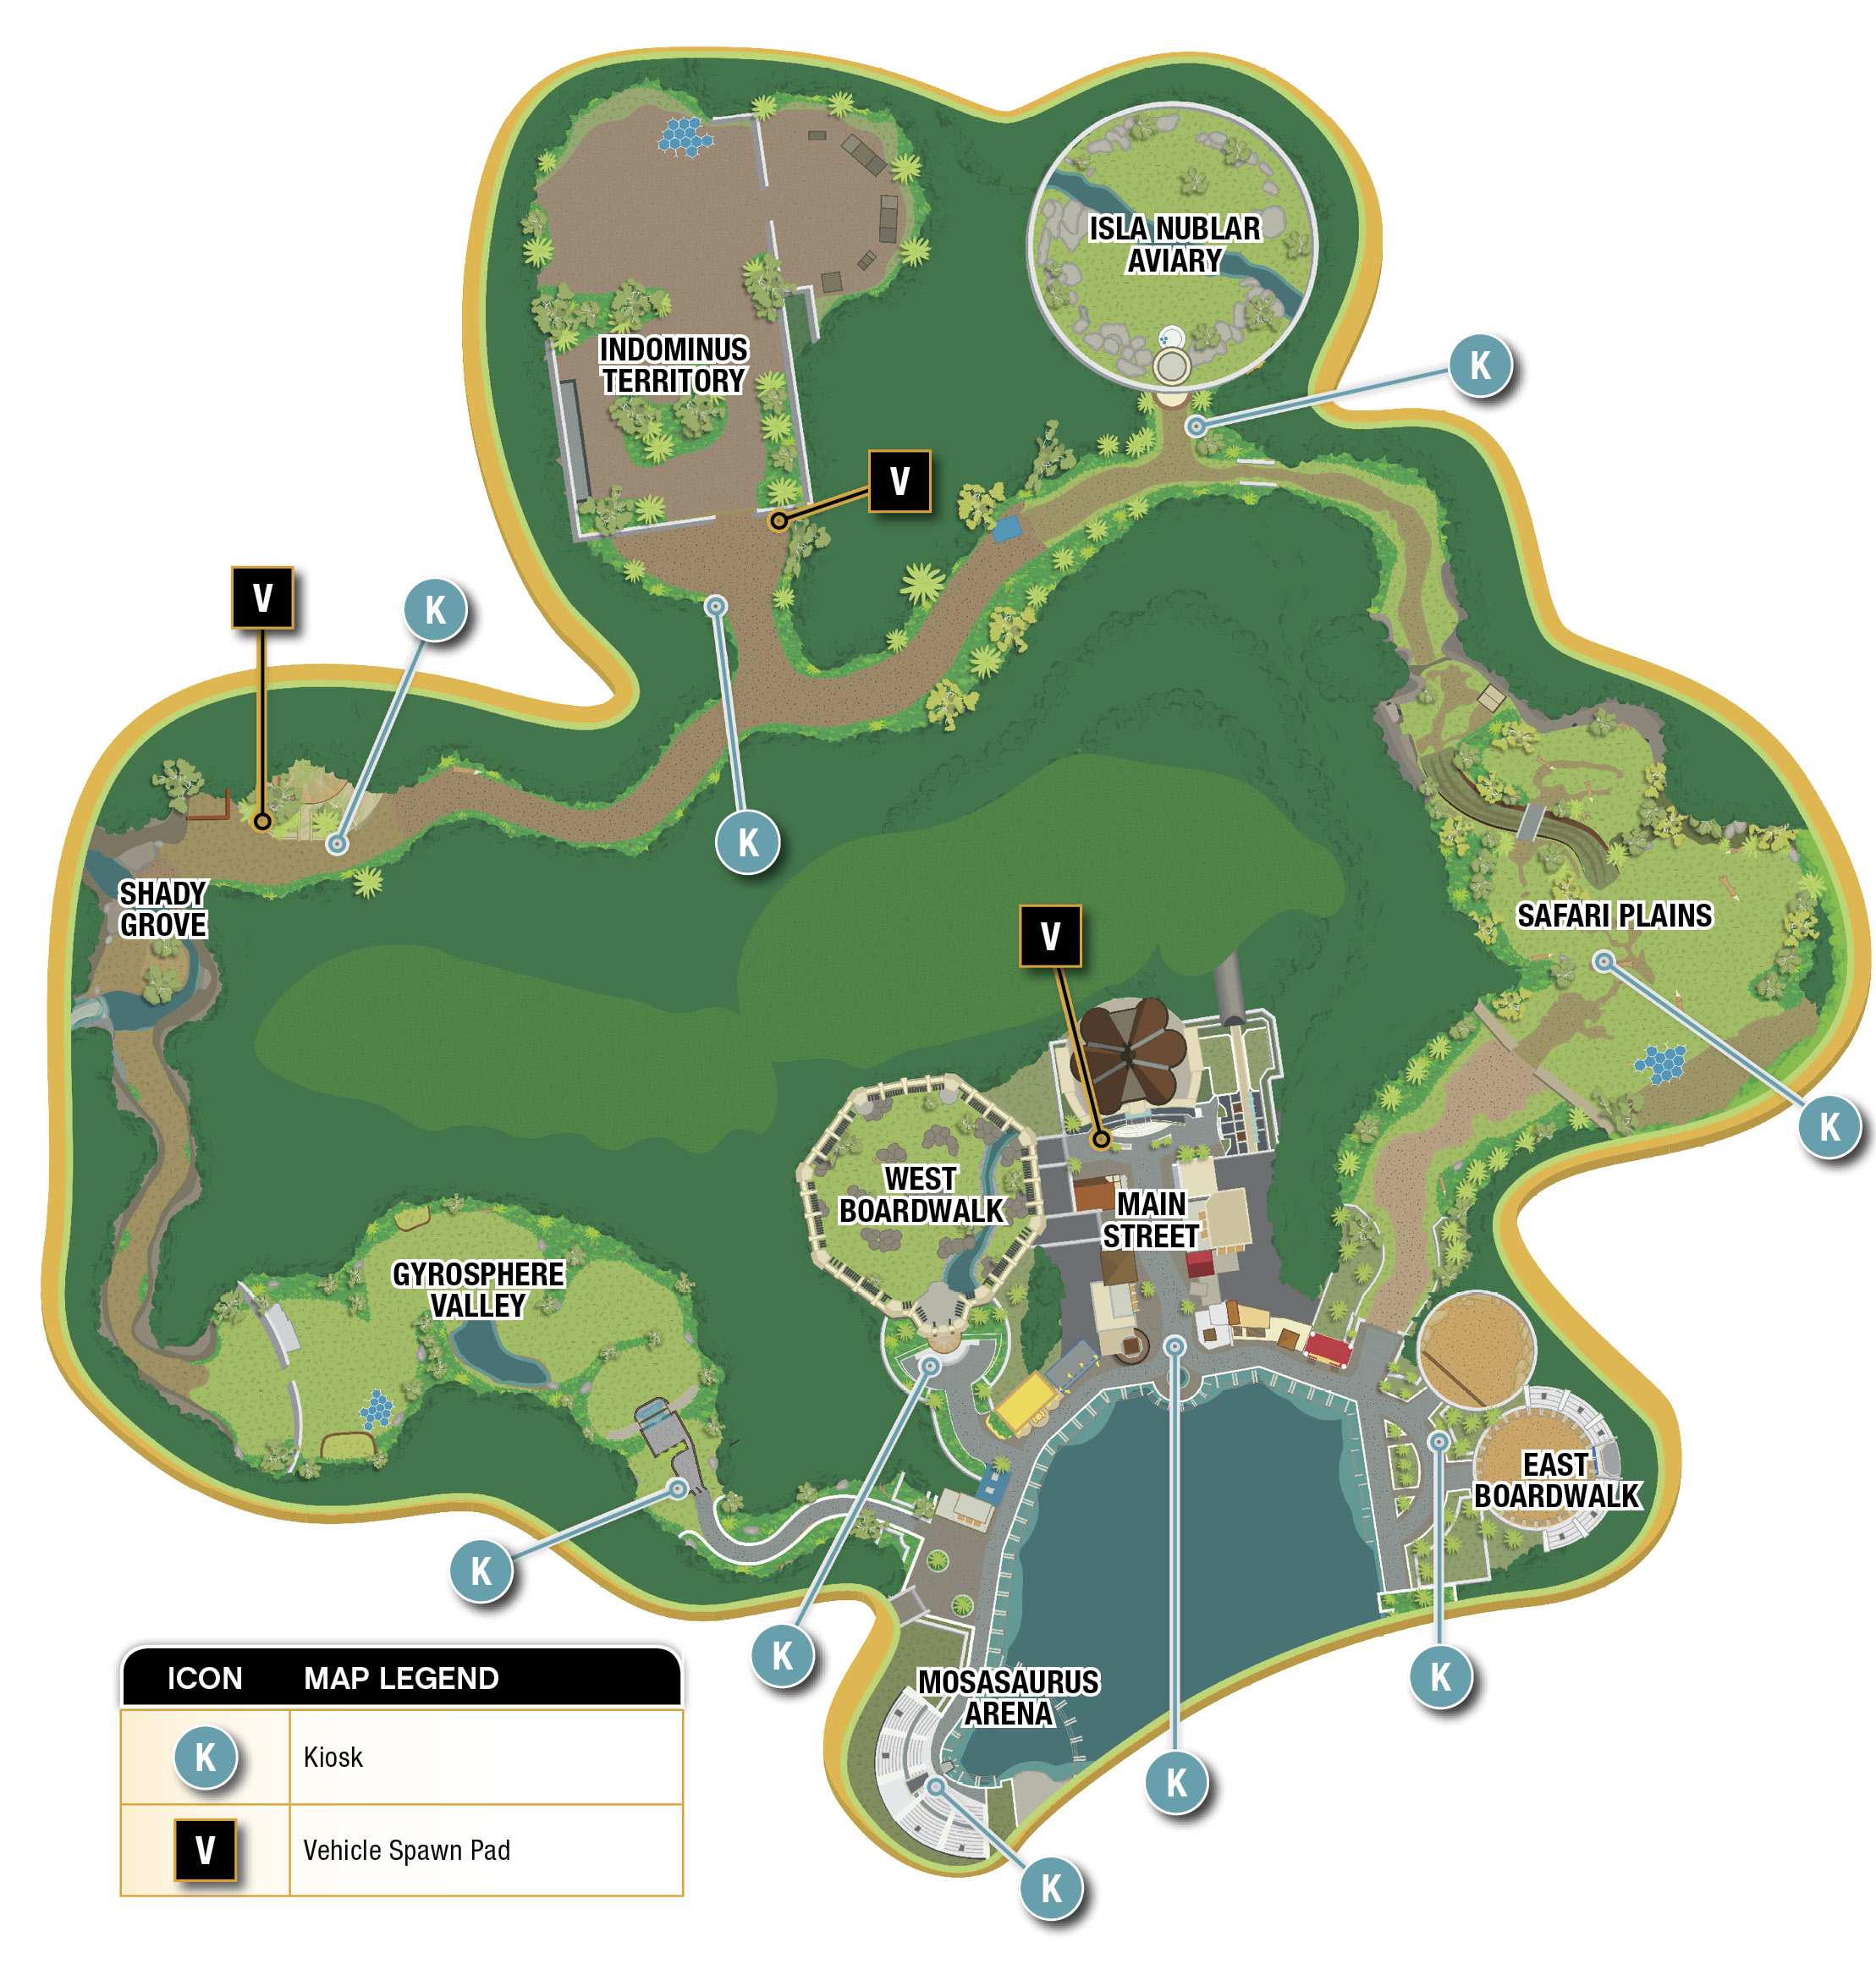
Main Street
Jurassic World’s main thoroughfare is bustling with crowds. Here you can find five Gold Bricks plus a photography spot and a Worker in Peril that can earn you two more Gold Bricks.
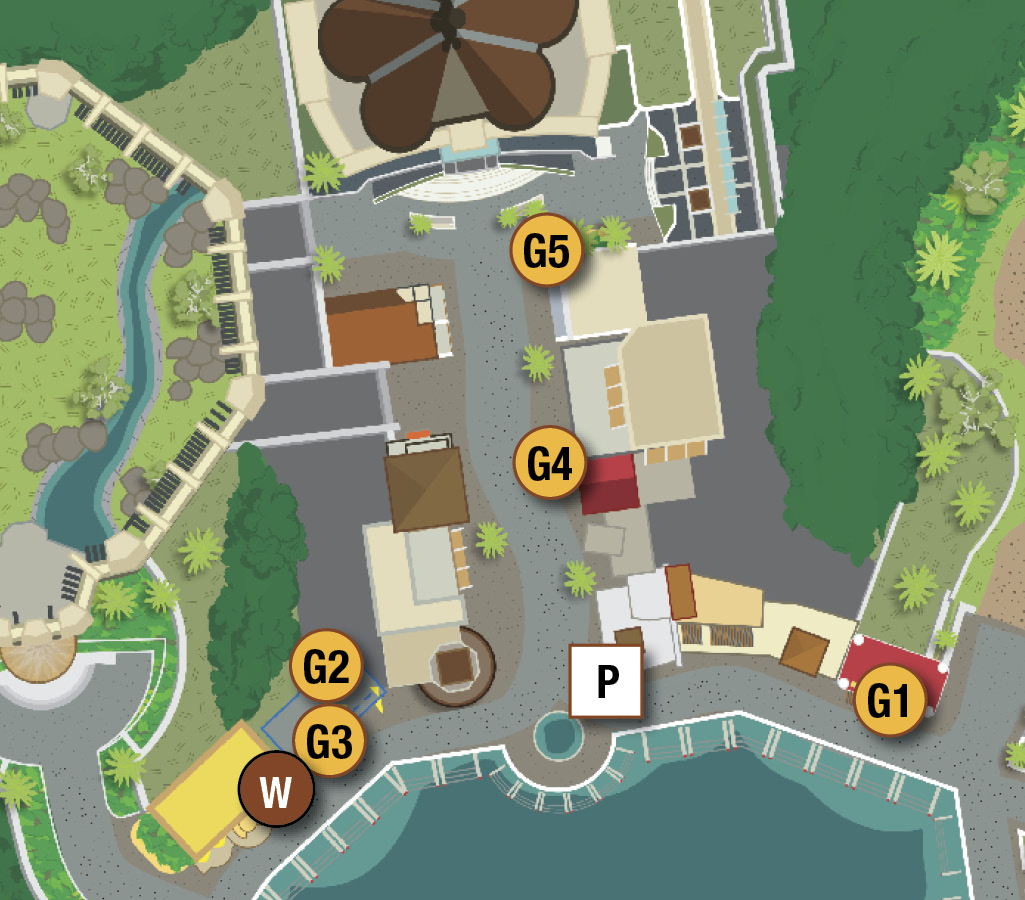
Main Street Challenges
| Icon | Type | Notes |
|---|---|---|
| P | Photograph | Take a photo on the corner where Main Street meets the waterfront walk. |
| G1 | Gold Brick | See “Smash the Saxophones.” |
| G2 | Gold Brick | Send a hacker like Lex Murphy to play the driving game in the Arcade on the waterfront walk. Make it across the finish line in time by avoiding the cars along the road. |
| G3 | Gold Brick | Shoot the electric switch above the Arcade with an electric rifle to activate the rocket ship ride and earn a brick. |
| W | Worker In Peril | Help the poor fellow trapped under the Cupcakes shop security door. Send a Velociraptor to pull and release the dino switch between the shop and the Theatre. |
| G4 | Gold Brick | Shoot the bull’s-eye in the souvenir stand to trigger a shooting gallery. Shoot all six new bull’s-eyes that appear to win the Gold Brick. |
| G5 | Gold Brick | Find the climbing blocks on the pillar here near the entrance to the monorail. Hop up the blocks to the roof; then run to the right until you reach the Gold Brick. |
Smash the Saxophones

Find the Music Store on the waterfront walkway and switch to a Compsognathus. Use both of the green Compy Tubes, one on either side of the store. Each one drops your Compy onto the awning where you can smash a huge gold saxophone.
When you shatter the second saxophone, a compartment drops open revealing a Gold Brick. Switch from the Compy to any character to jump over and grab the brick.

East Boardwalk
The East Boardwalk area features three freestanding Gold Bricks, plus bricks for using a photography spot, healing a sick dino, and a completing checkpoint race. You can also find a Red Brick here too.
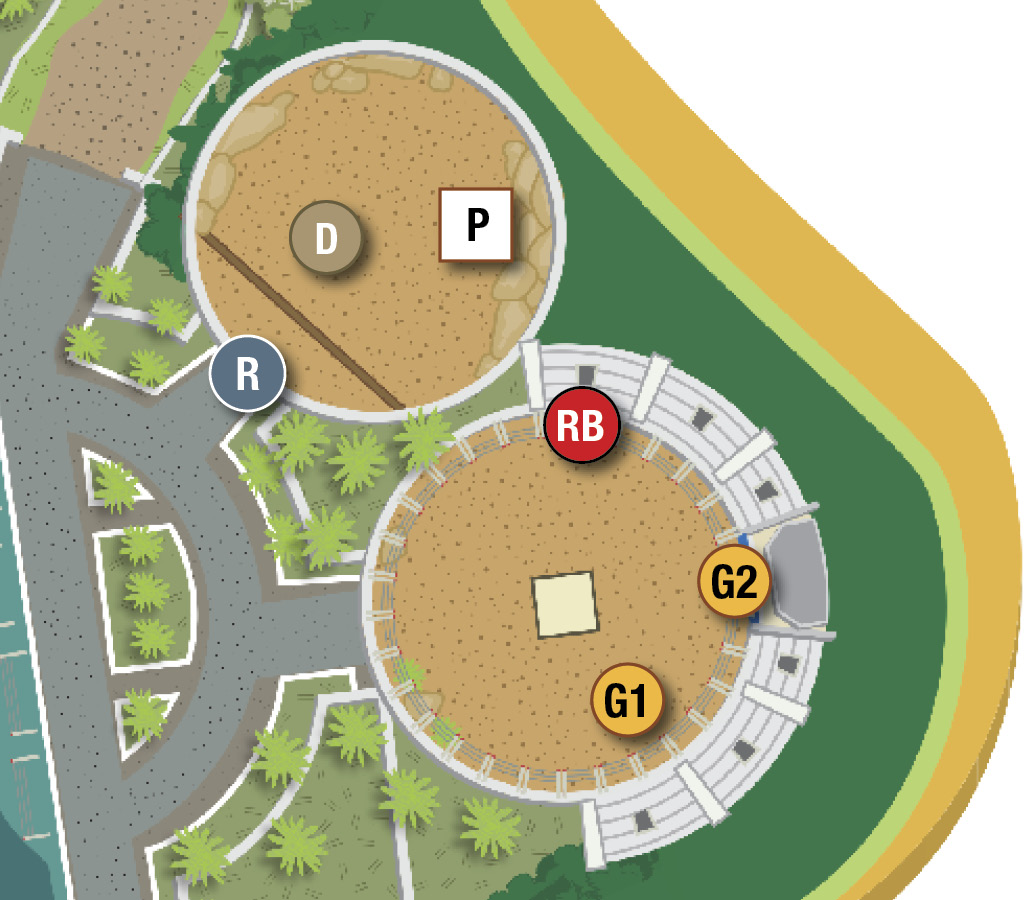
East Boardwalk Challenges
| Icon | Type | Notes |
|---|---|---|
| P | Photography | Take a photo at the spot in the Petting Zoo just to the left of the soccer goal. |
| D | Sick Dino | See “Dino Food.” |
| R | Race | Switch to a fast runner like Gallimimus and start the race from the gate at the entrance to the Petting Zoo. Follow the gates all the way back to Safari Plains to win. |
| G1 | Gold Brick | In the Pachycephalosaurus Arena, use a stun-gun to open the lift door. Enter the lift cage and ride up into the arena. Then follow the scent trail with a raptor to unearth a Gold Brick. |
| G2 | Gold Brick | Inside the Pachycephalosaurus Arena, use a Pachycephalosaurus to head-bash through the cracked LEGO door. Then defeat the waves of attackers within the time limit. |
| G3 | Gold Brick | Kick the soccer ball into the goal three times in the petting zoo. |
| RB | Red Brick | In the Pachy Arena, use a raptor to pull and release the dino switch to bring up a black LEGO target. Switch to a Dilophosaurus and spit goo at the eight targets within the time limit to win a Red Brick. |
Dino Food

Find the sick dino in the Petting Zoo. You need three items for the beast. First, grab the nearby tracking object (some berries) and follow the trail to unearth a plant root. Water the root to grow a big apple tree, and then give the tree a punch to shake out an apple. Feed the apple to the hungry dino.

Next, solve the academic board to activate the nearby conveyor that dumps a green crate. When the crate breaks, grab the croissant and feed it to the dino. Finally, use a repair guy to fix the blue food dispenser in the back of the enclosure. When it spits out a carrot, feed it to the dino.
West Boardwalk
The highlight of the West Boardwalk is the T. rex paddock. Look for a photo spot, a Red Brick, a pair of races (one inside and one outside the paddock), and five standalone Gold Bricks.
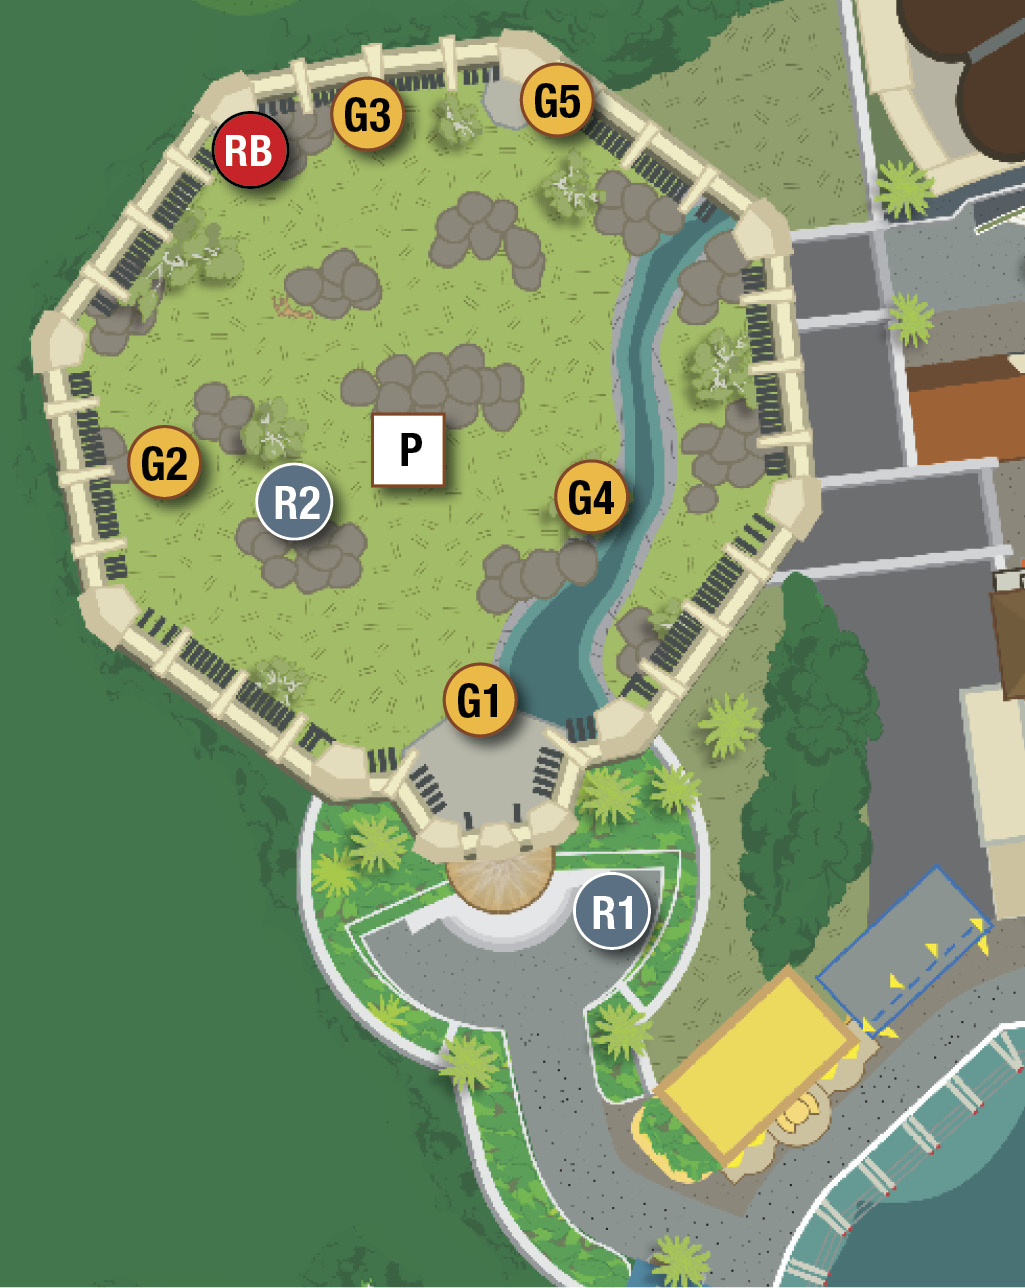
West Boardwalk Challenges
| Icon | Type | Notes |
|---|---|---|
| R1 | Race | Use a crowbar to open the pigpen on the patio outside the T. rex paddock. Hop on the speedy pig and ride to the starting gate just ahead. Beat the time at each gate to earn a Gold Brick. The course takes you all the way to Gyrosphere Valley! |
| G1 | Gold Brick | After you use Jurassic World Access to unblock the lift platform then ride down, shoot the electric switch left of the lift with an electric rifle. This releases the T. rex into the pen and drops a Gold Brick up on the viewing balcony. |
| P | Photography | Find the photo spot in the center of the paddock near the central rock formation. |
| G2 | Gold Brick | Use T. rex’s roar to shatter the amber on the dino spawner, uncovering a Gold Brick. |
| G3 | Gold Brick | Use T. rex’s roar to shatter the amber hatch over the academic board by the big entry doors. Solve the equation to open the gate and release four Gallimimuses. Switch to T. rex and hunt them all down to earn a Gold Brick that appears on the ground by the big gate. |
| RB | Red Brick | See “Red Brick Tower.” |
| R2 | Race | Mount the cow on the low rock near the left tower and ride to the starting gate. Race through the course in time to earn a Gold Brick. (Like the pig, the cow is very fast.) |
| G4 | Gold Brick | Switch to a charging dinosaur and smash all four of the cracked LEGO boulders in the enclosure to earn a Gold Brick. |
| G5 | Gold Brick | Use a Compy to climb the right tower via the green Compy Tube. A Gold Brick sits on the platform, waiting for you. |
Red Brick Tower


As T. rex, bite apart the dino-strength boulder to get access to the rock platforms under the left tower. Switch to a human and hop up the rocks to the spiky green plant. Smash and reassemble it into a bounce pad. Continue up the tower to find the Red Brick!
Mosasaurus Arena
This area is similar to the Isla Sorna Aviary in Hub 3 in that you enter a separate, self-contained habitat. Here, you get to play as a massive prehistoric fish in a large, open tank.
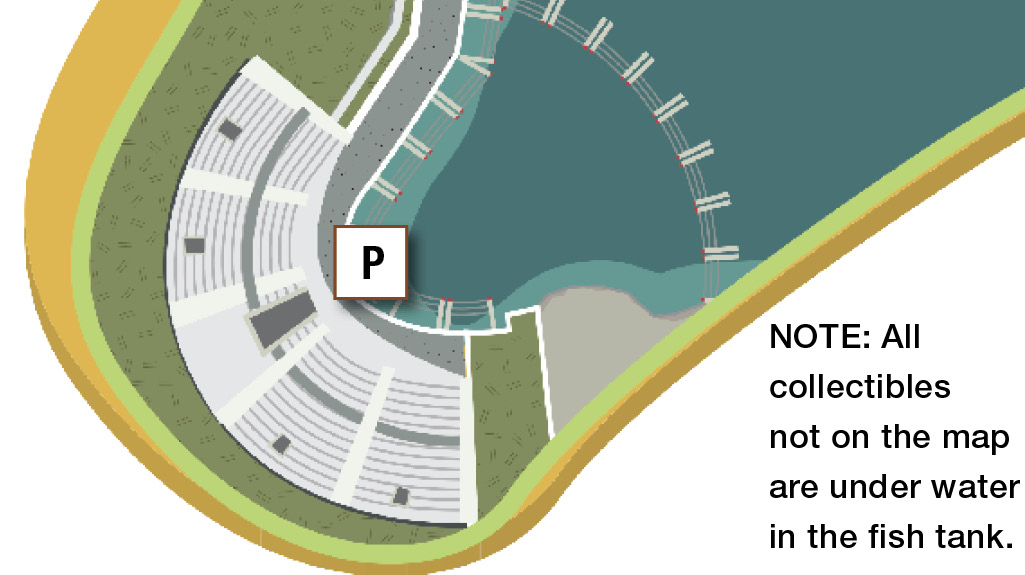
Mosasaurus Arena Challenges
| Icon | Type | Notes |
|---|---|---|
| P | Photograph | See “A Killer Shot.” |
| G1 | Gold Brick | When you arrive at the underwater observation chamber, switch to a Bone-Build character and assemble the big bone pieces at right into a Mosasaurus skull. |
| G2 | Gold Brick | Snag the Gold Brick floating in the middle of a circle of gold studs. |
| G3 | Gold Brick | Knock out six of the sharks in the tank. |
| G4 | Gold Brick | Smash the three brown sea creatures floating in the tank. One is an ammonite shellfish, one is a starfish, and one is a trilobite. Just swim right through them. |
| R | Race | Swim through the first gate to trigger a checkpoint race. Get through each gate in time! |
| RB | Red Brick | Roar to shatter all three amber rock clusters in the tank to get the Red Brick. |
A Killer Shot
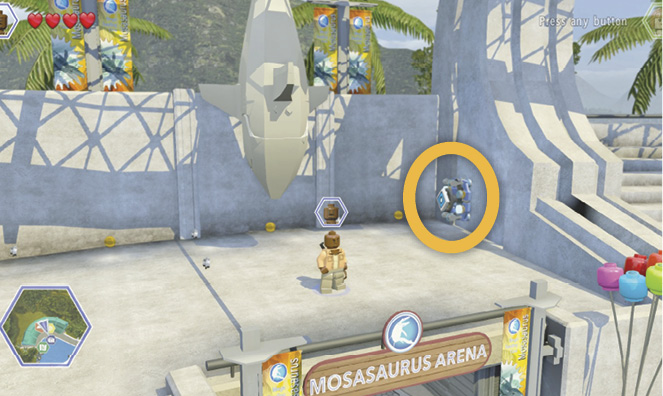
You have to do a little work to set up the photograph for this area. First, head up the stadium ramp and climb the ladder to the patio where the shark hangs. Switch to a character with an electric rifle to shoot the electric switch. This sends the shark down the cable so it hangs over the water.

Now go to the tripod set up at the water’s edge. Take the photo to get your first glimpse of the mighty Mosasaurus and earn a Gold Brick!
Gyrosphere Valley
This sweeping, open valley features roaming dinosaurs that you can observe from the comfort of your Gyrosphere. You’ll need to hop out, though, in order to scoop up most of the collectibles in the area.
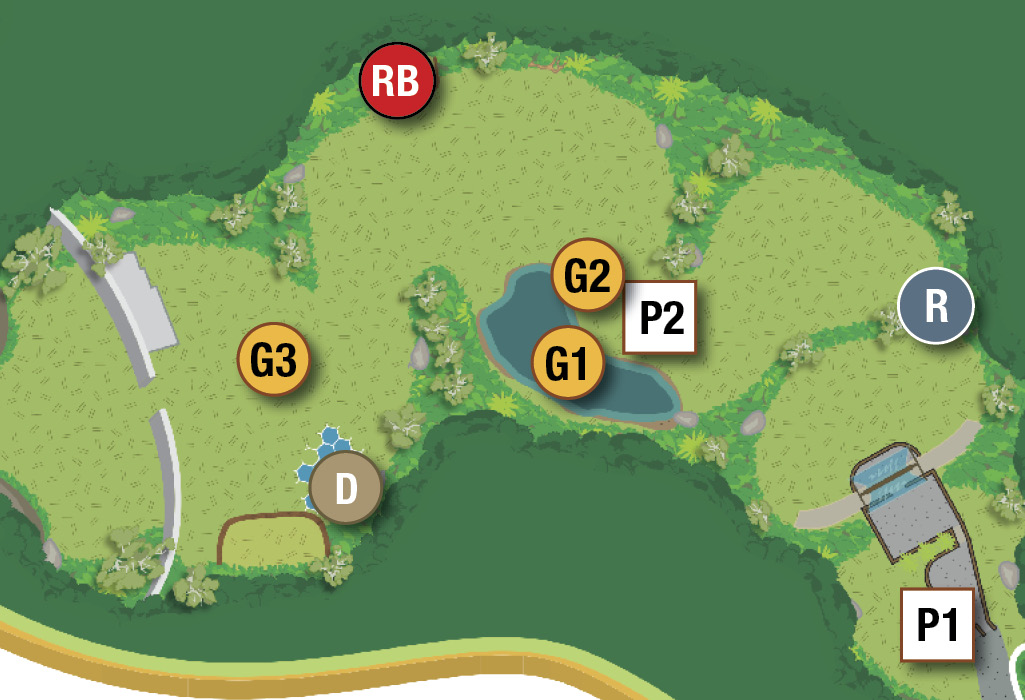
Gyrosphere Valley Challenges
| Icon | Type | Notes |
|---|---|---|
| P1 | Photograph | Snap a shot of the Gyrosphere Valley sign near the kiosk. |
| R | Race | Hop in the Gyrosphere near the entrance and roll into the starting gate. Press Activate and race through the gates! |
| P2 | Photograph | Hop out of your sphere near the Compy pack that swarms around the tripod. Switch to Eric Kirby and toss a bottle of T. rex scent to scatter the Compys. Switch to a character with a camera and snap the photo. |
| G1 | Gold Brick | Step onto the small dock and toss a hook to the orange grapple plug on a raft out in the water. Haul in the raft and hop aboard to nab the brick. |
| G2 | Gold Brick | Drive your Gyrosphere onto the launch pad here to get flung across the lake. The sphere flies right through a Gold Brick floating in the air! |
| D | Sick Dino | The sick Triceratops lies on the dino spawner. Rummage in the droppings pile on the right to find out what the dino needs; then rummage the pile on the left to find a carrot. Sharpshoot the bull’s-eye in the tree to get an apple. Drive the Gyrosphere onto the nearby launch pad to get flung into the banana tree. Feed the banana that falls out to the dino. |
| G3 | Gold Brick | After you heal the sick dino, repair the dino spawner and spawn a dinosaur who can destroy quake LEGO objects. Take control of this big dino and stomp on the three cracked ground patches in the area to earn a brick. |
| RB | Red Brick | See “Terrace Brick.” |
Terrace Brick
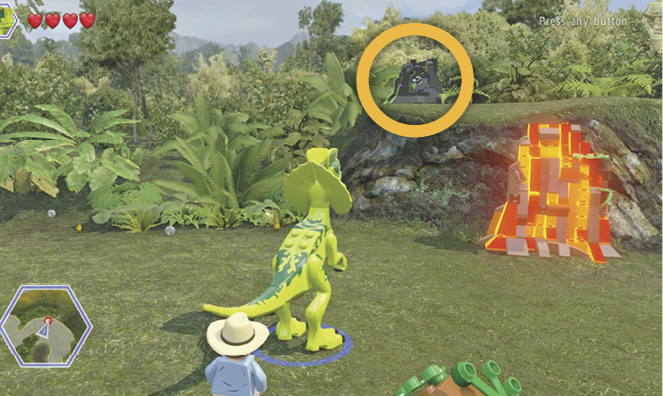
Use a Dilophosaurus to goo spit several times on the black LEGO block up on the terrace with the amber wall section. After a few hits, a Red Brick appears. Once you heal the sick dino on the dino spawner, spawn a “roar” dinosaur like the T. rex. Use its roar to shatter the terrace’s amber wall.

Assemble the build-it pieces into a raptor rail. Switch to a Velociraptor and use Pounce on the rail to swing onto the terrace. The Red Brick is all yours now!
Shady Grove
This shady area is where Zach and Gray Mitchell found the old InGen vehicle maintenance facility in the “Parking Garage” mission of Level 18, Out of Bounds. This time you work along the road outside the structure.
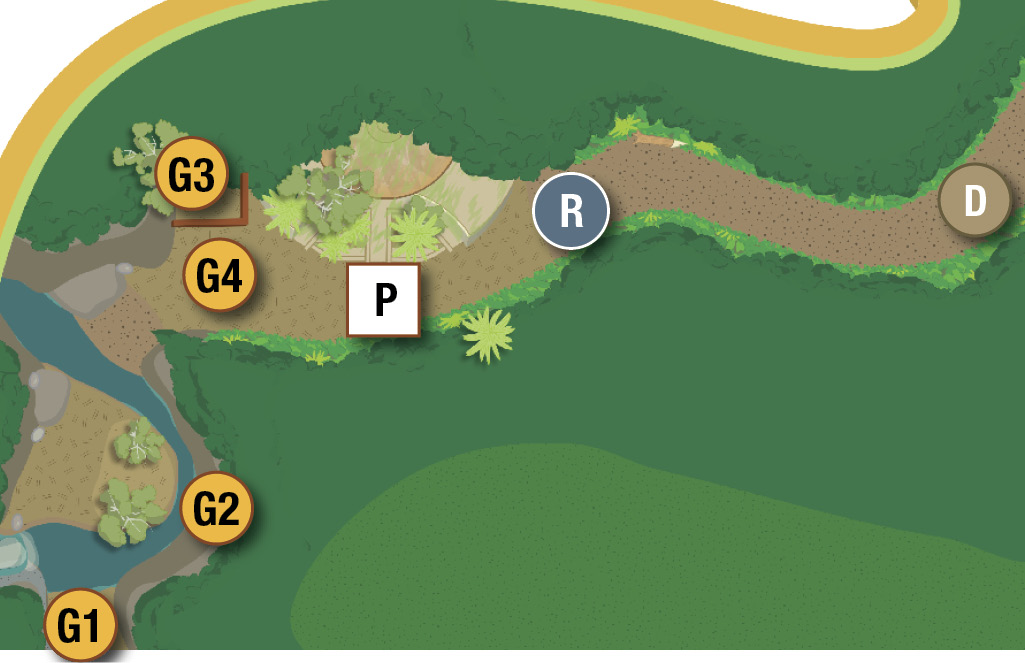
Shady Grove Challenges
| Icon | Type | Notes |
|---|---|---|
| G1 | Gold Brick | When you exit Gyroscope Valley and drop to the riverside ledge, turn around to see a dark cave directly behind you. Use an illumination character to get the Gold Brick inside. |
| G2 | Gold Brick | See “Spit & Glide.” |
| G3 | Gold Brick | Use a character with bolt cutters to slice the chain on the big brown gate next to the area entrance. A Gold Brick is just inside. |
| G4 | Gold Brick | As you approach the facility, KO the lone Compy in the road to trigger waves of Compy attackers. Knock out 12 Compys within 45 seconds to earn the brick. |
| P | Photography | Use the photo spot near the staircase leading into the facility. |
| D | Sick Dino | Before trying the race (which takes you far from Shady Grove), find the sick Pachycephalosaurus just down the road. Rummage the small droppings pile nearby to find the leaf. Shoot the bull’s-eye in the tree to knock down the apple. Then use a Dilophosaurus to goo spit on the nearby black LEGO block to find the banana. |
| R | Race | Use the vehicle spawner at the facility to spawn your favorite car. Then drive into the starting gate and press Use to start the countdown. Get through all gates in time to earn a Gold Brick. You end up on the waterfront walkway next to the Petting Zoo! |
Spit & Glide
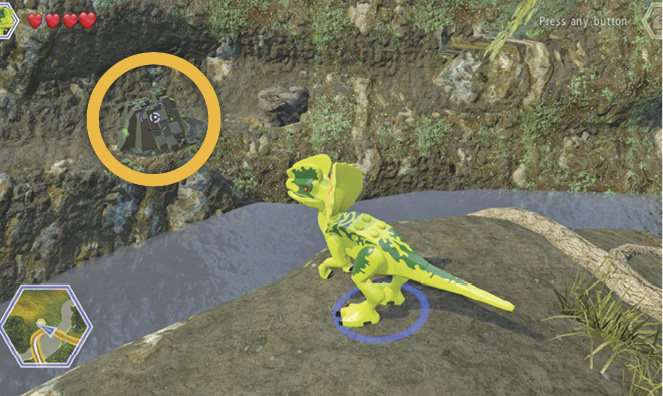
Find the glide arrow pointing across the river ravine. Before you use it, however, switch to a Dilophosaurus and goo spit on the black LEGO on the narrow ledge across the river. This releases a Gold Brick. (You can’t glide across first then switch to a Dilophosaurus over on the ledge because it’s too narrow.)
Switch to a character who can glide such as Billy Brennan and make a jumping parachute glide across the river ravine to get the brick on the ledge.

Safari Plains
This area features a pair of meadow-like clearings, one larger and one smaller. You find another sick dino in the smaller clearing, and an annoying pack of Compys.
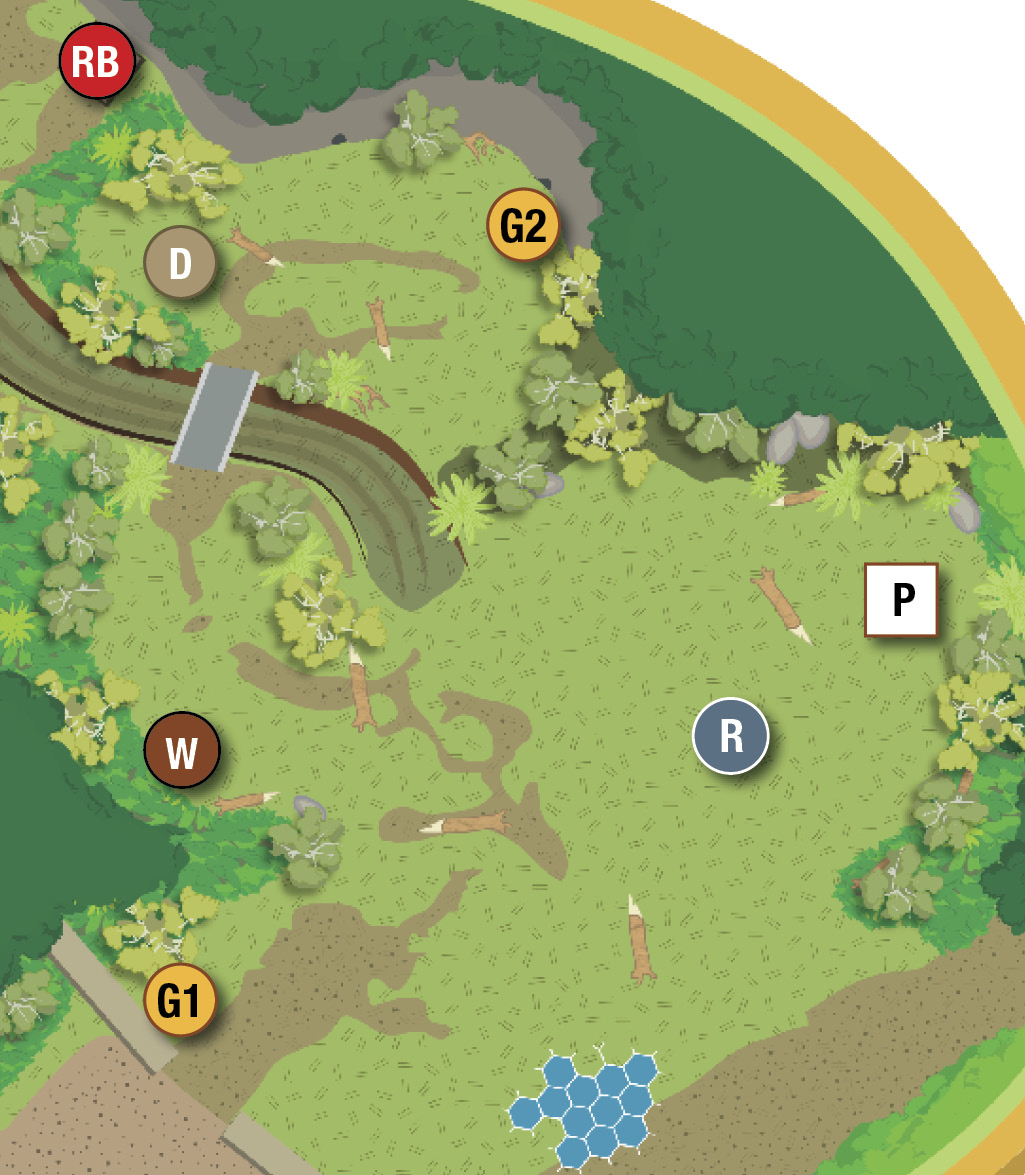
Safari Plains Challenges
| Icon | Type | Notes |
|---|---|---|
| G1 | Gold Brick | Switch to a charging dinosaur and smash all four of the cracked LEGO boulders in the area to earn a brick. |
| P | Photograph | Switch to a Velociraptor and follow the yellow scent marker that starts here. You end up next to the dino spawner, where the raptor digs up a camera tripod. Use a character with a camera to take a photo to earn yourself a Gold Brick. |
| W | Worker In Peril | Use the dino spawner to make a “roar” dinosaur. Use its roar to shatter the amber block near the worker in the truck being harassed by dinosaurs. The harassers run off and you earn a Gold Brick. |
| R | Race | Switch to a fast dinosaur like the Gallimimus and step into the race starting gate in the big clearing. Hit the gates within their time limits to win a Gold Brick. The route takes you underneath the bridge. |
| RB | Red Brick | After finishing the race, you end up next to a shack with a red-striped awning folded up and a Red Brick on the roof. Use a raptor to pull the dino switch on the shack’s left side. This lowers the awning. Jump onto the awning, then onto the roof, and collect the Red Brick. |
| G2 | Gold Brick | Cross over the bridge to the smaller clearing and use a Dilophosaurus to spit at the black LEGO boulder. This triggers a stream of attacking Compys. Defeat them within the time limit to earn the brick. |
| D | Sick Dino | See “Gallimimus Healer.” |
Gallimimus Healer
In the smaller clearing across the bridge you find a sick Gallimimus near the log. Rummage in the small droppings pile to discover the three ingredients you must feed the dino to heal it. Water the plant root across the clearing to grow a huge flower that drops a leaf. Feed the leaf to the dino.

Next, use a grappling hook on the nearby orange plug to pull apart the boulder pile. Grab the berries that fall and feed them to the sick Gallimimus. Finally, use an electric rifle to shoot the three electric switches. Pick up the ice cream cone that appears and deliver it to the dino. The beast rises and you earn a Gold Brick!

Isla Nublar Aviary
This aviary is considerably smaller than the one in the Movie 3 hub on Isla Sorna. Its primary features are a series of dino switches for a Pteranodon and a racecourse with tight turns best navigated by a Dimorphodon. Don’t miss the Gold Brick on the path before you even reach the aviary structure!
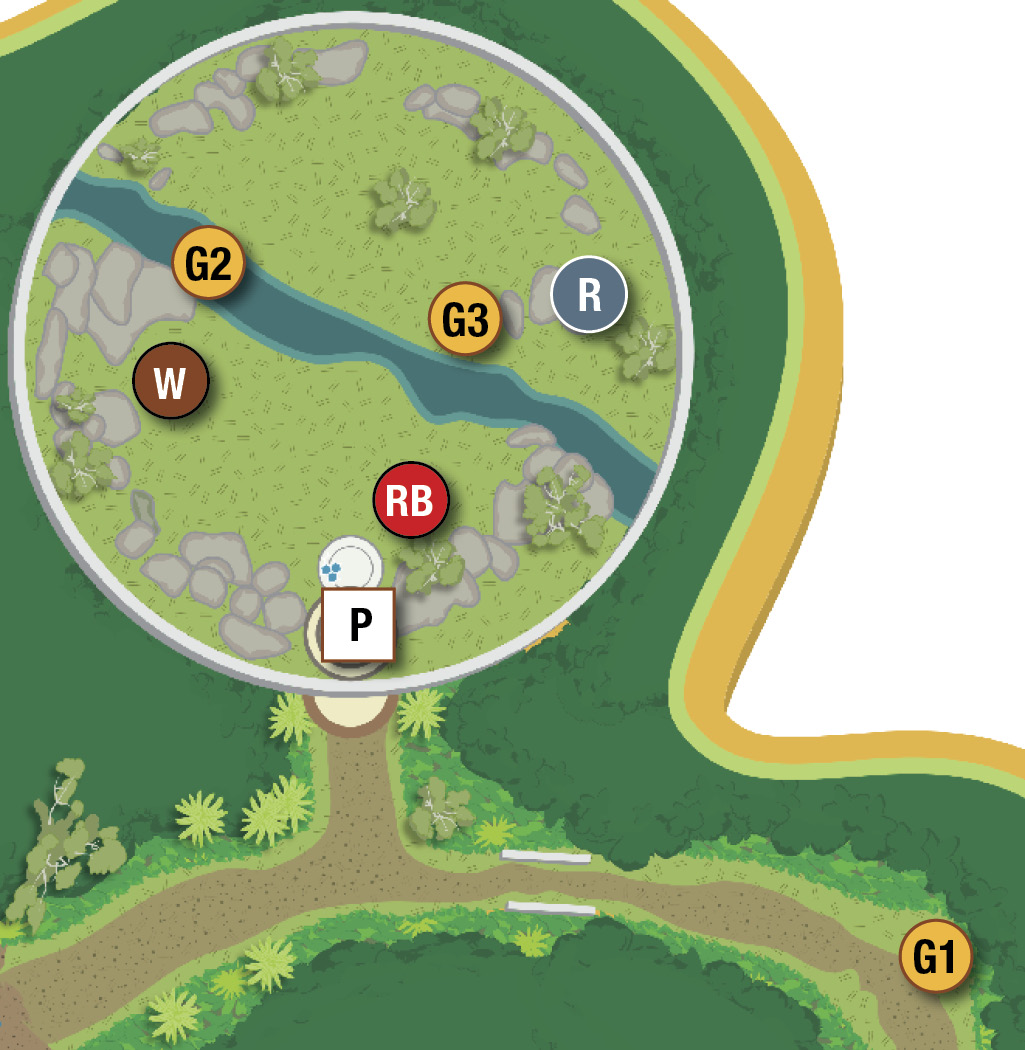
Isla Nublar Aviary Challenges
| Icon | Type | Notes |
|---|---|---|
| G1 | Gold Brick | On the road between the Aviary and Safari Plains, find a large black LEGO rock. Spit on it with a Dilophosaurus to uncover the yellow scent source. Follow it with a raptor until it digs up a Gold Brick. |
| P | Photography | Take a photo from the tripod spot on the aviary’s observation deck. You get a Gold Brick reward. |
| G2 | Gold Brick | Pick a flyer from the dino spawner and fly down to the rickety wooden bridge over the stream. Glide underneath the bridge to collect the Gold Brick floating there. |
| R | Race | Pick a Pterosaur at the dino spawner and fly to the gate’s far side on the high rock to the right. (We like the Dimorphodon for its finer controls on the course’s tight turns, but the Pteranodon is a good flyer too.) Fly through the gate to start the race automatically, following the line of silver studs from gate to gate. When you fly through the final gate a Gold Brick is earned. |
| W | Worker In Peril | See “Rescue Masrani.” |
| RB | Red Brick | See “Platform, Switch, Cage.” |
Rescue Masrani
Fly a Pteranodon down to the ground near the helicopter wreckage. Simon Masrani is pinned under the fuselage and calls for help. Walk the dinosaur to the dino icon; then press your Use/Activate button. The Pteranodon hops onto the nearby power switch (the device connected to red and green power cables) and pulls upward, flapping its mighty wings.

Press Use again to release the switch. This sends a surge of power to the copter blades. As they turn, their motion pushes over the fuselage, letting Masrani crawl out from underneath. Well done!
Platform, Switch, Cage
Fly a Pteranodon down to the dino switch (G3) on the ground next to the blue/white platform, just across the stream to the right of the observation deck. Pull and release the switch to raise the platform and reveal another dino switch up on the platform. A 1:30 timer also begins ticking down.

Fly to the switch on the newly raised platform and pull/release it. This raises the next blue/white platform just up ahead, revealing its switch. Pull and release that switch to raise a third platform across the river, next to the helicopter wreckage.
Pull and release the switch on the third platform to raise the final blue/white platform near the observation deck. Pull and release its switch to open the cage ahead with the Red Brick inside! Drop into the cage to nab the brick.
Indominus Territory
This big enclosure houses a dino spawner. You’ll need to spawn a powerful but stealthy Indominus Rex for two of the challenges in this area.
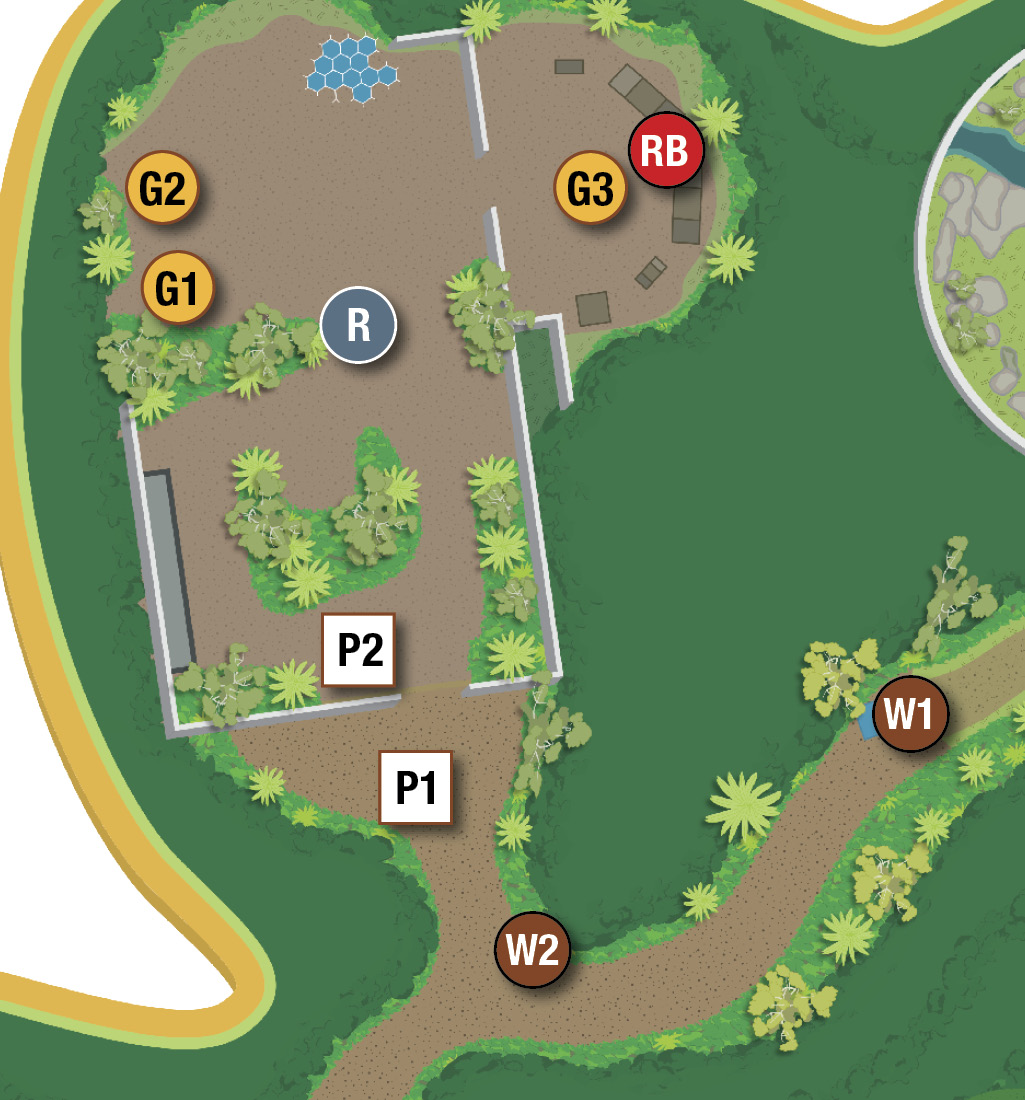
Indominus Territory Challenges
| Icon | Type | Notes |
|---|---|---|
| W1 | Worker In Peril | Look for a chain-locked blue shipping container on the path from the Aviary to the Indominus Rex paddock. Use a bolt cutter character to slice the chain and release the worker trapped inside. You get a Gold Brick as reward. |
| W2 | Worker In Peril | On the entry path, slice through the winch rope to cut down the worker caught by his foot in the snare. Again, you get a Gold Brick reward. |
| P1 | Photography | Use a tracker character to pick up the blue tracking item (a banana) and follow the trail until he unearths build-it pieces for a tripod. Assemble them and take the photo to earn a Gold Brick. |
| P2 | Photography | Just inside the paddock, switch to Eric Kirby and toss a bottle of T. rex scent at the swarm of Compys around the camera tripod. Then switch to a photographer and take the photo there. |
| R | Race | You can switch to a dinosaur and try the race that starts at the gate in the center of the main enclosure. But we suggest you use a crowbar to free the speedy cow from its cage near the dino spawner. Then ride the cow through the race gates. When the race is completed, you win a Gold Brick. |
| G1 | Gold Brick | Switch to a charging dinosaur and smash into all four of the cracked LEGO trees in the main enclosure to earn a brick. |
| G2 | Gold Brick | Use the dino spawner to make a “quake” dinosaur like the Apatosaurus. Stomp on the cracked ground section across the enclosure. A Gold Brick pops out of the water basin next to where you stomp. |
| G3 | Gold Brick | See “Indominus Stealth.” |
| RB | Red Brick | See “Indominus Stealth.” |
Indominus Stealth
Use the dino spawner out in the main yard to conjure up Indominus Rex. The security gate to the paddock’s back area closes if you approach. To fool the camera, use Indominus Rex’s ability to camouflage; then sneak through the gate.

In the back area, use the Rex’s “roar” to shatter all three of the amber blocks and earn the Gold Brick, which appears in the middle of the yard. Then use the beast’s fearsome bite to chew off the dino-strength gate of the cage holding the Red Brick.
