
LEGO Jurassic World Guide Console Hub Areas
Jurassic Park: The Lost World
Jurassic Park: The Lost World is the second hub and contains six different areas. You start out at the docks. Working your way toward the communication center, there are 31 challenges ahead. You must complete all of these, as well as many others, to achieve 100% completion of the game.
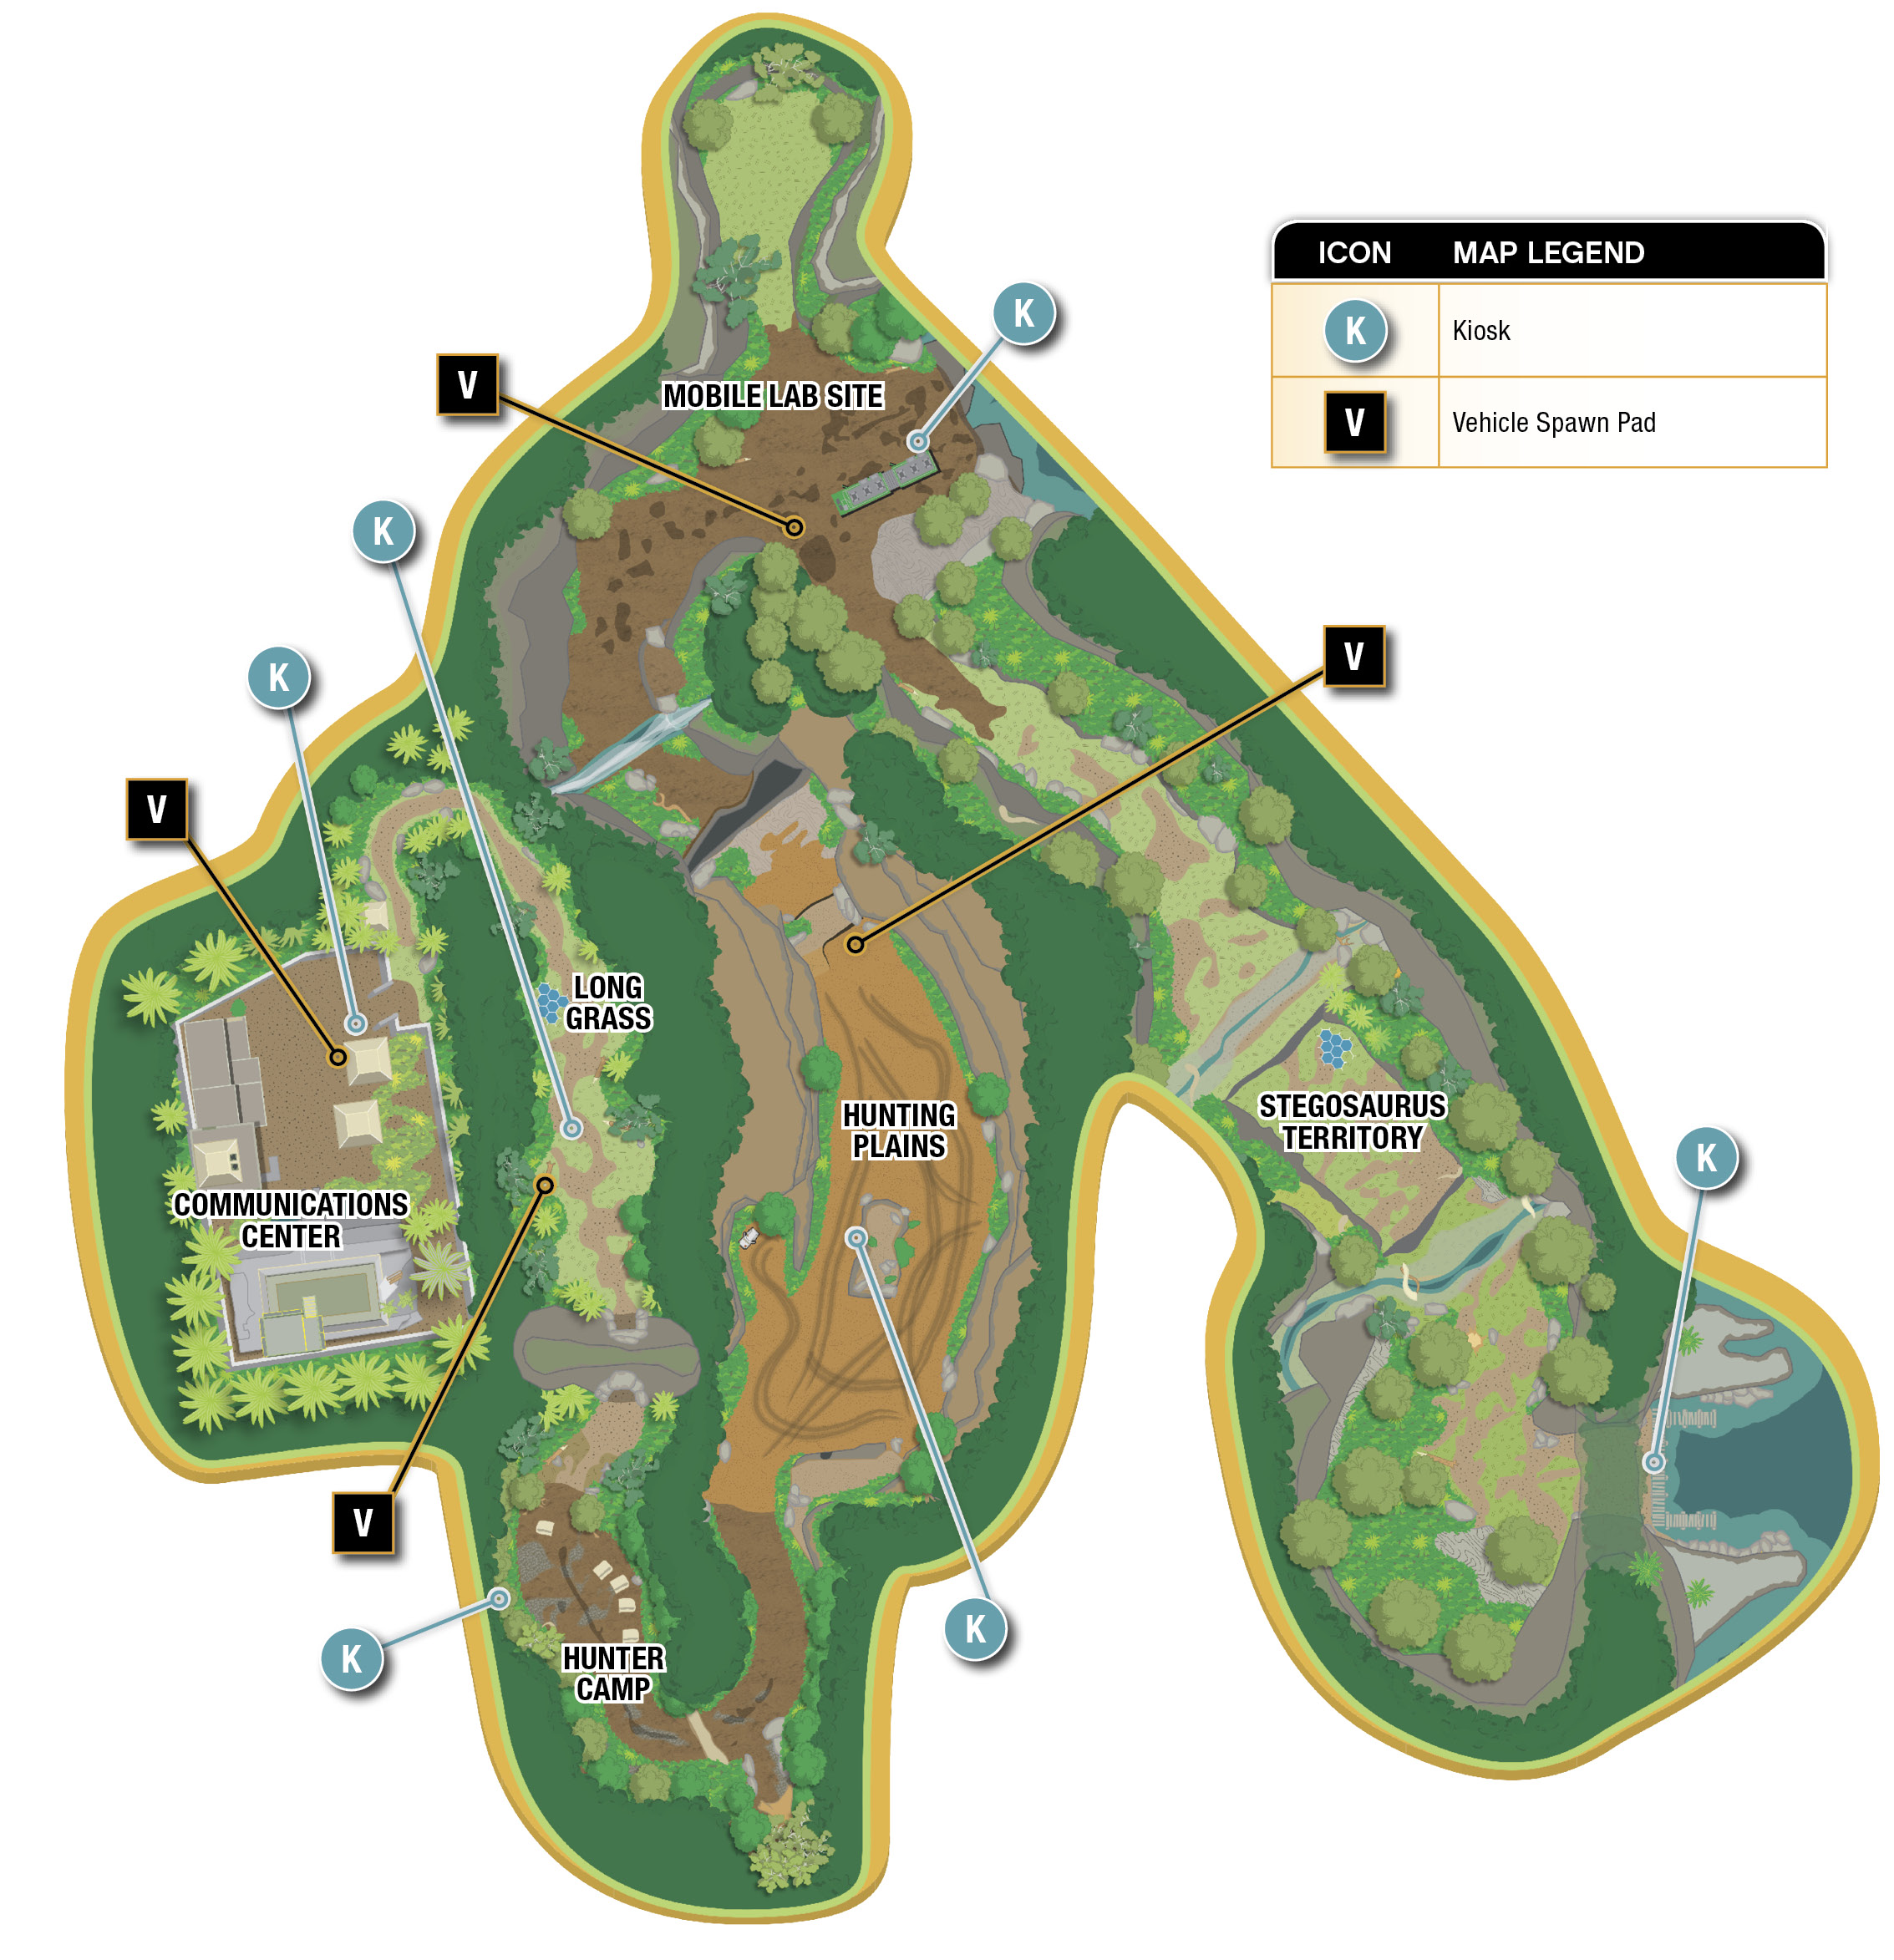

Stegosaurus Territory
Once you arrive at the docks, start trekking into the jungle. The first area is Stegosaurus Territory. There are five challenges here.
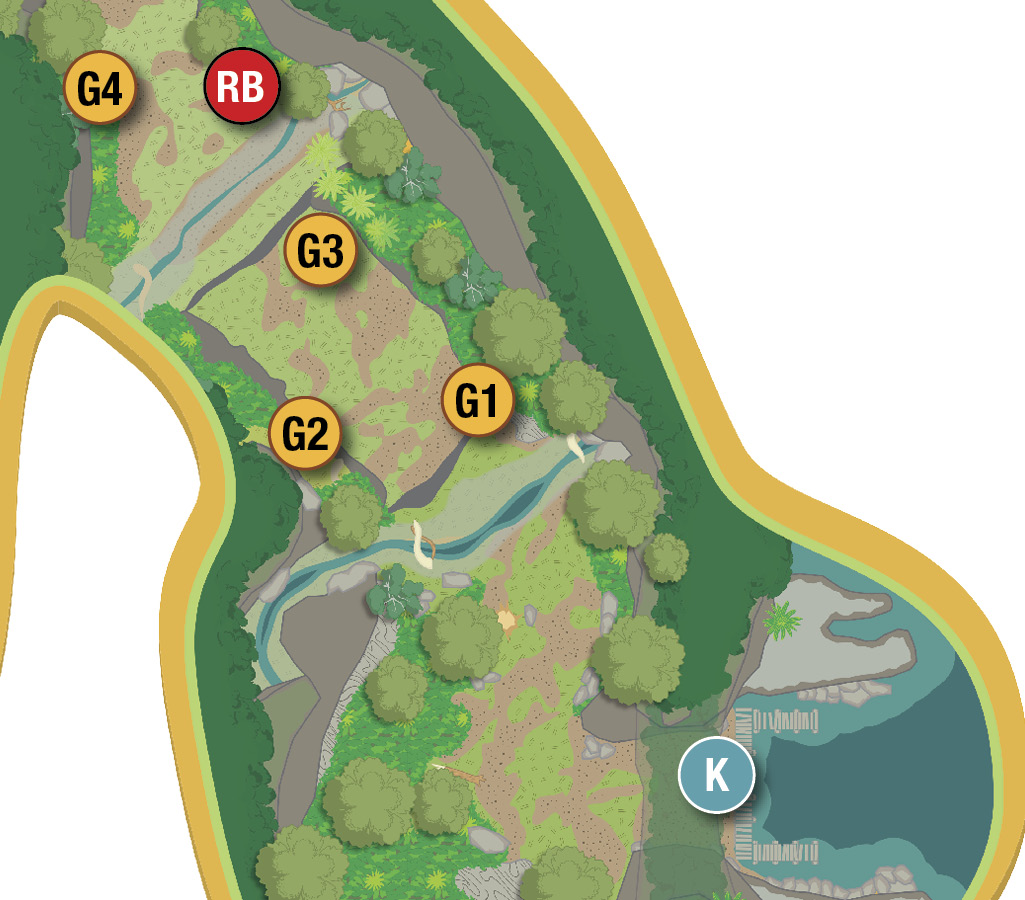
Stegosaurus Territory Challenges
| Icon | Type | Notes |
|---|---|---|
| G1 | Gold Brick | Select a dinosaur that can break cracked objects to break a large lantern-shaped object. Then defeat the hunters within the time limit to get this Gold Brick. |
| G2 | Gold Brick | Use a Dilophosaurus to spit venom at a black rock. Then switch to a small character to go through the hatch. Push a crate along some checkered tiles to break it and get the Gold Brick. |
| G3 | Gold Brick | Use a crowbar to free a Stegosaurus that has its tail caught to get this Gold Brick. |
| G4 | Gold Brick | As a raptor, pounce to a ledge using a raptor rail and break some plants to get to the Gold Brick. |
| RB | Red Brick | Smash a number of cracked walls to get this Red Brick. (See “Smash and Run.”) |
Smash and Run

In order to get the Red Brick in this area, you must smash five different cracked walls. However, you also need to do it without the timer running out. Select a Pachycephalosaurus since you need a dinosaur that can smash cracked objects as well as jump. You could also design your own dinosaur with a raptor body and a Pachycephalosaurus head. It is also a good idea to free the Stegosaurus first and move it to the right of the area so it’s out of the way.

Hit the first wall and then hold down the Attack button to run and smash the second wall. Turn and charge the third wall. Now jump onto the red, bouncy mushroom and bounce to the higher level. Smash two more walls and the Red Brick is yours. If you have trouble getting this Red Brick, practice the bounce on the mushroom since that is usually where players lose time.
Mobile Lab Site
The Mobile Lab Site area is the first one you come across with the vehicle pad. It also has five challenges which are scattered around this area. While the race takes you back to the previous area, the photograph challenge leads you forward to the next area.
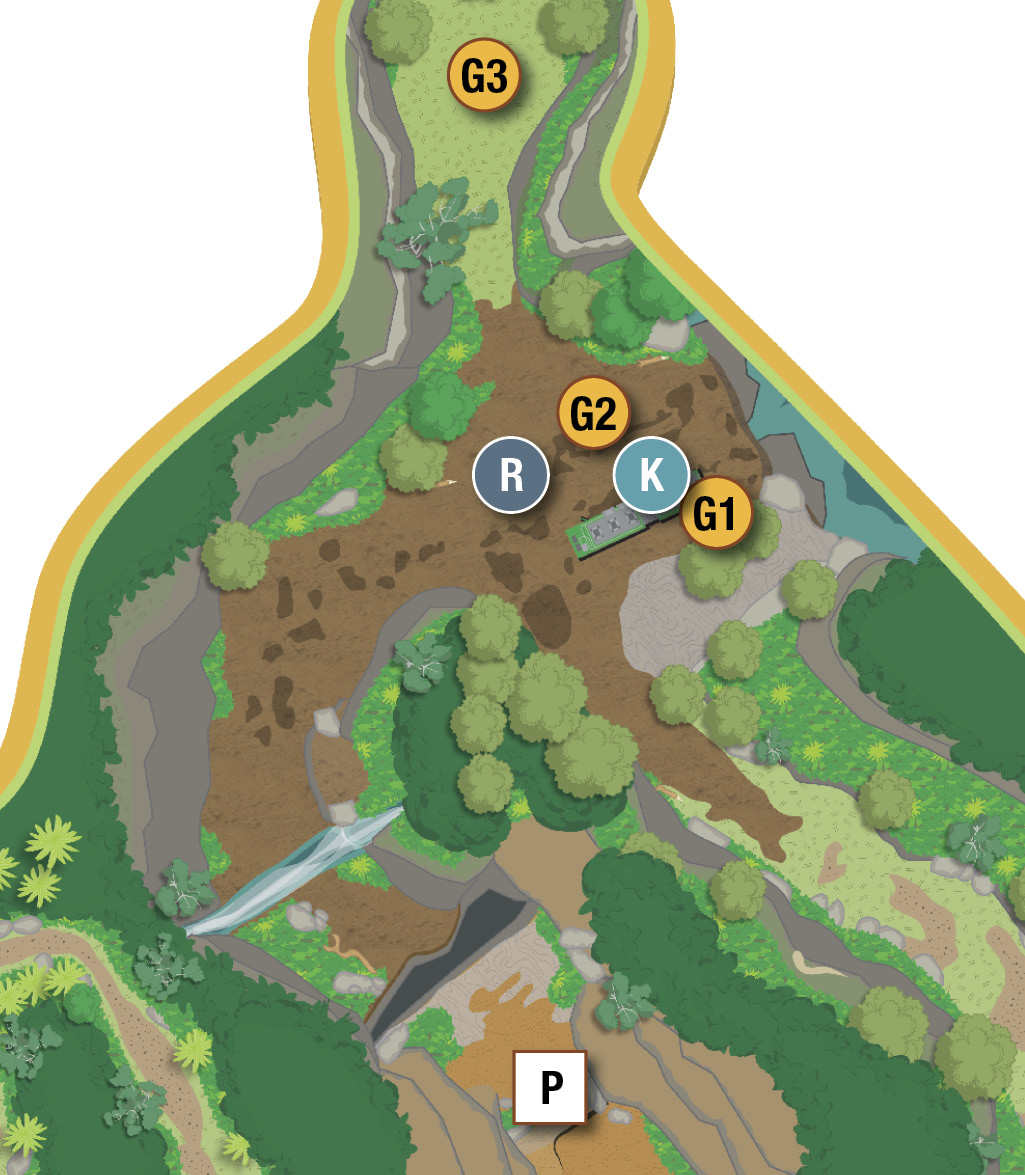
Mobile Lab Site Challenges
| Icon | Type | Notes |
|---|---|---|
| G1 | Gold Brick | Use a Dilophosaurus to spit at a pile of black rocks near the cliff’s edge to break them up. Then move in and get the Gold Brick. |
| G2 | Gold Brick | Water a grow spot with a character with that ability. When a flower blooms, a Gold Brick drops out. |
| G3 | Gold Brick | You must rescue a captured Gold Brick. (See “The Caged Gold Brick.”) |
| P | Photograph | Follow the trail around toward the Hunting Plains; then break a rock and build a tripod. Select a character with a camera and take the photo. |
| R | Race | Race through a series of checkpoints within the time limit. Since you need to be able to jump and run, use a Gyrosphere to do this. |
The Caged Gold Brick


This Gold Brick is in a secluded part of the area. First you need a character with a knife or raptor claw to cut away a wall of vines. Continue down a short path to a clearing where a Gold Brick is suspended in a cage. Defeat the enemy that is guarding this spot. Then use the knife or raptor claw to cut a rope that is holding the cage. When the cage drops and breaks apart, the Gold Brick is released.
Hunting Plains
The Hunting Plains is in the middle of the hub and it’s wide open compared to the other areas. There are a total of five challenges here.
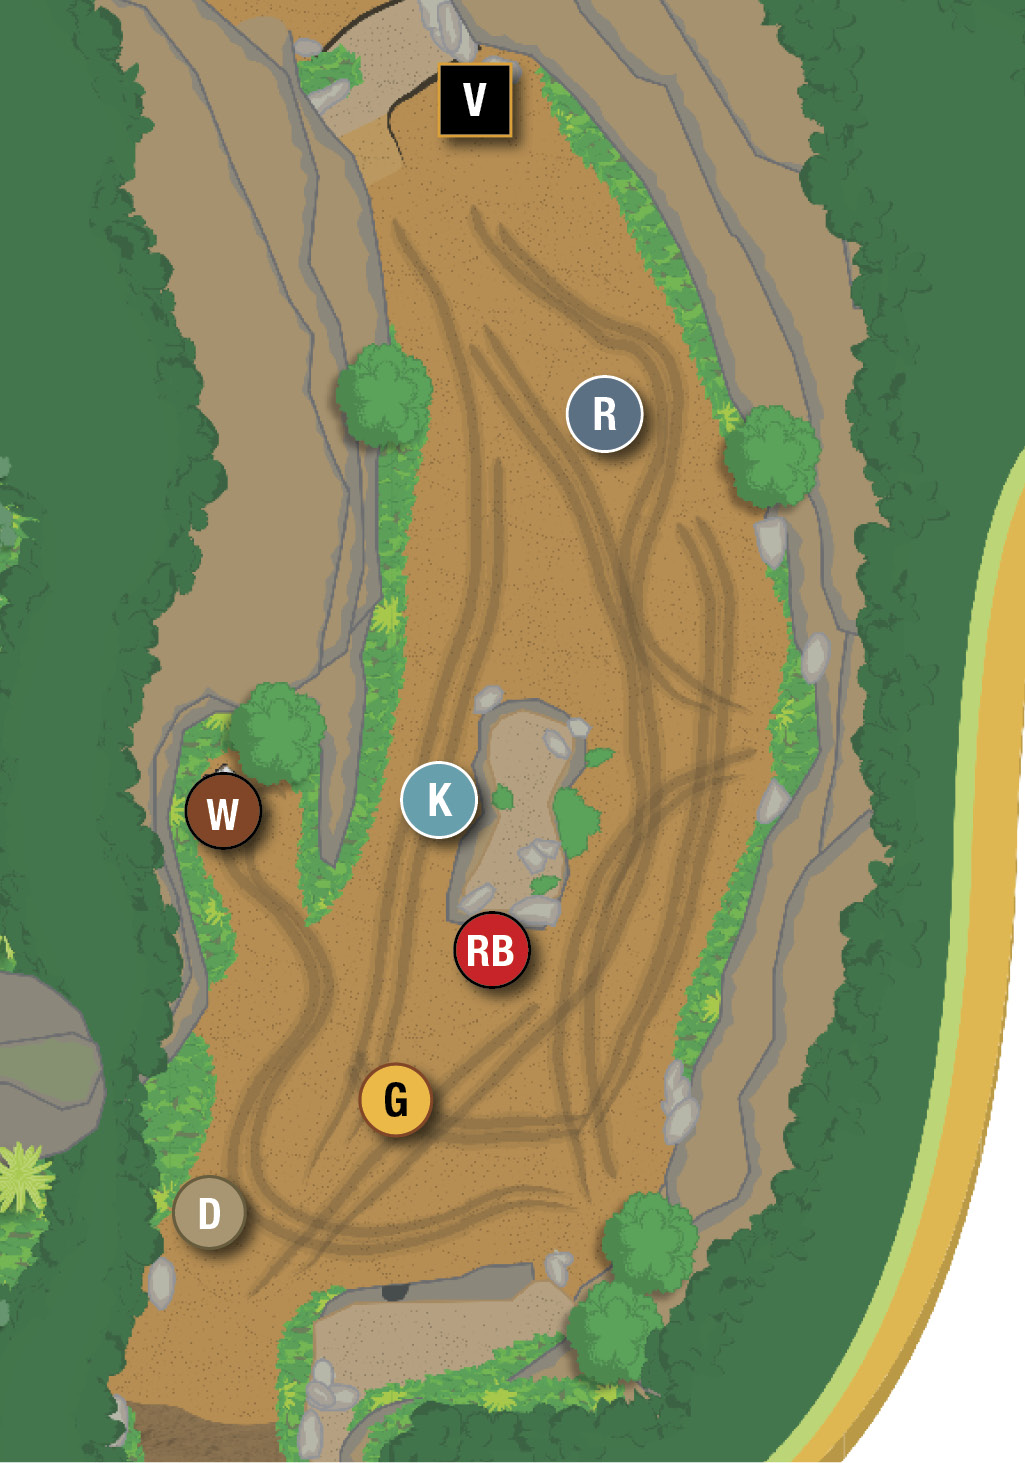
Hunting Plains Challenges
| Icon | Type | Notes |
|---|---|---|
| D | Sick Dino | See “Healing the Dino.” (Completed in the Story Mode’s Hub Transit 7.) |
| G | Gold Brick | Select a large dinosaur that can break quake LEGO; then use it to break three of the pads to get the Gold Brick. |
| R | Race | Select a vehicle and then race around this area without letting time run out to complete the race and earn a Gold Brick. |
| RB | Red Brick | Use the Gyrosphere fling pad to break tech. Use the roar ability on the amber revealed and collect the Red Brick. |
| W | Worker in Peril | A worker is surrounded by a Compy herd. Use Eric Kirby’s ability to drive them away to save the worker and get a Gold Brick. |
Healing the Dino
This challenge is completed in the Story Mode’s Hub Transit 7; see that section of the guide for an even more detailed walkthrough.
When you come upon the sick Triceratops, the three items needed to heal the dino are visible: the ice cream cone, banana, and mushroom.

Tag to Nick Van Owen and head left along the rock wall. Use Nick’s crowbar on the rocks to clear the cave mouth. Then tag to Ian Malcolm, enter the cave using your flare, and nab the ice cream cone. Return to the Triceratops and feed him the cone.
Tag to Sarah Harding and rummage through the droppings pile behind the Triceratops to uncover a tracking item. Tag to Roland Tembo, pick up the item, and follow the blue tracks until Roland unearths the banana. Pick up the banana and feed it to the sick Triceratops.
Find the LEGO skeleton to the cave’s left where you found the ice cream cone. Smash the skeleton into build-it bones; then tag to Dr. Robert Burke, a paleontologist with the Bone-Build ability. Assemble the bones into a Buddy Boost, tag to Sarah, and step aboard. Tag to anyone else to jump and fling Sarah onto the terrace above. Smash the mushroom patch and pick up the remaining mushroom. Then take it to the Triceratops to complete the healing.
Hunter Camp
The InGen hunters have set up camp in this part of the jungle. While a few of them will fight you, there are others that need your help and will show their appreciation with rewards of Gold Bricks.
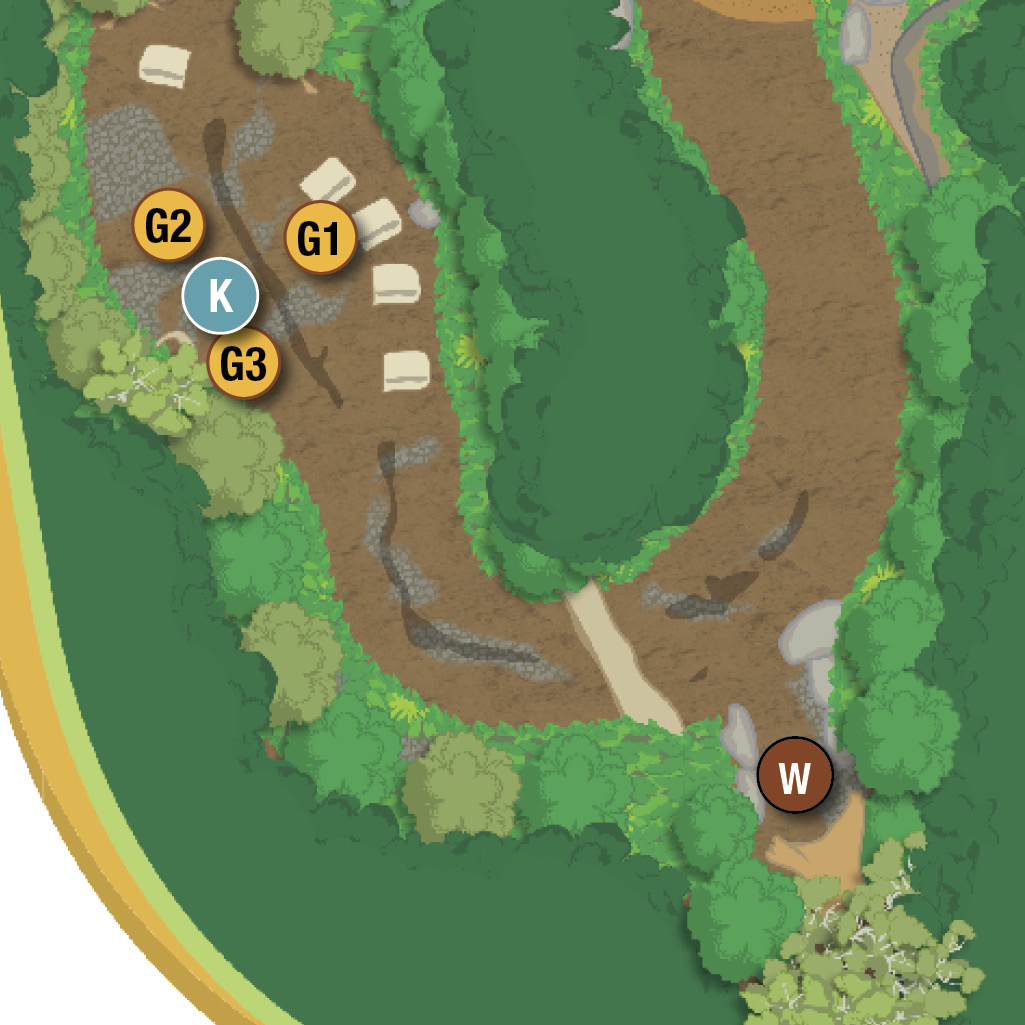
Hunter Camp Challenges
| Icon | Type | Notes |
|---|---|---|
| G1 | Gold Brick | Break up some crates near the tents and assemble the pieces into a giant marshmallow for toasting over the campfire to get this Gold Brick. |
| G2 | Gold Brick | Grow some flowers and play music to get this Gold Brick. (See “Musical Flowers.”) |
| G3 | Gold Brick | A hunter has lost his rifle. Use a small character to go through a hatch in the tree to find the rifle. Pick it up and take it back to the hunter to get a Gold Brick. |
| W | Worker in Peril | Cut away a wall of vines with a knife or raptor claw; then use Eric Kirby to drive away a Compy herd to save this worker and get a Gold Brick. |
Musical Flowers

A grow spot is near the map kiosk. Select a character with this ability and water the grow spot. The plant blooms into four different colored flowers. Watch as the flowers vibrate one at a time and each play a musical note. Then jump on the flowers in the same order to repeat the musical piece. If you are not sure where to jump next, some sparkles appear above the next flower you need to jump on. Play the music exactly and a Gold Brick appears.
Long Grass
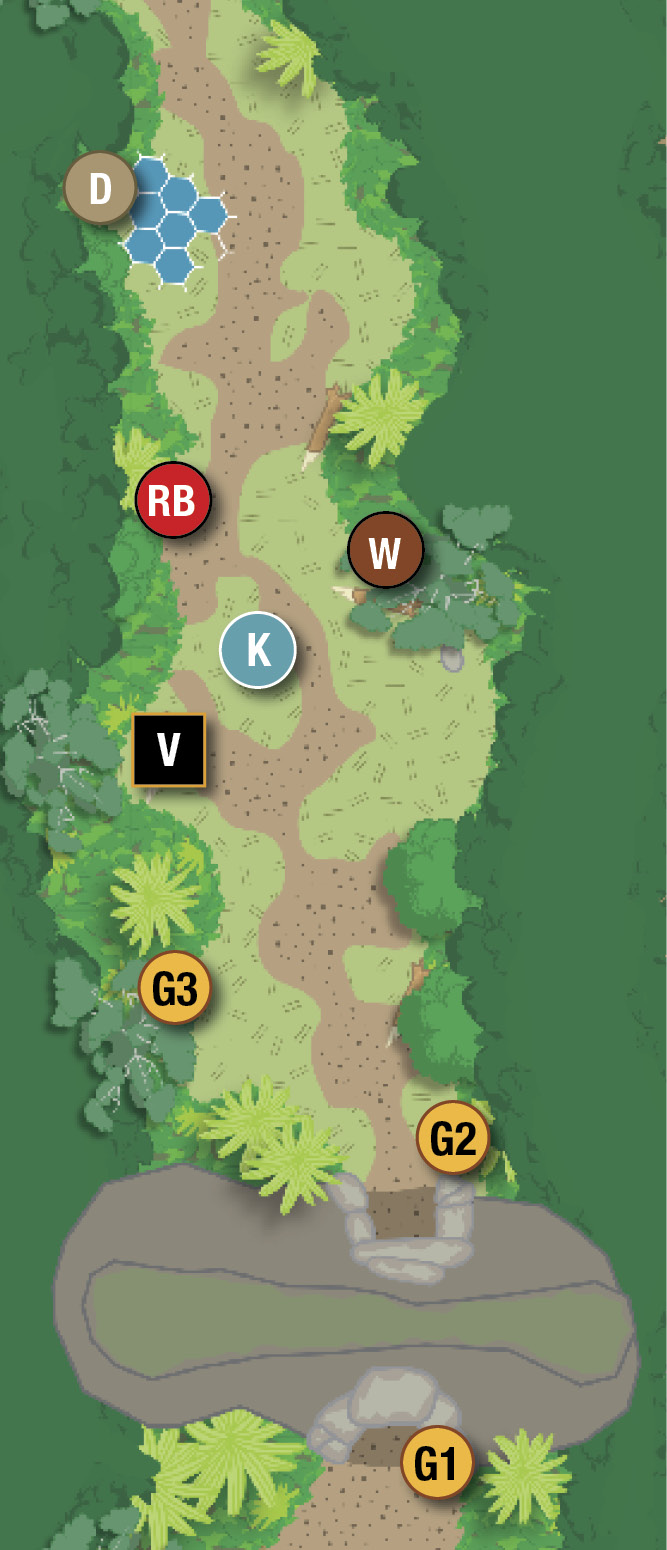
This area contains six challenges which are all located near one another. While some are fairly obvious, others are a bit more hidden. Be sure to look around and even look up to find objects that will lead you to Gold Bricks and a Red Brick.
Long Grass Challenges
| Icon | Type | Notes |
|---|---|---|
| D | Sick Dino | Heal a sick Velociraptor to get this Gold Brick. (See “Raptor Recovery.”) |
| G1 | Gold Brick | On the outside of the waterfall tunnel, use a grappling hook on an orange piece. Then climb up the rope and jump across the grab points to get the Gold Brick. |
| G2 | Gold Brick | Use a crowbar to pry open a rock to get at the Gold Brick. |
| G3 | Gold Brick | Select a raptor and pull on a raptor rail to get to the Gold Brick. |
| RB | Red Brick | Switch to a raptor and follow a scent trail around the area to find the Red Brick. |
| W | Worker in Peril | A worker is stuck under a vehicle. Pull the worker out from under the vehicle and get the Gold Brick. |
Raptor Recovery


A sick raptor is near the dino pad. Select a character who can rummage through dino droppings to find out the cause of the illness. The raptor needs three types of meat: a chicken leg, a sausage, and a steak. Look for a grow spot. Break a rock to get it and then water the spot. A giant carnivorous plant grows and spits out the sausage. Take it back to the raptor. Next, locate a dig spot and dig up a bone. Switch to a character who can track and follow the trail to the chicken leg. After giving it to the raptor, break up a red and white striped barricade and assemble the pieces into a cooler filled with steaks. Pick up a steak and feed it to the raptor to complete the treatment and earn a Gold Brick.
Communications Center
The Communications Center is located at the end of the long and winding trail which began at the docks. Six challenges are here, all within the walled compound. You will need to get on the roofs of two buildings for a few of the challenges.
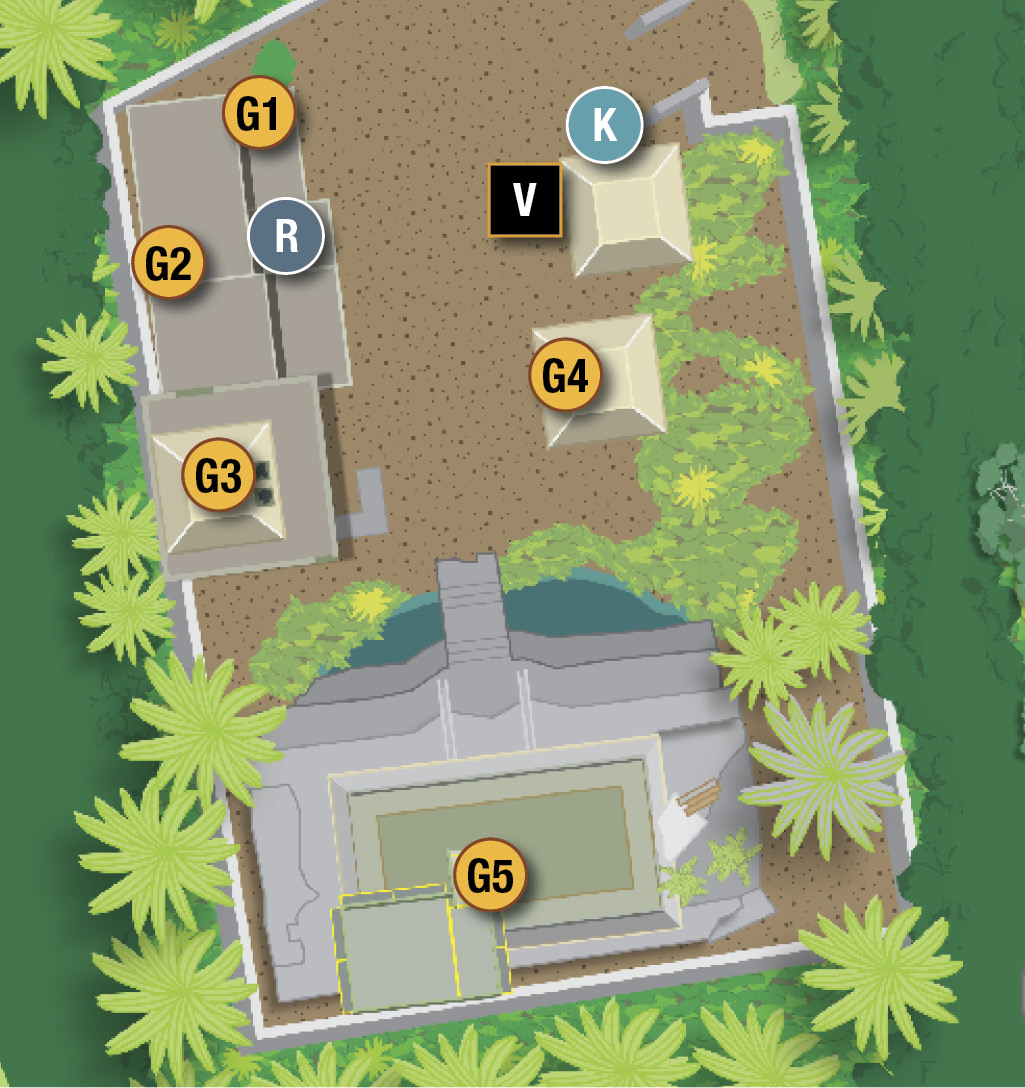
Communications Center Challenges
| Icon | Type | Notes |
|---|---|---|
| G1 | Gold Brick | This Gold Brick is located in a garage. (See “Car Repair.”) |
| G2 | Gold Brick | As a raptor, follow scent trails on the roof of the building to find the Gold Brick. |
| G3 | Gold Brick | Go around the back of the tower and break up objects to find a hatch. Use a small character to go through the hatch and get to the top of the tower. Then use a screaming character to shatter the glass to get the Gold Brick. |
| G4 | Gold Brick | Use a Dilophosaurus to spit several times at the black sign on the wall to break it into pieces and get the Gold Brick. |
| G5 | Gold Brick | Switch to a Compy and go through Compy Tubes to get the Gold Brick |
| R | Race | As a raptor, pounce onto the garage roof using the raptor rail; then race through a series of checkpoints which require you to jump. Complete the race before time runs out and get a Gold Brick. |
Car Repair

This Gold Brick is in a garage with the door closed. You must find a way to open the door. Select a dino that can break cracked objects and break down a wall to get into the building. Switch to a raptor and pull on a raptor rail inside the building to open the garage door.

Once the door is open, you can see the Gold Brick inside the engine compartment of a broken-down automobile. Select a character with the repair ability and move to the side of the vehicle and fix it. The hood then opens and out pops the Gold Brick.