
LEGO Jurassic World Guide Console Walkthrough: Movie 2
Level 08: The Hunted
As the exhausted crew sleeps in the new camp, Roland Tembo notes that the Operations Building isn’t far away. But suddenly, thundering footsteps awaken everybody. A hungry T. rex spurs a panicked sprint from the camp!


| True Survivor Stud Requirement |
|---|
| 45,000 studs |
Attack on the Camp
Here’s another chase sequence where you can snag a lot of loot, including three Minikits, as you flee from the mighty meat-eater.

| Story Characters | Abilities |
|---|---|
| Numerous story characters flee from the T. rex | N/A |
Run!
Immediately steer your character to the screen’s far left to grab a Minikit stashed amongst the camp equipment—one of three kits stashed along the escape route. Then, as in the previous chase sequences, align your character’s escape path with the rows of silver studs to collect them, and jump when you reach the gold stud to nab blue studs floating above each log.
MINIKIT: Left Side, Camp Gear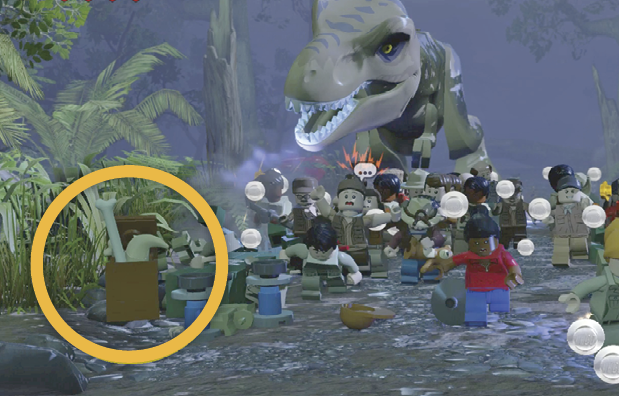 Shortly after the chase begins, you can collect a Minikit stashed in the camp gear on the far left side of the screen. |
MINIKIT: Right Side, Halfway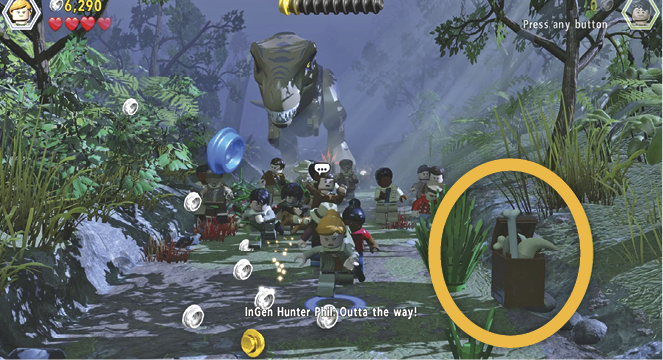 In the middle stretch of the chase, the escaping mob veers to their left (your right) and the camera swings to a side view. Then the runners veer back, running toward the camera again. When this happens, guide your character to the far right side of the screen to pluck another Minikit. |
MINIKIT: Before the WaterfallIn the final stretch, the camera swings behind your fleeing characters as they run toward a waterfall. Just over the last fallen log to snag a Minikit floating above it. |


The last stretch leads through the backside of a waterfall. Once you hop through the water, the chase is over. Watch as the T. rex takes off after Robert Burke, and Ian Malcolm makes it alive to the delight of his daughter.
The Long Grass
The fleeing survivors emerge in separate groups from the forested area into a wide meadow of tall grasses. As the InGen hunters follow the meadow path, a troop of hungry but playful Velociraptors suddenly converges on them!


| Icon | Story Characters | Abilities |
|---|---|---|
 |
Sarah Harding | Droppings Rummage, Dino Heal, Agile, Photography |
 |
Nick Van Owen | Photography, Crowbar, Bolt Cutters |
 |
Ian Malcolm (Isla Sorna) | Illuminate (Flare), Academic Panels |
 |
Kelly Malcolm | Agile, Scream |
Survive the Long Grass
After the checkpoint, move down the path to the right. Optional: Pull the InGen hunter out of the tall grass to save him. This is the first of five InGen guys you can save. (See our Amber Brick tip.) Tag to Sarah Harding and rummage in the steaming droppings heap to extract a pile of build-it pieces. Assemble them into a lawn mower to mow through the tall weeds blocking the path ahead. It also lures the nearby raptor away.
AMBER BRICK: Rescue Five Hunters Along the route, you run into five InGen hunters at the mercy of raptors. Do something to save all five and you earn an Amber Brick that unlocks the Parasaurolophus. The first hunter is trying to crawl out of the grass near where you start. Pull him out! You rescue the other four hunters in order to progress in the mission, so just follow the story walkthrough to save them. In each case, you take a flash photo to drive away the raptor. |

Continue down the path until you reach a blue stud. When you grab it, a raptor ambushes your character. Hit the buttons indicated onscreen to fight off the attack. Tag to Nick, proceed to the fallen, hollow tree trunk, and use his crowbar to pry it open.
MINIKIT: Hidden in Tree Trunk After Nick tears open the huge hollow log, step inside and turn left to find a hidden Minikit. |
Move through the hollow log and fight off a pack of small dinosaurs. Tag to Sarah and use her Agile ability to make a running slide under the pink/blue “agility object” on the skeleton spanning the path. (Remember: Run at the bar and hit your Jump button at the last second to slide underneath.) Fight off the small Compsognathus pack on the other side. Then smash the two InGen crates and assemble the build-it pieces into an industrial jack. Turn its crank to jack up the skeleton and let the others pass underneath.

Distract the Raptors
Continue along the path until another Velociraptor blocks the way up ahead. Tag to Nick and use his bolt cutters to slice open the nearby chain-wrapped crate. This releases two Compsognathuses who run down the path, attracting the raptor’s attention. Follow the raptor to find that it has an InGen hunter pinned on the ground. Step into the dino icon and use Nick’s camera to shoot a photo and drive away the raptor with the flash.

A little further ahead, you reach an intersection where two more hunters are trapped by a pair of Velociraptors. Tag to Sarah and sneak down the left path to the droppings pile. Rummage to find build-it pieces and assemble them into an ice cream mini-truck. It scoots past the raptors and they take off in hot pursuit! That’s two more lucky hunters who owe you.

Keep moving until another raptor ambushes your character. Press the buttons prompted onscreen to drive it away. Proceed to the clearing where an abandoned truck sits next to the exit path, blocked by the raptor with the remains of the ice cream mini-truck. Tag to Kelly Malcolm and use her Scream ability to shatter the truck’s window glass. Assemble the build-it pieces that fall into a “burger contraption.” Then hustle past the distracted raptor.

Tag to Sarah and continue down the path until you encounter another hunter pinned by a raptor. As before, step into the dino icon and take a flash photo to stun the beast and drive it away. Be sure to nab the Amber Brick that appears if you rescued the other four hunters earlier!

Walk down the path to trigger the level-ending scene: After the foursome survives a wild mud slide, Nick Van Owen rushes ahead to look for the communications center, saying he’ll meet up with the others later.

Hub Transit 8
With Nick Van Owen running on ahead of them, Sarah Harding, Ian Malcolm, and his daughter Kelly follow down the last stretch of the trail leading to the Operations Building.

| Icon | Story Characters | Abilities |
|---|---|---|
 |
Sarah Harding | Droppings Rummage, Dino Heal, Agile, Photography |
 |
Ian Malcolm (Isla Sorna) | Illuminate (Flare), Academic Panels |
 |
Kelly Malcolm | Agile, Scream |
Get Through the Gate

Follow the blue stud trail to the gate. Tag to Kelly Malcolm and use her Scream ability to shatter the glass covering the doorway on the building to the right.
Enter and turn the crank switch to open the gate. Then proceed through the gateway into the next area to trigger the opening scene of the next level.
