
Nintendo Playing with Power Guide The Legend of Zelda The Underworld
Labyrinth 4: Snake
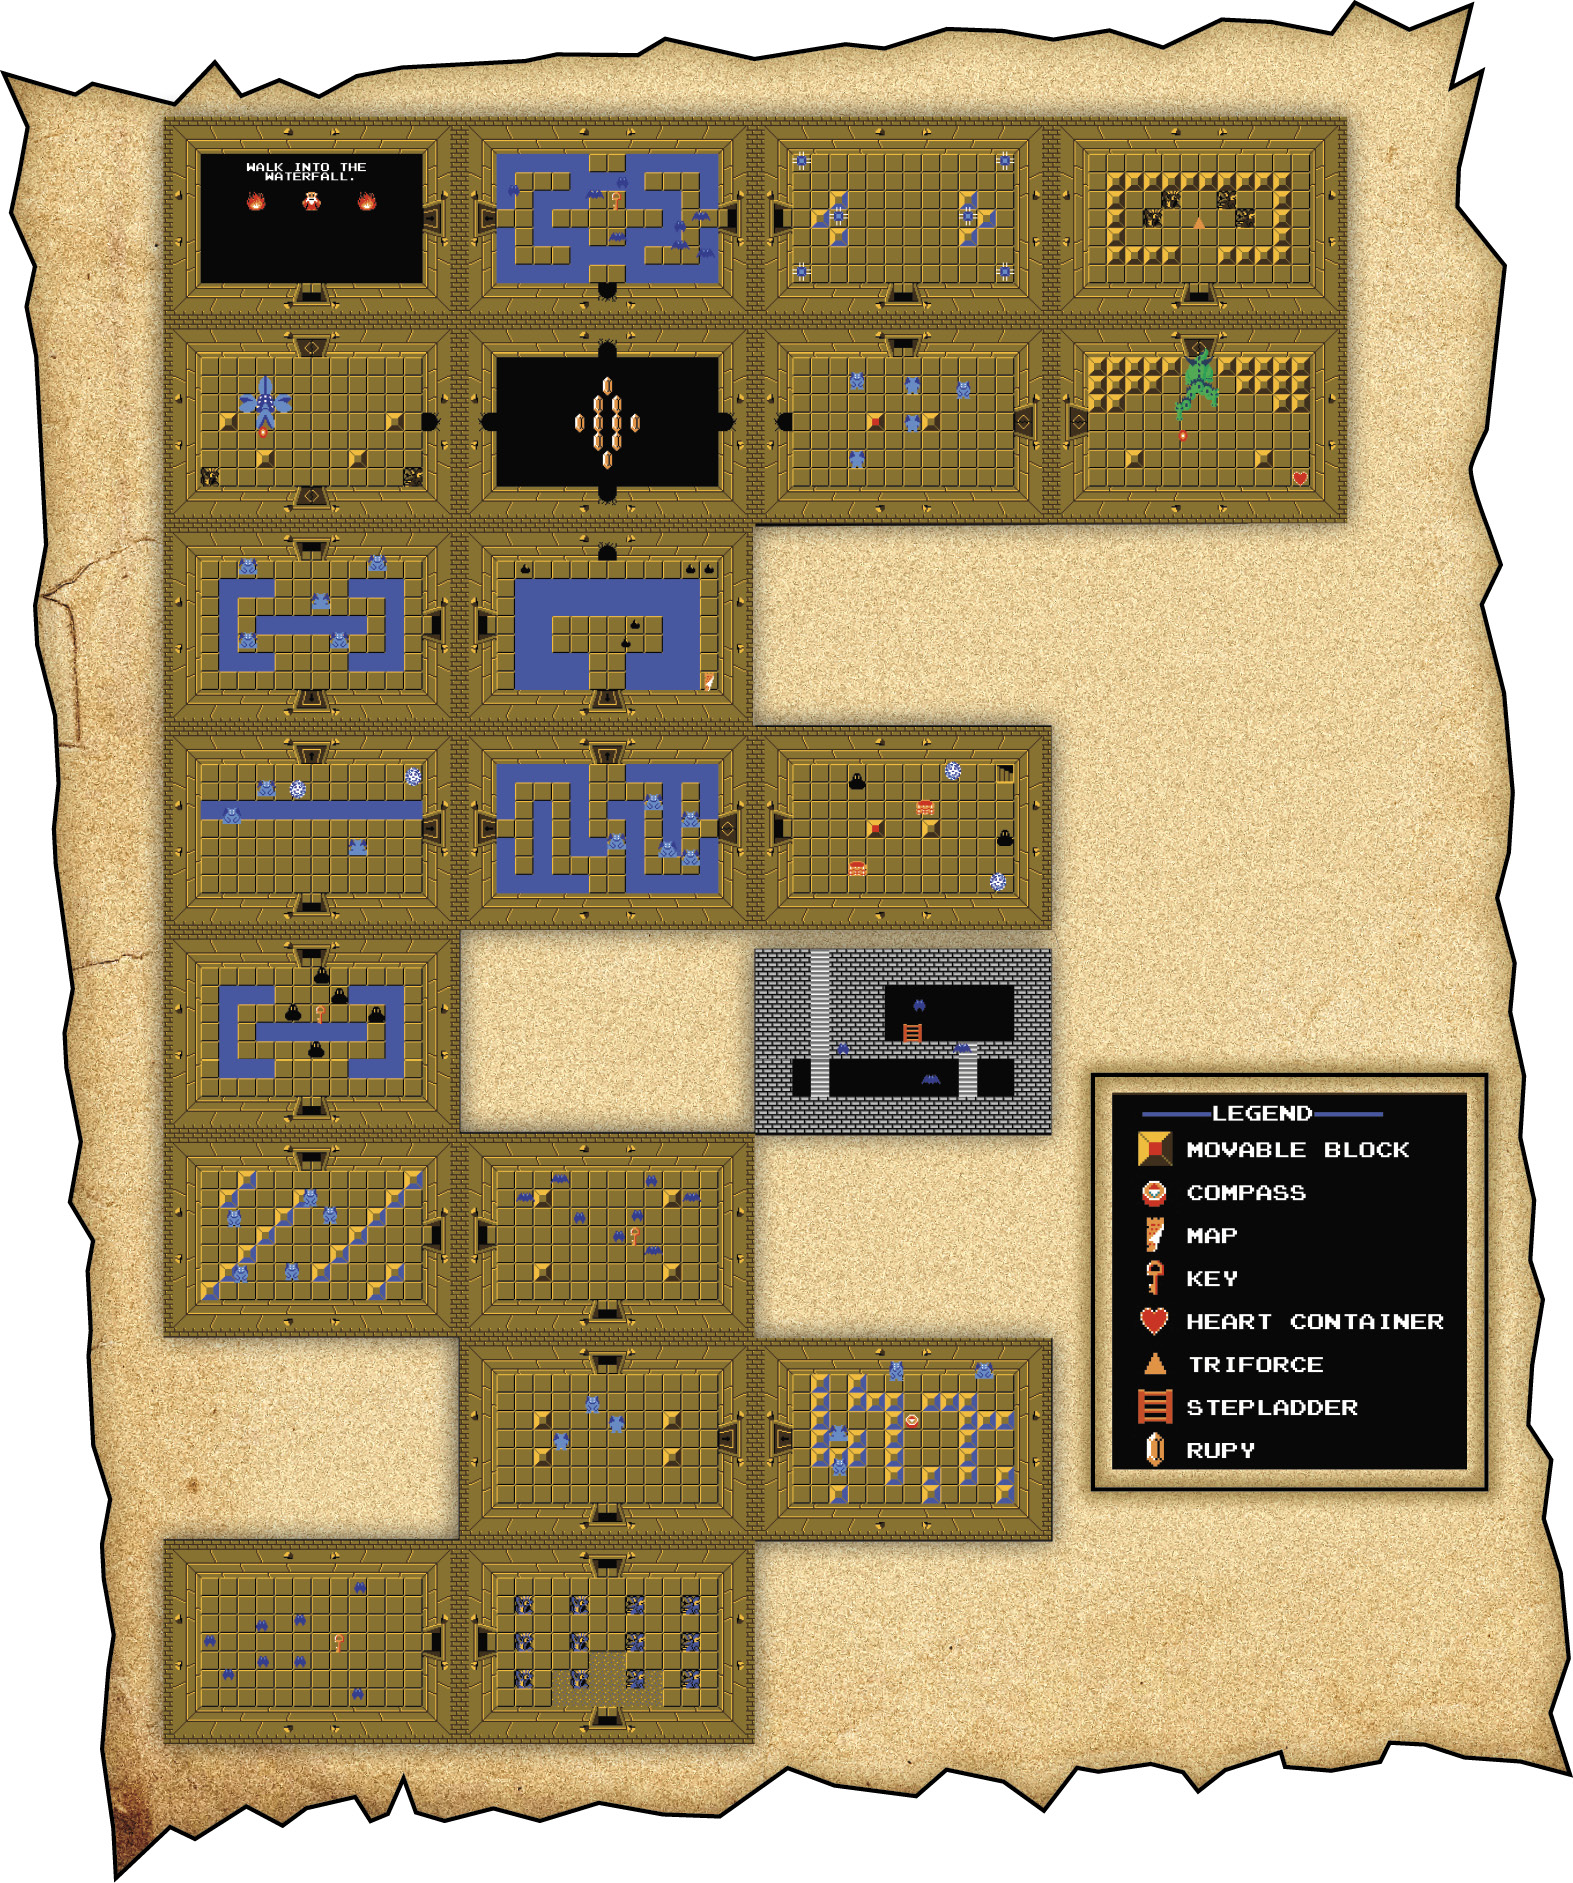
Level 4’s Tricks and Traps
The main feature of this labyrinth is a new enemy type, known as the Vire. Vires come in droves. If you pay close attention to their movements, they’re not too difficult, but underestimate them and you’ll see a “Game Over” screen faster than you can blink.
Manhandla, the boss of Level 3, makes its reappearance here for a rematch, but not as the boss of the stage. After going through all that, you have to deal with Gleeok, the two-headed dragon, if you want to grab the Triforce piece.
An advanced player can get through this labyrinth without the Water of Life, but all other players should definitely consider picking some up to make it without dying.

Buy a Blue Candle for Later
You traverse some dark rooms while in Level 4. Without a light, these rooms are really dangerous. Fortunately, you can buy a Candle before entering the labyrinth to light your way.
With the Blue Candle in hand, wait in the doorway of a room until the Candle takes effect. You’ll be safe in the doorway while waiting for the room to light up, which is why patience is key.
On top of lighting up a room, the Candle can also shoot out a flame directly in front of Link to burn enemies and bushes in the Overworld. Not a bad deal!


Getting the Map and Compass
Find the Compass for this labyrinth by going one screen north and one screen east. To get the Map, head to the room four rooms north of the entrance (not counting the empty space in the middle of the labyrinth). Grab the Ladder from this level to reach the Map—we’ll tell you where to find that first.


Finding the Ladder

The Ladder is the treasure of Level 4. It allows you to cross a single uncrossable space at a time. For example, if you attempt to walk across a single square of water, your Ladder automatically comes out and you cross unimpeded.

To find the Ladder, go to the second room in the second-to-the-right row of rooms. The Ladder is hidden in the basement of that room, but finding the entrance to the basement requires some investigating. Defeat all the enemies in the room and investigate the two blocks. One of them holds the secret to unlocking the basement.
Advancing with the Ladder
The Ladder you just found can be put to use immediately. For example, the fourth room in the leftmost row of rooms has a small moat near its top that prevents you from progressing through its northern door. With the Ladder’s aid, walk right over the moat and into the northern door.
There are a couple of other rooms in this labyrinth that have similar obstacles, so get plenty of use out of the Ladder now that you have it.

Attack Your Enemies Using the Ladder
The Ladder allows Link to cross a single uncrossable square if it’s the same width as Link, but the Ladder can also be used as an offensive tool. If Link is on the Ladder, certain enemies, such as Zols, can’t attack him, but he can attack them no problem.
This method doesn’t work on flying and jumping enemies like Vires or Keese, unfortunately. They have little issue crossing over the obstacles in any room.

Tricky Doors
Some of the doors in this labyrinth slam shut when you enter, just like in other labyrinths before this. Unlike in those previous labyrinths, however, they won’t reopen after you defeat all the enemies.

When this happens, inspect the blocks in the room and give them a push from all sides. That almost always unlocks any doors that don’t unlock after you defeat a room’s enemies.
Finding Hidden Rooms
The hidden rooms start to appear in Level 4. For example, Level 4 as a whole has the shape of a snake, and a hidden room can be found at the eyes of the snake. Find the passage to this hidden room by Bombing the walls. You don’t want to miss this hidden room, because there is a nice collection of Rupees here.
Most likely, you’ll find hidden rooms in empty spaces on the Map, like the eyes of the snake or in a labyrinth’s corners.

Seeking Information from the Old Man
The Old Man can be found in the top-left corner of the Map. Go to him for information, and he tells you to seek out a certain place. After you’ve found the Triforce piece in Level 4, go to the place he indicated. The person you meet there gives you a hint about reaching Level 5. Since the people living in the Underworld labyrinths can help Link, you’d better listen to their suggestions.

How to Fight Vires and Keese
The Vires, which appeared for the first time in Level 4, attack Link as they jump. The Vires and the Keese are similar to Zols and Gels in that a Vire becomes two Keese when the Vire is cut in half. Split the Vire into two Keese first with your Sword, then beat the Keese with the Boomerang. This is a very effective strategy, because you can attack the Vires and Keese at the same time.

Manhandling Manhandla
The boss of Level 3 is back for a rematch. Manhandla fights exactly the same as before, but this time with the assistance of two stone faces in the corners of the room that gladly spit fireballs at Link during the fight. Use your experiences from your first Manhandla fight and try to defeat Manhandla with a single Bomb to end this fight as quickly as possible.
You can find Manhandla in the second room from the top in the top-left corner of the Map.
