
Dragon Age: Origins — Awakening Guide Essentials The Classes
Skills
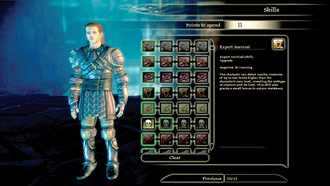
All characters have the same set of skills from which to choose (not to be confused with talents/spells, which are unique for each class). Skills range from Coercion, which influences how well you can change NPCs’ points of view, to Combat Tactics, which gives you more options in battles, to Runecrafting, which enables you to create runes to power up certain magic weapons and armor.
For the most part, your cunning score and level affect how far you can advance in a skill. Raise your cunning to 16 to access all of Coercion, Stealing, Survival, and Combat Tactics. Gaining level 10 opens up all of Trap-Making, Herbalism, and Poison-Making. Combat Training has no restrictions on it. Reach level 20 to begin acquiring the new Awakening skills: Runecrafting, Vitality, and Clarity.
When you purchase a skill for the first time, you start at its basic effect, and with each upgrade your ability grows and more options open up. For example, a basic herbalist can create lesser potions, while an improved herbalist can craft normal lyrium and health potions, and so on up the ladder to expert and master Herbalism.
Only one skill point is available every three levels (or every two if you’re a rogue), so make your skill choices count. At most you will max out two to three skills during the game, or you may master one skill and dabble in others. To aid in choosing the best skills for you, here are some pointers.
Coercion
You can access more game areas and information, bargain for better rewards or terms, and talk your way out of many difficult situations with this skill. While all classes can intimidate effectively (given a high Coercion skill and some fearsome party members), warriors can use their strength score (instead of cunning) to gain a bit of an edge in their intimidations.
For convincing companions to follow your lead without serious approval drops, you will likely gain the most use out of this skill. When in doubt, put your points into Coercion.
Herbalism
Gain the ability to make your own potions, poultices, and salves with this skill. These are invaluable items, and you’ll always want at least five in any difficult fight. Regardless of class, all parties should have at least one person proficient in Herbalism.
Stealing
You are quick enough to pilfer small items from others, whether friendly or hostile, as long as they aren’t too alert. Of course, you may have to pay the price if someone catches you in the act.
Poison-Making
The ability to create poison works best for rogues, or warriors who want a boost to damage. You need at least one point in Poison-Making to use poisons and bombs. If you already have a character crafting health and mana potions, it never hurts to increase your offensive potential as well, even with just one level in this skill.
Trap-Making
Learning how to make traps and lures seems like a good rogue talent, but this can be very useful for mages as well. If you’re not all that strong in melee range, use traps and lures to draw in enemies and deal some preliminary damage while you cast a barrage of spells from afar. Even a warrior can throw a trap around once in a while to root extra enemies.
Combat Training
The more points you spend here, the better your warrior or rogue performs in combat. It’s essential for any melee-based character. Warriors and rogues gain access to new weapon talents, stamina regeneration, attack bonuses, and armor upgrades. Mages can take more damage before it interrupts spellcasting.
Survival
The more you advance this skill, the better chance you have to detect creatures on your mini-map before they surprise you. This skill can save you from more than a few ambushes. In addition, you get a bonus to nature resistance, which protects against poison attacks of all sorts as well as spells such as Stonefist, Walking Bomb, and Virulent Walking Bomb.
Combat Tactics
Spending points in this skill gives you more tactics slots for your character. If you make all the decisions yourself, it’s not that important; if you allow the characters to act on their own in combat, it’s a big deal to get more tactics slots to better customize your combat strategies.
Runecrafting
This skill enables you to create your own runes for weapons and armor. It’s expensive to craft potent runes, because you must create two runes of a lesser level and then destroy them in the process of creating the higher-level rune. Despite this, the power to customize your weapons and armor with extra abilities is worth having in any party.
Vitality
Bulk up your health with this skill. Each level increases your health gain, which should prove a necessity for warriors or any other characters frequently taking blows in the heart of combat. At higher experience levels, if you don’t have any other skills you want to take for a character, think about Vitality to maximize defense.
Clarity
Improve your stamina/mana pool with this skill. Each level increases your stamina or mana gain, which works for just about any character, especially mages and DPSers who constantly rely on heavy stamina talents. At higher experience levels, if you don’t have any other skills you want to take for a character, think about Clarity to increase how many spells or talents you can use in a fight.
NPC Crafters
Not every skill has to come from you or your party; some NPCs around the world can craft items for you. You might not have the hands of a blacksmith, for example, but if you bring special items to Herren and Wade in the Vigil’s Keep courtyard, they will craft you a superior weapon, piece of armor, bow, or shield, depending on the original materials. Look for help wherever you go.
Choosing Skills
You should choose skills that appeal to your play style, and vary it from character to character. A rogue may enjoy Stealing, while Herbalism is a natural fit for a mage because it benefits from a high magic score. That doesn’t mean a rogue shouldn’t learn Herbalism or a mage learn Stealing. Always have fun with your choices, and remember that between the four characters in your party, you can play with most, if not all, of the game’s skills.
However, some skills influence the game directly more than others. Coercion is the most important. It can give you options in dialogue to avoid fights or open up new areas of play that you might not have received without the art of persuasion. Survival points out enemies on the mini-map, which helps you set up your party for fights and avoid deadly ambushes.
Herbalism creates super-useful health poultices and lyrium potions. Unless you want to spend tons of coin on these essential accessories, invest in Herbalism to make your own at a fraction of the price. Runecrafting works similar to Herbalism, only with creating runes and with a higher price associated with the crafting materials. Without a doubt, Combat Training is vital to warriors and rogues who want access to top-tier weapon talents.
Warrior Combat Skils
A warrior primarily concerned aout combat and dialogue options with eight points to spend on skills might lean toward this configuration to start with:
Combat Training +4
Coercion+4
Survival+1
Mage Healing and Coercion Skills
A mage primarily concerned about dialogue options and healing and with eight points to spend on skills might lean toward this configuration at the outset:
Coercion +4
Herbalism +3
Combat Training +1
Rogue Combat Skills
A rogue primarily concerned about combat and Poison-Making with 11 points to spend on skills might lean toward this configuration when starting out:
Combat Training +4
Poison Making +3
Coercion +3
Stealing +1
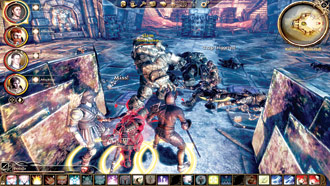
The biggest choice of your early career comes next: Do you play a warrior, mage, or rogue? All experiences are rewarding, but each is unique in the origin story you play through, the talents/spells you gain and your ability to affect combat and influence the storyline. Which type of Grey Warden will you be?