
Sniper Ghost Warrior 2 Guide Bonus Content Sniper Tactics Book
Shooting Positions
The following shooting positions are designed to maximize stability and comfort while minimizing muscular effort.
Most of these positions will also evenly dissipate the recoil force and not impart any lateral components to the rifle’s motion (and therefore the bullet’s motion) while the bullet is traveling down the barrel.
These are the fundamental principles that determine good shooting positions. Some of these positions will offer advantages over others, while requiring compromise in other areas.
The choice of position will depend on the shooter’s judgment and the tactical situation. At the end of this section, I lay out a couple example situations and what a sniper’s thought process might look like.
You should look at these positions and examples as starting points for adapting these principles to a wide variety of tactical scenarios, rifles, gear, and body types.
For the purposes of this discussion, I am going to assume you are a right handed shooter and describe the positions accordingly. It is most often just a matter of switching left and right to adapt these descriptions for the left handed shooter (though not always).
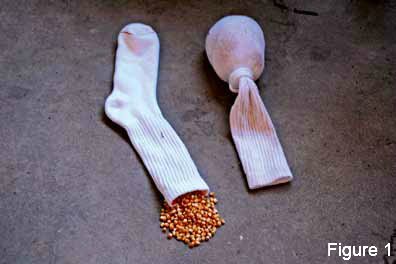
Some of these positions will make mention of a “sand sock” (see figure 1).
This is merely a sock filled with sand or some other particulate matter (I used un-popped popcorn kernels) that one uses to stabilize and affect small changes in the position of the buttstock of the rifle.
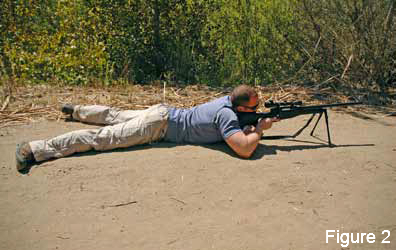
Prone,- Bipod Supported
In the first variant of this position, you will be on the ground, prone, with the rifle in front of you and with the bipod legs deployed.
The longer the length to which the bipod legs are extended, the less stability the rifle has (though this effect may seem small, it will have a noticeable influence on your shot groups).
However, if your bipod legs are not extended enough, you will have to strain your neck and shoulders to get your head low enough to see through the scope.
This factor works against the goal of minimizing the muscular effort needed to maintain a shooting position.
Find the best compromise by extending the rifle’s bipod legs to the shortest extent that still minimizes the muscle strain needed to maintain the position.
There is a proper distance (called “eye relief”) between your eye and the eyepiece of the scope that will eliminate “scope shadow” (the black regions the appear around the rim of the eyepiece as a result of improper eye alignment).
Note where your cheekbone rests on the buttstock when you have the best eye relief with a piece of tape on the buttstock. You could also tape a piece of foam to the buttstock to both mark the position and give additional comfort.
After you have positioned your head for proper eye relief, adjust your shoulders and arms for proper comfort. Have both elbows on the ground. Curl your left arm so that your left hand is gripping the sand sock positioned underneath the buttstock.
Have your right hand on the grip of the rifle. Now that your hands are in place, if your rifle has an extendable buttstock, you can adjust it to comfortably rest against your right shoulder.
Remember, the positions of your arms will be dictated by the position of your shoulders and neck which are determined by the positions of your head and eye, which is set by your eye relief position.
At this point, your body will be contacting the rifle in three places: the cheekpad, the buttplate of the buttstock, and the grip. It is important not to apply too much pressure at these positions.
If you rest the full weight of your head on the cheekpad, there will be a diagonally downward force on the rifle that will influence the rifle’s recoil motion and impart lateral components to the bullet’s velocity.
Similarly, if there is too much forward force applied by your right shoulder to the buttplate, you have the same problem. However, if there is a gap between the buttplate and your right shoulder, the buttplate will slam into your shoulder during recoil, bruising you and throwing off your shots.
The best compromise is to have gentle pressure between your body and the rifle at these two points. Your cheek should be lightly touching the cheekpad and your shoulder should be in contact with the buttplate but not pressing too firmly against it (note that this is the opposite of when firing a machine gun, where the pressure your shoulder provides against the buttplate adds stability to the gun).
Unlike with pistol shooting, the weapon’s stability does not derive from your hand grip. Additionally, because you are gripping the grip with only one hand, the grip force presented to the rifle is unbalanced. Do not grip too tightly, for this reason.
Think of your grip as a comfortable, firm handshake. This will also offer your hand enough stability to allow you to operate your trigger finger smoothly and in a solely rearward direction.
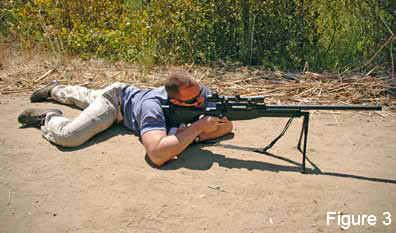
Try a variant of the prone bipod supported position if you have a lot of upper body bulk (whether from muscle or body armor) and find it hard to get your head low enough to make the prone position work and still be comfortable.
Instead of pressing your torso and hips flat, twist your hips slightly so that your right hip is higher than your left. Your torso will rotate slightly, offering your head and neck a more comfortable alignment with the cheekpad and scope.
This variant requires the bipod legs to extend a little longer. With proper adjustment, this position will still evenly dissipate the recoil force (see figure 3).
Grounded Seated
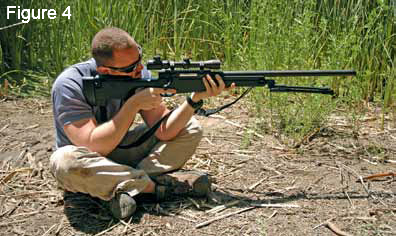
Start by sitting with your legs crossed. As I point out in many of these body positions, you do not want two joints touching each other (for example an elbow directly on a knee) as this is not stable. Rather, you want some muscle in between the two points of contact to provide a more stable platform for the joint (usually the elbow). In seated position, this is accomplished by placing the elbows on the inner thigh. The left hand will be used to hold the rifle at a location just forward of the rifle’s center of mass. The right hand will be on the grip and the right shoulder will be on the buttplate. As with the prone positions, the positioning of all the limbs and points of contact with the rifle are dictated by proper eye relief. The position on the cheekpad that allows for proper eye relief should be the same for every position. The setting on an adjustable buttstock might change slightly for different positions but the change should be small. Rather than actually change it for each position, it might be simpler to just set it for the prone position and accept slight discomfort in the other positions. Some of these other positions are not suited for long hours of observation (for example, the grounded seated, the kneeling positions, and some of the standing positions) and you will likely not be maintaining them for very long stretches.
With your legs crossed, your elbows on your inner thighs and the rifle held as described above, your body will be somewhat “bladed” towards the target (your body will not be pointed directly toward the target, but rather off at an angle). This is a necessary consequence of the geometry of the position, but it means the position will not evenly distribute the recoil force and provide another potential source of inaccuracy in this position (see figure 4).
Kneeling
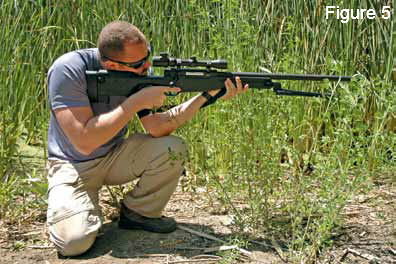
Kneeling positions give you a little bit more height than the grounded seated positions and you are able to stand up from them faster than if you were seated on the ground or prone. In the first kneeling position, your right leg is bent and you are essentially sitting on your right foot. The top of your right foot can be flat on the ground (for better stability, but less comfort, height and mobility) or bent (for less stability but greater comfort, height and mobility). Your left leg will be bent and extended out in front of you, towards the target. You will hold the rifle as in the grounded seated position but your left elbow will rest on your left quadriceps (not the knee).
Your right arm will be flat against your torso. There is a tendency to cock the right arm outward so that the elbow points out to the side. Resist this tendency as it takes muscular effort to maintain and does nothing for your stability (see figure 5).
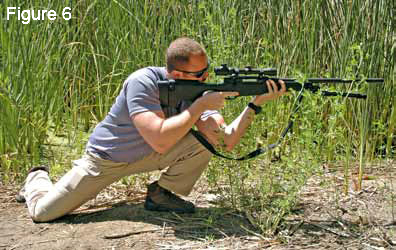
For an alternate, more aggressive kneeling position, shift your weight forward so that now, instead of you sitting on your right foot, you are leaning forward. Your left elbow will no longer be on your left quadriceps: instead, your left knee will be in contact with your left triceps. This alternate kneeling position is less stable but it provides a lot more mobility. It is much easier to get up from this position than from the less aggressive kneeling position (see figure 6).
Seated and Supported
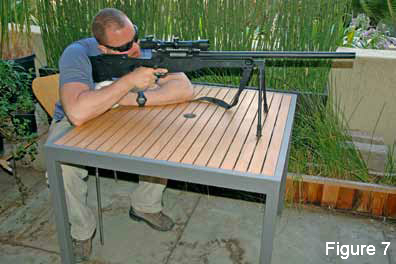
The supported seated positions are derived from those positions you see at many civilian rifle ranges. You will be seated on something stable like a chair, and the rifle will be resting on something stable like a table. Deploy the bipod legs and support the buttstock with a sand sock (if possible). Your upper body will be arranged on the table as if you were emulating one of the prone bipod supported positions. Follow the same rules for eye relief and pressure on the rifle. This position can be just as stable and precise as a prone bipod supported position. The chief advantage is the additional height it offers. The chief disadvantage is the need for a stable chair and table. This sort of position will almost exclusively be used at the firing range or in urban hides.
When using this type of position in an urban hide, remember the basic principles of urban hides: avoid exterior lighting, do not allow your muzzle to breach the plane of the window, keep back from windows, stay at off angles and so forth. Unlike the grounded seated position and the kneeling positions, it is possible for your spotter to get in a good position to your side or behind you and follow the trace of your bullet from these supported seated positions (see figure 7).
Standing - Sling Supported
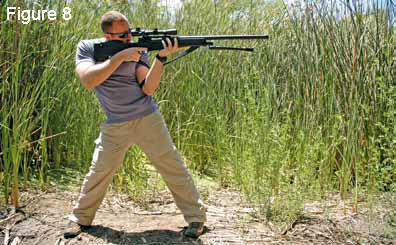
The standing sling supported position may seem counter-intuitive at first, but with some practice, it can be a very serviceable shooting position. Stand bladed toward the target with your feet approximately shoulder width apart. Cock your left hip out in front of you. This pose is largely supported by bone, not muscle, which is why it can be surprisingly stable for a standing position. Rest your left elbow upon your left hip, with your left hand cradling the rifle forward of its center of mass. Grip your right hand on the grip, with your right elbow held to your side. This position is somewhat stable, but you can increase stability by using the sling.
If your rifle has a thick, leather sling with a loop, place your left arm through the loop and tighten the loop about your lower biceps so that the taught sling and your forearm form a rigid, inflexible support for the rifle, resting on your left hip. This arrangement will take some experimentation, practice and testing to perfect but the increased stability can greatly impact your precision (see figure 8).
The sniper should consider the sling support a useful tool for augmenting any other position. For example, the less aggressive kneeling stance could be improved by sling support, if the tactical situation offers the opportunity. The disciplined sniper should practice quickly getting into and out of the sling support. The ability to get out of it quickly, opens up its use to many more scenarios wherein it might otherwise not be suitable.
Standing - Tripod Supported
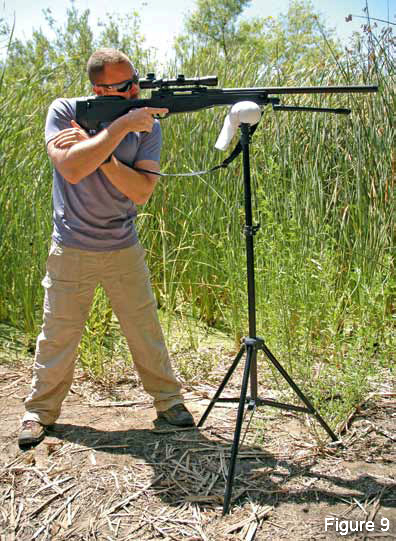
In order to make a decent sniper’s tripod, you only need a lightweight camera tripod that will extend up to standing height. Affix a half piece of PVC pipe to where you would normally attach the camera (any sturdy method will do, such as glue or a screw). Line the inside of the half-pipe with some foam to improve stability and reduce sliding. Spray paint the entire contraption to match the color scheme of the mission environment. When in your hide, set up the tripod and place the rifle in the PVC half-pipe at about the position you would place your left hand if this was a sling supported standing position. The half-pipe will be cradling the rifle just as your hand would. Assume a bladed stance with your feet slightly wider than shoulder width behind the rifle. Set up proper eye relief and hold the grip with your right hand (right elbow held close to the torso, as usual). Use your left hand to provide additional rigidity for your upper body. For some, this may mean gripping your right triceps with your left hand (this has the advantage of closely mimicking the holding of the sand sock as done in the prone positions). Other shooters may find other preferences, but a dangling left hand is sure to introduce instability and reduce the rigidity of your upper body, so be sure to experiment with places to put it. Be sure not to let the full weight of your right arm hang from the rifle when firing; this will introduce another unbalanced force that will influence the motion of the bullet while it is still traveling down the barrel (see figure 9).
SELECTING A POSITION
Choosing the proper position for a shot requires an overall analysis of the situation. If you anticipate long hours of scanning a sector, or if it is critical to achieve a difficult first round hit on a distant target, then select a position that offers the most stability and comfort. Also take into account your hide selection. If your hide only offers a ballistic loophole at the height of a grounded seated position, you may have to scan from the prone position before transitioning to the grounded seated position for the shot. Transitioning from the prone to seated position may increase the likelihood of a miss and the movement may increase the chance of being detected, but it may be your only option.
If you and your team are bounding from enemy contact and the enemy is still somewhat distant, you might consider taking a few shots from behind cover between bounds using one of the kneeling stances. If you need to get up fast, the more aggressive kneeling stance will provide you increased mobility. If you are well practiced in getting in and out of the sling support, you might consider taking advantage of the increased accuracy of the less aggressive kneeling stance, augmented with sling support.
The sniper may find that positions in which the buttstock is supported (by a sand sock, for example) more readily lend themselves to smooth and rapid bolt manipulation and reloading. Ideally, the sniper will be well practiced in bolt manipulation and reloading from any position. However, if the sniper is noticeably slower at these tasks in some positions and the team anticipates needing to make great use of these tasks during a mission (for example, in a target-rich environment), this should inform the decision on shooting position and therefore hide site. This sort of analysis requires not only careful thought but frank and honest self-assessments of the team’s proficiency in certain tasks.