Prima Games eGuides
primagames.com Browse Redeem a code Help
Army of Two: The Devil's Cartel eGuide
Sign in My Guides

Sign in or create an account

We'll email you a link. No password needed, and if you don't have an account yet, the link makes one.

By creating an account or signing in, you agree to our Terms of Service and Privacy Policy.

Have a password?

Had an account on the old eGuides site, or a code from a printed guide? Help and troubleshooting

Sign in with a password

By signing in, you agree to our Terms of Service and Privacy Policy.

Check your email

A sign-in link is on its way. It works once and expires in 15 minutes. Open it and you're in, with an account if you didn't already have one.

Contents

  • Essentials
    • Welcome Back to Tactical Worldwide Operations
      • Welcome Back to Tactical Worldwide Operations
    • Operational History and Character Bios
      • Operational History and Character Bios
    • Tactical Operations Manual
      • Tactical Operations Manual
    • Two Gear
      • The Gear Makes The Man
      • Modifications
      • Weapon Skins
      • Tactical Gear
      • Tattoos
    • The Enemy
      • The Enemy
    • Contracts
      • Contracts
    • Achievements and Trophies
      • Achievements and Trophies
    • Concept Art
      • Concept Art
  • Walkthrough
    • Mission 1: New Blood
      • Special Callouts
      • Chapter 1: Protection
      • Chapter 2: Tutorial
    • Mission 2: Cause And Effect
      • Chapter 3: Permission to Engage
      • Chapter 4: Foxhunt
      • Chapter 5: Split Decision
      • Chapter 6: Baptism by Fire
    • Mission 3: Rally Point
      • Chapter 7: Politics in Action
      • Chapter 8: Picking Up the Pieces
      • Chapter 9: Into the Chaos

      • Chapter 10: Riot Act

      • Chapter 11: Urban Chaos

    • Mission 4: Outside Contact
      • Chapter 12: Fuel for the Fire

      • Chapter 13: Observe and Detect

      • Chapter 14: Local Heroes

      • Chapter 15: Stronghold Assault
      • Chapter 16: Suicide Run

    • Mission 5: Last Resort
      • Chapter 17: Holiday Retreat

      • Chapter 18: Room Service

    • Mission 6: Salvation
      • Chapter 19: Among the Dead

      • Chapter 20: Open Season

      • Chapter 21: Rest for the Wicked

      • Chapter 22: Shadows Walk

      • Chapter 23: Into the Light

      • Chapter 24: Loose Cannon

      • Chapter 25: Special Delivery

    • Mission 7: Enemy Territory
      • Chapter 26: Behind Enemy Lines

      • Chapter 27: Guardian Angel

      • Chapter 28: Manhunt

      • Chapter 29: Fight for the Future

      • Chapter 30: Desperate Measures

      • Chapter 31: Objective Lost

    • Mission 8: Narco Hell
      • Chapter 32: Scavengers

      • Chapter 33: Game Face

      • Chapter 34: A Ray of Sun

      • Chapter 35: Rooftop Rampage

      • Chapter 36: Adrenaline High

      • Chapter 37: Mad Science

      • Chapter 38: The Butcher

    • Mission 9: Assault
      • Chapter 39: The Assault

      • Chapter 40: Down But Not Out

      • Chapter 41: Get Her Back

      • Chapter 42: Race to the Quarry

      • Chapter 43: Fish in a Barrel

    • Mission 10: Confrontation
      • Chapter 44: Burning Bridges

      • Chapter 45: No Return

      • Chapter 46: A Hero's Rescue

      • Chapter 47: The Lion's Den

      • Chapter 48: Salem On Trial

      • Chapter 49: The Devil's Due

  • Overkill Vids
    • Mission Overkill Videos
      • Mission Overkill Videos

Army of Two: The Devil's Cartel Guide › Walkthrough › Mission 9: Assault

Chapter 43: Fish in a Barrel


Chapter 43: Fish in a Barrel

The quarry is a large circular area. At its center, at the very bottom level, lies a cluster of crates, overhangs, excavated stones, and fencing. This central area should be considered your fort. As far as you are concerned, only Alpha and Bravo are allowed to be there, and any trespassers should be dealt with accordingly.

As you approach the center of the quarry, cartel elites enter the area through one of the mine shafts at the top level of the quarry . This force includes snipers. The gauntlet begins! They’ve got an excellent position on you, but sniper rifles like the AMR-50 can drop them before they begin to present a credible threat.

A second group of cartel members emerge from a mineshaft that is much closer to your temporary home base . They may not have the same height advantage as the first group, but they’ve got better protection.

Group three arrives from a mineshaft to the right of the second wave of attackers , even closer to your central area.

The fourth wave comes through a mineshaft to the right of the third group . Unfortunately for them, if you’re holding down the central area as suggested, you can take them out before they even leave the shaft proper.

Wave five opens up another mineshaft to the right of the fourth wave’s ill-fated entrance . Wave six... well, you get the idea .

Wave seven, unlucky wave seven, starts back on the upper levels of the quarry . These guys are much more aggressive than the first group that started from on high. They quickly begin making their way down to the ground level in hopes of overwhelming you. Meanwhile, a pair of Brutes enter the quarry from the mineshafts that waves three and four came from . Do what you can to prevent yourself from being driven out of the center of the quarry.

Survive all this, and you’ll see the welcome sight of an evac chopper headed your way. And, wonder of wonders, it doesn’t get blown out of the sky only seconds before you can climb aboard! However, the area is still too hot for the pilot’s liking, so you have a decision to make.

OVERKILL

Using Overkill for the incoming waves of hostiles can be tricky. It’s tempting to use a Double Overkill, but the time dialation slows the action down so much that you’d be wasting time just waiting for more targets to appear. When you use Overkill during the wave seven assault, cancel it the moment you run out of targets, even if you know more exist. It’s better to conserve your meter instead of letting it run down entirely while you try to find one last hidden enemy.

Decision Point: Provide Air Support, or Stay on the Ground

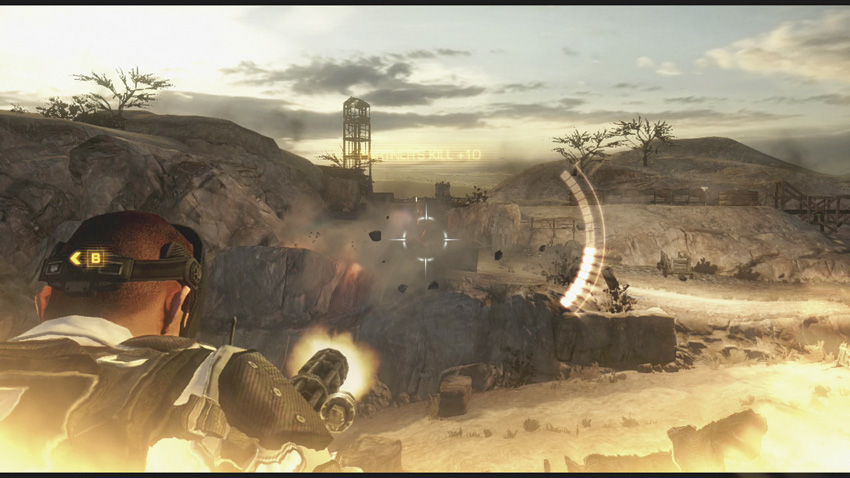
The operative on the ground gets to enjoy the sweet sound of a minigun raining down death and destruction on the enemies in the quarry while marching forward with a grenade launcher and infinite ammo. The goal is to get the man on the ground to the top of the quarry, and the cartel are sending a significant force of elites and mercenaries to stop this from happening. It’s a target-rich environment for Alpha and Bravo.

Provide Air Support

Soon after handing the grenade launcher to your partner who is being left on the ground, an RPG shot forces the chopper to gain altitude. As the door gunner, your targets are along the entire path winding up the side of the quarry. It’s recommended that you destroy anything you see that could be used as cover so that it’s easier for you to spot targets.

Your goal here is to not only protect the chopper from incoming fire, but also to protect your partner on the ground. They will be significantly more vulnerable than you are inside the chopper, especially during co-op. Try not to use Overkill too recklessly. If the operative on the ground looks like he’s about to go down, trigger Overkill to grant him some invincibility.

The top of the quarry path is where things get a bit crazy for the operative on the ground, so you need to be on point with your fire support. Multiple elites and Brutes guard the landing zone (LZ) and they can swiftly bring down your partner if he walks out unprepared. Cut them down to clear the LZ so that the chopper can pick up your partner.

Stay on the Ground

First, blast open the gate that blocks your path to the top of the quarry.

If your air support is doing their job, you shouldn’t have to worry about an excess of hostiles for the majority of your climb. You should still be cautious, however. Always check the sides of the path to make sure you’re not about to run past a hostile. Don’t fire the grenade launcher unless you are either shooting at an actual target, or in Overkill mode. The reload time on the grenade launcher is long enough that it can get you killed if an enemy is closing in on you. As always, you need to really be careful about taking damage while you are alone. It’s typically the operative on the ground that sends a good team back to the previous checkpoint simply because they got too hasty.

About halfway through your death march, you can get a very good angle on some cartel elites running across a wooden bridge . Don’t let them regroup with their allies at the top of the quarry.

The final group at the end of the path contains multiple Brutes among the elites stationed there. Unless you can round that last corner with Overkill up and running, just let the chopper gunner go to town on those guys before you even think of exposing yourself. Head toward the indicated LZ once you get the all-clear.

It turns out that the chopper’s pilot is Rios! He’s a little upset that Alpha and Bravo decided to go off on their own to try and kill the man he was friends with for so many years. In all fairness, ‘El Diablo’ did manage to kill almost every T.W.O. operative at the company’s disposal, and he’s holding Fiona hostage. The fight’s not over yet.

Keep reading with a free account

The first 3 sections of Army of Two: The Devil's Cartel are open to everyone. An account opens the rest of it, and every other guide in the archive. It's free, and there's nothing to buy.

Bought guides on the old Prima Games site? Your account and every guide you own moved here, so there's nothing to buy again. Sign in.

Create a free account Or browse our free guides

PreviousChapter 42: Race to the Quarry
 NextChapter 44: Burning Bridges