
Prima Games eGuides
primagames.com Browse Redeem a code Help
Army of Two: The Devil's Cartel eGuide
Sign in My Guides

Sign in or create an account

We'll email you a link. No password needed, and if you don't have an account yet, the link makes one.

By creating an account or signing in, you agree to our Terms of Service and Privacy Policy.

Have a password?

Had an account on the old eGuides site, or a code from a printed guide? Help and troubleshooting

Sign in with a password

By signing in, you agree to our Terms of Service and Privacy Policy.

Check your email

A sign-in link is on its way. It works once and expires in 15 minutes. Open it and you're in, with an account if you didn't already have one.

Contents

  • Essentials
    • Welcome Back to Tactical Worldwide Operations
      • Welcome Back to Tactical Worldwide Operations
    • Operational History and Character Bios
      • Operational History and Character Bios
    • Tactical Operations Manual
      • Tactical Operations Manual
    • Two Gear
      • The Gear Makes The Man
      • Modifications
      • Weapon Skins
      • Tactical Gear
      • Tattoos
    • The Enemy
      • The Enemy
    • Contracts
      • Contracts
    • Achievements and Trophies
      • Achievements and Trophies
    • Concept Art
      • Concept Art
  • Walkthrough
    • Mission 1: New Blood
      • Special Callouts
      • Chapter 1: Protection
      • Chapter 2: Tutorial
    • Mission 2: Cause And Effect
      • Chapter 3: Permission to Engage
      • Chapter 4: Foxhunt
      • Chapter 5: Split Decision
      • Chapter 6: Baptism by Fire
    • Mission 3: Rally Point
      • Chapter 7: Politics in Action
      • Chapter 8: Picking Up the Pieces
      • Chapter 9: Into the Chaos

      • Chapter 10: Riot Act

      • Chapter 11: Urban Chaos

    • Mission 4: Outside Contact
      • Chapter 12: Fuel for the Fire

      • Chapter 13: Observe and Detect

      • Chapter 14: Local Heroes

      • Chapter 15: Stronghold Assault
      • Chapter 16: Suicide Run

    • Mission 5: Last Resort
      • Chapter 17: Holiday Retreat

      • Chapter 18: Room Service

    • Mission 6: Salvation
      • Chapter 19: Among the Dead

      • Chapter 20: Open Season

      • Chapter 21: Rest for the Wicked

      • Chapter 22: Shadows Walk

      • Chapter 23: Into the Light

      • Chapter 24: Loose Cannon

      • Chapter 25: Special Delivery

    • Mission 7: Enemy Territory
      • Chapter 26: Behind Enemy Lines

      • Chapter 27: Guardian Angel

      • Chapter 28: Manhunt

      • Chapter 29: Fight for the Future

      • Chapter 30: Desperate Measures

      • Chapter 31: Objective Lost

    • Mission 8: Narco Hell
      • Chapter 32: Scavengers

      • Chapter 33: Game Face

      • Chapter 34: A Ray of Sun

      • Chapter 35: Rooftop Rampage

      • Chapter 36: Adrenaline High

      • Chapter 37: Mad Science

      • Chapter 38: The Butcher

    • Mission 9: Assault
      • Chapter 39: The Assault

      • Chapter 40: Down But Not Out

      • Chapter 41: Get Her Back

      • Chapter 42: Race to the Quarry

      • Chapter 43: Fish in a Barrel

    • Mission 10: Confrontation
      • Chapter 44: Burning Bridges

      • Chapter 45: No Return

      • Chapter 46: A Hero's Rescue

      • Chapter 47: The Lion's Den

      • Chapter 48: Salem On Trial

      • Chapter 49: The Devil's Due

  • Overkill Vids
    • Mission Overkill Videos
      • Mission Overkill Videos

Army of Two: The Devil's Cartel Guide › Walkthrough › Mission 4: Outside Contact

Chapter 15: Stronghold Assault

Chapter 15: Stronghold Assault
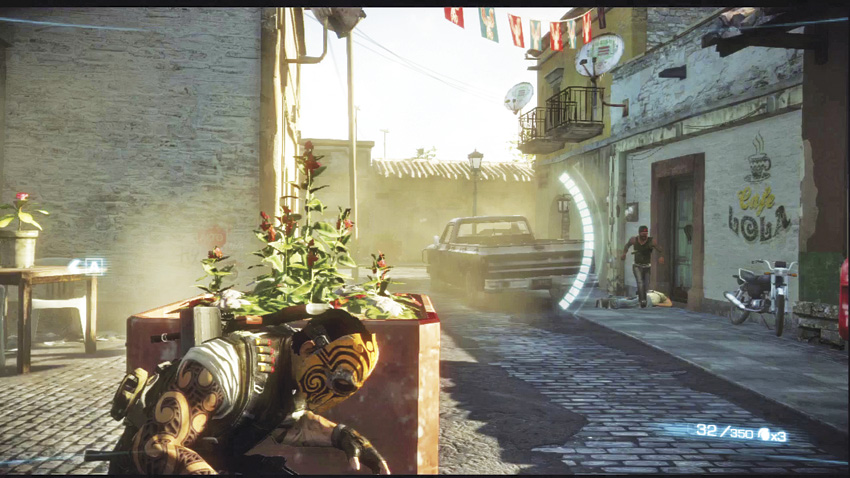
This chapter wastes no time in getting the action started. You emerge from the start point in an alley with multiple thugs running past you, trying to reach cover by a truck. Some turn to engage you immediately, while others keep running. Do what you can to prevent them from settling in.

Further down the alley is a T-intersection. Make a right to proceed. There’s a building at this intersection that thugs will try to use for cover and flanking maneuvers , so be sure to perform a thorough sweep of the structure before following the curved street downhill.

As you travel down the street, another group of cartel will engage you, but they are far from the biggest problem. The stairway leads to an upper-level walkway that crosses over the street . On this same level, at the very end of the street, is an MMG .

Flanking Route

This can be a tricky MMG to take out. You need to employ rudimentary aggro management tactics, but unless you have Overkill ready to go, you’ll have to use what little cover is available to set up the attack. Sticking to the street level is very unsafe; while there is a lot of cover that is easily accessible, you’ll have to contend with cartel soldiers and the constant hammering from the MMG from above. When playing alone, AI Bravo tends to get Wounded very quickly, which can suddenly cause aggro to snap back toward you at the most inopportune times. You can coordinate your offensive much more precisely when playing co-op.

We recommend sticking to the upper route by taking the connecting bridge over the street, and then moving from cover to cover as quickly as you can while taking out any hostiles that try to stop you from flanking the gun on the right-side balcony.

When taking the stairs up to the crossing bridge, check the building rooftops on the right side of the street, directly across from the stairs . A lone cartel gunman tends to be posted up there, and they can make using the walkway very frustrating.

You’re not done after taking out the gunner. Alpha and Bravo should rendezvous near the MMG itself, and one should man the gun while the other provides security from any potential enemy flanking maneuvers. A large group of cartel soldiers begins charging down the street from the direction you came. Next to the MMG is a stairwell that leads down to the street, and hostiles have a tendency to try to approach from there. Just keep mowing down the cartel until the all-clear is sounded by either Alpha or Bravo.

The street path to the next area is blocked off, so you need to shoot out a section of a wall in order to bypass the roadblock.

The next alley you enter seems peaceful enough until a scary looking monster of a man kicks open a door and brandishes a shotgun at Alpha and Bravo. This is your first encounter with a Brute. Clad in heavy body armor, Brutes can absorb plenty of punishment before going down... unless you aim for their heads.

Note

This first Brute represents Los Marcados, the faction of the cartel you’ve been facing off against since the beginning of the game, so he is not as well-geared as Brutes from later factions. Later Brutes wear full-body protection, and have special ballistic helmets to protect them from easy headshots.

Shortly after killing the first Brute, you’ll discover that this alley is a tightly-packed kill zone. You’ll encounter regular thugs and several more Brutes as you push down the alley, eventually encountering snipers on the rooftops once you reach the alley’s end . Clear the area out, and then proceed to the designated door to reach the plaza that Fiona has been directing you toward.

Flanking Route

There are numerous small side alleys that act as potential flanking routes if advancing down the main alley should prove to be difficult. Keep your eyes open for opportunities to use them, but remember that the enemy is capable of doing the same to you.

Breaking into the plaza starts you off on the balcony that circles around most of it, with a thug directly in front of you.

Taking out this thug marks the beginning of a very large firefight in an explosive environment. The plaza has been decorated for the Dia de los Muertos celebration, and as a result you can find a lot of fireworks on display, ready to fire. Ideally, Alpha and Bravo will control the fight from the surrounding balcony while cartel soldiers stream in from the lower level . The cartel eventually brings in reinforcements via SUV, which are easily handled if you stick to the upper balcony.

Several Brutes show up on the ground level of the plaza from an entrance underneath the balcony, supported by RPG users entering the upper balcony directly above them. As you finish this wave off, a crowd of Stabbers, backed up by standard soldiers and another Brute, try to counterattack from one of the side alleys. It’s only after you put this last group down that the plaza is considered secured.

It’s not quite over yet, though! Another Brute literally drops into the alley on top of a parked car (or what is left of a car, depending on how things went during the previous firefight) as you approach it. At the same time, another RPG thug tries to get lucky from the rooftops directly ahead . Bring these last two hostiles down and proceed to the exit.

Keep reading with a free account

The first 3 sections of Army of Two: The Devil's Cartel are open to everyone. An account opens the rest of it, and every other guide in the archive. It's free, and there's nothing to buy.

Bought guides on the old Prima Games site? Your account and every guide you own moved here, so there's nothing to buy again. Sign in.

Create a free account Or browse our free guides

PreviousChapter 14: Local Heroes
 NextChapter 16: Suicide Run