
Prima Games eGuides
primagames.com Browse Redeem a code Help
Army of Two: The Devil's Cartel eGuide
Sign in My Guides

Sign in or create an account

We'll email you a link. No password needed, and if you don't have an account yet, the link makes one.

By creating an account or signing in, you agree to our Terms of Service and Privacy Policy.

Have a password?

Had an account on the old eGuides site, or a code from a printed guide? Help and troubleshooting

Sign in with a password

By signing in, you agree to our Terms of Service and Privacy Policy.

Check your email

A sign-in link is on its way. It works once and expires in 15 minutes. Open it and you're in, with an account if you didn't already have one.

Contents

  • Essentials
    • Welcome Back to Tactical Worldwide Operations
      • Welcome Back to Tactical Worldwide Operations
    • Operational History and Character Bios
      • Operational History and Character Bios
    • Tactical Operations Manual
      • Tactical Operations Manual
    • Two Gear
      • The Gear Makes The Man
      • Modifications
      • Weapon Skins
      • Tactical Gear
      • Tattoos
    • The Enemy
      • The Enemy
    • Contracts
      • Contracts
    • Achievements and Trophies
      • Achievements and Trophies
    • Concept Art
      • Concept Art
  • Walkthrough
    • Mission 1: New Blood
      • Special Callouts
      • Chapter 1: Protection
      • Chapter 2: Tutorial
    • Mission 2: Cause And Effect
      • Chapter 3: Permission to Engage
      • Chapter 4: Foxhunt
      • Chapter 5: Split Decision
      • Chapter 6: Baptism by Fire
    • Mission 3: Rally Point
      • Chapter 7: Politics in Action
      • Chapter 8: Picking Up the Pieces
      • Chapter 9: Into the Chaos

      • Chapter 10: Riot Act

      • Chapter 11: Urban Chaos

    • Mission 4: Outside Contact
      • Chapter 12: Fuel for the Fire

      • Chapter 13: Observe and Detect

      • Chapter 14: Local Heroes

      • Chapter 15: Stronghold Assault
      • Chapter 16: Suicide Run

    • Mission 5: Last Resort
      • Chapter 17: Holiday Retreat

      • Chapter 18: Room Service

    • Mission 6: Salvation
      • Chapter 19: Among the Dead

      • Chapter 20: Open Season

      • Chapter 21: Rest for the Wicked

      • Chapter 22: Shadows Walk

      • Chapter 23: Into the Light

      • Chapter 24: Loose Cannon

      • Chapter 25: Special Delivery

    • Mission 7: Enemy Territory
      • Chapter 26: Behind Enemy Lines

      • Chapter 27: Guardian Angel

      • Chapter 28: Manhunt

      • Chapter 29: Fight for the Future

      • Chapter 30: Desperate Measures

      • Chapter 31: Objective Lost

    • Mission 8: Narco Hell
      • Chapter 32: Scavengers

      • Chapter 33: Game Face

      • Chapter 34: A Ray of Sun

      • Chapter 35: Rooftop Rampage

      • Chapter 36: Adrenaline High

      • Chapter 37: Mad Science

      • Chapter 38: The Butcher

    • Mission 9: Assault
      • Chapter 39: The Assault

      • Chapter 40: Down But Not Out

      • Chapter 41: Get Her Back

      • Chapter 42: Race to the Quarry

      • Chapter 43: Fish in a Barrel

    • Mission 10: Confrontation
      • Chapter 44: Burning Bridges

      • Chapter 45: No Return

      • Chapter 46: A Hero's Rescue

      • Chapter 47: The Lion's Den

      • Chapter 48: Salem On Trial

      • Chapter 49: The Devil's Due

  • Overkill Vids
    • Mission Overkill Videos
      • Mission Overkill Videos

Army of Two: The Devil's Cartel Guide › Walkthrough › Mission 7: Enemy Territory

Chapter 31: Objective Lost


Chapter 31: Objective Lost
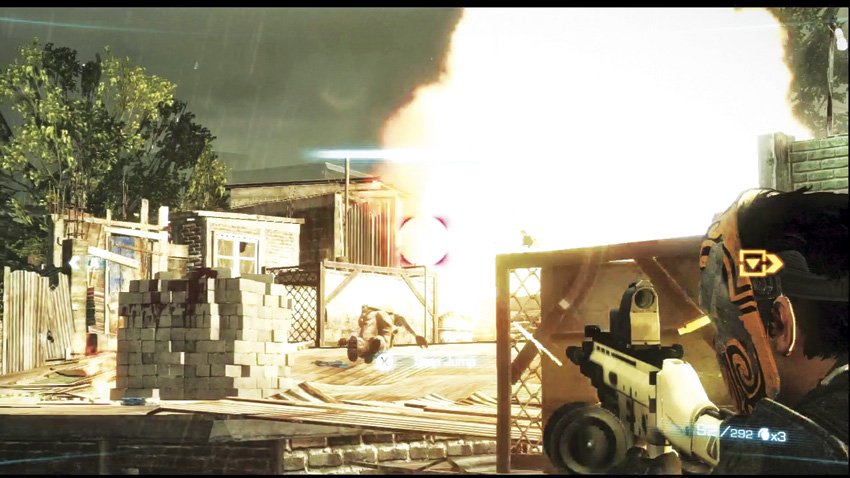
Shortly after you press onward from the previous chapter, you encounter what is arguably the toughest firefight in all of Mission 7. The rooftops between you and a sniper position that has your entry point locked down are connected by a thin metal bridge . There’s plenty of defensive cover for the mercenaries to use against you, and they have the additional advantage of being on successively higher positions the farther across the roof you go. Then, there’s the sniper position itself , although it can be neutralized fairly quickly with any accurate weapon. You can also expect to find RPG users on the rooftops close to the sniper nest .

The problem here is that there are a lot of troops to deal with—enough that you can expect to be stuck on the lower rooftops trying to plink away at the enemy from relative safety. Fortunately, you have options.

Flanking Route

There is a brick wall that Alpha or Bravo can be boosted over, which will take the chosen operative down a narrow side alley filled with hostiles. Cover is sparse throughout this route, and generally favors the enemy. Bring the highest-damaging weapons you can, with the largest magazines they can mount so that you don’t have to reload often. As you get close to the tower, watch your left flank. You can get the aggro of mercs on the rest of the rooftop and die in short order. Your partner should be clearing the rooftop toward your eventual rendezvous point in front of the sniper nest, but ideally, you should have spent some time taking out hostiles before getting boosted over the wall.

If you take this flanking route, bear in mind that should either you or your partner die, it will result in an immediate restart of the battle.

OVERKILL

The other option is to use Double Overkill to swiftly charge right up the roof, killing everything in your way. You can do this with a single Overkill charge, but you have much less time to work with in that state.

Once you clear the rooftops, however you manage to do so, duck inside a small shack to the left of the sniper nest to proceed.

A Brute marks the start of a narrow and winding path through enemy-held territory. You’ll encounter a Stabber and another merc a short distance past the Brute .

Things get a bit dicey as you move forward. A pair of snipers take to the rooftops, while a pair of cartel mercs and a Brute charge forward around a corner . Beyond them, another pair of mercenaries lie in wait .

Another mercenary squad tries to ambush you near a shack that splits the alley. Clear your way forward slowly, and strongly consider picking up the Riot Shield next to the shack. It can make the next stretch much easier.

OVERKILL

Not long after you pick up the Riot Shield, you’ll come across a fairly large merc squad that includes a pair of Brutes . Even though the shield can protect you if employed effectively, Overkill racks up a hearty cash bonus on top of conserving your ammunition. Cancel it early once you splatter this crowd. The real test is yet to come.

Around the corner from the first ambush is a proper strongpoint, manned by multiple Brutes armed with LMGs. If Overkill isn’t ready for at least one of the T.W.O. operatives, you will want to use the Riot Shield to generate co-op bonuses that will fill your Overkill meters up. Again, Overkill isn’t required. You can strong-arm your way through the strongpoint with regular tactics. Overkill makes things easier, though. Beware of the RPG merc hiding to the left of the strongpoint as you advance . It’d be really embarrasing for Overkill to fade just as he fires at you.

The alley underneath the RPG merc contains another Brute.

You’re almost out of this hellish set of alleys. You just have to get through one last push up a hill that is defended by a complement of mercenaries . During the fighting, you’ll receive word that Cordova has reuinited with Bradley, but they’ve come under fire. Quickly advance to the next area!

You’ll arrive at a balcony overlooking Bradley and Cordova’s position just as a squad of mercs rush them. Give them support from above until the all clear is sounded. Move to your left to push down an obstacle and make a path to head back down to street level.

Down on the street, pick off any surviving cartel mercs and make your way to Bradley’s position. During all of this, a sniper will take aim and grievously wound Bradley, and he drops down to the ground. Get to him quickly!

His injuries are bad, but Alpha and Bravo assure him that he’s going home.

Of course, he can’t do that when he’s plastered all over the front of a large truck.

Alpha, Bravo, and Mayor Cordova do their best to try and escape, but their efforts are for nothing...

El Diablo and El Carcinero have come for them.

Keep reading with a free account

The first 3 sections of Army of Two: The Devil's Cartel are open to everyone. An account opens the rest of it, and every other guide in the archive. It's free, and there's nothing to buy.

Bought guides on the old Prima Games site? Your account and every guide you own moved here, so there's nothing to buy again. Sign in.

Create a free account Or browse our free guides

PreviousChapter 30: Desperate Measures
 NextChapter 32: Scavengers